1
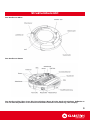
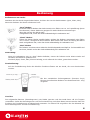
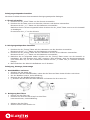
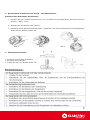
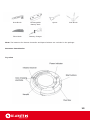
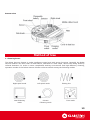
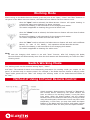
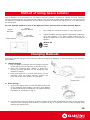
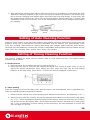
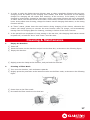
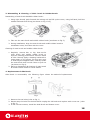
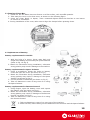
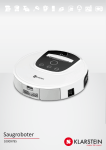
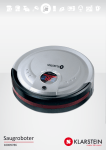
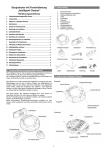
Zitruspresse orange
Saugroboter
10008166
10009782
10009783
10009784
10008167
10008168
Sehr geehrter Kunde,
zunächst möchten wir Ihnen zum Erwerb Ihres Gerätes gratulieren.
Bitte lesen Sie die folgenden Anschluss- und Anwendungshinweise sorgfältig durch und befolgen Sie
diese um möglichen technischen Schäden vorzubeugen.
Lieferumfang
Sauger
Ladestation
Fernbedienung
Raumbegrenzer
Staubpinsel
Akku
Löffel
Seitenbürsten
Filter
Netzteil
PARAMETER DATA
2
Strukturübersicht
Das Gerät von Oben
Das Gerät von Unten
Das Gerät verfügt über einen Ein/Aus-Schalter. Wenn Sie das Gerät einschalten, befindet es
sich im Standby-Modus und erwartet die Befehle mittels Fernbedienung oder Display.
3
Bedienung
Bedientasten am Gerät:
Nachdem Sie das Gerät eingeschaltet haben, drücken Sie eine der Bedientasten (Spot, Clean, Max)
damit der Roboter die Abreit aufnehmen kann.
„Spot“-Modus:
In diesem Modus säubert das Gerät intensiv eine Fläche von ca. 1m² spiralförmig (90cm
Durchmesser). Dieser Modus ist geeignet für starke Bodenverschmutzungen.
Wenn die Leitung des Akkus stark
nachgelassen hat, sucht das Gerät selbstständig die Ladestation auf.
„Clean“-Modus:
Sollten Sie diesen Modus gewählt haben, säubert der Roboter automatisch eine Fläche
von ca. 20m². Geeignet für kleine Räume. Nach 30min oder wenn die Leitung des Akkus
stark nachgelassen hat, sucht das Gerät selbstständig die Ladestation auf.
„Max“-Modus:
Der Roboter verrichtet seine Arbeit bis die Akkukapazität erschöpft ist. Im Normalfall sind
es 60min, danach sucht das Gerät selbstständig die Ladestation auf.
Anmerkung:
Wenn die Ladestation sich im „Auto“-Modus befindet, nimmt der Roboter seine Arbeit wieder auf
nachdem die Batterien geladen sind.
Die Modi (Spot, Clean, Max) können beliebig, auch während der Arbeit, gewechselt werden.
Fernbedienung:
Auf der Fernbedienung finden Sie ähnliche Funktions-Tasten wie am Gerät, die zuvor beschrieben
wurden.
Mit den zusätzlichen Richtungstasten (Direction keys)
können Sie selbst dem Roboter eine bestimmte Rich- tung
vorgeben.
Vorsicht:
Die aufgestellte Barriere (Raumbegrenzer) wird dabei ignoriert und das Gerät kann z.B. die Treppen
runterfallen. Sollte der Raumbegrenzer und die Fernbedienung im Selben Raum benutzt werden kann die
Funktion der Fernbedienung vorübergehend aussetzen. In diesem Fall vergrößern Sie den Abstand zw.
Dem Raumbegrenzer und der Fernbedienung.
4
Raumbegrenzer:
Dieses Zubehörteil hat die Funktion einer virtuellen Wand und hält den Roboter vom Betreten
bestimmter Bereiche fern.
Betriebs-LED
Reichweite
AN/AUS-Knopf
Infrarot
Sender
1. Vermeiden Sie den direkten Augenkontakt mit dem
Sensor!
2. Für den Betrieb wenden 2xD Batterien mit 1,5V
benötigt.
3. Die Reichweite der Infrarot-Barriere lässt sich in 3
Stufen regulieren.
•
0-3 Meter
•
3-7 Meter
•
über 7 Meter
Laden des Geräts:
Der Saugroboter kann entweder manuell oder automatisch geladen werden.
Manuelle Aufladung:
1.
2.
3.
Verbinden Sie das mitgelieferte Netzteil mit dem Gerät, siehe Abbildung.
Sobald Sie das Gerät einschalten beginnt der Ladevorgang.
Drücken Sie die Taste „L“ und „Power“ auf dem Gerät, wenn das Gerät aus dem Betrieb heraus die
Ladestation aufsuchen soll.
Automatische Aufladung:
1. Befestigen Sie die Ladestation an einer geeigneten Oberfläche (z.B. Wand) mit Hilfe der Klebefolie
und schließen sie es an das Stromnetz an.
Netzanschluss Klebefolie Befestigungsseite
4.
Achten Sie darauf, dass keine Gegenstände im weg sind. Ansonsten kann es dazu kommen, dass
das Gerät die Ladestation nicht findet. Wenn die Räume groß und mit Möbeln vollgestellt sind,
kann es dazu kommen, dass der Roboter die Ladestation ebenfalls nicht finden kann. In diesem
Fall platzieren sie den Saugroboter ca. 1,5m vor der Ladestation und drücken Sie die Taste „L“ und
„Power“ auf dem Gerät, dann wird das Gerät die Ladestation finden.
5
Reinigungszeitpunkt einstellen:
Mit dieser Funktion können Sie automatisch Reinigungszeitpunkte festlegen.
a. Uhrzeit einstellen
1. Drücken Sie die „Clock“-Taste um die Uhrzeit einzustellen.
2. Drücken Sie die Taste erneut um Stunden, Minuten und Wochen einzustellen.
Benutzen Sie die „+/-“-Tasten um die Parameter einzustellen.
Nachdem Sie die Uhrzeit eingestellt haben drücken Sie die „Clock“-Taste erneut um die Auswahl
zu bestätigen.
Es erscheint eine „1“ vor der Uhrzeit.
b. Reinigungszeitpunkte einstellen
1. Drücken Sie die „Timing“-Taste auf der Ladestation um die Stunden einzustellen.
Benutzen Sie die „+/-“-Tasten um die Parameter einzustellen.
2. Drücken Sie die „Timing“-Taste auf der Ladestation erneut um die Minuten einzustellen.
Benutzen Sie die „+/-“-Tasten um die Parameter einzustellen.
3. Nachdem Sie es eingestellt haben drücken Sie die „Timing“-Taste erneut um die Auswahl zu
bestätigen. Die LCD-Anzeige wird „OFF“ anzeigen. Dies bedeutet, dass der Reinigunszeitpunkt
noch nicht aktiv ist, um ihn zu aktivieren drücken Sie die „+“-Taste und „2“ erscheint auf dem
Display.
4. Bitte bedenken Sie dabei die Aufladezeit von 5 Stunden.
Reinigung, Montage, Demontage
1. Staubbehälter entleeren
• Schalten Sie das Gerät aus
• Entnehmen Sie den Staubbehälter, indem Sie die Taste auf dem Gerät drücken und ziehen
• Sie den Behälter heraus, siehe Abbildung.
• Reinigen Sie den Behälter(siehe Punkt 2.).
• ④ Drücken Sie die Taste auf dem Behälter und setzen Sie ihn erneut ein.
2. Reinigung des Filters
• Drehen sie den Filter um.
• Drücken Sie leicht auf den Knopf um den Filter
herauszunehmen, siehe Abbildung.
• Säubern Sie den Filter.
• Setzen Sie den Filter wieder ein.
6
3. Raunsehmen und Säubern der Haupt - und Gummibürste
Einsetzen und Entnehmen der Bürsten:
1. Schieben Sie den Verschlussriegel nach vorn und öffnen Sie die Abdeckung. Entnehmen Sie die
Bürsten. ( Bild 1 und 2)
2. Nehmen Sie die Bürsten raus ( Bild 3).
3. Nachdem Sie die Bürsten gereinigt haben, unterande- rem unter Zuhilfenahme des Staubpinsels,
setzen Sie die Bürsten wieder ein.
Bild 1
Bild 2
Bild 3
4. Seitenbürste ersetzen
1. Entfernen Sie die Zwei Schrauben.
2. Ersetzen Sie die Bürste.
3. Setzen Sie die neue Bürste wieder ein..
PARAMETER DATA
7
SICHERHEITSHINWEISE UND GEWÄHRLEISTUNG
• Diese Bedienungsanleitung dient dazu, Sie mit der Funktionsweise dieses Produktes vertraut zu
machen. Bewahren Sie diese Anleitung daher stets gut auf, damit Sie jederzeit darauf zugreifen
können.
• Sie erhalten bei Kauf dieses Produktes zwei Jahre Gewährleistung auf Defekt bei sachgemäßem
Gebrauch.
• Bitte verwenden Sie das Produkt nur in seiner bestimmungsgemäßen Art und Weise. Eine anderweitige
Verwendung führt eventuell zu Beschädigungen am Produkt oder in der Umgebung des Produktes.
• Ein Umbauen oder Verändern des Produktes beeinträchtigt die Produktsicherheit. Achtung
Verletzungsgefahr!
• Öffnen Sie das Produkt niemals eigenmächtig und führen Sie Reparaturen nie selber aus!
• Behandeln Sie das Produkt sorgfältig. Es kann durch Stöße, Schläge oder den Fall aus bereits geringer
Höhe beschädigt werden.
• Halten Sie das Produkt fern von Feuchtigkeit und extremer Hitze.
ACHTUNG:
Es wird keine Haftung für Folgeschäden übernommen. Technische Änderungen und Irrtümer
vorbehalten!
Wichtige Hinweise zur Entsorgung
Dieses Elektrogerät gehört NICHT in den Hausmüll. Für die fachgerechte Entsorgung wenden Sie sich
bitte an die öffentlichen Sammelstellen in Ihrer Gemeinde.
Einzelheiten zum Standort einer solchen Sammelstelle und über ggf. vorhandene Mengenbeschränkungen pro Tag/ Monat/ Jahr sowie über etwa anfallende Kosten bei Abholung entnehmen Sie
bitte den Informationen der jeweiligen Gemeinde.
8
Hinweise zur Batterieentsorgung
Batterien dürfen nicht in den Hausmüll gegeben werden. Als Endverbraucher sind Sie
zur Rückgabe gebrauchter Batterien gesetzlich verpflichtet. Sie können Batterien nach
Gebrauch in der Verkaufsstelle oder deren unmittelbarer Nähe (z.B. in kommunalen
Sammelstellen oder im Handel) unentgeltlich zurückgeben. Sie können Batterien auch per
Post an uns zurücksenden.
Batterien oder Akkus, die Schadstoffe enthalten, sind mit dem Symbol einer durchgekreuzten
Mülltonne gekennzeichnet, wie das oben stehende Symbol.
In der Nähe zum Mülltonnensymbol befindet sich die chemische Bezeichnung des Schadstoffes. »Cd«
steht für Cadmium, »Pb« für Blei und »Hg« für Quecksilber.
Viel Spaß mit unserem Produkt.
Warnhinweise
•
•
•
•
•
•
•
•
Reparaturen am Gerät sollten nur von einer autorisierten Fachwerkstatt durchgeführt werden.
Öffnen Sie in keinem Fall das Gerät.
Falscher Zusammenbau führt möglicherweise zu Fehlfunktionen oder dem Totalausfall.
Das Gerät sollte vor jeglichen Feuchtigkeit und direkter Sonneneinstrahlung geschützt werden.
Das Gerät bitte nicht mit Reinigungsmitteln reinigen.
Verwenden Sie zur Reinigung nur ein trockenes (Mikrofaser) Tuch.
Schließen Sie das Gerät nur an die dafür vorgesehene Netzspannung.
Schließen Sie das Gerät in keinem Fall an andere Spannungen als vorgesehen an.
Die Gewährleistung verfällt bei Fremdeingriffen in das Gerät.
CHAL-TEC Vertriebs- + Handels GmbH; Wallstraße 16; 10179 Berlin, Germany
9
Safety Precautions
Caution
No one else can disassemble, maintain or
transform the product except the
maintenance technicians designated by
the company, or it may cause fire, electric
shock or personal injury.
Don’t use other charger but the equipped
one of the Robot, or it may cause product
damage,
electric shock or fire due to high voltage.
Don’t touch high- voltage power cord of
the electric appliance with your wet hand,
or it may cause electric shock.
Don’t bend the power cord overly or place
weight on it, or it may cause power cord
damage, fire or electric shock.
Don’t twist your clothes or any part of
your body (head, finger, etc.) into
the brush or wheel of the Robot, or it may
cause personal injury.
Don’t approach cigarette, lighter, match
and other heat objects or
combustible materials such as the gasoline
cleaner.
Attention
Don’t forget to turn off the power while
transporting or storing
the Robot for long, or the battery may be
damaged.
Insert the power cord of the charger well or
it may cause electric shock, short
circuit, smoking or fire.
Check whether the charger and socket is
connected well, or it may cause charging
failure or even fire.
If the machine is long time not in use,
remove the battery from the machine and
store it in a cool dry place after being fully
charged
To extend the cleaner’s battery life;
make sure charging the battery 12 hours
before you first use the machine or if it is
long time not in use, otherwise its working
time would dramatically lower down. Its
cleaning reaches peak performance after 2
or 3 circles of using out the battery power.
Remove all easily damaged objects
(including luminous objects, fabrics, glass
bottles, etc.) before using, or it may cause
damage to these objects or affect the
using of the Robot.
Please use the Robot cautiously in the
presence of the children to avoid frightening
or harming them.
Don’t stand or sit on the Robot, or it may
cause damage to the Robot or personal injury.
Don’t make the Robot take in water and
other liquors for fear of the product damage.
Don’t use the Robot on small tables and
chairs or other small space, or the Robot
may be damaged.
Don’t use the Robot outdoors, or it may
cause the product damage
Don’t use the Robot in commercial places,
or the Robot may be damaged by excessive
use.
No cord , wire or other objects that longer
than 150mm on the floor to avoid entangling with cleaner’s brushes.
This product is not recommended for the
disable (physically or emotionally), children
or those who haven’t read carefully this
manual.
10
Functions Introduction
Intelligence function: Automatically
clean rooms, requiring no manual
monitoring during the whole cleaning
process
Space Isolator:
Cleaner can be stopped from entering
where you don’t want it to enter
Auto charging:
When the battery runs low , the Robot
Vacuum Cleaner will automatically
search the charging dock station
for charging
Spiral brush:
4-layer spiral brush under global patents,
with high cleaning efficiency
Auto cleaning: After set with this
function, the Robot Vacuum Cleaner
will automatically continue working
after fully charged.
Low-noise design Low noise, far
than normalvacuum cleaners
Timing cleaning:
Allow to full charge for 4-5hours
and start work as per the time you
appoint
With side brush:
Side brush is configured at the right side of
the machine, to easily clean room edges/
corners
Anti-fall function
In normal cases, prevent the Robot
Vacuum Cleaner from falling from
table or stairs
Ultrathin body: Ultrathin design and can
easily clean hard to reach places,under and
around furniture, into corners and along
wall edges
Safety & energy saving Voltage:
DC14.4V, Rated power: 23W.
Soft wheel design:
The wheel is made from soft rubber, free of
abrasion to parquet flooring or carpet
lower
Accessories Inside
Robot Vacuum Cleanerx1Side BrushX1
Space IsolatorX1Dust BrushX1
ChargerX1Filter MeshX1
Chargeable Battery Pack
X1
User Manual
X1
Spoon
X1
Charging dock station
X1
Remote Controller
X1
Robot
Vacuum Cleaner
Charging
dock station
(2 pcs AAA battery) (D size battery)
Remote
Controller
Space Isolator
11
Dust Brush
Rechargeable
Battery Pack
Filter Mesh
Battery Charger
Spoon
Side Brush
Note: The batteries for Remote Controller and Space Isolator are excluded in the package.
Structure Introduction
Top view
12
Bottom view
Method of Use
1. Cleaning Route
The Robot Vacuum Cleaner is under intelligent control and with strong functions. Normally the Robot
Vacuum Cleaner can steer clear of obstructions, staircases or other steps, rather than falling down by
infrared detection. In order to meet complicated working environment and high-efficiency cleaning,
operation modes of the Robot Vacuum Cleaner will auto switch among the following modes:
Right spiral mode
Wall following
mode
Left spiral mode
Column
following mode
Folding line
Free mode
13
Working Mode
After turning on the Robot Vacuum Cleaner, press any one of the “Spot”, “Clean” and “Max” Buttons on
the panel of the Robot Vacuum Cleaner; the Robot Vacuum Cleaner will then start to work.
Once the “Spot” mode is selected, the Robot Vacuum Cleaner will repeat cleaning in
a spiral way within 90cm diameter, for about 4 minutes.
In case of low battery, it will auto search for the charging dock station.
This mode is applicable to cleaning dirty ground of about 1m2.
Once the “Clean” mode is selected, the Robot Vacuum Cleaner will auto clean for about
30 minutes.
In case of low battery, it will auto search for the charging dock station.
This mode is applicable to small room less than 20m2.
Once the “Max” mode is selected, the Robot Vacuum Cleaner will work until insufficient
battery. In case of full battery, such operation will last about 60 minutes.
In case of low battery, it will auto search for the charging dock station.
This mode is applicable to cleaning of a whole room.
Note:
In case the charging dock station is set with “Auto” function, after full charging the Robot
Vacuum Cleaner will automatically leave from the dock station and automatically run under the “Max”
cleaning mode.
Switch Working Mode
The working mode can be switched among “Spot”, “Clean”
and “Max”. The method of switch is to continuously press twice the working mode you expect on the
panel of machine body or remote control. For example, if the Robot Vacuum Cleaner is staying under
“Spot” mode, press twice on “Max” will change the working mode of the Robot Vacuum Cleaner to
be “Max”.
Method of Using Infrared Remote Control
Gentle reminder: Keep pressing “Forward” or “Backward”,
the invisible barrier created by the Space Isolator will
have no effect to the working cleaner, it may fall down
from steps. When the Space Isolator and the infrared
Remote Control are used in the same zone, as they are both
using infrared signals, the Remote Control may fail to work
temporarily; in such case, you may close either the Space
Isolator or the Robot Vacuum Cleaner, and restart remote
control operation after far away from the Space Isolator.
14
Method of Using Space Isolator
Space Isolator is an accessory of the Robot Vacuum Cleaner; it blocks a certain area by emitting
special infrared signals, and restricts the cleaner from entering certain places where are not required to
be cleaned or relatively dangerous. As the effect is similar to what a wall can present, it is also named
as virtual wall.
For the specific method of use of the Space Isolator, please refer to the following figure:
Power
Indicator
Power switch
Range
Selector Switch
Infrared
wave emitter
1. Don’t align the infrared emitter to eyes during use.
2. A Space Isolator emitter is power supplied by 2 batteries
of D size battery, 1.5V. Three gears stands for the
effective distances of infrared emission, as shown as
follows:
Within 7M
3-5M
0-3M
Charging Methods
The Robot Vacuum Cleaner can be directly manual charged by adaptor, or auto charging by the charging
dock station.
a.
Manual Charge
1. Plug the Battery Charger into the charging socket
of the Robot Vacuum Cleaner, as shown on Fig 1.
2. Once the charging dock station is power on,
directly put the machine on the charging dock
station to charge.
3. Press and hold the “L” button and power on the
machine, then the Robot Vacuum Cleaner will
auto search the dock station for charging.
b. Auto Charge
1. Tear off the paper piece on the EVA film on the back
of the charging dock station, and fix t dock station
to wall surface with the EVA film. No object shall be
laid below it, as shown on Fig 2.
2. Connect one end of the Battery Charger to 220V 50Hz power supply and the other to the charging
socket of the charging dock station, as shown on Fig 3. Then the screen of the charging dock
station will display time.
15
3.
After placed the charging dock station, when the Cleaner is in low battery, it will search the dock
station for charging. However, if the room is too big or full filled with furniture, the Cleaner may
fail to find the charging dock station within short time and thus stop finding. In such case, put
the Robot Vacuum Cleaner at 1.5m in front of the dock station, keep pressing the “L” button, and
meanwhile power on the machine, then it will automatically return to the charging dock station
for charging.
Charging
socket
bonding
sheet
Wall fixing piece
Setting of Auto Cleaning Function
Press the “Auto” button on the left of the charging dock station, the down-right corner of the screen will
display a brush icon, it indicates the function is activated, and the Cleaner will automatically leave
from the charging dock station for cleaning after being fully charged. Again press the “Auto” button,
the brush icon will disappear, it means the function is disenabled, and the Robot Vacuum Cleaner will not
leave from the charging dock station after being fully charged.
Setting of Timing Cleaning Function
This function enables the Robot Vacuum Cleaner start to clean within set time. The specific setting
methods are as follows:
a. Clock Function 1. Press the Clock key to adjust the time of clock as per Fig.1
2. Press the Clock key for one time and respectively adjust hour, minute & week. Press +/- key to
adjust the specific parameters. After setting the time, press the Clock key as clock setting
finished. At the time being, there will be “1” before the time is displayed in the screen.
b. Timer Setting Press the Timing key to set the alarm time, and the Cleaner will automatically work in specified time,
under the specific operating methods as follows:
1. Press once the “Timing” key on the charging dock station to set the hour, and adjust by “+”or“-”;
2. Press one more time the “Timing” key on the charging dock station to set the minute, and adjust
by “+”or“-”. After completion of both hour and minute setting, press one more time the “Timing”
key and the screen will display “OFF”, which means the timer function has been off. Further press
the“+” key as completion of timer setting; at the time being, the time displayed on screen will
have the digit “2” in front.
16
3. In order to make the Robot Vacuum Cleaner start to clean completely following the set time,
charging must be made by the charging dock station, and direct connection to the Battery
Charger for charging will not realize auto cleaning. At the set time, if the battery is not fully
charged or continuously charged for less than 5 hours, the timing function will not be activated.
In other words, the set time must be at least 5 hours later, and will not work if set as within 5
hours. At the same time of timing, charge the cleaner via the charging dock station, or the timing
function will fail;
4. At “Timer” status, please close the auto function during charging of the cleaner, otherwise the
cleaner will assign priority to exercise the auto function after full charge, and automatically
leaving from the charging plate for cleaning, resulting in failure of the Timer function.
5. In the period from completion of timer setting to the set time, the charging dock station cannot
be power off, or both the “Hour” and “Timer” need be reset.
Cleaning & Maintenance
1.
2.
Empty the Dust Box
① Power off
② Press the button on the dust box and pull out the dust box, as shown on the following figure.
③ Empty the dust box.
④ Slightly press the clamp at the dust box, and put back the dust box.
Cleaning of Filter Mesh
① Turn over the dust box, with its bottom upwards.
② Slightly press the protrusion at the bottom to take out the Filter mesh, as shown on the following
figure.
③ Clean dust on the Filter mesh.
④ Re-install the Filter mesh into the dust box.
17
3. Dismantling & Cleaning of Main brush & Rubber Brush:
Dismantling of main brush &middle rubber brush:
1. Using right thumb, push forward the locking rod and lift up the cover; using left hand, hold the
middle hairbrush and lift up (as shown on Fig 1 & 2)
Fig 1
Fig 2
Fig 3
2. Take out the main brush and middle rubber brush (as shown on Fig 3).
3. During installation, align the main brush and middle rubber brush to
installation holes, and close with the cover.
Cleaning of main brush and middle rubber brush:
1. Regularly remove hair or big dust on the
main brush and middle rubber brush to
improve cleaning performance. Remove dusts
at inlet. Directly apply a cleaning hairbrush to
clean paper or tiny pieces. For any hair, wool
or other object wrapped inside, carefully rotate
the main brush and cut with cutter or pull out
(as shown on Fig 4).
2. Refer to dismantling & cleaning of main brush
& middle rubber brush for other details.
Fig 4
4. Replacement of Side Brush
Side Brush is consumable; the following figure shows the method of replacement:
Fig 1
Fig 2
1. Remove the two bolts;(refer to Fig 1)
2. Rotate away the bolts on the Side Brush unplug the old brush and replace with a new one. (refer
to Fig 2)
3. In the reverse manner, install the Side Brush and bottom cover.
18
5. Cleaning of Dust Box
1. Power off. Put the Robot Vacuum Cleaner on a flat surface, with its soffit upwards.
2. Take away the cover to the dust room, as shown on the following figure.
3. Using the Clean Brush or Spoon, clean unwanted objects within the dust box or over leaves
to ensure air ventilation.
4. During installation of the cover, take note to align the clamps before pressing down.
6. Replacement of Battery
Battery replacement for machin
1.
2.
With the help of a screw- driver raise both end
snaps of the battery and vertically lift up the batteries
(Refer to Fig 1 & Fig 2)
Match the electrodes during installation, otherwise
wrong polarity may result in damage to the machine.
Battery replacement for Space Isolator:
1.Using a screwdriver, loosen the bolts on battery
cover and open the cover (as shown on Fig 1).
2. Match the electrodes during installation, otherwise
wrong polarity may result in damage to the Space
Isolator (as shown on Fig 2).
3. Correct position of batteries (as shown on Fig 3).
4. Take out batteries in case of long time of no using
the Space Isolator. Battery replacement for Remote Control:
1. Using fingers, open the battery cover and expose
the battery case (as shown on Fig 1).
2. Match the electrodes during installation, otherwise
wrong polarity may result in damage to the Remote
Control (as shown on Fig 2).
3. Take out batteries in case of long time of no using
the Remote Control.
Fig 1
Fig 1
Fig 2
Fig 1
Fig 2
Fig 3
Fig 2
1. Take out batteries in case of no more use of the machine.
2. Power off first, before taking out the batteries of the machine and the Space Isolator.
19
3. Don’t put batteries at any environment over 45oC or inside water.
4. Don’t apply external load to batteries or fall them from height.
5. Batteries must be recycled for safe treatment. No free disposal away or into fire is allowed,
otherwise there may be explosion.
6. In case of leakage, don’t let the liquid exposed to skin or clothes but immediately wipe with dry
clothes and then send to recycling station or appointed maintenance outlet, rather than free
disposal.
7. No chargeable battery of other suppliers is allowed for the machine.
Common Failures & Troubleshooting Methods
1.
2.
3.
4.
5.
6.
7.
What should we do if the Cleaner drops down from edge of stairs?
Answer: Wipe away dusts for the probe at the bottom of the front plate with dry cloth.
If the Robot Vacuum Cleaner shutdowns during cleaning, and all the lights are on, how
to solve the problem?
Answer: Please check whether there is block-type or strip-type debris inside the middle hairbrush
and left/ right wheels resulting in jam, further check whether the dust box is full, and timely
remove debris.
How to deal with it if the Cleaner sticks to a certain place and rotates?
Answer: Check whether there are junks blocked at the left/ right wheel and clean away the dust
on the probe at the bottom.
What should we do if the Space Isolator doesn’t work?
Answer: Place the Space Isolator at the right place. Further replace the batteries for the Space
Isolator if the green indicator keeps flashing.
What should we do if the battery can’t be recharged?
Answer: Firstly, check whether the battery is correctly installed and you should hear two
sounds when installing the battery. Then check whether the contact on the front plate and dome
on the dock station is dirty. If it can’t be charged on the dock station, please directly use the
charger for the unit to charge.
How should we do if the Cleaner cannot find the charging dock station?
Answer: The dock station will generate infrared signals and it only can return to the dock station
after finding the signals. You should confirm the power is on for the dock station and do not use
the Space Isolator near the dock station as its signals may disturb finding the position of the dock
station. However, if your room is large enough, it is possible for the Cleaner to fail to find the
dock station after cleaning. In such circumstance, you should re-place the dock station and
do not put any obstacles 3-4m before it.
What should we do if the Cleaner do not perform the timer cleaning function?
Answer: A. Please check whether there is power failure for the charging dock station or during
working. If there is any change to the displayed parameter, the function should be re- set. B. Both
the auto cleaning function and timer cleaning function are effective only when the Robot Vacuum
Cleaner is charged via the charging dock station. In case both functions are set, the Robot
Vacuum Cleaner will auto assign priority to exercise the auto cleaning function. C. Timer cleaning
function will be auto exercised by the Robot Vacuum Cleaner only after full charge. If the set time
is improperly set, (i.e., continuous charging to the Robot Vacuum Cleaner is less than 4.5H within
the booked time), the Robot Vacuum Cleaner will not exercise this function but until full charging.
CHAL-TEC Vertriebs- + Handels GmbH; Wallstraße 16; 10179 Berlin, Germany
20