1
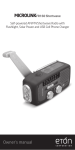
TurboDyne Series AXIS Self-Powered Safety Hub with AM/FM/Shortwave Rada and USB Cell Phone Charger O W N ER'S M ANUAL A X IS OWNER'S MANUAL DO YOU NEED HELP? If you need help, please contact us, Monday-Friday, 8:00 a.m.4:30 p.m.. North American Pacific Tim e. 1-800-872-2228 from the U.S; 1-800-637-1648 from Canada; 650-903-3866, world wide; FAX: 650-903-3867; web site, www.lextronixusa.de; Lextronix, 1015 Corporation W ay, Palo Alto, CA 94303, USA W ARNIN G • Do not expose this appliance to rain or moisture. • Do not submerge or expose for extended period to water. • Protect from high humidity and rain. • Unplug immediately if liquid has been spilled or if an object has fallen into the apparatus. • Clean only w ith a dry cloth. Do not use detergents or chemical solvents as this might damage the finish. • Unplug and disconnect external antennas (not included) during lightning storms. • Do not remove cover [or back]. • Refer servicing to qualified service personnel. ENVIRONMENT Disposal According to the European Directive 2002/96/EC all electrical and electronic products must be collected separately by a local collection system. Please act according to your local rules and do not dispose of your old products w ith your normal household waste. Please dispose of afl types of batteries per your Government, State or Local rules anchor regulations. If you are unsure, please call the appropriate local authority to find out how to dispose of them safely and help protect the environment 3 A XIS OWNERS MANUAL FUNCTION KEYS 4 AXIS OWNER'S MANUAL TURNING THE AXIS ON/OFF The A XIS is powered by 3 AAA batteries (BATT) and the rechargeable battery (DYN) that plugs inside the battery compartment. To turn the radio on, press the BATT button or the DYN button (front right side) and then press PO W ER (button with the circle and vertical line). THE POWER BUTTON The POW ER button is located on the front right side of the radio and has a circle w ith the vertical line through it. Press this button to turn the radio on. VOLUME CONTROL Turn the control knob, labeled VOL, to control the volume. Scroll the knob up to raise the volume; scroll it down to lower volume. Always turn down the volume before using earphones. USING BATTERY POWER Insert 3 AAA batteries, press the BATT button (front right side of radio) and then press the POWER button to turn the radio on. 5 AXIS OWNER'S MANUAL USING AND CHARGING THE RECHARGABLE BATTERY The rechargeable Ni-MH (nick9t-metal hydride) battery is located in the battery compartment. To use it, plug the battery into the socket adjacent to it press the DYN button (front right side of radio) and then the POWER button. You may have to charge the battery. To do this, simply turn the crank for 90 seconds. You can also charge via mini USB located under DC-IN (5V) on the back of the radio. After charging, press DYN and then POWER. After a few years the rechargeable battery will eventually lose its ability to hold a charge. Contact Lextroiix to order a replacement. While crank charging the Ni-MH battery, the battery charge indicator (located on front right side of radio) turns red. While charging the battery with the USB cord, the charging light turns red while charging and turns green when fully charged. A fully charged rechargeable sli-MH battery will play for about 4 to 5 hours, at low volume. Crank charging for 1 minute will play the radio for about 5 minutes at low volume. W arning: If you have the rechargeable battery unplugged, do not turn the crank, as this can cause overload to internal components, and possibly damage them. 6 AXIS OWNER'S MANUAL USING THE DC-IN (5V) USB CORD A USB charging cord is included. Plug the large USB plug into your computer's USB socket (computer must be turned on) or into an AC adapter (not inducted) with a USB socket on it (must support 5V 500), available at most electronics retailers. Plug the mini-USB plug intothe DC-IN socket (located under the top rubber cover on the back of the radio). To play the radio without charging the rechargeable battery, press BATT and then POWER (button with circle and vertical line). To play the radio and charge the rechargeable battery, press DYN and then press POWER. A full charge is acquired after about 8 hoursof charging. The radio can be played while it's charging. LCD BACKLIGHT Each time a button is pressed, the LCD backlight turns on for about 10 seconds. SELECTING BANDS AND TUNING IN STATIONS The AXIS plays A M (520-1710 KHz), FM (87.5-108 MHz) and seven Shortw ave channels: Select AM, FM or SW1-SW7 with the band knob on the left side of the radio. When listening to FM and Shortw ave channels, extend the telescopic antenna all the way up. When tuning AM stations the telescopic antenna is not needed and can be lowered. Tune into stations by scrolling the TUNE knob. 7 AXIS OWNER'S MANUAL For best results use 49,41 31 and 25 meters at night and use 25, 22,19 16 and 13 meters during the day: SW1: 5.8-7.5 MHz, 49 (5.8-6 2 MHz) and 41 (7.1-7.5 MHz) metei bands SW2: 9.3-10.05 MHz, 31 meler band SW3: 11.55-12.2 MHz, 25 meter band SW4: 13.4-14 MHz, 22 metei band SW5: 15-15.8 MHz, 19 metei band SW6: 17.4-18.05 MHz, 16 meter band SW7: 21.2-21.8 MHz, 13 meler band CHARGING CELL PHONES If your cell phone has a USB charging cord, you can use it. If rot, you can purchase one from www.iGo.co n , or call 1-888-205-0093. To purchase a charging tip and cord for your cell phone, go to www.iGo.com, or call 1-888-205-0093. Purchase USB charging cable model# PS00271-0003 and have the brand and modelof your cell phone ready to purchase the tip. To use the cell phone's USB charging cord, connect it to the radio's large USB socket (located unde' the rubber cover on the back of the radio.) Press the CELL autton and the battery power will directly dump charge to your cell phone. The Axis w ill only charge your cell phone if the battery indicator shows it at half full, or two bars. To charge your cell phone w ith a low battery, turn the crank for 7 minutes at 130 rpm to charge the cell phone enough to talk for about 5 ninutes. AXIS OWNER'S MANUAL The Axis has a low voltage protection circuit to avoid the battery from dropping too low in voltage from cell phone charging. If the battery symbol on the LCD display shows three bars, it can support cell phone-charging. When the battery symbol is blinking, it stops charging your cell phone and you are urged to re-charge the battery until the blinking stops so that cell phone charging can resume. To charge your cell phone: 1. 2. 3. 4. Press DYN. Make sure that the battery symbol has three bars. If it doesn't or if it’s blinking it must be charged by cranking or with an AC adapter until it stops blinking. Plug the USB cell phone charging cord into the PHONE CHARGER socket (under the rubber cover on the back of the radio). Plug the other end of the cord into the cell phone. Press the button labeled CELL and 'CELL' will appear in the lower right comer of the LCD display. The cell phone should start charging and show charging on its display. After about 20 minutes of charging, the cell phone should have a talk time of 20 to 25 minutes. If you don't have time to charge the radio's rechargeable battery you can still charge your cell phone by pressing DYN and turning the crank for 7 minutes. W ith your cell phone plugged in, press CELL and charge the cell phone for about 5 minutes, after which you can talk for about 6 minutes. AXIS OWNER'S MANUAL SETTING THE TIME AND ALARM The clock is a 12 or 24-hour dock. It is set as a 12-hour dock by default, showing PM in the display starting at noon. To change it to a 24-hour dock see the time setting instructions below. The alarm turns on the radio to tie last station tuned. To set the time: 1. 2. 3. 4. 5. 6. 7. W ith the radio turned off, p'ess the SET button (the fourth button from the left, under the display) for one seond. W hile the hour flashes press the U P or DOW N buttons (the 3rd and 2nd button from the left, under th e display) to set the hour. Press SET again. W hile the minute flashes press the U P or D O W N buttons to set the minutes. Press SET again. If you wish to change the dock mode from 12 to 24 hours or vice versa, press the U P or DOWN buttons to change it from the one displayed to :he other. Press SET to finalize the tin e setting. To set the alarm: 1. 2. 3. 4. 5. 6. 7. 10 W ith the radio turned off, press the ALARM but:on (to the far left side under the display) so that 'ALARM ' appears at the top of the display. Press SET to make the hour flash. W hile the hour flashes, press the U P or DO W N buttons to set the alarm hour. Press SET to make the m irutes flash. W hile the minute flashes, Dress the U P or DOWN buttons to set the alarm minutes. Press SET to finalize the afemn setting*. Press ALARM again to deactivate the alarm. AXIS OWNER'S MANUAL TURNING THE ALARM ON AND OFF W ith the radio on or off press the A LA RM button. Notice that when it's on, 'ALARM ' appears at the top of the display. W ien it's off, 'ALARM ' disappears. USE OF SLEEP TIMER W ith the radio turned on or off, sequentially pressing the SLEEP button cycles the timer through 90, 60, 30 and 10 minutes, allowing the radio to play for the selected amounl of time and then autom atically turn off. USING THE FLASHLIGHT AND EMERGENCY LIGHT Use the ON/OFF/ " z i " switch on the top left of the radio to turn these lights on and off. The ON position turns on a flashlight. The "H i " position turns on a flashing red lig h t The OFF position turns the lights off. EARPHONE JACK The AUDIO-OUT socket is under the lower rubber cover Dn the back of the radio. Plug in any stereo earphones. Audio is heard in mono only. A lw ays turn dow n the volum e before plugging in earphone/headphones. 11 AXIS OWNER S MANUAL AUDIO-IN SOCKET The AUDIO-IN socket is located under the lower rubber cover on the back of the radio. It enables you to listen to other devices, such as MP3 players, using a stereo 3.5 mm (1/8 inch) connector cord. RESETTING THE AXIS If the Axis ever stops working cr w on't turn on, just reset it. Remove your AAA batteries and unplug the rechargeable battery. Let the radio sit for 30 minutes, then put them back in. To play it from AAAs press BATT first, then PO W ER. To play it from the rechargeable batteries, first press DYN, turn the crank for at least one minute, then press POW ER. WARRANTY REGISTRATION To ensure full warranty coverage or product updates, registration of your product should be completed as soon as possible after purchase or receipt. You may use one of the following options to register your product: 1. By visiting our website at iwww.lextronixusa.de 2. M ail in enclosed warranty card. 3. Mail your registration card Dr information to the following address. Indude your name, full mailing address, phone number, model purchased, date purchased, retail vendor name and product serial number (typically located in or near the battery compartment): Lextronix 1015 Corporation Way Palo Alto, CA 94303 12 AXIS OWNER'S MANUAL LIMITED WARRANTY Retain the warranty information from your warranty card w ith your proof of purchase or the Limited Warranty information can also be viewed at www.lextronixusa.de SERVICE FOR YOUR PRODUCT To obtain service for your product, we recommend first contacting an Et6n service representative at 1-800-872-2228 (US), 1-800-637-1648 (Canada) or (650) 903-3866 (Wordwide) for problem determination and trouble-shooting. If further service is required, the technical staff w ill instruct how to proceed based on whether the radio is still under warranty or needs non-warranty service. WARRANTY - If your product is still in warranty and the Etm service representative determines that warranty service is needed, a return authorization w ill be issued and instructions for shipnent to an authorized warranty repair facility. DO NOT ship your radio back without obtaining the return authorization number. NON-WARRANTY - If your product is no longer under warranty and requires service our technical staff w ill refer you to the nearest repair facility that will be able to best handle the repair. For service outside of North America, please refer to the distributor information induded at time of purchase or receipt. 13 GUIDE DE L’UTILISATEUR DU AXIS AVEZ-VOUS BESOIN D'AIDE? Si vous avez besoin d'aide, veuillez nous contacter, Du Lund au Vendredi, 8:00 à.- 16:30., Fuseau horaire du Pacifique Amérique du Nord. 1-800-872-2228 depuis les U.S.A; 1-800637-1648 depuis le Canada; 650-903-3866, ailleurs dans le monde; FAX: 650-903-3867; site Internet, www.lextronixusa. de; Lextronix, 1015 Corporation Way, Palo Alto, CA 94303, USA AVERTISSEMENT • Ne pas exposer cet appareil à la pluie ou à l'hum idité. • Ne pas immerger ou exposer à l'eau pendant une longue période. • Protéger d'une grande humidité et de la pluie. • Débrancher immédiatement si un liquide a été renversé sur l'appareil ou si un objet quelconque est tombé à l'intérieur. • Nettoyer seulement avec un chiffon sec. Ne pas utiliser de déter gents ni de solvants chimiques qui pourraient endommager lefini. • Débrancher et déconnecter l'antenne extérieure en cas d'orages. • Ne pas enlever le couvercle [ou l'arrière]. •S'adresser à du personnel qualifié pour la maintenance. ENVIRONNEMENT Mise au rebut Conformément à la Directive Européenne 2002/96ÆC tous les produits éectriques et électroniques doivent être récupérés séparément parun système local de collecte.Veuillez agir suivant les règles locales et nepas mettre au rebut vos vieux appareils avec vos déchets ménagers ordhaires. Veuillez mettre au rebut tout type de piles selon vos tas/ règlements locaux, d'état, ou de gouvernement. Si vcus n'êtes pas sûr de vous, veuillez appeler l'autorité locale appropriée pour savoir comment les mettre au rebuten sécurité et aider à protéger l'environnement. 15 GUIDE DE L'UTILISATEUR DU A XIS FONCTIONS DES TOUCHES 16 GUIDE DE L'UTILISATEUR DU OCIS ALLUMER ET ETEINDRE L'AXIS L'AXIS est alim enté par 3 piles A A A (BATT) et par une batterie rechargeable (D Y N ) qui est branchée dans son com partim ent intérieur. Pour allum er la radio, appuyez sur le bouton BATT ou sur le bouton DYN (côté droit de la face avant), puis appuyez sur PO W ER (bouton de mise sous tension marqué d'un trait vertical dans un cercle). BOUTON DE MISE SOUS TENSION Le bouton PO W ER (mise sous tension) est situé sur le côté droit de la face avant de la radio e t comporte un trait vertical dans un cercle. Appuyez sur ce bouton pour allum er la radb. REGLER LE VOLUME Tournez le bouton du volume, qui comporte l'indication VOL, pour régler le volume. Tournez le bouton vers le haut pour monter le volume ou vers le bas pour le baisser. Baissez toujours le volume avant d'utiliser des écouteurs. UTILISER DES PILES Installez 3 piles AAA dans la radio, appuyez sur le bouton BATT (côté droit de la face avant de la radio), puis appuyez sur le bcuton POWER pour allumer la radio. 17 GUIDE DE L'UTILISATEUF. DU AXIS UTILISER ET RECHARGER LA BATTERIE RECHARGEABLE La batterie rechargeable Ni-MH (nickel - hydrure métallique) est située dans un compartiment spécifique de la radio. Pour l'utiliser, vous devez la brancher dans la prise située à son côté, puis appuyer sur le bouton DYN (côté droit ce la face avant de la radio) et enfin appuyer sur le bouton POWER. Il peut être nécessaire de recharger la batterie. Pour cela, il vous suffit de tourner la manivelle pendant 90 secondes. Vous pouvez égaement la recharger à l'aide du port mini USB présent sous la prise DC-IN (5V) au dos de la radio. Une fois la batterie rechargée, appuyez ;urDYN, puis sur POWER. Au bout de quelques années, la batteriefirit par perdre sa capacité à tenir la charge. Contactez Lextronix peur commander une batterie de rechange. Quand vous rechargez la batterie Ni-MH avec la manivelle, le voyant de recharge de la batterie (stué sur le côté droit de la face avant de la radio) s'allume en rouge. Quand vous rechargez la batterie à l'aide d'un câbe USB, le voyant de recharge s'allume en rouge pendant la recharge, puis en vert une fois que la batterie est compÉtement rechargée. 18 GUIDE DE L'UTIUSATEUR DU AXIS Avec une batterie rechargeable Ni-MH complètement rechargée, la radio a une autonomie de 4 à 5 heures à faible volume. Tourner la manivelle pendant 1 minute donne à la radio une autonomie de 5 minutes à faible volume. Avertissem ent : Si la batterie rechargeable est débranchée, ne tournez pas la manivelle, car cela risque de provoquer une surcharge des composants internes de la radio, ce qui peut les endommager. UTILISER LE CABLE USB DC-IN (5V) Un câble de recharge USB est fourni. Branchez la grande fiche USB du câble sur un port USB de votre ordinateur (l'ordinateur doit être allumé) ou d'un adaptateur secteur (non fourni) pourvu d'une prise USB (5V/500mA, disponible dans la plupart des magasins d'appareils électroniques). Branchez la fiche mini USB dans la prise DC-IN (située sous le capuchon en caoutchouc au dos de la radio). Pour écouter la radio sans recharger la batterie rechargeable, appuyez sur BATT, puis sur POW ER (bouton marqué d'un trait vertical dans un cercle). Pour écouter la radio et recharger la batterie rechargeable, appuyez sur DYN, puis sur POWER, il faut environ 8 heures pour que la batterie soit complètement rechargée. Vous pouvez écouter la radio pendant que sa batterie est en recharge. RETROECLAIRAGE DE L'ECRAN LCD Chaque fois que vous appuyez sur un bouton, le rétroéclairage de l'écran LCD s'allume pendant 10 secondes. 19 GUIDE DE L'UTIUSATEUR DU AXIS SELECTIONNER UNE BANDE DE FREQUENCES ET REGLER LA FREQUENCE L'AXIS permet d'écouter des stations AM (520-1710 KHz) et FM (87.5-108 MHz), ainsi que sept stations à ondes courtes. Sélectionnez AM, FM ou SW1 - SW7 à l'aide du bouton de sélec tion de la bande de fréquences situé sur le côté gauche de la radio. Avec le bouton de bande situé sur la gauche du poste, sélectionnez AM , FM ou SW1-SW7. Pour les stations FM et les stations à ondes courtes, sortez complètement l'artenne télescopique. Pour les stations AM, l'antenne télescopique n'est pas nécessaire et peut être rentrée. Réglez les stations à l'aide du bouton TUNE. Pour de meilleurs résultats, utilisez les bandes 49,41,31 et 25 mètres la nuit et les bandes 25,22,19,16 et 13 mètres pendant la journée. SW1 : 5.8-7.5 MHz, bande des 49 (5.8-6.2 MHz) et 41 (7.1-7.5 MHz) mètres. SW2: 9.3-10.05 MHz, bande des 31 mètres SW3: 11.55-12.2 MHz, bande des 25 mètres SW4: 13.4-14 MHz, bande des 22 mètres SW5: 15-15.8 MHz, bande des 19 mètres SW6: 17.4-18.05 MHz, bande des 16 mètres SW7: 21.2-21.8 MHz, bande des 13 mètres 20 GUIDE DE L'UTILISATEUR DU A XIS RECHARGER UN TELEPHONE PORTABLE Si votre téléphone portable est équipé d’un câble de recharge USB, utilisez-le. Dans le cas contraire, vous pouvez en acheter un sur www.iGo.com ou en contactant le 1-888-205-0093. Pour acheter un embout adaptateur et un câble pour votre téléphone portable, rendez-vous sur le site www.iGo.com ou contactez le 1-888-2050093 en indiquant le numéro de câble de recharge USB PS002710003. Veillez à pouvoir fournir la marque et le modèle de votre téléphone portable lorsque vous achetez un embout adaptateur pour votre téléphone portable. Branchez le câble USB de recharge du téléphone sur le grard port USB de l'appareil (situé sous le capuchon en caoutchouc présent au dos de la radio). Appuyez sur la touche C ELL pour effectuer un transfert de charge de la batterie sur le portabe. L'Axis ne recharge votre téléphone portable que si son voyant de la batterie indique que sa charge est d'au m oins 5 0 % , so it deux traits. Si la charge de la batterie est inférieure et que vous désirez recharger votre téléphone portable, tournez la m anivelle pe\dani 7 m inutes à 130 tr/min pour donner au téléphone environ 5 m inutes d'autonom ie de com m unication. L'Axis intègre un circuit de protection basse tension permettant d'éviter que la batterie ne subisse une décharge profonde lois de la recharge d'un téléphone portable. Si le symbole battere affiché à l'écran comporte trois traits, la batterie peut supporte! recharge d'un téléphone portable. S'il se met à clignoter, cela ir dique que la radio a cessé de recharger votre téléphone portîfc et que vous devez recharger la batterie de la radio sans attendi Vous ne pouvez recommencer à recharger le téléphone portai que lorsque le symbole batterie s'est arrêté de clignoter GUIDE DE L'U 'J JTIUSATEUR DU AXIS RECHARGER UN TELEPHONE PORTABLE (continu) Pour recharger votre téléphone portable : 1. Appuyez sur DYN. Vérifiez que le symbccbole batterie comporte trois traits. Si ce n'est pas le o cas ou s'il est en train de clignoter, vous devez recharger w la batterie avec la m anivelle ou avec un adaptateur CA j / jusqu'à ce que le symbole batterie s'arrête de clignoter. 2. Branchez un câble USB de recharge de téléàléphone portable dans le port de RECHARGE DE TÉLÉPHOIONE (situé sous le capuchon en caoutchouc au dos de la radicikio). 3. 4. Plug the other end of the cord into the cell III phone Press the button labeled CELL and 'CELL' wwvill appear in the lower right corner of the LCD display. The o cell phone should start charging and show charging on its disïiisplay. Après environ 20 minutes de recharge, le téléplcphone a une autonomie en communication d'environ 20 à 2125 minutes. Si vous n'avez pas le temps de recharger la batterærie rechargeable de la radio, vous pouvez quand même recharger i£r votre téléphone portable en appuyant sur DYN, puis en toumanttnt la manivelle pendant 7 minutes. Branchez votre téléphone pocortable, appuyez sur CELL et rechargez-le pendant environ 5 minurutes. Cela lui donne une autonomie en communication d'enviiviron 6 minutes. 22 GUIDE DE L'UTILISATEUR )*-* **** REGLER L'HORLOGE ET L'ALARME L'horloge peut afficher l'heure sur 12 ou 24 heures. Par d é fa it, elle affiche l'heure sur 12 heures avec l'indication PM l'aprè—rnidi Pour passer à l'affichage de l'heure sur 24 heures, effectue! procédure de réglage de l'horloge indiqué ci-dessous. L'alarm e allume la radio et diffuse la dernière fréquence utilisée. Réglage de l'horloge: 1. Radio éteinte, appuyez sur le bouton SET (le 4e bouton à partir de la gauche, sous l'écran) pendant une s e c o rd e . 2. Quand les chiffres des heures clignotent, appuyez surie bouton U P (haut) ou DOWN (bas) (les 3e et 2e boutcns à partir de la gauche, sous l'écran) pour les régler. 3. Appuyez à nouveau sur SET 4. Quand les chiffres des minutes clignotent, appuyez sir le bouton UP (haut) ou DOWN (bas) pour les régler. 5. Appuyez à nouveau sur SET 6. Si vous désirez modifier le mode d'affichage de l'heur?, sur 12 h ou 24 h, appuyez sur le bouton UP (haut) ou DCWN (bas) pour basculer de l'un à l'autre. 7. Appuyez sur SET pour finaliser le réglage de l'horloge 23 SUIDE DE L'UTILISATEUR DU AXIS REGLER L'HORLOGE ET L'ALARME (continu) Réglage de l'alarme: 1. Radio éteinte, appuyez sur le •bouton ALARM (bouton le plus à gauche sous l'écran) pcour qu'« ALARM » s'affiche en haut de l'écran. 2. Appuyez sur SET pour que less chiffres des heures se mettent à clignoter. 3. Quand les chiffres des heures; clignotent, appuyez sur le bouton UP (haut) ou DOWN (bas) pour régler l'heure de déclenchement de l’alarme. 4. Appuyez sur SET pour que less chiffres des minutes se mettent à clignoter. 5. Quand les chiffres des minutess clignotent, appuyez sur le bouton UP (haut) ou DOWN i (bas) pour régler l'heure de déclenchement de l'alarme. 6. Appuyez sur SET pour finaliseer le réglage de l'alarme. 7. Appuyez à nouveau sur ALAR3M pour désactiver l'alarme. ACTIVER ET DESACTIV/ER L'ALARME Radio allumée ou éteinte, appuyezsuurle bouton ALARM. Quand l'alarme est activée, « ALARM » est ; affiché en haut de l'écran. Quand l'alarme est désactivée, « ALAVRM » n'est plus affiché. 24 GUIDE DE L’UTIUSATEUR DJ AXIS ACTIVER ET DESACTIVER L'ALARME Avec la radio allumée ou éteinte, appuyez de manière répttée sur SLEEP pour régler la minuterie sur 90, 60, 30 ou 10 minutes; la radio restera allumée pendant la durée réglée, puis s'éteindra automatiquement. UTILISER LA LAMPE TORCHE ET LA BALISE LUMINEUSE D'URGENCE Le commutateur ON/OFF/ “i l " (allumer/éteindre/digncter) situé dans la partie supérieure gauche de la radio permet d'allumer et d'éteindre la lampe torche et la balise clignotante. La position ON permet d'allumer la lampe torche. La positon " permet d'allumer la balise clignotante rouge. La position OFF permet d'éteindre la lampe torche et la balise. PRISE ECOUTEURS La prise AUDIO-OUT est située sous le capuchon en caoutchouc inférieur au dos de la radio. Branchez-y des écouteurs stéréo. Le signal sonore transmis aux écouteuis est monophonique. Baissez toujours le volum e avant de brancher des écouteurs ou un casque. PRISE AUDIO-IN La prise AUDIO-IN est située sous le capuchon en caoutchouc inférieur au dos de la radio. Elle vous permet d'écouter sur la radio le signal sonore transmis par un autre appareil, sar exemple un lecteur MP3, à l'aide d'un câble stéréo mun d'une fiche de 3,5 mm. 25 GUIDE DE L'UTILISATEUR DU AXIS REINITIALISER L'AXIS Si l'Axis ne fonctionne plus ou ne s'allume plus, réinitialisez-le. Retirez les piles AAA et débranchez sa batterie rechargeable. Attendez 30 minutes, puis remettez les piles et reb'anchez la batterie. Pour ali menter la radio avec les piles AAA, appuyez d'abord sur BÂTT, puis sur POWER. Pour alimenter la radio avec sa batterie rechargeable, appuyez d'abord sur DYN, tournez la manivelle pendant une minute au minimum, puis appuyez sur POW ER. ENREGISTREMENT POUR LA GARANTIE La garantie est de un an. Les détails de la garantie complète sont disponibles sur notre site internet : www.lextronixusa.de. Afin de pouvoir bénéficier de la garantie complète et des mises à jour produit, enregistrez votre appareil dès que possible après l'avoir acheté ou reçu. Vous pouvez procéder de l'une des manières suivantes pour l'enregistrer: 1. En vous rendant sur notre site internet : www.lextronixLisa.de 2. En envoyant la carte de garantie par courrier. 3. En envoyant les informations nécessaires ou votre carte d'enregistrement par courrier à l'adresse ci-dessous, en indi quant vos nom et prénom, votre adresse postale complète, votre numéro de téléphone, vctre adresse électronique, le modèle acheté, la date d'achat, le nom du revendeur. Lextronix 1015 Corporation W ay Palo Alto, CA 94303 26 GUIDE DE L'UTILISATEUR DU AXIS GARANTIE LIMITEE Conservez les informations concernant la garantie indiquées sur votre carte de garantie avec votre preuve d'achat. Les détails de la Garantie Limitée sont disponibles sur notre site internet : www.lextronixusa.de REPARATION DE VOTRE PRODUIT Pour faire réparer votre produit, nous vous recommandons de contacter d'abord le service après-vente d'Etôn au 1-800-872-2228 (US), 1-800-637-1648 (Canada), (650) 903-3866 (Monde entier), ou par courriel [email protected], ou de contacter le distributeur de votre pays si vous êtes en Europe, afin de déterminer le problème et de le résoudre. S'il est nécessaire de faire réparer votre radio, le personnel technique vous indiquera la procédure à suivre selon que votre radio est toujours sous garantie ou nécessite une réparation hors garantie. SOUS GARANTIE - Si votre produit est toujours sous garantie et que le service après-vente d'Etôn juge qu'une réparation dans le cadre de la garantie est nécessaire, une autorisation de retour du produit vous sera délivrée et des instructiors vous seront données. NE RETOURNEZ PAS votre radio sais avoir obtenu une autorisation de retour du produit. HORS GARANTIE - Si votre produit n'est plus sous garantie et nécessite une réparation, le service après-vente d'Etôn vous indiquera le centre de réparation le plus proche et le plus à même de procéder à la réparation. Pour les réparations en dehors de l'Am érique du Nord, reportez-vous aux coordonnées des distributeurs fournies au moment de l'achat ou de la réception du produit. 27 MANUAL DEL USUARIO D a AXIS ¿NECESITA AYUDA? Si usted necesita ayuda, por favor póngase en contacto con nosotros, de lunes a viernes, de 8:00 de la mañana a 4:30 de la tarde. Hora del Pacífico Norteamericano. 1-800-872-2228 en Estados Unidos; 1-800-637-1648 en Canadá; 650-903-3866, para el resto del mundo; FAX: 650-903-3867; sitio web, www.lextronixusa.de; Lextronix, 1015 Corporation Way, Palo Alto, CA 94303, USA ATENCIÓN • No exponer este aparato a la lluvia ni a la humedad. • No sumergir ni exponer al agua durante un período prolongado. • Proteger contra la humedad alta y la lluvia. • Desenchufar inmediatamente en caso de derrame de líqui dos o de caída de cualquier objeto sobre el aparato. • Limpiar únicamente con un trapo seco. No usar detergentes ni solventes químicos, ya que estos podrían dañar el acabado del producto. • Desenchufar y desconectar antenas externas durante tormentas eléctricas. • No retirar la tapa [ni la parte de atrás]. • Referir cualquier revisión del aparato a personal de servicio cualificado. MEDIO AMBIENTE Desecho Según la D irectiva Europea 2002/96/EC, todos los productos eléctricos y electrónicos deben ser recogidos de form a separada por parte jn sistem a local de recogida. Por favor, actúe de acuerdo a sus leyes locales y no deseche sus productos viejos en la basura norm al de su casa. Para desechar cualquier tip o d e baterías siga las normas o leyes d e su g o b ie rn o , e s ta d o o c iu d a d . Si n o está s e g u ro , p ó n g a s e en c o n ta c to c o n las au torid a d es locales a p ro p ia d a s p a ra sa be r c ó m o desecharlas de m a n e ra se gu ra y así p ro te g e r el m e d io a m b ie n te . 29 MANUAL DEL USUAWO DEI AXIS TECLAS DE SELECCIÓN DE FUNCIONES 30 MANUAL DEL USUARIO DEL AXIS CÓMO ENCENDER O APAGAR SU AXIS El aparato modelo AXIS funciona con 3 pilas de tipo AAA (BATT), así como con el acumulador recargable (DYN) qie hay que conectar en el interior del compartimento de las pilas. Para encender la radio, pulse el botón "BA T T ” (p ilas) c 'D YN " (acum ulador, situado en la parte delantera derecha) y, a continuación, pulse el botón de ENCENDIDO (b o tín estampado con un círculo y una línea vertical). BOTÓN DE ENCENDIDO Para ajustar el volumen, gire el mando estampado con la palabra "VO L". Desplace el mando hacia arriba para aumentar el volumen, o hada abajo para disminuirlo. Asegúrese siempre de bajar el volumen antes de colocarse unos auriculares. AJUSTE DEL NIVEL DE VOLUMEN Para ajustar el volumen, gire el mando estampado con la palabra "VOL". Desplace el mando hada arriba para aumentar el volumen, o hada abajo para disminuirlo. Asegúrese siempre de bajar e l volumen antes de colocarse unos auriculares. ALIMENTACIÓN DEL APARATO UTILIZANDO LAS PILAS Instale 3 pilas de tipo AAA, pulse el botón "BATT'* (situado en la parte delantera derecha de la radio) y, a continuación, pulse el botón de ENCENDIDO para encender la radio. 31 MANUAL DEL USUARIO DEL AXIS AUMENTACION DEL APARATO UTILIZANDO EL ACUMULADOR RECARGABLE Y PROCEDIMIENTO DE CARGA DEL MISMO El acumulador recargable de Ni-MH (níquel-hidruro metálico) está ubicado en el compartimento de las pilas. Para utilizarlo, conecte su cable a la toma de conexión existente junto al acumulador, pulse el botón "DYN" (situado en la parte delantera derecha de la radio) y, a continuación, pulse el botón de ENCENDIDO. Es posible que tenga que cargar el acumulador. Para ello, bastará con que gire la manivela durante 90 segundos. Asimismo podrá recargar el acumulador mediante el puerto mini USB situado bajo la indicación "DC-IN (5 V )” en la parte posterior de la radio. Una vez cargado, pulse el botón "DYN" y después el de ENCENDIDO. Al cabo de unos años, el acumulador recargable perderá su capscidad para mantener la carga. En dicho caso, póngase en contacto con Lextronix para solicitar un acumulador de recambio. Mientras se acciona la manivela para cargar el acumulador de Ni-MH, el testigo de carga (situado en el lateral derecho de la radio) se ilumi nará en rojo. Asimismo, cuando se esté recargando el acumulador utilizando el cable USB, el testigo de carga se iluminará primero en rojo durante el proceso de carga, para iluminarse después en verde una vez que el acumulador esté totalmente cargado. 32 MANUAL DEL USUARIO DEL AXIS A su carga máxima, el acumulador de Ni-MH proporcionará suficiente energía para utilizar el aparato durante aproximadamente entre 4 y 5 horas a bajo volumen. Accionando la manivela durante 1 minuto secargará suficientemente el acumuladorcomo para poder utilizar la radiodurante aproximadamente 5 minutos a bajo volumen. ¡Advertencia! No gire la manivela cuando el acumulador recargable esté desenchufado, ya que dicha acción podrá sobrecargar los componentes internos y llegar a dañarlos. UTILIZACIÓN DEL CABLE USB EN EL PUERTO DC-IN (5V) El aparatosesuministra con cable USB de carga. Conecte el extremo del cable con la clavija de mayor tamaño al puerto USB de su ordenador (que deberá estar encendido) o de un adaptador de comente (no incluido) equipado con puerto USB (5 V -500 mA de salida) disponible en la mayoria de los comercios de venta de componenteselectrónicos. Enchufe el conectar mini USB del cable en el puerto "DC-IN" del aparato (oculto detrás de la tapa de goma superior situada en la parte posterior de la radio). Para utilizar la radb sin proceder a cargar el acumulador recargable pulse primero el botón "BATT" (pilas) y después el botón de ENCENDIDO (botón estampado con un círculo y una línea vertical). Para utilizar la radio y cargarsimultáneamente el acumulador recargable, pulse primero el botón "DYN” (acumulado!) y después el botón de ENCENDIDO. Para recargartotalmente acumulador, habrá que dejarlo en carga durante 8 horas. No obstante, le será posible utilizar la radio durante el proceso de carga. 33 MA MUAL DEL USUARIO DEL AXIS RETROILUMINACION DE LA PANTALLA LCD Cada vez que se pulse un botón, la retroiluminación de la pantalla LCD se activará durante aproximadamente 10 segundos. SELECCIÓN DE BANDA Y SINTONIZACION DE EMISORAS Su AXIS puede sintcnizar emisoras en banda AM (520 -1710 kHz), FM (87.5 -108 MHz), así como siete canales de onda corta: Utilice el mando de selección de bandas situado en el lado izquierdo de la radie para seleccionar entre los modos AM , FM o SW1-SW7 Para escuchar la radio FM y los canales de onda corta, extienda completamente la antena telescópica. La antena telescópica no será necesaria cuando sintonice emisoras de banda AM y por lo tanto, Dodrá dejarse replegada. Utilice el mando de sintonización «TUNE» para sintonizar las emisoras recibidas. Utilice 49,41,31 y 25 metros durante la noche, así como 25,22,19,16 y 13 metros durante el día parar obtener unos resultados óptimos. SW 1: 5.8-7.5 MHz, bandas de 49m (5.8-6.2 MHz) y 41m(7.1-7.5 MHz) SW 2: 9.3-10.05 MHz, banda de 31m SW 3 : 11.55-12.2 MHz, banda de 25m SW 4: 13.4-14 MHz, banda de 22m SW 5: 15-15.8 MHz, banda de 19m SW 6 : 17.4-18.05 MHz, banda 16m SW 7 :21.2-21.8 MHz, banda de 13m 34 MANUAL DEL USUARIO DELAXIS CÓMO CARGAR TELÉFONOS MÓVILES Si votre téléphone portable est équipé d'un câble de recharge USB, vous pouvez l'utiliser. Dans le cas contraire, vous pouvez en acheter un surwww.iGo.com ou en contactant le 1-888-205-0093. Pojr acheter un embout adaptateur et un câble pour votre téléphore portable, rendez-vous sur le site www.iGo.com ou contactez le 1-888-205-0093 en indiquant le numéro de câble de recharge USB PS00271-0003. Veillez à pouvoir fournir la marque et le modèle de votre téléphone portable lorsque vous achetez un embout adaptateur pour votre téléphone portable. Utilice el cable USB de carga de teléfonos móviles y conéctelo al puerto USB de mayor tamaño de la radio (oculto detrás de la tapa de goma situada en la parte posterior de la radio). Pulse el botón "CELL" (teléfono móvil) para iniciar la descarga directa de energía del acumulador del aparato a la pila de su móvil. Su Axis solo cargará su teléfono móvil cuando su indicador de carga muestre la mitad de su capacidad o el equivalente a dos barras. Para cargar su móvil cuando el acumulador interno del aparato está bajo de carga, gire la manivela durante aproxi madamente 7 minutos a una cadencia de 130 rpm para cargar el teléfono móvil lo suficiente como para contar con una au tonomía en conversación de aproximadamente 5 minutos. Su aparato modelo Axis cuenta con un circuito de protección de baja tensión que impide que el acumulador se descargue en exceso mientras se recarga un teléfono móvil. Si el sfmbolode estado del acumulador en la pantalla LCD indica tres barras, será posible llevar a cabo la carga de un teléfono móvil. Si el símbolo de estado del acumulador comienza a parpadear, se dejará de recargar su móvil y deberá proceder a cargar el acumulador hasta que el símbolo deje de parpadear, de manera que sea posible reanudar el proceso de carga del teléfono móvil. 35 MANUAL DEL USUARIO DEL AXIS Para cargar su teléfono móvil, proceda como sigue: 1. Pulse el botón "DYN" (acumulador). Asegúrese de que el símbolo de estado de carga del acumulador muestra tres barras. De no ser así o si aparece parpadeando, deberá cargar primero el acumulador utilizando la manivela o bien un adaptador de corriente hasta que el símbolo deje de parpadear. 2. Conecte el cable USB para carga de móviles en la toma para carga de móviles "PHONE CHARGER" (oculta detrás de la tapa de goma situada en la parte trasera de la radio). 3. Conecte el extremo opuesto del cable al teléfono móvil que corresponda. Pulse el botón estampado con la palabra 'CELL"; la indicación "CELL" (teléfono móvil) se mostrará en la esquina inferior derecha de la pantalla LCD. De este modo, el móvil empezará a cargarse y así se indicará en su pantalla. 4. Tras haber permanecido en carga durante aproximadamente 20 minutos, el móvil contará con suficiente energía para una autonomía de entre 20 y 25 minutos de conversación. Si no dispone de tiempo suficiente para cargar el acumulador recargable de la radio, podrá cargar su teléfono móvil pulsando el botón "DYN" y girando la manivela durante 7 minutos. Para ello, con el teléfono móvil conectado, pulse el botón "CELL" y deje el móvil cargando durante aproximadamente 5 minutos, tras lo cual tendrá una autonomía en conversación de aproximadamente 6 minutos. 36 MANUAL DEL USUARIO D I A XIS CONFIGURACIÓN DEL RELOJ Y DE LA ALARMA El reloj podrá visualizarse en formato de 12 o 24 horas. For defecto, está configurado en form ato de 12 horas e indicará "P M " en la pantalla a partir del mediodía. Para cam biarb al form ato de 24 horas, siga las instrucciones de configuración horaria que se describen a continuación. Cuando suenela alarma, se activará automáticamente la última em isora ce radio sintonizada. Para ajustar la hora, proceda como sigue: 1. Con la radio apagada, mantenga pulsado el botón de configuración "SET " (el cuarto botón empezando p ala izquierda debajo de la pantalla) durante un segundo. 2. Mientras la indicación de las horas parpadea en la pantalla, pulse el botón de desplazamiento ASCENDENTE o DESCENDENTE (el 3oy 2obotón respectivamente empezando por la izquerda debajo de la pantalla) para ajustar la hora. 3. Vuelva pulsar el botón "SET". 4. Mientras la indicación de los minutos parpadea en la pantalla, pulse el botón de desplazamiento ASCENDENTE o DESCENDENTE para ajustar los minutos. 5. Vuelva pulsar el botón "SET". 6.. Si desea cambiar el formato de visualización de 12 324 horas o viceversa, pulse el botón de desplazamiento ASCENDENTE o DESCENDENTE para m odificar el formato indicado en la pantalla. 7. Pulse el botón "SET " para confirmar el ajuste de la hora efectuado. MANUAL DEL USUARIO >EL AXIS Para ajustar la función de alarma, proceda como sigue: 1. Con la radio apagada, pulse e l botón "A LA R M ' (el botón situado más a la izquierda debajo de la pantalla) de manera que la indicación "A LARM " se muestre en la parte superior de la pantalla. 2. Pulse el botón "SET" para que la indicación de las horas comience a parpadear. 3. Mientras la indicación de las horas parpadea en la pantala, pulse el botón de desplazamiento ASCENDENTE o DESCEBENTE para ajustar la hora deseada para la alarma. 4. Pulse El botón “ SET" para que la indicación de los minutos comience a parpadear. 5. Mientras la indicación de los minutos parpadea en a pantalla, pulse el botón de desplazamiento ASCENDENTE o DESCENDENTE para ajustar los minutos de la hora configurada para que suene la alarma. 6. Pulse el botón "SET " para confirm ar la configuración de alarma efectuada. 7. Pulse de nuevo el botón "ALARIWI" para desactivar la alarma. CÓMO ACTIVAR O DESACTIVAR LA ALARMA Con el radio parado, pulse el botón ''A LA RM ". Observe cue, cuando la alarma está activada, la indicación "A LA R M " sa muestra en la parte superior de la pantalla. Mientras que cuando está desactivada, dicha indicación desaparece de la pantalla. MANUAL DEL USUARIO DEL A XIS USO DEL TEMPORIZADOR PARA DORMIR Con la radio encendida o apagada, pulse el botón «SLEEP» roetidam ente para cambiar el temporizador a 90,60,30 o 10 rrnutos, dejando así la radio activada por el tiempo seleccionado artes de que se apague automáticamente. UTILIZACIÓN DE LA LINTERNA \ BALIZA DE EMERGENCIA Utilice el selector de modo Encendido/Apagado/Intermitente GN/OFF/ " S í" situado en la parte superior izquierda de la radio para activar o desactivar el tipo de luz correspondiente. L¿ posición "O N " (encendido) hará que se encienda la linterna. Le posidón "zw " (intermitente) hará que parpadee una luz roja de emergenda. Finalmente, la posición "O FF" desactivará cualquiera de estas dos funciones. SALIDA PARA AURICULARES Elconector de salida "AUDIO -O UT" (salida de audio) se eicuentra oculto detrás de la tapa de goma inferior situada e i la parte trasera de la radio. Conecte en el mismo unos auriculares estéreos. El sonido se em itirá únicamente en modo monoaural. Asegúrese siem pre de bajar el volum en antes da colocarse unos auriculares o audífonos. 39 MANUAtL DEL U SU A R IO DEL AXIS CONECTOR DE ENTRADA DE AUDIO (AUDIO-IN) El conector de entrada de audio "AUDIO-IN" se encui entra I oculto detrás de la tapa de goma inferior situada en la parte ] trasera de la radio. Podrá conectar al mismo otros dispositivos de audio tales como reproductores de MIP3 utilizando un cable con clavija estéreo de 3,5 mm (1/8 de pulg). CÓMO REINICIAR SU APARATO MODELO AXIS En caso de que su Axis deje de funcionar oniio se encienda, proceda aneinidario. Para ello, retire las pilas de tipo AA A y desconecte el ! acumulador recargable. Espere aproximadamente 30 minutos y, a I continuación, vuelva a instalar las pilas y ooneectar el acumulador. Para utilizar la radio con la alimentación suministrada por las pilas ! detipoAAA, pulse primero el botón "BATTT" (pilas) y, a continu- | ación, el botón de ENCENDIDO. Para utilizarla con la alimentatión j propordonada por el acumulador recargables, pulse primero e l botórf “DYN", acdone la manivela durante un minruto como mínimo y, a I continuación, pulse el botón de ENCENDIDO. REGISTRO PARA PROPÓSITOS DE GARANTIA La garantía proporcionada con el aparato es ’válida durante unaño. Podrá obtener informadón detallada de la cobertura proporcorada j por la garantía visitando nuestro sitio web www.lextronixusade. Para poder disfrutar de toda la cobertura proporcionada por la garantía u ¡ obtener actualizadones del producto, deberá completar el formulario £ de registro de su producto b antes posible dlespués de su compra o recepción. Para registrar su producto, podlrá utilizar una deas siguientes opaones: 40 MANUAL DEL USUARIO DELAXIS REGISTRO PARA PROPÓSITOS DE GARANTIA (continuó) 1. Viste nuestro sitio web en la dirección www.lextronixusa.de 2. Envfe por correo postal la tarjeta de garantía que se adjunta. 3. Envíe su tarjeta de registro o información al respecto a la siguiente dirección. No se olvide de incluir su nombre, dirección postal completa, número de teléfono, direccon decorreo electrónico, modelo adquirido, fecha de conpra y rombre de la tienda o distribuidor a la dirección: Lextronix 1015 Corporation Way Palo Alto, CA 94303 GARANTÍA LIMITADA Consene la información sobre garantía de su tarjeta de garantí! junto con su recibo de compra. Asimismo, pod á consultar la información acerca de la Garantía Limitada visitando la página www.lextronixusa.de MANUAL CEL USUARIO DEL AXIS REPARACIONES DE SU PRODUCTO Si desea obtener soporte técnico para su producto, le recomendamos que se ponga en contacto primero con un representante de servido de Etón ya sea llamando al número de teléfono 1-800-872-2228 (EÉ. UU.), 1-800637-1648 (Canadá), por fax (650) 903-3866 (resto del mundo), enviardo un mensaje por correo electrónico a customer5\*c@etoncorpcom o bien, póngase en contacto con su distribuidor nacional de Europa (véase la lista que se adjunta) para determinar el problema y obtener asesoramiento sobre loca ización de averías. 1 De ser necesaria cualquier reparación, el perscnal técnico le proporcionará instrucciones sobre cómo debe p'oceder en función de si la radio aún se encuentra en garantía o bien requiere una reparación fuera de garantía. EN GARANTÍA - Si su producto aún se encuentra en garantía i y el representante de servicio de Etón considera la necesidad de j efectuar una reparación en garantía, se emitirá in a autorización 1 de devolución con las correspondientes instrucdones al respecto. 1 NO NOS envíe su radio sin haber obtenido antes la autorización I de devolución. FUERA DE GARANTÍA - Si su producto requiere reparación pero ya no está cubierto por la garantía, el representante de servicio de Etón le indicará el servicio técnico más próximo le suficientemente cualificado como para encargarse de la reparacói. Para aquellas reparaciones fuera del territorio norteam ericano, consulte la información sobre distribuidores incluida con el aparato en el momento de su com pra/receprión. 42 AXIS BENUTZERHANDBUCH BRAUCHEN SIE HILFE? i/Venn S e Hilfe benötigen, bitte wenden Sie sich von MontagFreitag, won 8:30 Uhr.-16:00 Uhr Nordamerikanische Pazifik Ortszeit an: 1-800-872-2228 aus den U.S A.; 1-800-637-1648 aus Kar=da; 650-903-3866, W eltw eit; FAX: 650-903-3867; 'A'ebseiia, www.lextronixusa.de; Lextronix, 1015 Corporation Way, Palo Alto, CA 94303, USA W ARNUNG • Das Garät nicht Regen oder Feuchtigkeit aussetzen. • Dem Wasser nicht längere Zeit aussetzen. •Vor g n ß er Luftfeuchtigkeit und Regen schützen. • Sofort cerät ausstecken wenn Flüssigkeiten darüber verschüttet wurden oder Gegenstände hineingefallen sind. • Nur m it einem sauberen Tuch reinigen. Keine Reinigungsmittel oder Lösungsmittel benutzen, da diese die Lackierung beschädigen könnten • Exterrs Antennen während Gewittern ausstecken und vom Gerät trennen. • Abdeckung [oder die Rückabdeckung] nicht entfernen. • Repanturen einem qualifizierten Kundendienst überlassen. ENVIRONMENT Entsorgung Gemäß d *' EG-Verordnung 2002/967EC ist vorgeschrieben, dass alle elektrisch? n Geräte und Elektroprodukte separat von einem örtlichen /.fcfallbetreb entsorgt werden müssen. Bitte halten Sie sich an die örtlichen Vorschriften und entsorgen Sie ihre Altgeräte nicht in den Hausmüll. Bitte entsorgen Sie alle Batterietypen gemäß der örtlich geltenden Regierungsbestimmungen oder Entsorgungsge setzen. Wenn Sie unsicher sind, setzen Sie sich mit ihrer dafür zuständigen Behörde in Verbindung, um Batterien umweltgerecht und sicher zu entsorgen. 45 AXIS BENUTZERHANDBUCl FUNCTION KEYS 46 AXIS BENUTZERHANDWCH AXIS EIN-/AUSSCHALTEN Das A XIS wird mit 3 AAA Batterien (BATT) und dem Akku DYN) betrieben, der im Batteriefach angeschlossen ist. Um das Radio einzuschalten, drücken Sie die BATT-Taste odefdie DYN-Taste (vorne rechts) und drücken Sie dann die BETRIEBSTASTE (Taste mit dem Kreis und der senkrechten Linie). DIE BETRIEBSTASTE Die BETRIEBSTASTE befindet sich vorne rechts am Radio und ist mit einem Kreis, der von einer senkrechten Linie durchzogen ist, versehen. Drücken Sie diese Taste, um das Radio einzuschalten. LAUTSTÄRKEREGELUNG Drehen Sie den Regelknopf, der mit VOL gekennzeichnet ist..um die Lautstärke einzustellen. Schieben Sie den Regler nach oben, um die Lautstärke lauter zu steilen; schieben Sie ihn nach unten, um leiser zu stellen. Stellen Sie immer erst leise, bevor Sie Ohrhörer benutzen. VERWENDEN VON BATTERIESTROM Legen Sie 3 AAA Batterien, drücken Sie die BATT-Taste (vorne rechts auf dem Radio) und drücken Sie dann d ie BETRIEBSTASTE, um das Radio einzuschalten. 47 AXIS BENUTZERHANDBUCH VERWENDEN UND AUFLADEN DES AKKUS Der Ni-MH (Nickel-Metallhydrid) Akku befindet sich im Batteriefach. Um ihn zu benutzen, verbinden Sie den Akku mit der angrenzenden Buchse, drücken Sie die DYN-Taste (vorne rechts am Radio) und dann die BETRIEBSTASTE. Sie müssen den Akku eventuell au fladen. Drehen Sie hierfür einfach nur die Kurbel für 90 Sekunden, j Sie können auch über den Mini-USB-Port unter DC-IN (5V) auf der Rückseite des Radios aufladen. Drücken Sie nach dem Aufladen DYN und dann die BETRIEBSTASTE. Nach einigen Jahren wird * der Akku die Fähigkeit verlieren, Ladung zu halten. Wenden Sie sich an Lextronix, um einen Ersatz zu bestellen. Wenn Sie den Ni-MH-Akku mithilfe der Kurbel aufladen, leuchtet die Batteriestandsanzeige (vorne rechts am Radio) rot. I Wenn Sie den Akku über das USB-Kabel aufladen, leuchtet die | Batteriestandsanzeige rot während des Aufladens und wird grün, wenn der Akku vollständig aufgeladen ist. Ein vollständig aufgeladener Ni-MH-Akku generiert eine Spieldauer von 4 bis 5 Stunden bei niedriger Lautstärke. 1 Minute Aufladen mithilfe der Kurbel generiert 5 Minuten Betriebsdauer bei niedriger Lautstärke. Warnung: Wenn der Stecker des Akkus gezogen ist, drehen Sie I nicht die Kurbel, da dies eine Überlast bei internen Komponenten verursachen kann, wodurch diese beschädigt werden körnten. I 48 AXIS BENUTZERHANDB'JCH VERWENDEN DES DC-IN (5V) USB-KABELS Ein USB-Ladekabel ist im Lieferumfang enthalten. Verbinden Sie den großen USB-Stecker mit dem USB-Port Ihres Computers (Com puter muss engeschaltet sein) oder mit einem AC-Adapter (nicht mitgeliefert), der mit einer USB-Buchse versehen ist (muss 5 V 500 unterstützen), erhältlich bei den meisten Elektronikfachhändlem. Verbinden Sie den Mini-USB-Stecker mit der DC-IN-Buchse (unter der Gummiabdedcung auf der Rückseite des Radios). Um das Radio zu benutzen, ohne den Akku aufzuladen, drücken Sie BATT urd dann die BETREIBSTASTE (Taste mit Kreis und senkrechter Line). Um das Radio zu spielen und den Akku aufzuladen, drücken Sie DYN und dann die BETRIEBSTASTE. Der Akku ist nach ungefihr 8 Stunden vollständig aufgeladen. Das Radio kann während des Ladevorgangs gespielt werden. LCD-HINTERGRUNDBELEUCHTUNG Jedes Mal, wenn eine Taste gedrückt wird, leuchtet das LCD-Hintergrundlicht für 10 Sekunden auf. AUSWAHL DER FREQUENZBEREICHE UND EINSTELLEN DER SENDER Das AXIS spielt A M (520-1710 KHz), FM (87,5-108 MHz) und sieben Kurzwellenkanäle: Wählen Sie mit dem Frequenzbereich-Knopf auf der linken Seite des Radios AM , FM oder SW1-SW7. Wenn Sie FM und Kurzw ellenkanäle hören, ziehen Sie die Teleskopantenne ganz aus. Wenn Sie AM-Sender einstellen, wird die Telesko pantenne nicht benötigt und kann eingeschoben werden. Stellen Sie die Sender m ithilfe des RW E-Knopfes ein. 49 AXIS BENUTZERHNDBUO I Um die besten Ergebnisse zu erzielen, verwenden S ie ö , 41 31 und 25 M eter in der Nacht und 25, 22, 19, 16 ud 13 M eter tagsüber. SW1: 5,8-7,5 MHz, 49- (5,8-6,2 MHz) und 41- (7,1-7,5 MHz) Meterbänder. SW 2: 9,3-10,05 MHz, 31 -Me:erband SW 3: 11,55-12,2 MHz, 25-Msterband SW 4: 13,4-14 MHz, 22-Meterband SW5: 15-15,8 MHz, 19-Mete'band SW6: 17,4-18,05 MHz, 16-Meterband SW7. 21,2-21,8 MHz, 13-Meterband MOBILTELEFONE AUFLADEN Falls Ihr Handy über ein USB-Ladekabel verfügt können Siedieses l benutzen. Falls nicht, können Sie eines von www.iGo.com taufen* oder 1-888-205-0093 anrufen. Um einen Adapter und Ka:el für 1 Ihr Mobiltelefon zu kaufen, gehen Sie zu www.iGo.com oer rufen Sie 1-888-205-0093 an. Kaufen Sie das USB-Ladekabelmcdell# 1 PS00271-0003 und haben Sie die Marke und das Modell Ifres Mobiltelefons zur Hand, um den Adapter zu kaufen. Um das USB-Ladekabel des Mobiltelefons zu benutzer verbin den Sie es mit der großen USB-Buchse des Radios (unter der 1 Gummiabdeckung auf der Rückseite des Radios.) Drüden S ie l die CELL-Taste und die Batterien werden Ladung direk auf Ihr Mobiltelefon übertragen. Das Axis lädt Ihr Mobiltelefon nur auf, wenn die Batteriestandsanzeige halb voll oderzwei 1 Balken anzeigt. Um Ihr Mobiltelefon mit einem schwanen Akku zu laden, drehen Sie die Kurbel für 7 M inuten mr. einer I Drehzahl von 130 rpm, um das Mobiltelefon ausreichend für I ein 5-minütiges Gespräch aufzuladen. 50 AXIS BENUTZERHANDBJCH Das Axis verfügt über eine Niederspannungsschutzschaltung, um zu vermeiden, dass die Batteriespannung durch das Aufladen des Mobiltelefons zu niedrig wird. Wenn das Batteriesymbol auf dem LC-Display drei Balken zeigt, kann der Akku das Aufladen des Mobiltelefons unterstützen. Wenn das Batteriesymbol binkt, hört der Akku auf. Ihr Mobiltelefon aufzuladen und Sie sollten unbedingt den Akku aufladen, bis das Blinken aufhört. Sie ken nen dann fortfahren das Mobiltelefon aufzuladen. Um Ihr Mobiltelefon aufzuladen: 1. 2. 3. 4. Drücken Sie DYN. Vergewissern Sie sich, dass das Batteriesymbol drei Balken zeigt. Falls nicht oder wenr es blinkt, muss der Akku durch Kurbeln oder über einen AC-Adapter aufgeladen werden, bis es aufhört zu blinken. Verbinden Sie das USB-Handyladekabel mit der M O BILTELEFO NLADEBUCHSE (unter der Gummiabdeckung auf der Rückseite des Radios). Verbinden Sie das andere Ende mit dem M obiltelefon. Drücken Sie die Taste, die mit CELL gekennzeichnet ist jn d 'CELL' wird in der unteren rechten Ecke auf dem LC-Display angezeigt Das Mobiltelefon sollte beginnen, sich au fzir laden und den Ladevorgang auf seinem Display anzeigen. Nach etw a 20 M inuten Aufladen sollte das M obiltelefon eine Sprechzeit von 20 bis 25 Minuten haben. 51 AXIS BENUTZERH^D3UCI« Falls Sie keine Zeit haben den Akku des Radios aufzulader, können Sie trotzdem Ihr Mobiltelefon aufladen, indem Sie DYN drücken und die Kurbel für 7 Minuten drehen. Drücten 1 Sie, während Ihr Mobiltelefon verbunden ist, CELL und laden Sie das Mobiltelefon für etwa 5 Minuten auf. Anschließend I können Sie für ungefähr 6 Minuten telefonieren. I EINSTELLEN DER UHR- UND WECKZEIT Die Uhrzeit kann im 12/oder 24-Stundenformat angezeigt i werden. Standardmäßig ist das 12-Stundenformat einces- 1 teilt. PM wird ab M ittag auf dem Display angezeigt. Um zum 24-Stundenformat zu wechseln, sehen Sie unten die Anleitun gen zum Einstellen der Uhrzeit. Die Wecker schaltet das Radic mit dem zuletzt eingestellten Sender ein. Um die Uhr zu stellen: 1. 2. 3. 4. 5. 6. 7. 52 Drucken Sie für eine Sekunde die SET-Taste, während dasRadk ausgeschaltet ist (die vierte Taste von links unter dem Display). I Wenn die Stunden blinken, drücken Sie die UP- oder DOWN-Taste (die 3. und 2. Taste von links unter cem ] Display), um die Stunde einzustellen. Drücken Sie erneut SET. Wenn die Minuten blinken, drücken Sie die UP- oder DOWN-Taste, um die M inute einzustellen. Drücken Sie erneut SET. Wenn Sie den Uhrzeitmodus vom 12-Stundenformatzum 1 24-Stundenformat umstellen möchten oder umgekehrt, j drücken Sie die UP- oder DOWN-Tasten, um das angezeigt Format zu wechseln. Drücken Sie SET, um das Stellen der Uhr abzuschfeßen.l AXIS BENUTZERHANDBUCH Um den Wecker zu stellen: 1. 2. 3. 4. 5. 6. 7. Drücken Sie die ALRAM-Taste (ganz links unter dem Display), während das Radio ausgeschaltet ist, damit 'ALARM ' oben auf dem Display angezeigt wird. Drücken Sie SET, damit die Stunden blinken. Während die Stunden blinken, drücken Sie die U P oder DOWN-Tasten, um die Stunde der Weckzeit einzustellen. Drücken Sie SET, damit die Minuten blinken. Während die Minuten blinken, drücken Sie die U P oder DOWN-Taste, um die Minuten der Weckzeit einzustellen. Drücken Sie SET, um das Stellen des Weckers abzuschließen. Drücken Sie erneut ALARM , um den Wecker zu deaktivieren. EIN- UND AUSSCHALTEN DES WECKERS Drücken Sie bei ein- oder ausgeschaltetem Radio die ALARM-Taste. Beachten Sie, dass wenn er aktiviert ist, 'ALARM ' oben auf dem Display erscheint. Wenn erdeaktiviert ist, verschwindet ’ALARM'. BENUTZUNG DER SCHLUMMERTZEITUHR Drücken Sie bei ein- oder ausgeschaltetem Radio mehrmals die SLEEP-Taste und die Einstellung durchläuft 90,60,30 und 10 Minuten. Das Radio wird die eingestellte Dauer spielen und sich dann automatisch ausschalten. VERWENDEN DER TASCHENLAMPE UND NOTBELEUCHTUNG Schalten Sie diese Lichter mit dem ON/OFF/ " i l " Schalter oben links am Radio ein und aus. Die ON-Position schaltet die Taschenlampe ein. Die " O " Position schaltet ein blinkendes rotes Licht ein. Die OFF-Position schaltet das Licht aus. 53 AXIS benutzeeandbuch AUDIO-EIN-BUCHSE Die AUDIO-AUS-Buchse befindet sich unter der u rre n Gummiabdeckung auf der Rückseite des Radios. Sc feßen I Sie beliebige Stereoohrhörer an. Der Ton wird nur ¡m ono I gehört. Stellen Sie immer erst leise, bevor Sie O-hörer,' Kopfhörer anschließen. AUDIO-EIN-BUCHSE Die AUDIO-EIN-Buchse befindet sich unter der unten Gu it miabdeckung auf der Rückseite des Radios. Sie erm<licht I Ihnen andere Geräte zu hören, wi« zum Beispiel M PPlayer mit einem 3,5 mm-(1/8 Zoll)-Stereoverbindungskab« ZURÜCKSETZEN DES AXIS Sollte das Axis jemals nicht funktionieren oder sich n it ein- ■ schalten lassen, setzen Sie es einfa<h zurück. Entferntste Ihre AAA-Batterien und ziehen Sie den Stecker des AkkusVarter» Sie 30 Minuten, bevor Sie die Batterien wieder einlegi, bzw. verbinden. Um das Radio über AAA-Batterien zu betoen, I drücken Sie zuerst BATT, dann die BETRIEBSTASTE, m das Ä Radio über den Akku zu betreiben, drücken Sie zuerstYN, j drehen Sie die Kurbel für mindestens eine Minute, dricen Sie dann die BETRIEBSTASTE. 54 AXIS BENUTZERHANDBUCH GARANTIEREGISTRIERUNG Die Garantie gilt für ein Jahr. Einzelheiten über die komplette Garantie können auf unserer Website, www.lextronixusa.de entnommen werden Um einen umfassenden Garantieschutz oder Produktaktualisierungen zu gewährleisten, sollten Sie Ihr Produktso bald wie möglich nach Kauf oder Erhalt registrieren Sie können eine der folgenden Optionen zur Registrierung Ifres Produktes nutzen, 1. Besuchen Sie unsere Website unter http://www.lextronixJsa. de 2. Senden Sie die beiliegende Garantiekarte ein 3. Schicken Sie Ihre Registrationskarte oder Informationen an diefolgende Adresse. Schicken Sie Ihren Namen, vollständige Postanschrift, Telefonnummer, E-Mail-Adresse, gekaufte Modell, Kaufdatum, Händlernamen an: Lextronix 1015 Corporation Way Palo Alto, CA 94303 EINGESCHRÄNKTE GARANTIE Conserve la información de la garantía presente en su tarjeta de garantía junto a su prueba de compra; o bien puede obtener información acerca de la Garantía Limitada en '/vww.lextronixusa.de 55 AXIS BENUTZE RHAMDEJGH AUDIO-EIN-BUCHSE Die AUDIO-AUS-Buchse befindet sich unter der unteren Gummiabdeckung auf der Rückseite des Radios. Schließen I Sie beliebige Stereoohrhörer an. Der Ton wird nur in mono f gehört. Stellen Sie immer erst leise, bevor Sie O h rh ö re/ Kopfhörer anschlieBen. AUDIO-EIN-BUCHSE Die AUDIO-EIN-Buchse befindet sich unter der unteren Gunmiabdeckung auf der Rückseite des Radios. Sie erm öglicht I Ihnen andere Geräte zu hören, wie zum Beispiel MP3-Playe< mit einem 3,5 mm-(1/8 Zoll)-Stereoverbindungskabel. ZURÜCKSETZEN DES AXIS Sollte das Axis jemals nicht funktionieren oder sich nicht ein- J schalten lassen, setzen Sie es einfach zurück. Entfernen Sie Ihn AAA-Batterien und ziehen Sie den Stecker des Akkus. Warten Sie 30 Minuten, bevor Sie die Batterien wieder einlegen, bzw .l verbinden. Um das Radio über AAA-Batterien zu betreiben, I drücken Sie zuerst BATT, dann die BETRIEBSTASTE. Um das Radio über den Akku zu betreiben, drücken Sie zuerst DYN, j drehen Sie die Kurbel für mindestens eine Minute, drücken Sie dann die BETRIEBSTASTE. 54 AXIS BENUTZERHANDBUCH GARANTIEREGISTRIERUNG Die Garantie gilt für ein Jahr. Einzelheiten über die komplette Garantie können auf unserer Website, www.lextronixusa.de entnommen werden Um einen umfassenden Garantiesdiutz oder Produktaktualisierungen zu gewährleisten, sollten Sie Ihr Produktsobald wie möglich nach Kauf oder Erhalt registrieren Sie könneneine der folgenden Optionen zur Registrierung Ihres Produktesnutzen, 1. Besuchen Sie unsere Website unter http://www.lextronixusa. de 2. Senden Sie die beiliegende Garantiekarte ein 3. Schicken Sie Ihre Registrationskarte oder Informationen an diefolgende Adresse. Schicken Sie Ihren Namen, vollständige Postanschrift, Telefonnummer, E-Mail-Adresse, gekauftes Modell, Kaufdatum, Händlernamen an: Lextronix 1015 Corporation Way Palo Alto. CA 94303 EINGESCHRÄNKTE GARANTIE Conserve la información de la garantía presente en su tarjeta degarantía junto a su prueba de compra; o bien puede obtener información acerca de la Garantía Limitada en www.lextronixusa.de 55 AXIS BENUTZERHAdbuI h KUNDENDIENST FÜR IHR PRODUK' Um der Kundendienst für Ihr Produkt in Anspruch zu nehnen, 1 empfehlen wir Ihnen, dass Sie erst einen Kundendienstmitibeiter von Etön unter 1-800-872-2228 (wsltweit), 1-800-637-16|8 j (Kanada), (650) 903-3866 (USA), <^stomersvc@etoncorpJ3rn 1 kontaktieren oder den Ihrem Land entsprechenden Handle in Eu ropa (siehe beiliegende Liste), um cas Problem zu bestimn?n und den Fehler zu beheben. Sollten Sie weiteren Service benögen, ■ werden unsere Mitarbeiter vom technischen Kundendienste 1 über die weitere Vorgehensweise i vormieren, abhängig cvon, ob das Radio noch Garantie hat oder Service ohne Garantie fcjiötigt. GARANTIE - Falls Ihr Produkt ncrh von der Garantie algedeckl wird und der Kundendienstmitar^eiter von Etön entschdet, dass garantieberechtigter Service oenötigt wird, wird ee Rücksendegenehmigung ausgestellt und Sie erhalten uvjtere Informationen. Schicken Sie Ihr Fcd o NICHT zurück, ohe dass Sie eine Rücksendegenehmigunc erhalten haben. I KEINE GARANTIE - Falls Ihr Proaukt keine Garantie melihat und Service benötigt, wird der Kunderdienstmitarbeiter von Ein Sie an eine Werkstatt in Ihrer Nähe verweisen, die am besterjr die Reparatur geeignet ist. Für Reparaturen außerhalb Norcsrrerikas sehen Sie bit? die V Händlerinformationen, die zum Si:punkt des Kaufs/Eialts I beigelegt wurden. 56 AXIS MANUALE UTENTE HAI BISOGNO DI AIUTO? So hai bisogno di assistenza, contattaci dal Lunedi al Venerdi d.ille 8:00 della m attina alie 4:30 del pom eriggio., North Am erican Pacific Tim e. 1-800-872-2228 dagli Stati Unrti U.S; 1-800-637-1648 dal Cañada; 650-903-3866, dal resto del Mondo; FAX: 650-903-3867; w eb site, www.lextronixusa.de; Lextronix, 1015 Corporation W ay, Palo A lto, CA 94303, USA A W ER T EN Z E • Non esporre questo dispositivo a pioggia o um iditá. • Non immergere il dispositivo in acqua. • Proteggere il dispositivo da um iditá e pioggia. • Se un liquido entra per sbaglio nel dispositivo, asciugarlo Immediatamente per evitare problemi. • Puliré il dispositivo con un panno umido. Non utilizzare dotergenti osolventi chimici altrim enti il dispositivo potrebbe rompersi del tutto. • Durante i tem porali staccare la spina e scollegare l'antenna • Non rímuovere la scocca del dispositivo. • I .ir riferim ento ad un centro autorizzato o persónate qualificato per ríparare il dispositivo. SMALTIMENTO AMBIENTALE Dlsposal In ímsg alia direttiva Europea 2002/96/EC, tutte le apparecchiature etettriche ed rMlroniche devono essere dismesse separadamente e utilizzando contenitori •il>lioMti. Contattare le autorítá locali che si occupano di questo tipo di soluzioni i mi '«ipeme di píu e non dismettere il dispositivo nefia stessa maniera in cui si (livncttono attrí tipi di rífiuti. Si prega di smattire le batterie in base alie leggi vigentinel proprio Stato o Governo, facendo attenzione anche allaJegislazione regionale. Se non si é certi, si prega di contattare l'autoritá apposita in modo da avere chiarimenti in materia di protezione ambiéntale e smaltimento. 59 A XIS M A N U A l B 60 AXIS MANUALE LITENTE SPEGNERE/ACCENDERE L'APPARECCHIO A X IS èaliméntate da 3 batterie AAA (B A T T ) e da una batteria rlcaricabile (DYN) collegata al vano batteria. IVt accendere la radio, premere il tasto BATT o il tasto DYN (lato anteriore destro), quindi premere il tasto di accensione (il tasto con il cerchio e la linea verticale). TASTO DI ACCENSIONE II tasto di accensione è situato sul lato anteriore destro della radio edècontrassegnato da un cerchio attraversato da una linea verticale. Premere questo tasto per accendere la radio. REGOLAZIONE DEL VOLUME Per impostare il volume, ruotare la manopola VOL. Spostare la manopola verso l'alto per alzare il volume e verso il basso per abbassarlo. Abbassare sempre il volume prima di utilizzare gil auricolari. USO DELLA BATTERIA Inserire 3batterie AAA, premere il tasto BATT (lato anteriore destro della radio), quindi premere il tasto di accensione per accendere la radio. 61 AJKIS M A N U A lU E fm USO E RICARICA DELLA BATTERIA RICARICABILE La batteria ricaricabile al nichel-metallo idruro •¡Ni-M H) èstuta nel vano batterie. Per utilizzarla, collegare la batteria alla pta tn adjacente, premere il tasto DYN (lato anteriores destro delaïdi i), quindi premere il tasto di accensione. Potrebb«? essere neaarht carica re la batteria. Per eseguire questa opérairione, è sufórUe ruotare la manovella per 90 secondi. È anche | aossibile effean la ricarica tramite la presa mini USB sotto l'indilcatore D C -W tj sul retro délia radio. Dopo la ricarica, prem ere:DYN e poiîvnee il tasto di accensione. Dopo alcuni anni, la batlteria ricana:! : ! perde la capacità di mantenere la carica. Per sustituirla, soja di contattare Lextronix. Durante il caricamento a manovella della batteria Ni-Wk I l'indicatore di carica (sul lato anteriore desti.o della raoi I diventa rosso. Durante la ricarica con il cavo USB, l'in d o re B diventa rosso durante la ricarica e verde qu.endo la battué ■ completamente carica. Quando la batteria Ni-MH é completamente carica, la radsOTa 4 o 5 ore di autonomía a basso volume. Una rcarica a ma,»a c 1 minuto fomisce un'autonomia di arca 5 mirruti a basso >:ire.l | A vvertenza: se la batteria ricaricabile é scollegata, n jota > la manovella perché potrebbe verificarsi un sovraccarioa I componenti intemi i quali potrebbero dannieggiarsi. AXIS MANUALE UTÏNTE USO DEL CAVO USB DC-IN (5V) I a radio dispone di un cavo USB di ricarica. Collegare la spina USB grande alla presa USB del computer (deve essere acceso) Oppure a un adattatore CA (non induso) prowisto di una presa USB (devesupportare 5 V 500), acquistabile presso la maggior parte dei rivenditori di prodotti elettronid. Collegare la spina mini USB alla presa DC-IN situata sotto il coperchio di gomma sul rétro délia radio. Per ascoltare la radio senza ricaricare la bdtteria ricaricabile, premere BATT e poi il tasto di accensione (tasto con il cerchio e la linea verticale). Per ascoltare la radio e ricaricare la batteria ricaricabile, premere DYN e poi premere il tasto di accensione. La ricarica compléta richiede circa 8 ore. La radio puôessere utilizzata mentre è in fase di ricarica. RETROILLUMINAZIONE DEL DISPLAY LCD Ogni volta che si preme un tasto, la retroilluminazione del display LCD si attiva per circa 10 secondi. SELEZIONE DELLE BANDE E SINTONIZZAZIONE DELLE STAZIONI La radio AXIS puó ricevere le bande AM (520-1710 KHz), FM (87,5-108MHz) esette canali meteorologid ad onde corte. Per selezionare la banda AM , FM o SW1-SW7, utilízzare la manopolasul lato sinistro dell'apparecchio. Quando si ascoltano .t.i/ioni FM e i canali ad onde corte, allungare completamente r.mtenna telescópica. Per ricevere lestazioni AM l'antenna telescópica non é necessaria e puó essere abbassata. Per slntonizzarsi sulle stazioni, utilizzare la manopola TUNE. 63 AXIS M ANUAiUr*'nt Per risultati ottimali, utilizzare le gamme da 49,41 31 eh 3 metri di notte e le gam rreda 25, 22,19 16 e 13 m etri d i '° no. SW1: 5,8-7,5 MHz. bande da 49 (5,8-6,2 MHzli ■ 41 (7,1-7,5 MHz) metri SW2: 9,3-10,05 MHz, banda da 31 metri SW3: 11,55-12,2 MHz, banda da 25 metri SW4: 13,4-14 MHz, banda da 22 metri SW5: 15-15,8 MHz, banda da 19 metri SW6: 17,4-18,C5 MHz, banda da 16 metri SW7: 21,2-21,8 MHz, banda da 13 metri RICARICA DEL TELEFONO CELLULARE & ¡I telefono cellulare é dcitato di un cavo di ricarica USB, épcsibl» utilizzarlo. In caso contrario, é possibile acquistame uno aü'iffc® www.iGo.conn oppure al numero 1-888-205-0093. Per arqúaij« ma spina e un cavo di ricarica USB modello # PS00271-0003|ier í telefono cellulare, visitare i sito www.iGo.com o chiamare ilnmeb 1-888-205-0093. Prima d effettuare l'acquisto, annotare fanicfc iImodello del proprio celLIere. Per utilizzare il cavo di ricarica USB del telefono cellulare, cdtoilo ála presa USB grande della radio situata sotto il coperchio tritmra s i retro della radio. Premere il tasto CELL per caricare il telefero■ cellulare con la batteria déla radio. La ricarica del telefono cebar^t a/viene solo se la batteria é carica almeno a metá. Se la batte ■ interna é completamente scarica, motare la manovella perJmnuti c 130 giri al minuto per ricaricane il telefono cellulare. Questo.» <$ rcarica é suffiaente per a ra 5 minuti di conversazione. L'apparecchio dispone di un arcuito di protezione dalla basa ■ tensione per evitare che la Datteria si scarichi troppo du rarttH ricarica del telefono cellulare. Se il símbolo della batteria suiplaj 64 AXIS MANUALE UIENTE 1( Dmostotrebarre, la ricarica del cellulare é possibile. Quando II llmbobdellabattería lampeggia, la ricarica del telefono cellulare ti interrompeedé necessario ricaricare la batteria fino a quando Ihfnpeggiamentocessa. A quel punto, é possibile riprendere a Carleare9telefonocellulare. l’Oflicaricareil telefono cellulare: 1, PremereDYN, Assicurarsi che il símbolo della batteria abbia tiebarre.Incaso contrario, oppure se lampeggia, é necessario ñcancarelabatteria con la manovella o con l'adattatore CA finoaquandol'indicatore smette di lampeggiare. 2 Collegareil cavo USB di ricarica del telefono cellulare alia presadi ricarica del cellulare (sotto il coperchio in gomma sulretrodella radio). I, 'I Colegarel’altra estremitá del cavo al telefono cellulare. Premereil tasto CELL. Nell'angolo inferiore destro del display LCDapparel'indicatore "CELL" II telefono cellulare inizia a ncarorsiesul suo display appare il relativo indicators Dopo 20diricarica, il cellulare avrá un'autonomia di circa 20 O25minuti. Si; nonahatempodi ricaricare la batteria ricaricabile della radio, é |Hnvbileñcancareiltelefono cellulare premendo DYN e motando la manovellaper7minuti. Con il telefono cellulare collegato, premere CEU ericaricareil cellulare per circa 5 minuti. Con questo tipo di «carica, iltelefonohaun'autonomia di arca 6 minuti. 65 AXIS MA'JJAlWT» IM PO STAZIO N E DELL'OROLOGIO 3 E D ELL'ALLARM E L'o ro lo g io ha un form ato a 12 o 24 ore. Con il formato | d e fin ito a 12 ore, sul display appare il símbolo PM a oarH m ezzogiorno. Per passare al formato a 24 ore, vedere p ® ti le istruzioni p er l'im postazione dell'ora. L'allarme a :c e n S radio attivan d o l'ultim a stazione impostata. Per im postare l'ora: 1. Con la radio spenta, tenere premuto il tasto SET (iliia tasto da sinistra, sotto il display) per un secondc. j l. M entre le ore lampeggiano, premere i tasti SU o l (il terzo e il secondo tasto da sinistra, sotto il cisp1 1 per im postare Tora. 3. Prem ere di nuovo SET. 4. M entre i minuti lampeggiano, premere i tast SU «J per im postare i minuti. 5. Premere di nuovo SET. 6. Per passare dal formato a 12 ore a quello a 24 orí I viceversa, premere i tasti SU o G ILI. 7. Premere SET per confermare 1'ora. Per impostare l'allarm e: 1. 2. 3. 4. 5. 6. 7. Con la radio spenta, premere il tasto A LA RM (l'iP l sinistra sotto il display). Sulla parte superioredel 'm appare l'indicatore "ALARM ". Premere SET per fare lampeggiare le ore. Mentre le ore lampeggiano, premere i tasti SU oV|f impostare l'ora dell'aliarme. Premere SET per fare lampeggiare i minuti. Mentre i minuti lampeggiano, premere i tas1 SUílU per impostare i minuti detallarm e. Premere SET per confermare Tora dell'allarnre. Premere di nuovo ALARM per disattivare l'álarr | AXIS MANUALE OTENTE ATTIVAZIONE E DISATTIVAZIONE DETALLARME Con la radio accesa o spenta, premere il tasto ALARM. Si noti che quando I'altarme é attivo, sulla parte superíore del display rtpparel'indicatore "ALARM ". Quando Pallarme é disattivato, l'indicatore scompare. USO DEL TIMER SLEEP Con la radio accesa o spenta, premere in sequenza il tasto SLEEP per impostare il tim er su 90, 60,30 o 10. La radio si attivaper il periodo di tempo selezionato, quindi si spegne Automáticamente. USO DELLA TORCIA E DELLA LUCE DI EMERGENZA Utilizzare l'interruttore ON/OFF/ sulla parte superiore sinistra della radio per attivare e disattivare le lucí. Quando l'interruttore é su ON si attiva la torda. L'impostazione " B i" ,ill Iva una luce rossa lampeggiante. L'impostazione OFF disattiva le lucí. JACK PER AURICOLARI I a presa AUDIO-OUT é sotto il coperchio in gomma sul retro della radio. Collegare gli auricolari stereo. L'audio é solo in modalitá mono. Abbassare sempre il volume prima di utilizzare gli auricolari/cuffie. 67 A A Ib M A . » ‘H'ITI PRESA AUDIO-IN La presa AUDIO-OUT è sotto il coperchio in gomr* ■ retro délia radio. Consente di collegare altri disposr ad esempio un lettore MP3, utilizzando un cavo s t (Y 3,5 mm (1/8 pollici). REIMPOSTAZIONE D ELL'APPAR^ Se la radio smette di funzionare o non si accende, è M resettarla. Togliere le batterie AAA e scollegare la b ?V , cabile. Lasciare spenta la radio per 30 minuti, quindiV ricollegare le batterie. Per utilizzare le batterie A A A , W prima BATT e poi il tasto di accensione. Per utÜ izzarfl ricaricabile, premere prima DYN, ruotare la manovei aimeno un minuto, quindi premere il tasto di accen$,B REGISTRAZIONE DI GARANZIA La garanzia ha una validité di un anno. Per informazio I tagliate sulla garanzia, consultare il nostro sito web alf 1 www.lextronixusa.de. Per usufruire di tutte le condizj^ dalla garanzia, si raccomanda di completare la reg istr¡Y dell'apparecchio il prima possibile, subito dopo l'acquç m ricevimento del prodotto. Per registrare il prodotto, è £ utilizzare una delle seguenti opzioni: 1 2. 3. 68 Visitare il nostro sito web all'indirizzo www.lextr* i ode Inviare la scheda di garanzia fornita con il pror S Inviare via e-mail la propria scheda oipropridati dit ;ï al seguente incürizzo. Comunicare il proprio nome, ¡ postale completo, numero cfi telefono, indirizzo e-m acquistato, data di acquisto e nome del rivenditore:^ AXIS M ANUALE OTENTE Lextronix 1015 Corporation Way Palo Alto, CA 94303 GARANZIA LIMITATA Conservare la garanzia insieme alio scontrino. La garanzia limil.ii.i é visualizzabile anche airindirizzo www.lextronixusa.de SERVIZIO DI ASSISTENZA Por riparazioni o assistenza, si raccomanda di contattare un Cintro di assistenza Etón al numero 1-800-872-2228 (USA), 1-800-637-1648 (Cañada) o 650903-903-3866 (altre nazioni), [email protected] oppure il proprio distributora in hiropa (vedere relenco acduso). Qualora siano necessarie ulteriori riparazioni, il personale spiegherá come procedere a Stconda che l'apparecchio sia ancora in garanzia oppure no. IN GARANZIA -Se il prodotto da riparare é ancora in garaníié, ('assistenza Etón invierá un'autorizzazione alia restituzione ilnllVipparecchio con istruzioni per la spedizione presso un ten tro di riparazione autorizzato. NON restituiré l'apparecchio m* non si é prima ricevuto il relativo códice di autorizzazione. FUORI GARANZIA - Se il prodotto da riparare non é piü in <j*w«inzia, l'assistenza Etón indicherá il centro di assistenza piü vl<ino in grado di effettuare al meglio le necessarie riparazioni. Pttr l'assistenza al di fuori del Nord America, consultare le mformazioni sui concessionari fornite al momento dell'acquisto odella spedizione. 69