1
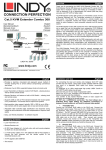
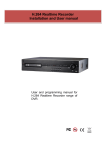
Overview
English
Thank you for purchasing the LINDY KVM Extender Combo 200. The
KVM Extender Combo 200 allows you to control your PC, server or KVM
switch from a keyboard, mouse and monitor at a resolution of 1600 x
1200 or 1680 x 1050 at distances of up to approximately 200 metres (600
feet) away using low cost UTP CAT5 or higher cable.
Cat.5 KVM Extender Combo 200
User Manual
Benutzerhandbuch
Manuale d’uso
Manuel d’utilisateur
English
Deutsch
Italiano
Français
Local
Console
Remote
Operator’s PC
Transmitter
Up to 200m
Receiver
KVM Switch / or PC
The KVM Extender Combo 200 consists of a Transmitter (Local) unit and
a Receiver (Remote) unit. The Transmitter connects to a computer or
KVM switch. The Receiver unit is located at a remote location and
connects to a keyboard, monitor and mouse console offering a KVM
switch to switch between a local connected computer and the remote
system.
The KVM Extender Combo 200 convertss the VGA
VGA, USB and PS/2 signals
into a signal that can be transmitted over inexpensive CAT5 Ethernet
cable. The extender accepts USB as well as PS/2 keyboard and mouse
signals in any combination and can also output it in any combination.
However, please note
te that for USB only HID devices like mice and
keyboards are supported. The extender only supports standard signals
for mice with up to 5 buttons as well as standard keyboard functions.
The VGA signal is separated into the RGB components and sent over
individual
ividual twisted pairs of the RJ45 cable. The extender features an OSD
adjustable electronic skew compensation and amplification circuit to
adjust the video quality to the connection cable to provide optimum video
quality.
The KVM Extender Combo 200 is idea
ideal for network managers and
system administrators - a workstation can be connected to the Receiver
unit allowing the operator to work on his computer or remotely on the
KVM switch. Additionally, a local console can be connected to the
Transmitter unit for direct
irect access to the KVM switch. Both local and
remote consoles can access the servers connected to the KVM switch
simultaneously, governed by a short timeout.
LINDY No. 39398
www.lindy.com
Tested to Comply with FCC Standards
For Home and Office Use!
© LINDY ELECTRONICS LIMITED & LINDY-ELEKTRONIK GMBH - FIRST EDITION (May 2010)
Features
English
• Provides a real-time, convenient and password secure method of
remotely locating PCs or servers without compromising convenience
and control
• Distances of up to 200m supported between local and remote units
• Local Transmitter unit features a built-in KVM Switch - allowing local as
well as remote console access
• Remote Receiver unit features a built-in KVM Switch – allowing local
and remote access
• Supports USB as well as PS/2 standard keyboard and mouse signals
in any combination – for devices and for output to the systems
• High-resolution video support: typically 1600 x 1200 or 1680 x 1050 for
up to 200m – Use monitors with the same aspect ratio on local and
remote console
• Adjustable OSD controlled VGA amplification and focus tuning control
as well as electronic RGB skew compensation to improve video quality
• Easy, user-friendly installation - no software required
Packaging Contents
English
• Local Transmitter unit
• Remote Receiver unit
• 5V DC, ~1A Power Adapter (x2 – for both units, with multi country
adapters for EUR, UK, US and AUS/China)
• 2 x KVM combo cables 3-in-1 with additional USB to PS/2 adapter to
connect the local computer and the remote system to the
transmitter/receiver units
• This manual
Installation and Use
English
For connecting the local and remote units Category 5e/6 UTP cable
provides the best results. Using higher quality shielded STP/FTP cable
may result in a degraded video signal and shorter transmission
distances.
See www.lindy.com for our range of appropriate cables.
Make sure all of your computers and peripherals are switched OFF
before proceeding with the installation.
Your monitor at the remote Receiver should at least support the
resolution as provided by the remote system.
Receiver Unit, Model 39398
Connect your keyboard, mouse and monitor to the Console ports on the
Receiver unit. You may either use USB or PS/2 mouse and keyboard.
Use the supplied 3-in-1 KVM cable to connect to your computer. Do NOT
connect USB AND PS/2 at the same time! If you want to connect via
USB use the VGA and USB connector only! If you want to connect via
PS/2 use the supplied USB to PS/2 adapter for the USB cable end on the
3-in-1 cable. Connect the Receiver’s power supply and power on your
computer and monitor and check if the Receiver works correctly.
Connect the CAT5/5e/6 RJ45 cable to the RJ45 port. Do NOT use a
LAN/Ethernet connection. You must always use a dedicated direct
cable! Adding any additional connections in-between like wall
outlets etc. will result in reduced video quality!
Transmitter Unit, Model 39398
Connect the CAT5/5e/6 RJ45 cable to the RJ45 port.
Connect your console keyboard, mouse and monitor to the ports on the
Transmitter unit labelled Console. Use the other 3-in-1 cable to connect
to the keyboard, video and mouse ports on the KVM switch or on the
system. Regard the USB-PS/2 connectivity remarks as mentioned above!
Connect the Transmitter’s power supply and power on your system and
monitor and check if the Transmitter is working correctly.
Now go to the Receiver and switch it to use the remote Cat.5
connection either by pressing the switch button or by typing in the
hotkey command CAPS + CAPS + left or right cursor key. Your
video image may be blurred in the beginning. It must now be tuned
via the OSD (On Screen Display) adjustment.
To adjust the display please use a test image with a white and black
background and sharp edged red, green and blue lines. You may
download this test image from the LINDY website.
To enter the video adjustment
OSD open the OSD by typing in
the hotkey command CAPS +
CAPS + SPACE in sequence
followed after each other within
less than 2 seconds.
Use the up/down cursor keys to
select
the
Video
Setting
submenu and press ENTER.
The Video Setting submenu
allows adjustment for brightness,
sharpness
and
skew
compensation (Phase red and
green). First adjust Phase red
and green so that you don’t have
any coloured edges on the right
or left of any white and black
fields or vertical lines or so that
red and green vertical lines are
exactly in the same line with blue
vertical lines on the test picture.
Then adjust brightness and
sharpness using the Windows
desktop icon texts and also open
text windows with text until you
are satisfied.
You may have to go through the complete procedure several times.
When the skew adjustment cannot be corrected then you need to use a
different and higher quality RJ45 cable!
Whenever you change the RJ45 cable you will need to repeat this
adjustment process.
OSD Operation
The proceeding hotkey of the KVM Extender can be changed if it is in
conflict with any other hotkeys. The available hotkeys are: CAPS, NUM,
SCROLL, F12, R_CTRL and L_CTRL.
To change the hotkey either change it within the OSD menu or use the
hotkey command HOTKEY + HOTKEY + H + [new HOTKEY] where
HOTKEY is the recent hotkey and [new HOTKEY] is the new one as
mentioned above.
Password:
Disable/Enable the password protection feature. After you logout or the
Auto logout timeout has passed, the console gets locked and you will be
prompted for your password before you can access the console again.
If you set a password, please make sure to note it in a safe place where
you can find it in case you forget it.
Auto logout: [0 ~ 60]
Disable / Enable the logout timeout (0~60min, 0 = Disable).
The Auto logout time can be configured from 0 (Disable), with an
increment of 5, right up to 60 Min. If the password protection is not
enabled, the Auto logout will not be put into operation.
OSD Timeout: [0~60]
Configure the OSD timeout value (0~60 seconds, 0 = Disable). When this
time has passed the OSD will automatically be closed again.
Load Monitor DDC
Copy and duplicate the DDC data of the remote monitor on the Receiver
Console to both the Transmitter and Receiver Units.
Load Default DDC
Copy and duplicate the factory default DDC data to both the Transmitter
and Receiver Units.
Load Default Setting: Load factory default settings.
Firmware upgrade
Enter the firmware upgrade mode. Whenever you need to upgrade the
firmware please contact LINDY Tech Support for further details.
Both extender consoles (local and remote) can have simultaneous
access to the connected server or KVM switch. Active keyboard and
mouse access is governed by a short timeout period.
When you access from the local console at the Transmitter unit you can
operate your KVM switch using its regular keyboard hotkeys. When you
use the remote console you have two additional hotkeys that allow you to
switch between your workstation and remote KVM access.
You can switch console control at the Remote Receiver unit from PC port
(connected workstation) to RJ45 port (the PC / KVM switch connected to
the Local Transmitter) using this simple hotkey command:
HOTKEY + HOTKEY + left or right cursor key
Troubleshooting
English
My monitor stays dark when I access the remote system/ KVM switch.
Make sure the remote system is switched on and not in energy save
mode. Make sure your monitors have approximately the same aspect
ratio, frame rate and resolution. The monitor at the user’s desk should at
least support the resolution as the local monitor on the KVM switch /
remote system. If you still encounter problems, you should try to copy the
EDID information from the smaller monitor and load it into the transmitter
and receiver to see if this can eliminate the display problem. Any further
inquiry, please contact your dealer or LINDY technical support team.
My monitor picture is blurred or low quality.
Please follow video quality adjustment steps as described in section
Installation and Use. The video quality has to be re-adjusted whenever
anything is changed for the Cat.5 connection cable.
My KVM switch and the extender use the same hotkeys. How can I
change hotkeys?
Please refer to section OSD Operation to find the available hotkeys and
how to change them.
My mouse (or keyboard) doesn’t work
Please connect either PS/2 or USB connectors from the 3in1 system
cable to your local workstation as well as remote system/KVM Switch. Do
NOT connect both USB and PS/2! (See installation section above)
Einführung und Betrieb
Deutsch
Dieser KVM-Extender erlaubt Ihnen Monitor-, Maus- und Tastatursignale
zu Ihrem entfernten KVM-Switch oder Rechner über günstiges Cat.5
Netzwerkkabel über eine Entfernung bis zu 200m zu senden. Erhöhte
VGA Auflösungen bis 1600x1200 bzw. 1680x1050 unterstützt er bis etwa
200m bei hervorragender Bildqualität.
Der KVM Extender Combo 200 besteht aus einem Transmitter und
einem Receiver. Der Transmitter wird am fernzubedienenden Rechner
oder KVM Switch angeschlossen und stellt dort sowohl Anschlüsse für
eine lokale Konsole für Wartungsarbeiten wie auch für den remote
Anschluss (RJ45) zur Verfügung. Der Receiver befindet sich beim User
und bietet zusätzlich eine Anschlussmöglichkeit für einen
Arbeitsplatzrechner. Er enthält einen KVM Switch um zwischen
Arbeitsplatzrechner und Zugriff auf den entfernten Rechner/KVM-Switch
umzuschalten.
Die beiden Units werden mit preiswertem Netzwerkkabel Cat.5 UTP oder
höher verbunden. Beide Konsolen können simultan arbeiten, der aktive
Zugriff wird über einen kurzen Time-out geteilt.
Der KVM Extender Combo 200 wandelt VGA-, USB- und PS/2-Signale
und sendet sie über günstiges Netzwerkkabel. Er unterstützt sowohl
USB- wie auch PS/2-Maus- und -Tastatursignale sowohl für die
angeschlossenen Geräte wie auch für den Anschluss an die Rechner
bzw. den KVM-Switch, in jeder Kombination. Es ist lediglich zu beachten,
dass der Rechneranschluss entweder über USB ODER PS/2 erfolgt! Es
werden ausschließlich Standardfunktionen von Mäusen mit bis zu 5
Tasten und Standardtastaturen unterstützt und bei Bedarf in das jeweils
andere USB- oder PS/2-Protokoll gewandelt.
Die USB Anschlüsse unterstützen lediglich Maus und Tastatur!
Das VGA-Signal wird in den Komponenten RGB über jeweils eins der
verdrillten Adernpaare im Cat.5 Kabel gesendet. Da diese meist
unterschiedlich lang sind kommen die RGB-Komponenten zu
unterschiedlichen Zeiten an. Zur Kompensation dieses Effektes und zur
Optimierung der Bildqualität verfügt der Extender über einen elektronisch
regelbaren Skewkompensator und eine Signalverstärkung.
Eigenschaften
Deutsch
• Erlaubt den bequemen komfortablen Real Time Remote Zugriff auf
PCs, Server und KVM-Switches aus Distanzen bis 200m
• Unterstützt am KVM-Switch bzw. am abgesetzten Rechner eine
lokale Konsole für (Wartungs-)Arbeiten
• Unterstützt am Büroarbeitsplatz das Umschalten zwischen einem
Arbeitsplatzrechner und dem Remote KVM-Fernzugriff
• Unterstützt sowohl USB- wie auch PS/2-Tastaturen und -Mäuse in
jeder Kombination und wandelt auch zwischen den Protokollen
• Dual Console Betrieb: Zugriff sowohl lokal als auch remote mit
kurzem Timeout
• Passwortschutz ein-/ausschaltbar
• Unterstützt hohe VGA Auflösungen, z.B.: 1600x1200 bis 200m –
Verwenden Sie bitte Monitore mit etwa gleichem Seitenverhältnis
• Einstellbare VGA Bildqualität durch Laufzeitkompensation der RGB
Komponenten sowie Verstärkung und Fokussierung
• Einfach zu bedienen und zu installieren - keine Softwareinstallation
• LINDY gewährt für dieses Produkt über die gesetzliche Regelung
hinaus eine zweijährige Herstellergarantie ab Kaufdatum. Die
detaillierten Bedingungen dieser Garantie finden Sie auf der LINDY
Website aufgelistet bei den AGBs.
Lieferumfang
Deutsch
• Local Transmitter Unit
Installation und Betrieb
Deutsch
Verwenden Sie zur Verbindung von Transmitter und Receiver UTP
Verlegekabel der Kategorie 5e/6 mit starren Adern (Solid Core) um
größte Distanzen und beste Bildqualität zu erreichen. Die Verwendung
abgeschirmter STP/FTP Kabel führt in der Regel zu Nachteilen.
Zur Installation schalten Sie bitte alle Geräte und Computer aus.
Der Monitor an Ihrem Arbeitsplatz sollte zumindest die Auflösung des
lokalen Monitors am ferngesteuerten System haben, die gleiche
Bildwiederholrate unterstützen und das gleiche Seitenverhältnis haben.
Receiver Unit – Installation mit Arbeitsplatzrechner
Schließen Sie Tastatur, Maus und Monitor ihres Arbeitsplatzes direkt an
die CONSOLE gelabelten Ports am Receiver an. Sie können sowohl
PS/2- als auch USB-Maus & -Tastatur verwenden, auch gemischt.
Verwenden Sie zum Anschluss Ihres Arbeitsplatzrechners das
beiliegende 3in1 Kombikabel. Schließen Sie ENTWEDER den USBoder den PS/2-Anschluss am Rechner an! Wenn Sie sich für die
PS/2-Anschlüsse entscheiden verwenden Sie den mitgelieferten
USB auf PS/2-Adapter am USB-Kabelende des 3in1-Kabels!
Schließen Sie das Netzteil am Extender an und schalten Sie Ihren
Arbeitsplatzrechner ein. Prüfen Sie bitte ob Ihre Konsole wie gewollt am
Arbeitsplatzrechner funktioniert.
Wenn Sie vom USB- zum PS/2-Rechneranschluss wechseln wollen
müssen Sie den Rechner neu booten.
Schließen Sie anschließend das Cat.5e/6 Verbindungskabel an die RJ45
Buchse an.
Transmitter Unit – Installation am KVM-Switch
• Remote Receiver Unit
• 2x KVM 3-in1 Kabel und 2x USB-PS/2-Adapter zum Anschluss der
Rechner / des KVM Switch
Schließen Sie Tastatur, Maus und Monitor an die CONSOLE gelabelten
Ports am Transmitter an. Schließen Sie mit dem beiliegenden 3in1
Kombikabel ihren ferngesteuerten Rechner oder KVM-Switch an.
Bezüglich USB- oder PS/2-Anschluss beachten Sie bitte die oben
genannten Punkte!
• Diese Anleitung
Schließen Sie das Cat.5e/6 Verbindungskabel an die RJ45 Buchse an.
• 2x Netzteil 5V DC, ~1A, 100…240VAC mit Steckeradaptern für
EURO,US, UK, AUS/China
Gehen Sie als nächstes wieder zum Receiver und schalten Sie ihn um,
um über die Cat.5 Remoteverbindung auf den KVM-Switch zuzugreifen.
Drücken Sie dazu die Taste am Receiver oder verwenden Sie den
Tastaturhotkey CAPS + CAPS + Cursor/Pfeiltaste rechts oder links.
Das Monitorbild des entfernten Systems sollte nun angezeigt werden.
Über das On-Screen-Display des Receivers muss nun die Bildqualität an
die Kabelverbindung angepasst und optimiert werden. Verwenden Sie
dazu bitte das Testbild Skew_Adjust.bmp (Download von der LINDY
Webseite) oder ein geeignetes Testbild mit roten, grünen und blauen
scharf abgegrenzten Linien auf weißen und schwarzem Hintergrund.
Öffnen Sie das OSD des
Receivers durch Eingabe des
Tastaturhotkeys CAPS + CAPS
+
Leertaste
(Eingaben
nacheinander innerhalb von je 2
Sekunden).
Verwenden Sie die Cursor
Rauf/Runter-Tasten um im OSD
zu navigieren, wählen Sie Video
Settings und ENTER.
Das Video Setting Untermenü
erlaubt die Einstellung von
Helligkeit (Brightness), Schärfe
(Sharpness) und Laufzeitkompensation (Phase red / green).
Stellen Sie Phase red/green so
ein, dass im Testbild die roten
und grünen Striche exakt in einer
Linie mit den blauen Strichen
sind.
Öffnen Sie zusätzlich ein Textund Ordnerfenster und stellen
Sie Brightness und Sharpness
so
ein,
dass
Text
und
Grafikelemente
optimal
zu
erkennen sind.
Eventuell müssen Sie den gesamte Vorgang mehrfach wiederholen um
die beste Einstellung zu finden. Sollte dies nicht zum Erfolg führen so
benötigen Sie ein anderes höherwertiges Cat.6 UTP Verlegekabel!
Die Bildoptimierung muss jedes Mal wiederholt
irgendetwas am Verbindungskabel geändert wird!
werden
wenn
OSD Eingaben und Optionen
Der einführende Hotkey ist konfigurierbar und kann bei Bedarf geändert
werden, z.B. wenn er mit anderen Hotkeys des KVM Switches kollidiert.
Die verfügbaren Hotkeys sind: CAPS (Großbuchstaben / Feststelltaste),
Num, SCROLL (Rollen), F12, R_CTRL (rechte Strg) und L_CTRL (linke
Strg).
Um den Hotkey zu ändern gehen Sie entweder über das OSD Menü oder
geben Sie HOTKEY + HOTKEY + H + [neuer HOTKEY] ein, wobei
HOTKEY der alte und [neuer Hotkey] der neue Hotkey sind.
Password
Ein- oder Ausschalten des Passwortschutzes. Wenn eingeschaltet
fordert der Extender nach Ausloggen bei der nächsten Eingabe zur
Eingabe des Passwortes auf. Notieren Sie ihr Passwort an einem
sicheren Ort wo Sie es ggf. wiederfinden.
Autologout: [0~60]
Ausschalten oder setzen der Zeitspanne des automatischen
zeitgesteuerten Logout 5…60 Minuten, 0 schaltet den zeitgesteuerten
Logout aus, andernfalls wird die Zeitspanne in 5 Minutenschritten
eingestellt.
OSD Timeout: [0~60]
Ausschalten oder setzen der Zeitspanne des automatischen
zeitgesteuerten Ausblenden des OSD Fensters 5…60 Sekunden, 0
schaltet das zeitgesteuerte Ausblenden aus, andernfalls wird die
Zeitspanne in 5 Sekundenschritten eingestellt.
Load Monitor DDC
Kopiert und dupliziert die DDC Daten des Monitors am Receiver auch in
den Transmitter und somit zum ferngesteuerten Rechner.
Load Default DDC
Kopiert und dupliziert die Factory Default DDC Daten in Transmitter und
Receiver und somit zum ferngesteuerten Rechner.
Load Default Settings
Stellt die Factory Default Einstellungen des Extenders wieder her
Firmware Upgrade
Sollten Sie jemals einen Firmware Update benötigen so kontaktieren Sie
bitte das LINDY Support Team.
Betrieb und Fehlersuche
Deutsch
Es kann sowohl von der Konsole am Local Transmitter wie auch von der
Remote Konsole gleichzeitig auf den ferngesteuerten Rechner / KVM
Switch zugegriffen werden. Der aktive Zugriff wird über einen kurzen
Timeout gesteuert zwischen den beiden Konsolen automatisch
umgeschaltet.
Von der Konsole am KVM Switch können Sie auf die bekannte Art wie
auch vor der Installation des Extenders zugreifen. Vom entfernten
Arbeitsplatz aus haben Sie jetzt zusätzliche Tastatur-HotkeyKommandos zur Verfügung.
Um am Receiver zwischen Arbeitsplatzrechner und Fernzugriff
umzuschalten verwenden Sie den Tastaturhotkey
HOTKEY + HOTKEY + Cursor/Pfeiltaste rechts oder links.
Problem: Mein Monitor bleibt dunkel wenn ich auf den KVM-Switch oder
den entfernten Rechner umschalte.
Prüfen Sie ob der entfernte Rechner eingeschaltet ist und nicht im
Energiesparmodus ist. Beide Monitore sollten etwa das gleiche
Seitenverhältnis, die gleichen Bildwiederholraten und Auflösungen
aufweisen. Der Monitor am Arbeitsplatzrechner darf leistungsfähiger
sein. Falls Sie weiterhin Probleme haben kopieren Sie die DDC/EDID
Daten des kleineren Monitors sowohl in Receiver als auch Transmitter.
Sollten die Probleme weiter bestehen kontaktieren Sie bitte das LINDY
Support Team
Problem: Die Bildqualität ist unzureichend
Introduzione
Italiano
Grazie per aver acquistato il KVM Extender Combo 200 LINDY. Questo
Extender vi consente di controllare il vostro PC, server oe KVM switch
da una tastiera, mouse e monitor alla risoluzione di 1600 x 1200 o 1680 x
1050 ad una distanza massisma di 200 metri (600 piedi) utilizzando
normale cavo UTP CAT5 o superiore.
Il KVM Extender Combo 200 è composto da un unità Trasmittente
(Locale) e una Ricevente (Remota).
Il KVM Extender Combo 200 converte i segnali VGA, USB e PS/2 per la
trasmissione su cavo CAT5 Ethernet. L’Extender accetta connessioni
USB e PS/2 per tastiera e mouse in qualsiasi combinazione. Tuttavia il
dispositivo è compatibile solo con periferiche USB HID come mouse e
tastiere. L’Extender supporta solo tastiere standard e mouse standard
con un massimo 5 pulsanti.
Il segnale VGA viene separato nelle componenti RGB e trasmesso su
singoli doppini del cavo RJ45. L’Extender prevede un sistema di
regolazione della diffrazione e amplificazione video via OSD permettendo
di ottenere velocemente un’ ottima visualizzazione del segnale originale
Il KVM Extender Combo 200 è la soluzione ideale per amministratori di
rete e di sistema. L’unità remota è infatti predisposta per il collegamento
di una workstation locale permettendo l’utilizzo alternativo del proprio PC
in locale e il controllo dei server o workstation collegate in remote. Inoltre
una console di controllo può essere connessa all’unità locale
consentendo la manutenzione dei sistemi direttamente sul luogo di
installazione. Sia la consolle remota che quella locale possono utilizzare i
server connessi alternandosi grazie un sistema a timeout.
Führen Sie die Justierung der Bildqualität wie im Abschnitt Installation
beschrieben erneut durch. Dies ist bei jeder Änderung am
Verbindungskabel erforderlich!
Problem: Maus / Tastatur funktionieren nicht richtig
Schließen Sie beim 3in1 Kombikabel ENTWEDER USB oder PS/2 an
aber nicht beides! Weitere Hinweise finden Sie im Abschnitt Installation!
Problem: Kann ich den Hotkey bei Konflikt mit anderen Geräten ändern?
Ja, beachten Sie bitte den Hinweis im Abschnitt OSD Eingaben &
Optionen.
Caratteristiche
Italiano
• Consente l’acceso a PC o Server da remoto, in tempo reale e con l’a
possibilità di accesso protetto da password
• Distanza massima tra unità remota e locale di 200m
• Unità locale trasmittente con KVM Switch integrato – consente di
accedere alla console locale o remota
• Unità remota ricevente con KVM Switch integrato – consente l’accesso
locale e remoto
• Supporta tastiere e mouse standard USB e PS/2 in qualsiasi
combinazione – sia in ingresso che in uscita
• Supporta alte-risoluzioni video: 1600 x 1200 o 1680 x 1050 fino a 200m
– Consigliamo l’utilizzo di monitor con lo stesso rapporto in locale e
remoto
• Gestione via OSD dell’amplificazione del segnale VGA, messa a fuoco
e compensazione elettronica RGB per migliorare la qualità del segnale
video
• Installazione facile e veloce - nessun software richiesto
Contenuto della confezione
Italiano
• Unità locale (trasmettitore)
• Unità remota (ricevitore)
• Alimentatori 5V DC, ~1A (x2 – per entrambe le unità, con adattatori
multi country per EUR, UK, US e AUS/China)
• 2 cavi KVM combo 3-in-1 con adattatori USB - PS/2 per collegare il
computer locale e remoto ad entrambe le unità
• Questo manuale
Installazione ed utilizzo
Italiano
Utilizzate un cavo di rete Cat 5e/6 UTP per collegare le due unità
dell’Extender. L’impiego di cavi di qualità superiore schermati STP/FTP
potrebbe causare un degrado del segnale video e supportare distanze
minori.
Consultate il sito www.lindy.com per individuare i cavi di rete appropriati.
Assicuratevi che computer e periferiche siano spenti prima di iniziare
l’installazione.
Il monitor sull’unità ricevente deve supportare la risoluzione impostata sul
sistema remoto.
Unità ricevente, Art. 39398
Collegate tastiera, mouse e monitor alle porte Console sul ricevitore.
Potete utilizzare mouse e tastiera USB o PS/2. Collegate il computer
utilizzando il cavo KVM 3-in-1 incluso nella fornitura, NON collegate il
cavo USB e PS/2 insieme! Se volete connettervi via USB utilizzate solo I
connettori VGA e USB, se volete connettervi via PS/2 utilizzate
l’adattatore USB - PS/2 sul connettore USB del cavo 3-in-1. Collegate
l’alimentatore al ricevitore ed accendete computer e monitor e controllate
che il ricevitore funzioni correttamente.
Collegate il cavo RJ45 CAT5/5e/6 alla porta RJ45. NON utilizzate una
connessione ad una LAN/Ethernet, è necessario avere sempre una
connessione diretta tramite un cavo dedicato! L’aggiunta di ulteriori
collegamenti potrebbe ridurre la qualità video!
Unità trasmittente, Art. 39398
Collegate il cavo RJ45 CAT5/5e/6 alla porta RJ45.
Collegate tastiera, mouse e monitor alle porte Console sul trasmettitore.
Utilizzare l’altro cavo KVM 3-in-1 per collegare le porte tastiera, video e
mouse sul KVM switch o sistema. Valgono le stesse raccomandazioni
sopra citate in riferimento ai collegamenti USB-PS/2! Collegate
l’alimentatore al trasmettitore ed accendete il vostro sistema e monitor e
controllate che il trasmettitore funzioni correttamente.
Dal ricevitore potete commutare per utilizzare la connessione
remota Cat.5 sia premendo il tasto sullo switch sia tramite il
comando hotkey CAPS + CAPS + sinistra o destra. Il segnale video
può apparire sfocato, tramite le funzioni OSD (On Screen Display) è
possible regolarlo ed assettarlo.
Per regolare il segnale video utilizzate un immagine con sfondo bianco e
nero, con contorni ben definiti e tratti possibilmente rossi, verdi e blu.
Potete scaricare questa immagine dal sito LINDY.
Per entrare nel menu OSD
premete il comando hotkey
CAPS + CAPS + SPAZIO nella
sequenza indicata entro 2
secondi.
Utilizzate i tasti su/giù per
selezionare il submenu Video
Setting e premete ENTER.
Il submenu Video Setting
consente
di
regolare
la
luminosità, messa a fuoco e
compensazione
(RGB).
Per
prima
cosa
regolate
la
compensazione in modo da non
avere contorni colorati a destra o
sinistra di ogni parte bianca e
nera; inoltre nell’immagine di test
le linee verticali rosse e verdi
dovranno essere esattamente
nella stessa linea con all’interno
linee verticali blu.
Quindi regolate la luminosità e la
messa a fuoco in base alle
scritte delle icone sul desktop di
Windows o anche visualizzando
dei testi fino a quando ottenete un risultato soddisfacente.
E’ possibile che dobbiate ripetere l’intera procedura più volte.
Se non è più possibile regolare l’immagine sarà necessario utilizzare un
cavo di rete RJ45 di qualità superiore!
Una volta sostituito il cavo RJ45 è comunque necessario ripetere questa
procedura di regolazione immagini.
Entrambe le console (locale e remota) possono avere accesso
simultaneo al server o KVM switch connesso. L’attivazione di tastiera e
mouse avviene dopo un breve periodo di timeout.
Quando accedete al trasmettitore dalla console locale potete lavorare sul
KVM switch utilizzando le relative hotkey della tastiera. Quando utilizzate
la console remota avete due hotkey addizionali che consentono di
commutare tra la workstation e l’accesso KVM remoto.
Potete commutare il controllo della console dal ricevitore dalla porta PC
(workstation collegata) alla porta RJ45 (PC / KVM switch collegato al
trasmettitore) tramite questo semplice comando hotkey:
HOTKEY + HOTKEY + tasto cursore destro o sinistro
Soluzione problemi
Italiano
Il monitor rimane nero quando accedo al sistema remoto/KVM switch.
Assicuratevi che il sistema remoto sia acceso e non in stand-by.
Controllate che i monitor utilizzati abbiano lo stesso rapporto, frame rate
e risoluzione. Il monitor remoto deve supportare la risoluzione del
monitor locale sul KVM switch/sistema remoto. Se il problema persiste
potete provare a copiare i dati EDID del monitor più piccolo e caricarle
nel trasmettitore e ricevitore. Per altre segnalazioni potete contattare il
vostro rivenditore o il reparto tecnico della LINDY.
L’immagine è di scarsa qualità.
Seguite le indicazioni indicate nella sezione Installazione e Utilizzo su
come regolare le impostazioni video. Potete regolare le impostazioni
video una volta scelto e collegato il cavo Cat.5.
Il KVM switch ed extender hanno le stesse hotkey. Come posso
modificarle?
Consultate la sezione Operazioni OSD per trovare le hotkey disponibili e
come modificarle.
Il mouse (o tastiera) non funziona
Collegate i connettori PS/2 o USB del cavo system 3in1 alla workstation
locale e al sistema remoto/KVM Switch. NON collegate entrambi i
connettori USB e PS/2 insieme (vedi sezione Installazione qui sopra)!
Operazioni OSD
L’Hotkey del KVM Extender può essere modificata se in conflitto con
altre hotkey. Le hotkey disponibili sono: CAPS LOCK, BLOC NUM,
BLOC SCORR, F12, R_CTRL e L_CTRL.
Per modificare la hotkey potete farlo dal menu OSD o con il comando
HOTKEY + HOTKEY + H + [nuova HOTKEY] in cui HOTKEY è l’attuale
hotkey e [nuova HOTKEY] è una nuova tra quelle sopra indicate.
Password:
Disabilitare/Abilitare la protezione tramite password. Dopo il logout o il
periodo di Auto logout, la console si blocca e per accedere nuovamente
occorre inserire la password.
Se impostate una password assicuratevi di annotarla e conservarla in un
posto sicuro dove potete recuperarla nel caso la dimentichiate.
Auto logout: [0 ~ 60]
Disabilitare/Abilitare il periodo di logout automatico (0~60min,
0 = Disabilitato).
Il periodo di logout automatico può essere impostato da 0 (Disabilitato),
con un incremento di 5, fino a 60 Min. Se la password non è abilitata, il
periodo di logout automatico non può essere attivato.
OSD Timeout: [0~60]
Configurate l’OSD timeout (0~60 secondi, 0 = Disabilitato). Quando
trascorre il lasso di tempo impostato il menu OSD si chiude
automaticamente.
Monitor DDC
Copiate e duplicate i dati DDC del monitor remoto sulla console del
ricevitore sia sul trasmettitore che sul ricevitore.
Default DDC
Copiate e duplicate i dati DDC di default sul trasmettitore che sul
ricevitore.
Impostazioni Default: carica le impostazioni di default.
Aggiornamento Firmware
Modalità aggiornamento firmware. Se avete la necessità di aggiornare il
firmware contattate LINDY per richiedere eventuali aggiornamenti.
Introduction
Français
Cet extender KVM permet d’éloigner votre écran, clavier, souris via du
câble réseau cat.5 jusqu’à 200m. Il supporte des résolutions VGA jusqu’à
1600x1200 ou 1680x1050 à 200m.
L’extender KVM Combo 200 comprend un émetteur et un récepteur. Le
récepteur se connecte à l’ordinateur ou au switch KVM et possède les
prises pour une console locale. L’émetteur est situé côté
utilisateur/console déportée et offre la possibilité de connecter un
ordinateur en plus. Il comprend un switch KVM qui commute entre cet
ordinateur et l’accès distant extender.
Les deux unités sont connectées via un câble réseau cat.5 UTP ou plus.
Les deux consoles peuvent travailler quasi simultanément, l’accès est
activé après un court délai (Time-out).
L’extender KVM Combo 200 transforme les signaux VGA, USB et PS/2
et les envoie sur un câble réseau. Il supporte les souris/claviers USB et
PS/2, même mélangés. Les souris 5 boutons et claviers standard sont
supportés.
Attention : la connexion côté PC est USB OU PS/2, pas les deux en
même temps!
Les prises USB ne concernent que la souris et le clavier, rien d’autre!
Le signal VGA est émis en composante RGB sur une paire du câble
réseau cat.5. Comme les paires d’un câble réseau ne possèdent pas la
même longueur, le signal RGB „arrive“ avec de l’avance ou du retard.
Pour compenser cet effet et pour aussi optimiser la qualité d’image,
l’extender dispose d’un compensateur réglable électroniquement et d’un
réglage de l’amplification du signal.
Caractéristiques
Français
• Permet un accès distant d’un PC/serveur/switch KVM en temps réel;
jusqu’à 200m
• Supporte une console locale sur l’unité émettrice (côté PC)
• Depuis l’unité réceptrice, permet une commutation entre un PC et
l’accès distant
• Supporte les claviers et souris USB et PS/2
• Utilisation Dual Console: l’accès se fait après un court délai
(Timeout)
Installation et utilisation
Français
Connectez l’émetteur et le récepteur via un câble réseau catégorie 5e/6
avec fils rigides (monobrins / Solid Core) pour atteindre les plus grandes
distances et la plus haute qualité d’image. L’utilisation de câbles blindés
STP/FTP apportera des inconvénients (qualité d’image inférieure).
Lors de l’installation, éteignez tous les appareils et ordinateurs.
L’écran distant et l’écran local doivent avoir la même résolution, le même
taux de rafraîchissement d’images. Pour résumer, prenez 2 écrans de
marque/modèle identiques.
• Protection par mot de passe activable/désactivable
Unité réceptrice – Installation côté console déportée (Receiver Unit)
• Supporte de hautes résolutions VGA, par exemple: 1600x1200
jusqu’à 200m – Utilisez des écrans avec les mêmes caractéristiques
d’affichage (résolution et fréquence de rafraîchissement)
Connectez le clavier, la souris et l’écran directement sur les ports
CONSOLE du récepteur. Vous pouvez aussi utiliser une souris ou un
clavier PS/2 ou USB, même mélangés. Utilisez le câble combo 3 en 1
fourni. Connectez SOIT l’USB, SOIT le PS/2 sur l’ordinateur! Si
vous disposez de prises PS/2 sur le PC, utilisez alors les 2
adaptateurs USB vers PS/2 fournis (entre le PC et le câble combo
KVM 3 en 1)
• Réglage de la qualité vidéo VGA via un compensateur du signal
composant RGB et via un amplificateur du signal
• Facile à utiliser et à installer – aucun logiciel à installer
• LINDY garantit ce produit (avec une correcte utilisation) pour une
durée de deux ans.
Livraison
Français
Connectez l’alimentation sur l’émetteur et le récepteur, puis démarrez
votre ordinateur. Vérifiez que votre console (sur l’unité émettrice)
fonctionne correctement.
Si vous voulez changer la connectique PC de l’USB en PS/2: vous devez
alors redémarrer votre ordinateur.
• Unité locale (émetteur)
Connectez ensuite le câble réseau cat.5e/6 sur la prise femelle RJ45.
• Unité distante (récepteur)
Unité émettrice – Installation côté ordinateur (Transmitter Unit)
• 2 alimentations 5V DC, ~1A, 100…240VAC avec prises pour EURO,
USA, UK, Australie/Chine
• 2 câbles combo KVM 3 en 1 et 2 adaptateurs USB-PS/2 pour la
connexion de l’ordinateur/switch KVM
Connectez le port clavier, souris et écran du PC aux ports CONSOLE de
l’émetteur. Connectez le câble combo 3 en 1 fourni sur votre PC local (si
vous en avez un, c’est optionnel). Attention à bien respecter la
connectique côté PC (voir les 2 phrases au-dessus en gras)!
• Ce manuel
Connectez le câble réseau cat.5e/6 sur la prise femelle RJ45.
Retournez sur cette unité émettrice et utilisez sa console, pour avoir
accès au switch KVM intégré. Lancez ensuite la séquence hotkey depuis
le clavier console (connecté à l’unité émettrice) : CAPS + CAPS +
Flèche droite ou gauche.
Le menu OSD de l’unité émettrice doit alors apparaître. Vous pouvez
étalonner les couleurs de l’affichage à partir d’une image test
comprenant des lignes vertes, rouges et bleues sur fond noir et blanc.
Celle-ci est téléchargeable depuis notre site lindy.fr dans le descriptif du
produit N° Art. 39398 : Skew_Adjust.bmp
Ouvrez le menu OSD en tapant
CAPS + CAPS + Espace (en
moins de 2 secondes).
Utilisez le pavé directionnel
haut/bas pour y naviguer,
sélectionnez Video Settings et
ENTREE.
Le sous-menu Video Setting
permet le réglage de la
luminosité
(Brightness),
contraste (Sharpness) et la compensation (Phase red / green).
Réglez la Phase red/green de
telle sorte que les traits rouges et
verts apparaissent bien dans une
ligne avec le trait bleu.
Ouvrez ensuite un document
texte et une image pour pouvoir
affiner le réglage de la luminosité
et du contraste.
Si malgré tout, le réglage
d’affichage ne vous convient
pas, vous devrez alors utiliser un
câble réseau cat.6 UTP!
Le réglage d’affichage doit être répété chaque fois que le câble réseau
est changé! (suivant le type de câble et la longueur)
Utilisation et options du menu OSD
La séquence clavier hotkey est configurable et peut être changée, par
exemple : quand il y a un conflit/collision avec les séquences hotkey
d’autres switchs KVM. Les séquences clavier hotkey disponibles sont:
CAPS (verr. Maj.), Verr. Num., Arrêt défil, F12, CTRL de droite, CTRL de
gauche.
Pour changer la hotkey, tapez HOTKEY + HOTKEY + H + [nouvelle
HOTKEY] , où HOTKEY est par défaut: Arrêt défil.
Password / mot de passe
Activation ou désactivation du mot de passe. S’il est activé, l’extender
demande un mot de passe dès activité du clavier/souris déportés.
Inscrivez votre mot de passe dans un endroit sûr.
Autologout: [0~60]
Délai utilisé pour la déconnexion automatique: réglable entre 5 à 60
minutes, 0 désactive l’option de déconnexion automatique (la connexion
reste donc permanente), sinon la déconnexion automatique est réglée
sur 5 minutes.
OSD Timeout: [0~60]
Délai utilisé pour faire disparaître la fenêtre du menu OSD, réglable entre
5 et 60 secondes, 0 laisse le menu OSD affiché en permanence, sinon le
délai est de 5 secondes.
Load Monitor DDC
Copie et duplique les données DDC de l’écran distant (connecté à
l’émetteur) vers le récepteur et l’émetteur.
Load Default DDC
Copie et duplique les données DDC par défaut de l’écran distant
(connecté à l’émetteur) vers le récepteur et l’émetteur.
Load Default Settings
Remet les paramètres par défaut de l’extender
Firmware Upgrade
Pour toute mise à jour du ffirmware, merci de contactez notre support
technique LINDY.
Utilisation et recherche de pannes Français
L’accès peut se faire soit depuis la console de l’unité émettrice, soit de la
console de l’unité réceptrice (côté PC distant). L’accès entre ces deux
consoles se fait après un court délai (Timeout).
Depuis la console déportée, vous pouvez accéder à l’accès extender ou
à un PC (optionnel),, grâce au switch KVM intégré, via une séquence
clavier hotkey :
HOTKEY + HOTKEY + flèche de gauche ou de droite.
Problème: mon écran reste noir lorsque je commute entre le PC local et
le PC distant (accès extender).
Vérifiez que l’ordinateur distant est allumé et qu’il ne soit pas en veille.
veille
Les deux écrans doivent avoir grosso modo les mêmes caractéristiques,
caractéristiques
même résolution, même fréquence de rafraîchissement
ment d’images (en
gros, prenez deux écrans identiques). Si vous avez toujours des
problèmes, copiez les données DDC/EDID du plus petit écran sur l’unité
émettrice et réceptrice. Sinon merci de contacter le support technique
LINDY
Problème: la qualité d’image insuffisante
Relancez les réglages d’affichage comme décrit précédemment.
précédemment Cela est
nécessaire à chaque changement de câble réseau!
Problème: la souris / le clavier ne fonctionnent pas
Connectez le câble combo 3 en 1 SOIT en USB SOIT en PS/2 mais
jamais les deux en même temps! Voir section précédente !
Problème: puis-je changer la séquence clavier hotkey lors de conflits
avec d’autres produits?
Oui, merci de lire les informations de la section “menu OSD et options“.
options“
FCC Statement
FCC Warning
This device complies with part 15 of the FCC Rules. Operation is subject to the following
two conditions:
1. This device may not cause harmful interference, and
2. This device must accept any interference received, including interference that may
cause undesired operation.
Recycling Information
WEEE (Waste of Electrical and Electronic Equipment),
Recycling of Electronic Products
United Kingdom
In 2006 the European Union introduced regulations (WEEE) for the collection and recycling of all
waste electrical and electronic equipment. It is no longer permitted to simply throw away electr
electrical
and electronic equipment. Instead, these products must enter an environmentally friendly
recycling process.
Each individual EU member state has implemented the WEEE regulations into national law in
slightly different ways. Please follow your national law when you want to dispose of any electrical
or electronic products. More details can be obtained from your national WEEE recycling agency.
Deutschland
Die EU hat mit der WEEE Direktive Regelungen für die Verschrottung und das Recycling von
Elektro- und Elektronikprodukten geschaffen. Diese wurden im Elektro
Elektro- und
Elektronikgerätegesetz – ElektroG in deutsches Recht umgesetzt. Dieses Gesetz verbietet das
Entsorgen von entsprechenden, auch alten, Elektro- und Elektronikgeräten über die
Hausmülltonne! Führen Sie Ihre alten Geräte den lokalen Sammelsystemen oder örtlichen
Sammelstellen zu! Dort werden sie kostenlos entgegen genommen. Die Kosten für den weiteren
Recyclingprozess sowie die optimierte umweltgerechte Wiederver
Wiederverwendung der Rohstoffe
übernimmt die Gesamtheit der Gerätehersteller.
France
En 2006, l'union Européenne a introduit la nouvelle réglementation (DEEE) pour le recyclage de
tout équipement électrique et électronique.
Chaque Etat membre de l’Union Européenne a mis en application la nouvelle ré
réglementation
DEEE de manières légèrement différentes. Veuillez suivre le décret d’application correspondant
à l’élimination des déchets électriques ou électroniques de votre pays.
Italy
Nel 2006 l’unione europea ha introdotto regolamentazioni (WEEE) per la raccolta e il riciclo di
apparecchi elettrici ed elettronici. Non è più consentito semplicemente gettare queste
apparecchiature, devono essere riciclate.
Ogni stato membro dell’ EU ha tramutato le direttive WEEE in leggi statali in varie misure. Fare
riferimento
ferimento alle leggi del proprio Stato quando si dispone di un apparecchio elettrico o elettronico.
Per ulteriori dettagli fare riferimento alla direttiva WEEE sul riciclaggio del proprio Stato.
LINDY No. 39398
www.lindy.com
st
1 Edition May 2010