1
Contents
1
Table of Contents
Part I Introduction
3
1 Buddy...................................................................................................................................
7G Overview
3
2 MyBuddyMic
...................................................................................................................................
Overview
4
3 BDK Overview
................................................................................................................................... 7
4 Event/Action
...................................................................................................................................
architecture
7
Part II Buddy 7G Devices
7
1 Buddy...................................................................................................................................
StylusMic 7G
8
2 Buddy
...................................................................................................................................
DesktopMic 7G
10
3 Buddy
...................................................................................................................................
DesktopMic Pro 7G
11
4 Buddy
...................................................................................................................................
USB 7G (Sound Pod)
12
5 Buddy
...................................................................................................................................
GooseneckMic 7G USB
13
6 Buddy
...................................................................................................................................
FootSwitch 7G
15
7 Buddy
...................................................................................................................................
ElbowSwitch 7G
16
8 Buddy
...................................................................................................................................
FlamingoMic 7G
17
9 Buddy
...................................................................................................................................
FlamingoMic 7G Portable
18
Part III Using MyBuddyMic
19
1 MyBuddyMic
...................................................................................................................................
Window
19
Device Tab .......................................................................................................................................................... 20
Configuration..........................................................................................................................................................
Tab
21
2 Firmware
...................................................................................................................................
Upgrade
22
3 Restore
...................................................................................................................................
factory settings
25
4 Voice...................................................................................................................................
Command Database
26
Part IV Configuring your Buddy microphone
28
1 Profiles
................................................................................................................................... 28
2 Events
...................................................................................................................................
and Actions - Concept
29
3 Configurable
...................................................................................................................................
parts
30
4 Defining
...................................................................................................................................
actions
31
Adding a new..........................................................................................................................................................
action
32
Editing an action
.......................................................................................................................................................... 33
5 Action
...................................................................................................................................
types
33
Com m and action
.......................................................................................................................................................... 33
Joystick action
.......................................................................................................................................................... 35
Keyboard action
.......................................................................................................................................................... 36
LED Action .......................................................................................................................................................... 37
Mouse action.......................................................................................................................................................... 39
© 2011 - InSync Speech Technologies, Inc.
1
2
MyBuddyMic.net User Manual
String action .......................................................................................................................................................... 41
Volum e action
.......................................................................................................................................................... 42
Part V Default Profile Configurations
45
1 Loading
...................................................................................................................................
a Profile
45
Part VI Examples
47
1 Dictation
...................................................................................................................................
Box Command for Dragon NaturallySpeaking
47
Part VII Video Tutorials
Part VIII Buddy Development Kit
Index
51
0
53
© 2011 - InSync Speech Technologies, Inc.
Introduction
1
3
Introduction
In early 2010, InSync Speech Technologies introduced a new version of Buddy StylusMic 7G
which was an early model based on our Buddy 7G technology. We added a Buddy DesktopMic
7G to this list in late 2010. We have since introduced several new devices based on this
exciting and most advanced technology for the speech processing environment. This list will
continue to grow for the wired USB and Express card devices.
7G in the name stands for 7th generation of our USB devices. Buddy Devices based on this
technology have significant improvements in all aspects including its primary objective, which
is the microphone for voice capture. But that is not all. This technology also adds complete
customization capabilities by simulating a Keyboard, Mouse and Joystick as required to
automate repetitive tasks in a day-to-day professional work environment.
MyBuddyMic and MyBuddyMic.net are 2 different implementations of the a software utility
designed to enable easy customization of any Buddy 7G device. It is also used to enable
advanced features such as "Sending Voice Commands" to Dragon NaturallySpeaking or
controlling the Dragon NaturallySpeaking® microphone with the push of a button.
BDK (Buddy Development Kit) is a software development kit designed to ease the Buddy 7G
device integration with any third party software application written in compiled languages
including C#, VB, C++, Delphi as well as scripting languages such as VB Script and Java Script.
1.1
Buddy 7G Overview
InSync Speech Technologies started making Buddy microphones in late 1990. Our first highly
successful microphone was called Buddy-Q. Since then we have gone through several major
redesigns of the technology. Buddy 7G is our latest. It has the following improvements over
its predecessors.
Customizable components such as buttons, lights, microphone, speakers, etc. using this
free download software
Event/Action architecture to simulate keyboard, mouse or joystick in response to a button
click or change in any other dynamic part of the device
© 2011 - InSync Speech Technologies, Inc.
4
MyBuddyMic.net User Manual
Support for Windows, Mac and Linux
On-site firmware upgrades for future enhancements
Significantly improved built-in, state of the art sound card
Built-in FilteredAudio™, an optional noise cancellation algorithm in selected models for
highly effective mechanical noise cancellation
Improved microphone capsules
USB HID standards based for 3rd party software integration
BDK (Buddy Development Kit) available for free download
Built-in support for Dragon NaturallySpeaking®
Built-in self-diagnostics
1.2
MyBuddyMic Overview
MyBuddyMic uses a user friendly GUI (Graphical User Interface) with all the features of any
customizable object visible at a glance on a single window.
MyBuddyMic detects all Buddy 7G devices plugged into the system and shows the selected
one in the true likeness of the actual device.
© 2011 - InSync Speech Technologies, Inc.
Introduction
5
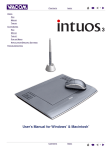
1
Main Toolbar
The first item in this toolbar is a drop down list which displays
all Buddy 7G devices attached to the system. If you have more
than 1 Buddy 7G devices attached to your PC, you can choose
the device you wish to modify.
2
Main Toolbar
Additional functions for maintenance or troubleshooting
3
Page Tabs
This are splits the software into various functions such as
Device Information or device Configuration. We have made an
attempt to minimize dialogs popping up all over the place.
Most of this software replaces a region of the screen rather
than popup windows.
4
Secondary
Toolbar
This toolbar includes buttons that can be used to create, save,
delete a profile from disk as well as upload and download
profile from the selected device.
5
Event/Actions
A list box maintains a list of event/action table for the
currently selected object on microphone. To select a different
© 2011 - InSync Speech Technologies, Inc.
6
MyBuddyMic.net User Manual
object and see its events/action table, click on the picture on
the right side.
6
Action Detail
When you select a Event/Action entry from the list above, this
region of window changes to display and optionally enable
you to edit the action.
7
Quick Help
This region displays help relating to currently selected action.
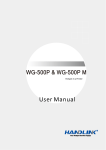
8
Programmable
Microphone at the top of the Buddy StylusMic 7G body.
9
Programmable
RGB light (7 colors)
1
0
Programmable
Top half of the upper button. Can be used to fire 6 events;
Press, Release, Click, Double-Click, Hold and Hold-End. The
difference between “Press and Release” and “Hold and HoldEnd” is that Press and Release events are always generated
when a Click, or Double click happens. However, Hold and
Hold-End events only happen when there is no Click or Double
Click event. This generates 3 distinct events Click, DoubleClick and “Hold and Hold-End” combination. Again Press and
Release are not distinct from other events.
1
1
Programmable
Bottom half of the upper button. Similar in behavior to item
10.
1
2
NotProgrammable
This button is controlled by the Wacom stylus. This cannot be
configured.
1
3
NotProgrammable
This button is controlled by the Wacom stylus. This cannot be
configured.
1
4
Programmable
USB connector. This connector signifies a power on operation.
It is often desired to preset the state of microphone at powerup. This object fires a System_Init event. You can use
System_Init event to define various actions that take place
each time the microphone is powered up.
1
5
Programmable
An RGB light (7 colors) on the USB box connected to StylusMic
by a cable.
1
6
Programmable
A push button on the USB box. This has similar functionality to
item 10.
© 2011 - InSync Speech Technologies, Inc.
Introduction
1.3
7
BDK Overview
BDK (Buddy Development Kit) is an API (Application Programming Interface) to integrate any
Buddy 7G Device with 3rd party software application. It will work with almost any compiled
software program or with a scripting language such as VB Script or Java Script.
More detail on this will be available in the future.
1.4
Event/Action architecture
Each event generated by a button can be programmed to carry out one or more actions. These
action-triggered events can:
1. Mute or activate a microphone for Push-To-Talk or mute toggle
2. Turn a light on or off
3. Simulate a keyboard or mouse to send user-stored strings, key combinations, mouse
clicks, messages to Dragon NaturallySpeaking, etc.
The microphone unit can store up to 500 separate actions or data strings. MyBuddyMic
software is required to customize advanced operations, but the majority of basic operations
need neither programming nor driver software on the target computer. Advanced operations
include maintaining a list of voice commands for a speech engine such as Dragon
NaturallySpeaking.
2
Buddy 7G Devices
Buddy 7G is a technology which includes support for buttons, multiple color lights,
microphones, speakers, internal storage, trackball, color display, barcode reader and stylus to
name a few. Using these components we can design any device imaginable.
Based on our more than 12 years of experience in speech recognition and other speech
related technology such as VoIP, we have created the following devices:
Buddy StylusMic 7G
Buddy DesktopMic 7G
Buddy DesktopMic Pro 7G
Buddy USB 7G (sound pod)
Buddy GooseneckMic 7G
© 2011 - InSync Speech Technologies, Inc.
8
MyBuddyMic.net User Manual
Buddy FootSwitch 7G
Buddy ElbowSwitch 7G
2.1
Buddy StylusMic 7G
The Buddy StylusMic 7G is a one of a kind, an all-in-one productivity aid designed for medical and
legal professionals. It combines a Wacom stylus, a high quality unidirectional microphone and
several programmable buttons to make it the most efficient tool for professionals using tablets
and transcription or dictation software.
It is designed for use with Wacom Penabled devices such as tablets and touch screen netbooks.
The combination of the stylus with our high quality Buddy 7G technology makes it highly
customizable using our free MyBuddyMic customization software. Our proprietary
FilteredAudio™ algorithm allows this product to perform even in the most hectic environments.
© 2011 - InSync Speech Technologies, Inc.
Buddy 7G Devices
Great for use with Dragon NaturallySpeaking and other popular speech recognition
applications.
3 Programmable buttons, allowing for up to 3 custom functions per button
Programmable LED light
High quality unidirectional microphone element at top of stylus pen
USB or ExpressCard Plug & Play design
For help programming your Buddy StylusMic 7G, please consult our tutorials here:
MyBuddyMic Overview
© 2011 - InSync Speech Technologies, Inc.
9
10
MyBuddyMic.net User Manual
Programming Buddy 7G Devices
Updating Device Firmware
Resetting your Device
See the Buddy DesktopMic 7G on our Website
2.2
Buddy DesktopMic 7G
Buddy DesktopMic 7G is a highly customizable desktop USB Microphone designed for home and
office use. It is a highly unidirectional noise cancelling microphone, perfect for use with
transcription or dictation software. It is a flexible gooseneck microphone with a sturdy base to
keep it anchored. This is our most popular microphone. Now featuring our revolutionary
FilteredAudio™ technology for highly effective mechanical noise cancellation.
One programmable button
Two Programmable LEDs
Flexible Gooseneck Construction
Sturdy base
Great quality sound input
© 2011 - InSync Speech Technologies, Inc.
Buddy 7G Devices
11
Available with optional FilteredAudio for highly effective mechanical noise cancellation
For help programming your Buddy DesktopMic 7G, please consult our tutorial here.
MyBuddyMic Overview
Programming Buddy 7G Devices
Updating Device Firmware
Resetting your Device
See the Buddy DesktopMic 7G on our Website
2.3
Buddy DesktopMic Pro 7G
© 2011 - InSync Speech Technologies, Inc.
12
2.4
MyBuddyMic.net User Manual
Buddy USB 7G (Sound Pod)
The Buddy USB 7G Sound Pod is a must for users for transcription and dictation software using low
quality headsets commonly found on the market today. The Buddy USB Sound Pod is an external
sound card combined with a highly advanced noise cancelling system. The advantage to having an
external sound card is that it remains unaffected by noisy electrical circuitry inside the CPU.
Eliminating such interference will greatly improve accuracy in programs such as Dragon
NaturallySpeaking. This product is available with optional FilteredAudio™ technology for highly
effective mechanical background noise cancellation.
High quality external sound card
Optional FilteredAudio Technology
Audio In/Out jacks for 3.5 mm connectors
2 Programmable LED Lights
Great for use with low quality headsets
Improve dictation and speech recognition accuracy
Avoid electrical noise from inside the CPU
Available with USB or ExpressCard interface (coming soon)
For help programming your Buddy USB 7G Sound Pod, please consult our tutorial here.
© 2011 - InSync Speech Technologies, Inc.
Buddy 7G Devices
13
MyBuddyMic Overview
Programming Buddy 7G Devices
Updating Device Firmware
Resetting your Device
See the Buddy USB 7G Sound Pod on our Website
2.5
Buddy GooseneckMic 7G USB
The Buddy GooseneckMic 7G is a highly versatile, high quality noise cancelling microphone. It has
a long 30 inch flexible gooseneck tube, allowing the user to contort the microphone in any
direction they desire. It can be clamped on to almost any table, desk or chair. The unidirectional
microphone produces amazing accuracy when used with popular speech recognition or dictation
software such as Dragon NaturallySpeaking.
© 2011 - InSync Speech Technologies, Inc.
14
MyBuddyMic.net User Manual
Flexible Gooseneck microphone
Unidirectional element for quality sound capture
Highly flexible and durable
Clamp at base allows Gooseneck to be fixed on various surfaces
Portable, practical
USB Plug & Play design
For help programming your Buddy GooseneckMic 7G, please consult our tutorial here.
MyBuddyMic Overview
Programming Buddy 7G Devices
Updating Device Firmware
© 2011 - InSync Speech Technologies, Inc.
Buddy 7G Devices
15
Resetting your Device
See the Buddy USB 7G Sound Pod on our Website
2.6
Buddy FootSwitch 7G
The Buddy FootSwitch 7G is a USB foot switch designed as a productivity aid for speech
recognition and dictation software users. The three switch pedal is ideal for controlling playback
of transcription or dictation media. There are different pressure settings available to suit the
individual user, ranging from soft pedals which are easily activated to hard pedals requiring more
pressure. The FootSwitch 7G is in use by many professionals seeking to make their work more
efficient.
Ergonomic Design
Customizable pedals
USB Plug & Play design
Productivity Tool
For help programming your Buddy FootSwitch 7G, please consult our tutorial here
MyBuddyMic Overview
Programming Buddy 7G Devices
Updating Device Firmware
Resetting your Device
© 2011 - InSync Speech Technologies, Inc.
16
MyBuddyMic.net User Manual
See the Buddy FootSwitch 7G on our Website
2.7
Buddy ElbowSwitch 7G
The Buddy ElbowSwitch 7G is designed as a productivity aid for speech recognition and dictation
users, as well as a tool for those with limited mobility. The pedal is ideal for controlling any
desired function ranging from audio play-back to simple computer commands. The ElbowSwitch
7G is available with three different pressure settings, ranging from soft to hard. The ElbowSwitch
7G is in use by professionals and those seeking mobility and freedom alike.
Ergonomic Design
Programmable Switch
USB Plug & Play Operation
Productivity Tool
Great for those with limited mobility who rely on switches and buttons to perform
routine daily tasks
For help programming your Buddy FootSwitch 7G, please consult our tutorial here
MyBuddyMic Overview
Programming Buddy 7G Devices
Updating Device Firmware
Resetting your Device
See the Buddy ElbowSwitch 7G on our Website
© 2011 - InSync Speech Technologies, Inc.
Buddy 7G Devices
2.8
17
Buddy FlamingoMic 7G
The Buddy FlamingoMic 7G is a highly versatile high quality USB microphone. The only one of its
kind, the FlamingoMic can easily be twisted and contorted to whatever for the user wants. Comes
with a built-in sound card designed to reduce ambient noise and curtail any high frequency
interference often present in a notebook or PC’s chipset. The Buddy FlamingoMic 7G is a great
microphone for use with dictation or speech recognition software on-the-go. With our embedded
FilteredAudio™ technology, you can be confident that this product will perform even in industrial
settings.
High quality unidirectional microphone element
Completely portable
Highly flexible, sturdy design
USB Plug & Play interface
Available with angled USB connectors to suit your individual preference
For help programming your Buddy FlamingoMic 7G, please consult our tutorial here:
MyBuddyMic Overview
Programming Buddy 7G Devices
Updating Device Firmware
Resetting your Device
See the Buddy FlamingoMic 7G on our Website
© 2011 - InSync Speech Technologies, Inc.
18
2.9
MyBuddyMic.net User Manual
Buddy FlamingoMic 7G Portable
The Buddy FlamingoMic 7G Portable is a highly versatile, portable high quality USB microphone.
The only one of its kind, the FlamingoMic 7G portable features a 90° USB connector specially
designed for notebook and tablet computers. The gooseneck can easily be twisted or contorted to
whatever form the user wants. Comes with a built-in sound card designed to reduce ambient
noise and curtail any high frequency interference often present in a notebook or PC’s chipset. The
Buddy FlamingoMic 7G Portable is a great microphone for use with dictation or speech
recognition software on-the-go. With our embedded FilteredAudio™ technology, you can be
confident that this product will perform exceptionally even in industrial settings.
MyBuddyMic Overview
Programming Buddy 7G Devices
Updating Device Firmware
Resetting your Device
See the Buddy FlamingoMic 7G Portable on our Website
© 2011 - InSync Speech Technologies, Inc.
Using MyBuddyMic
3
19
Using MyBuddyMic
This chapter covers how to do basic tasks with MyBuddyMic.net software, mainly the use of
MyBuddyMic window.
3.1
MyBuddyMic Window
MyBuddyMic Window is the main window of MyBuddyMic application. Almost all features of
it can be found in this window.
When your Buddy 7G device is plugged in the computer, you will see a picture of it displayed
at the right side of the window, and you can then perform operations with this device. In case
that you have more than one device attached, you can choose which device to configure by
using the first button in the "MyBuddyMic" tab at the top of the window.
Toolbar buttons:
Firmware Upgrade: Allows you to check the current firmware version of your device and
update the firmware if needed.
Restore Factory Settings: Discards any changes you have made to the device and restore its
configuration to factory defaults.
Voice Commands: Opens the Voice Command Database window allowing you to add,
© 2011 - InSync Speech Technologies, Inc.
20
MyBuddyMic.net User Manual
edit and delete voice commands.
InSync Speech: Open the InSync Speech home page in your browser.
Check for Updates: Checks if there is a newer version of MyBuddyMic software available
to download from the web.
Close: Closes the MyBuddyMic window
Exit: Closes the MyBuddyMic window and terminates the MyBuddyMic application (tray
icon is gone).
Tabs:
Device Tab: Displays general information about the Buddy 7G device.
Configuration Tab: Allows you to fully configure your Buddy 7G device
Device picture:
You can also move your mouse over the picture of the device to check the parts that can be
configured. Clicking any configurable part will switch to Configuration Tab and will allow you
to configure that specific device feature (button, LED, etc.)
3.1.1
Device Tab
The Device Tab shows general information about the Buddy device.
The following information is displayed:
Product Name: A brief description of Buddy device, including the model number
Manufacturer: The name of Buddy device manufacturer
Vendor ID: A number that identifies the manufacturer of Buddy device
© 2011 - InSync Speech Technologies, Inc.
Using MyBuddyMic
21
Product ID: A number that identifies the Buddy device model. Usually each model has a
different product ID
Configurable parts: The number of parts in the device (button, LEDs, etc.) that can be
configured
Hardware version: Current version of device's hardware
Number of Buttons: Indicates the number of buttons in the device]
Number of LEDs: Indicates the number LEDs in the device
Is Bootloader: Usually should be "false". If this value is "true", you should upgrade the
firmware.
Firmware version: Current version of the device firmware
Serial Number: The serial number of the device
3.1.2
Configuration Tab
The Configuration Tab is the place where you can fully configure your Buddy 7G device. Each
configuration consist of events and actions for each configurable part of the device, and you
can use profiles to manage your configuration. In summary, you take the following steps to
configure the Buddy device:
1. Click a configurable part on the device image (button, LED, etc.)
2. The list of actions for that part is displayed. Click
selected action, or just click an action to edit it
to add new actions, click
to delete
3. Repeat steps 1 and 2 for any configurable part you want to configure or modify
4. Save the changes to the profile and then send the saved configuration to device to update
it
For more detailed information, see Configuring your Buddy microphone.
© 2011 - InSync Speech Technologies, Inc.
22
3.2
MyBuddyMic.net User Manual
Firmware Upgrade
In the Firmware Update window you can check the current firmware version loaded into the
device. This window also displays all the available firmware files you can use to upgrade the
firmware. You can select one of the available firmware versions from the list. Detailed info
about the selected firmware will be displayed in the "Revision history" table. Once you have
selected the desired firmware, you can click the "Update" button to perform the upgrade.
1. To upgrade or change the firmware for your Buddy 7G device, you must click the Firmware
Upgrade button, illustrated below. This will ask MyBuddyMic to check to see if you are
running the latest firmware.
© 2011 - InSync Speech Technologies, Inc.
Using MyBuddyMic
23
2. Once you press the Firmware Upgrade button, the below window will pop up. The window
details which firmware version you are currently running and which versions are available
3. Check the current firmware version
© 2011 - InSync Speech Technologies, Inc.
24
MyBuddyMic.net User Manual
4. Select a firmware from "available firmwares". Usually you should choose the latest version
(first item in the list).
5. Click "Update" button to update the firmware, the device will start the updating process
and you may see this window
6. When the update is finished and successful you will see the below window
© 2011 - InSync Speech Technologies, Inc.
Using MyBuddyMic
25
Note: While all firmware is tested before release, there is always the possibility that there
may be slight bugs remaining in the firmware. If you are experiencing problems after
updating your firmware, you can always downgrade to a previous version by selecting an
earlier release from the revision history table. Do this by selecting a previously released
firmware version and clicking update. We encourage users to report any firmware issues they
may be experiencing.
If you encounter an error:
1. Close the error message
2. Disconnect the device
3. Wait a few seconds
4. Reconnect the device
5. Reopen the firmware upgrade window
6. Restart the upgrade process
3.3
Restore factory settings
Use this action to restore all parameters in the configuration to the factory-default settings.
By clicking the Restore Factory Settings button in the MyBuddyMic Window, you can discard any
changes you made in the device configuration, and restore all the actions and events to the
factory default settings.
Just click the button, confirm the operation and wait for the process to complete. Do not unplug
your device while the operation is being performed.
WARNING: If you have saved configuration entries to the device without creating a new profile,
those entries will be deleted. This action cannot be undone.
© 2011 - InSync Speech Technologies, Inc.
26
MyBuddyMic.net User Manual
Once the device has been restored to factory settings, the following dialogue box will appear:
3.4
Voice Command Database
The Voice Command Database contains a list of commands that can be executed using a voice
command action. A voice command is an integration with Dragon NaturallySpeaking (DNS)
software. Whenever a voice command is "executed" in MyBuddyMic, it executes the
associated command in DNS.
© 2011 - InSync Speech Technologies, Inc.
Using MyBuddyMic
To add a new command, use the button with the plus sign
list. To delete an existing command, use the
27
at the top of the command
at the top of the command list.
Click "OK" button to save all changes, click "Cancel" button to discard any changes you have
made since opening the window or since the last time you "OK" button.
Any change to the voice command database is not immediately saved, which means that if
you add/delete one or more commands, all these operations must be saved at once by
clicking "OK", or discarded in a whole by using "Cancel".
For each command you can fill in the following fields:
ID: Is read-only and indicates the internal ID (identifier) of the voice command.
Type: It can be any of these four values:
a) Heardword
b) Keystrokes
c) Script
d) String
Window: Indicates the window
Command Text: Depending on the value of "Type" field, you might need to fill in
complementary info in this field.
© 2011 - InSync Speech Technologies, Inc.
28
4
MyBuddyMic.net User Manual
Configuring your Buddy microphone
MyBuddyMic enables you to configure your Buddy 7G device.
You use profiles to edit and save each configuration scheme.
Each profile contains a list of events and actions that can be defined for each configurable part
of the device.
There are several action types that can be associated with each configurable part.
4.1
Profiles
Profiles are an easy way to have multiple configurations for a single Buddy 7G device. When
you configure a Buddy device using MyBuddyMic, what you are really doing is changing a
configuration profile. The configuration tab of MyBuddyMic window shows you the current
profile being edited (in the example in the picture below, the "Default" profile). You can
change the selected profile by choosing one of the available profiles in the combo box.
After you have made changes to a profile, you can save the changes to it, and also create a
new profile based on the current one. Profiles are saved per device model, and you can have
as many profiles as you want for each model of Buddy device you have. The Default profile is
always present and cannot be deleted. Each profile can then be "sent" (downloaded) to the
device in order to effectively update the device with the defined actions.
The buttons at the right of profile combo allows you to perform several operations in the
profile. Below is a description of each of these buttons:
Overwrite or create a new profile based on the current configuration. MyBuddyMic will ask
you for a new profile name, and a new profile will be created with the exact configuration of
the current one. This feature will also allow you to overwrite existing profiles.
Load any existing profile configuration.
Retrieve the current configuration (actions) of the device into the profile. In other words, the
profile configuration will be exactly as the one in the device.
© 2011 - InSync Speech Technologies, Inc.
Configuring your Buddy microphone
29
Send the current profile configuration to the device. In other words, the device will be
updated according to the profile. This is the final action you need to make your device to work
as configured.
4.2
Events and Actions - Concept
Your Buddy 7G device can be fully configured with MyBuddyMic software, defining in detail
how it behaves. The configuration is done by having an event/action relation in mind, which
means that for each event that happens in some part of the device, one or more action is
executed.
The configuration takes place in device parts. For example, for a button, a LED, or a
microphone, you can specify which actions must be executed for each event. The following
tables are examples of how each part can be configured:
Configurable part: Button 1
Event
Action Description
Action Type
Button 1 clicked
Increase speaker volume by 0.5 dB
Volume Action
Button 1 clicked
Send event notification for Button 1
clicked
Command Action
Configurable part: Button 2
Event
Action Description
Action Type
Button 2 pressed
Unmutes microphone
Volume Action
Button 2 released
Mutes microphone
Volume Action
Configurable part: Microphone
Event
Action Description
Action Type
Microphone muted
Turn Led 2 off
LED Action
Microphone unmuted
Turn Led2 on set blue color
LED Action
© 2011 - InSync Speech Technologies, Inc.
30
MyBuddyMic.net User Manual
As you can see in the tables, each row of the action specifies the event (Button 1 clicked, for
example) and the action to be taken (Turn LED 2 off). With MyBuddyMic you can define such
event/action rows by using the Configuration Tab.
4.3
Configurable parts
Each Buddy 7G device has dynamic parts that can be configured. For each part you can choose
the events and which action will be executed for each event. Examples of configurable parts
are:
Buttons (events: click, double click, etc.)
LEDs (events: on, off, etc.)
Speakers (events: mute, unmute, etc.)
Etc.
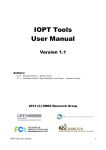
To configure one of the aforementioned configurable parts, you must click in the desired part
in the Buddy 7G device picture. The pictures below show two different Buddy devices. The
red circles indicate clickable parts that can be configured. In the MyBuddyMic program you can
identify the configurable parts when you move the mouse over the picture - the clickable
parts change color, highlight and the mouse cursor changes to a handpoint when the mouse
pointer is over it.
When you click a configurable part, the defined events and actions for that part are displayed
in the configuration tab. You can then start defining actions for the selected part.
© 2011 - InSync Speech Technologies, Inc.
Configuring your Buddy microphone
4.4
31
Defining actions
In the configuration tab, after you click a configurable part, you can start defining actions for
it. The picture is an example of what is displayed when you click a configurable part:
You can use any of the buttons at the top of the action list to manipulate the actions:
Add action
© 2011 - InSync Speech Technologies, Inc.
32
MyBuddyMic.net User Manual
Adds a new action at the end of the list.
Delete action
Deletes the currently selected action
Move up
Moves the selected action up in the list. The order of actions is important as the actions are
executed in the specified order.
Move down
Moves the selected action down
You can also edit an action by selecting it. The proper action editor will be displayed below
the action list, according to the action type.
4.4.1
Adding a new action
One of operations you can do when defining actions for a configurable part in a Buddy device
is to add a new action. You do that by clicking the
button at the left of the action list.
Once you decide to add an action, the following dialogue box appears:
You must choose the event to respond, the action type to be executed when that event
happens. For each type of configurable part, the list of events may vary. For example, if the
© 2011 - InSync Speech Technologies, Inc.
Configuring your Buddy microphone
33
configurable part is a button, the events would be Press, Release, Click, etc. If the
configurable type is a microphone, the events would be Mute, Unmute, etc.
Once you choose the event and the action type, click "OK" and the action will be added at the
end of list. You can then edit the action properties. Each action type has different properties
and so different editors.
4.4.2
Editing an action
When you select an action in the action list, the related action editor is displayed in a panel
below the list. You can then edit the action properties directly in the editor.
Each action type has a different type of editor, please refer to the action types topic to see
what you can change for each of them.
4.5
Action types
When defining actions for a device, you can have many different action types that can be
added and edited for the device. Each action type has a different purpose and has different
editors. The list of available action types are:
Command action
Keyboard action
Mouse action
Joystick action
LED action
String action
Volume action
4.5.1
Command action
A command action sends an application command to the host operating system. It is different
from other action types. There are some actions that directly execute operations in the OS,
like mouse action or keyboard action. There are also actions that execute operations in the
device itself, like LED actions or volume actions. Instead, a command action simply tells the
MyBuddyMic (or other software) to execute a specific command.
Voice command
Executes one of the voice commands specified in the voice command database.
© 2011 - InSync Speech Technologies, Inc.
34
MyBuddyMic.net User Manual
Parameters:
Voice command: The voice command to be executed.
One command type is a Voice Command. When such a command action is executed from, it
sends a notification to the OS indicating that a specific voice command must be executed.
MyBuddyMic software detects this command and then executes the voice command.
There are several command types in a command action, and for each of them a different
editor is displayed.
Voice Command: Sends a pre-recorded voice command to Dragon NaturallySpeaking as if it
was dictated into a live microphone. This includes voice commands such as Next Field,
Previous Field, etc.
Mic Control: Controls the microphone status in Dragon NaturallySpeaking. These include, off,
on, and sleep modes. This means that you can control the status of the microphone without
having to reach to your mouse or keyboard.
Example
1. In MyBuddyMic, select the configurable button you would like to program to perform the
required command
2. Press the
profile
button on the secondary toolbar to add a command to the currently selected
3. Select the event you would like to associate with the command (ie. Click, double-click)
4. Select Voice Command in the Actions column, as illustrated below
5. Press OK. This will bring up the Command Action field with a drop-down box of available
command types
6. Select Voice Command as illustrated below
© 2011 - InSync Speech Technologies, Inc.
Configuring your Buddy microphone
35
7. Selecting Voice command will bring up a drop down menu listing all possible voice
commands to execute. These available voice commands can be edited in the Voice
Command Editor
8. Select the desired command. In the example below, we will select “next field”
9. Once you have saved the profile to the device, you will no longer need to dictate “next
field” to Dragon NaturallySpeaking, but can simply perform the programmed event to
perform the “next field” action
10. Once you have entered your desired voice command, be sure to save your profile by
pressing the
button to avoid losing any changes
11. Always be sure to save the actions to the device by pressing the
button
Your command has now been saved and added to your profile.
4.5.2
Joystick action
A joystick action is similar to a command action with the command type button event. It
simulates the pressing of a button in the device. Joystick actions are used to integrate Buddy
7G products with third party applications.
Parameters:
Button: Indicates which button must be simulated as clicked.
Event: Indicates whether is "Click" or "Release".
**Joystick actions are used primarily for integration with third-party applications.
© 2011 - InSync Speech Technologies, Inc.
36
4.5.3
MyBuddyMic.net User Manual
Keyboard action
A keyboard action simulates pressing one or more keys in the host operating system. Its
execution happens just as if the user has pressed the keys on his or her keyboard. This action
doesn't perform pressing of keys one after another as if a text was typed. For that you must
use string action. This action presses all defined keys at once. This is useful if you want to
simulate a combination of keys
Example
1. In MyBuddyMic, select the configurable button you would like to program to enter a
keyboard action.
2. Press the
button on the secondary toolbar to add the keyboard action to the currently
selected profile.
3. Select the event you would like to associate with the keyboard action (ie. Click, doubleclick).
4. Select Keyboard in the Actions column, as illustrated below.
5. Press OK.
Now select the keys, as well as the modifiers to be pressed in the Keyboard Action menu,
illustrated below
© 2011 - InSync Speech Technologies, Inc.
Configuring your Buddy microphone
37
6. Once you have entered your desired keyboard action, be sure to save your profile by
pressing the
button to avoid losing any changes.
7. Always be sure to save the actions to the device by pressing the
button.
Your keyboard action has now been saved and added to your profile.
4.5.4
LED Action
The LED action performs an action in a LED or RGB light in the device. The action can be turning
the LED off, on, setting the LED color or blink rate.
© 2011 - InSync Speech Technologies, Inc.
38
MyBuddyMic.net User Manual
Parameters:
Led: Indicates which LED will be acted on
Led Action: Indicates the new color of the LED. To turn the LED off, set the color to black.
Blink rate : Specifies the blink rate for the LED, the higher the number, the slower the LED will
blink.
Example
1. Press the
button on the secondary toolbar to add a LED criterion to the currently
selected profile.
2. Select the event you would like to associate with LED action (i.e. Press, release).
3. Select LED in the Actions column, as illustrated below.
4. Press OK.
5. Now you must select what you want the LED to do when the event takes place. This is done
in the LED Action Properties box, shown below.
© 2011 - InSync Speech Technologies, Inc.
Configuring your Buddy microphone
39
6.Select which color you want the LED to display in the LED color drop-down menu. If you would
like the LED to blink, specify a blink rate beside it.
7. Once you have entered your desired LED action, be sure to save your profile by pressing the
button to avoid losing any changes.
8. Always be sure to save the actions to the device by pressing the
button.
Your LED action has now been saved and added to your profile.
4.5.5
Mouse action
A mouse action executes a mouse operation in the host OS. A mouse operation can be
pressing a mouse button, moving the mouse pointer, or both.
Example
1. In MyBuddyMic, select the configurable button you would like to program to perform a
mouse action.
2. Press the
profile.
button on the secondary toolbar to add the action to the currently selected
© 2011 - InSync Speech Technologies, Inc.
40
MyBuddyMic.net User Manual
3. Select the event you would like to associate with the mouse action (i.e. Click, doubleclick).
4. Select Mouse in the Actions column, as illustrated below.
5. Press OK.
6. Now specify which mouse action you would like your Buddy 7G device to simulate when
the event is takes place. Be aware of the following parameters.
Parameters:
Button: Specifies the mouse button to be pressed (simulated).
X: Defines the mouse pointer movement in the X-axis. Positive values are
movements to right, negative values to left. Setting zero performs no
movement
operation in Y-axis.
Y: Defines the mouse pointer movement in Y-axis. Positive values move mouse
pointer down, negative values move mouse pointer up. Setting
zero performs no
movement operation in Y-axis.
Z: Defines the mouse pointer movement in Z-axis. Positive values move mouse
pointer forward/in, negative values move mouse pointer
backward/out.
Setting to zero performs no movement operation in Z-axis.
In the example below, the mouse will move 15 pixels along the X axis, 10 pixels along the Y
axis, and 0 pixels along the Z axis.
7. Once you have entered your desired mouse actions, be sure to save your profile by
© 2011 - InSync Speech Technologies, Inc.
Configuring your Buddy microphone
pressing the
41
button to avoid losing any changes.
8. Always be sure to save the actions to the device by pressing the
button.
Your mouse action has now been saved and added to your profile.
4.5.6
String action
A string action simulates a text typing in the host OS. It's just as if the user types a text using
its keyboard. This action simulates pure text typing, and cannot perform pressing of control
keys like Ctrl, Alt, Esc, etc.. It also cannot simulate pressing two or more keys at once - each
key is typed one after another. If you want to execute pressing of control keys, or pressing
two or more keys at once, use a keyboard action instead.
Just type the text you want in the memo editor. Note that the length of text is limited by the
device memory, usually you can enter several words to a maximum of 4100 characters.
Example
To program your Buddy 7G device to insert a string of text:
1. In MyBuddyMic, select the configurable button you would like to program to enter a string
of text.
2. Press the
profile.
button on the secondary toolbar to add an action to the currently selected
3. Select the event you would like to associate with the string of text (ie. Click, double-click).
4. Select String in the Actions column, as illustrated below.
© 2011 - InSync Speech Technologies, Inc.
42
MyBuddyMic.net User Manual
5. Press OK.
6. Now insert the string of text you would like your Buddy 7G device to process when the
Event is selected in the String Action box. Enter a string up to 4100 characters.
6. Once you have entered your desired String action, be sure to save your profile by pressing the
button to avoid losing any changes.
7. Always be sure to save the actions to the device by pressing the
button.
Your String action has now been saved and added to your profile.
4.5.7
Volume action
A volume action performs one or more operations in the audio device of a Buddy
microphone. The audio device to be operated can be a microphone, a speaker, or both. The
operation to be performed can be muting or unmuting the audio device, increasing or
decreasing the volume level or even setting the volume level to a specified value.
© 2011 - InSync Speech Technologies, Inc.
Configuring your Buddy microphone
43
Parameters (same for both Microphone and Speaker tabs):
Action: Defines an action to be performed in the microphone/speaker volume. Action can be
mute, unmute, set volume level, or toggle (mute/unmute).
Increase/decrease by: Specifies a value to increase/decrease the volume level of
microphone/speaker. The increment is in 0.5 dB. Positive values increases the volume level,
while negative values decrease it.
Set volume to: Specifies a fixed level to which the speaker/microphone volume must be set
to. The value is specified in % of maximum volume level, so 0% is mute and 100% is maximum
level.
Example
To program volume actions to your Buddy 7G device:
1. In MyBuddyMic, select the configurable button you would like to use to perform a volume
action.
2. Press the
profile.
button on the secondary toolbar to add an action to the currently selected
3. Select the event you would like to associate with the string of text (i.e. Click, double-click).
4. Select Volume in the Actions column, as illustrated below.
© 2011 - InSync Speech Technologies, Inc.
44
MyBuddyMic.net User Manual
5. Press OK.
6. Now select which component (microphone or speaker, if available) you would like to
modify. In the below case, clicking will adjust the volume level to 50% of maximum
capacity.
7. Once this is set, when the user clicks the programmable button, the volume level of the
microphone will either increase or decrease to the desired amount. You can also use this
feature to toggle mute/unmute, mute or unmute the microphone when a button event is
generated.
8. Once you have entered your desired volume action settings, be sure to save your profile by
pressing the
button to avoid losing any changes.
9. Always be sure to save the actions to the device by pressing the
button.
Your volume action settings have now been saved and added to your profile.
© 2011 - InSync Speech Technologies, Inc.
Default Profile Configurations
5
45
Default Profile Configurations
Each configurable Buddy 7G device comes with three pre-configured profiles. These profiles have
been designed with speech recognition and dictation users in mind.
These profiles are:
Mute Toggle:
Push-to-Talk:
great for noisy environments
DragonMic Push-to-Talk:
5.1
Toggle mute on/off using the microphone button
Microphone hears sound only when button is held down Push to activate the Dragon NaturallySpeaking microphone
Loading a Profile
Loading a pre-configured user profile is simple and quick using MyBuddyMic software.
1. Begin by pressing the Loa d from profile button on the main toolbar.
© 2011 - InSync Speech Technologies, Inc.
46
MyBuddyMic.net User Manual
2. Select the desired profile from the L oad Action s From Profile menu
3. Click "Load". This will load the selected profile to MyBuddyMic software
4. To save this configuration to the device, click "Save Actions" on the main MyBuddyMic menu
to save the configuration to the Buddy 7G Device.
© 2011 - InSync Speech Technologies, Inc.
Default Profile Configurations
47
The device will now be updated with the selected profile.
6
Examples
In this section you will find some configuration examples for Buddy 7G devices.
6.1
Dictation Box Command for Dragon NaturallySpeaking
By default these key sequences are assigned to Dictation box operations:
{Ctrl+Shift+D} to open the Dictation box
{Ctrl+Shift+T} to transfer text
{Ctrl+A} select all text in current window
{Ctrl+C} copy text to clipboard
{Ctrl+V} paste text from window.
We will start by assigning {Ctrl+Shift+D} to the click event of the top half of the top button.
© 2011 - InSync Speech Technologies, Inc.
48
MyBuddyMic.net User Manual
1. Open MyBuddyMic software. You will see an image of the device on the right side
2. Click on the top half of the top button and then click on the + to open the "New Action
Window". This will bring up event action table for this button.
3. Choose "Click" from events and "Keyboard" from Actions and press the "OK" button. This
will close the window an display a new section in the current window to select the
keystrokes.
© 2011 - InSync Speech Technologies, Inc.
Examples
4. You can select Ctrl, Shift and D keys to define the desired key combination.
5. Click "Save actions" if you want to save this configuration to the device only.
© 2011 - InSync Speech Technologies, Inc.
49
50
MyBuddyMic.net User Manual
6. A message will display if the action was successful.
7. If you want to save the action to a profile, click on "Save to Profile", if you have
previously created a Profile you can "Overwrite existing profile" or you can choose to
"Create new profile".
© 2011 - InSync Speech Technologies, Inc.
Examples
51
8. Once you download this change to the Buddy StylusMic 7G, the "click" event of the top half
of the top button will now send {Ctrl+Shift+D} key combination to the host, which will be
trapped by Dragon NaturallySpeaking to open the Dictation Box.
Note: After above example, you still have Double-Click and Hold to add more operations.
9. You can program "Double-Click" for the top half of the top button to send {Ctrl+A} to the
host. To perform an additional Action for the Double Click event for the top half of the
top button, you can add {Ctrl+C}. This way 2 actions can be performed in order, to select
all and copy to clipboard by the same "Double Click" event. Just follow the above steps.
7
Video Tutorials
There are a number of guided video tutorials online for MyBuddyMic.net software. Click any link
below to view the corresponding video tutorial:
Firmware Upgrade
Restore Factory Settings
Profiles
© 2011 - InSync Speech Technologies, Inc.
52
MyBuddyMic.net User Manual
Volume Actions
Keyboard Actions
String Actions
Led Actions
Voice Commands
Multiple Actions
Controlling the Dragon Microphone
Push to Talk
© 2011 - InSync Speech Technologies, Inc.
Index
Index
-PProfiles
-AAction
42
3, 7, 21, 29, 31, 32, 33, 35, 36, 37, 39, 41,
-RRestore
-BBuddy 7G
command
3
string
26, 33
Voice Command Database
volume
32, 33, 42
Event
3, 7, 29
Event/Action architecture
examples
47
3, 21, 31, 32, 33
-FFirmware Update
22
-J32, 33, 35
-Kkeyboard
32, 33, 41
-V-
-E-
joystick
25
-S-
-C-
32, 33, 36
-LLED
28
33, 37
-Mmouse
32, 33, 39
MyBuddyMic
3
© 2011 - InSync Speech Technologies, Inc.
26
53
54
MyBuddyMic.net User Manual
Endnotes 2... (after index)
© 2011 - InSync Speech Technologies, Inc.
Back Cover