1
-PWFPGMJGFCFHJOTXJUI3DPN
REV. 4.0
DIGITAL EGG INCUBATOR
USER'S MANUAL
MAX 20
Contents
How to use Rcom MAX 20
1. Introduction
(1) Rcom 20 Introduction
(
(2) Safety Precautions
)
(3) Identification of Parts and Composition
*
(4) Function of Digital Control & How to Operate
+
Introduction
2. Before use
(1) How to Assemble the Incubator / Egg-Turning plate
,
(2) What is an incubation room?/ Preparation for Incubation
Before use
-r%$
3. Function Settings
(1)
Incubator Start&Termination /
Return to Factory Setting
(2) Change Cels.& Fahr.
(3) Temperature & Humidity Setting / How to Set Egg-Turning
%%
%&r%'
4. Incubation
(1)
Function Settings
Humidity & Air Maintenance during Incubation / (2) Dew Condensation
Maintenance after Hatching
Incubation
%(
5. How to Clean
(1) How to Disassemble
%)
(2) How to Clean
%*
How to Clean
6. Product Information
(1) Servicing / Frequently Asked Questions (FAQ)
%+
(2) Troubleshooting
%,
(3) Specification
%-
Product Information
The result of Hatching can be changed by a large numbers of factors. Autoelex Co., Ltd. &
our distributors will not take any responsibility for ‘Loss of eggs or pet/animal lives’ under any
circumstances such as ‘Hatching/Brooding failures’, ‘User’s carelessness’, ‘Personal (un-certificated)
conversion / alteration’, ‘Arbitrary using out of the machine’s purpose’, ‘Electric power failure’, or
‘Malfunctioning’. Please be sure that the machine works without any problem before placing Eggs or
Pets(Animals). Also, we strongly recommend you to read the User’s Manual carefully to minimize of
any failure.
Mark Explanation
Caution : Caution mark against a fault that can cause damage, trouble, or failure of incubation.
Tip :
Prohibited
It is necessary to keep.
Do not disassemble.
Remove the power cord from outlet.
Do not touch.
Ground Connection for preventing electric shock.
References or useful suggestions in using Rcom product
Warning of actions which may be dangerous or cause damage to the incubator.
%*(*5"-*/$6#"503
6
1. Introduction
(1) Rcom 20 Introduction
Rcom 20
Thank you for choosing the Rcom incubator.
The Rcom 20 incubator is the first incubator with creditability to have a superior design and function
which help in controlling optimum incubation conditions. It has two sensors, one for detecting
surrounding environments and the another for internal incubator conditions.
The Rcom20 is designed easy to use and simple to use as a customer orientated product, but please
remember that the user's incubation knowledge and proper operation are very important for the best
incubation result. Therefore, be sure to read this user's manual carefully before you use this incubator.
The Rcom 20 offers optimum incubation conditions, but users need to observe and manage all
incubation conditions such as species of eggs, temperature or humidity for each incubation period, and
an optimum incubation circumstances .
Features
[Main Features]
* Outer Temp. Sensor included for Automatic Adjustment of Heating rate responding to Incubation Room
Temperature
* Superior design with convenient operation
* Optimum air circulation technique with 3 strong BLDC fans
* Automatic Temp. & Humidity setting and control
* Body locking device
* Water supplement alarm function
* 20 eggs capacity for chicken size eggs ( 52 Quail egg size / 10 Goose egg size)
* Antiblastic Humidification method by heating water, which discourages bacterial growth
* Double-glazed view window for minimizing the influence of outside temperature
* Enhanced reliability by applying Swiss's Sensirion's 3rd generation temperature & humidity sensor
* Powerful SMPS application for stable power supply
[Safety Features]
* Alarm and display function of abnormal incubator temperature caused by sudden fluctuation of ambient
temperature
* Incubation data memory function and power outage notification function in case of power failure
* Circulation fan cover for safety and electric safety cut-out switch on the upper main body for safety
* Heater supporter designed for heater tension control and its safety
* Safety cover applied for protecting humidification unit
* Humidification unit durability improved by water proof BLDC fan
* Alarm function when water needs replenishing
[Easy Features]
* No need of separate humidification unit as it included in main body
Û&RUÛ)FRQYHUWLEOH
* Easy attachment and detachment of double-glazed viewing window
* Universal egg tray for various size eggs
* Slide plate with embossed feature for preventing skid
* Variable air vent for adjusting air supply
* Bottom body designed for easy cleaning
* Roller Dividers, which can safely apply egg turning for expensive or rare eggs. (Option)
7
%*(*5"-*/$6#"503
1. Introduction
Electrical hazards
Do not use a damaged power Do not pull the cord when
cord or loose outlet.
taking out the power cord, and
▶ Risk of electric shock or fire. keep wet hands away from
connecting plug.
▶ Risk of electric shock or fire.
Setting Cautions
(2) Safety Precautions
Be careful the details below when you use.
Never pull the plug out of the
outlet during the incubation
period.
Do not install in moist or
humid environment.
▶ Risk of damage or fire within
the incubator.
▶ Risk of fire or interference
with the incubation process.
▶ Risk of fire or electric shock.
Do not cover the ventilating
opening.
Install away from heat
sources.
▶ Inner temperature can rise,
interrupting incubation.
▶ Risk of damage to the
incubator case and
interference with the
incubation process.
Ensure that the incubator is
installed on a stable surface
away from edges.
Do not disassemble or modify
the incubator in any way.
Please ensure that no small
objects get into
the holes on the incubator.
If the incubator sounds
strange or emits smoke
contact your service center.
▶ Risk of electric shock or fire.
▶ Risk of electric shock or fire.
Do not spray cleanser directly
on the incubator surface.
Clean the incubator by a soft
cloth with a neutral detergent.
▶ Risk of electric shock or fire.
▶ Risk of fire or electrical
overload.
Be careful the details below when you use.
Do not install under the direct
sunlight.
Cleaning Cautions
Do not insert multiple
connecting plugs in an outlet.
▶ Incubation will be interrupted.
Do not install in dusty or dirty
environment.
▶ Risk if electric shock or fire.
Do not twist or crush electric
cord.
▶ Risk of damage to incubator
and eggs and user from
accidental knocks or drops.
Do not install in excessively
cold or hot conditions,
cigarette smoke, etc.
Do not use any other
non-standard parts except
those provided.
▶ Risk of interference with
the incubation process.
▶ Risk of damage or hatching
failure.
Do not turn the incubator
upside down.
Children should be supervised
to ensure that they do not play
with the appliance.
▶ Water will pour out of the
incubator, and view window ▶ Risk of knocking the incubator
or accidental interference with
can be dropped or damaged.
the controls.
Clean the incubator thoroughly If the incubator requires repair
before storing.
disconnect from the power
supply and please contact to
your service center.
Be sure to disconnect the electric cord
from the outlet before cleaning.
Brush away dust on the plug
with a dry cloth.
Do not use chemicals like wax, For special cleaning of inner
benzene, alcohol, thinner,
part per year, contact to the
aromatic, or lubricant, etc.
service center.
▶ If you don't clean the inside of
incubator for a long time, dust
can cause some trouble or a fire.
%*(*5"-*/$6#"503
8
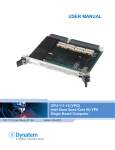
(3) Identification of Parts and
Compositio
1. Introduction
Identification of Parts
View Window
For a clear view of
the incubation process.
(Double Skin Viewing Window)
Serial No.
(EX:RCM0950278)
If you register your information with
your machine’s serial number on our
web-site(www.Rcom.co.kr),
you can get 2 year warranty service.
Power Connecting (the rear)
For connecting power cord.
Egg Tray
Adjust the space of dividers
according to egg size.
Vents for air circulation
For circulating warm air
Air inlet vent
For inlet of air
from outside
Water hole
Digital Control Center
To facilitate water top-up
for the humidity control.
See description of
the function and operation.
Locking Button
Main Body-1
Main Body-2
Basic Components
F9 5F
Main Body-1
Main Body-2
Power Cord
F9
5F
User's Manual
:FCB
H
Water Cap
View Window
Easy function
operation
Duplicated
View Window
Egg-Turning Plate
Gc`XGYdUfUhY`m
Universal Tray
Divider(10EA)
Universal Tray SET
9
Rolling Divider SET
Small egg
Tray
Standard egg
Tray
Large egg
Tray
%*(*5"-*/$6#"503
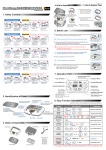
(4) Function of Digital Control &
How to Operate
1. Introduction
Function of Digital Control & How to Operate
Temp. Display
Temp. UP Button
Humidity Display
Humidity UP Button
Setting Temp. Up
Calibration Temp. Up
Setting Humidity Up
Calibration Humidity Up
Temp. DOWN Button#
Setting Temp. Down
Calibration Temp. Down
Humidity DOWN Button
Setting Humidity Down
Calibration Humidity Down
Egg-Turning Setting Button
Setting Button
Automatic egg-turning setting
or cancellation
/ Egg-turning test
Setting value check
Heater Lamp
(Lighting when working)
Humidification working lamp
Egg-Turning Lamp
Water Supplement Lamp
Power Failure Alarm Function
Turn on with automatic
egg-turning mode.
(Blink when working)
(Lighting when working)
(Blink with water shortage)
Blink with power failure
(to remove, press SET button)
- Alarm for water supplement sounds in twice.
( First alarm with water shortage / Second alarm after 3 hours )
What’s ‘Temperature&Humidity Setting’?
This is that you set up temp.&humi. As you want to have inside of the machine.
[ Function Operation & Explanation ]
Function
put some water after take off label from the back and attach to the window.
If you want to change setting value, keep pressing "SET" button and change the value.
How to Operate
Explanation
Temp.
Setting
Setting of needed temp.
Humidity
Setting
Setting of needed humidity.
Egg-Turning
Interval Setting
Ghidxow#vhwwlqj
#hyhu|4#krxu#
#+Odps=#RQ,
rqfh
5#Krxuv
5#wlphv
6#Krxuv
6#wlphv+RII,
Odps#RII
###7#wlphv
hyhu|#4#krxu#
+Odps#RQ,
uhshdw
Egg-Turning Interval Setting
as required
Egg-Turning
Test
Egg-Turning Test (once)
Changing
Cels. & Fahr.
Changing Cels. & Fahr.
Initialization
Initialization
(Factory setting)
How to OFF
Humidification
Function
%*(*5"-*/$6#"503
20%
Set Humidity as 20%
:
(1) How to Assemble the Incubator /
Egg-turning plate
2. Before use
How to Assemble
*
)
▶ Lock the three locking buttons
at the front and rear of the
incubator.
View Window
(
+
BACK
Universal Tray
110V~120V
'
▶ Insert the power cord in the
socket at the back of the
main body.
* Fit the water cap.
Be careful when you assemble egg turning plate.
Gear
connecting part
Water Cap
F9 5F
Main Body-1
F9
&
5F
H
:FCB
F9 5F
%
F9 5F
Egg-Turning Plate
8
1
F9
'
5F
(5
6,
'
F9
(
5F
H
:FCB
Main Body-2
▶ If you do not assemble egg turning place correctly,
it can cuase incubator failure.
:FC
BH
▶ Gear connecting part of egg turning plate must be
on the top side.
;
%*(*5"-*/$6#"503
2. Before use
(2) What is an incubation room? /
Preparation for Incubation
What's an Incubation Room? / Preparation for Incubation
The Incubation Room is a confined space for setting and operating an incubator.
Because the incubation room environment has a considerable effect on hatch rate, it's recommended to
control the environment for setting up an incubator; there should be little noise and vibration around and
temperature ranging 28℃(82.4℉) with small variation in temperature. Especially, if there are frequent occasions
when the temperature drops suddenly at night, compared with daytime, be sure to check from time to time
and pay attention so that the incubator is not directly exposed to s
unlight during daytime.
1
Insert the electric cord in the connecting jack
in the back of the main body and put the main plug into a socket.
The FND display will light up and show temperature.
2
Open the watercap and fill the hole with DISTILLED WATER and refill water after about 5 min.
again up to the limit line on its inside mark.
(If you refill water during the incubation period, humidity goes down temporarily.)
After filling up with water, never shake or turn over the main body of the incubator, which would cause
water to spill inside the body and could cause a breakdown.
During incubation period, check the DISTILLED WATER water levelabout every three days and refill water,
if necessary. (After you refill water, check again after 5min. and refill again.)
110V~120V
DISTILLED
WATER
In case you use the incubator without adding humidification water or intend to incubate eggs at low
humidity under RH 20%, you must stop its humidification function. please turn off the humidity unit if the
unit is empty water otherwise, humidity unit
will be broke or you may not no longer use the unit.
(When using this function, the alarm for sensing water drop will go out.)
[See the description of humidification function OFF on Page 12]
※ How to turn off Humidification Function : Set humidity level at RH 20%.
%*(*5"-*/$6#"503
<
2. Before use
(2) What is an incubation room? /
Preparation for Incubation
Some gap (about 2mm) around the eggs is needed for easy egg turning as shown on the below. ▼
About 2mm
{ltwGR
{ltwGT
20
o|tpk
p{
L
olh{pu
n
{|yupu
͑ ͑ ͑͑ ͑͑
{ltwl
yh{|y
l
jhs
{|yu
5@=B
o|tpGR
jhs
o|tpGT
o|tpkpmp
jh{pvu
nGvu
8=;=H
~h{lyGl
7I65
tw{
HCF
zl{
F
K5H9
※ When you use the 'universal rolling divider' which is sold separately, be careful to adjust the distance of rolling
divider so that eggs do not roll out of position. Refer to the picture rignt side.
If you use Mineral water or Tap water for humidification,
the humidity unit can be broken easily because of water
scales. We strongly recommend you to use only
“DISTILLED WATER” for your machine, and
Autoelex Co.,Ltd & our distributors do not indemnify for
warranty service not only if you have any problem with
using mineral water, regular water, tab water and the like
but also if you had improper management or handling
for your machine. In this case, Autoelex Co.,Ltd. & our
distributors will charge for your after service.
20
yl
o|tp
kp{
o|t
You can buy the ‘Distilled water’ in your local market,
and if you have any question, please contact the shop,
where you purchased your machine.
3
Place the eggs to incubate in the egg groove and
then close the view window.
Be careful to close the view window completely;
if not, the temperature and humidity will fail to go up.
F
K5H9
The egg to incubate must be a fertilized egg.
(Refer to the guidebook.)
43
%*(*5"-*/$6#"503
(1)Incubator Start&Termination /
Return to Factory Setting
(2) Changing Cels.&Fahr.
3. Function Settings
How to start incubation
▶ If you connect the incubator with power cord,
second dot " . " of temp. display is blink with alarm.
Press SET to remove blink and then it starts incubation with
existing temperature and humidity.
[Factory default setting - Temp. : 37.5℃ (99.5℉), Humidity : RH 45%]
110V~120V
▶ Be sure to turn ON egg turning before incubation starts
and turn OFF before 3 days of hatching. At this time, it's
recommendable to raise humidity up to 60~70%.
[Refer to Egg Turning ON/OFF on Page 13.]
There can be some smell the first time you use the incubator, that is normal.
Power Failure Notification : When firstly input power, or power
failure during incubation, second dot " . " of temp.
display is blink with alarm. Press SET to remove.
How to terminate incubation
▶ After all eggs are hatched, you should REMOVE
the power cord for incubation termination.
(The incubator has no separate power switch.)
110V~120V
Return to factory settings
▶ It is for returning to the factory default setting.
▶ It is for initializing the incubator setting or calibration to the factory settings when you handle the incubator
improperly so that the value has changed. Unplug the power supply and hold SET button and re-plug
the power supply as shown on picture. Then, rSt will show on the display, and the incubator will be
initialized to factory setting.
Keep pressing SET button
Re-plug the power supply
R
"rSt" will show on the display as below,
and the incubator initialize to factory setting.
d
110V~120V
HOLD
How to change Cels. & Fahr.
TEMP +
▶ Press
and
buttons at the same time
TEMP -
and CA will show on Temp. display.
fYdYUh
Then press
button, it will change
as shown on the right.
%*(*5"-*/$6#"503
44
3. Function Settings
(3) Temperature & Humidity Setting /
How to Set Egg-Turning
How to Set Temperature
▶ In a state of
button being pressed, adjust the
temperature you want with
or
button.
Temperature setting will be completed when you remove
your finger from the
button, and the present
temperature of the incubator inside will be indicated.
ŷ (Keep pressing the button)
If you set the incubator under a direct ray of light or too cold spot, the incubator temperature can be higher
or lower than setting temperature.
If you press SET button, the present setting temperature and humidity will be indicated and, if you remove
your finger from the button, the present inner temperature and humidity indicated.
How to Set Humidity
▶ In a state of
button being pressed, adjust the
humidity you want with
or
button.
humidity setting will be completed when you remove your
finger from the
button, and the present humidity
of the incubator inside will be indicated.
ŷ (Keep pressing the button)
▶ Be sure to set humidity RH 65 ~ 70% from 1~3 days before hatching.
Temperature and humidity can be different from normal setting levels according to the surrounding
environment. (Refer to a incubation guidebook which is supplied separately.)
Temperature and humidity is optimized when Rcom products are released.
We do no recommend customers to recalibrate by their own. If you need to recalibrate, please visit our
ZHEVLWHZZZUFRPFRNUĺ'RZQORDGĺ0DQXDORUDVNSXUFKDVHSODFH
Because of low price thermometers and hygrometers are not accurate, e recommend you to use special
FDOLEUDWHGWKHUPRK\GURPHWHU3RXOWU\RQO\WKHUPRK\GURPHWHUFKHFN5FRPZHEVLWH'LJLORJⅡ)
How to Turn ON/OFF Humidification Function
▶ In a state of
button being pressed, press
button to adjust humidity at RH 19% and, then,
humidification function will be OFF. On the contrary, if you adjust humidity above RH 20%, its function will
be ON.
In case you use the incubator without adding humidification water or intend to incubate eggs at low
humidity under RH 20%, you must stop its humidification function. please turn off the humidity unit if the
unit is empty water otherwise, humidity unit will be broke or you may not no longer use the unit.
45
%*(*5"-*/$6#"503
(3) Temperature & Humidity Setting /
How to Set Egg-Turning
3. Function Settings
How to Set Abnormal High or Low Temperatue Alarm
▶ What is Abnormal High or Low Temperature Alarm?
It is alarm soulds when incubator temperature is higer or lower than setting value because of various
reasons such as room temperature change or disorder of temperature controlling system.
<ckhcGYh
Set required
high range with
UP / DOWN button
5Sec.
Save setting and
pass to
low humi. set
Save setting and
Set required
pass to current
low range with
UP / DOWN button temp. & humi.
indication
* Max. abnormal temp. alarm limit (0.0 ~ 5.0℃ Default Setting:2.0℃)
* Min. abnormal temp. alarm limit (0.0 ~ -5.0℃ Default Setting:-3.0℃)
How to Set Egg Turning ON/OFF
▶ Egg Turning Test : If you press
button for
about 5 seconds, egg turning test will be effected once.
▶ In a state of
button being pressed, press
button then the setting will be changed as required.
Be sure to set TURNING OFF 3 days before hatching.
ŷ (Keep pressing the button)
repeat
CbWY@UadCB
9[[hifb]b[=bhYfjU`
.&\cifg
&H]aYg@UadCB
9[[hifb]b[=bhYfjU`
.'\cifg
'H]aYg@UadC::
9[[hifb]b[=bhYfjU`
.C::
(H]aYg@UadCB
9[[hifb]b[=bhYfjU`.
Ub\cif
'II6WTPKPI/GNQF[101((
▶ Plese press
button over 5 seconds
to turn ON or OFF egg turning melody.
%*(*5"-*/$6#"503
46
4. Incubation
(1) Humidity & Air Maintenance during Incubation /
Maintenance after Hatching
(2) Dew Condensation
Humidity & Air Maintenance During Incubation
▶ When hatching, humidity should be relatively high to prevent
the thin membrane from drying out or hardening before hatching.
▶ When hatching, it's recommended not to open the lid often.
This is because if you open the lid often humidity will be rapidly
decreased and it will take a long time to regain the proper humidity.
Incubator internal temperature is 37℃ (99.5℉) or more, and
hatching room temperature is below 28℃, in that case, RH 70%
humidity is may not be able. The difference of ±5% humidity
value may occur from the humidity sensors difference, and there
are no problems at hatching
▶ It's very important to maintain humidity higher 1~2 days before
hatching than the early and middle incubation periods. Humidity
requirements during incubation are RH 45~55% for waterfowl,
RH 40~45% for poultry and RH 35~45% for parrot, in general.
One day before hatching, all kinds of birds need about RH 65%
humidity and sometimes need higher than that.
However, in areas of high ambient humidity, lower levels of
humidity may be needed during incubation.
F
K5H9
When the baby chickens hatch out,
please move them into a brooder.
It's very important to keep humidity higher than RH 60%
before hatching 3days.
Maintenance after Hatching
▶ It is necessary to use a brooder for baby chicken or bird since they are too week against cold or cool environment.
If you try egg-hatching in your incubator, there would be lots of germs, feathers, which causes of low egg hatching
possibility for your next hatching. Also, they can make your incubator broken or faulty.
We strongly recommend you to use independent Hatcher or Brooder for egg-hatching.
If you have any faulty or broken because of not using independent Hatcher or Brooder, we do not serve you the
free warranty service. In other words, you have to pay for the service charge.
To make a simple Hatcher or Brooder, please refer to the our web-site (www.Rcom.co.kr).
Please do not try to egg-hatching in the incubator. It makes your incubator broken or faulty, and we do not
give you free warranty service. (Please move all the eggs 1~3 days before hatching into Hatcher or Brooder.)
Hatcher : The machine for egg-hatching. Operate it 1~3 days before egg-hatching. (Rcom MARU H&B)
Brooder : The machine makes baby chickens or birds warm up against cold or cool environment. You can
set up proper temperature and humidity. (Rcom MARU H&B / Rcom Brooder Series)
▶ As there is some difference in chick feed for each kind of bird, so it's desirable to obtain useful information
about the chicks before hatching.
5IHC9@9L7C" @H8"
8F5=B
BH
:FC
Be sure to use a three-wavelength 20W bulb. If you
use a bulb over 20W. temperature goes up, possibly
killing the chick or causing a fire. If there is too much
water and a chick would falls into water, its feathers
get wet and it can be died of loss of body heat. Here,
dry feathers with a hairdryer. etc
Be sure to use a three-wavelength 20W bulb :
In case breeding room size 370 x 270 x 130(mm)
Dew Condensation
This is a naturally occurring phenomenon when there is a
significant difference in temperature between inside and
outside of the incubator during incubation period. If this occurs,
water may form in inside bottom of the main body of the
incubator(bottom part).
47
%*(*5"-*/$6#"503
5. How to Clean
(1) How to Disassemble
▶ Pull out the electric cord from the connecting jack and
also take out the plug from the outlet.
Don't turn off the power soon after using the incubator,
as this may cause a break down due to moisture left
inside the main controller. At this time, it's better to
firstly remove the water inside of the incubator and dry
by operating it for 1hour and then turn it off or open the
view window and dry it naturally for 2~3 hours and,
then, re-operate it, which may lengthen the life time of
incubator.
(Set humidification function OFF. / Refer to the page 12.)
110V~120V
How to disassemble and clean the incubator
1
Unlock and remove the locking buttons for
three parts at the front and back of incubator
by pulling them forward.
back
2
The bottom part of incubator should be thoroughly cleaned
with water and dried. The upper part should be naturally dried
in the well-ventilated place for about one day to remove
moisture left inside of the incubator after hatching thoroughly.
Don't clean the product with organic solvents such as
benzene, thinner, etc. which may cause deformation or
decoloration of the plastic parts.
3
▶ When using humidification function, a lot of alien matter
sticks to the humidification heating element ⓐ. This may not
cause failure, but when terminating incubation please clean
the humidifying heater lightly with a soft brush.
9L
C9@
5IH
▶ If you place the main body(upper part) on the floor,
please don't let the humidification heating part touch with the
floor.
If you inflict impact on the humidification heating part or
scrape it with a sharp instrument, the humidifying heater
will be damaged.
9L
C9@
5IH
We kindly recommend you to use distilled water
In order to reduce a foreign substance on the
humidifying heater device.
%*(*5"-*/$6#"503
48
5. How to Clean
(2) How to Clean
4
F9 5F
Start the vacuum cleaner to remove the dust as shown on the
right and thoroughly shake out the minute dust with a fine brush.
F9
5F
If the incubator goes through incubations several times,
feather, dust, shell, etc. accumulate inside the main body,
which may cause a break down, so be sure to clean
the product before storage.
BH
:FC
In case the incubator clean status is poor which may cause fan noisy or stopping.
F9 5F
9L
C9@
5IH
Cleaning
the fan
9L
C9@
5IH
F9
5F
BH
:FC
5
If you finish cleaning the incubator, reassemble it in the reverse
order of disassembly. Wipe out outside the main body with a
wet cloth and dry it in a cool and well-ventilated place before
storage.
[Refer to How to assemble on Page 8.]
Don't clean the product with organic solvents such as
benzene, thinner, etc. which may cause deformation or
decoloration.
49
%*(*5"-*/$6#"503
6. Product Information
(1) Servicing /
Frequently Asked Questions (FAQ)
Servicing
All our Rcom digital incubators of Autoelex Co., Ltd. are made by precision systems under strict quality
control. But occasionally some defective products are found on the way of their distribution.
If any problem occurs, then please contact Rcom service center or distributorsin your country.
We will do our best to solve the problems, if any, for you. This product is designed in modular mode, so
for its repair, if any, a qualified person can replace the part concerned with ease.
* Complaint Department : 82-55-337-2560
*E-mail Receipt : [email protected]
Frequently Asked Questions (FAQ)
Troubles
Expected Causes (Possibility)
Countermeasures
In case hatching rate
is low
ઔWhen the egg is an unfertilized egg.
ઔGetting infected by germs
ઔWrong incubation setting
ઔHealth condition of mother bird
ઔImproper egg turning
ઔ Inspect the egg to check possibility
of egg surviving.
ઔ Disinfect the incubator.
ઔ Check all settings of incubator.
Especially, check them focusing
on the temperature.
ઔ Review care of health of mother bird.
ઔ Check if egg turning is normal.
When a chick hatches
out earlier than expected
or a deformed chick
hatches out
ઔSetting temperature high
ઔEgg turning was not operating normally
ઔ Lower temp. setting of the
incubator about 0.5(1એ)
ex) 37.5℃ (99.5℉) ĺ 37.0℃ (98.6℉)
ઔ Check if egg turning function is OFF
When a chick hatches
out later than
expected
ઔSetting temperature low
ઔ Raise temp. setting of the
incubator about 0.5(1એ)
ઔ ex) 37.0℃ (98.6℉) ĺ 37.5℃ (99.5℉)
When hatching dates
are so different from
each egg (When all
chicks don't hatch out at
the same time but over a
long period)
ઔ Eggs stored for different lengths of time
ઔ Diffferent incubation temperatures
ઔ Minimize the time to store egg properly.
ઔ Check Temperature difference
in the incubator.
(sunlight, temp of incubation room, etc.)
When intending to
hatching various eggs
at the same time
ઔ Incubation days are different,
so hatching rate falls down.
ઔ Eggs might be contaminated by chicks
that hatched first.
ઔ Mark hatching date on eggs and
move them to other incubator
(brooder) just on the marked date.
ઔ In case of putting in many eggs
at the same time, it's convenient
to prepare a spare incubator available
as a brooder
%*(*5"-*/$6#"503
4:
6. Product Information
Troubleshooting
CIRCUMSTANCE
(2) Troubleshooting
If you need detail self diagnosis,
please click “self diagnosis” on our website.
ITEMS TO BE CONFIRMED
SOLUTIONS
No signs of power
to the incubator.
ઔ Check electric cord is properly connected.
ઔ Check if there is a power outage.
ઔ Check whether the plug is damaged.
ઔ Connect the cord again.
ઔ Check the main socket with any other
electric appliances.
ઔ Try to insert to another outlet.
Temperature will
not go high enough.
ઔ Check your setting temperature.
ઔ Check the air circulation FAN is working.
ઔ Initialize the incubator.
[Refer to the page 11]
ઔ Set the temperature as required.
Alarm sounds with
HI indication
䯝 Check if room temperature is too high
䯝 Check if incubator is exposed to the direct
rays of sun
䯝 Adjust room temperature 28℃ (82.4℉)
䯝 Install incubator without the direct rays of sun
䯝 Return incubator to factory setting [Refer to page 11]
(abnormal high temp.)
Alarm sounds with
LO indication
(abnormal low temp.)
ઔ Take the power plug out of the outlet, and
disassemble the main body for cleaning
around the air circulation fan with brush.
䯝 Adjust room temperature 28℃ (82.4℉)
䯝 Check if room temperature is too low
䯝 Check if incubator heater(temperature controlling- 䯝 Place thermometer inside of incubator and check
system) is normally working
if setting temperature is correct
䯝 Return incubator to factory setting [Refer to page 11]
Humidity will not
go high enough.
ઔ Check your setting humidity.
ઔ Close the view window again after checking.
ઔ Initialize the incubator. [Refer to the page 11]
ઔ Supply water.
ઔ Set the humidity again as required.
The machine makes
some noise.
ઔ Check if there is any hatching debris such as
feather or eggs-shell in the incubator FAN.
ઔ Take out the plug out of the outlet and
disassemble the main body and clean
around the air circulation fan with brush.
Egg-Turning fails
to work.
ઔ Check that the Egg-turning stoppage is not
activated. (Egg-turning lamp lighting)
ઔ Check that there are no foreign items on the
egg turning tray.
ઔ Check if egg turning plate is assembled correctly.
[Refer to the page 9]
ઔ If you need to turn the eggs, you can
manually re-start egg-turning.
ઔ Unplug the power supply and
disassemble the main body for cleaning
the egg turning tray and gear.
ઔ Assemble egg turning plate as the picture on page 9.
Dew foams in
the incubator.
ઔ Check the incubator is not placed
too cold circumstances.
ઔ When you turn OFF incubator and then
turn on.
ઔ Move the incubator to where the ambient air
temperature is over 28℃ (82.4℉)
ઔ Check that you have not overfilled the incubator.
ઔ Check that the incubator placed on inclined
surface.
ઔ Check if it is Dew condensation
ઔ Do not fill water over LIMIT indication.
ઔ Place incubator under a level surface.
- It is normal that the machine
emits some sounds because
it uses air circulation fan
for working.
Water leaks from
the machine.
ઔ Dew condensation is normal.
ઔ Dry the incubator completely under well ventilated place.
Be sure that the incubator works without any problem before placing eggs in the incubator.
4;
%*(*5"-*/$6#"503
6. Product Information
Specification
1-1 NAME : Rcom MAX 20
1-2 MODEL NO. : MX-20
Power
AC 100 ~ 120[V], 50/60[Hz]
AC 220 ~ 240[V], 50/60[Hz]
Temp. limits
20.0 ~ 42.0[Q
Working Temperature
Ideal:20 ~ 25[Q
Humidity Limits
Min. 15[Q / Max. 30[Q
20 ~ 70[%]
( It can be changed according to the conditions )
Power Consumption
Average. 48[W]
Egg-Turning Interval
Various according to the tray
Capacity
(3) Specification
MAX. 65[W]
For all size egg : Various sized egg incubation is : Universal tray
available
:
: Small egg tray
Small
52 [EA] ( Quail egg size )
: 20 [EA] ( Chick egg size )
: Standard egg tray
Standard
Large
: 10 [EA] ( Goose egg size )
Net Weight
4.35[kg]
Size
(W)500@410<160 [mm]
Fuse Standard
250[V] 2.0[A] (ಸ520[mm])
: Large egg tray
(Included)
(option)
(option)
(option)
You will be asking for service charge if you are in below cases.
1. Broken or Problem caused by ‘No cleaning’ or ‘Improper handling’
2. Broken or problem caused by ‘Not using distilled water’
3. Broken or problem caused by ‘Trying Bird hatching in incubator’
(Please don’t try bird hatching in incubator. Please use Hatcher during bird hatching.)
4. Broken or problem caused by ‘Wrong controling(Using)’
5. Broken or Problem caused by using the machine out of User’s Manual.
6. Broken or problem caused by ‘Customer’s mistake or fault’
Ě Register your product Serial No. on our website for free 2 years gurantee.
Ě Refer to website for how to register. (Free 1 years gurantee in case not registerd.)
※ Product Registration Procedures
If you are a new member of Rcom, you need to log in our website at www.Rcom.co.kr
1. Click “SIGN UP” on top of the right corner.
2. Fill out the information on the blanks.
If you already registered your information on the Rcom website, please log in to
www.Rcom.co.kr.
1. Click “Login” on top of the right corner.
2. Select “Customer” and click “Register Products”.
3. Fill out the information on the blanks.
You will need below information to register on our website.
1. Your name
2. Your (home/company) address & Email address, country
3. Your product(model) name & Serial number
4. Date of purchase & Name of purchased shop you bought from
%*(*5"-*/$6#"503
4<
Rcom USB 20, PRO 20, MAX 20 PART LIST
Image
P a rt N o
Names of goods
(*.Compatible)
H20-F201-10
H20 Body
H20-A202-10
H20-F203-10
H20-A200-10
Image
P a rt N o
Names of goods
(*.Compatible)
H50-H611-10
H50 Hum i
Hea ter C over
H20-A 216-10
H20 Hum idity
Unit A S M
RC M -700-10
S il icon T ube
K 20-H512-10
Heat Support -A
H50-H612-10
Heat Support- B
H20-A 234L -10
H20-A 234H-10
H20 Silicon
110HEAT ER
ASM H20 Silicon
220HEAT ER ASM
H20-A F212-10
H20 Front
L ock A S M
H20 Bottom ASM
H20 S lide
H20 Window ASM
H20-A218P -10
H20 P RO M ain
P C B AS M
H20-A218U-10
H20 M ain P C B
US B AS M
H20-A218M -10
H20 M AX M ain
P C B AS M
H20-A219-10
H20 S M P S
P C B AS M
H20-A F211-10
H20 Rea r
L ock A S M
RC M -A310-10
T H V 2 S ens or
AS M
H20-F240-10
H20 A ir Fin
H20-F206-10
H20 M ain
P C B C over
H20-F229-10
H20 Wa ter C a p
Partly spare parts are not on the parts list.
Rcom USB 20, PRO 20, MAX 20 PART LIST
Image
P a rt N o
H20-F237-10
( Option)
H20-F210-10
H20-F233-10
H20-F234-10
( option)
H20-F208-10
H20-F207-10
Names of goods
(*.Compatible)
H20 Brooding T ray
(*For reptile
incubator)
Image
P a rt N o
Names of goods
(*.Compatible)
H20-F219P -10
( R90-F219M -10)
H20 PRO
M em brane SW
(R90 Pro type)
H20-F224-10
H20 Pinion Gear
H20-F223-10
330 Geard M otor
H20-F214-10
Hum i BLDC FAN 40
H20-F226-10
BL DC FA N 50
H20-304X X -10
Pow er Coard(8)
H20-H686-10
H20 Rubber Foot
H20-F239-10
H20 Sty rofoam Ball
H20-F244-10
( Option)
H20 Hatching Pad
RC M -347-10
US B C a bl e
H20 Univers al
T ray
ABS
Divider( No.2)
H20 Roller
Divide
H20 S tandard
T ray
H20 L arge T ray
H20-F209-10
H20 S m all T ray
H20-F219M -10
( R90-F219M -10)
H20 M AX
M em brane S W
( R90 M ax type)
Partly spare parts are not on the parts list.
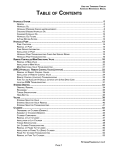
Rcom Incubator Series
PUM
P
POW
ER
Rcom PRO MINI (PX-03)
INL
POW
ER
ET
Rcom KINGSURO MAX 20 (MX-SURO)
Fklfn
hq
F
K5H9
Rcom MAX 20 (MX-20)
Rcom PRO 20 (PX-20)
PUM
POW
ER
INL
P
POW
ER
ET
F
K5H9
Rcom reptiles PRO 90 (PX-R90)
Rcom reptiles MAX 60 (MX-R60)
WATE
R
WATE
R
PULL OP
PULL OP
EN
Rcom MAX 50 (MX-50)
Rcom BROODER&ICU
(MX-BS500(N))
EN
Rcom PRO 50 (PX-50)
Rcom DIGILOG
(PX-V1)
Rcom DIGILOG2
(PX-V2)
3DPNJTEFTJHOFEGPSVTFSTFBTZBOEDPOWFOJFOUVTF
*UDBOCFDIBOHFEXJUIPVUOPUJDFGPSJNQSPWFNFOUJOQFSGPSNBODF
EFTJHOUSFBUNFOUBOETPGUXBSFFUD
www.Rcom.co.kr
SELLER
MANUFACTURER
ú)FBE0GGJDF%FPLBN+VDIPO(JNIBF
,03&"
ú5&%JSFDUUPTBMFTUFBN
_0GGJDF
ú'"9
ú&."*3DPN!3DPNDPLS
3DPNJTUIF#FTU%FTJHOXJUI)JHI2VBMJUZ7BMVFBOE1FSGPSNBODF