1
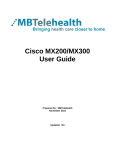
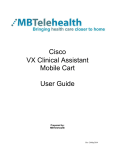
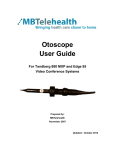
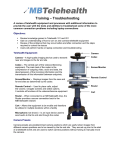
Tandberg 1700 MXP User Guide Prepared by: Jason Macdonald February 2009 Updated: <Date> MBTelehealth – Tandberg 1700 MXP User Guide TABLE OF CONTENTS 1.0 OBJECTIVES ......................................................................................................................3 2.0 THE TANBERG 1700 MXP .................................................................................................3 3.0 3.1 3.2 3.3 3.4 3.5 3.6 3.7 3.8 GENERAL SET UP AND USE ............................................................................................4 General Set Up................................................................................................................4 Mute/Microphone.............................................................................................................4 Placing and Receiving a Video call .................................................................................4 Adjusting the Volume ......................................................................................................4 Far End Control ...............................................................................................................4 Layout (Picture in Picture)...............................................................................................4 Selfview ...........................................................................................................................4 Disconnecting from a Call ...............................................................................................4 4.0 CONNECTING A LAPTOP/PC............................................................................................4 5.0 GLOSSARY OF TERMS .....................................................................................................4 6.0 6.1 6.2 TROUBLESHOOTING ........................................................................................................4 Audio Issues....................................................................................................................4 Video Issues....................................................................................................................4 7.0 AKNOWLEDGEMENTS ......................................................................................................4 APPENDIX A – 1700 MXP CHEAT SHEET.....................................................................................4 Page 2 of 14 MBTelehealth – Tandberg 1700 MXP User Guide 1.0 OBJECTIVES This user guide will provide you with an overview of the Tandberg 1700 MXP and the knowledge to setup and use the videoconferencing equipment. Learning Outcomes: After reviewing this guide, you should be able to: 1. Identify and explain the main parts of the Tandberg 1700 MXP Video Conference System 2. Setup and use the equipment to place video conference calls. 3. Connect and use a laptop/pc to share images and presentations 4. Troubleshoot common Audio and Video issues 2.0 THE TANBERG 1700 MXP The Tandberg 1700 MXP is a fully integrated system that operates both as a Video Conference Unit and a PC display. The main components of the Tandberg 1700 MXP videoconferencing system are the Camera, Codec, Microphone, Screen/Monitor, Inputs, Headset Connectors and the Remote Control. Tandberg 1700 MXP Camera Codec (located in back) Screen/ Monitor Headset and Headset Microphone Inputs Inputs (located in back) Page 3 of 14 MBTelehealth – Tandberg 1700 MXP User Guide 1. Camera - The built-in camera is a high quality imaging device which transmits images to the screen/monitor. The camera movements are controlled by a wireless infra red (IR) remote that controls a variety of functions, both on the near and far end. 2. Codec - The codec is the central part of the videoconferencing equipment. The main task of the codec is the compression of outgoing video, audio and data, the decompression of the incoming information and the transmission of this information between endpoints. The name codec comes from a combination of the two words compression and decompression. 3. Microphone - The microphone is built into the Tandberg 1700 and the system will automatically equalize sound levels so that loud and soft voices are picked up and transmitted to the far end at approximately the same level. 4. Screen/Monitor - The screen/monitor displays the far end or the near end image. 5. Inputs – The video conference system can be used for video conferences only or it can be used as both a video conference unit and a monitor for a pc or laptop depending on user preference. The inputs at the back of the unit allow you to choose your preferred set up. Tandberg 1700 MXP Inputs 6. Remote Control - The remote control is used to place calls, adjust the volume, navigate screens and select options. It controls all functions of the videoconferencing equipment. When the remote control is not in use, it should be secured in a safe place so it does not get misplaced, the equipment will not function without it. Page 4 of 14 MBTelehealth – Tandberg 1700 MXP User Guide The Tandberg MXP Remote Control Video Sources switch between Main Camera, Laptop, Document Camera, DVD / VCR and Aux Mic Off turns your microphone on and off. The Presentation key toggles between the laptop/pc and the main cam video sources Arrow Keys are used for navigation in the menu and for moving the camera Press Ok/Menu to show the menu and to select menu items. Use Zoom + and – to zoom the camera in and out. Volume + and – adjusts the system volume. Selfview video. The Layout key toggles between full screen and different display layouts. displays your outgoing Use the red End Call key to end the current call. If you press this key and you are not in a call, the system will go into Standby mode. Press the Call key to place a call. Camera Presets define specific camera positions. Press and hold a number key for 1 second to save the current camera position to that number key. To activate a preset press the Preset button then the corresponding number key Store and recall your video contacts via the system Phone Book for easy placement of calls. Number/Letter keys function in the same manner as with a mobile phone. Far End allows user to easily take far end control during a site to site event or change layouts in a multisite 3.0 GENERAL SET UP AND USE The following sections will provide instructions for setting up and using your Tandberg 1700 MXP to place and receive video conference calls. A Cheat Sheet is available in Appendix A for a quick reference on how to set up and use of your video conference system. 3.1 General Set Up To setup and use the Tandberg 1700 MXP videoconferencing equipment: 1. Position the equipment in the desired location 2. Connect the power cord to the unit (see inputs diagram on page 4 for location information) and the wall outlet. Page 5 of 14 MBTelehealth – Tandberg 1700 MXP User Guide 3. Connect one end of an Ethernet cable to the unit (see inputs diagram on page 4 for location information) and the other end to the Cisco 871 router. Connect a second Ethernet cable to the router and the MBTelehealth drop (labeled MBTelehealth or MBT) Note: When the cable is connected, the VPN light on the front of the Cisco 871 router will flash Green. 4. When the system boots up, press cancel once to remove the Main Menu from the startup screen. The Startup Screen Main menu 5. Remove the lens cover from the camera, and then adjust the focus using the dial on the front of the camera to ensure the participants are viewed clearly. 3.2 Mute/Microphone To mute the microphone: 1. Press the Mic Off button on the remote control. 2. An onscreen indicator will appear when the microphone is off. 3. Press the Mic Off button on the remote control again to unmute. The onscreen indicator will disappear from the screen. Make sure your site is on mute before making a call to the far end. Unmute when you are ready to begin the session. 3.3 Placing and Receiving a Video call To place a video call: 1. Press the Phone Book button directory. on the remote control to open the site Page 6 of 14 MBTelehealth – Tandberg 1700 MXP User Guide 2. Scroll down the list of contacts until you find the site you want to connect to, then press the Green Call Key on the remote control. Note: You can quickly skip to the site you are looking for using the corresponding number key on the remote control. For example, if you are looking for Pine Falls, press #7 on the remote to skip to the P section of the phone book. To accept an incoming video call: 1. MBTelehealth videoconferencing systems are set to Autoanswer On + Mic Off which means that the calls will be automatically answered with the microphone turned off 2. If the call status menu (shown below) appears while you are already connected, this means that there is an incoming call. Toggle to the red Reject icon in the Call Status Menu and press the OK button on the remote control to reject the call. Multi-site Sessions For sessions with 3 or more participating sites, you will be automatically dialed in by the MBTelehealth Service Desk. If you are participating in a multi-site session, have your equipment set up and turned on at least 15 minutes prior to the scheduled start time with the microphone on mute. Do not attempt to connect to another location. Page 7 of 14 MBTelehealth – Tandberg 1700 MXP User Guide 3.4 Adjusting the Volume To adjust the volume: 1. Press the Volume + or – key on the remote control to adjust the volume. The volume indicator appears on the top left corner of the screen. Remote Control Volume Indicator 2. When the volume is turned off, the volume indicator will appear onscreen. Press the Volume + key to turn on the sound and remove this indicator. Note: During a conference, all sites should be muted except the presenter site. If the participants at the far end are having trouble hearing, they may need to adjust their volume on their monitor in addition to the volume on the remote. It should be adjusted to at least the halfway point as shown below. Screen/Monitor Volume Indicator If you continue to have audio concerns, contact the MBTelehealth Service Desk at 1-866-667-9891 3.5 Far End Control Taking Far End Camera Control allows you to move the camera at the far end site as well as control their video sources and presets during Point- to- Point calls only. You cannot save far end camera presets. Before taking far end camera control, always request permission first and explain why you are taking control. You may need to take far end camera control if: There is an unskilled user at the far end. The user requests that you take control. If the user isn’t able to facilitate the event at their end. To use far end camera control during a point to point call: 1. Press the Far End button on the remote control. 2. Move the camera to the desired position using the directional arrows on the remote control. Zoom in and out on the person or item you want to see. 3. Press the Far End button again to turn far end control off Page 8 of 14 MBTelehealth – Tandberg 1700 MXP User Guide Note: Taking far end control of the camera may not always work especially if you are connecting to a videoconferencing system that is a different brand from the videoconferencing system you are using as they use different protocols. If having far end camera control is important during the session, disconnect from the call, re-establish the connection and try to take far end camera control again. To split the screen in a Multi-Point session: 1. Press the Far End button on the remote control then toggle through the layout options using the up arrow. 2. Press the Far End button again to turn far end control off 3.6 Layout (Picture in Picture) The layout button on the remote control makes it possible to see an image of what you are sending to the far end site in a small window in the corners of the screen (Picture in Picture [PIP]). The user can decide in which corner the second image is to be displayed. Example of PIP To use Picture in Picture (PIP): 1. Press the Layout button once on the remote control to bring up a PIP. 2. Press the Layout button again to move the PIP around in four corners of the screen and to finally hide it. 3. Press and hold the Layout button for 1 second to hide the small picture directly from any position. Note: It is recommended for all users to use the layout button after connecting to display an image of what they are sending to the far end site. The PIP acts as a constant reminder that the user is on camera and helps to ensure the far end sees the appropriate video source and camera view. 3.7 Selfview When the layout (PIP) is displayed on the video conference screen, the Selfview button can be used to swap images between the large and small windows. This is useful when Page 9 of 14 MBTelehealth – Tandberg 1700 MXP User Guide you want to share presentation or other video source to participants in the room and at the far end site. To swap images between the large and small screens: 1. Press the Selfview button once on the remote control move the near end to the large window. 2. Press the Selfview button again to swap the images back. 3.8 Disconnecting from a Call To disconnect from a call: 1. Mute the microphone by pressing Mic Off. 2. Press the red End Call Key call. two times on the remote control to disconnect a Another method to disconnect a call is to press the Menu key on the remote control. When the End Call Dialogue box is displayed, select the red End Call icon by pressing the OK button on the remote control. End Call Dialogue Box 3. Push the on/off switch located at the back of the codec (if applicable). 4. Place the remote control in a safe area. It takes a few moments for the audio to turn off when disconnecting from a call. Therefore, it is important to mute the microphone when the session is over. 4.0 CONNECTING A LAPTOP/PC To connect a laptop or PC to the Tandberg 1700: Page 10 of 14 MBTelehealth – Tandberg 1700 MXP User Guide 1. Connect the DVI end of the cable provided to the PC in (DVI) input on the back on the Tandberg 1700 2. Connect the other end of the cable to the VGA output on the laptop or PC. DVI Connector VGA Connector 3. Plug in and turn on the laptop or PC. 4. Press the Presentation button on the remote control to access the PC Video Source. 5. You should now see your PC image displayed on the video conference monitor. 6. If you see a message that says PC Not Connected, do the following: on the laptop keyboard, press the Function key (Fn) and the appropriate F key (often F5, F8 or F10) simultaneously. A display options menu should appear; select the option to display on both as shown below. Display options 7. Press the Presentation button again to return to the Main Camera view. 8. To disconnect, remove the VGA cable from the laptop. Note: If you are experiencing any problems with the videoconferencing equipment or connecting the laptop to the equipment, please contact the MBT Service Desk for assistance. Page 11 of 14 MBTelehealth – Tandberg 1700 MXP User Guide 5.0 GLOSSARY OF TERMS Bandwidth The amount of data that can be transmitted in a fixed amount of time. For example, the higher the amount of data transmitted will result in a higher quality video call. Bandwidth is usually expressed in bits per second (bps) or bytes per second. Codec The word codec comes from a combination of the two words compression and decompression. The main task of the codec is the compression of outgoing video, audio and data, the transmission of this information to the far end and the decompression of the incoming information. Ethernet Cable Type of cable that connects to the Local Area Network (LAN). Far End Site In a videoconferencing session, far end site refers to the remote conference site. Far End Camera Control Taking control of the camera at the far end site. Near End In a videoconferencing session, near end refers to the site making the videoconference call. Picture in Picture (PIP) This feature makes it possible to see a second image in a smaller view in one of the corners of the screen (this is known as Picture in Picture [PIP]). The second image will be placed on top of the main image. The user can decide in which corner the second image is to be displayed. PIP will always appear on the main monitor. Camera Presets Predefined camera positions (and video sources). Selfview The outgoing video from the main camera which shows the user of the system. S-Video Cable Super-Video cable. The video signals are transmitted through a cable which is divided into two separate signals: one for color (chrominance), and the other for brightness (luminance). Table Microphone A high quality microphone that is designed to be used on a table top during a videoconferencing session. Page 12 of 14 MBTelehealth – Tandberg 1700 MXP User Guide 6.0 TROUBLESHOOTING 6.1 Audio Issues Issue Far-end site unable to hear you Possible Cause(s) Resolution Your microphone is muted Your microphone is obstructed or too far from the person speaking Unable to hear far-end site Microphone is muted at far end site Near end monitor and/or codec Volume is too low Audio distortion from far-end site Echo or distortion at near-end when people speaking Far site monitor volume is too high Far-end microphone is situated too close to the monitor Speaker/volume is too high on farend monitor Un-mute your microphone (check for icon in top right corner) Check microphone and ensure it points towards the person speaking Try to instruct far site to un-mute their microphone Increase the volume on the monitor and/or the codec Turn down the volume on the far end monitor Ask to move microphone further away from monitor Ask far-end site to turn volume down on their monitor. 6.2 Video Issues Issue Possible Cause(s) Resolution Picture is blank on the monitor System has gone into “sleep” mode Monitor has been powered off Monitor input has changed Near-end site unable to hear or see the picture from far-end peripheral Proper input has not been selected Cables are not properly connected Pick up the remote, system will reactivate in normal mode. Turn the monitor on Check to see if the monitor input has been changed (using the select or input button on the TV Monitor) Check for correct input selection on remote control Check that output from laptop patient camera, VCR, or document camera are connected properly If you are experiencing any problems with the videoconferencing equipment or have any questions, please contact the service desk for assistance: Winnipeg or outside of Manitoba Phone: (204) 975-7714 Outside of Winnipeg (within Manitoba only) Phone: 1-866-667-9891 (toll free) Page 13 of 14 MBTelehealth – Tandberg 1700 MXP User Guide 7.0 AKNOWLEDGEMENTS Tandberg www.tandberg.net MBTelehealth www.mbtelehealth.ca APPENDIX A – 1700 MXP CHEAT SHEET Double Click Word Icon to Open Printable Version 1700 Cheat Sheet Page 14 of 14