1
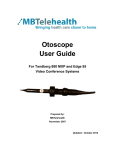
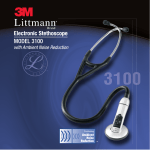
`
Zargis TeleSteth and the
Littmann 3200
Electronic Stethoscope
USER GUIDE
Version 1.3
Prepared by:
MBTelehealth
February 2010
Updated: July 2011
MBTelehealth – Zargis TeleSteth
TABLE OF CONTENTS
1.0 EQUIPMENT REQUIRED ...................................................................................................3 2.0 SET UP ................................................................................................................................3 3.0 CONNECTING THE PATIENT SITE ...................................................................................4 4.0 CONNECTING THE PROVIDER SITE ...............................................................................5 5.0 INSTRUCTIONS FOR USE.................................................................................................6 5.1 Chestpiece Buttons and Indicators .................................................................................6 5.2 Selecting a Filter..............................................................................................................7 5.3 Adjust Sound Amplification .............................................................................................7 5.4 Placement Indicator Diagram ..........................................................................................7 5.5 Battery Replacement .......................................................................................................9 5.6 Position Headset .............................................................................................................9 5.7 Adjust Headset for Comfort .............................................................................................9 5.8 Monitor Patient Heart Rate............................................................................................10 6.0 APPENDIX A - TECHNIQUES OF AUSCULTATION .......................................................10 7.0 APPENDIX B – TROUBLESHOOTING .............................................................................11 Page 2 of 11
MBTelehealth – Zargis TeleSteth
1.0
EQUIPMENT REQUIRED
1. A video conference unit connected to the MBTelehealth Network
2. A laptop that has the TeleSteth Application Installed and is configured to work
with the Video Conference unit
Note: The laptop will only work with a designated video conference unit unless
the IP address is changed. Contact the MBTelehealth Service Desk at
1-866-667-9891 Option 1 if you need to make a change.
3. A Littman 3200 Electronic Stethoscope
4. A Zargis Medical Wireless Dongle
2.0
SET UP
To set up the TeleSteth Application and the Littman 3200:
1. Connect an Ethernet cable from the laptop to port FE1 on the Cisco router or if
there is no router present, plug the Ethernet cable into the identified drop on the
wall
MBT
or
From Laptop
Steth
2. Plug in and turn on the laptop.
3. Plug the Zargis Medical wireless dongle into a USB port on the laptop (it will
flash Green when connected)
* Note: The USB port may located be on either side of the laptop or the back
Page 3 of 11
MBTelehealth – Zargis TeleSteth
4. Turn on the Littman 3200 by pressing the power button
Power
5. Double click the TeleSteth Icon
on the laptop to launch the application
Note: It may take between 30 and 60 seconds to open. Be patient
6. Enter the user name and password located on the bottom left hand corner of
your laptop.
Note: The password is always 1Mbtsteth and it is case sensitive
3.0
CONNECTING THE PATIENT SITE
1. Click the Host a Session button then follow the instructions to connect the
Stethoscope.
Note: Once the stethoscope is connected, the My Stethscope status will change
from a red X to a green checkmark
M
Page 4 of 11
MBTelehealth – Zargis TeleSteth
2. Read the Session ID to the Provider
The provider can
use this diagram
to give direction
on placement of
the stethoscope
on the patient
3. Once connected, watch the placement indicator (white dot) for placement
instructions from the provider.
4.0
CONNECTING THE PROVIDER SITE
1. Click the Join a Session button then enter the Session ID provided by the
patient site and press Join
Page 5 of 11
MBTelehealth – Zargis TeleSteth
2. Click Play to Stethoscope then follow the instructions to connect the
stethoscope
Click the location you
want the stethoscope
placed
M
Note: If Play to Stethoscope is already selected, click the Red X beside My
Stethscope and then follow the instructions to connect
3. Once connected, use the white dot to provide placement instructions for the
patient site (see 5.3 for instructions for use).
5.0
INSTRUCTIONS FOR USE
Once connected through the TeleSteth software, adjustments can be made to the device
to ensure optimum performance.
5.1
Chestpiece Buttons and Indicators
Page 6 of 11
MBTelehealth – Zargis TeleSteth
5.2
Selecting a Filter
The electronic stethoscope allows the user to select between three different digital
frequency filters to better emphasize the specific patient sounds of interest. Filter
settings are adjusted by the provider and are not dependent on the facilitator at the client
end. The default setting is the Diaphragm filter.
Press the filter button on the chestpiece to toggle between options.
5.3
Adjust Sound Amplification
The Model 3200 sound level can be amplified in 8 increments up to 24X amplification of a non‐
electronic (cardiology‐level) stethoscope. Level 1 is equal to a non‐electronic stethoscope. Level 9 is equal to 24X amplification of a non‐electronic stethoscope. The greater the amplification, the more bars you will see. • Increase Amplification: Press ( + ) button until desired amplification level is achieved • Decrease Amplification: Press ( ‐ ) button until desired amplification level is achieved 5.4
Placement Indicator Diagram
The Zargis software includes an option for identifying the desired location of the
stethoscope. By clicking on the model, a provider can indicate to the patient site the
exact location the want the stethoscope to be placed. Clicking in the desired location
moves the white dot to that location on both the provider and patient site displays.
There are four (4) options for torso display that can be selected by clicking on the
desired option and there are also preset sites that can be selected from a drop down
listing. The patient site sees exactly what the provider site sees.
Page 7 of 11
MBTelehealth – Zargis TeleSteth
To use the placement indicator diagram:
1. Instruct the patient site to look at the laptop and find the white dot on the model
2. Click the desired location for stethoscope placement
3. Ask the patient site to place the stethoscope in that location
4. Click the torso display options to change display or select from the preset
placement sites to select specific locations
Placement Indicator
Preset Placement Sites
Torso Display Options
Note: See below for recommended location for holding the stethoscope while in
use.
Page 8 of 11
MBTelehealth – Zargis TeleSteth
5.5
Battery Replacement
5.6
Position Headset
Eartips should point in a forward direction as you insert them into your ear canals. When ear tips are properly positioned, diaphragm will face towards your body. Your new 3M™ Littmann® Electronic Stethoscope Model 3200 is designed to give you a very comfortable, acoustically sealed fit. It comes with two sizes of eartips to assure a perfect fit. The large eartips are pre‐
installed. Smaller eartips are included in package. Please choose the set that is most comfortable for you. To remove eartips, pull eartips firmly away from eartube. To apply new eartips, push eartip firmly onto eartube to secure. 5.7
Adjust Headset for Comfort
To reduce spring tension in the headset, hold each eartube at the bend near the eartips and gradually pull apart until fully extended (180 degrees). To increase spring tension, grasp the headset with one hand where the metal eartubes enter the plastic tubing, and squeeze until the plastic tubing on one eartube touches the other. Repeat as necessary. Page 9 of 11
MBTelehealth – Zargis TeleSteth
5.8
Monitor Patient Heart Rate
The Model 3200 detects and displays an acoustic‐based heart rate when presented with consistent heart sounds (heart rate variation < 10%). It takes five seconds to compute the initial heart rate and updates are provided every two seconds. The heart rate will then be displayed for 10 seconds after removal of the chestpiece from the patient. Prior to the initial reading, the display shows two dashes (‐‐). For heart rates outside a range of 30‐199 bpm, the display will also show two dashes (‐‐). The acoustic‐based heart rate display functions best when the Model 3200 is placed near the apex of the patient’s heart and can be monitored while using any filter mode and/or volume level. If the heart rate changes from consistent to inconsistent or if there is excessive ambient noise, patient movement or lung sounds during auscultation, the heart rate display number will display two dashes (‐‐). 6.0
APPENDIX A - TECHNIQUES OF AUSCULTATION
The following are recommendations to perform adequate
auscultation:
1. A quiet, well lit, warm room. [This eliminates extraneous
noise and facilitates cardiac inspection.]
2. A properly disrobed patient. [This permits the stethoscope to
be placed directly on the chest.]
3. Ability to examine patient supine, sitting, and in left lateral
recumbent positions (see Diagram A). [Various sounds,
especially abnormal sounds, may be elicited in different
positions.]
4. Ability to examine from right side. [This decreases the
likelihood of producing extraneous sounds from the tubing of
the stethoscope hitting objects.]
Diagram A
5. A stethoscope with both a bell and diaphragm or capacity to
act as a bell and diaphragm. [The bell when held lightly against
the chest picks up sounds of low frequency. The diaphragm
when firmly pressed so that it leaves an after imprint picks up
sounds of high frequency.]
6. A sequence of auscultation (see Diagram B). Minimally four
areas should be auscultated using first the diaphragm and then
the bell:
a. Left Lateral Sternal Border (LLSB)-the fourth intercostal
space to the left of the sternum. Tricuspid and right heart
sounds are heard best in this area.
b. Apex-the fifth intercostal space in the midclavicular line.
Page 10 of 11
Diagram B
MBTelehealth – Zargis TeleSteth
Mitral and left heart sounds are heard best in this area.
c. Base Right-second intercostal space to the right of the
sternum. Sounds from the aortic valve are best heard here.
d. Base Left-second intercostal space to the left of the
sternum. Sounds from the pulmonic valve are best heard here.
7. Ability to selectively listen. [One sound at a time is attended
to. When listening to sounds in systole, sounds in diastole are
initially ignored.]
The sequence listed above is only one of the many acceptable
ones. The important point is that the four areas mentioned are
auscultated each time in a consistent manner, and that each
area is assessed for sounds of both low and high frequencies.
Differences in Acoustics
There are many factors that contribute to acoustic response, such as a complete seal from the
point of auscultation to the stethoscope user's ear canal.
Our laboratory results do not include factors like ambient noise, motion artifact, and ear canal
seal. Because of these variables and differences in each individual's hearing ability, we
recommend trying different stethoscope models before purchasing.
7.0
APPENDIX B – TROUBLESHOOTING
Contact the MBTelehealth Service Desk at 1‐866‐667‐9891 Option 1 Page 11 of 11