1
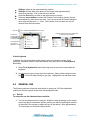
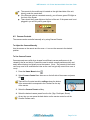
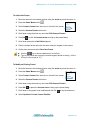
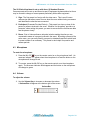
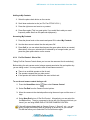
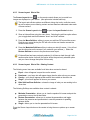
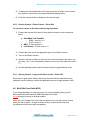
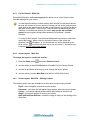
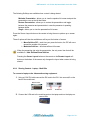
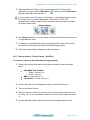
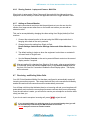
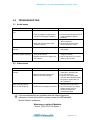
Cisco VX Clinical Assistant Mobile Cart User Guide Prepared by: MBTelehealth Rev 26May2014 MBTelehealth – VX Clinical Assistant Mobile Cart User Guide Table of Contents CISCO 1 1.0 OBJECTIVES ...................................................................................................................... 3 2.0 OVERVIEW ......................................................................................................................... 3 3.0 BASIC NAVIGATION ........................................................................................................... 5 4.0 GENERAL USE ................................................................................................................... 6 4.1 Set Up ............................................................................................................................. 6 4.2 Camera Controls ............................................................................................................. 7 4.3 Microphone ...................................................................................................................... 9 4.4 Volume ............................................................................................................................ 9 4.5 Site to Site Calls ............................................................................................................10 4.5.1 Making video calls to MBT Site ..............................................................................................10 4.5.2 Making video calls to a site outside the MBT Network ..........................................................10 4.5.3 Using My Contacts or Recent Calls .........................................................................................10 4.5.4 Far End Control: Site to Site ...................................................................................................11 4.5.5 Screen Layout: Site to Site .....................................................................................................12 4.5.6 Screen Layout: Site to Site - Sharing Content ........................................................................12 4.5.7 Sharing Content: Laptop - Site to Site ....................................................................................13 4.5.8 Sharing Content: Patient Camera - Site to Site .......................................................................14 4.5.9 Sharing Content: Laptop and Patient Camera - Site to Site ....................................................14 4.6 Multi-Site Event Calls (MCU) ........................................................................................14 4.6.1 Far End Control: Multi-Site ....................................................................................................15 4.6.2 Screen Layout: Multi Site ......................................................................................................15 4.6.3 Screen Layout: Multi Site – Sharing Content .........................................................................15 4.6.4 Sharing Content: Laptop – Multi Site .....................................................................................16 4.6.5 Sharing Content: Patient Camera - Multi Site .......................................................................17 4.6.6 Sharing Content: Laptop and Camera - Multi Site .................................................................18 4.6.7 Adding an External Monitor ....................................................................................................18 4.7 Receiving and Ending Video Calls ...............................................................................18 4.8 Dual Video .....................................................................................................................19 5.0 5.1 5.2 TROUBLESHOOTING ......................................................................................................20 Audio Issues ..................................................................................................................20 Video Issues ..................................................................................................................20 6.0 ADDITIONAL TRAINING INFORMATION ........................................................................21 7.0 VIDEOCONFERENCING ETIQUETTE .............................................................................21 Page 2 of 21 MBTelehealth – VX Clinical Assistant Mobile Cart User Guide 1.0 OBJECTIVES This user guide will provide you with an overview and the knowledge to setup and use the VX Clinical Cart videoconference solution and the TRC5 remote Learning Outcomes: After reviewing this guide, you should be able to: 1. Identify and explain the main parts of your videoconference solution. 2. Use the remote control or the source buttons on the cart to navigate through the menus, set camera presets, and access additional video sources. 3. Setup and use the equipment. 2.0 OVERVIEW The main components included with the VX Clinical Assistant solution are the Camera, Codec, Ethernet Cable, Microphone, Screen/Monitor and Remote Control. Page 3 of 21 MBTelehealth – VX Clinical Assistant Mobile Cart User Guide 1. Camera - The built-in camera is a high quality imaging device which transmits images to the screen/monitor. The camera movements are controlled by a wireless infra-red (IR) remote control that controls a variety of functions, both on the near and far end. 2. Codec - The codec is the central part of the videoconferencing equipment. The main task of the codec is the compression of outgoing video, audio and data, the decompression of the incoming information and the transmission of this information between endpoints. The name codec comes from a combination of the two words compression and decompression. 3. Microphone - The microphone will automatically equalize sound levels so that loud and soft voices are picked up and transmitted to the far end at approximately the same level. 4. Screen/Monitor – The built-in screen/monitor displays the far end or the near end image and content as selected by the user. 5. Remote Control - The remote control is used to place calls, adjust the volume, navigate screens and select options. It controls all functions of the videoconferencing equipment. The source control buttons on the front of the cart can be used as well. The SOURCE CONTROLS located on the front of the cart allow the user to select and display peripheral devices that are connected to the back of the videoconference solution. The Cisco TR5 Remote Control Page 4 of 21 MBTelehealth – VX Clinical Assistant Mobile Cart User Guide Home 3.0 BASIC NAVIGATION The remote control is used to operate your video equipment in conjunction with the source controls found on the front of the cart. Refer to the diagrams in the previous section for a description of each of the buttons. Here are some commonly used buttons on the remote and navigation options. Home Key - used to access the Home menu or display source softkeys. Continue pressing to toggle between options. Arrow Keys - found in the centre of the remote and used to navigate menus. Back Arrow - used to collapse a menu or “go back” one level. Enter Key – used to accept or select an entry. Cancel/Clear key - used to remove characters from a text field. 5 Function Buttons - found on the top of the remote and correspond with context sensitive softkeys that will appear at the bottom of the screen. Screen Layout Button – allows you to change the layout of the images on your screen (includes selfview option) Page 5 of 21 MBTelehealth – VX Clinical Assistant Mobile Cart User Guide Softkeys default to the camera selection options. Softkeys will auto hide at the bottom of the screen after approximately 5 seconds of inactivity. Pick up the remote to unhide. Press the Exit softkey to return to the previous menu choices. Press any arrow button to access the Camera Control softkey options (far end, camera presets, main source and exit). You can now move the camera using the arrow keys and the zoom +/-. Note: The Camera Control screen can also be selected from the home menu. Press the key to display the Home menu on the screen. The element currently selected is indicated by an orange rectangle. Use the up/down Arrow keys to Navigate in a menu. Example showing a sub menu displayed by pressing the right arrow key. The little triangle indicates that a submenu is available. Virtual Keyboard In addition to using the keypad on the remote control you can also use the virtual keyboard. Whenever there is a field that requires entry there will be a Turn Keyboard On softkey. 1. Select Turn Keyboard On and use the Up arrow to move the cursor inside the keyboard. 2. Use all 4 arrow keys to move about the keyboard. Select a letter using the enter key. The list will keep filtering as you type. Highlight the site and press enter. 4.0 GENERAL USE The following sections will provide instructions for using your VX Clinical Assistant mobile cart solution to place and receive videoconference calls. 4.1 Set Up To setup and use the videoconference solution: 1. Turn on the screen/monitor if required. Wake the codec by picking up the remote control and point it towards the system (ensure your hand is touching the sensors on the sides of the remote) or press any key on the remote. After approximately 15-20 seconds you will see the home screen. Page 6 of 21 MBTelehealth – VX Clinical Assistant Mobile Cart User Guide The remote for the mobile cart is located on the right hand side of the unit, directly under the round shelf. If the Ethernet cable is connected correctly, you will see a green VPN light on the front of the Router. There should be 5 green lights on the front of the cart. If the power cord is not plugged in you will only see 4 green lights. 4.2 Camera Controls The camera can be controlled manually or by using Camera Presets. To Adjust the Camera Manually Use the arrows on the remote and the zoom +/- to move the camera to the desired position. To Use Camera Presets Camera presets are useful when images from different camera positions are to be viewed by the far end site(s). Presets are used to switch camera positions quickly and easily without having to manually move the camera. (Note: The presets on the mobile carts may need to be modified each time as the carts are typically moved from room to room) 1. Press the Home Menu button . 2. Select Camera Control from the menu on the left side of the screen and press OK . There will be 5 context sensitive softkeys along the bottom of the screen which correspond to the 5 buttons on the top of the remote. 3. Select the Camera Presets softkey. 4. Select the desired camera preset from the list. (Sign, Participant, Room) At any time you can press the back button on the remote control to exit the Camera Presets menu, Page 7 of 21 MBTelehealth – VX Clinical Assistant Mobile Cart User Guide To Add a New Preset: 1. Move the camera to the desired position using the arrow keys and the zoom +/-. 2. Press the Home Menu button . 3. Select Camera Control from the menu on the left of the screen. 4. Select the Camera Presets soft button. 5. Scroll down using the arrow key and select Edit Camera Presets. 6. Click OK or click the forward arrow to bring up the preset listing. 7. Scroll down and select a Not Defined preset. 8. Click the forward arrow and enter the name using the keypad on the remote. 9. Hit the down arrow and select Save New Preset. Use the key to remove characters in a text field. Type in the preset name using the remote keypad (similar to texting – hit the #7 key 4 times to get an “S”). To Modify an Existing Preset: 1. Move the camera to the desired position using the arrow keys and the zoom +/-. 2. Press the Home Menu button . 3. Select Camera Control from the menu on the left of the screen. 4. Select the Camera Presets soft button. 5. Scroll down using the arrow key and select Edit Camera Presets. 6. Press OK or press the forward arrow to bring up the preset listing. 7. Scroll down to the preset to be modified and click OK or the forward arrow. 8. Select Update to Current Camera Position. Page 8 of 21 MBTelehealth – VX Clinical Assistant Mobile Cart User Guide The VX Clinical Assistant is set up with three (3) Standard Presets: Camera presets will be set up and saved as part of equipment implementation but there may be a need to change or resave presets particularly with mobile equipment. 1. Sign - The first preset is of a sign with the sites name. This is an off screen camera view that allows users to move about the room without being on camera and identifies the sites that are connected. 2. Participant (Presenter/Provider/Patient) – This preset is a close up view of the person or persons involved in the event. Whether it is the patient, provider or a presenter, when setting this preset, you want to ensure that the far sites are able see the person clearly. 3. Room –Part of videoconference etiquette includes making the sites you are connected to aware of everyone involved in the event. By setting a preset of the entire room, you can easily identify everyone in attendance and then switch back to preset number 2 as necessary. This preset is also helpful for question and answer periods. 4.3 Microphone To mute the microphone: 1. Press the Mic Off key on the remote control or on the microphone itself. An onscreen indicator will appear when the microphone is off and the button on the microphone will change to red. 2. To unmute, press the Mic Off key on the remote control or on the microphone again. The onscreen indicator will disappear and the button on the microphone will change to green. 4.4 Volume To adjust the volume: 1. Use the Volume Key to increase or decrease the volume. A Volume Bar will appear at the bottom right of the screen Volume Bar Page 9 of 21 MBTelehealth – VX Clinical Assistant Mobile Cart User Guide 4.5 Site to Site Calls 4.5.1 Making video calls to MBT Site 1. For connections to MBT Sites, press the Phone Book button . 2. Scroll down the list of contacts to find the site and equipment you are scheduled to connect to and press to initiate the call. You can also use the Search field to find the site you are scheduled to connect to by typing the name using the keypad on the remote or the virtual keyboard. 4.5.2 Making video calls to a site outside the MBT Network 1. Click the Home menu button and select Call from the menu. 2. Enter the dial in number you have been provided using the number keypad on the remote then press the green call button on the remote control. 4.5.3 Using My Contacts or Recent Calls These options apply to both MBT sites and calls outside of the MBT network. Using the Call option from the Home menu to access Recent Calls 1. Select Phone Book . 2. Use the down arrow to scroll or start typing the site name. 3. Key the information directly by entering the site name or out of network phone number. Use function key #1 on the remote to toggle between abc/123. Start typing; if you type an “F” the listing will bring up all sites that include an “F” in the name. 4. The recent calls will appear above the matching phone book entries. 5. Use the down arrow and OK to select the site and click Call. Alternately, you can click the green phone button on the remote once you have selected the site. Using the green phone button on the remote to access Recent Calls This option just brings up recent calls. (note: sites such as the rural RHA’s may like this option as they often call the same sites and this will reduce the amount of scrolling through the entire contact list or the number of steps required to access recent calls using the Home menu as described above.) Page 10 of 21 MBTelehealth – VX Clinical Assistant Mobile Cart User Guide Adding to My Contacts 1. Select the phone book button on the remote. 2. Scroll down and select a site (ex: Flin Flon-FFPHC-VCU1 ). 3. Press the right arrow and save to my contact. 4. Press Save again (This is a great option if you would like to add your most frequently called sites from this particular equipment). Accessing My Contacts 1. Press the phone book on the remote and press OK to select My Contacts. 2. Use the down arrow to select the site and press OK. 3. Press Call (or you can select the site press the green phone button on remote) Alternatively, once your selected site is indicated by an orange border you can press the green phone button on the remote. 4.5.4 Far End Control: Site to Site Taking Far End Camera Control allows you to move the camera at the far end site(s). Before taking far end camera control, always request permission first and explain why you are taking control. You may need to take far end camera control if: There is an unskilled operator at the far end. The operator requests that you take control. If the operator isn’t able to facilitate the event at their end. To use far end camera control during a call: 1. Press the Home Menu button then select Camera Control 2. Select Far End from the Camera Control options. 3. Move the camera to the desired position using the arrow keys and the zoom +/keys. 4. Select Near End to turn off Far End Control. Alternatively you can select the the Exit soft key. There is a message in the top left of the screen which lets you know if you are using NEAR END or FAR END CAMERA CONTROL. If the soft buttons change back to Camera, Source 1, Source 2, etc…you can quickly change the soft keys back by pressing an arrow key on your remote. This will then allow you to select the Far End soft button again. Page 11 of 21 MBTelehealth – VX Clinical Assistant Mobile Cart User Guide 4.5.5 Screen Layout: Site to Site The Screen Layout button on the remote control allows you to control how images are displayed on your screen. (this option also includes selfview) The layout and selfview options are different during site to site, multi-site events as well as when you are sharing content and are therefore addressed under each of those sections. 1. Press the Screen Layout button to open the Layout Control window. 2. Show or hide selfview using the menu items. Selecting the selfview option allows you to toggle back and forth between “show” and “hide” selfview. 3. Press the Move Selfview softkey to move your selfview PIP around the screen. Each time you press the key the PIP will move to the next location around the outside of the screen. 4. Press the Maximize Selfview soft key to show your site full screen. (You will not see the other sites on the screen if you maximize your selfview.) Select the Restore Selfview to return to the previous screen layout. If hide selfview has been previously selected, it will have a slash through it with another option below it as well (the option will be the previously selected option and you cannot change that option in this mode) 4.5.6 Screen Layout: Site to Site - Sharing Content The following menu items are available for all sites when content is shared: Equal – sites will appear in equal size on the screen Prominent - your home site will appear larger than the other site on your screen Overlay - your site will appear smaller and will be overlaid on the other site Single - your site will appear full size on your screen Hide Selfview/Show Selfview – shows the image of what you are sending to the other sites. The following Softkeys are available when content is shared: Minimize Presentation - allows you to view the speaker full screen and puts the presentation over on the left hand side. Restore Presentation - allows you to restore the presentation and toggle between the presenter and presentation in case the presenter is speaking between slides. Single - allows you to view the presentation full screen. Press the Screen Layout button on the remote to bring the menu options up on screen again. Page 12 of 21 MBTelehealth – VX Clinical Assistant Mobile Cart User Guide These 2 options will also be available as soft keys at the bottom of screen: Move Selfview PIP – each time your press the button, the PIP will move around the outside of the screen. Maximize Selfview – will show selfview full screen When the presenting site exits the presentation, the only menu items that will be available is: Hide Selfview/Show Selfview Pressing the Screen Layout button on the remote or the Remote Layout soft button on the bottom of the screen only changes the layout when a site is sharing content. 4.5.7 Sharing Content: Laptop - Site to Site To connect a laptop to the videoconferencing equipment: 1. Using a VGA/ DVI cable, connect the DVI end to the DVI-I into source 3 at the back of the mobile cart. Do not plug it into the one that shows a picture of a PC. DVI Connector Source 3 Do Not Use 2. Connect the VGA end to the matching port on the laptop and turn the laptop on. VGA Connector 3. Press and hold the PC button on the remote and select PC as the source and then select the source 3 softkey or the source 3 button on the cart. (Alternately you can select the Home Menu button and select Presentation and then select PC on the sub menu.) If you do not see your PC image, do the following: on the laptop keyboard, press the Function key (Fn) and the appropriate F key (often F5, F8 or F10) simultaneously. A display options menu will appear, select the option to display on both as shown below. Display options 4. Use camera and source 3 on either the remote or the cart to toggle between views. Page 13 of 21 MBTelehealth – VX Clinical Assistant Mobile Cart User Guide 5. To display the local presentation full screen, press the PC button on the remote then press the layout button and select the desired display option. 6. Press the camera softkey to display the far end site again. 4.5.8 Sharing Content: Patient Camera - Site to Site To connect a camera to the videoconferencing equipment: 1. Connect the camera to the back of the mobile cart based on the connections below: GlobalMed Total ExamHD: o HDMI – source 1 or 2 o DVI-D - source 3 AMD: S Video source 1-3 LibreStream: S Video source 1-3 2. Connect the other end to the appropriate port on the Patient Camera. 3. Turn on the Patient Camera. 4. Select the soft key or button on the front of the cart that matches the source you are using. (Ex: if you connected the cable into source #2, then select the source 2.) 5. Use the applicable source and the camera source to toggle between views. 4.5.9 Sharing Content: Laptop and Patient Camera - Site to Site When both a Laptop and a Patient Camera will be used with the videoconferencing equipment use the softkeys to select the applicable sources to toggle between views. 4.6 Multi-Site Event Calls (MCU) If you are participating in a multi-site event (3 or more participating sites) you will be automatically connected by the MBTelehealth service desk. Do not attempt to connect to another location. When your unit accepts a call it turns the microphone off so you will need to unmute when you wish to speak. In larger multi-site events, all sites should keep their microphones muted unless they are speaking. Page 14 of 21 MBTelehealth – VX Clinical Assistant Mobile Cart User Guide 4.6.1 Far End Control: Multi-Site During Multi-Site calls, the Screen Layout button allows you to control how the other sites are displayed on your screen. You also have the ability to control another site’s camera, but this feature should be used with caution as you run the risk of locking one site as the focal point and when another site speaks you will be able to hear them but you will not be able to see them on the screen. If this occurs, it may be hard to troubleshoot the issue. Therefore, it would be best practice for sites to only use the Up and Down arrows for layout options except when assisted by a Facilitator – eHealth Solutions. To control a site’s camera: Use the forward/backward arrow keys to rotate sites around the screen. When a site is in the top left corner of the screen the presenter icon will appear. In 1-2 seconds the icon will be replaced by the arrow control icon which will allow you to use your zoom +/- and arrow keys to operate that particular site’s camera. 4.6.2 Screen Layout: Multi Site To change the layout in a multi-site session: 1. Press the Home button then select Camera Control. 2. Use the softkey to select Far End which will enable Far End Camera Control. 3. Use the Up and Down arrow keys to scroll through the layout options. 4. Use the soft key to select Near End which will turn off Far End Control. 4.6.3 Screen Layout: Multi Site – Sharing Content The following menu items are available for all sites when content is being shared: Equal – sites will appear in equal size on the screen Prominent - your home site will appear larger than the other site on your screen Overlay - your site will appear smaller and will be overlaid on the other site Single - your site will appear full size on your screen Hide Selfview/Show Selfview – shows the image of what you are sending to the other sites. Page 15 of 21 MBTelehealth – VX Clinical Assistant Mobile Cart User Guide The following Softkeys are available when content is being shared: Minimize Presentation - allows you to view the speaker full screen and puts the presentation over on the left hand side. Restore Presentation - allows you to restore the presentation and toggle between the presenter and presentation in case the presenter is speaking between slides. Single - allows you to view the presentation full screen. Press the Screen Layout button on the remote to bring the menu options up on screen again. These 2 options will also be available as soft keys at the bottom of screen: Move Selfview PIP – each time your press the button, the PIP will move around the outside of the screen. Maximize Selfview – will show selfview full screen When the presenting site exits the presentation, the only menu item that will be available is: Hide Selfview/Show Selfview Pressing the Screen Layout button on the remote or the Remote Layout soft button on the bottom of the screen only changes the layout when content is being shared. 4.6.4 Sharing Content: Laptop – Multi Site To connect a laptop to the videoconferencing equipment: 1. Using a VGA/ DVI cable connect the DVI end to the DVI-I into source #3 on the back of the mobile cart. DVI Connector Source 3 Do Not Use 2. Connect the VGA end to the matching port on the laptop and turn the laptop on. VGA Connector Page 16 of 21 MBTelehealth – VX Clinical Assistant Mobile Cart User Guide 3. Press and hold the PC button on the remote and select PC as the source. (Alternately, you can select the Main Menu and then select PC on the sub menu.) button and select Presentation If you do not see your PC image, do the following: on the laptop keyboard, press the Function key (Fn) and the appropriate F key (often F5, F8 or F10) simultaneously. A display options menu will appear, select the option to display on both as shown below. Display options 4. Use Camera and Source 3 on the remote or the Source Control panel on the cart to toggle between views. 5. To display the local presentation full screen press the PC button on the remote then press the layout button and select the desired display option. 6. Press the camera softkey to display the other sites again. 4.6.5 Sharing Content: Patient Camera - Multi Site To connect a camera to the videoconferencing equipment: 1. Connect the camera to the back of the mobile cart based on the connections below: GlobalMed Total ExamHD: o HDMI – source 1 or 2 o DVI-D - source 3 AMD: S Video source 1-3 LibreStream: S Video source 1-3 2. Connect the other end to the appropriate port on the Patient Camera. 3. Turn on the Patient Camera. 4. Select the soft key or button on the front of the cart that matches the source you are using. (Ex: if you connected the cable into source #2, then select the source 2.) 5. Use the applicable source and the camera source to toggle between views. Page 17 of 21 MBTelehealth – VX Clinical Assistant Mobile Cart User Guide 4.6.6 Sharing Content: Laptop and Camera - Multi Site When both a Laptop and a Patient Camera will be used with the videoconferencing equipment use the softkeys to select the applicable sources to toggle between views. 4.6.7 Adding an External Monitor If you require an external monitor so that the participants at your site can view the session on a larger screen rather than on the mobile cart screen you can add an external monitor. This can be accomplished by changing the video setting from Single (default) to Dual monitors. 1. Connect the external monitor to the cart using the HDMI output cable that is hanging at the back of the cart’s pedestal. 2. Change the monitor setting from Single to Dual: Home>Settings>Administrative Settings>Advanced>Video>Monitors. Set to Dual. 3. The default setting is single so when the equipment is shut down or restarted it will revert back to Single mode. 4. Use the Source Controls on the cart to present different content on the second display monitor if required. Alternate method for changing from Single to Dual mode: when a second display is connected, press and hold the Layout button on the Source Control panel on the front of the cart for 5 seconds to enable the Dual Display option. The display will be mirrored. 4.7 Receiving and Ending Video Calls Your VX Clinical Assistant Mobile Cart has been configured to automatically accept all incoming connection requests. This means that both site to site connections initiated by another site and multi-site connections will be automatically connected. You will hear a dial tone that indicates there is an incoming call and your microphone will automatically mute so that the connecting site cannot overhear what you are discussing. Once the connection is made, you will need to unmute your microphone so that the other site(s) can hear you. If you do not want to accept an incoming call, press to reject the call. If you are participating in a multi-site event (3 or more participating sites) you will be automatically connected by the MBTelehealth service desk. Do not attempt to connect to another location. Page 18 of 21 MBTelehealth – VX Clinical Assistant Mobile Cart User Guide When your unit accepts a call it turns the microphone off so you will need to ‘un mute” when your session starts. Ending video calls: At the completion of the call, press to disconnect 4.8 Dual Video Not currently in use The equipment listed below supports dual video streams which allows users to display additional video sources through a single DVI port connection: Cisco SX20 Set Top MX200/300 Touchscreen VX Clinical Assistant (Mobile Cart) Dual video stream allows you to view two different live video streams simultaneously; the main video and one additional source. For instance, you could view both the PC presentation as well as the person who gives the presentation. If the connecting video system does not support dual video stream, no second video stream will be established for this system and the PC presentation will be shown as the main video. Page 19 of 21 MBTelehealth – VX Clinical Assistant Mobile Cart User Guide 5.0 TROUBLESHOOTING 5.1 Audio Issues Issue Far-end site unable to hear you Unable to hear far-end site Possible Cause(s) Resolution Your microphone is muted Un-mute your microphone Your microphone is obstructed or too far from the person speaking Check microphone and ensure it points towards the person speaking Try to instruct far site to un-mute their microphone Increase the volume on the monitor and/or the codec Microphone is muted at far end site Near end monitor and/or codec Volume is too low Audio distortion from farend site Far site monitor volume is too high Turn down the volume on the far end monitor Echo or distortion at nearend when people speaking Far-end microphone is situated too close to the monitor Speaker/volume is too high on farend monitor Ask to move microphone further away from monitor Ask far-end site to turn volume down on their monitor. 5.2 Video Issues Issue Picture is blank on the monitor Possible Cause(s) Resolution System has gone into “sleep” mode Pick up the remote, system will reactivate in normal mode. Turn the monitor on Check to see if the monitor input has been changed (using the select or input button on the TV Monitor) Check for correct input selection on remote control Check that output from laptop patient camera, VCR, or document camera are connected properly Monitor has been powered off Monitor input has changed Near-end site unable to hear or see the picture from far-end peripheral Proper input has not been selected Cables are not properly connected If you are experiencing any problems with the videoconferencing equipment or have any questions, please contact the MBTelehealth Service Desk for assistance: Winnipeg or outside of Manitoba Phone: (204) 975-7714 Option 1 Page 20 of 21 MBTelehealth – VX Clinical Assistant Mobile Cart User Guide Outside of Winnipeg (within Manitoba only) Phone: 1-866-667-9891 (toll free) Option 1 6.0 ADDITIONAL TRAINING INFORMATION For additional information on videoconference equipment visit www.mbtelehealth.ca or contact your Facilitator-eHealth Solutions. 7.0 VIDEOCONFERENCING ETIQUETTE The following tips on videoconferencing etiquette will help prepare you for a successful session: Assume that people can see and hear you as the Camera and Microphone are always “Live”. Identify yourself and anyone else in the room to the client. Speak directly towards the microphone and use your normal speaking voice. Try to avoid a lot of movement or shuffling of papers as this may affect the quality of the sound transmission. Due to the audio delay, pause for clients to ask or answer questions or when they have comments. Always ensure there are no further questions and that the client is aware of follow-up instructions before signing off. Page 21 of 21