1
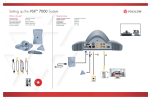
` Polycom VSX 7000 User Guide Prepared by: MBTelehealth January 2007 Updated: January 2010 MBTelehealth – Polycom VSX 7000 User Guide TABLE OF CONTENTS 1.0 OBJECTIVES ......................................................................................................................3 2.0 THE POLYCOM VIEWSTATION FX...................................................................................3 3.0 GENERAL SETUP AND USE .............................................................................................5 3.1 General Setup .................................................................................................................6 3.2 Mute/Microphone.............................................................................................................6 3.3 Video Sources .................................................................................................................6 3.4 Camera Presets ..............................................................................................................6 3.5 Placing and Receiving a Video Calls ..............................................................................7 3.6 Volume ............................................................................................................................9 3.7 Picture in Picture .............................................................................................................9 3.8 Far End Control ...............................................................................................................9 3.9 Disconnecting from a call ................................................................................................9 3.10 To Change Screen Layout in a Multi-site session.........................................................10 4.0 TROUBLESHOOTING ......................................................................................................11 5.0 APPENDIX A – QUICK SET UP........................................................................................13 6.0 APPENDIX B – VIDEOCONFERENCING ETIQUETTE ...................................................14 Page 2 of 14 MBTelehealth – Polycom VSX 7000 User Guide 1.0 OBJECTIVES This user guide will provide you with an overview of the Polycom ViewStation FX and the knowledge to setup and use the videoconferencing equipment. Learning Outcomes: After reviewing this guide, you should be able to: 1. Identify and explain the main parts of the Polycom VSX 7000 2. Use the remote control to navigate through the Polycom VSX 7000 menus, set camera presets, and access additional video sources. 3. Setup and use the equipment. 2.0 THE POLYCOM VSX 7000 The Polycom VSX 7000 videoconferencing equipment is ideal for meeting rooms, classrooms, or medium group environments. The main components of the Polycom VSX 7000 videoconferencing equipment are the Camera, Codec, Monitor, Subwoofer, Remote Control, Microphone, Scan Converter, Ethernet Cable and S-Video Cable Connector. THE EQUIPMENT AT A GLANCE Subwoofer Camera Codec Scan Converter Remote Control Microphone 1. Camera - The built-in camera is a high quality imaging device which transmits images to the screen/monitor. The camera movements are controlled by a wireless infra red (IR) remote control that controls a variety of functions, both on the near and far end. 2. Codec - The codec is the central part of the videoconferencing equipment. The main task of the codec is the compression of outgoing video, audio and data, the decompression of the incoming information and the transmission of this information Page 3 of 14 MBTelehealth – Polycom VSX 7000 User Guide between endpoints. The name codec comes from a combination of the two words compression and decompression. 3. Monitor - The monitor displays the far end or the near end image. 4. Remote Control - The remote control is used to place calls, adjust the volume, navigate screens and select options. It controls all functions of the videoconferencing equipment. The equipment will not function without the remote control. 5. Microphone – The Polycom VSX 7000 has an external table microphone which can be situated accordingly to suite the size of the room and the number of participants. The microphone will automatically equalize sound levels so that loud and soft voices are picked up and transmitted to the far end at approximately the same level. 6. Subwoofer – The subwoofer is used to enhance the sound produced by the video conference equipment. 7. Scan Converter – The scan converter is used to convert computer presentations to a format more suitable for videoconferencing. The Polycom VSX 7000 does not have one built in so it requires an external scan converter to ensure quality images are sent to the far end site. 8. Ethernet cable - This type of cable is similar to the one that connects to the Local Area Network (LAN). One end is plugged into the back of the codec and the other end (for MBTelehealth purposes), must be plugged into the specified jack in the wall. Once the Ethernet cable is plugged in, you will be able to connect, or be connected to other sites. 9. S-VIDEO Cable - S-Video is short for Super-Video. Video signals are transmitted through a cable which is divided into two separate signals: one for color and the other for brightness. Standard Ethernet Cable S-Video Cable Connector Page 4 of 14 MBTelehealth – Polycom VSX 7000 User Guide THE POLYCOM VSX 7000 REMOTE CONTROL NAVIGATION BUTTONS ARROWS KEYS AND OK BUTTON The arrow keys are used to navigate the menu options and to pan/tilt the camera in near and far end views. The Ok button is used to make a selection while in a menu. HOME BUTTON Press this button to get to the main screen/home screen or to exit from a menu. Page 5 of 14 MBTelehealth – Polycom VSX 7000 User Guide 3.0 GENERAL SETUP AND USE The following sections will provide instructions for setting up and using your Polycom ViewStation FX to place and receive video conference calls. 3.1 General Setup To setup and use the Polycom VSX 7000 videoconferencing equipment: 1. Position the equipment to the specified location/room. 2. Plug the power cord into the wall. 3. Connect the Ethernet cable to the MBTelehealth jack. (When the cable at the back of the codec is connected, you will see a green light). 4. Place the table microphone on the table in front of the participants. 5. Turn the Codec and monitor on. This may be accomplished by turning each device on individually or by turning on the power bar depending on how your equipment is set up. 6. Position the camera on the participant(s) using the arrow keys and the zoom in and zoom out button on the remote control. Avoid zooming in too closely on participants. Refer to Appendix A and Appendix B for quick setup of the MBTelehealth equipment as well as videoconferencing etiquette 3.2 Mute/Microphone To mute the microphone: 1. Press the Mute button beside the onscreen indicator on the remote control. The word Near will appear when the microphone is off. 2. Press the Mute button on the remote control again to turn mute off. You can also press the mute button on the table microphone to turn the microphone off. Pressing the mute button again will turn the table microphone on. 3.3 Video Sources To select a video source to send to the far end is: 1. Press the Camera button to bring up the Video Source screen. Page 6 of 14 MBTelehealth – Polycom VSX 7000 User Guide 2. Using the Arrow keys, toggle to the desired video source 3. Press the Ok button to make your selection 4. To return to the Main Camera, press the Camera button again and select the same video source. (For example; if you chose the document camera, choose it again to go back to the main camera) Once a selection has been made, the video source can be saved as a preset for quick access during a call. 3.4 Camera Presets Camera presets are useful when pictures from many different camera positions have to be viewed by the far end. Presets are used to switch camera positions without having to manually move the camera every time. Presets can be established before making a call or during a call. The camera presets are available using the Preset button on the remote control. To store a camera preset to the remote control: 1. Use the Arrow Keys and Zoom Button on the remote control to move the camera to the desired position. 2. Press the Preset button 3. Press and hold a number to store the preset position. 4. Repeat as needed. Presets are deactivated when the camera is moved manually. To view your near-site camera presets: 1. Press the Preset button on the remote control. 2. Icons for presets 0-9 are shown on the screen. The colored icons indicate stored camera positions, and the grey icons indicate available presets. Page 7 of 14 MBTelehealth – Polycom VSX 7000 User Guide To use camera presets directly from the remote control while in a call: 1. Press a number on the remote control quickly twice (similar to how you would double-click your mouse). 2. The camera will move to the preset position stored on that number. To delete all presets: 1. If a call is connected, press the Near End Camera button near-site video source. to choose a 2. Press the Preset button 3. Press the Delete button to delete all presets. You cannot delete just one preset. Instead, override an existing preset with the new camera position. 3.5 Placing and Receiving a Video Calls 3.5.1 Point to Point To place a video call: 1. Select Directory from the Home Screen or press the Directory button on the remote control. 2. Scroll down the list of contacts. Once you have found the site you want to connect to, press the Call – Hang Up button to place the call. You can quickly skip to a specific site by using the corresponding number key on the remote control. For example, if you are looking for Pine Falls, press #7 on the remote to skip to the P section of the phone book. To accept an incoming video call: 1. Your videoconferencing system is set to Auto-Answer which means that if the system is turned on, all calls will be answered unless you reject them. 2. If an incoming call notification appears while you are already in a call, press the green Call – Hang Up button or the red End Call button (depending on your remote control) to reject the call. Page 8 of 14 MBTelehealth – Polycom VSX 7000 User Guide 3.5.2 Multi-Point For sessions with 3 or more participating sites, you will be automatically dialed in by the MBTelehealth helpdesk. If you are participating in a multi-site session, have your equipment set up and turned on at least 15 minutes prior to the scheduled start time with the microphone on mute. Do not attempt to connect to another location. 3.6 Volume To adjust the volume: on the remote control to raise or 1. Press the Volume up or down button lower the volume. Changing the volume affects only the sound you hear at your site. Turning the volume down on the monitor will not affect the volume at the far end. 3.7 Picture in Picture The Picture in Picture (PIP) button allows users to display either near or far end images in a smaller screen in one of the four corners of the monitor. This is useful for systems that are set up using only one monitor. To use Picture in Picture (PIP): 1. Press the Picture in Picture button up a PIP. once on the remote control to bring 2. Press the Picture in Picture button again to move it around in the corners of the screen. Example of Picture in Picture View 3. To turn PIP off, press and hold the Picture in Picture button until the border turns blue, then press it again. 3.8 Far End Control Taking Far End Camera Control allows you to move the camera at the far end site as well as control their video sources and presets during Point- to- Point calls only. However, you cannot save far end camera presets. Page 9 of 14 MBTelehealth – Polycom VSX 7000 User Guide Before taking far end camera control, always request permission first and explain why you are taking control. You may need to take far end camera control if: There is an unskilled operator at the far end. The operator is unable to obtain the view you desire. The operator requests that you take control. If the operator isn’t able to facilitate the event at their end. To take far end control during a call: 1. Press the far end camera control button. 2. Move the camera on your subject using the arrows keys and the zoom in and out button on the remote control. 3. Press the far end camera control button 3.9 again to exit from this option. Disconnecting from a call To disconnect from a call: 1. Ensure everyone has completed talking and mute the microphone. 2. Press the red Hang up Button confirm. on the remote control. Press it again to 3. Once the call has been disconnected, turn off the equipment and place the remote control in a safe area. If applicable, unplug the power and Ethernet cable and put the microphone away. It takes a few moments for the audio to turn off when disconnecting from a call. Therefore, it is important to mute the microphone when the session is over. 3.10 To Change Screen Layout in a Multi-site session Changing the Screen Layout during an MCU Session allows the user to choose how the other sites are displayed on their video conference monitor. To change the screen layout in an MCU session: 1. Once connected, press the Far End button on the Page 10 of 14 MBTelehealth – Polycom VSX 7000 User Guide remote control. 2. Toggle between the screen layout options using the Up and down arrow keys 3. Once you have the screen layout you desire, press the Far End button again. 4.0 TROUBLESHOOTING PROBLEM EXPLANATION SOLUTION AUDIO You are unable to hear the participants at the far end. The microphone at the far end is on mute. The volume on the monitor at the near site is too low or has You are hearing echoes or distortion at the far end site when participants are speaking. Adjust the volume. been turned off. Check the microphone at the far end or The table microphone at the far end could be obstructed or placed too far away from the speaker(s). place it closer to the speaker(s). The audio is not connected properly. The inputs/outputs may have been disconnected. The audio is distorted at the far end. Ask the participant(s)/ speaker(s) at the far end to turn the microphone on. The volume on the far end monitor is too high. Check all of the connections including the condition of the wires. Disconnect from the call and then reconnect if it’s a point-topoint connection. If it’s a multipoint call, contact the helpdesk and ask them to re-connect you. Lower the volume on the monitor at the near site. The table microphone at the far end may have been placed too close to the equipment. The far end site microphone is situated too close to the monitor. Move the table microphone further away from the equipment. The volume is too high on the far end site monitor. Lower the volume on the far end site monitor. Page 11 of 14 Move the microphone further away from the monitor. MBTelehealth – Polycom VSX 7000 User Guide VIDEO The codec is on and connected but the screen is black. The near end site is unable to see a picture from the far end. The video signal is not transmitting from the codec to the monitor. The proper input source has not been selected correctly. The cables are connected to the wrong inputs/outputs at the back of the codec. Check the connectors such as the S-Video or, VGA cable. Check the input select button on the screen/ monitor. Ask the participants at the far end to first check their main camera source by pressing the main camera button/near site button on the remote control. If you are using a patient camera or document camera, check the camera source for these items. There is a blank picture on the main monitor. The videoconferencing system might be in sleep mode. Check to see if the output connectors are plugged in correctly. If you move or pick up the remote control, the videoconferencing system will return to normal mode. Ensure that the monitor is turned on. Check to see if the monitor input has been changed. If you are experiencing any problems with the videoconferencing equipment or have any questions, please contact the helpdesk for assistance: Winnipeg or outside of Manitoba Phone: (204) 975-7714 Toll Free (within Manitoba only) Phone: 1-866-667-9891 Option 1 Page 12 of 14 MBTelehealth – Polycom VSX 7000 User Guide 5.0 APPENDIX A – QUICK SET UP Page 13 of 14 MBTelehealth – Polycom VSX 7000 User Guide 6.0 APPENDIX B – VIDEOCONFERENCING ETIQUETTE Page 14 of 14