1
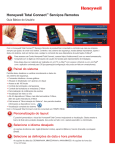
Honeywell Total Connect™ Remote Services
Basic User Guide
With Honeywell Total Connect Remote Services, you can stay connected and in control of your home or business
whenever you want, wherever you are. Control your security system, receive important alerts and true system status
in real-time, and control Z-Wave® automation devices.
1
o access your Honeywell Total Connect Account, go to https://totalconnect2.com or www.homesecurity.
T
honeywell.com and enter your temporary user information provided by your installing dealer.
his step must be completed using a PC or Mac® with Internet access or an iPad® using the iOS universal
T
app (programming/setup cannot be done from a smartphone).
2
System Dashboard
Remotely arm, disarm or check the status of your security system.
Intuitive prompts and graphic icons
Arm or disarm by a simple click
Access up to 100 locations
Control lighting and temperature
Control Z-Wave door locks and shades
Customize event notifications
View live video
Up to 40 Z-Wave devices, plus three Z-Wave thermostats,
plus four Z-Wave door locks
Easy access to “System Sync”. This allows you to update new
information and devices.
View system in it entirety
With Honeywell Total Connect you are connected in REAL TIME!
»
»
»
»
»
»
»
»
»
»
3
Customizing Your Layout
You can customize the look of Honeywell Total Connect by rearranging the view. Simply drag the title bar to the
desired position. This can be done with the dashboard either expanded or collapsed.
4
Select the Preferred Language You Desire
Language selection options are English (United States), Español (Mexico), Français (Canada) and Português (Brasil).
5
Select Your Preferred Date and Time Settings
Date selection options are DD/MM/YYYY, MM/DD/YYYY and YYYY/MM/DD. Time selection options are
12 hour vs. 24 hour.
6
Information Area
» The very top bar is the information area
» This area provides weather and messages. This information is based on the security system’s location.
» Click on the weather to pull up a five-day forecast, or click on the message envelope to read important messages
» These messages are from your security system provider and relate to service calls, new products, upgrades and
special offers
7
Security
Arming and disarming can be done through the “Quick Arm” feature or through the virtual keypad interface.
The virtual keypad provides detailed zone information. You can select from filters on the left such as alarms,
troubles, etc., to view specific zone conditions.
» Zones can be bypassed and troubles cleared
» Can show multiple zone faults
» Works like your security system’s keypad
» Control system partitions
Click to toggle back to “Status” view.
8
Adding, Deleting and Editing Users
From the master users dashboard, you can customize each user through a simple edit, add or delete feature.
You can manage security system user codes and gain access to multiple locations.
2
Adding, Deleting and Editing Users
One Master User Only
1. Select users from Honeywell
Total ConnectTM dashboard.
2. Select the type of user that you wish to create.
a. Administrative User has the ability to create and
manage other users
b. U
ser: Has the ability to access both the
mobile app and website
c. Panel User: Only has access to panel no
remote capabilities
3. C
heck the appropriate boxes you desire. By checking “Administrator” you will give the user the ability
to add/delete users. “Prompt for user code” will force entering a user code after you arm or disarm, and
“display user code” will display the actual four-digit code to the right. See help document in upper right corner
of dashboard.
4. Add email and SMS notification information. See help document in upper right corner of dashboard.
5. E
nter the control panel user number assigned for the user. This is for email and event logs when the
system is armed/disarmed and will display the user’s first and last name. If the “Enable User Code Sync”
is checked, the “Panel User” field will be grayed out and the “Panel User” number cannot be changed
(master user only).
6. C
heck the desired
boxes to grant access to
system devices.
7. C
lick Save to add a
new user or exit. Click to
synchronize user data
between the panel and
Honeywell Total Connect
Remote Services.
*The master user on Honeywell Total Connect must be assigned to the master user in the panel.
9
Creating Event Notifications Through Email and Text Messaging
» Each user must first be assigned to a group. The master
user is pre-defined as “default group”. You can rename
the “default group” at any time. Each user can be their
own group or you can assign multiple users to the same
group name. This is a convenient feature to send the same
notification to multiple users.
» Within a particular group you can choose ALL members,
NO members, or only certain members
» The notification list can be enabled or disabled as needed
1. Select from an existing group or click “Add Group”.
2. Enter a name for the group, then check “Enable This List”.
3. If desired, select only certain members within the group.
4. Click Save.
3
10 Events Rules and Notifications
This enables you to view events that result from your security system, IP video cameras and automation
devices (Z-Wave® devices).
Security events are stored for 90 days, and video events are stored for 90 days or a maximum of
approximately 100 MB. In either case, older events are deleted to make room for new events.
Setting Up Event Notifications
You can choose which system events will be sent, via email and/or text message, to a particular user or
group of users.
Before setting up event notifications for “Sensor Open” or “Sensor Close” conditions, ensure a session with
the security system’s control panel is not active. The best way to ensure this is to log-off of Honeywell Total
ConnectTM Remote Services, then log in again to setup the event notifications.
Take the time to explore each notification category and become familiar with the event types that can trigger
notifications. Event categories may have expandable sub-categories. Categories that are not supported by
your security system will not appear. Further, the admin category will not appear if the user does not have
admin rights.
To create a simple notification, follow the steps below:
1. Click “Setup”.
2. Click “Security Icon”.
3. Select type of notification i.e. arming, sensor alarms, sensor open/close, sensor other, system.
4. Click “+ Notification” then click “Save”.
For example, to send an email/text notification on disarm:
1. Click “Disarm”.
2. Click “+ Notification”.
3. Click “Send to” drop down menu, select user or group then click “Save”.
4
In another example below, a security system event (AC loss) was chosen to notify the “default group” of users.
When an AC loss occurs, each member of the “default group” will be notified.
1. On the Events, Rules & Notifications bar, click the Setup icon.
2. Pick the event category: Security, Video, Automation, Admin or Timed.
3. From the Security > System event category, choose the event (AC loss) to be notified of.
4. At the right, click “Notification”. The notification info window appears.
5. E
nter a subject name for the notification. Then from the “Send To” drop-down menu, select the user group
to notify (ensure the “Enabled” box is checked). To add another user group to be notified, click “Notification”
again and repeat.
6. Repeat for all events that require notifications.
7. Click Save. The “default group” will be notified whenever an AC loss condition occurs.
Sensor Open Event Notification
“Sensor Open” condition (flood) was chosen to notify the user or “default group” of users. This type of notification
might be used when you want to be notified when a security cabinet, special room, flood or other sensed
condition within the premises occurs. When the “Sensor Open” condition occurs, each member of the “default
group” will be notified. A sensor open notification can also be used when you wish to be notified when a door is
opened, motion sensor is activated, or Z-Wave® device is activated.
1. On the Events, Rules & Notifications bar, click the Setup icon.
2. Pick the event category: Security, Video, Automation, Admin or Timed.
3. From the Security > Sensor Open/Close event category, choose the event (flood) to be notified of.
4. At the right, click “Notification”. The notification info window appears.
5. Enter a subject name for the notification. Then from the “Send To” drop-down menu, select the user group
to notify (ensure the “Enabled” box is checked). Since this is a flood condition, you would always want to be
notified. Therefore, at the “Sched/State” drop-down field select “Always”. To add another user group to be
notified, click “Notification” again and repeat.
6. Repeat for all events that require notifications.
7. Click Save. The “default group” will be notified whenever a flood condition occurs.
5
“No Disarm” Event Notification (Latch Key)
In the example below, a “No Disarm” event was chosen to notify the user or “default group” of users. This
type of notification might be used when you want to be notified when a child is due home from school by a
certain time and did not arrive at the home. When the “No Disarm” condition occurs (by the specified time),
each member of the “default group” will be notified.
1. On the Events, Rules & Notifications bar, click the Setup icon.
2. Pick the event category: Security, Video, Automation, Admin or Timed.
3. From the Security > Arming event category, choose the event (disarmed) to be notified of.
4. At the right, click “Notification”. The notification info window appears.
5. Enter a subject name for the notification. Then from the “Send To” drop-down menu, select the user group
to notify (ensure the “Enabled” box is checked). Since you want to be notified if this event DOES NOT
occur, ensure the “Notify me when this event does not occur” is selected.
6. Since this is a time-dependent event, click the “Sched/State Edit” button to setup the schedule.
7. Set the schedule parameters, then click Save.
8. The “default group” will be notified whenever a disarmed condition DOES NOT occur by 4:30 p.m.
on any weekday.
Video Triggered Event Notification
Video images can be triggered and captured through different system events. For example, you can receive a
video notification on arming, disarming, any system alarms and sensor opening including Z-Wave® devices.
In the example below, a video camera will detect motion when the security system is armed away. Any
detected motion will be used to trigger a notification to the user or “default group” of users. This type of
notification might be used when you want to be notified if there is motion in a store after hours. When video
motion occurs, each member of the “default group” will be notified.
1. On the Events, Rules & Notifications bar, click the Setup icon.
2. Pick the event category: Security, Video, Automation, Admin or Timed.
3. From the Security > Arming event category, choose the event (Armed Away) to be notified of. You can also
6
activate a recorded video clip by activating the motion detection feature under “setup” in the video camera
section. This motion detection can also be scheduled for a certain time of day and certain days of the week.
4. At the right, click “Video Capture”. From the “Sched/State” drop-down field, choose “Always”.
5. From
the camera drop-down field, choose either a particular camera, or “All Cameras”. Ensure the Enabled
box is checked.
6. C
lick Save. The “default group” will be notified whenever camera three detects motion when the security
system is “Armed Away”.
Scheduled Event Notification
If you want to receive an email and/or text message during certain times of the day, you would create a
scheduled event notification.
In this example; when the “High Value Tool Room” is opened during the night shift, a notification will be sent to
the “default group” of users. This type of notification might be used when you want to be notified of an event
that might occur during a certain time schedule when the security system is disarmed. When this event occurs
(during the scheduled time), each member of the “default group” will be notified.
1. On the Events, Rules & Notifications bar, click the Setup icon.
2. Pick the event category: Security, Video, Automation, Admin or Timed.
3. From the Security > Sensor Open/Close event category, choose the event “Sensor Open”, then
“HV Tool Room”.
4. At the right, click “Notification”. The notification info window appears.
5. Enter a subject name for the notification. Then from the “Send To” drop-down menu, select the user group to
notify (ensure the “Enabled” box is checked). From the “Sched/State” drop-down field, choose “Always” to
cover every day.
6. Since this is a time dependent event, click the “Sched/State Edit” button to set up the schedule.
7. The schedule window appears.
7
11 Locations
Honeywell Total ConnectTM will conveniently allow for multiple location control from a single login.
Multiple locations must be added by the dealer, however, they may be edited by the “Master User”.
See example below.
Editing the Location
12 Edit Slide Show
The “Edit Slide Show” feature is supported by our LYNX Touch control systems. It allows you to add,
crop and delete photos. Pictures are cropped to 480 x 272 pixels.
» The files must be either .JPG or .PNG, and the size must be less than 2 MB
» Up to 13 MB of space is available
» The LYNX Touch control system must be communicating using Wi-Fi
®
8
13 Automation
This section is for Honeywell security products that support Z-Wave® automation devices, such as LYNX Touch
control systems, the Tuxedo TouchTM security and home/business controller and the VISTA Automation Module
(VAM). Z-Wave automation allows control of door locks, lights, outlets, shades and thermostats. In addition to
manual control of these Z-Wave devices through LYNX Touch control systems, Tuxedo Touch or Honeywell Total
ConnectTM Remote Services, you can create a “Scene” that would control a group of Z-Wave automation devices
when a specific condition occurs. Control of Z-Wave automation devices is restricted to users that are granted
permission as an administrator. Conditions such as arming and disarming a security system can trigger a “Scene”
to be run.
In the next topics we will explore thermostat scheduling and creating an automation scene. Please note that
whenever you save a created or edited scene, you will receive a temporary pop-up reminder to synchronize your
panel. This will send the new scene information to the control panel.
Thermostat Scheduling
In order to automate your thermostat, save money and become more energy efficient, Honeywell Total Connect
offers various options. You may create an energy saving schedule based on your lifestyle or control your
thermostat through “scenes.” For example, for energy saving mode you would do the following:
1. Click clock icon the scheduling icon will appear.
2. Click “Load Energy Star Defaults”.
See next section on how to create a “scene”. For example, you can manage your heating and cooling through
arming and disarming.
1. Click the clock icon to open the thermostat scheduling.
2. The scheduling window appears.
9
14 Creating a Z-Wave® Automation Scene
Creating scenes with Z-Wave® devices can enhance your lifestyle and help you save money and energy
without any change in your daily routine.
Here we will use the Z-Wave automation feature to create a simple scene to control your Z-wave thermostat
when you “disarm”.
1. Click “Create New”. In the “Scene Name” field, enter the name “Disarm” (for example), click “Icon”.
2. Click security icon that displays the house.
3. Check box above red thermostat.
4. Click “Save”.
5. Click the green “Run” button to verify the Z-Wave automation device actions. Make any changes
as necessary.
6. You must now assign the “scene” that you just created to an “action”.
To assign the “scene” to an action you must do the following.
1. Click on “Events Rules, Notifications”.
2. Click on “Setup”.
3. Click on security icon.
4. Select what will trigger the scene (i.e. arm/disarm).
5. Select “Trigger Scene”.
6. Choose appropriate scene from drop down, then click “Save”.
As a second example, here we will use the automation feature to create simple scenes to control your
automation devices during a vacation. In this scene you want the following scenario to take place when you
leave the premises for a vacation:
» When you leave, the automatic front and rear door locks will lock
» The living room light will be dimmed to 80%
» The kitchen light will be dimmed to 80%
» The porch light will be dimmed to about 25%
» The electric porch heater will be set to off
» The main thermostat will be set back to 62˚ to save energy
To create the vacation scene:
1. C
lick “Create New”. Then in the “Scene Name” field, enter the name “Vacation”, then choose an icon.
2. In the device area, ensure the ALL filter is activated so you can see every device. Use the scroll left and
right arrows if necessary to find the automation device.
3. S
ince we want the front and rear door locks in the locked mode, check the box by each lock to include it
in this scene. Click the front and rear door lock icons to attain the LOCKED state.
4. Find the living room light device and check the box to include it in the scene. Set the dimmer slide to about
80%. Repeat this for the kitchen light and the porch light, using the dimmer slide to the desired
illumination level.
5. Find the porch heater and check the box to include it in the scene. Click the icon to attain the OFF state.
6. Look at each device and ensure only those devices to be included in this scene have their box checked.
10
7. Set the thermostat to 62˚ and click the hold button.
8. Save the scene.
9. Click the green “Run” button to verify the automation devices action. Make any changes as necessary.
Note when using the scene:
Now that you have created a “scene” you have two options to operate the “scene”.
Option 1. Map the “scene” to an action (i.e. arm away/disarm).
Option 2. Manually turn on the “scene” at the touchscreen or remotely through Honeywell Total ConnectTM via
your mobile device.
15 Additional Information
See the help tab in the upper right hand corner where you can take an interactive tour of your new remote system,
and see how-to videos on notification setup, user management and lifestyle setup. Also included is an extensive
Honeywell Total Connect Remote Services end-user guide.
11
For more information:
www.honeywell.com/security
Automation and Control Solutions
Honeywell Security Products Americas
2 Corporate Center Dr. Suite 100
P.O.Box 9040
Melville, NY 11747
1.800.467.5875
www.honeywell.com
L/TCBUG/D
October 2014
© 2014 Honeywell International Inc.