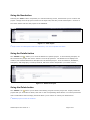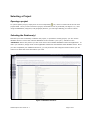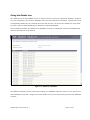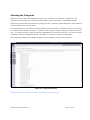
1
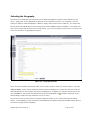
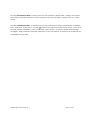
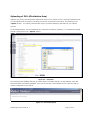
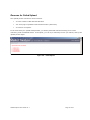
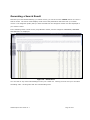
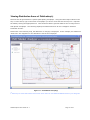
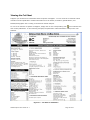
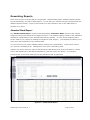
CCNA – Publishing Distributors
Help and User Guide V1.2
Prepared by
TRIMAP Communications Inc.
1210 Sheppard Ave E.,
Toronto, ON, M2K 1E3
Tel: 416.492.2114
Jan 25, 2006
Table of Contents
Introduction ......................................................................................................... 4
Objective ............................................................................................... 4
Key Features.......................................................................................... 4
User Guide Overview.............................................................................. 4
Getting started ..................................................................................................... 5
User Authentication................................................................................ 5
Getting into the main application........................................................................ 6
Home Navigation Bar ............................................................................. 6
Creating a new Project......................................................................................... 7
Project Management .............................................................................. 7
Using the New button............................................................................. 8
Using the Details button......................................................................... 8
Using the Delete button.......................................................................... 8
Selecting a Project ............................................................................................... 9
Opening a project .................................................................................. 9
Selecting the Database(s) ...................................................................... 9
Using the Details Icon .......................................................................... 10
Selecting the Categories....................................................................... 11
Selecting the Geography ...................................................................... 12
Uploading of DA’s (Distribution Area) .................................................... 14
Reasons for Failed Upload..................................................................... 15
Generating a Search Result ............................................................................... 16
Viewing Distribution Areas of Publication(s)........................................... 17
Viewing the Cut Sheet .......................................................................... 18
CCNA Help and User Guide v1.1
Page 2 of 21
Generating Reports ............................................................................................19
Standard Rank Report .......................................................................... 19
Standard Indexing Report..................................................................... 20
Standard Top 50 Ranking ..................................................................... 21
Standard Top 50 Indexing .................................................................... 21
CCNA Help and User Guide v1.1
Page 3 of 21
Introduction
Objective
This solution is designed to help you identify a target market and determine which distribution options
most effectively meet the needs of the media buying opportunity. The tool combines demographic/socio economic data with circulation distribution-based areas to present strategic information to describe how to
meet target markets on a local, regional and national level.
Key Features
Make a query against multiple databases, tables, and fields.
Find the specific geographic areas for each individual newspaper.
Find the specific circulation or distribution area for each newspaper/carrier.
Generate various reports based on your search results.
View an SVG map of Distribution Areas for individual publications
User Guide Overview
This document outlines the functionalities included in the Market Analyzer. After reading this manual, you
should be able to perform advanced queries across multiple databases, and generate various standard
reports for detailed distribution area analysis.
CCNA Help and User Guide v1.1
Page 4 of 21
Getting started
User Authentication
The login page authenticates the user prior to accessing the Market Analyzer application. To
start the application, you must point your web browsers to the specific URL
http://mail.trimap.com/ccna/templates/app/screens/Login.jsp. The following login screen will be
presented.
Figure 1.0 - Login Page
After you have entered a valid username and password, you will be presented with the
homepage.
! Usernames and passwords are case sensitive.
CCNA Help and User Guide v1.1
Page 5 of 21
Getting into the main application
Home Navigation Bar
After clicking on the “Login” button (along with a valid username and password), the home page for the
Market Analyzer will be presented. As illustrated below, the home page consists of a navigation bar that
allows you to access various components of the application.
Figure 1.1 - Home Page
Selecting specific links from the navigation bar moves you to different parts of the applications.
Home redirects you to the home page (the screen above).
Projects used to view a list of existing projects, or when creating a new project.
Administration used to change current password.
Help will provide the user with a user guide manual.
Logout is used to logout and end the current session.
! If the application is left unattended, system timeout occurs every 30 minutes and requires new login
The Market Analyzer is a dynamic website that sometimes requires you to navigate in a specific page order.
Please do not use the Back button.
CCNA Help and User Guide v1.1
Page 6 of 21
Creating a new Project
Project Management
Once the Project Link has been selected, the user will be given the ability to create a New project by
clicking the button on the left hand side of the screen. Existing projects created with the user
authentications provided can be extracted from the application by entering the Project Name or
Description in the appropriate field.
! Only those projects created with your user authentication can be searched.
Figure 2.0 - Project Management
The project management screen consists of the field headings “Project Name, Description, and Creation
date.” You can perform one of the following actions from the project management screen using one of the
three available button or icons.
New - allows you to create a new project, where you must define a project name and description
Details - opens the selected project, and displays the contents of the project.
Delete – deletes the selected project with a confirmation message.
CCNA Help and User Guide v1.1
Page 7 of 21
Using the New button
Selecting the “New” button will present you with the following screen, which allows you to create a new
project. Simply enter the project’s name into the input field, and also provide a description. On click of
the “Save” button will save the project to the database.
Figure 2.1 – New Project
! Project name and Description fields are mandatory. You must complete both fields.
Using the Details button
The “Details” icon
, allows you to view the details of a specific project. In the following example, we
have selected the project with name “Income ” from the projects list. The details screen displays the
creation, last modified date and a description for the selected project. Three new buttons, Databases,
Categories, and Geography, are also presented, which are used to help define your search criteria.
Figure 2.2 - Details for Project
Using the Delete button
The “Delete” icon
, allows you to delete unnecessary projects from the project list. Simply locate the
project that you would like to delete, and click on the corresponding delete button. You will be presented
with a confirmation alert message, which will allow you to confirm or cancel your delete action.
! Deleted projects cannot be retrieved.
CCNA Help and User Guide v1.1
Page 8 of 21
Selecting a Project
Opening a project
To open a specific project, simply click on the corresponding
icon, which is located at the end of each
project listed. Once you have selected a project, the details screen is presented (see Figure 2.2). Now
using the databases, categories, and geography buttons, you can begin defining your search criteria.
Selecting the Database(s)
Now that you have successfully created a new project, or opened an existing project, you can use the
database button to select the relevant databases to be included in your query. Selection of the
“Databases” button will present you with a list of all of the available databases within the application. To
make your selection, simply check off the applicable checkboxes found beside each database name. Once
you have completed your database selections, you can proceed to the Categories section where you can
continue to define the exact information you need.
Figure 3.0 Database Selections
CCNA Help and User Guide v1.1
Page 9 of 21
Using the Details Icon
The details icon from the database screen is used to view the contents of a particular database. Suppose
you were interested in the “Income” database, but were unsure about its information. Simply click on the
corresponding details icon for located at the end of the line item. On click of the details icon will present
you with a pop up window displaying the details for a selected database.
In the following example, the details for the database “Income ” are displayed, where the available fields
and their descriptions are presented.
Figure 3.1 - Details of a Database
The details functionality can be useful when making your database selections, when you are unsure as to
which databases to include. Simply click on the details icon to get a quick viewing of what each database
contains.
CCNA Help and User Guide v1.1
Page 10 of 21
Selecting the Categories
Now that you have made your database selections, you can begin your selection of categories. The
Categories screen allows you to select the specific fields you are interested in. All database-related
categories are presented with checkboxes (see figure below), which are used to determine which fields are
to be included into your search result.
By using this page you can select the specific fields you are interested in. Remember, that you are limited
to a maximum of 9 different categories. If these are not enough, consider running your search more than
once. To select a category, simply check off the applicable box to the left of its name. If you have missed
a database, select the "Databases" button, and add the one that you missed and start again.
In the following example, the available categories for the database “ Income" are presented.
Figure 3.2 - Categories Selection
! Remember that you are limited to a maximum of 9 different categories’ selections.
CCNA Help and User Guide v1.1
Page 11 of 21
Selecting the Geography
The selection of Geography process allows you to define geographical regions to be included into your
query. Simply click on the applicable checkboxes for the relevant provinces. For example, if you are
looking for data for CCNA newspapers in Alberta, simply check the box next to ‘Alberta.’ The results will
be then be shown individually for the coverage area of each AWNA member newspaper. Your search will
only return results that have met your search criteria. If you do not specify any provinces, your query will
return all records for all geographical regions.
Figure 3.3 – Geography Selection
There are three separate input fields, which can be used to further refine your search criteria. The field
“City or Town” can be used to determine which member newspaper(s) circulate into that town and the
data that pertains to the coverage area of that newspaper(s). Suppose you wanted a results set for the
city of Athabasca , this can be accomplished using the corresponding icon
located on the right of the
field heading is used to aid your selection of a city or town.
First, enter the city or town name to include the desired location in your criteria and click the Result
button. The newspaper(s) with circulation into Athabasca will appear along with the data that pertains to
the entire coverage of the newspaper.
CCNA Help and User Guide v1.1
Page 12 of 21
The field “Canada Post FSA” is used to perform a search based on postal codes. Simply enter the first
three letters of a postal code that you are interested in into the input field to include it into your search
criteria.
The field “Distribution filter” is used to perform a search based on a specific CCNA member newspaper,
Zone, Trade area, and/or Route . The icon
located on the right of the input field is used to view a list of
all CCNA member newspapers , Zones, Trade areas, and/or Routes . To select a specific CCNA member
newspaper, simply locate the newspaper name that you are interested in, and click on the underlined link
to populate the input field.
CCNA Help and User Guide v1.1
Page 13 of 21
Uploading of DA’s (Distribution Area)
Suppose you want to include specific distribution areas to your search criteria. Using the upload process,
you can upload a DA file (filter) by locating the new file using the Browse button, and clicking on the
“Upload” button. You will be presented with a pop up window displaying the status of your upload
process.
In the following figure, the file “testblocks.csv” has been selected for uploading. To complete the upload
process, simply click on the “ Upload” button.
Figure 3.4 – Upload DA
The following figure displays the pop up window after a successful upload. In this example, 2000 DA
blocks has been successfully uploaded. Now you can use the “Close Window” link to close the pop up
window, and perform your search.
Figure 3.5 – Successful Upload
CCNA Help and User Guide v1.1
Page 14 of 21
Reasons for Failed Upload
The Upload process can fail for various reasons.
•
Your file contains a Non-Existent DA block
•
You are trying to upload the same DA block twice (within file)
•
You have a corrupt file.
In the event that your upload attempt failed, you will be presented with the following error screen
containing a list of failed DA blocks. At this point, you can try to manually correct your DA file, and try the
upload process again.
Figure 3.6 – Failed Upload
CCNA Help and User Guide v1.1
Page 15 of 21
Generating a Search Result
Now that you have finished defining you search criteria, you can click on the “Result” button to return a
search results. The search result displays a list of all of the publications that have met your search
criteria. The categories (fields) that you have selected from the categories section are also displayed in
your search results.
In the following search results screen, all publication names, and the categories “NBROILER, NBFCOWS
and NOTHLIV“ are displayed.
Figure 4.0 – Search Result
You can click on any of the field headings to sort your results set. Clicking once will sort your records in
ascending order. Clicking twice will sort in descending order.
CCNA Help and User Guide v1.1
Page 16 of 21
Viewing Distribution Areas of Publication(s)
Data can also be generated for a specific participating newspaper. Using the same steps outlined in the
City or Town search, type in the name of newspaper you wish to view and click the map icon. Populate
the field by clicking the appropriate link. Click the Result button generate data for the coverage area of
that specific newspaper. The following displays the Distribution Area for the newspaper “Emerson
Southeast Journal”.
Please note in the following map, the dataset fo r a category is displayed. In this example, the dataset for
“Beef cows” are mapped on to the distribution area of the newspaper.
Figure 4.1 – Distribution Area (Map)
! Select any one of the radio buttons and click the “Show” button to view additional datasets based on your categories.
CCNA Help and User Guide v1.1
Page 17 of 21
Viewing the Cut Sheet
Suppose you wanted more information about a specific newspaper. You can view the “Cut Sheet” which
consists of various publication -related information such as “Rates, Circulation, Specifications, and
Market/Demographic info” to help you determine market analysis.
To view a cut sheet for a specific newspaper, simply click on the corresponding “CS”
icon located at the
end of each publication. In the following example, the publication “Altona Red River Valley Echo” was
selected.
Figure 4.2 – Cut Sheet for Publication
CCNA Help and User Guide v1.1
Page 18 of 21
Generating Reports
There are four types of reports that you can generate. Standard Rank Report, Standard Indexing Report,
Top 50 Rank Report, and Top 50 Index Report. You can make your selection using the drop down list box
labelled “Report Selection”. Once you have made your report selection, click on the “ Go” button to
generate your report.
Standard Rank Report
The “Standard Rank Report” consists of the field heading “ Publication Name” and all of the relevant
categories that you pre-defined in the categories section. The standard ranking is used to view publication
distribution reports based on your selected fields and their ranking. You can use the weighting tool to
further enhance your reports, by defining the weights for each category. The weighting tool allows you to
place more rank importance to any individual field.
You can sort on any one of the available fields by clicking on the field heading. Clicking once will sort
your records in ascending order. Clicking twice will re-sort in descending order.
Suppose you want to limit your report to include only the distributors’ that you are interested in. Simply
click on the checkboxes for the desired distributor(s), and click on the “Go” button. You should be
presented with a new result containing only the distributors that you specified.
Figure 5.0 - Standard Rank Report
CCNA Help and User Guide v1.1
Page 19 of 21
!
For all Standard Ranking Reports, up to seven contributing variables (categories) can be included. For each record,
the application will calculate the rank (+) value by adding the ranks of each contributing variable.
Calculating Rank
Rank = R + R1*W1 + R2*W2 …… Rn*Wn
R = field value
W = weight value
Standard Indexing Report
You can view the Standard Indexing Report by selecting “Standard Indexing” from the drop down list box
and clicking the “Go” button.
This report can contain up to seven categories (fields). The report will determine the index for each
category in the record set by dividing the value for each category by the average value for the category
considering all of the records in the record set. For each record, the application will calculate the Index+
by adding the index of each contributing category.
You can sort on any one of the available fields by clicking on the field heading. Clicking once will sort
your records in ascending order. Clicking twice will re-sort in descending order.
Figure 5.1 Standard Indexing Report
CCNA Help and User Guide v1.1
Page 20 of 21
!
To export contents of your report, simply click the “Export” button. The application will export the contents to Microsoft’s
Excel program.
Standard Top 50 Ranking
You can view the Standard Top 50 Ranking Report by selecting “Standard Top 50” from the drop down list
box and clicking the “Go” button.
This report can contain up to seven categories (fields). The application will determine the rank for each
category in the record set, for all non-zero records. Only records where the rank for each category is
greater than the median rank will be displayed. Finally, for each record, the application will calculate the
You can sort on any one of the available fields by clicking on the field heading. Clicking once will sort
your records in ascending order. Clicking twice will re-sort in descending order.
Standard Top 50 Indexing
CCNA Help and User Guide v1.1
Page 21 of 21