1
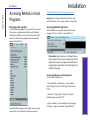
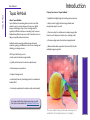
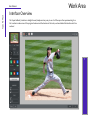
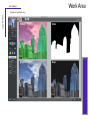
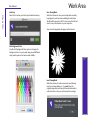
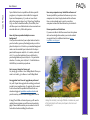
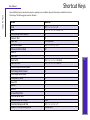
Topaz
ReMask
User Guide
The quickest and easiest way to create
professional extractions and masks.
Contents
Topaz ReMask
User Manual
I. Installation
A. System Requirements . . . . . . . . . . . . . . . . . . . . 3
B. Download Instructions. . . . . . . . . . . . . . . . . . . . 3
C. Installation . . . . . . . . . . . . . . . . . . . . . . . . . . . . . . 3
D. Compatibility . . . . . . . . . . . . . . . . . . . . . . . . . . . . 3
E. Accessing ReMask in Host Programs . . . . . . 4
F. Uninstalling. . . . . . . . . . . . . . . . . . . . . . . . . . . . . . 5
G. Entering License Key . . . . . . . . . . . . . . . . . . . . . 5
II. Introduction
A. Masking Unveiled. . . . . . . . . . . . . . . . . . . . . . . 6
1. What is Masking? . . . . . . . . . . . . . . . . . . 6
2. Benefits of Masking. . . . . . . . . . . . . . . . 6
3. When is Masking Needed?. . . . . . . . . . 6
4. Why Use ReMask 5. . . . . . . . . . . . . . . . . 6
5. How Does ReMask 5 Work?. . . . . . . . . 6
B. Topaz ReMask . . . . . . . . . . . . . . . . . . . . . . . . . . . 7
1. About Topaz ReMask. . . . . . . . . . . . . . . . 7
2. Primary Functions of ReMask . . . . . . . . 7
C. New ReMask 5 Features. . . . . . . . . . . . . . . . . . 8
III. Work Area
A. Interface Overview. . . . . . . . . . . . . . . . . . . . . . 9
B. View Options . . . . . . . . . . . . . . . . . . . . . . . . . . . 11
C. TriMap Technology. . . . . . . . . . . . . . . . . . . . . . 13
D. Tools. . . . . . . . . . . . . . . . . . . . . . . . . . . . . . . . . . . 14
1. General Tools. . . . . . . . . . . . . . . . . . . . . . 14
2. Brushes. . . . . . . . . . . . . . . . . . . . . . . . . . . 14
3. Fills. . . . . . . . . . . . . . . . . . . . . . . . . . . . . . . 15
4. Adjustments . . . . . . . . . . . . . . . . . . . . . . 15
5. Background Options . . . . . . . . . . . . . . . 17
E. Menu
1. Preferences. . . . . . . . . . . . . . . . . . . . . . . 19
2. Check for Updates. . . . . . . . . . . . . . . . . 19
3. Enter Key . . . . . . . . . . . . . . . . . . . . . . . . 20
4. Set Background Color. . . . . . . . . . . . . 20
5. Save Trimap/Mask . . . . . . . . . . . . . . . . 20
6. Load Trimap/Mask . . . . . . . . . . . . . . . . 20
7. What’s This?. . . . . . . . . . . . . . . . . . . . . . . 21
8. Users Guide. . . . . . . . . . . . . . . . . . . . . . . 21
9. Tutorials . . . . . . . . . . . . . . . . . . . . . . . . . . 21
10. Tech Support. . . . . . . . . . . . . . . . . . . . . . 21
11. Product Info. . . . . . . . . . . . . . . . . . . . . . . 21
12. About . . . . . . . . . . . . . . . . . . . . . . . . . . . . 21
13. Startup Guide . . . . . . . . . . . . . . . . . . . . . 21
IV. Additional Resources
A. Glossary. . . . . . . . . . . . . . . . . . . . . . . . . . . . . . . . 22
B. FAQ’s. . . . . . . . . . . . . . . . . . . . . . . . . . . . . . . . . 24
C. Shortcut Keys. . . . . . . . . . . . . . . . . . . . . . . . . . 26
D. Connect. . . . . . . . . . . . . . . . . . . . . . . . . . . . . . . 28
E. Company Info. . . . . . . . . . . . . . . . . . . . . . . . . . 29
2
Installation
Topaz ReMask
User Manual
Topaz ReMask works as both a standalone editor and
plugin. This means a compatible host editor is not
required to use Topaz ReMask, although you may
access it as a plugin in a few compatible host editors.
System Requirements
Mac OS X 10.8 or higher
Windows 7/8 x64 + Open GL 2.1
*Does not support Windows 32bit
Download Instructions
• To download ReMask please visit topazlabs.com/
downloads.
• Locate Topaz ReMask and click on the appropriate
Mac or Windows button beneath that product to
start your download.
• The download should start automatically, however
if prompted, select ‘Save’.
• The downloaded installer will then be located in
your Downloads folder or desktop as an .exe file
(Windows) or a .dmg file (Mac).
Installation
1. Exit Photoshop or any other image editing program if
it is open.
2. Open the Topaz ReMask .dmg or .exe file,
doubleclick on the Topaz ReMask installer and then
follow the on-screen instructions.
3. After installation is complete, open Photoshop and
ReMask will be located in the Filter menu.
4. See our FAQ’s (page 56) for additional support.
Please see our knowledge base at topazlabs.com/
support should you need any additional installation
assistance not answered in the FAQ’s.
Important Note:
While the Topaz plug-ins work in a variety of host
editors, ReMask is not compatible with Lightroom,
Aperture or iPhoto, as it requires layers and
transparency to function. Therefore, ReMask will not
appear in the external editor Fusion Express.
Compatibility
ReMask can be accessed as a plugin in:
Mac Dmg Windows exe
The program will then install as a standalone editor to:
Mac: Applications folder
Win: C:\Program Files\Topaz Labs\Topaz ReMask
•
•
•
•
•
•
•
Photoshop CS4+
Photoshop Creative Cloud
Photoshop Elements 6+
Corel Paintshop Pro X
Serif Photo Plus X5+
Lightroom as an external editor
NOT compatible with photoFXlab or Fusion Express
3
Installation
Topaz ReMask
User Manual
Accessing ReMask in Host
Programs
Important: Your image will need to be 8-bit or 16-bit
and in RGB mode. Go to Image-> Mode to change this.
Photoshop, PSE, and PSCC
Accessing ReMask in Lightroom
To use ReMask as a plugin in Ps, Pse and PsCC you must
first run it as a standalone editor (Mac only). ReMask
will then be available to use in Photoshop via the Filter
menu. For Windows, the plugin should automatically
appear in the Filter list.
I can’t find ReMask in the Photoshop Filter menu
After installation is complete, open Lightroom and
navigate to Photo -> Edit In -> Topaz ReMask 5.
Please Note: Lightroom does not support layers.
Any transparent masked areas will be returned to
Lightroom as white. Any images with solid color or
image backgrounds will be returned to Lightroom
as flattened images.
Accessing ReMask in Corel Paintshop Pro
1. First launch PaintShop Pro.
2. Go to Menu file -> Preferences -> File Locations.
Select “Plug-ins” from the “File Types” list and click
“Add”.
3. Choose C: \ Program Files \ Topaz Labs \ Topaz
ReMask plug-ins and click “OK”.
Should ReMask not appear in the Filter menu, you may
need to exit out of Photoshop and then re-open it. 4. Topaz ReMask 5 is now available to use. Simply go
to Effects -> Plug-ins and select “Topaz ReMask 5 ”.
4
Topaz ReMask
User Manual
Uninstalling
To uninstall Topaz ReMask follow these instructions:
Mac
1. Quit Photoshop (or other editing program).
2. Navigate to Macintosh HD -> Library -> Application
Support -> Topaz Labs. *To find this, go to your desktop
and click on Go-> Computer (top menu)
Installation
4. Select Topaz ReMask and click remove.
Windows 7*
1. Quit Photoshop (or other editing program).
2. Click on the Start Menu and select Control Panel ->
Programs -> Programs and Features.
3. Select Topaz ReMask and click uninstall.
3. Locate the Topaz ReMask file and move it to the
trash. You will need to enter your system password
to OK this change.
*Please note that if you also have the 64-bit version of
ReMask installed, then you will need to first uninstall
this version before you can uninstall the regular
version.
4. Navigate to your Photoshop plug-ins folder located
at: Applications -> Photoshop -> Plug-ins
Entering License Key
5. Locate any leftover Topaz ReMask files and move
them to the trash.
1. To activate the program, open ReMask and select
Menu-> Enter Key (bottom left corner).
Windows XP*
1. Quit Photoshop (or other editing program).
2. Enter or copy & paste your 30-digit license key to
start your trial or activate the program. (Be sure that
you have not copied any extra spaces).
2. Click on the Start Menu and select Control Panel.
3. Double-click on Add / Remove programs.
4. Select Topaz ReMask and click remove.
Windows Vista*
1. Quit Photoshop (or other editing program).
2. Click on the Start Menu and select Control Panel.
3. Select Programs, then Uninstall a Program.
3. If you are running trial mode, to switch to the full
version all you need to do is enter your full license key.
You do not need to uninstall the current software as
the only difference between the full and trial version is
the key used to activate the program.
5
Topaz ReMask
User Manual
Introduction
Masking Unveiled
a new innovative trimap technique. The trimap is made
up of three tones: green, red and blue.
What is Masking?
Users are able to quickly define the elements in their
image that they want to keep using green; elements
that they want to cut using red; and elements that they
want Topaz ReMask 4 to compute using blue.
Masking is the process of isolating a subject or specific
image elements that you wish to preserve, then erasing
everything else that you do not want. It is also referred
to as extraction or cutouts.
What are the benefits of masking?
Masking allows you to take the desired subject and
elements & cut them out and then merge them into
another image scene or background. Masking makes
it easy to change the theme, scene or setting of your
digital photography subjects.
Selections are made using the brush tools and then
Topaz ReMask 4 is able to analyze the user-made
selections and isolate the image subject with prec
ision.
Masking is not just for creating composite images; it
also makes it possible to adjust only parts of the image.
For example, selectively increasing saturation, contrast,
brightness, etc. (also called selective adjustments).
6
When do I need to mask?
Masking your digital images is ideal when you want to
remove backgrounds and unwanted detail elements or
to protect an area of your image from adjustments.
Why do I need Topaz ReMask 5?
Topaz ReMask 5 features easy to use, intuitive tools
that will save you time and money by simplifying
the masking process. With Topaz ReMask 4 you can
eliminate the busy work of using masks, paths, layer
adjustments, selections and eraser tools to isolate a
subject in your image.
How Does Topaz ReMask 5 Work?
Topaz ReMask streamlines the masking process using
ReMask TriMap
For video tutorials and other helpful resources
please visit us at: blog.topazlabs.com/tutorials and
youtube.com/topazlabs
Topaz ReMask
User Manual
Topaz ReMask
About Topaz ReMask
Topaz ReMask is a masking and extraction tool that
makes it easy to extract elements from your digital
images. Isolating an object from a background is
typically a difficult and time-consuming task, however
ReMask simplifies the process with its intuitive tools to
help you quickly make extractions.
ReMask makes merging multiple image elements
seamless, giving you ultimate control over creating and
refining your image scenes.
Introduction
Primary Functions of Topaz ReMask:
1. Simplified and lightning-fast masking and extraction.
2. Easily extract highly intricate image details and
transparent objects as well.
3. Precise cutting for delicate and complex images like
hair, fur and transparent objects (i.e. wedding veils).
4. Preserve edges and other intricate image details.
5. Make a believable composite that smoothly blends
multiple images together
With Topaz ReMask you can:
• Easily extract intricate image details
7
• Quickly isolate areas for selective adjustments
• Make unique compositions
• Replace backgrounds
• Selectively blur only the background for a simulated
bokeh effect
• Creatively emphasize the subject easily and naturally
To connect with other Topaz users, sign up with
the Topaz Forum online at: topazlabs.com/forum
The color-coded trimap system makes masking easy to
understand. It’s as simple as keep, cut, compute!
Introduction
Topaz ReMask
User Manual
New ReMask 5 Features
Topaz ReMask 5 Features
1. Standalone Program
GREAT NEWS! You no longer need a host editing
program to use ReMask. Now you can run ReMask 5
as a standalone program or as a plugin. This will also
enable ReMask to be used with Lightroom. When
installing ReMask 5 the icon will be added to your
Applications, along with your other standalone Topaz
programs.
2. Background Replacement and Editing
We’ve added new features that allow you to replace
and edit the background of your masked image
without having to leave ReMask. Once you compute
your mask a background panel will appear in the
editing parameters on the left.
you select an image background.
The orange transform icon will allow you to scale
and rotate the background image. Once you have
the background image to the size and position that
you want, click the orange icon again to deselect the
background image and continue editing.
The yellow image select icon will allow you to change
background images from the image you originally
selected.
8
Beneath the background icons are sliders that will
allow you to edit the background image to better
match the masked foreground.
3. Removed Background Color Selector Icon
With the enhanced background panel and additional
background editing options, the tri-circle background
color selector icon is no longer necessary. It has been
removed to streamline the user interface.
You can choose from a transparent, solid color, or
image background. Additional options appear after
Topaz ReMask
User Manual
Work Area
Interface Overview
The Topaz ReMask 5 interface is straightforward, simple and very easy to use. You’ll be a pro after experimenting for a
bit. In order to make sense of the program features and the function of the tools, we have divided the interface into five
sections:
9
Work Area
Topaz ReMask
User Manual
3
1
5
4
2
10
1. Preview Navigator
2. Editing Parameters
3. Editing Views
4. Preview Window
5. Split Screen Views
Displays the region of the
preview image you are
currently focused on.
Displays all of the tools
that you will need to
successfully create your
mask.
Displays editing views
used during the masking
process.
Displays the preview of
each editing view.
Single, double and quad
screen options. Also new
option to use checkerboard
or color background (Keep
and Cut views only).
Work Area
Topaz ReMask
User Manual
View Options
The large Preview window shows you the processed preview of your image.
11
View Modes
ReMask 5 gives you five options for viewing your
image in the preview section while creating your mask.
Choose from Original, Trimap, Mask, Keep, or Cut
modes.
View Tabs
Within ReMask you also have split screen capabilities
which allow you to view multiple modes at the same
time. This includes single, double or quadruple view.
Work Area
User Manual
Topaz ReMask
Example of quadruple view
TriMap
Original
Mask
Keep
12
Work Area
Topaz ReMask
User Manual
TriMap Technology
Topaz ReMask uses trimap technology to create your extraction. Using the green, red and blue primary brush tools, you
will define the areas that you want to keep (green), remove (red) and compute (blue).
1. Red Area
The red area represents the
part of the image that you
want to remove.
1
2. Blue Area (Outline)
The blue area represents the
part of the image that you
want to compute.
Topaz ReMask 5 will analyze
this area to help extract the
unwanted background from
the desired image subject.
13
2
3. Green Area
The green area represents
the part of the image that
you want to keep.
3
Work Area
Topaz ReMask
User Manual
Tools
General Tools
The general tools include: undo, redo, selection
marquee, hand tool, and zoom. The square selection
marquee tool allows you to select a certain area of your
image to mask without affecting the areas outside of
that boundary.
BRUSHES
Primary Brushes
The primary (or basic) brush tools allow you to select
the elements in the image t hat you want to keep
(green), remove (red) and compute (blue). The primary
brushes will turn into the Topaz Magic brush after you
select Compute. Brush sizes range from 1 - 255.
14
To pan the preview image, select the hand tool
(press H ) and hold the left mouse button on the
preview image and drag it around. You can also
pan your preview image by holding the spacebar key
and moving your mouse or by using the red selection
box in your preview navigator.
Topaz Magic Brush
The Topaz Magic Brush tool (which becomes available
after you select “Compute Mask”) allows you to make
intricate detail eliminations and recoveries to selected
parts of your image. It will only affect the blue area of
your initial trimap. It will not change your original red
and green selections.
Topaz ReMask
User Manual
Color Range Brushes
These brushes allow you to brush out the foreground
or background area in your image, based on the color
selected and the setting of the Color slider.
Color Range
The Color Range slider allows you to determine the
spectrum of shades affected within the image based on
the main color selection.
Work Area
Transparency Brushes
This brush allows you to define two colors (keep/ green
and remove/red) to target at once. The transparency
brush is key for images where transparency is a factor
because it will allow users to select a foreground color,
such as the white of a wedding veil, and a background
color to be removed from behind the veil.
Foreground
Color
Background
Color
FILLS
The fill tools allow you to fill all of your image or just a
portion of your image with the selected color.
Compute Mask
The Compute Mask button will analyze your trimap
selections and create your image mask. After you
click this button additional mask refinement tools will
appear allowing you to create a more accurate mask.
15
User Manual
Topaz ReMask
ADJUSTMENTS
After you make your trimap selections you will need
to click on “Compute Mask” for your selections to be
analyzed and your mask created. Once your mask is
created the Adjustment options will appear, allowing
you to refine your mask even further.
Work Area
Edge Hardness
Determines how hard your mask is applied to subject
edges in your image. The higher the parameter the
harder your edges will be. The lower the parameter,
the softer (more feathered) your edges will be.
Mask Strength
Determines the brightness of the mask. Increasing
this parameter will give you more detail by making the
weaker mask details stronger.
Edge Shift
Shifts the mask edge by one pixel in either direction.
Recovery (Foreground Color)
Revives the color of your foreground in weaker / more
transparent areas.
Desaturation (Foreground Color)
Desaturates the edges of your mask (in weaker/more
transparent areas) to help with color contamination
and bleeding.
Reset
The reset tools allow you to reset your entire image to
the selected trimap color. Using this feature will erase
any previous selections made.
16
User Manual
Topaz ReMask
BACKGROUND
Once your mask is refined you have the ability to
select which type of background you would like for
your image: transparent, solid color, or image. You
also have the ability to make some adjustments to the
background, if you choose an image background.
Work Area
Transform
The transform icon will allow you to make changes to
the scale and orientation of your background image.
Image Select
The image select icon will allow you to change your
background image to a different image.
17
Transparent
Selecting a transparent background will hide
everything that you selected to Cut in your mask and
will appear on screen as a gray and white checkerboard
pattern.
Solid Color
The solid color background option allows you
to choose what color will appear in place of Cut
selections. This is an excellent way to check your mask
as well.
Image
Selecting this option will open your computer file
browser, allowing you to select an image as the
background.
Brightness
Adjusts the brightness of your image. Drag to the left
to decrease brightness. Drag to the right to increase
brightness.
Contrast
Adjusts the difference between light and dark colors
in your image. Drag to the left to to increase contrast
difference. Drag to the right to decrease contrast
difference.
Saturation
Adjusts the depth of color in an image. Drag to the left
to decrease depth and brightness, moving closer to a
monochromatic image. Drag to the right to brighten
and deepen colors.
Topaz ReMask
User Manual
Temperature
Adjusts how cool or warm an image is. Drag to the left
to create a colder (blue) image. Drag to the right to
create a warmer (yellow) image.
Tint
Adjusts the color tones of your image. Drag to the left
to give your image a green tint. Drag to the right to
give your image a magenta tint.
Blur
Adjusts how clearly you see the background image.
Drag to the right to increase the amount of blur on the
background image.
Saving Your Image
Saving your image with ReMask is a fairly simple task.
To save navigate to the bottom right corner and select
‘Save As’
Another way to save your image is to navigate to the
top menu bar and select File-> Save As
18
You’ll then have the option to name the file and choose
the file types: JPEG, TIFF and PNG
Subject masked out and background blurred using ReMask 5 as
a standalone program.
Depending on the file type, you’ll then be presented
with several options including color space and bit
depth.
Topaz ReMask
User Manual
Menu
You can access the Topaz ReMask menu by clicking on
the “Menu…” button at the bottom left area of the
interface.
Work Area
Enable Brush on Original Image
Allows you to draw on the original image (you will
not see anything changed on the original image).
When this option is turned OFF, drawing on the
original image will force switch the view to Trimap
view.
Enable Sticky Mode for f/b brushes
Allows you to enable the sticky mode for your
foreground/background (f/b) brushes.
Enable Zoom with Mouse Wheel (Mac users only)
Allows user to zoom in using their mouse. May be
turned off for Mac users with Apple Magic Mouse.
Enable Auto-Create Layer
Automatically creates a new image layer for you in
Photoshop.
Preferences
Select this to enable or disable the program tool tips or
the Auto-Update feature.
Enable Use Layer Mask
Automatically saves your ReMask extraction back
to a
layer mask.
Enable Tooltips
Allows you to enable or disable the pop up tips
during
your workflow
Enable Auto-Update
Allows ReMask to automatically check for and
download
available Topaz ReMask updates.
Check for Updates
Checks for available Topaz ReMask updates.
19
Topaz ReMask
User Manual
Enter Key
Select this to enter your trial or purchased license key.
Work Area
Save Trimap/Mask
Select this feature to save your trimap/mask currently
in progress in order to resume editing at a later time.
The file will be saved as a tiff. You can name the file and
save it to any safe location on your computer.
Your saved trimap/mask will appear in this format:
Set Background Color
Use the Set Background Color option to change the
background color on your mask using several different
color palette options for better mask visibility.
20
Load Trimap/Mask
Select this feature to load a previously saved trimap/
mask to continue editing on. You must have the
original image that pairs up with the selected mask in
order to load it or else you will receive this message:
Topaz ReMask
User Manual
Work Area
What’s This?
Select this (or click F1) then click on a feature in the
ReMask interface to learn more about it.
Users Guide
Select for quick access to this user guide.
Tutorials
Takes you to the Topaz ReMask tutorials page where
you can access additional written and video tutorials to
help you with your ReMask workflow.
Tech Support
Brings you to the Topaz Labs support page where you
can request assistance from our support specialists,
contact our customer service team, retrieve lost license
keys, or browse through our Knowledge Base.
Before ReMask: The image is saturated and the brick wall in the
foreground takes focus away from the couple.
Product Info
Select this to go to the Topaz ReMask web page to
learn more about the Topaz ReMask plug-in.
About
Select this to see what version of ReMask you currently
have.
Startup Guide
Shows a step-by-step quick overview on how to use
ReMask. This is the pop-up that shows when you first
open the program and can be disabled.
After ReMask: The couple was masked out, allowing for
separate selective adjustments to their saturation and the new
monochromatic background. Now they are the focus!
21
Topaz ReMask
User Manual
50% Gray – The undefined area that the computer
(Topaz ReMask) will need to figure out.
Achromatic - Without color.
Action – A recorded task that works as an automated
memory of the enhancement and adjustment steps
executed on an image. Once an Action has been
recorded it can be invoked and reapplied to other
images without manually making the changes.
Adjustment Layer – A layer that allows you to adjust
the look of an original image with out making it
permanent. With adjustment layers you can make
various changes to a layer without damaging it and go
back and readjust it at anytime.
Algorithm – Any bit of code or programming that
defines a process.
Alpha Channel – Photoshop alpha channels are masks
through which you can apply effects. The alpha channel
is an 8-bit channel, which means it has 256 levels of
gray from 0 (black) to 255 (white). An alpha channel
lets you save and load selections.
Black Area - The masked area, which indicates the
portion of the image that you wish to get rid of.
Blue Area - The undefined area that the computer
(Topaz Mask) will need to figure out.
Chroma - Purity or intensity of color.
CMYK – Cyan, magenta, yellow, and black. A color
model commonly used for 4-color printing by printers
to define and mix all of the colors they are capable of
outputting.
Glossary
Color Bleed (Color Contamination) - the transfer of
color between nearby objects, caused by the colored
reflection of indirect light.
Color Decontamination - reduces color cast on the
edges of a selection.
Color Channel – The visual component of a color digital
image that represents all the pixels in that picture
made up of a specific primary color. For example, in a
typical digital photo, the primary colors of red, green
and blue (from the RGB color model) create all the
colors in that photo, which may be represented by
three color channels, each of red, green or blue.
Desaturate - Decreasing the intensity of a color (hue).
Diameter (brush) - Controls the size of the brush.
Download – The process of transmitting or transferring
data from one device to another.
Export – Outbound data transfer in a format that can
be used by other programs.
Filter Adjustment – Allows you to shift the overall color
in an image.
Green Area (Trimap View) - The active area, which
indicates the portion of the image that you wish to
keep.
Gradient - The gradient tool creates a gradual blend
between
multiple colors.
Hardness (brush) - Controls the size of the brush’s hard
center.
22
User Manual
Topaz ReMask
Import – Inbound data transfer into a file or document.
Layer Mask – An editable selection, attached to a layer
that tells Photoshop how to deal with the layer that it
is attached to. It enables us to get rid of a part of the
layer but with the possibility to go back and edit the
result at any time (also called nondestructive editing).
It in fact blocks part of the layer from appearing, as
if erased, while still being there. Layer Masks provide
extra flexibility to your Photoshop layers.
Quick Mask - Allows you to paint on your selection (or
the masked area). Then once you have your selection,
you can delete it, recolor it, mask it, etc.
Red Area - The masked area, which indicates the
portion of the image that you wish to get rid of.
Refine – Improve (something) by making small changes
to make it more subtle and accurate.
Non-Destructive Editing - A form of editing where the
original content is not modified in the course of editing
- instead the edits themselves are edited. This allows
for easy adjustments and images effects at a later time
making photo editing quick and flexible.
RGB – Red, Green, Blue. The color model that is used in
digital cameras and by computer monitors.
Opacity – The amount of transparency a layer has.
Trimap – User-generated mask map with three tones.
In Mask View: White (keep) , Black (remove) and Gray
(compute)
In Trimap View: Green (keep), Red (remove) and Blue
(compute)
Pan and Zoom - A useful function that allows users to
magnify the captured image in the preview and then,
by using the cursor, to move or pan around the image.
Typically Pan and Zoom allows users to magnify the
image 2x or 4x time. By magnifying the images and
zeroing in on a specific section, you can see details not
visible when the entire image is sized to fit the preview.
Photo-editing or Imaging software – Programs in
which you can alter your photos and / or create digital
images. Depending on the software, you can improve
exposure, color and other attributes of your picture,
paint on it, add type, apply special effects, remove
noise, resize it, combine it with other pictures, prepare
it for email or posting on the web, output it to a printer
or do any number of other manipulations or edits.
Plug-in - Computing (of a module or software) able
to be added to a system to give extra features or
functions. Saturate - Increasing the intensity of a color (hue).
Transparency - in reference to a portion of an image
that is completely invisible (as it has been removed).
White Area (Mask View) - The active area, which
indicates the portion of the image that you wish to
keep.
23
FAQ’s
Topaz ReMask
User Manual
I need a Topaz ReMask 5 trial key.
Visit www.topazlabs.com/checkout for a trial key.
If you need more time to evaluate, please contact us at:
http://www.topazlabs.com/support for an extended
trial key.
I can’t find Topaz ReMask 5 in the Photoshop Filters
menu.
For Windows:
1. Please go to your preferences menu in Photoshop
and select Plug-ins.
2. Check/enable the Additional Plug-ins Folder option
then click Choose.
3. After that, please navigate to: C: \ Program Files and
select the Topaz Labs folder.
4. Then click Choose (or it may say Save/OK) to save
this back to Photoshop.
5. Click OK to save your changes, then restart
Photoshop. Once Photoshop opens, go to your Filter
menu and you should be able to access Topaz.
For Mac:
1. Please go to your preferences menu in Photoshop
and select Plug-ins.
2. Check/enable the Additional Plug-ins Folder option
then click Choose.
3. After that, please navigate to: Computer ->
Macintosh HD -> Library -> Application Support and
select the Topaz Labs folder.
4. Then click Choose (or it may say Save/OK) to save
this back to Photoshop.
5. Click OK to save your changes, then restart
Photoshop.
Once Photoshop opens, go to your Filter menu and you
should be able to access Topaz.
If I use the 30-day trial version will I need to uninstall
the trial version before I upgrade to a full version?
No, there is no difference between the trial and full
version, except for the license key used to activate the
program. To take yourself off trial mode, simply enter
your full license key under Menu-> Enter Key.
Do you have any other ReMask tutorials?
Yes, we have plenty of tutorial videos on our YouTube
channel at youtube.com/topazlabs. Also be sure to
check out our tutorials page at blog.topazlabs.com/
tutorials
When I fill my red (cut) areas on my trimap the whole
image filled with red.
There is most likely a gap somewhere in blue
(compute) outline. The blue outline acts like a barrier
in order to ensure accurate masking results. Use your
undo button to go back a step then zoom in and pan
your image to find the opening in your blue outline.
Once you locate it, select your blue brush tool and
close it off. Then you can select your red flood fill tool
and fill in the parts of your image that you would like to
cut.
I get the error: ‘You have not selected Compute Mask
to compute your selections. Please click OK to go
back and select Refine Mask. To exit without making
changes to your image please select cancel.’
This is because your trimap selections have not been
analyzed. You will need to click on the Compute button
in order to create your mask. After that you can select
OK and process your entire image.
Why doesn’t ReMask appear in Lightroom/iPhoto/
Aperture/Fusion Express?
24
Topaz ReMask
User Manual
Topaz ReMask is not compatible with these specific
programs, as it requires a host editor that supports
layers and transparency. If you do not own a host
editor that supports layers (e.g. Photoshop, PaintShop
Pro), we offer a standalone editor, PhotoFXlab, that
will allow you to use ReMask and can be accessed as an
external editor in Lr, iPhoto & Aperture.
How do I place my masked subject on a new
background?
Once you have extracted your subject and are back to
your host editor, open up the background you wish to
place the object on. Go back to your masked image and
make sure the masked layer is selected in the layers
panel and then press cmd/ctrl + A to select, and cmd/
ctrl + C to copy that selection. Now switch back to
your background and press ctrl/cmd + V to paste that
selection. To resize, press ctrl/cmd + T and hold down
the Shift key to maintain proportions.
FAQ’s
How many computers may I install the software on?
You may install the purchased software on up to two
computers at a time. Simply download the software
from our downloads page to put it on another
computer and use the same license key to activate it.
I have a question not listed here.
If you are not able to find the answer here then please
visit our knowledge base where you can also submit
a support ticket for additional assistance: www.
topazlabs.com/support
25
Can I save my trimap for future use?
Yes, simply go to Menu-> Save TriMap/Mask. When you
want to re-load it, go to Menu-> Load TriMap/Mask
Are upgrades free? How do I upgrade my software?
Yes, with Topaz Labs upgrades for exisiting purchased
products are complimentary. To upgrade, all you need
to do is download the updated software from our
downloads page at topazlabs.com/downloads and
your license key will work with the upgraded version.
If using PhotoFXlab or Fusion Express, you’ll need to
update those programs as well from our downloads
page. Please make sure that you are exited out of all
host editors before installing the software.
Masking objects and changing the background can help
change the mood of your image. ReMask can make easy work
of intricate objects with many small spaces, like trees and
wedding veils.
Shortcut Keys
Topaz ReMask
User Manual
Topaz ReMask 5 uses some shortcut keys to speed up your workflow. Many of these keys are similar to those in
Photoshop. The following keys work at all times.
Action
Shortcut
Undo
Redo
Primary Keep Brush (Green)
Marquee Tool
Hand Tool
Remove Marquee
Primary Cut Brush (Red)
Zoom In
Zoom Out
Zoom to Fit
Zoom to 100%
Primary Compute Brush (Blue)
Color Range Brush (Green)
Color Range Brush (Red)
Transparency Brush
Green Fill
Red Bill
Blue Fill
Increase Brush Size
Decrease Brush Size
Compute Mask for TriMap
Transform Background Tool
Deselect Transform Background
Ctrl (Cmd on Mac) + Z
Ctrl (Cmd on Mac) + Shift + Z
Q
M
H or spacebar
Ctrl (Cmd on Mac) + D
W
+
Ctrl (Cmd on Mac) + 0 (zero)
Ctrl (Cmd on Mac)+ Alt + 0
E
A
S
Z
R
T
Y
]
[
Enter
Ctrl (Cmd on Mac) + T
Double click
26
Shortcut Keys
Topaz ReMask
User Manual
Action
Shortcut
Menu
Set Background Color
Save TriMap/Mask
Load TriMap/Mask
View Original Image
View TriMap
View Mask
View Keep
View Cut
Single Screen View
Double Screen View
Quad Screen View
Process Whole Image (OK)
Draw Straight Lines
Open Image
Save Image
Exit ReMask
O
Ctrl (Cmd on Mac) + B
Ctrl (Cmd on Mac) + M
Ctrl (Cmd on Mac) + L
1
2
3
4
5
8
9
0 (zero)
Ctrl (Cmd on Mac) + Enter
Shift + left mouse click
Ctrl (Cmd on Mac) + O
Ctrl (Cmd on Mac) + S
Ctrl (Cmd on Mac) + Q
27
Topaz ReMask
User Manual
Connect
Connect with Topaz
Follow us on Twitter (@topazlabs)
for notifications of recent news and
easily get in touch with us whenever you feel like it!
Find us on our Facebook page and
network with other Topaz users!
Participate in the entirely user-led
Topaz Flickr group for a helpful and
highly active community for Topaz
Photoshop plug-ins!
Subscribe to our YouTube channel
to keep up with any newly released
product video tutorials!
Check out our blog for tutorials, tips
and updates from Topaz Labs!
And don’t forget to check out our
other social media outlets including:
Instagram (@topazlabs), Pinterest,
LinkedIn and Google+!
28
Contact
Topaz ReMask
User Manual
Contact Information
Topaz Labs, LLC
14285 Midway Road
Suite 125
Addison, TX 75001
Technical Support
Visit: topazlabs.com/support
Email: [email protected]
29
Topaz Labs LLC, a privately owned company headquartered in Dallas, Texas, focuses on developing advanced image
enhancement technology. With today’s widespread use of digital still cameras, the need for high-quality digital images
has greatly increased. Topaz Labs’ mission is to bring practical state-of-the-art image enhancement technology to both
professionals and consumers.
Copyright © 2015 Topaz Labs, LLC. All rights reserved. www.topazlabs.com