1
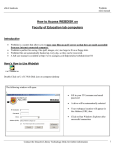
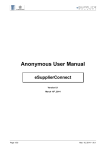
Master of Teaching Program eJournal User Manual
electronic Documentation of Learning (eDOL)
The MT Field electronic Documentation of Learning (eDOL) site
(http://education.ucalgary.ca/eDOL) is a communication tool for students in the Master of
Teaching program at the U of C, their instructors, and partner teachers. Students will have
their own blogs, enter their field notes, and share posts with their instructors and partner
teachers.
Everyone with an account will be able to do the following:
• Create an eJournal entry
• Reply to an eJournal entry
• Create a new group
• Add others to their groups
• Add images
• Add an audio file
Getting Additional Help
Contact:
[email protected]
or visit
the Doucette Library Technology Help Desk
Education Block 370
220-6052
Home Page Orientation
To access the site, go to:
http://education.ucalgary.ca/eDOL
This is the welcome page, the first page that you see when you go to the site.
The Content Frame is in the centre of the page, Navigation Tabs along the top of the
content frame, and Navigation down the column on the left. Login is on the left column.
Tabs
Navigation
Login
Content Frame
Request PW
2
Log In to the Site
1. Open your web browser (for example, Internet Explorer or Firefox)
2. Go to (http://education.ucalgary.ca/eDOL)
3. Enter your IT username and password
Students and UofC Field Advisors:
• To log in, you must use your UofC IT account (username is the same as the first part
of your UofC email address (ie cbuddy), and use the password from your UCIT
account).
• If you do not already have your UofC IT account, you can self-register online via the
UCIT SelfRegistration system.
https://www.acs.ucalgary.ca/itutil?process=WebRegister
• If you have forgotten your username or password, this can be reset using the UCIT
Password Reset utility. http://www.ucalgary.ca/it/forgot
Partner Teachers: (*important)
• For the FIRST time you login, please click the ‘Request New Password’ link to the
left. Enter your email address. Instructions for login will be returned to you via
email.
• If your contact information has not been provided to the UofC Field Advisor, you will
not be able to login or request a new password yet. Please inform the Field Advisor
with your correct information and allow 2-3 days for your account to be setup.
4. If you are having problems, please contact [email protected]
Log Out of the Site
1. In the navigation bar on the left, click log out.
3
Orientation after Logging In
Once you’ve logged in, you will see a screen similar to this:
Account Navigation
Your Groups
Unread Items
Recent Activity
Recent Comments
4
After logging in you’ll see similar content to the original page; however, your personal
options and groups will be listed in the column on the left, below your username.
Your personal menu includes:
• Home – Similar to the general menu, your home page displays general
information and posts that have been promoted to the front page
• My blog – This link displays blog entries, or ejournal entries, created by you
• Create content – Click on this link to access the area that allows you to create
the following types of content:
• Audio
• Blog entry
• Group
• Image
• Video
• My workspace – This link brings you to the page that displays the content you
have created. From here, you can access your content, add new items, edit
items, and delete items.
• My account – From this page you can view your membership information,
change your password, edit your account, and track your posts.
• Groups – This link lists all the groups to which you belong.
• Log out
My groups
This area also lists the groups to which you belong.
Who’s online
This area indicates the number of guests currently viewing the public page of the site, and
the usernames of users currently logged in.
Recent Comments
Click on the title to go to a recent post.
What’s New?
This chart displays recent activity in your groups
Unread Items
This chart displays posts in your groups that you haven’t read yet. Click on the titles to
read the new posts.
5
Read New Journal Entries
1. Log in to the site
2. Look in the main content frame for a section called What’s New? If you have new
posts to read, they will be listed in the chart
3. Click on the title to read the new post
See or Read all of a Group’s Entries
1. Log in to the site
2. Click on the group’s name in the ‘My Groups’ section.
3. The main content frame will display the blog posting in that group in reverse
chronological order.
4. In the bottom right hand corner, information regarding the number of comments,
attachments, and author will be displayed. These can be clicked on to view the
additional elements of the entry or to post a reply
6
Create an E-Journal Group (*First Step for all Students)
Create the Group
1. Log in to the site
*Students, please title your field journal
group in the following format…
2. Click ‘create content’
3. Click ‘Group’
“First LastName’s Field Journal Semester 1”
4. Enter information about your
group:
• the title: “Jane Doe’s Field Journal Semester x”, for example
• a brief description
• a welcome message for new group members
5. Under Subscription requests, ensure that ’closed’ is selected.
6. Click Preview to read over the information and make any changes
7. Click ‘Submit’ located at the bottom of the page
Search other users names… for login names…
8. Use the ‘Search for Users’ feature in left menu to find the usernames of the users
you wish to add (ie cbuddy) (*Note you will need to enter their usernames not
their real names in the next step)
Add the Users to your group
9. In the navigation bar on the left, the new
group you created will be listed under
‘My Groups’. Click on that group
name.
10. In the ‘MyGroupName’ Section, click
‘x Subscribers’’
11. Click ‘Add Subscribers’ Tab
12. Type in the usernames of the
people you wish to add to your
group. (multiple usernames must
be separated by a comma)
13. Click Submit.
14. Double check the group’s subscription by
clicking the ‘List’ tab.
7
Create an e-Journal Entry
*note: you must create a group or be subscribed to another users group before
you can create a blog entry
1. Log in to the site
2. Click ‘create content’
3. Click ‘blog entry’
4. Enter information about your blog post: the title, select a category if you’d like, and
enter keywords
*Note: Category and keywords are not required, but may make it easier for to sort
and search for your content later in the semester.
5. In the body, type your message
• If you are copying and pasting from word, click on the Paste
from Word icon. Paste your content into the text box, and
click Insert
6. Under Groups, decide who can view your post. By default, the posting is private
and remains that way unless you select one of the check boxes
• Select the appropriate groups in the Audience section. You can publish a
post to more than one group if you’d like, but you must select a location to
publish your post
7. Click ‘File attachments’, if you want to attach a file to your post. Click Browse,
click on the file name, click Open, and click Attach
8. Click Preview to read over your post and make any corrections
9. Click Submit
Reply to a Journal Entry
1. Locate the journal entry you want to reply to
2. Locate the links underneath the post. The second link will say either ‘add new
comment’, or will state the number of comments to the post. Click on this link to
reply to the post
• You may need to click add new comment or reply to bring up the input
screen for your comment
3. Enter the subject of your comment or reply
4. In the text box, type your message
• If you are copying and pasting from Word, click on the ‘Paste
from Word’ icon. Paste your content into the text box, and
click Insert
5. Click Preview comment to read over your post and make any corrections
6. Click Post comment
8
Edit Your Comment or Entry
1. Log in to the site
2. Click ‘my workspace’
3. The main content frame has a chart displaying your comments and blog entries.
Locate the comment or entry you want to edit, and click on the edit link to the
right
4. Edit your comment or entry
5. Click Preview comment to read over your edits before posting
6. Confirm you have the correct audience group selected.
7. Click ‘Post comment’
Change the Audience of Your Published Entry
1. Log in to the site
2. Find the post that you published to the wrong place. (One way to find it is to click
on my workspace, and then click on the title of the post)
3. Click on the edit tab
4. Scroll down to the section called ‘Groups’. Deselect the group or audience, as
needed, and select the group to which you would like to publish your post
5. Click Submit
Delete Your Comment or Entry
1. Log in to the site
2. Click my workspace
3. The main content frame has a chart displaying your comments and blog entries.
Locate the comment or entry you want to delete and click on the Title
4. Click on the Edit tab at the top
5. Scroll down to the bottom of the page and click Delete
6. Click Delete
You might accidentally publish your entry to the wrong audience. For example, you
publish your post to your entire field class, rather than to your own group that includes
only your partner teacher and field advisor.
If this happens, you don’t have to delete your entry and start over. Change the audience
instead.
9
Post an Audio File
1. Log in to the site
2. Click ‘create content’
3. Click ‘audio’
4. Type in the Title of your audio
5. Type your message in the text field
6. Type in your keywords
7. To attach the audio file, click Browse, click on the file name, click Open, and click
Attach
8. Choose the appropriate audience group.
9. Click Preview to read over your post and make any corrections
10. Click Submit
This website does not support all audio files. Make sure your audio files are in
MP3 format.
Post an Image
1. Log in to the site
2. Click ‘create content’
3. Click ‘image’
4. Type in the Title of your image
6. Type in your keywords
7. To attach the image, click Browse, click on the file name, click Open
8. Type your message in the text field (usually a description of the image)
9. Choose the appropriate audience group.
10. Click Preview to look at your post and make any corrections
11. Click Submit
10
Insert an Image into Text (blog entry)
1. Log in to the site
2. Click ‘create content’
3. Click ‘blog entry’
4. Enter your title and keywords
5. Enter the body text. When you reach the point at which you
want to insert a picture, click on the camera icon
6. Click Upload to load a new image.
7. Choose a ‘Title’ for the image
8. Click Browse to locate the image you have saved on your computer.
9. Click Submit
10. Choose the Size you wish the image to display at (thumbnail or preview)
11. Click Insert.
12. Continue posting the blog as normal.
Enable email for Your Account
1. Log in to the site
2. Click ‘my account’
3. Click the ‘edit’ tab
4. Scroll down to the section called ‘Contact settings’. Select the box next to Personal
contact form
5. Click Submit
Allows other users to contact you by e-mail via your personal contact form
Getting Additional Help
Contact:
[email protected]
or visit
the Doucette Library Technology Help Desk
Education Block 370
220-6052
11