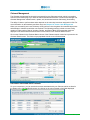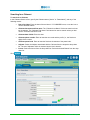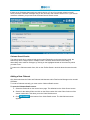
1
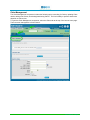
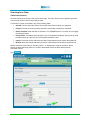
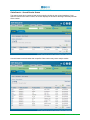
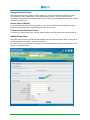
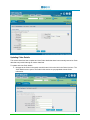
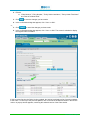
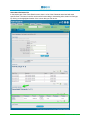
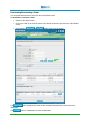
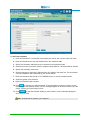
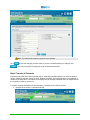
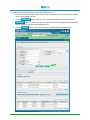
INSURER USER MANUAL Chapter 6 Claim & Claimant Management June 2014 Chapter 6: Claim & Claimant Management OVERVIEW HCAI delivers a standard solution for collecting and processing Claims data for the automotive insurance industry. HCAI manages the basic Claim data and the associated Claimant information to ensure plans, invoices and Adjusters are associated with the correct Claimant. Both the Facility and Insurer can manage this information in a way that enables them to accomplish their daily business goals without undue delay. HCAI can accept both manual and data-feed driven updates to Claim and Claimant information, with the information from the Insurer feed considered authoritative. The option to manually handle Claim and Claimant information is available and is designed to support Insurers who decide not to provide Claim and Claimant data feeds. Only Users who have the Claim and Claimant Administrator role have access to the Claim and Claimant Management component of HCAI. CLAIM MANAGEMENT ................................................................................................................................... 2 W ORKING WITH CLAIM AND CLAIMANT NOTIFICATIONS ................................................................................... 3 SEARCHING FOR A CLAIM ............................................................................................................................. 4 Claim Search screen.............................................................................................................................. 4 Claim Search – Search Results Screen ................................................................................................ 5 Sorting the Search Results .............................................................................................................. 5 Several Pages of Results ................................................................................................................. 6 To Return to the Claim Search Form ..................................................................................................... 6 ADDING A NEW CLAIM .................................................................................................................................. 6 UPDATING CLAIM DETAILS ............................................................................................................................ 9 DEACTIVATING/REACTIVATING A CLAIM ....................................................................................................... 12 CLAIMANT MANAGEMENT ........................................................................................................................... 13 Documents associated with a Claimant ............................................................................................... 13 SEARCHING FOR A CLAIMANT ..................................................................................................................... 14 Claimant Search Results ..................................................................................................................... 15 To Return to the Claimant Search Form .............................................................................................. 15 ADDING A NEW CLAIMANT .......................................................................................................................... 15 UPDATING CLAIMANT DETAILS .................................................................................................................... 17 BATCH TRANSFER OF CLAIMANTS ............................................................................................................... 18 DEACTIVATING/REACTIVATING A CLAIMANT ................................................................................................. 20 MATCHING CLAIMANT DETAILS – LINKING CLAIMANTS WITH DOCUMENTS...................................................... 22 Claim Management The Claim Management component includes the following topics: searching for Claims, updating Claim details, adding new Claims, deactivating/reactivating Claims. The User’s ability to perform these tasks depends on his/her roles. To open the Claim Management component, select the Claims tab at the top of the Insurer home page. The first screen that appears is Claim Search. 2 Insurer Manual – Chapter 6 Working with Claim and Claimant Notifications The General Notification Area is located in the upper part of either the Claim Search or Claimant Search screen, and is available only to Users who have been granted the Claim and Claimant Administrator or Plan/invoice Manager roles. If you are responsible for Claim and Claimant administration, the General Notification Area displays Claims that do not have any associated Claimants. The <Add Claimants> text-link that appears here leads to the Add Claimant screen. From the Add Claimant screen, you can add a Claimant. If you are responsible for assigning Adjusters, the General Notification Area displays the name of any Claimant who has not yet been associated with an Adjuster. The <Assign Adjuster> text-link that appears here leads to the Claimant Details screen, where you can assign a new Adjuster to the Claim. 3 Insurer Manual – Chapter 6 Searching for a Claim Claim Search screen Click the Claims tab at the top of the Insurer home page. The Claim Search screen appears by default. You can enter search criteria in the fields provided. To search for a Claim, enter data in any of the following fields: Claim #. If known, the Claim number returns the exact Claim for which you searched. Policy #. If known, the policy number returns the exact Claim for which you searched. Date of Accident. Enter the date of accident in YYYY/MM/DD format, or use the icon to engage the calendar feature. Policy Holder. Last Name and First Name. The “Policy Holder First Name” field cannot be used to search unless you also use the “Policy Holder Last Name” field. Insurer. Select the Insurer with which the Claim is associated from the Insurer drop-down list. Branch. Select the branch with which the Claim is associated from the branch drop-down list. Specify the status of the Claim by selecting “Active,” or “Deactivated” using the checkbox. Active Claims are those still being worked on in HCAI; deactivated Claims are those that have been concluded in HCAI. Click . 4 Insurer Manual – Chapter 6 Claim Search – Search Results Screen The search results list is numbered and can be sorted by clicking on the column headings. If your search is based on the Claim number, the search displays all the Claims that begin with that particular Claim number. A search based on criteria other than a specific Claim number may return multiple results. 5 Insurer Manual – Chapter 6 Sorting the Search Results When working with a large number of search results, you can sort the results using different criteria. The default sort order is alphanumeric, ascending by Claim number. The items can be sorted in ascending or descending order, based on field type, by clicking on the highlighted header of the column on which you wish to sort. Several Pages of Results If your search results comprise several pages, you can use the numbered links located on the right, above the search results list, to page through the entire set of results. To Return to the Claim Search Form To return to the Claim search form, click the <Refine Search> text-button above the search results list. Adding a New Claim Only Users with the Claim and Claimant Administrator role can add new Claims in HCAI. Claims can be created manually in the Claims, Claims Search screen. Note that, in the event that an OCF is received for a Claim that has been archived, HCAI allows for the creation of a duplicate Claim. 6 Insurer Manual – Chapter 6 To create a Claim: 1. Click the button located in the “Add a New Claim” section of the Claims, Claim Search screen. The Claimant Details screen appears. 2. Select a required Insurer from the “Insurer” drop-down list. The set of Insurers available for selection is determined by your domain. 3. Specify the Claim number, policy number, and policy holder’s first and last name in the respective fields. 4. Enter the date of accident in YYYY/MM/DD format, or click on the calendar feature. icon to engage the 5. Click . If any information is missing or invalid, an error message appears at the top referring you to the field in error. Successfully saving the information brings forward the three sections described below: State. This section shows the status of the Claim and its latest version. When you create a new Claim, the status is “Active” and the latest version is “1.” Activity Log. This section contains a list of activities associated with the current Claim. It shows: “Date & Time” (when the activity occurred), “Description” (the type of activity), “Version,” “In Dispute” and “Actor” (the author of the activity). Associated Claimants. This section shows a list of Claimants associated with your Claim. When you create a new Claim, the list contains no records (see next page). 7 Insurer Manual – Chapter 6 To clear the Claim details you have entered without saving, click that appears, click <Yes> or <OK>. . In the confirmation dialog box To add Claimants to a newly created Claim, click the button that appears in the bottom of the screen. The Claimant Details screen opens. Enter the Claimant’s data. 8 Insurer Manual – Chapter 6 Updating Claim Details This section describes how to update and view Claim details that have been manually entered or Claim data that was provided through an Insurer data feed. To update and view Claim details: 1. Navigate to the Claim in the search results list and click on the link in the Claim # column. The Claim Details screen opens. The fields in this section are pre-populated with the Claim information. 9 Insurer Manual – Chapter 6 2. Edit the: a. “Claim Number,” “Policy Number,” “Policy Holder Last Name,” “Policy Holder First Name” and “Date of Accident fields.” 3. Click to save the changes you have made. 4. In the confirmation dialog that appears, click <Yes> or <OK>. OR, 3. Click to cancel the changes you have made. 4. In the confirmation dialog that appears, click <Yes> or <OK>.The screen is reloaded to display the original Claim information. If this is not the first time the Claim is being updated, the Activity Log displays a list of previous updates to the Claim. To view any of the previous updates, click on the link of the desired version in the Version column. A pop-up window appears, containing the selected version of the Claim details. 10 Insurer Manual – Chapter 6 Associated Claimants List In the bottom part of the Claim Details screen, there is a list of the Claimants associated with each specific Claim. The items in the list can be sorted in ascending or descending order, based on field type, by clicking on the highlighted header of the column that you wish to sort. 11 Insurer Manual – Chapter 6 Deactivating/Reactivating a Claim You can deactivate/reactivate a Claim from the Claim Details screen. To deactivate or reactivate a Claim: Search for the desired Claim; Click on the Claim in the Claim # column of the search results list to proceed to the Claim Details screen; Click either the The deactivated. The or button at the top of the screen. button is enabled only when all the Claimants associated with a Claim have been button is enabled when a Claim is deactivated. 12 Insurer Manual – Chapter 6 Claimant Management The Claimant management functionality is accessed from the Claimants sub tab, which is accessible from the Insurer home page if you have the Claim/Claimant Administrator or Plan/Invoice Manager role. Claimant Management enables search, update, add, deactivate/reactivate Claimant(s) functionality. The ability of Users to perform these tasks depends on the roles they have been assigned in HCAI. For more information on task authority and User roles, see Chapter 10: Insurer User Management. When you successfully add a new Claimant, HCAI performs a check against all unmatched documents and attempts to match them with the new Claimant. The following matching criteria are used: Policy number or Claim number, Date of Accident, Gender, and Date of Birth. Documents that match are displayed in the Associated Documents section at the bottom of the Claimant Details screen. Click on the Claimant in the Claimant Name column of the Claimant search results list to proceed to the Claimant Details screen. The fields are pre-populated with the current Claimant data. Documents associated with a Claimant For your convenience, you can sort the documents associated with your Claimant, which are listed in the bottom of the Claimant Details screen, by clicking on the column header of the fields displayed. 13 Insurer Manual – Chapter 6 Searching for a Claimant To search for a Claimant, In the Claimant Search screen, specify the Claimant status (“Active” or “Deactivated”), and any of the following criteria: Click Date of accident. Enter the date of the accident in YYYY/MM/DD format, or use the icon to use the calendar feature. Claimant last name and first name. The “Claimant Last Name” field must contain at least two characters. The “Claimant First Name” field cannot be used to search unless you also use the “Claimant Last Name” field. Claimant date of birth. Enter the date. Claimant phone number. Enter at least the area code and the prefix (i.e., the first three digits) of the number. Claimant postal code. Enter at least the first three characters of the postal code. Adjuster. Select the Adjuster associated with the Claimant from the respective drop-down list. The set of Adjusters visible is restricted by the User’s domain. Insurer. Select the Insurer from the drop-down list.. Select the desired Branch from the dropdown list. . 14 Insurer Manual – Chapter 6 If there are no Claimants that match your search criteria, or if any of your search criteria is invalid, HCAI provides a notification message and you are returned to the Claimant Search form. If your search criteria are validated, you proceed to the Claimant Search Results screen. Claimant Search Results The search results list is numbered and can be sorted. Depending on the search criteria used, the search may return a single result or multiple results. The items can be sorted in ascending or descending order, based on field type, by clicking on the highlighted header of the column by which you wish to sort. To return to the Claimant search form, click on the <Refine Search> text-link above the search results list. Adding a New Claimant Only Users who have the Claim and Claimant Administrator and/or Plan/Invoice Manager roles can add Claimants. To create a Claimant manually, you must use the Claimant Details screen. To open the Claimant Details screen: 1. Select the Claims tab on the Insurer home page. This defaults into the Claim Search screen. 2. Search for the desired Claim and click on the Claim number link in the Claim # column of the search results table. This takes you to the Claim Details screen. 3. Click appears. in the bottom of the Claim Details screen. The Add Claimant screen 15 Insurer Manual – Chapter 6 To add a new Claimant: 1. Enter the Claimant ID. This identifier is provided by the Insurer and is unique within the Claim. 2. Enter the Claimant’s last, first, and middle name in the respective fields. 3. Specify the Claimant’s address and city of residence in the respective fields. 4. Select the province of residence from the respective drop-down list. This list defaults to “Ontario.” 5. Specify the Claimant’s postal code. 6. Select an Adjuster to manage the Claimant from the “Adjuster” drop-down list. This list contains only active Adjusters and is restricted by your access domain. 7. Enter the Claimant’s date of birth in YYYY/MM/DD format, or use the calendar function. 8. Select the gender of the Claimant. 9. Enter the Claimant’s phone number. 10. Click to save the new Claimant details. If any information is missing or invalid, you are returned to the Add Claimant screen. An error message appears in the error list at the top of the screen, referring you to the field(s) in error. 11. Click to clear the Claimant details you have entered. In the confirmation dialog box, click <Yes> or <OK>. Note: All fields with an asterisk (*) are required. 16 Insurer Manual – Chapter 6 When you successfully add a new Claimant, HCAI performs a check against all unmatched documents and attempts to match them with the new Claimant. The matching criteria used are the policy number or Claim number, date of accident, gender, and the date of birth. If any documents are found that match, they display in the Associated Claimants section at the bottom of the Claimant Details screen. Updating Claimant Details This section describes the process of updating and viewing Claimant details that have been provided either through an Insurer’s data feed or created manually. You can update a Claimant associated with a specific Claim in the Claimant Details screen. To update Claimant details: Open the Plan that belongs to the Claimant whose information you wish to update. Navigate to Part 1 of Tab 1 in the selected Plan and click on the button. Edit the content as required in any of the available fields. 17 Insurer Manual – Chapter 6 Note: The Claimant ID must be unique for each Claimant. Click to save the changes you have made. If you are not satisfied with your changes, click . The screen refreshes to display the original Claimant information. Batch Transfer of Claimants Individuals with either the Plan/Invoice Manager or Claim/Claimant Administrator role have the ability to use the “Reassign Adjuster” feature in batch. Multiple Claimants can be transferred from one Adjuster to another at the same time. This feature is commonly used to reassign Claimants when an Adjuster leaves the company or takes on a new role. To transfer multiple Claimants from the Claimants > Claimant Search Results screen: 1. Navigate to the Claims > Claimants sub-tab. 18 Insurer Manual – Chapter 6 2. Apply your search parameters in the relevant fields (viz., Insurer, Branch and/or Adjuster) in the “Search for Claimants” section, then click selected. . To reassign the Adjuster, Branch must be 3. A list of Claimants associated with the specified Branch or Adjuster (depending on what has been specified when executing the Claimant Search) will populate the Search Results. 19 Insurer Manual – Chapter 6 4. At the bottom of the Search Results list, use the drop-down list to select an Adjuster to whom the Claimants should be reassigned. 5. In the “Reassign” column, check the box for each Claimant that needs to be assigned to the specified Adjuster. 6. Once you have selected the Adjuster and specified which Claimants should be reassigned to the Adjuster chosen, click Deactivating/Reactivating a Claimant To deactivate/reactivate a Claimant from the Claim Details screen: Search for the Claim that is linked with the desired Claimant, as described in Searching for a Claim in Chapter 6. Click on this Claim in the Claim # column of the search results list to proceed to the Claim Details screen. If a Claimant’s status is active, the adjacent button is . Click this button to deactivate the Claimant and change the status to “Deactivated.” You can deactivate a Claimant only if all of the documents associated with that Claimant have been adjudicated. If a Claimant’s status is deactivated, the adjacent button is Claimant and change the status to “Active.” 20 . Click this button to activate the Insurer Manual – Chapter 6 To deactivate/reactivate a Claimant from the Claim Details screen: Click on the Claimant’s name in the Claimant Name column of the search results list to proceed to the Claimant Details screen. Click the button at the top of the screen to deactivate an active Claimant. The button is enabled only when all of the documents associated with a Claimant have had an Adjuster’s response recorded against them. Click the button at the top of the screen to activate a deactivated Claimant. 21 Insurer Manual – Chapter 6 Matching Claimant Details – Linking Claimants with Documents If there is a perfect match between the applicant details specified by the Facility and the Claim and Claimant details recorded in HCAI by the Insurer, HCAI links the information and documents automatically so there is no need for Users to match documents to Claimants. A perfect match occurs when the following data elements match between the information provided by the Facility and the information provided by the Insurer: Either the policy number or the Claim number matches (Facility leaves the other one blank); Date of Loss / Accident; Date of Birth; Gender. However, if the Facility does not leave the other one blank (either the policy or Claim number) and enters some information that is not matched, HCAI will cross-match the Claim and policy number. The crossmatch allows for the following additional matches: If either the Policy number of Claim number match, the other one need not be matched and need not be blank; Policy number that is set up by the Insurer matches the Claim number that is set up by the Facility; Claim number that is set-up by the Insurer matches the policy number that is set up by the Facility. When the cross-match rules are initiated and a match is made for a submission that is not exact, the following warning message is provided for the Adjuster in receipt of the form: “Please review the matching of Claim/Claimant and un-match if incorrect.” This warning will display until the form changes from a “Submitted” state to a “Review Required” state. Organizations containing more than one insurance company as part of their structure, or more than one branch, may have forms that are misdirected by the Facility to a Branch or Insurer in error. If the form is a match with one of the group of companies or another Branch of the company, HCAI will search the organization structure for a match and, upon discovery, will match the form. If the form has incorrect information and is “Unmatched”, it will stay in the unmatched bucket of the Branch to which it was submitted until a match can occur. The Claimant matching functionality can be accessed only if you have been assigned the role of Plan/Invoice Manager. To match a Claimant with a plan or invoice: Open a plan or invoice with “Unmatched” status from the Work In Progress work list on the Insurer home page using the “Review Form” ( ) button. If the plan or invoice has not been automatically matched by HCAI, you are taken directly to the Match Claimant screen. 22 Insurer Manual – Chapter 6 If you are satisfied with one of the possible matches presented by HCAI, click the button next to the respective item. This takes you back to the OCF from which you accessed the Match Claimant screen, and the OCF is now linked to the Claimant. When the Possible Matches section does not contain the Claimant you are looking for, you must decide whether to search for the Claimant, or to create a new Claim and Claimant to which the document can be linked. Should you want to search for the Claimant, click the the Claimant Search screen where you can specify your search criteria. button. This takes you to When the Claimant search produces a possible match that you want to link to the Claim, click on the button to complete the link and return to the original OCF. If, based on the search criteria entered, no potential Claimant matches are found, you are then returned to the Claimant Search screen where you can try another Claimant search, cancel the matching attempt, or create a new Claim and Claimant in HCAI to link with the document. 23 Insurer Manual – Chapter 6 If you want to create a new Claim to match to the document, click the button and proceed to add a new Claim from the Claim Details screen. If HCAI has made an automatic match that you want to change, you can unlink the document from the Claimant and make a manual match. To unlink Claimant data and look for another match: Click the The Insurer Claimant information disappears, and the top of the Applicant Information section. Click the button near the top of Part 1: Applicant Information section. This takes you to the Claimant Match screen where you can search for a proper match. button on Tab 1. 24 button appears at the Insurer Manual – Chapter 6 To update Claimant information: Click the button that appears at the top of the Applicant Information section. The Claimant Details screen opens. Update the Claimant information in HCAI and click 25 to accept your changes. Insurer Manual – Chapter 6