1
Action Request System™
User’s Guide for Windows
2550 Garcia Avenue
Mountain View, CA 94043
U.S.A.
SunSoft Part No: 875-1774-10
Revision A, January 1996
Copyright 1996 Sun Microsystems, Inc., 2550 Garcia Avenue, Mountain View, California 94043-1100 U.S.A. All rights reserved.
This document and related product are protected by copyright and distributed under licenses restricting their use, copying,
distribution, and decompilation. No part of this document or the product may be reproduced in any form by any means without
prior written authorization of Sun and its licensors, if any.
Portions of this product may be derived from the UNIX® system, licensed from Novell, Inc., and from the Berkeley 4.3 BSD
system, licensed from the University of California. UNIX is a registered trademark in the United States and other countries and is
exclusively licensed by X/Open Company Ltd. Third-party software, including font technology in this product, is protected by
copyright and licensed from Sun’s suppliers.
RESTRICTED RIGHTS: Use, duplication, or disclosure by the U.S. Government is subject to restrictions of
FAR 52.227-14(g)(2)(6/87) and FAR 52.227-19(6/87), or DFAR 252.227-7015(b)(6/95) and DFAR 227.7202-1(a).
Sun, Sun Microsystems, the Sun logo, SunSoft, the SunSoft logo, Solstice, Solstice HelpDesk, and Solaris are trademarks or
registered trademarks of Sun Microsystems, Inc. in the United States and other countries. All SPARC trademarks are used under
license and are trademarks or registered trademarks of SPARC International, Inc. in the United States and other countries.
Products bearing SPARC trademarks are based upon an architecture developed by Sun Microsystems, Inc.
The OPEN LOOK® and Sun graphical user interfaces were developed by Sun Microsystems, Inc. for its users and licensees. Sun
acknowledges the pioneering efforts of Xerox in researching and developing the concept of visual or graphical user interfaces for
the computer industry. Sun holds a non-exclusive license from Xerox to the Xerox graphical user interface, which license also
covers Sun’s licensees who implement OPEN LOOK graphical user interfaces and otherwise comply with Sun’s written license
agreements.
X Window System is a trademark of X Consortium, Inc.
THIS PUBLICATION IS PROVIDED “AS IS” WITHOUT WARRANTY OF ANY KIND, EITHER EXPRESS OR IMPLIED,
INCLUDING, BUT NOT LIMITED TO ANY WARRANTY OF NON-INFRINGEMENT, OR THE IMPLIED WARRANTIES OF
MERCHANTABILITY, OR FITNESS FOR A PARTICULAR PURPOSE.
Please
Recycle
1991, 1992, 1993, 1994, 1995, 1996 by Remedy Corporation. All rights reserved. This documentation may not be copied in whole or in part
without the prior written consent of Remedy Corporation.
Printed in the U.S.A.
Action Request System and AR System are trademarks of Remedy Corporation.
Apple and Macintosh are registered trademarks and MacTCP is a trademark of Apple Computer, Inc.
AT&T is a registered trademark of American Telephone and Telegraph Company.
CA-OpenINGRES is a trademark of Computer Associates, Inc
ChameleonNFS and NETMANAGE are trademarks of NETMANAGE, Inc.
HP, HP-UX, and OpenView are trademarks of Hewlett-Packard Company.
HyperHelp is a trademark of Bristol Technology Inc.
IBM, OS/2, and RISC System/6000 are registered trademarks, and RS/6000, NetView and AIX are trademarks of
International Business Machines Corporation.
INFORMIX is a registered trademark of Informix Software, Inc.
LAN WorkPlace and Novell are registered trademarks of Novell, Inc.
Microsoft, MS, MS-DOS, and XL design (the Microsoft Excel logo) are registered trademarks, and Windows and Windows NT are trademarks of
Microsoft Corporation.
Motif, OSF, and OSF/Motif are trademarks of the Open Software Foundation, Inc.
Motorola mc88100 is a registered trademark of Motorola Corporation.
ORACLE and SQL*Plus are registered trademarks, and ORACLE7 is a trademark of Oracle Corporation.
PC/TCP is a registered trademark of FTP Software, Inc.
Reflection and Reflection Network Series are registered trademarks of Walker Richer & Quinn, Inc.
Silicon Graphics and IRIS are registered trademarks and IRIX is a trademark of Silicon Graphics, Inc.
Sun Microsystems, NFS, and PC-NFS are registered trademarks of Sun Microsystems, Inc. SunOS, Solaris,
SunSelect, OpenWindows, and SunNet are trademarks of Sun Microsystems, Inc. SPARCstation is a trademark of SPARC International, Inc.,
licensed exclusively to Sun Microsystems, Inc.
SuperTCP for Windows is a trademark of Frontier Technologies Corporation.
SYBASE is a registered trademark of Sybase, Inc.
UNIX is a registered trademark in the United States and other countries, licensed exclusively through
X/Open Company Ltd.
Verity and TOPIC are registered trademarks of Verity, Inc.
All other products mentioned in this document are identified by the trademarks or service marks of their respective companies or organizations.
Use, duplication, or disclosure by the Government is subject to restrictions as set forth in subparagraph (c) (1) (ii) of the Rights in Technical Data
and Computer Software clause in DFAR 52.227-7013 or the equivalent clause in FAR 52.227-19, whichever is applicable.
Cover design by Carlick Advertising.
Part Number: UGW-210-001
Contents
Preface. . . . . . . . . . . . . . . . . . . . . . . . . . . . . . . . . . . . . . . . . . . . . . . . . . . . xviii
1. Overview of the Action Request System . . . . . . . . . . . . . . . . .
1
AR System Users . . . . . . . . . . . . . . . . . . . . . . . . . . . . . . . . . . . . . .
1
AR System Tools. . . . . . . . . . . . . . . . . . . . . . . . . . . . . . . . . . . . . . .
2
User Tool . . . . . . . . . . . . . . . . . . . . . . . . . . . . . . . . . . . . . . . . . .
2
Notification Tool . . . . . . . . . . . . . . . . . . . . . . . . . . . . . . . . . . .
3
Administrator Tool . . . . . . . . . . . . . . . . . . . . . . . . . . . . . . . . .
3
Import Tool . . . . . . . . . . . . . . . . . . . . . . . . . . . . . . . . . . . . . . . .
4
Action Request System Activities . . . . . . . . . . . . . . . . . . . . . . . .
4
2. Getting Started with the User Tool . . . . . . . . . . . . . . . . . . . . . .
7
Using the Mouse with the AR System. . . . . . . . . . . . . . . . . . . . .
8
Controlling Window Size and Position . . . . . . . . . . . . . . . . . . . .
8
Windows User Conventions in the AR System . . . . . . . . . . . . .
9
Using Function Keys . . . . . . . . . . . . . . . . . . . . . . . . . . . . . . . .
10
Installing the AR System Tools for Windows . . . . . . . . . . . . . . .
10
iv
v
Starting the User Tool . . . . . . . . . . . . . . . . . . . . . . . . . . . . . . . . . .
13
User Name and Password . . . . . . . . . . . . . . . . . . . . . . . . . . .
13
The Main Window . . . . . . . . . . . . . . . . . . . . . . . . . . . . . . . . . . . . .
16
Making Menu Selections. . . . . . . . . . . . . . . . . . . . . . . . . . . . .
17
Using the Tool Bar . . . . . . . . . . . . . . . . . . . . . . . . . . . . . . . . . .
25
Exiting the User Tool . . . . . . . . . . . . . . . . . . . . . . . . . . . . . . . . . . .
27
Working with Action Requests. . . . . . . . . . . . . . . . . . . . . . . . . . .
28
Using Schemas . . . . . . . . . . . . . . . . . . . . . . . . . . . . . . . . . . . . . . . .
28
Selecting a Schema. . . . . . . . . . . . . . . . . . . . . . . . . . . . . . . . . .
30
Login Information . . . . . . . . . . . . . . . . . . . . . . . . . . . . . . . . . . . . .
31
Specifying Alternate Login Information . . . . . . . . . . . . . . . .
32
Modifying Login Information . . . . . . . . . . . . . . . . . . . . . . . .
35
Copying Login Information . . . . . . . . . . . . . . . . . . . . . . . . . .
36
Modifying the Default Login Information . . . . . . . . . . . . . .
37
Deleting Login Information . . . . . . . . . . . . . . . . . . . . . . . . . .
38
Changing the Current Login Information. . . . . . . . . . . . . . . . . .
39
Sharing Macros and Custom Reports . . . . . . . . . . . . . . . . . . . . .
40
Copying Files . . . . . . . . . . . . . . . . . . . . . . . . . . . . . . . . . . . . . .
40
Specifying your AR Path Preference . . . . . . . . . . . . . . . . . . .
41
Server Information Window . . . . . . . . . . . . . . . . . . . . . . . . . . . . .
41
Setting User Preferences . . . . . . . . . . . . . . . . . . . . . . . . . . . . . . . .
42
Displaying Help . . . . . . . . . . . . . . . . . . . . . . . . . . . . . . . . . . . . . . .
60
Displaying Application Help . . . . . . . . . . . . . . . . . . . . . . . . .
60
Displaying Context-Sensitive Help . . . . . . . . . . . . . . . . . . . .
60
Action Request System User’s Guide for Windows—January 1996
Displaying Version and Environment Information . . . . . . .
61
3. Submitting an Action Request . . . . . . . . . . . . . . . . . . . . . . . . . .
63
General Steps for Submitting an Action Request. . . . . . . . . . . .
64
When You Can Access Fields . . . . . . . . . . . . . . . . . . . . . . . . . . . .
66
Filling in Fields. . . . . . . . . . . . . . . . . . . . . . . . . . . . . . . . . . . . . . . .
66
Field Data Types. . . . . . . . . . . . . . . . . . . . . . . . . . . . . . . . . . . .
68
Field Data Entry Operations. . . . . . . . . . . . . . . . . . . . . . . . . .
70
Using Keywords. . . . . . . . . . . . . . . . . . . . . . . . . . . . . . . . . . . . . . .
72
Special Data Entry Operations . . . . . . . . . . . . . . . . . . . . . . . . . . .
73
Using the Text Editor Dialog Box. . . . . . . . . . . . . . . . . . . . . .
73
Using the Diary Editor Dialog Box . . . . . . . . . . . . . . . . . . . .
75
Text and Diary Editor Operations . . . . . . . . . . . . . . . . . . . . .
77
Using Active Links . . . . . . . . . . . . . . . . . . . . . . . . . . . . . . . . .
78
Setting Submit Window Preferences . . . . . . . . . . . . . . . . . . . . . .
81
4. Reviewing and Modifying Action Requests . . . . . . . . . . . . . .
83
General Steps for Querying the Database . . . . . . . . . . . . . . . . . .
84
Defining Query Criteria . . . . . . . . . . . . . . . . . . . . . . . . . . . . . . . .
86
Query-by-Example . . . . . . . . . . . . . . . . . . . . . . . . . . . . . . . . .
86
Query Bar . . . . . . . . . . . . . . . . . . . . . . . . . . . . . . . . . . . . . . . . .
88
Using Relational Operators in the Query Window . . . . . . .
89
Using Wild Card Symbols. . . . . . . . . . . . . . . . . . . . . . . . . . . .
90
Using the Query Bar . . . . . . . . . . . . . . . . . . . . . . . . . . . . . . . .
92
Query Bar Format and Syntax . . . . . . . . . . . . . . . . . . . . . . . .
95
Using Operators in the Query Bar . . . . . . . . . . . . . . . . . . . . .
95
Contents
vi
vii
Query Bar Statement Conventions . . . . . . . . . . . . . . . . . . . .
97
Examples of Query Statements . . . . . . . . . . . . . . . . . . . . . . .
99
Query Operations . . . . . . . . . . . . . . . . . . . . . . . . . . . . . . . . . . . . .
99
Sorting Query Operation Results. . . . . . . . . . . . . . . . . . . . . .
102
Specifying a Maximum Number of ARs . . . . . . . . . . . . . . . .
106
Listing Action Requests . . . . . . . . . . . . . . . . . . . . . . . . . . . . .
106
Displaying Action Requests . . . . . . . . . . . . . . . . . . . . . . . . . .
110
Modifying Action Requests . . . . . . . . . . . . . . . . . . . . . . . . . .
114
Deleting Action Requests . . . . . . . . . . . . . . . . . . . . . . . . . . . .
118
Full Text Search Option . . . . . . . . . . . . . . . . . . . . . . . . . . . . . . . . .
119
What is Full Text Search? . . . . . . . . . . . . . . . . . . . . . . . . . . . .
120
Who Can Perform a Full Text Search? . . . . . . . . . . . . . . . . . .
120
How Do I Use FTS? . . . . . . . . . . . . . . . . . . . . . . . . . . . . . . . . .
121
Limits in Doing an FTS . . . . . . . . . . . . . . . . . . . . . . . . . . . . . .
123
Ignore Words List. . . . . . . . . . . . . . . . . . . . . . . . . . . . . . . . . . .
124
Efficient Full Text Searching . . . . . . . . . . . . . . . . . . . . . . . . . .
124
Setting Query Window Preferences . . . . . . . . . . . . . . . . . . . . . . .
125
5. Reports . . . . . . . . . . . . . . . . . . . . . . . . . . . . . . . . . . . . . . . . . . . . . .
127
Generating Reports . . . . . . . . . . . . . . . . . . . . . . . . . . . . . . . . . . . .
127
Designing Reports . . . . . . . . . . . . . . . . . . . . . . . . . . . . . . . . . . . . .
129
Selecting Fields. . . . . . . . . . . . . . . . . . . . . . . . . . . . . . . . . . . . .
130
Setting the Report Layout . . . . . . . . . . . . . . . . . . . . . . . . . . . .
131
Sorting and Grouping Records in a Report . . . . . . . . . . . . .
136
Generating Statistics . . . . . . . . . . . . . . . . . . . . . . . . . . . . . . . .
139
Action Request System User’s Guide for Windows—January 1996
Specifying Statistics . . . . . . . . . . . . . . . . . . . . . . . . . . . . . . . . .
140
Defining Page Setup and Report Options. . . . . . . . . . . . . . .
143
Using Custom Reports . . . . . . . . . . . . . . . . . . . . . . . . . . . . . . . . .
147
Saving a Custom Report . . . . . . . . . . . . . . . . . . . . . . . . . . . . .
148
Using a Custom Report . . . . . . . . . . . . . . . . . . . . . . . . . . . . . .
149
Modifying a Custom Report. . . . . . . . . . . . . . . . . . . . . . . . . .
150
Modifying the Name or Help Text of a Custom Report . . .
151
Deleting a Custom Report . . . . . . . . . . . . . . . . . . . . . . . . . . .
152
Generating Report Output . . . . . . . . . . . . . . . . . . . . . . . . . . . . . .
152
6. Using Macros . . . . . . . . . . . . . . . . . . . . . . . . . . . . . . . . . . . . . . . . .
161
Recording Macros . . . . . . . . . . . . . . . . . . . . . . . . . . . . . . . . . . . . .
161
Executing Macros . . . . . . . . . . . . . . . . . . . . . . . . . . . . . . . . . . . . . .
169
Modifying the Macro Name or Help Text. . . . . . . . . . . . . . . . . .
171
Deleting Macros . . . . . . . . . . . . . . . . . . . . . . . . . . . . . . . . . . . . . . .
172
Sharing Macros with Other Users . . . . . . . . . . . . . . . . . . . . . . . .
173
7. Customizing the Environment . . . . . . . . . . . . . . . . . . . . . . . . . .
175
Defining Default Field Values . . . . . . . . . . . . . . . . . . . . . . . . . . .
175
Customizing Your Schema View . . . . . . . . . . . . . . . . . . . . . . . . .
177
Changing the Layout. . . . . . . . . . . . . . . . . . . . . . . . . . . . . . . .
178
Selecting an Alignment Method . . . . . . . . . . . . . . . . . . . . . .
180
Changing Field and Active Link Button Properties . . . . . .
180
Restoring Previous Views . . . . . . . . . . . . . . . . . . . . . . . . . . . . . . .
183
Exporting Views . . . . . . . . . . . . . . . . . . . . . . . . . . . . . . . . . . . . . . .
184
Selecting a Administrator View . . . . . . . . . . . . . . . . . . . . . . . . . .
185
Contents
viii
ix
8. Using the Notification Tool . . . . . . . . . . . . . . . . . . . . . . . . . . . . .
187
Starting the Notification Tool . . . . . . . . . . . . . . . . . . . . . . . . . . . .
188
Changing the Current Login. . . . . . . . . . . . . . . . . . . . . . . . . . . . .
189
Making Menu Selections . . . . . . . . . . . . . . . . . . . . . . . . . . . . . . . .
190
Exiting the Notification Tool. . . . . . . . . . . . . . . . . . . . . . . . . . . . .
191
Receiving a Notification . . . . . . . . . . . . . . . . . . . . . . . . . . . . . . . .
192
Reviewing the Notification Log . . . . . . . . . . . . . . . . . . . . . . . . . .
192
Setting Notification Tool Preferences. . . . . . . . . . . . . . . . . . . . . .
194
Specifying an Alternate Configuration Directory . . . . . . . . . . .
196
Displaying Help . . . . . . . . . . . . . . . . . . . . . . . . . . . . . . . . . . . . . . .
197
Displaying Application Help . . . . . . . . . . . . . . . . . . . . . . . . .
197
Displaying Version and Environment Information . . . . . . .
197
9. Using Electronic Mail. . . . . . . . . . . . . . . . . . . . . . . . . . . . . . . . . .
199
Overview of the AR System’s Use of Electronic Mail . . . . . . . .
199
The Email Template . . . . . . . . . . . . . . . . . . . . . . . . . . . . . . . . . . . .
200
Querying or Submitting via Electronic Mail. . . . . . . . . . . . . . . .
204
Querying via Electronic Mail . . . . . . . . . . . . . . . . . . . . . . . . .
204
Formatting a Query via Electronic Mail . . . . . . . . . . . . . . . .
205
Submitting Email . . . . . . . . . . . . . . . . . . . . . . . . . . . . . . . . . . .
205
Responses to Email Submissions . . . . . . . . . . . . . . . . . . . . . .
207
Receiving Email Notifications . . . . . . . . . . . . . . . . . . . . . . . . . . .
207
A. AR System File Locations . . . . . . . . . . . . . . . . . . . . . . . . . . . . . .
209
AR System User Tool Files . . . . . . . . . . . . . . . . . . . . . . . . . . . . . .
209
AR System Notification Tool Files . . . . . . . . . . . . . . . . . . . . . . . .
210
Action Request System User’s Guide for Windows—January 1996
B. Networking Notes. . . . . . . . . . . . . . . . . . . . . . . . . . . . . . . . . . . . .
211
Requirements for Supported Stacks . . . . . . . . . . . . . . . . . . . . . .
211
Chameleon by NetManage . . . . . . . . . . . . . . . . . . . . . . . . . . .
211
LAN WorkPlace by Novell . . . . . . . . . . . . . . . . . . . . . . . . . . .
212
Pathway by Wollongong . . . . . . . . . . . . . . . . . . . . . . . . . . . . .
212
PC-NFS by SunSelect. . . . . . . . . . . . . . . . . . . . . . . . . . . . . . . .
212
PC/TCP by FTP . . . . . . . . . . . . . . . . . . . . . . . . . . . . . . . . . . . .
213
TCP/IP by Microsoft . . . . . . . . . . . . . . . . . . . . . . . . . . . . . . . .
213
Super TCP by Frontier. . . . . . . . . . . . . . . . . . . . . . . . . . . . . . .
214
Reflection Network Series by Walker Richer & Quinn . . . .
214
C. DDE Functionality in the AR System . . . . . . . . . . . . . . . . . . . .
215
Third Party Applications and Macros . . . . . . . . . . . . . . . . . . . . .
216
DDE Server Name and User Tool Pathname . . . . . . . . . . . .
217
Supported DDE Topic and Function . . . . . . . . . . . . . . . . . . .
217
Example Program and Buffer . . . . . . . . . . . . . . . . . . . . . . . . .
218
D. List of Procedures . . . . . . . . . . . . . . . . . . . . . . . . . . . . . . . . . . . . .
225
Glossary . . . . . . . . . . . . . . . . . . . . . . . . . . . . . . . . . . . . . . . . . . . . . . . . . .
229
Index . . . . . . . . . . . . . . . . . . . . . . . . . . . . . . . . . . . . . . . . . . . . . . . . . . . . .
241
Contents
x
xi
Action Request System User’s Guide for Windows—January 1996
Tables
Table 2-1
Function Keys in the User Tool . . . . . . . . . . . . . . . . . . . . . . . . . .
10
Table 2-2
User Tool Menu Items. . . . . . . . . . . . . . . . . . . . . . . . . . . . . . . . . .
18
Table 2-3
Tool Bar Functions. . . . . . . . . . . . . . . . . . . . . . . . . . . . . . . . . . . . .
26
Table 3-1
Field Data Types . . . . . . . . . . . . . . . . . . . . . . . . . . . . . . . . . . . . . .
68
Table 3-2
Keywords . . . . . . . . . . . . . . . . . . . . . . . . . . . . . . . . . . . . . . . . . . . .
72
Table 3-3
Text and Diary Editor Menu Items . . . . . . . . . . . . . . . . . . . . . . .
77
Table 4-1
Relational Operators Used in the Query Window . . . . . . . . . .
89
Table 4-2
Wild Card Symbols . . . . . . . . . . . . . . . . . . . . . . . . . . . . . . . . . . . .
90
Table 4-3
Operators Used in the Query Bar . . . . . . . . . . . . . . . . . . . . . . . .
95
Table 4-4
Query Operations . . . . . . . . . . . . . . . . . . . . . . . . . . . . . . . . . . . . .
100
Table 5-1
Statistical Operations . . . . . . . . . . . . . . . . . . . . . . . . . . . . . . . . . .
139
Table 5-2
Fields Required for dde.ini File . . . . . . . . . . . . . . . . . . . . . . . . . .
156
Table 8-1
Notification Tool Menu Items . . . . . . . . . . . . . . . . . . . . . . . . . . .
191
Table 8-2
Notification Tool Preference Settings . . . . . . . . . . . . . . . . . . . . .
195
xii
xiii
Action Request System User’s Guide for Windows—January 1996
Figures
Figure 1-1
Flow of AR System Activities . . . . . . . . . . . . . . . . . . . . . . . . . . .
5
Figure 2-1
Login Dialog Box . . . . . . . . . . . . . . . . . . . . . . . . . . . . . . . . . . . . . .
15
Figure 2-2
User Tool Main Window . . . . . . . . . . . . . . . . . . . . . . . . . . . . . . .
17
Figure 2-3
Exiting the Tool . . . . . . . . . . . . . . . . . . . . . . . . . . . . . . . . . . . . . . .
27
Figure 2-4
Sample Trouble Ticket Schema . . . . . . . . . . . . . . . . . . . . . . . . . .
29
Figure 2-5
Selecting a Schema. . . . . . . . . . . . . . . . . . . . . . . . . . . . . . . . . . . . .
30
Figure 2-6
The Login Information Dialog Box . . . . . . . . . . . . . . . . . . . . . . .
33
Figure 2-7
Servers Dialog Box. . . . . . . . . . . . . . . . . . . . . . . . . . . . . . . . . . . . .
34
Figure 2-8
Server Information Dialog Box . . . . . . . . . . . . . . . . . . . . . . . . . .
42
Figure 2-9
User Preferences - Desktop . . . . . . . . . . . . . . . . . . . . . . . . . . . . .
43
Figure 2-10
User Preferences - Submit . . . . . . . . . . . . . . . . . . . . . . . . . . . . . .
46
Figure 2-11
User Preferences - Query . . . . . . . . . . . . . . . . . . . . . . . . . . . . . . .
47
Figure 2-12
User Preferences - Confirm . . . . . . . . . . . . . . . . . . . . . . . . . . . . .
49
Figure 2-13
User Preferences - Report . . . . . . . . . . . . . . . . . . . . . . . . . . . . . . .
50
Figure 2-14
User Preferences - Fonts . . . . . . . . . . . . . . . . . . . . . . . . . . . . . . . .
54
Figure 2-15
Font Dialog Box . . . . . . . . . . . . . . . . . . . . . . . . . . . . . . . . . . . . . . .
55
xiv
xv
Figure 2-16
User Preferences - Colors . . . . . . . . . . . . . . . . . . . . . . . . . . . . . . .
56
Figure 2-17
Symbol Elements . . . . . . . . . . . . . . . . . . . . . . . . . . . . . . . . . . . . . .
57
Figure 2-18
User Preferences - View Management . . . . . . . . . . . . . . . . . . . .
59
Figure 2-19
Field/Schema Help Dialog Box. . . . . . . . . . . . . . . . . . . . . . . . . .
61
Figure 2-20
The About Dialog Box. . . . . . . . . . . . . . . . . . . . . . . . . . . . . . . . . .
62
Figure 3-1
Select Schema - Submit Dialog Box. . . . . . . . . . . . . . . . . . . . . . .
64
Figure 3-2
Submit Window . . . . . . . . . . . . . . . . . . . . . . . . . . . . . . . . . . . . . . .
65
Figure 3-3
Example of the Submit Window . . . . . . . . . . . . . . . . . . . . . . . . .
67
Figure 3-4
Entering Data in Fields . . . . . . . . . . . . . . . . . . . . . . . . . . . . . . . . .
70
Figure 3-5
Text Editor Dialog Box . . . . . . . . . . . . . . . . . . . . . . . . . . . . . . . . .
74
Figure 3-6
Diary Editor Dialog Box . . . . . . . . . . . . . . . . . . . . . . . . . . . . . . . .
76
Figure 3-7
Active Link Example. . . . . . . . . . . . . . . . . . . . . . . . . . . . . . . . . . .
79
Figure 3-8
Selection List Dialog Box . . . . . . . . . . . . . . . . . . . . . . . . . . . . . . .
81
Figure 4-1
Select Schema - Query Dialog Box . . . . . . . . . . . . . . . . . . . . . . .
85
Figure 4-2
Specifying Query Criteria. . . . . . . . . . . . . . . . . . . . . . . . . . . . . . .
86
Figure 4-3
Using a Relational Operator. . . . . . . . . . . . . . . . . . . . . . . . . . . . .
90
Figure 4-4
The Query Bar . . . . . . . . . . . . . . . . . . . . . . . . . . . . . . . . . . . . . . . .
93
Figure 4-5
Query Menu . . . . . . . . . . . . . . . . . . . . . . . . . . . . . . . . . . . . . . . . . .
100
Figure 4-6
Results of Multiple Query Operations . . . . . . . . . . . . . . . . . . . .
101
Figure 4-7
Query List Results in Descending Order . . . . . . . . . . . . . . . . . .
103
Figure 4-8
Sorted Report Results . . . . . . . . . . . . . . . . . . . . . . . . . . . . . . . . . .
104
Figure 4-9
Field Sort Order Dialog Box. . . . . . . . . . . . . . . . . . . . . . . . . . . . .
105
Figure 4-10
Query List Window. . . . . . . . . . . . . . . . . . . . . . . . . . . . . . . . . . . .
106
Figure 4-11
Set Polling Interval Dialog Box . . . . . . . . . . . . . . . . . . . . . . . . . .
110
Figure 4-12
Display Window . . . . . . . . . . . . . . . . . . . . . . . . . . . . . . . . . . . . . .
110
Action Request System User’s Guide for Windows—January 1996
Figure 4-13
Viewing Status History. . . . . . . . . . . . . . . . . . . . . . . . . . . . . . . . .
113
Figure 4-14
Viewing Diary Entries. . . . . . . . . . . . . . . . . . . . . . . . . . . . . . . . . .
114
Figure 4-15
Modify Individual Window. . . . . . . . . . . . . . . . . . . . . . . . . . . . .
115
Figure 4-16
Diary Editor Dialog Box . . . . . . . . . . . . . . . . . . . . . . . . . . . . . . . .
118
Figure 4-17
Delete Dialog Box . . . . . . . . . . . . . . . . . . . . . . . . . . . . . . . . . . . . .
119
Figure 4-18
Context-sensitive help showing full text options . . . . . . . . . . .
121
Figure 5-1
Report Window . . . . . . . . . . . . . . . . . . . . . . . . . . . . . . . . . . . . . . .
128
Figure 5-2
Report Design Dialog Box . . . . . . . . . . . . . . . . . . . . . . . . . . . . . .
130
Figure 5-3
Report Formatted by Record . . . . . . . . . . . . . . . . . . . . . . . . . . . .
132
Figure 5-4
Report Formatted in Columns . . . . . . . . . . . . . . . . . . . . . . . . . . .
133
Figure 5-5
Report Formatted in Compressed Text Format . . . . . . . . . . . .
134
Figure 5-6
Report Window with Prototype of Formatted Report. . . . . . .
136
Figure 5-7
Grouping Query Results in a Report . . . . . . . . . . . . . . . . . . . . .
137
Figure 5-8
Report Field Sort Order Dialog Box . . . . . . . . . . . . . . . . . . . . . .
138
Figure 5-9
Specifying Statistics . . . . . . . . . . . . . . . . . . . . . . . . . . . . . . . . . . . .
140
Figure 5-10
Page Setup Dialog Box . . . . . . . . . . . . . . . . . . . . . . . . . . . . . . . . .
143
Figure 5-11
Print Setup Dialog Box . . . . . . . . . . . . . . . . . . . . . . . . . . . . . . . . .
145
Figure 5-12
Report Options Dialog Box . . . . . . . . . . . . . . . . . . . . . . . . . . . . .
146
Figure 5-13
Save Custom Report Dialog Box . . . . . . . . . . . . . . . . . . . . . . . . .
148
Figure 5-14
Custom Report List . . . . . . . . . . . . . . . . . . . . . . . . . . . . . . . . . . . .
149
Figure 5-15
Manage Custom Reports Dialog Box . . . . . . . . . . . . . . . . . . . . .
151
Figure 5-16
Reporting to the Screen. . . . . . . . . . . . . . . . . . . . . . . . . . . . . . . . .
153
Figure 5-17
Report File Dialog Box . . . . . . . . . . . . . . . . . . . . . . . . . . . . . . . . .
154
Figure 5-18
Print Setup Dialog Box . . . . . . . . . . . . . . . . . . . . . . . . . . . . . . . . .
155
Figure 5-19
Example dde.ini File . . . . . . . . . . . . . . . . . . . . . . . . . . . . . . . . . . .
158
Figures
xvi
xvii
Figure 5-20
Report Window with Application Button . . . . . . . . . . . . . . . . .
159
Figure 5-21
Application Dialog Box. . . . . . . . . . . . . . . . . . . . . . . . . . . . . . . . .
159
Figure 6-1
Recording in Progress . . . . . . . . . . . . . . . . . . . . . . . . . . . . . . . . . .
163
Figure 6-2
Stop Recording Dialog Box . . . . . . . . . . . . . . . . . . . . . . . . . . . . .
164
Figure 6-3
Specifying a Variable. . . . . . . . . . . . . . . . . . . . . . . . . . . . . . . . . . .
166
Figure 6-4
Prompt to Enter Example Value . . . . . . . . . . . . . . . . . . . . . . . . .
167
Figure 6-5
Execute Macros Window . . . . . . . . . . . . . . . . . . . . . . . . . . . . . . .
169
Figure 6-6
Entering Parameters for a Macro . . . . . . . . . . . . . . . . . . . . . . . .
170
Figure 6-7
Edit Macros Dialog Box . . . . . . . . . . . . . . . . . . . . . . . . . . . . . . . .
172
Figure 7-1
Customize Defaults Window. . . . . . . . . . . . . . . . . . . . . . . . . . . .
176
Figure 7-2
Dragging a Field to a New Location . . . . . . . . . . . . . . . . . . . . . .
178
Figure 7-3
Display Attributes Dialog Box. . . . . . . . . . . . . . . . . . . . . . . . . . .
181
Figure 7-4
Export View Menu Command. . . . . . . . . . . . . . . . . . . . . . . . . . .
184
Figure 7-5
Export View Dialog Box . . . . . . . . . . . . . . . . . . . . . . . . . . . . . . . .
185
Figure 7-6
Choose Views Dialog Box . . . . . . . . . . . . . . . . . . . . . . . . . . . . . .
186
Figure 8-1
Notifier Tool - Login Dialog Box . . . . . . . . . . . . . . . . . . . . . . . . .
188
Figure 8-2
Notification Tool Window . . . . . . . . . . . . . . . . . . . . . . . . . . . . . .
189
Figure 8-3
Notification Popup Dialog Box . . . . . . . . . . . . . . . . . . . . . . . . . .
192
Figure 8-4
Notification Log . . . . . . . . . . . . . . . . . . . . . . . . . . . . . . . . . . . . . . .
193
Figure 8-5
Notifier Tool Preferences Window . . . . . . . . . . . . . . . . . . . . . . .
195
Figure 8-6
The About Dialog Box. . . . . . . . . . . . . . . . . . . . . . . . . . . . . . . . . .
197
Figure 9-1
Sample Email Template . . . . . . . . . . . . . . . . . . . . . . . . . . . . . . . .
200
Figure 9-2
Completed Email Template . . . . . . . . . . . . . . . . . . . . . . . . . . . . .
204
Action Request System User’s Guide for Windows—January 1996
Preface
The Action Request System User’s Guide for Windows manual is for anyone who
uses the Action Request System (AR System) Windows User and Notification
Tools. This manual describes the operations that are performed regularly by
those using the User Tool and the Notification Tool. It assumes familiarity with
MS-DOS and Microsoft Windows.
How This Book Is Organized
Chapter 1, “Overview of the Action Request System,” provides a general
description of Action Request System Tools and how they are used.
Chapter 2, “Getting Started with the User Tool,” tells you how to install, start,
and be productive with the User Tool. (See Chapter 8, for information on
starting the Notification Tool.)
Chapter 3, “Submitting an Action Request,” tells you how to submit a new
action request (AR) to the Action Request System database.
Chapter 4, “Reviewing and Modifying Action Requests,” tells you how to
perform queries to retrieve specific ARs and list, review, modify, or delete
them.
Chapter 5, “Reports,” describes how you can generate reports and statistics
from the AR System database.
Chapter 6, “Using Macros,” tells you how to use the macro facility to automate
operations.
xviii
Chapter 7, “Customizing the Environment,” tells you how to personalize your
view of AR System schemas and how to set field properties and defaults.
Chapter 8, “Using the Notification Tool,” tells you how to start and use the
Action Request System Notification Tool.
Chapter 9, “Using Electronic Mail,” tells you how electronic mail works with
the AR System.
Appendix A, “AR System File Locations,” tells you where the AR System files
are located.
Appendix B, “Networking Notes,” tells you about the supported network
stacks and requirements for their use.
Appendix C, “DDE Functionality in the AR System,” tells you how to use
DDE (dynamic data exchange) to communicate with third party Windows
applications.
Appendix D, “List of Procedures,” lists the location and the type of procedure
available in this book.
Glossary lists and describes terms that you need to be familiar with as you use
the AR System.
Action Request System Documents
The Action Request System Installation Guide provides instructions for installing
the AR System software on several operating environments. There are separate
installation chapters in the guide for the UNIX and Windows NT
environments.
The Action Request System User’s Guide (this document) is a how-to description
of the operations that most AR System users perform. There are separate
User’s Guides for environments supporting the Motif, Windows, and
Macintosh graphical user interfaces (GUIs) as well as for ASCII terminals.
Make sure that you are using the guide that is appropriate for your
environment.
The Action Request System Getting Started Guide and Sample
Schemas provides an online demonstration showing the use of the AR System
in a sample help desk environment and describes how you can use the sample
schemas provided with the AR System.
xix
Action Request System User’s Guide for Windows—January 1996
The Action Request System Administrator’s Guide describes how the AR System
Administrator can use the Administrator Tool to set up the AR System and
define its local operations. This manual is also a reference of advanced AR
System concepts. There are separate Administrator’s Guides for the Motif and
Windows environments.
The Action Request System Distributed Server Option Administrator’s Guide
provides information about operating the AR System in a distributed, multiserver environment. Included are instructions for creating all of the necessary
mappings and filters that you use along with the Distributed Server Option to
keep AR System entries synchronized across multiple servers.
The Action Request System Help Desk Template Guide describes the Helpdesk
application that runs in conjunction with the AR System to help you manage
your internal help desk organization. The template takes full advantage of the
rich feature set of the AR System and implements workflow and reporting
mechanisms to simplify the task of working in or managing a help desk.
The ARWeb Administrator’s Guide provides details about installing, using, and
customizing the ARWeb application, so that you can provide access to your
company’s AR System applications through the World-Wide Web.
The Action Request System Programmer’s Guide is a reference guide for
programming with the Application Programming Interfaces (APIs) that come
with the AR System.
The Action Request System Troubleshooting and Error Messages Guide provides
information to help you identify and solve problems with the AR System.
The Action Request System Workflow Demonstration and Guide to Sample Schemas
leads you through an online demonstration showing the use of the AR System
in a sample help desk environment and describes how you can use the sample
schemas supplied with the AR System.
The Action Request System Help Desk Template Guide describes the Help Desk
application that runs in conjunction with the AR System to help you manage
your internal help desk organization.
The Action Request System Accessories binder provides a place to keep
documentation for utilities and peripheral add-ons to the AR System. As
shipped, the Accessories binder includes the documentation for the Network
Management Platforms Integration Accessory.
Preface
xx
Hardware and OS Dependencies
The User Tool and Notification Tool for Windows run on any IBM PC or
compatible running MS-DOS 3.3 or higher and Microsoft Windows 3.1 or
Windows for WorkGroups 3.11 with the following minimum configuration:
•
•
•
At least 8MB RAM.
•
•
•
A monitor with a minimum screen resolution of 600 x 800 (SVGA).
At least 4MB of hard disk space available for the AR System software.
A mouse. While a mouse is not required for the AR System, it is a
convenient tool to use when interacting with the AR System.
Any of the network adapter cards needed by the networking software.
One of the following networking stacks:
• Windows Sockets certified on one of the following:
- Chameleon NFS by NetManage.
- LAN WorkPlace by Novell.
- Pathway by Wollongong.
- PC-NFS by SunSelect.
- PC/TCP by FTP.
- Super TCP/NFS by Frontier.
- TCP/IP by Microsoft.
- Reflection Network Series 4.0 by Walker Richer & Quinn.
See either the Release Notes that came with this product or Appendix B for
specific information about network stacks.
Conventions Used in this Manual
bold font
Indicates that a word is a new or important term.
Example: filters.
Initial Caps
Button and menu names and items have the first letter capitalized.
Example: File.
bold computer font
Indicates data to be entered by the user.
Example: A: (or B:)\SETUP.
xxi
Action Request System User’s Guide for Windows—January 1996
computer font
Indicates computer output, an explicit directory, or a file name.
Example: win.ini.
<italic computer font>
Indicates a variable directory, file name, or string that you replace with an
appropriate directory, file name, or string.
Example: <ar_config_dir>.
italics
Indicates a reference to another manual or to a different section within the
current manual.
Example: see “Action Request System Documents.”
Italic type is also used for emphasis.
Example: All users will be affected.
Shell Prompts in Command Examples
The following table shows the default system prompt and superuser prompt
for the C shell, Bourne shell, and Korn shell.
Table P-1
Shell Prompts
Shell
Prompt
C shell prompt
machine_name%
C shell superuser prompt
machine_name#
Bourne shell and Korn shell
prompt
$
Bourne shell and Korn shell
superuser prompt
#
Preface
xxii
xxiii
Action Request System User’s Guide for Windows—January 1996
Overview of the Action Request
System
1
The Action Request System (AR System) provides you with all the tools you
need to quickly and easily manage support requests and problems. Using the
AR System, your AR System administrator can create a flexible, customizable
workflow process for you. As you make entries in the AR System, you are
automatically capturing a database of problem solving experience. You can
efficiently track and report a variety of issues, information, and problems. Both
end users and support staff can take advantage of interactive access to the AR
System database.
This chapter introduces all users to the concepts and features of the AR
System. It provides an overview of:
• The roles that various people play in the operation of the AR System.
•
•
The tools provided by the AR System.
The activities that users of the AR System are involved in.
AR System Users
There are four types of users who are involved with the operations of the AR
System:
•
•
•
•
AR System administrators.
AR System subadministrators.
Support staff.
End users.
1
1
AR System administrators are responsible for the management of the AR
System. They set up database schemas (the definitions of AR System
databases), set access rights for users, and design the workflow process.
AR System Subadministrators are responsible for the set up, design, and
access rights of a given set of schemas as permitted by the AR System
Administrator.
Members of the support staff resolve action requests (ARs) using the AR
System as set up by the AR System administrator. They assign and are
assigned ARs, and log their progress in the appropriate fields. Support staff
members are able to use information stored in previous ARs to avoid
redundant effort and to expedite the resolution of current ARs.
End users are individuals with problems and support requests who initiate
ARs. End users ideally have direct access to the AR System, although it is not a
requirement. End users with direct access submit ARs using the User Tool.
AR System Tools
The Action Request System provides four tools that help administrators,
support staff, and end users perform their jobs: the User Tool, the Notification
Tool, the Administrator Tool, and the Import Tool.
User Tool
The User Tool is generally used by everyone involved in the workflow process.
It allows you to:
2
•
•
Submit ARs describing problems or support requests.
•
•
Modify one or multiple previously submitted ARs.
•
•
Delete ARs (if you are an AR System administrator or subadministrator).
Query AR System databases either for information or to keep track of
previously submitted ARs.
Report on and calculate statistical information on ARs that share similar
query criteria (information).
Create macros.
Action Request System User’s Guide for Windows—January 1996
1
•
Run macros to help automate the steps involved in complex queries and
other operations.
•
•
Customize schema views.
Define default field values.
The User Tool is described in this document.
Notification Tool
Like the User Tool, the Notification Tool can be used by anyone involved in the
workflow process. The Notification Tool provides a means of alerting users of
progress being made in the resolution of an action request. Through filters built
into the AR System schemas by the administrator, users may be notified of any
change in an AR. For example, the administrator may have defined a filter that
sends a notification to the support staff when new ARs are assigned and
another filter that notifies end users when an AR is closed. (In a user
environment that does not run the Notification Tool, users can be notified
through electronic mail.)
The Notification Tool is described in Chapter 8 of this document.
Administrator Tool
The Administrator Tool is used exclusively by AR System administrators to set
up the AR System for use by support staff and end users. This includes:
•
•
•
•
•
•
Setting up schemas (the definitions of AR System databases).
Setting access permissions on the fields within the schemas.
Setting up access on schemas themselves.
Creating both dynamic and static menus.
Setting up AR System filters, escalations, and active links that define the
workflow processes.
Creating administrator commands. (Administrator commands only work on
UNIX workstations.)
The Administrator Tool is described in the Action Request System Administrator’s
Guide.
Overview of the Action Request System
3
1
Import Tool
The Import Tool allows users to transfer data from databases on other servers
to the AR System database on the local server.
If the data you want to import already exists in a AR Export file, you can use
the AR System Import Tool to import data into your server.The Import Tool
can handle files in CSV or ASCII format.
The Import Tool is described in the Action Request System Administrator’s Guide.
Action Request System Activities
AR System activities include setting up schemas, submitting ARs, querying the
database to find similar ARs or to check on the progress being made on a
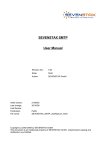
specific AR, and resolving ARs. Figure 1-1 shows the flow of these activities
through the AR System.
4
Action Request System User’s Guide for Windows—January 1996
1
Defines schemas and workflow
filters and active links.
Reviews and
resolves ARs.
3
AR System Administrator
Support
Staff
Administrates subset of schemas
as defined by AR System
Administrator.
2
Notification of
assignment.
Subadministrator
Notification
of fix.
4
1
AR System
Server and
Databases
Submits ARs.
End User
Figure 1-1
Flow of AR System Activities
The AR System administrator is responsible for setting up schemas.
Subadministrators are users that have been granted administrator permission
to a subset of schemas by hear System administrator. Once a schema is
established, end users and support staff can submit ARs and query the
database as needed, within their allowed permissions.
ARs can enter the system in several ways:
•
Through support staff when end users call on the telephone.
Overview of the Action Request System
5
1
•
Directly from the end user’s desktop through the Submit window of the
User Tool.
•
Through electronic mail. For more information, see Chapter 9, “Using
Electronic Mail.”
•
Through APIs that allow integration with other processes (like network
management platforms). APIs are only available as UNIX clients.
Typically end users notify support staff of problems and service requests by
submitting ARs. Submitters can be notified of actions taken on their request
and can also query the database for the status of their request. Support staff
can be alerted at their workstation (or any workstation where they are logged
in) of the arrival of new ARs. Incoming ARs are assigned by the manager, or
they can be automatically assigned based on field values in the AR. The
assignment of ARs can be changed if necessary.
The query facility assists support staff in resolving ARs by providing a
versatile tap into a growing knowledge and experience base. As problems are
resolved, the staff can keep a history in diary fields. This history can help
provide answers to future problems.
The AR System macro facility lets the support staff automate frequently
performed operations, such as creating daily reports or performing a query
that produces a list of high priority problems.
When an AR is resolved, the end user can be notified through either the
Notification Tool, electronic mail, or the telephone. The AR is now part of an
experience base to be drawn upon in the future.
6
Action Request System User’s Guide for Windows—January 1996
Getting Started with the User Tool
2
The Action Request System (AR System) User Tool is the tool you use to
perform most of the day-to-day AR System functions. You use the tool to
submit information to the AR System in the form of action requests (ARs) and
to find specific ARs so that you can view or modify them. You also use the tool
to create and run reports as your needs require. Given the proper permissions,
you may also be able to use the tool to customize what you see when you look
at a particular schema (that is, customize your view of the schema).
This chapter helps you get started in the daily operations of the User Tool. It
covers the following topics:
•
•
•
•
User conventions in the AR System.
•
•
•
•
•
•
Using Schemas.
Installing the AR System tools on a Windows-based client.
Starting and exiting the User Tool.
Working in the User Tool Main window (includes information on making
menu selections and using the tool bar).
Modifying your login information.
Defining login information for multiple users.
Sharing macros and custom reports.
Setting preferences that determine how the User Tool looks and acts.
Displaying help.
7
2
See Chapter 8 for information on the Notification Tool.
Using the Mouse with the AR System
Mouse operations in the AR System tools are much like those in other
Windows applications. The following terminology is used in this manual to
describe the operations you perform using the mouse.
Select means to click once on an item with the left mouse button.
Double-click means to click the left mouse button twice in quick succession.
Drag means while pointing on an object, hold down the left mouse button and
move the mouse.
Press means hold down the left mouse button without moving the mouse.
Pull-right means to click and hold the left mouse button on the character menu
symbol (to the right of a field) to display the items. Continue to hold the mouse
button as you move the pointer over the menu items. (An arrow to the right of
a selection means that there are sub-menu items for that selection. To display
and select the items from a sub-menu, move the mouse to the right with that
choice highlighted.) When your choice is highlighted, release the mouse button
and your selection is made. (If you release the mouse button with the cursor on
the character menu symbol and the menu is small, the menu remains displayed
until either you select an item or select outside of the menu. If you release the
button outside of the menu, the menu closes and nothing is selected.)
Controlling Window Size and Position
You can manipulate windows in the AR System in the same way that you can
for most Windows applications. Use the maximize and minimize buttons to
control whether or not a window is iconized and whether or not it fills the
entire screen. You can also control the size of a window by clicking on the edge
or corner of the screen and dragging with the mouse.
The Control-menu box in the top left hand corner of each screen also provides
options that let you control the size and location of windows.
You can also set options that cause the size of all User Tool windows of the
same type (all Submit, Query, Modify Individual windows) or that cause the
position of all Submit and Query windows to be saved when closed or exited
8
Action Request System User’s Guide for Windows—January 1996
2
by selecting Preferences from the File menu. Select Desktop in the User
Preferences dialog box, then select the option or options you want. See “Setting
User Preferences” on page 42 for more information.
Windows User Conventions in the AR System
Remember the rules that follow as you work with the Action Request System
Windows User and Notification Tools:
•
The AR System is case-sensitive. The only exceptions where the AR System is
not case-sensitive is if you are using the Sybase database configured to be
case insensitive or if you are using the full text search (FTS) option
configured case-insensitive.
•
Within the Main window of the User Tool, the window (or dialog box) that
is active (selected) is the one whose title bar is highlighted.
•
In a dialog box with selection buttons, pressing the Return/Enter key
performs the default action. The default action is the action performed by
the button that has a heavy black border (the focus rectangle) around it.
•
In a dialog box, pressing escape (Esc) closes the dialog box. (Pressing Esc is
the same as selecting Close on the File menu when a window is active, and
Esc is the same as selecting the Cancel button when a dialog box is active.
Pressing Esc also closes a menu.)
Getting Started with the User Tool
9
2
Using Function Keys
You can use the following function keys to perform actions in schemas in the
AR System Windows User Tool:
Table 2-1
Function Keys in the User Tool
Key
Action
F1
Opens a window that contains a list of the application help topics for
selection. Each help topic may have one or more levels of subtopics
available.
F5
Performs the same action as pressing the Return/Enter key only for
schema window. If an active link is set up to activate when the Return
key is entered in a multi-line field, you must use the F5 key instead.
The F5 key does not function as an Enter key in dialog boxes.
F6
In a field with a menu, causes the menu to appear. This is the same as
selecting the character menu symbol.
F7
Opens a Text Editor dialog box in a text field or a Diary Editor dialog
box in a diary field. This is the same as selecting the text edit or diary
edit symbols to the right of the fields.
Installing the AR System Tools for Windows
Before you install the AR System User and Notification Tools, make sure you
have all of the following information from your AR System administrator:
•
•
Your registered AR System user name and password.
•
•
The directory where Windows is installed.
The names of the AR System and Notification servers. Most likely, the AR
System server and the Notification server are on the same machine.
The network stack you are using.
Note – Before installing, it is a good idea to make a backup copy of your AR
System for Windows floppy disks. (Refer to the
DISKCOPY command in your DOS manual for instructions.)
10
Action Request System User’s Guide for Windows—January 1996
2
To install the AR System:
Note – When you install the PC client tool, your old ar.ini file is copied into
ar.ini in the <ar_config_dir>\backup directory.
1. Scan the entire Release Notes before installing. Make sure that you have a
supported network stack already installed.
2. Start Windows, if it is not already running.
3. Insert the AR System for Windows floppy Disk #1 (3.5") in the A: or B:
floppy drive.
4. Select the Run command on the Program Manager’s File menu. In the Run
dialog box, type A: (or B:)\SETUP and select the OK button.
This starts the installation program and a note window appears indicating
that the Setup program is initializing.
Setup searches your local drives for a previous Action Request System
installation.
5. The Action Request System installation welcome dialog box appears.
After reading the greeting, select the Exit button to stop the installation
process or select the Continue button to proceed.
The Installation Options dialog box appears displaying your current Home
and Windows directories and disk space information.
6. If you want to change the default directories for the AR System
installation, your AR System configuration file, or for your Windows files,
select the Directories button on the Installation Options dialog box.
The Directories dialog box appears letting you specify alternate directories.
The default directories are C:\Remedy, C:\Home, and
C:\Windows for the AR System installation directory, AR System Home
(configuration) directory, and Windows respectively.
7. To find out how much space is available on one of your drives, select the
drive from the Drive drop down list box. The Disk Space Information
reflects the available space on the disk.
8. To change the directories in the Install Directory, Home Directory and
Windows Directory fields, either type directly in the fields or press the
Browse button next to the Install Directory and Home Directory fields to
Getting Started with the User Tool
11
2
display the Browse Directories dialog box. The Browse Directories dialog
box allows you to browse through and select from all available directories
on the different drives on your system.
Note – While you can edit the Windows Directory field, if you specify a
directory that does not already contain the win.ini file, the Windows Directory
field returns to the default directory.
9. Select the OK button on the Directories dialog box to return to the
Installation Options dialog box. Select the Exit button to stop the
installation procedure. Select the Cancel button to go back to the
Installation Options dialog box and not apply any changes.
10. On the Installation Options dialog box, select the Continue button to
continue. Select the Exit button to stop the installation procedure.
If you selected the Continue button, the Time Zone dialog box appears.
11. In the Time Zone field, select the appropriate time zone for your region
from the drop down list box. Ensure that the Daylight Savings Time
checkbox is checked if Daylight Savings Time is observed in your region.
12. When you are satisfied with the Time Zone settings, click on the Continue
button.
13. The Server Locations dialog box appears allowing you to add servers. The
Server List in the lower portion of the dialog box is a list of AR System
servers which your User and Notification Tools can connect to.
14. To add a server, enter a server name in the Server Name field and select
the AR System Server and Notification Server check boxes as appropriate.
15. Select the Add button to add each server to the list.
16. To delete a server from the Server List, select the server in the Server List,
and then select the Delete button.
17. Once your server list is correct, select the Continue button to continue
with the installation procedure. Select the Exit button to stop the
installation procedure.
12
Action Request System User’s Guide for Windows—January 1996
2
18. A message box appears which displays the progress of loading the AR
System executables.
The Configuration Files dialog box appears allowing you to modify your
win.ini and any existing Action Request System files either now or later.
19. Select the Make Changes now and backup current version radio button to
have the installation process backup the current version of your win.ini
and Action Request System files and to make the changes now to the
original files.
20. Select the Write modified version to another location radio button to have
the installation process save your modifications in another location
allowing you to update your win.ini and Action Request System files at a
later time.
21. Select the Continue button to continue with the installation procedure.
Select the Exit button to stop the installation procedure.
22. A Modified Files dialog box appears providing the location of the
unmodified versions of win.ini and any existing AR and ar.ini files. Select
the OK button to complete the installation process.
The Setup Complete dialog box appears telling you setup has successfully
installed the Action Request System Version 2.1.
23. Select the OK button to complete the installation process.
Starting the User Tool
Once the AR System is installed, your desktop automatically displays the
“Remedy AR System” group window containing the User Tool icon. To start
the tool, simply double-click on the User Tool icon. (Note that you may only
run one instance of the User Tool at any one time on each machine.)
User Name and Password
Your user name and password identify you to the AR System and give you the
appropriate access permissions. Whenever you use the AR System, you should
make sure you are logged in with the correct user name and password to
assure that you have access to the fields, schemas, and functions required to
help you do your job.
Getting Started with the User Tool
13
2
Users are set up in the AR System by the AR System administrator. If you do
not know the login you should be using for the AR System, see your AR
System administrator before you continue.
Note – If you are not a registered user, and unregistered users are allowed at
your site, the User Tool starts with a “guest” set of capabilities. A guest user
can retrieve any public information in the system. In addition, a guest user
may be allowed to submit ARs, record a macro, generate a report, specify user
defaults, and review ARs.
To start the User Tool:
•
From the “Remedy AR System” window icon, double-click on the User Tool
icon.
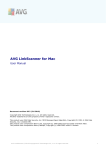
If you are starting the User Tool for the first time (or if you have set
preferences so that the AR System always asks you to login), the Login
dialog box appears as shown in Figure 2-1. Enter your registered user name
and password, then select the OK button.
If you do not select the preference that causes the user to always prompt for
login, your user name and password are saved in your ar.ini file and you are
automatically logged in when you start the User Tool.
14
Action Request System User’s Guide for Windows—January 1996
2
Figure 2-1
Login Dialog Box
If the name and password you entered are valid, the Login dialog box is
exited. You are in the AR System User Tool Main window and ready to
begin working.
If this is the first time you are logging into the User Tool, your login
information consists of the default configuration directory and server list on
your PC. For information on how to change these, see the section entitled .
If you enter a valid user name but an invalid password, you receive an error
message and are not logged in. If you enter an unknown or invalid user
name and guests are allowed use of your AR System, you are successfully
logged in with a warning telling you that you only have guest privileges. If
you enter an unknown or invalid user name and guests are not allowed use
of your AR System, you receive an error message and are not logged in.
The kind of license that your user name is allowed determines what you can
do in the User Tool. If you have a Read license, you can read and submit ARs
within the limitations specified by your AR System administrator, but will not
be allowed to update existing entries.
If you have a Fixed license, you can read, submit and update existing ARs
within the limitations specified by your AR System administrator. Fixed
licenses are permanently associated with a single user name. With this type of
license, you can always access the User Tool.
If you have a Floating license, you have the same privileges as with the Fixed
license. Floating licenses are not attached to any single user name. With
Floating licenses, there are only a certain number of licenses available for use.
If no license is available when you try to log in, you will receive a warning
telling you that no license token is currently available and you are being
allowed access to the system with Read Only permission. If a token becomes
Getting Started with the User Tool
15
2
available, it will be allocated to you. You will receive a note indicating you
have been allocated a token when it becomes available. (The default “timeout”
value for Floating licenses is two hours. For information on specifying
timeouts, see the Action Request System Administrator’s Guide.)
You may also be assigned a Fixed or Floating Full Text license. A Full Text
License grants you the ability to use the full Text Search capacity supported by
the AR System. If you are assigned a Floating license, you will grab one of the
tokens available in the license pool. If no license is available, you will receive a
warning and be allowed to access the system without using the full text search
capability (the system will use the default database search capability). When a
token becomes available, it will be allocated to you; you will receive a note,
and will then be able to perform full text searches. (The default “timeout”
value for Floating Full Text licenses is two hours. For information on
specifying timeouts, see the Action Request System Administrator’s Guide.)
The Main Window
The User Tool Main window is the basic window of the AR System Windows
User Tool, as shown in Figure 2-2. You use the menus and options available
from the Main window to select and control the operations you need to
perform. From the Main window, you can open and close the other windows
that let you display, modify, and submit action requests, or generate reports on
action requests that match specific query criteria.
The Main window includes a title bar at the top, a menu bar, an optional tool
bar, and an optional status bar. The menu bar provides access to the User Tool
menus that allow you to select the operations you want to perform. The
optional tool bar provides shortcuts to performing some of the most common
User Tool operations. The optional status bar, at the bottom of the window,
displays messages that let you know the status of the operation in progress.
You can determine whether or not to display the tool bar and the status bar by
setting preferences for your desktop. See “Setting User Preferences” on page 42
for information.
16
Action Request System User’s Guide for Windows—January 1996
2
Title bar
Menu bar
Tool bar
Status bar
Figure 2-2
User Tool Main Window
Making Menu Selections
You can choose options from the menu bar at the top of the Main window in
any of three ways:
•
•
•
Use the mouse to display the menu and select the desired item.
Hold down the Alt key as you press the key that corresponds to the letter
that is underlined in the menu, then press the key that corresponds to the
letter that is underlined in the menu item. For example, to choose Open
Query from the File menu, type Alt, F, Q.
Type the shortcut key sequences that are shown beside many of the items in
the menu. These key sequences are also called accelerator keys. For
example, to choose Open Query from the File menu, type Ctrl+O.
Note – The Cut, Copy, Paste, and Clear accelerator keys work in any text entry
field, including those in the Login dialog box and the query bar.
Table 2-2 on page 18 shows the options available from each Main window
menu along with their corresponding accelerator key sequences.
Getting Started with the User Tool
17
2
Table 2-2
18
User Tool Menu Items (1 of 8)
Key
Sequence
Menu
Item
Function
File
Login
Opens a Login dialog box.
Open Query
Displays the Select Schema Query
window so that you can display a
particular schema for query.
Ctrl+O
Open
Submit
Displays the Select Schema Submit
window so that you can display a
particular schema for submit.
Ctrl+S
Close
Closes the active window.
Ctrl+F4
Export View
Exports the current customized view
to the server as a new Administrator
View. (This menu item is available
only to users with Administrator or
Subadministrator capabilities.)
Server
Information
Displays list of servers, licensing
information, and whether you are
connected to the servers.
Preferences
Sets options that control the
appearance and behavior of the User
Tool for your user login. Preference
categories are: Desktop, Submit,
Query, Fonts, Colors, Confirm[ation],
Report, and View Management.
Exit
Exits the User Tool.
‘Active
Schema List’
Lists your most recently used
schemas for Query and Submit
windows allowing you to quickly
return to a schema by selecting its
name displayed in the lower portion
of the File menu. You can specify the
maximum number of schemas that
can be displayed in this list at any
one time by using the Maximum
Number of Schemas to Remember
desktop preference on the
Preferences dialog box.
Action Request System User’s Guide for Windows—January 1996
Alt+F4
2
Table 2-2
User Tool Menu Items (2 of 8)
Key
Sequence
Menu
Item
Function
Edit
Cut
Deletes highlighted text and moves it
to the clipboard.
Ctrl+X
Copy
Copies highlighted text to the
clipboard.
Ctrl+C
Paste
Pastes current clipboard contents at
the location of the cursor.
Ctrl+V
Clear
Deletes highlighted text.
Del
Copy All
Copies all field contents from the
active window to the clipboard.
Clear All
Clears the contents of all fields in the
active window.
Ctrl+E
Set To Defaults
Sets the value of the fields in the
active window to the default values.
Ctrl+U
List
Opens a Query List window
containing a one-line summary of
ARs meeting current query criteria.
Ctrl+L
Display
Opens a Display window to show the
ARs that meet current query criteria
or were selected. ARs are displayed
one at a time. Use Next and Previous
to move from one AR to another.
Ctrl+D
Modify
Individual
Opens a Modify window to make
changes to each AR that meets the
current query criteria or were
selected. ARs are displayed for
modification one at a time. Use Next
and Previous to move from one AR
to another.
Ctrl+M
Modify All
Opens a Modify window that
contains a blank copy of the current
schema so that you can make bulk
changes that affect every AR that
meets the current query criteria or
were selected.
Query
Getting Started with the User Tool
19
2
Table 2-2
20
User Tool Menu Items (3 of 8)
Menu
Item
Function
Query
(continued)
Refresh
Reissues the query that produced a
Query List window to keep the query
list up-to-date.
Polling
Interval
Displays the Set Polling Interval
dialog box which lets you
automatically reissue the query of the
database that produced a Query List
window. You specify in minutes how
often you want the query to be
reissued.
Report
Displays the Report dialog box to
generate a report for the entries that
meet current query criteria or that are
selected in an active Query List
window. You can send the report to
the screen, to a printer, to a file, or to
an application that supports DDE
(Dynamic Data Exchange).
Delete
Deletes all ARs that meet current
query criteria or were selected. This
function is available only to users
with Administrator or
Subadministrator permission.
Action Request System User’s Guide for Windows—January 1996
Key
Sequence
Ctrl+
Home
Ctrl+R
2
Table 2-2
User Tool Menu Items (4 of 8)
Key
Sequence
Menu
Item
Function
Actions
Previous
In the Modify or Display window,
moves to the AR before the one
currently in the window. If the first
AR is showing, Previous moves to
the last AR.
Ctrl+P
Next
In the Modify or Display window,
moves to the AR after the one
currently in the window. If the last
AR is showing, Next moves to the
first AR.
Ctrl+N
Apply
Applies the current change or
performs the current operation. Use
to submit a new AR, modify an
existing AR, and save customized
views or defaults.
Ctrl+A
Customize
Defaults
Sets default values for a schema.
These default values are stored in a
file saved in your Home directory.
Customize
View
Customizes the appearance of a
schema. This customized view is
stored in a file saved in your Home
directory.
Display
Attributes
Opens a Display Attributes dialog
box showing the properties (such as
location and length) of the current
field or active link button when in a
Customize View window.
View
Restores the default administrator
view or the previous user view for a
schema when in a
Customize View window.
Sort
Options
Specifies sorting for the results of all
Query menu operations. Sorting can
include up to five fields and you can
specify whether each field is sorted in
ascending or descending order. You
can specify a different sort order for
each schema.
Getting Started with the User Tool
21
2
Table 2-2
Key
Sequence
Menu
Item
Function
Actions
(continued)
Show Query
Displays the query operation that
resulted in the current set of action
requests.
Ctrl+B
Copy to
Submit
Opens a Submit window that
contains the same field values as the
currently active Query, Display, or
Modify Individual window.
Ctrl+T
Show
Status
History
Opens a dialog box that displays the
status history for the action request
in the active window.
Ctrl+H
Start
Recording
Begins recording a macro for later
execution. Actions you perform after
selecting Start Recording and before
selecting Stop Recording from the
Macros menu are recorded as part of
the macro.
Stop
Recording
Stops recording a macro that you are
recording for later use. The Stop
Recording dialog box appears so that
you can name and save the macro
you have just recorded.
Edit
Macros
Opens the Edit Macro dialog box.
You can then select an existing macro
to modify its name or help text or to
delete the macro.
Run
Macros
Selects and execute an existing
macro. The Execute Macro dialog box
appears.
Macros
22
User Tool Menu Items (5 of 8)
Action Request System User’s Guide for Windows—January 1996
Ctrl+I
2
Table 2-2
User Tool Menu Items (6 of 8)
Menu
Item
Function
Layout
Drag
Alignment to
Grid
Aligns to an active grid when
Alignment to Grid is on. Pull to the
right to choose from the following
options:
* Left. Aligns the left edge of the
field, including the field label, to the
grid line.
* Value Left. Aligns the left edge of
the data entry portion of the field to
the grid line.
* Right. Aligns the right edge of the
field, including any associated field
icons, to the grid line.
* Value Right. Aligns the right edge
of the data entry portion of the field
to the grid line.
Alignment To
Grid
Enables the alignment to grid feature
during a move operation. A check
mark next to the menu selection
means this feature is on.
Expand
Expands or contracts the spacing of
the fields on the schema. A dialog
box appears so you can specify a
percentage of the current spacing,
horizontally, vertically, or both. Enter
percentages greater than 100 to move
the fields farther apart. Enter
percentages less than 100 to pull the
fields closer together.
Show Grid
Makes the grid lines visible in the
Customize View window. A check
mark next to the menu selection
means this feature is on.
Grid Size
Specifies the distance between lines
in an active grid.
Select All
Selects all fields in the Customize
View window.
Getting Started with the User Tool
Key
Sequence
23
2
Table 2-2
24
User Tool Menu Items (7 of 8)
Menu
Item
Function
Window
Tile
Vertically
Arranges open windows vertically so
that each is visible.
Tile
Horizontally
Arranges open windows horizontally
so that each is visible.
Cascade
Arranges open windows so that they
overlap with the title bar of each
window visible.
Arrange Icons
Arranges the icons in a group.
Close All
Windows
Closes all open User Tool windows.
‘Open
Windows List’
Lists all open windows. The selected
window becomes active.
Action Request System User’s Guide for Windows—January 1996
Key
Sequence
Shift+F4
Shift+F5
2
Table 2-2
User Tool Menu Items (8 of 8)
Menu
Item
Function
Help
Index
Opens a window that contains a list
of help topics for selection. Each help
topic may have one or more levels of
subtopics available.
Procedures
Displays help on the most commonly
performed User Tool procedures. A
list of available procedures appears
so that you can select the procedure
in which you are interested.
Tool Bar
Displays a summary of the
operations performed when you
select each of the tool bar icons.
Accelerator
Keys
Displays a list of operations that you
can perform using shortcut key
sequences.
Menu Items
Displays a list of options available for
each of the menus in the Main
window menu bar.
Using Help
Displays help on using the help
system.
Field/Schema
Help
Displays context-sensitive help on
the schema, selected field or active
link. This includes any help text
supplied by your AR System
administrator.
About
Displays information about the AR
System
Windows User Tool.
Key
Sequence
F1
Shift+F1
Using the Tool Bar
For many of the most commonly performed menu items, a corresponding icon
is available from the optional tool bar located below the menu bar on the Main
window. To select a function from the tool bar, simply click the mouse on the
icon for that function.
Table 2-3 shows the tool bar icons and their functions.
Getting Started with the User Tool
25
2
Table 2-3
Icon
Tool Bar Functions (1 of 2)
Function
Apply. Applies the current change or performs the
current operation. Use to submit a new AR, modify an
existing AR, and save customized views or defaults.
Previous. In the Modify or Display window, moves to
the AR before the one currently in the window. If the
first AR is showing, Previous moves to the last AR.
Next. In the Modify or Display window, moves to the
AR after the one currently in the window. If the last
AR is showing, Next moves to the first AR.
List. Opens a Query List window containing a one-line
summary of ARs meeting current query criteria.
Display. Opens a Display window to show the ARs
that meet current query criteria or were selected. ARs
are displayed one at a time. Use the Next and Previous
menu items (or the Next and Previous tool bar icons)
to move from one AR to another.
Modify Individual. Opens a Modify window to make
changes to each AR that meets current query criteria
or were selected. ARs are displayed for modification
one at a time. Use the Next and Previous items (or the
Next and Previous tool bar icons) to move from one
AR to another.
Report. Generates a report for the entries that are
selected in the active window. You can send the report
to the screen, to a printer, to a file, or to an application
that supports DDE.
Open Submit. Opens a Select Schema - Submit dialog
box allowing you to select the schema to display and
then opens a Submit window.
26
Action Request System User’s Guide for Windows—January 1996
2
Table 2-3
Tool Bar Functions (2 of 2)
Icon
Function
Open Query. Opens a Select Schema - Query dialog
box allowing you to select the schema to display and
then opens a Query window.
Run Macros. Executes a macro listed in the drop down
list box.
Help. Changes the cursor to an arrow and a question
mark so that you can display context-sensitive help on
a field, active link or on the schema itself.
Exiting the User Tool
You can exit the User Tool by any one of the following ways:
•
•
•
•
Select Exit from the File menu, as shown in Figure 2-3.
•
Double-click on the Control menu box.
Type Alt+F X.
Type Alt+F4.
Select Close from the Control menu box in the upper left hand corner of the
Main window.
Figure 2-3
Exiting the Tool
If you have selected the Confirm to Exit AR System confirm preference, a
dialog box appears asking you if you really want to exit the AR System. Select
the OK button to exit the User Tool. Select the Cancel Exit button to cancel the
exit operation.
Getting Started with the User Tool
27
2
Note – If your User Tool is in the middle of a transaction with the server, you
will not be able to exit the User Tool.
Working with Action Requests
An action request (AR) is a collection of information that describes a single
event or incident, such as a problem or a service request. Each AR represents a
single entry in an AR System database.
As a user of the Action Request System, you are involved in two primary
activities:
•
•
Creating and submitting new action requests.
Looking at or modifying existing action requests.
You create ARs by opening a Submit window. See Chapter 3, “Submitting an
Action Request, for detailed instructions on using the Submit window.
You look at or modify ARs by opening a Query window for the schema that
holds the information you want to view. See Chapter 4, “Reviewing and
Modifying Action Requests, for detailed instructions on using the Query
window.
Using Schemas
A schema is the definition of an AR System database. Each schema is designed
to help you perform a different type of activity. The schemas that you can
select from were implemented by your AR System administrator to help you
manage the workflow of your daily operations.
For example, your AR System administrator may have implemented one
schema to help keep track of calls coming in to the help desk. The
administrator may have also implemented a schema that contains a record of
the equipment that each user has. You may use one or both of these schemas to
perform your job tasks.
The administrator can implement as many (or as few) schemas as needed. The
administrator can also control whether or not a specific user has full, limited,
or no access to a schema and to the information it contains. If you do not have
access to the schema at all, it does not appear in your list of available schemas.
28
Action Request System User’s Guide for Windows—January 1996
2
Each schema contains a set of fields. The fields contain various pieces of
information that are part of the schema. Each field contains a certain type of
information and has its own set of rules about who can look at or modify the
information in the field.
Note – Since it is possible for you to have access to a schema but not to any of
its fields, you could display a schema that appears to not have any fields.
For more information on fields see Chapter 3, “Submitting an Action Request.
Figure 2-4 on page 29 shows the fields that you might see in a typical schema
designed to track trouble reports. The schema shown is one of the schemas
supplied as sample schemas with the AR System. Your AR System
administrator may have implemented this schema for use at your job site.
(Each sample schema may be used as it exists or modified to fit local
requirements.)
Figure 2-4
Sample Trouble Ticket Schema
Getting Started with the User Tool
29
2
Selecting a Schema
Each time you open a new Query window, Submit window, Customize View
window, or Customize Default window, you need to select the schema that you
want to use in that window. You can display a different schema in each
window you open. The number of windows that you can open at one time
depends on the amount of memory that is available on your system.
The instructions that follow describe how to select a schema and then open a
Submit window.
To select a schema:
1. Select Open Submit from the File menu. (You could also type Ctrl+S or
select the Open Submit tool bar icon.)
The Select Schema - Submit dialog box is shown in Figure 2-5.
Figure 2-5
30
Selecting a Schema
Action Request System User’s Guide for Windows—January 1996
2
2. In the Select Schema dialog box, select the schema that you want from the
Schema Name list, then select the OK button, Return/Enter key, or
double-click on the schema name. By default, the last schema used is
selected when the Select Schema - Submit dialog box appears. If you
choose a schema that is already being displayed on your screen, then a
new copy of that schema will be displayed in a separate window.
Like other Windows applications, you can use the up and down arrow keys
and the Page Up and Page Down keys to display different portions of the
Schema Name list.
Each schema is uniquely identified by a name and the server where it
resides. (The same schema name may appear on more than one server.) If
the schema is unavailable, the user will not see its name.
The Submit window appears containing the selected schema. Any actions
you perform with this window active affect the schema you have selected.
To select a schema for a Query window, you follow the same steps except
that you select Open Query from the File menu (or type Ctrl+Q or select the
Open Query tool bar icon).
To select a schema for a Customize View or Customize Defaults window,
select Customize View or Customize Defaults respectively from the Actions
menu.
Note – If a schema is larger than the window, you can use the scroll bars to
view the portions of the form that are not displayed or you can resize the
window.
Login Information
Your login information consists of a login name, configuration directory (AR
Home Directory), and a server list. The configuration directory is a directory
that the AR System uses to hold your personalized configuration information
for both the User and Notification Tools. If you do not specify alternate
configuration directories and more than one person logs into your User and
Notification Tools, your customizations (preferences) may be overwritten and
notifications stored in the notification log may be both yours and theirs. If
more than one person will be using the User and Notification Tools on your
Getting Started with the User Tool
31
2
PC, you may want to specify an alternate configuration directory for each user.
This allows each user to have their own customizations (preferences,
customized defaults, and customized views) and notification log.
Note – You should only add a user that the AR System administrator has
already added as a registered user of the AR System. Otherwise, if they are not
a registered user, and unregistered users are allowed on the servers in the
server list, the User Tool starts with a “guest” set of capabilities. A guest user
can retrieve any public information in the system. In addition, a guest user
may be allowed to submit ARs, record a macro, generate a report, specify user
defaults, and possibly review ARs.
If they are not a registered user, and unregistered users are not allowed on the
servers in the server list, they will not be able to log in at all.
We provide default login information for any user who logs into the User Tool
who does not specify any alternate login information. When first installing the
AR System, the default login’s configuration directory is named Home.
Throughout this manual, we refer to your configuration directory as either
<ar_config_dir> or Home.
Note – If you change your configuration directory for the User Tool, you are
also changing it for the Notification Tool.
The server list is the list of servers that you can connect to with your User and
Notification Tools. The server name must be a name that is known on the
network. You supply the default server list when first installing the Action
Request System.
Note – Any user can change any other user’s login information.
Specifying Alternate Login Information
You can specify alternate login information for any user name from within the
User Tool. When you do this, you add the user name to the User Name drop
down list box on the Login dialog boxes for both the User and Notification
Tools. This makes it easier to log into the User and Notification Tools.
32
Action Request System User’s Guide for Windows—January 1996
2
Use the following instructions to specify alternate login information after
logging into the User Tool.
To specify alternate login information:
1. Select Login from the File menu.
The Login dialog box (shown in Figure 2-1) appears.
2. Select the Login Information button.
The Login Information dialog box appears, as shown in Figure 2-6.
Figure 2-6
The Login Information Dialog Box
3. To use the default configuration directory and server list, select
***Default Login*** in the User Names list.
*** Default Login *** appears in the Login Name field and the default
configuration directory and server list appear in the AR Home Directory
and Servers fields.
4. To copy someone else’s configuration directory and server list, select that
person’s user name in the User Names list.
That user’s login name, configuration directory, and server list appear in the
Login Name, AR Home Directory, and Servers fields.
Getting Started with the User Tool
33
2
5. To change the configuration directory, in the AR Home Directory field
enter a new directory path.
6. To make changes in the server list, select the Servers button.
The Servers dialog box appears, as shown in Figure 2-7.
Figure 2-7
Servers Dialog Box
7. To add a server to the server list, enter a server name in the Name field
and select the User and Notification check boxes as appropriate and select
the Add button.
8. To modify a server in the server list, select the server name in the Servers
list and make any changes in the Name field, or in the User and
Notification check boxes and select the Modify button.
9. To delete a server from the server list, select the server name in the Server
list and select the Delete button.
10. To comment out a server from the server list without deleting it, place a
number sign (#) in front of the server name and select the Modify button.
11. Select the OK button to close the Servers dialog box and return to the
Login Information dialog box.
12. To go back to the last saved server list for the given AR Home directory,
select the Refresh button.
All changes that you have made to the server list are lost.
13. Edit the Login Name field, as appropriate.
34
Action Request System User’s Guide for Windows—January 1996
2
14. To add this login information, select the Add button.
15. For each additional user, repeat from Step 3.
16. To remove the Login Information dialog box, select the Close button.
Note – After specifying alternate login information, the changes go into effect
the next time this user name logs into the User or Notification Tool.
Modifying Login Information
You can modify any user’s login information (including the default login
information) from within the User Tool. Use the following instructions to
modify any user’s configuration directory or server list at any time after you
have successfully logged into the User Tool.
To modify login information:
1. Select Login from the File menu.
The Login dialog box (shown in Figure 2-1) appears.
2. Select the Login Information button.
The Login Information dialog box appears, as shown in Figure 2-6.
3. Select the user name from the User Names list.
The AR Home Directory field and Servers list contain your configuration
directory and server list.
4. To change the configuration directory, in the AR Home Directory field,
enter a new directory path.
5. To make changes in the server list, select the Servers button.
The Servers dialog box appears, as shown in Figure 2-7.
6. To add a server to the server list, enter a server name in the Name field
and select the User and Notification check boxes as appropriate and select
the Add button.
7. To modify a server in the server list, select the server name in the Servers
list and make any changes in the Name field, or in the User and
Notification check boxes and select the Modify button.
Getting Started with the User Tool
35
2
8. To delete a server from the server list, select the server name in the Server
list and select the Delete button.
9. To comment out a server from the server list without deleting it, place a
number sign (#) in front of the server name and select the Modify button.
10. Select the OK button to close the Servers dialog box and return to the
Login Information dialog box.
11. To go back to the last saved server list for the given AR Home directory,
select the Refresh button.
All changes that you have made to the server list are lost.
12. To save the modified login information, select the Modify button.
Note – After modifying login information, the changes go into effect the next
time this user name logs into the User or Notification Tool.
Copying Login Information
You can copy either the default login information or an existing user’s login
information to another user only if this second user’s Login Name isn’t already
in the User Names list. If the Login Name is already in the User Names list,
you must first delete this user’s login information. For more information, see
the section entitled “Deleting Login Information” on page 38.
Use the following instructions to copy login information at any time after you
have successfully logged into the User Tool.
To copy login information:
1. Select Login from the File menu.
The Login dialog box (shown in Figure 2-1) appears.
2. Select the Login Information button.
The Login Information dialog box appears, as shown in Figure 2-6.
3. To use the default configuration directory and server list, select
***Default Login*** in the User Names list.
*** Default Login *** appears in the Login Name field and the default
configuration directory and server list appear in the AR Home Directory
and Servers fields.
36
Action Request System User’s Guide for Windows—January 1996
2
4. To copy someone else’s configuration directory and server list, select that
person’s user name in the User Names list.
That user’s login name, configuration directory, and server list appear in the
Login Name, AR Home Directory, and Servers fields.
5. Edit the Login Name field as appropriate.
Note – You cannot enter a name in the Login Name field that already exists in
the User Names list. If you want to copy existing login information to a name
already in the User Names list, you must first delete the user name from the
User Names list.
6. To add this login information, select the Add or Modify button.
Note – After modifying login information, the changes go into effect the next
time this user name logs into the User or Notification Tool.
Modifying the Default Login Information
You can modify the default login information from within the User Tool. The
default login information is used by every user name that does not specify
alternate login information.
Use the following instructions to modify the default configuration directory
and default server list at any time after you have successfully logged into the
User Tool.
To modify the default login information:
1. Select Login from the File menu.
The Login dialog box (shown in Figure 2-1) appears.
2. Select the Login Information button.
The Login Information dialog box appears, as shown in Figure 2-6.
3. Select ***Default Login*** from the User Names list.
*** Default Login *** appears in the Login Name field and the default
configuration directory and server list appear in the AR Home Directory
and Servers fields.
Getting Started with the User Tool
37
2
4. To change the default configuration directory, in the AR Home Directory
field, enter a new directory path.
5. To make changes in the default server list, select the Servers button.
The Servers dialog box appears, as shown in Figure 2-7.
6. To add a server to the default servers list, enter a server name in the Name
field and select the User and Notification check boxes as appropriate and
select the Add button.
7. To modify a server in the default servers list, select the server name in the
Servers list and make your changes in the Name field, or in the User and
Notification check boxes and select the Modify button.
8. To delete a server from the default servers list, select the server name in
the Servers list and select the Delete button.
9. To comment out a server from the default servers list without deleting it,
place a number sign (#) in front of the server name and select the Modify
button.
10. Select the OK button to close the Servers dialog box and return to the
Login Information dialog box.
11. To go back to the last saved default servers list for the given AR Home
directory, select the Refresh button.
All changes that you have made to the default servers list are lost.
12. To save the modified default login information, select the Modify button.
Note – After modifying the default login information, the changes go into
effect the next time any one using the default login information logs in.
Deleting Login Information
You can delete login information from within the User Tool. If you do this, the
user name no longer appears in the User Name drop down list box on the
Login dialog boxes for both the User and Notification Tools and that user name
will use the default configuration directory and server list.
Use the following instructions to delete login information at any time after you
have successfully logged into the User Tool.
38
Action Request System User’s Guide for Windows—January 1996
2
To delete login information:
1. Select Login from the File menu.
The Login dialog box (shown in Figure 2-1) appears.
2. Select the Login Information button.
The Login Information dialog box appears, as shown in Figure 2-6.
3. Select the user name in the User Names list box.
4. Select the Delete button.
Note – When you delete a user name from the User Names list, all directories
and files associated with this user name remain on your system.
5. To remove the Login Information dialog box, select the Close button.
Changing the Current Login Information
If the User Tool was previously started by another user, you can change the
login information and log in as yourself. You can log in at any machine on the
network that has access to the AR System server.
Note – Preference settings, customized views, macros, custom reports, and
customized default settings are saved in each user’s configuration directory on
each PC and are therefore specific to the PC on which they were set. This
means that if you log onto a machine other than the one you normally use, and
the directory containing your login information is not mounted as a network
drive, or your login information has not been added to this User Tool, the
preference settings, customized views, macros, custom reports, and customized
default settings (login information) may be different from those you normally
see.
To change the current login:
1. Select Login from the File menu.
The Login dialog box (shown in Figure 2-1) appears.
2. Type your user name in the User Name field or click on the drop down list
box symbol and select your user name from the drop down list box.
Getting Started with the User Tool
39
2
3. Type your password in the Password field.
4. Select the OK button to complete the login.
Sharing Macros and Custom Reports
There are two ways that you can share macros and custom reports. The first
way is to copy the macro or custom report files and place them in your
<ar_config_dir>\arcmds directory. The second way is to specify the directory
that contains the files you want to access in your AR Path desktop preference.
Copying Files
By default, the AR System creates a subdirectory under your configuration
directory for storing custom reports and macros. By default, this subdirectory
is called <ar_config_dir>\arcmds. You can copy the custom reports and macro
files from other user’s <ar_config_dir>\arcmds directory into your
<ar_config_dir>\arcmds directory. Once the custom report and macro files are
copied, they are available the next time the User Tool is started.
In general, you can share custom reports and macros with colleagues using
User Tools running on different machine architectures. The only exceptions are
as follows:
•
Macros that generate printed reports and macros that set preferences cannot
be shared between PC, UNIX, and Macintosh User Tools.
•
Custom report files that contain printer setup information (*.arp) are not
shareable. This is because the Printer Setup information may not be true
across all PC's.
Note – The name you give a custom report or macro is used to construct the
name of the file holding the custom report or macro. The filename is eight
characters and appended with the suffix .arq for macros and .arr for custom
reports. Whenever the first five characters of a custom report or macro name
are identical to those of an existing custom report or macro respectively, the
last three characters are made numeric. Also, blanks and special characters are
replaced with an x.
40
Action Request System User’s Guide for Windows—January 1996
2
Specifying your AR Path Preference
The second way you can share macros and custom reports is by using the AR
Path desktop preference. By saving macros and custom reports in directories
that are included in everyone’s AR Path preference, you can all access the same
custom reports and macros.
The directories defined by your AR Path preference can be any directory that
you have access to. In the AR Path field, just enter the entire directory path for
each directory you want to access separating each directory path with a
semicolon. You can also use the Browse button to select a directory and the
directory path is automatically added to your AR Path preference. By default,
your AR Path preference contains your <ar_config_dir>\arcmds directory.
Note – If you delete all directory paths (including
<ar_config_dir>\arcmds) from your AR Path preference, you will not be able to
access any custom reports or macros.
Using the AR Path preference allows many users access to the same macros
and custom reports without always having to copy files. For more information
about the AR Path preference, see the section entitled “Setting User
Preferences” on page 42. For more information about saving macros and
custom reports in directories other than your configuration directory, see
Chapter 6, “Using Macros,” and Chapter 5, “Reports,” respectively.
Server Information Window
The Server Information window, shown in Figure 2-8, displays when you select
Server Information from the File menu. It displays licensing information about
the servers listed in your Servers list, including the server names and versions.
It also shows what type of license is available from each server (assigned and
current).
Getting Started with the User Tool
41
2
Figure 2-8
Server Information Dialog Box
Setting User Preferences
Select Preferences from the File menu to set options that control the appearance
and behavior of various aspects of the User Tool. The AR System remembers
the preferences you set.
You can select preference settings for your desktop, submit and query options,
confirmation options, the default settings of any AR System reports you
generate, the fonts and colors for User Tool windows, and customize view
options that your User Tool should use. Instructions for setting preferences are
provided as follows.
To set desktop preferences:
1. Select Preferences from the File menu.
The User Preferences dialog box appears.
2. In the User Preferences dialog box, make sure Desktop is selected from
the Preference list, as shown in Figure 2-16.
42
Action Request System User’s Guide for Windows—January 1996
2
Figure 2-9
User Preferences - Desktop
3. To select or de-select an option, click on the option. An X appears in the
box if the option is selected. You can set any of the following desktop
options:
Maximize AR System
Select to have the User Tool Main window fill
the entire screen (maximize) on startup.
Always Prompt for Login
Select to cause the Login dialog box to display
every time the User Tool or Notification Tool
is started.
Getting Started with the User Tool
43
2
Save All Open Windows
Position/Size
Select to cause the AR System to remember
the size and position of all Submit and Query
windows that are open at the time you exit
the tool. The size and position are used the
next time you start the tool.
This option ONLY tells the User Tool whether
it should update the window position/size
when User Tool exits. However, this option
DOES NOT instruct User Tool whether User
Tool should read [Open Query Windows]
section of AR.INI or not.
By default, User Tool ALWAYS READ [Open
Query Windows] section regardless whether
this preference option is on or off. Turning
this option off really means that UT stop
updating [Open Query Windows] section. See
“To eliminate entries under Open Query
windows section:” on page 45
44
Show Status Bar
Select to cause the status bar to appear at the
bottom of the window. De-select to hide the
status bar.
Show Tool Bar
Select to cause the tool bar to appear below
the menu bar.
De-select to hide the tool bar.
Save Window Position/Size After
Close
Select to cause the AR System to remember
the size and position of all windows of the
same type (all Submit windows, all Query
windows, etc.) at the time you close the
window. The size and position are used the
next time you open a window of the same
type.
Action Request System User’s Guide for Windows—January 1996
2
AR Path
Specifies the directories where
you can access custom reports
and macros. Enter the entire
directory name for each directory you want to
access separating
each directory name with a
semicolon. The default value is
<ar_config_dir>\arcmds. You can use the
Browse button to select a directory from the
Browse Directories dialog box.
Maximum Number of
Schemas to Remember
Specifies the maximum number of schemas
kept in the active schema list displayed at the
bottom of the File menu. You can specify from
0 to 9 schemas.
4. Select the OK button to accept the options as set.
To eliminate entries under Open Query windows section:
1. Keep SaveAllOpenWindowPosition/Size option ON.
2. Close all active query windows.
3. Exit User Tool. At this time, there should be NO entry under [Open
Query Windows] section.
4. Start User Tool and set SaveAllOpenWindowPosition/Size option to OFF.
5. User Tool will stop remembering query window's position/size while
exits.
6. Open a couple of query windows and then exit.
7. Start User Tool. This time, you should not see any query windows.
To set Submit window preferences:
1. Select Preferences from the File menu.
The User Preferences dialog box appears.
In the User Preferences dialog box, make sure Submit is selected from the
Preference list, as shown in Figure 2-10.
Getting Started with the User Tool
45
2
Figure 2-10 User Preferences - Submit
2. To select or de-select an option, click on the radio button. You can set any
of the following options to specify what state the window opens in and
what happens after a successful AR submission.
Clear
Select to clear all information from the fields
on the schema.
Set to Defaults
Select to load the schema fields with any
existing default values. If no administrator or
user defaults are defined, the field is cleared.
To specify user default information, see
Chapter 7, “Customizing the Environment.
Keep Previous
Select to retain information from the last AR
submitted.
3. Select the OK button to accept the options as set.
To set Query window preferences:
1. Select Preferences from the File menu.
The User Preferences dialog box appears.
2. In the User Preferences dialog box, make sure Query is selected from the
Preference list, as shown in Figure 2-11.
46
Action Request System User’s Guide for Windows—January 1996
2
Figure 2-11 User Preferences - Query
3. To select or de-select an option, click on the check box or radio button. For
selections with boxes, an X appears in the box if the option is selected.
You can set any of the following query options:
Show Query Bar
Select to specify whether or not the query bar is visible.
You may want to hide the query bar if you rarely
perform complex queries.
Max in Query
Specifies the maximum number of ARs that are returned
when doing one of the query menu operations. If your
query matches more than this number, only the number
specified display and you receive a warning message that
there are more ARs that match but are not returned in
your results. If you want to have all matching results
returned, increment the Max in Query value and then
reissue your query operation. To display all matching
ARs, enter 0.
Getting Started with the User Tool
47
2
Prior to a New Query
Clear
Select to clear all information from the fields on the
schema.
Set to Defaults
Select to load the schema fields with any existing default
values. If no administrator or customized defaults exist
for a field, the field is cleared. (To set the default
information that is loaded, see Chapter 7, “Customizing
the Environment.)
Keep Previous
Select to retain information from the last query.
Note – Any default values defined for hidden fields are also loaded when you
select Set to Defaults. This can cause unexpected query results since the query
attempts to match the value in the hidden field as well as the query criteria
you define.
Double Click on a Query List Item:
Open Display
Window
Select to cause a Display window to open after doubleclicking a Query List item.
Open Modify
Window
Select to cause a Modify window to open after doubleclicking a Query List item.
Open Report
Window
Select to cause a Report window to open after doubleclicking a Query List item.
4. Select the OK button to accept the options as set.
To set confirmation preferences:
1. Select Preferences from the File menu.
The User Preferences dialog box appears.
2. In the User Preferences dialog box, make sure Confirm is selected from
the Preference list, as shown in Figure 2-12.
48
Action Request System User’s Guide for Windows—January 1996
2
Figure 2-12 User Preferences - Confirm
3. To select or de-select an option, click on the option. An X appears in the
check box if the option is selected. You can select any of the following
confirmation options:
Confirm to Exit AR System
Select to cause a confirmation box to appear each
time you exit the User Tool.
Confirm After
Successful Submit
Select to cause a confirmation message that includes
the Entry ID to appear each time you successfully
submit an AR. The message appears in a dialog box
and in the status bar, if the status bar is enabled.
Confirm to Delete a Macro
Select to cause a confirmation box to appear when
you delete a macro.
Confirm to Delete a Custom Select to cause a confirmation box to appear when
Report
you delete a custom report.
Confirm to Close Modify
Window
Select to cause a confirmation box to appear if you
attempt to close a Modify window after making
changes that you have not applied.
Confirm to Close Report
Window
Select to cause a confirmation box to appear if you
attempt to close a Report window after making
changes that you have not applied.
Getting Started with the User Tool
49
2
Confirm to Close
Custom View
Window
Select to cause a confirmation box to appear if you
attempt to close a Customize View window after
making changes that you have not applied.
Confirm to Close
Custom Defaults Window
Select to cause a confirmation box to appear if you
attempt to close a Customize Defaults window after
making changes that you have not applied.
4. Select the OK button to accept the options as set.
To set report preferences:
Note – When sending a report to another application using DDE, the report
preferences, page setup, and options are ignored. If you specified a column
separator character as a report preference or report option, it is ignored and the
value in the Format field in the dde.ini file is used instead. For more
information about DDE formatted reports, see Chapter 5, “Reports.”
1. Select Preferences from the File menu.
The User Preferences dialog box appears.
2. In the User Preferences dialog box, make sure Report is selected from the
Preference list, as shown in Figure 2-13.
Figure 2-13 User Preferences - Report
50
Action Request System User’s Guide for Windows—January 1996
2
Note – The report preferences that you can specify here are the default report
preferences. You can override any of these report preferences for a specific
report using the Report Design dialog box. See Chapter 5, “Reports” for more
information.
Getting Started with the User Tool
51
2
3. To set an option, type an appropriate value in the field beside the option.
You can set or select any of the following report options:
Number of Lines
Specifies the number of lines for each page. This
setting determines the location of the header and
footer on the page. (This setting is used for reports
sent to the screen or to a file. For printed reports,
this information is provided by the printer setup.)
Char per Line
Specifies the line length (specified in character
units). This setting is used for reports sent to the
screen or to a file. For printed reports, this
information is provided by the printer setup.
Left Margin
Specifies the left text margin (the number of blank
character units from the left edge of the page).
Right Margin
Specifies the right text margin (the number of blank
character units from the right edge of the page).
Top Margin
Specifies the number of blank lines at the top of
each page of your report (including the header line,
if any).
Bottom Margin
Specifies the number of blank lines at the bottom of
each page of your report (including the footer line,
if any).
Column
Record
52
Specifies a character to be used as the default
separator between columns in a column
formatted report. You can use any of the
following special characters in the Label field:
\b
\n
\t
\\
\<nnn>
Backspace
Return
Tab
Backslash
ASCII character <nnn>
Default:
two spaces
Specifies a character to be used as the separator
between records (ARs).
Action Request System User’s Guide for Windows—January 1996
2
Column Title
Specifies a character to be used as the default
separator between the column title and the rest
of the report.
Default: –
Page Break Per
Specifies whether or not to force a page break
(include a form feed character) after each AR,
after each group (Group1, Group2, Group3,
Group4, or Group5), after each Page as defined
by the Lines per Page preference, or none at all.
Default: None.
Column Titles Per
Specifies whether to provide a column title at
the beginning of each page, each AR, each
Group (Group1, Group2, Group3, Group4 or
Group5), or not at all. If you choose None, your
prototype report in the Report window appears
blank, if you have a column oriented report.
Enable Report to
Application
Specifies whether DDE is activated when
creating reports. When this option is selected,
the Application button appears on the Report
window. You need to select this option when
you want to send reports to other applications
using DDE.
4. Select the Printer Setup button to display the Print Setup dialog box. The
Print Setup dialog box allows you to modify the printer selection, paper
size, page orientation, and printer options as required. You can override
these options for specific custom reports by setting these options when
designing a custom report. See Chapter 5, “Reports,” for more
information.
5. Select the OK button to accept the options as set.
To set font preferences:
1. Select Preferences from the File menu.
The User Preferences dialog box appears.
2. In the User Preferences dialog box, make sure Fonts is selected from the
Preference list, as shown in Figure 2-14, User Preferences - Fonts.
Getting Started with the User Tool
53
2
Figure 2-14 User Preferences - Fonts
3. Select a screen element from the Select Font For list by clicking on the
drop down list box symbol and highlighting one of the choices. The
current font type, style, and size is shown at the bottom of the User
Preferences window and a sample is displayed in the Sample box.
You can set the font for the following screen elements (listed in the order
they appear in the scrolling list):
54
Edit Field
Specifies the font to use for data in fields.
Optional Field
Specifies the font to use for labels of fields that may or
may not contain data.
Default: regular font style
Push Button
Specifies the font to use for buttons that you select to
perform an action.
System Field
Specifies the font to use for labels of fields set by the AR
System.
Default: italic font style
Radio Button
Specifies the font to use for radio buttons.
Required Field
Specifies the font to use for labels of fields required by the
AR System.
Default: bold regular font style
Action Request System User’s Guide for Windows—January 1996
2
Query List
Specifies the font to use for text displayed in Query List
windows and Selection List dialog boxes. To make sure the
columns line up, use a fixed pitch font.
Menu List Node
Specifies the font to use for text displayed for major list
items (nodes).
Default: bold italic font style.
Menu List Leaf
Specifies the font to use for text displayed for list items for
each node.
Default: regular font style.
Note – If you change the font used for required fields or for system fields, it is
a good idea to continue to use a font that differentiates these fields from
normal (optional) fields and from each other.
4. With the chosen screen element highlighted, select Change Font. The Font
dialog box appears, as shown in Figure 2-15.
Figure 2-15 Font Dialog Box
5. In the Font dialog box, select a font, style, and size and select the OK
button.
6. To change the font of additional screen elements, select the new element
by repeating steps 3, 4 and 5.
Getting Started with the User Tool
55
2
7. When you have finished specifying font settings, select the OK button in
the User Preferences dialog box to accept the fonts as set.
Note – Changing the size of the fonts you use can affect schema layout. For
example, if you choose a large font size for push button controls, the buttons
may become too large to fit the space available for them on the schema. This
will cause screen elements to overlap.
To set color preferences:
1. Select Preferences from the File menu.
The User Preferences dialog box appears.
2. In the User Preferences dialog box, make sure Colors is selected from the
Preference list, as shown in Figure 2-16.
Figure 2-16 User Preferences - Colors
You can change the background color and three dimensional color
definitions in the Customize Default windows, Customize View windows,
Display windows, Modify All windows, Modify Individual windows,
Report windows, Submit windows, Query Bar, Query List windows, and
Query windows.
56
Action Request System User’s Guide for Windows—January 1996
2
3. Select an element from the Select a Window Type list by clicking on the
drop down list box symbol and highlighting one of the choices. For all
windows, you can change the color for the window background color.
For Customize Default, Customize View, Display, Modify All, Modify
Individual, Submit, and Query windows you can also change the color for
the following control elements:
• Control shadow color.
• Control highlight color.
• Control frame color.
• Control text color.
The control elements are the same for the symbols that appear to stand out
(icons and active link buttons). The control elements are also the same for
the symbols that appear indented (radio buttons and field text boxes).
Figure 2-17 calls out the control elements for icons and field text boxes. The
symbol frame is made up of the four inside lines.
Symbol Highlight
Symbol
Symbol
Icons
Symbol
Symbol Frame
Symbol Highlight
Field Text Boxes
Figure 2-17 Symbol Elements
Getting Started with the User Tool
57
2
4. Select an element from the Color Attribute for Selected Window list by
clicking on the drop down list box symbol and highlighting one of the
choices.
Except for the window background color, these elements allow you to
specify different colors for the different parts of the symbols letting you
create a three dimensional look to your schemas. For Report windows,
query bar, and Query List windows, you can only set the window
background color, so no list is available.
A sample of the current background color with the three dimensional
definitions is shown in the Sample box.
5. With the chosen element highlighted, select the Change Color button.
The Color dialog box appears, allowing you to select or create a custom
color.
6. When you are satisfied with your color choice, select the OK button in the
Color dialog box.
7. To change the color of additional elements, select the new element by
repeating from step 4 to step 6.
8. To return the window to the default colors, select the Set to Defaults
button.
9. To change the color of additional windows, select the window by
repeating from step 3 to step 6.
10. When you have finished specifying colors, select the OK button in the
User Preferences dialog box to accept the colors as set.
To set View Management window preferences:
1. Select Preferences from the File menu.
The User Preferences dialog box appears.
2. In the User Preferences dialog box, make sure View Management is
selected from the Preference list, as shown in Figure 2-18.
58
Action Request System User’s Guide for Windows—January 1996
2
Figure 2-18 User Preferences - View Management
3. To select or de-select an option, click on the check box or radio button, or
enter a value in the field to the right of the option. You can set the
following View Management preferences:
Default Schema View
Enter the name of the view to be used as the default
administrator view for all schemas opened from this
PC. For example, your AR System administrator may
have customized views for the PC and named them
Windows View. Check with your administrator for
the name you should enter here or leave this field
blank.
Arrow Key Step Size
Specifies the distance that the arrow keys move a
selected field or active link button in the Customize
View window.
Default: one pixel
Display Menu Method
Select Popup Menu or List Box to specify how menus
will display.
Default: Popup Menu
Popup Menu
Select to display menus in standard popup windows.
Hierarchical menus will display with arrows
indicating that you must pull to the right to view
lower level menu selections. Be aware that large
menus may cause display problems.
Getting Started with the User Tool
59
2
List Box
Select to display menus in a list box. You should
choose this option if you need to display large
menus.
When you select this option you must also specify
the settings below.
Always: select to display all menus as list boxes
regardless of size.
Only if: Select to specify item and level thresholds
beyond which menus will display in list boxes. (enter
the threshold values in the fields.) Menus containing
fewer items and fewer levels than specified will
continue to display as popup menus. Menus
containing more items or more levels than specified
will display in list boxes.
Expand Items at Startup
For menus displayed in list boxes, select this option
to cause all levels of hierarchical menus to display at
the time the menu is opened.
4. Select the OK button to accept the option as set.
Displaying Help
The Action Request System provides both application help and contextsensitive help. It also provides version and environment information about
your User Tool.
Displaying Application Help
Help information is available on all User Tool and Notification Tool windows
and commands. Help is also available on many of the procedures that you
most commonly perform. Select Index from the Help menu or press the F1 key
to see an index of the available help topics.
Displaying Context-Sensitive Help
Select Field/Schema help from the Help menu or the help tool bar icon to
display help on the current field or active link. The cursor changes to an arrow
and a question mark. Then, select the field, active link button or anywhere
within the schema. To display help on an active link tied to a field, select the
field. To display help on an active link tied to the schema (an active link that
60
Action Request System User’s Guide for Windows—January 1996
2
triggers when you an AR is submitted or when a query is issued), select
anywhere within the schema. This help contains such information as the name
of the field, the field ID, the data type, the maximum length of the field as well
as any help text supplied by your AR System administrator.
Figure 2-19 illustrates an example of a Field/Schema Help dialog box.
Figure 2-19 Field/Schema Help Dialog Box
Displaying Version and Environment Information
Select the About item from the Help menu to display information about the
product, as shown in Figure 2-20. You should be prepared to provide this
information whenever you call for Customer Support.
Getting Started with the User Tool
61
2
Figure 2-20 The About Dialog Box
62
Action Request System User’s Guide for Windows—January 1996
Submitting an Action Request
3
An action request (AR) is a collection of information that describes an incident,
such as a problem or a service request.
You submit an AR by entering the appropriate information in the Submit
window of the User Tool. The AR is added to the database and, normally, a
member of the support staff is assigned the AR and notified automatically —
often through the Notification Tool. After the AR is resolved, it remains in the
database where other users managing similar ARs are able to reference it.
You can open more than one Submit window at any time. You can open
multiple Submit windows for the same schema, or you can open Submit
windows for multiple schemas.
This chapter describes the features of the Submit window and tells you how to
use the Submit window to submit an AR. It covers the following topics:
•
•
•
•
•
Submitting an AR.
Filling in fields of different data types.
Using keywords when filling in fields.
Using Text Editor and Diary Editor dialog boxes.
Using active links.
63
3
General Steps for Submitting an Action Request
The steps that follow describe the process of submitting an action request to
the AR System using the User Tool. (To review or modify information in an AR
once it is submitted, you must use the Query window, as described in
Chapter 4, “Reviewing and Modifying Action Requests.)
To submit an action request:
1. Open a Submit window by selecting Open Submit from the File menu.
(You can also open a Submit window by selecting the Open Submit tool
bar icon or by typing Ctrl+S).
The Select Schema - Submit dialog box appears, as shown in
Figure 3-1.
Figure 3-1
64
Select Schema - Submit Dialog Box
Action Request System User’s Guide for Windows—January 1996
3
2. Select the schema you want to work with by selecting the schema name
and then selecting the OK button or Return/Enter key, or by
double-clicking on the schema name. By default, the last schema used is
selected when the Select Schema - Submit dialog box appears.
Like other Windows applications, you can use the up and down arrow keys
and the Page Up and Page Down keys to display different portions of the
Schema Name list.
The Submit window appears, as shown in Figure 3-2.
Figure 3-2
Submit Window
Select and fill in fields as appropriate to describe the problem or request. For
details, see the section “Filling in Fields” on page 66.
Submitting an Action Request
65
3
3. Select Apply from the Actions menu (or select the Apply tool bar icon or
type Ctrl+A) to submit the completed AR.
The system checks to ensure that all required information has been entered
and all values are valid. If any required information is missing or an error is
found, an error message appears in a dialog box and the AR is not
submitted. Make the necessary corrections and resubmit the AR.
If there are no errors, the AR is added to the database. If the Confirm After
Successful Submit confirm preference is selected, a confirmation message
appears in the status bar even if the Confirm After Successful Submit
confrim preference is not selected. If there are warnings or notes from the
server about the submitted AR, they appear in a message dialog box. For
more information about preferences, see Chapter 2, “Getting Started with
the User Tool.
Note – If a schema is larger than the window, use the scroll bars to view the
undisplayed portions or resize the window.
When You Can Access Fields
Your schema view shows only fields to which you have complete or conditional
access. The AR System administrator determines which fields you can access
and when access is allowed. If you do not have permission to a field, the field
is not visible, or it is read only (you cannot change the value).
If a field is protected, you must be a member of a group with write access to
that field and have a fixed or floating write license. If you want users to be able
to set the field at Submit time without write access, you must set the Create
Mode to Open. Refer to Create Mode in Chapter 4 of the AR System
Administrator’s Guide for more information.
Filling in Fields
Figure 3-3 on page -67 shows an example of a Submit window with a typical
schema view. Field labels may appear either to the left of or over the field. You
can move from field to field by selecting a field with the mouse or by pressing
the Tab key. Note the different font styles used for the field labels. These are
the default font styles. The font style provides you with some information
about the field:
66
Action Request System User’s Guide for Windows—January 1996
3
•
Bold text means the field is required. You must enter appropriate data in
required fields.
•
Plain text means the field is optional. You may enter data or leave the field
empty.
•
Italic text means the field is managed automatically by the system and
cannot be filled in during AR submission. It is a read only field.
Note – If you have permission to do so, you can change the field labels that
appear on your view of the schema by customizing your environment. (See
Chapter 7, “Customizing the Environment.)
You can also change the font styles used for required and system fields by
setting font preferences (see Chapter 2, “Getting Started with the User Tool). If
you do modify the font style for required or system supplied fields, it is a good
idea to choose a font that continues to differentiate these fields from optional
fields and from each other.
System
maintained
fields are
shown in
italic
typeface.
Required
fields are
shown in
bold
typeface.
Optional
fields are
shown in
regular
typeface.
Figure 3-3
Example of the Submit Window
Submitting an Action Request
67
3
Field Data Types
A field is characterized by its data type which determines the kind of
information you can enter in the field. The following list (Table 3-1) describes
the different data types.
Table 3-1
68
Field Data Types (1 of 2)
Data Type
Description
Character
Character fields can contain any characters that you can type or
copy. The AR System administrator sets the maximum length of
each field and (optionally) a pattern defining allowable
characters. The maximum length for a character field is 32,000
characters. A character field can include a pull-right menu that
serves as a fill-in aid. Depending on how your AR System
administrator defines this menu, selecting an item from the menu
may either overwrite or append to any existing field contents.
Character menus can be created from a static list of items, from
the contents of a file, or from the result of a query on another
schema. Since changes to the file or to the other schema might
change the items contained in the menu, your AR System
administrator can choose whether to update the menu when the
schema is first read, when the menu is first displayed, or after a
specific period of time. Therefore, the contents of a character
menu might change from time to time. A good example of using
this type of menu is a list of all employees which changes over
time.
If a character field is 70 characters or more, you can open a Text
Editor dialog box by selecting the text edit symbol to the right of
the field with the mouse button (or type F7). For more
information, see “Using the Text Editor Dialog Box” on page 73.
Diary
Diary fields contain multiple character entries that are
automatically stamped with the date, time, and the name of the
user who entered the item. Each diary item can contain any
characters that can be typed or copied. The maximum length for
a diary field is 32,000 characters. You can open a Diary Editor
dialog box for the field by selecting the diary symbol to the right
of the field with the mouse button (or type F7). For more
information, see “Using the Diary Editor Dialog Box” on page 75.
Action Request System User’s Guide for Windows—January 1996
3
Table 3-1
Field Data Types (2 of 2)
Data Type
Description
Integer
Integer fields contain a number between -2147483648 and
2147483647, though their range may be limited by the AR
System administrator. For integer fields with a display property
field type of numeric text, up and down arrows appear to the
right of the field allowing you to increment and decrement the
value in the field.
Real
Real fields contain a floating-point number. You can enter
numbers either with a decimal point or in scientific notation (for
example, 1.43 or 2.9e-9). The AR System administrator sets the
range of real fields. If your AR System administrator set up a real
field to be a precision field, the number that is displayed is
rounded off. The number stored in the database is not changed,
only the number that you see is either rounded up or down.
Selection
Selection fields provide a list of exclusive, named choices. The
possible choices are displayed as radio buttons or as items in a
drop down list box.
Date/Time
Date/time fields may contain numerics, characters for months,
time/date punctuation, and AM/PM designations. You must
enter the date first when entering both date and time.
Note: If the date is not entered, the current date is assumed. If
the time is not entered, 0:0:0 (12:00 midnight) is assumed.
You can enter the month as text as a full word or as an
abbreviation (February or Feb) or numerically with or without a
leading zero (02 or 2).
You can enter the day with or without a comma or leading zero:
October 4, 1993, Oct 04 93, or 10/04/93
The year is optional. You can enter it as two digits (93) or four
digits (1993). If you do not enter the year, the current year is
assumed.
Note: You can specify the date format from International Control
on the Control panel. For information about what date format
your platform uses, either check the Control Panel or see your
System Administrator.
You can enter the time in either 24 or 12 hour format, using a
colon to separate hours, minutes, and seconds (minutes and
seconds are optional):
13:30:28 or 1:30:28 PM
To change a format, use International Control on the Control
panel.
Submitting an Action Request
69
3
Field Data Entry Operations
The following summarizes the ways in which you enter data and select choices
in schemas. Refer also to the illustration in Figure 3-4 on page -70.
Character
menus. Note the
menu
symbol to the
right of the field.
A text field
longer than
70
characters.
Select the
text editor
symbol to
display a
Text Editor
dialog box.
A diary field. Select the
diary symbol to display a
Diary
Editor dialog box.
Figure 3-4
70
Drop down list box in a
selection field. Note the
drop down list box
symbol to the right of the
field.
Radio
buttons in a
selection
field.
Entering Data in Fields
Action Request System User’s Guide for Windows—January 1996
Numeric text
field with
increment/dec
rement
arrows.
3
To type and edit information in a field:
•
Select the field and begin typing.
The type of information you can enter in a field depends on that field’s data
type, as previously described. In date/time fields, information must be
entered in a specific format. You can type directly into the field to add to or
modify the text. You can continue typing up to the maximum length
allowed for the field.
In diary fields and character fields 70 characters or more, you can open a
Text Editor or Diary Editor dialog box that lets you enter more information
by selecting the symbol to the right of the field.
Some fields may have a character menu associated with them providing
suggestions. Select the character menu symbol to the right of the field and
then highlight the menu item you want and release the mouse. Your
selection either replaces or appends to any existing text depending on how
your AR System administrator defined this field. You can also press the F6
function key to display a character menu.
To delete data from this field, highlight the text and then select Clear from
the Edit menu. (You can also press the Delete key or Shift + Delete keys.)
To use a drop down list box:
•
Use the mouse to select the drop down list box symbol next to the field and
then select an item from the menu that appears. Your selection replaces any
existing selection in the field, since selection fields can contain only one
choice.
To delete all data from this field, select the drop down list box symbol and
then select the Clear item from the drop down list box.
To use selection radio buttons:
•
Select the radio button you want (you can select only one button at a time).
To de-select a button, simply select it again. To change your selection, select
another button.
To use numeric text fields with arrows:
•
Select the up arrow symbol to increment the field value by one. Select the
down arrow symbol to decrement the field value by one.
Submitting an Action Request
71
3
Using Keywords
You can enter keywords any place that you can enter character values.
Keywords used to fill in fields on an AR are replaced with their corresponding
values once you submit the AR. The available keywords are shown in
Table 3-2.
Table 3-2
72
Keywords (1 of 2)
Keyword
Substituted Value
$DATE$
Current date. In a date/time field, the time defaults to
midnight (0:0:0).
$DEFAULT$
Default value for the associated field (only used when
assigning a value to a field).
$GROUPS$
The groups of which the current user is a member.
$HARDWARE$
Hardware platform the current process is running on. The
different values that can be returned are:
PC 80386
PC i486
PC unknown
$NULL$
A null value (mainly used during modify operations or when
selecting Set to Defaults on the Edit menu when displaying a
Query or Submit window to remove a value). For more
information on how to remove a value when selecting Set to
Defaults, see Chapter 7, “Customizing the Environment.
$OPERATION$
Current operation being performed. One of the following
values is returned:
* CREATE is returned for a Submit operation.
* DELETE is returned for a Delete operation.
* GET is returned for a Display operation.
* GETLIST is returned for a Query List operation.
* SET is returned for a Modify operation.
* QUERY is returned for a Query operation.
$OS$
Operating system that the current process is running under.
The value that is returned is:
DOS: vx.xx Windows: vx.xx (enhanced mode)
where x is your particular version number of DOS and
Windows.
$SCHEMA$
Schema currently operating on.
$SERVER$
Server currently operating on.
Action Request System User’s Guide for Windows—January 1996
3
Table 3-2
Keywords (2 of 2)
Keyword
Substituted Value
$TIME$
Current time. In a data/time field, the date defaults to the
current date.
$TIMESTAMP$
Current date/time stamp.
$USER$
Name of the user who is currently logged in.
$WEEKDAY$
Current day of the week.
Note – These keywords are especially useful for specifying default values (see
Chapter 7, “Customizing the Environment), in query definitions (see Chapter 4,
“Reviewing and Modifying Action Requests), and in macro definitions (see
Chapter 6, “Using Macros”).
Special Data Entry Operations
The Text Editor and Diary Editor dialog boxes provide the means for
compiling narrative information about the condition described in an action
request.
Using the Text Editor Dialog Box
If a character field has a maximum length 70 characters or more, you are able
to open a Text Editor dialog box in which you can enter as much text as you
want up to the limit defined by your AR System administrator. Simply select
the text edit symbol to display the Text Editor dialog box, as described as
follows and as shown in Figure 3-5 on page -74.
Submitting an Action Request
73
3
Select the
text edit
pop-up
symbol next
to a long
character
field to open
Text Edit
dialog
box.
Figure 3-5
Text Editor Dialog Box
To use the Text Editor dialog box:
If your text entry is short enough to be visible in the field, simply type into the
field. Otherwise, do the following:
1. Select the text edit symbol to the right of the field to open a Text Editor
dialog box. You can also press the F7 function key. A Text Editor dialog
box appears (Figure 3-5).
Note – If there is no text edit symbol beside the field it is because the field is
shorter than 70 characters.
2. Select anywhere in the Text Editor dialog box and begin typing or copying
from other windows. Use the features provided by the Text Editor dialog
box’s File and Edit menus as needed. See the section entitled “Text and
Diary Editor Operations” on page 77 for a discussion of the available file
and edit operations.
Note – You cannot use tabs in Text Editor dialog boxes.
3. When you have finished, select the OK button.
74
Action Request System User’s Guide for Windows—January 1996
3
Using the Diary Editor Dialog Box
Diary type fields are where you keep a narrative history of actions taken on an
AR. They allow you to open a Diary Editor dialog box where you can add a
comment about actions taken on the AR. Each addition to the diary is name,
date, and time stamped. A diary field can be set to a maximum of 32,000
characters.
Typically, you would update a diary field any time a notable change has
occurred that is not automatically captured in the Status History or in another
field. See “Adding a New Diary Entry” on page 117 in Chapter 4 for
information on how to update the diary field on an existing AR.
On the Display and Modify Individual windows, the diary symbol appears
different when the diary field contains information. The pages in the diary
symbol appear to contain text. This way, you can tell at a glance if the field
already contains information.
Note – You can make additional diary entries after an AR is submitted.
Previous entries cannot be edited; they can only be reviewed.
Figure 3-6 on page 76 illustrates a Diary Editor dialog box.
Submitting an Action Request
75
3
Select the diary
pop-up symbol to
open a Diary
Entry dialog box.
Diary Editor
dialog box.
Figure 3-6
Diary Editor Dialog Box
To use the Diary Editor dialog box:
If your text entry is short enough to be visible in the field, simply type into the
field. Otherwise:
1. Select the diary symbol to the right of the field to open a Diary Editor
dialog box. You can also press the F7 function key. A Diary Editor dialog
box appears (Figure 3-6).
2. Select anywhere in the Diary Editor dialog box and begin typing or
copying from other windows. Use the features provided by the Diary
Editor dialog box’s File and Edit menus as required. See the next section,
“Text and Diary Editor Operations, for a discussion of the available file
and edit operations.
3. When you have finished, select the OK button.
76
Action Request System User’s Guide for Windows—January 1996
3
Text and Diary Editor Operations
The Text and the Diary Editor dialog boxes provide an identical set of file and
edit operations. The File menu provides basic file operations. For all File menu
choices except Save, a dialog box appears. The Edit menu provides basic text
editing commands with keyboard shortcut keys to speed up simple operations.
First select either File or Edit, and then select a menu item to perform the
operation. Table 3-3 shows the available file and edit operations.
Table 3-3
Text and Diary Editor Menu Items
Menu
Item
Function
File
Read File
Copies the selected file into the dialog box.
Any existing text in the dialog box is
replaced. text (ascii) only.
Include
File
Appends the selected file to the text
currently in the dialog box. Text (ascii)
only.
Save
Saves the file under its current file name.
This command is active only after the file
was first saved using the Save As
command.
Save As
Saves the file under a new name.
Undo
Undoes (backs out of) the last operation.
Ctrl+Z
Cut
Deletes highlighted text in the dialog box
and moves it to the clipboard.
Ctrl+X
Copy
Copies highlighted text in the dialog box to
the clipboard.
Ctrl+C
Paste
Pastes the contents of the clipboard at the
location of the cursor.
Ctrl+V
Clear
Deletes any highlighted text in the dialog
box.
Del
Select All
Highlights (selects) all of the text in the
dialog box.
Edit
Submitting an Action Request
Key Sequence
77
3
Using Active Links
An active link is an operation that the AR System administrator has set up to
execute automatically when you perform certain actions while filling in,
viewing or modifying an AR. Since your AR System administrator can set up
an active link to execute only when certain conditions are met, an active link
may not always execute. An active link may cause one of the following
operations:
•
•
•
•
•
•
•
•
•
Execute a macro.
Open a Submit window.
Fill in fields automatically.
Run another program.
Move the focus to a different field.
Change the access to a field. (Read, Write, or Disabled).
Display a Note, Warning, or Error message.
Change the items on a menu.
Copy or retrieve information from another Windows application using DDE.
Depending on how the AR System administrator has set up the active link, you
may trigger the operation by one of the following actions:
•
•
•
•
•
•
Selecting a button.
Selecting a radio button.
Selecting an item on a character menu.
Submitting, displaying or modifying an AR.
Setting default field values on either the Submit or Query window.
Pressing Return/Enter in a field.
Note – In a multi-line text field, you need to press F5 to activate the last type
type of active link (pressing Return/Enter).
Your AR System administrator may have attached more than one active link to
any of these actions. In this case, performing an action can trigger more than
one operation.
78
Action Request System User’s Guide for Windows—January 1996
3
In the example shown in Figure 3-7, selecting the active link button called
“Show Related Calls” caused a macro to be executed that displayed a Query
List window containing entries that match the contents of the Problem Area
field. For more information about Query List windows, see Chapter 4,
“Reviewing and Modifying Action Requests.
Active
Link
button.
Figure 3-7
Active Link Example
Note – Active links designed to execute on a different platform, such as UNIX,
may generate unexpected results if run from a Windows User Tool. For
example, an active link that runs a UNIX process will not execute successfully
from a Windows User Tool. Contact your AR System administrator if you
experience problems while using a schema that includes an active link that was
designed for a different platform.
Submitting an Action Request
79
3
Selection Lists
If you activate an active link that does a query and then fills a field with the
value it finds as a result of the query, and if the query returns more than one
possible result, a Selection List dialog box (pick list) is displayed letting you
select which value you want entered into the field. The Selection List dialog
box contains the query list description of all of the ARs that match the query
criteria.
Note – Your AR System administrator can specify which fields are displayed in
a query list description for each schema and the order they are displayed. Also,
any sorting options that you specify affect your Query List and Selection List
windows. So, if you activate an active link that returns a query list on two
different schemas, the selection list in the two Selection List windows might
not display the same field contents. For more information about Query List
windows and how your AR System administrator can customize them, see
Chapter 4, “Reviewing and Modifying Action Requests, and the Action
Request System Administrator’s Guide.
A good example of where you might see a Selection List window is if you have
an active link on your Job Requisition schema that queries your Recruiting
schema for all names of those candidates who interviewed for a particular job.
Suppose you have already interviewed three people for a secretarial position
entered in the Job Requisition schema. An AR has been entered in the
Recruiting schema for each of the three candidates.
When displaying the secretarial position AR in the Job Requisition schema, you
can select the active link that queries the Recruiting schema searching for all
ARs listing people who interviewed for this secretarial position. A Selection
List window is displayed, as shown in Figure 3-8, listing the three people
previously interviewed. Now you can select the name you want entered into
the Hired field on the Job Requisition AR.
80
Action Request System User’s Guide for Windows—January 1996
3
Figure 3-8
Selection List Dialog Box
To use a Selection List dialog box:
1. Select the value you want in the selection list and then select the OK
button.
2. Selecting the Cancel button removes the Selection List dialog box without
entering a value in the field.
Setting Submit Window Preferences
You can control several aspects of how the Submit window looks and acts by
selecting Preferences from the File menu in the User Tool Main window. Using
the Submit preferences, you can specify that fields be cleared, loaded with
default values, or retain their previous contents after each successful
submission. For more information on how to set Submit window preferences,
see “Setting User Preferences” on page 42 in Chapter 2.
Submitting an Action Request
81
3
82
Action Request System User’s Guide for Windows—January 1996
ReviewingandModifyingActionRequests
4
You can use the Query window of the User Tool to look at or modify any AR or
set of ARs that your AR System administrator has given you permission to
look at or modify. For example, you might want to look at all the ARs that
were submitted during the last month for a particular piece of equipment. You
can do so by defining a query that locates the ARs you are interested in and
performing an operation to display those ARs.
To find specific ARs, you query the database; that is, you specify a set of search
criteria that define the set of ARs in which you are interested. You specify
query criteria in one of two ways: by using a simple query-by-example method
or, for more complex search conditions, by using the query bar. You can also
combine the two query methods to search for results that match both.
Once you have found an AR or a set of ARs, you can perform many different
operations on them, including listing, displaying, modifying, deleting, and
generating reports or statistics based on their contents.
This chapter describes the Query window and tells you how to use the Query
window to review and modify ARs. It covers the following topics:
•
•
•
•
•
Defining query criteria using query-by-example.
Defining query criteria using the query bar.
Listing ARs in a one-line summary.
Displaying ARs one by one.
Modifying one or more existing ARs.
83
4
•
•
Deleting ARs.
Full text search option.
Chapter 5, “Reports, describes how to create reports based on the contents of
the ARs.
General Steps for Querying the Database
When you query the database, you are searching for ARs that meet a specific
set of criteria. The following describes the general steps you use to query the
database.
To query the database:
1. Open a Query window by selecting Open Query from the File menu. (You
can also open a Query window by selecting the Open Query tool bar icon
or by typing Ctrl+O).
The Select Schema - Query dialog box appears, as shown in Figure 4-1.
84
Action Request System User’s Guide for Windows—January 1996
4
Figure 4-1
Select Schema - Query Dialog Box
2. Select the schema you want to work with by selecting the schema name in
the Schema Name list and then selecting the OK button, Return/Enter key,
or by double-clicking on the schema name. By default, the last schema
used is selected when the Select Schema - Query dialog box appears.
Like other Windows applications, you can use the up and down arrow keys
and the Page Up and Page Down keys to display different portions of the
Schema Name list.
3. Define the query criteria to be applied to the search by filling in fields in
the Query window or by using the query bar. (The query bar is an area at
the bottom of the Query window that allows you to easily “build”
complex query criteria.) See the next section, Defining Query Criteria, for
more detailed information.
Reviewing and Modifying Action Requests
85
4
4. Select the operation that you want to perform on the ARs from the Query
menu or by selecting an icon from the tool bar. (Not all actions are
available from the tool bar.) See “Query Operations” on page 99 for more
detailed information.
Defining Query Criteria
The query criteria you specify determine which AR or set of ARs the system
selects for the query operation. There are two ways that you can specify query
criteria, creating a query-by-example and using the query bar, as shown in
Figure 4-2.
Query-byExample: fill in
this part of the
window to
“match” the
ARs you want
to find.
Query Bar: use
when you want
to define more
complex search
conditions.
Figure 4-2
Specifying Query Criteria
Query-by-Example
The simplest way to specify query criteria is to fill in fields and select choices
and radio buttons in the Query window that match the ARs you want to find.
This is called creating a query-by-example.
When filling in character fields, you need to be aware of the default search
style that your AR System administrator specified for the field. The three
different search styles are: Equal, Leading, and Anywhere.
86
Action Request System User’s Guide for Windows—January 1996
4
The Equal search style means that whatever you enter into the field is searched
for exactly. For example, if you enter Bob Smith in the Submitter field you only
find all ARs submitted by Bob Smith, but not any submitted by Bob Smithe.
The Leading search style means that whatever you enter into the field is
searched for at the beginning of the field with any number of trailing
characters. This means that the query will return every AR with this field that
contains the first characters exactly as you entered plus any characters that
may follow. For example, if you enter Bob in the Submitter field you find all
ARs submitted by Bob Smith, as well as those submitted by Bobby Jones.
The Anywhere search style means that whatever you enter into the field is
searched for anywhere within the field. For example, if you enter Bob in the
Submitter field you find all ARs submitted by Bob Smith, as well as those
submitted by Bobby Jones and Jill Bobbington.
Equal and Leading searches are faster than Anywhere searches since
Anywhere searches have to compare each character in the field while Equal
and Leading searches do not.
You can override your administrator’s default search style by entering exactly
what you are searching for using relational operators and wild card characters.
However, doing this you lose any performance gains that would result from
using the Equal or Leading search styles. For more information, see “Using
Relational Operators in the Query Window” on page 89 and “Using Wild Card
Symbols” on page 90.
To find out what search style your AR System administrator specified for a
particular character field, display the context sensitive help for that particular
field. For more information on context sensitive help, see “Displaying Help” on
page 60 in Chapter 2.
You can perform an unqualified query by first clearing all fields and then
querying for all ARs that match anything in every field. This type of query
returns all ARs submitted using this schema. While this is useful for some
schemas, if the schema contains a large number of ARs, this type of query
could overload your server. In this case, your AR System administrator might
specify that you can’t perform an unqualified query for all schemas on a
particular server. If you try to perform an unqualified query on a protected
server, you receive an error message informing you that this is not allowed and
that you need to specify some query criteria.
Reviewing and Modifying Action Requests
87
4
For a more precise query, you can specify values for more than one field. The
system searches for ARs that meet all of the criteria (a logical AND), so the
more fields you fill in the more specific your query becomes.
Query Bar
The second method for specifying query criteria is to use the query bar at the
bottom of the window. The query bar lets you define a more complex set of
criteria such as searching for all ARs with one of two different values in the
same field. It also allows you to use a Status History field item in a query,
which is not possible in a query-by-example. For more information, see “Using
the Query Bar” on page 92.
You can turn off the display of the query bar by de-selecting the Show Query
Bar query preference. If the query bar is not visible at the bottom of the Query
window, check this query preference. For more information about preferences,
see the section entitled “Setting User Preferences” on page 42 in Chapter 2.
You can use both the query-by-example style and the query bar at the same
time. However, it is important to remember that any criteria you enter in the
query bar is used in addition to the criteria you have defined in the query-byexample section of the window. That is, the two sets of criteria are considered
in the search (logically ANDed).
Note – You can record and save frequently used and complex queries as
macros that can be run automatically at any time. For more information, see
Chapter 6, “Using Macros.”
To define query criteria:
1. Fill in fields in the query-by-example section of the Query window or use
the query bar to define a query statement.
You can use relational operators (<, >,!=, <=, >=, =) and wild card symbols to
further define query criteria. For more information, see “Using Relational
Operators in the Query Window” on page 89 and “Using Wild Card Symbols”
on page 90.
To clear all fields, select Clear All from the Edit menu (or type Ctrl+E).
To fill in fields with pre-set default information, select Set To Defaults from
the Edit menu (or type Ctrl+U).
88
Action Request System User’s Guide for Windows—January 1996
4
2. After you have finished defining query criteria, select a query operation.
For more information, see “Query Operations” on page 99.
Using Relational Operators in the Query Window
You can use the relational operators shown in Table 4-1 anywhere in the Query
window. Relational operators are especially useful in non-text fields (such as
date and time fields) when you want to query for a value within a numerical
range. (See Table 4-3 in the section entitled “Using Operators in the Query Bar
for the list of additional operators you can use only in the query bar.)
Table 4-1
Relational Operators Used in the Query Window
Operator
Action
<
Match contents that are less than the value.
>
Match contents that are greater than the value.
!=
Match contents that are not equal to the value.
<=
Match contents that are less than or equal to the value.
>=
Match contents that are greater than or equal to the value.
=
Match contents that are exactly equal to the value.
Note – You can override the search style specified by your AR System
administrator using relational operators. For example, you can use = (an equals
sign) to search for an exact match even if your AR System administrator
specified the search style to be Anywhere. For more information about the
different search styles, see “Query-by-Example” on page 86.
The example shown in Figure 4-3 uses the “=” relational operator. In the
example, Open Ticket Status is selected and =Bob is entered in the Submitter
field. The resulting search finds all open ARs with an exact match for “Bob” in
the Submitter field.
Reviewing and Modifying Action Requests
89
4
Using the
= (equals
to)
relational
operator.
Figure 4-3
Using a Relational Operator
To search for all ARs created after a date or time, simply use the “>” (greater
than) relational operator and one of the date and time formats discussed in
“Filling in Fields” in Chapter 3. For example, set Modified Date to > June 5,
1994 11:59 to select all ARs modified after June 5, 1994 11:59.
Using Wild Card Symbols
You can use wild card symbols when you are defining query criteria in
character and diary fields. The available wild card symbols and their meanings
are shown in Table 4-2.
Table 4-2
90
Wild Card Symbols (1 of 2)
Wild Card
Meaning
%
Use to match any string of 0 or more characters.
For example: J%son matches Jackson, Johnson, Jason, and Json.
_
(Underbar). Use to match any single character.
For example: B_b matches Bab, Bob, and Bub.
Action Request System User’s Guide for Windows—January 1996
4
Table 4-2
Wild Card Symbols (2 of 2)
Wild Card
Meaning
-
(Hyphen). Use to indicate a range. Always use within brackets ( [ ] ).
See next example.
[]
Use to match any single character within a specified range or set. For
example: [a-f] matches the range of characters a through f while
[abcf] matches the set of characters a, b, c, or f.
Note, using square brackets and the LIKE operator works for flat files,
Sybase, and Ingres.Using square brackets and the LIKE operator does
not work with Oracle or Informix. Refer to Database Considerations in
Chapter 4 of the Action Request System Installation Guide for more
information.
[^]
Use to match any single character not within a specified range or set.
For example: [^a-f] matches all characters except the range a through
f while [^abcf] matches all characters except a, b, c, or f.
You can force interpretation of wild card characters as explicit characters. To
use the percent symbol (%), underbar ( _ ) or open bracket ( [ ) as an explicit
text character, enclose the character in brackets. For example, [%] matches the
% character, and does not find 0 or more characters.
The close bracket ( ] ) functions as a wild card only when it is accompanied by
an open bracket ( [ ). The hyphen functions as a wild card character only when
preceded by an open bracket ( [ ) or ( [^ ).
In the query-by-example section, the %, underbar ( _ ), and open bracket ( [ )
symbols always function as wild card symbols except in the following
scenarios where they function as explicit characters:
•
•
When you specify one of the relational operators (for example: >, =).
When your AR System administrator specified a default search style of
Equal and you do not use any leading or trailing % (percent signs).
Reviewing and Modifying Action Requests
91
4
Note – You can override the search style specified by your AR System
administrator by using a leading %. For example, if your AR System
administrator specified the search style to be Equal, and you enter %Rob into
the Submitter field, your search finds Robert Smith as well as Jim Robertson
and not only any exact or equal matches to %Rob. However, if you use a
leading %, you lose any performance gains (faster search times) that would
result from using the Equal or Leading search styles. For more information
about the different search styles, see “Query-by-Example” on page 86.
In the query bar, wild card symbols are only interpreted as wild cards when
used with the LIKE operator; otherwise they are interpreted as explicit
characters. The query bar also requires that you use the % symbol when you
want to include leading or trailing characters in your query. For example, if
you want to find all ARs submitted by Jill Bobbington, Bobby Fenton, and Bob
Compton, you would enter the following in the query bar:
'Submitter' LIKE ''%Bob%ton%''
To execute this same query in the query-by-example section when the search
style for the field is “Anywhere”, you would simply enter Bob%ton in the
Submitter field, taking advantage of the fact that the system assumes you want
to allow for leading and/or trailing characters.
Using the Query Bar
Use the query bar, as shown in Figure 4-4, when you want to define a query
that does more than simply find ARs with fields that match an example. The
query bar lets you define more complex logical statements. For example, you
may want to match one field or another. You also use the query bar whenever
you want to use a Status History field item in your query. Remember that the
criteria you enter in the query bar are used in conjunction with any criteria
defined in the query-by-example section of the window.
92
Action Request System User’s Guide for Windows—January 1996
4
Add keywords
by selecting
from the
Keywords list.
Add
operators by
selecting from
the palette.
Select the Fields button to see the Field List dialog box.
Figure 4-4
The Query Bar
You can define a query statement in the query bar by using any of the
following techniques:
•
•
•
Type information in the Query field.
•
Select an operator from the query bar palette to add an operator.
Click on a field label in the query-by-example area to add a field.
Select a field label or a keyword from the Field List dialog box to add a field,
a status history item, or a keyword.
Note – You can hide the query bar from view when it is not used. To hide (or
display) the query bar, display the query preferences. See “Setting User
Preferences” on page 42 in Chapter 2.
You must follow certain formatting conventions in constructing the query
statement. The sections that follow describe these conventions as well as the
logical and arithmetic operators that you can use. You can also use the Edit
menu operations (Cut, Copy, Paste, Clear, and Copy All) in the Query Bar.
Reviewing and Modifying Action Requests
93
4
To enter information in the query bar:
1. Add a field name to the query bar using any of the following methods:
• Select the Fields button on the query bar to display the Field List dialog box
that lists all of the fields on the schema. You can then select any listed field
name. You can also select a Status History field item or keyword from the
Field List dialog box.
• Click on a field label in the query-by-example area to add it to the query bar
within single quotes.
• Type the field name, enclosed in single quotes, in the query bar. (Field labels
that use spaces or special characters must be enclosed in single quotes. You
may want to establish the habit of using the single quotes even when they
are not specifically required for the field specification.)
For example, if you select the field name Ticket Status, you see:
'Ticket Status'
2. Type an operator or select the appropriate operator from the palette in the
query bar.
The operator is added to the query bar.
For example, if you select (or type) the equals sign (=), you see:
'Ticket Status' =
3. Select another field or type a field value.
When typing in a field value, non-numeric values must be enclosed in double
quotes. These values are case and space-sensitive.
For example, you could enter Open in the query bar.
'Ticket Status' = ''Open''
4. Continue adding operators, field names, and field values until you have
completed the query statement. You can put spaces between operators,
field names, and field values, but you don’t have to.
For example:
'Ticket Status' = ''Open'' OR 'Ticket Status' = ''Escalated''
5. When you are ready to perform the query, select the query operation that
you want from the Query menu. The query operations are described in
the section Query Operations later in this chapter.
94
Action Request System User’s Guide for Windows—January 1996
4
Query Bar Format and Syntax
You must follow a set of formatting conventions when you build a query in the
query bar. You can use the relational operators and wild card symbols shown
in Table 4-1 and Table 4-2 in the query bar. You can also use the operators
shown in Table 4-3.
The preceding example, 'Ticket Status'=''Open'', finds only the ARs with a status
of “Open”. By itself, this may be the lowest common denominator in your
search but it may also provide you with far too many matches. To avoid the
frustration of going through all of them, you can refine your search by using
the query bar operators. Refining your query criteria helps you narrow down
the number of ARs you need to deal with when searching for a specific answer.
Using Operators in the Query Bar
You can use the operators shown in Table 4-3 in the query bar in addition to
the wild card characters described earlier in Using Wild Card Symbols.
Table 4-3
Operators Used in the Query Bar (1 of 3)
Operator
Action
AND
Logical AND of the result of two conditions (the result is true only if both conditions
are true). For example, 'Status'=''New'' AND 'Assigned-to'=''Andy'' would find all
new ARs assigned to Andy. You can use the symbols && instead of the word AND.
&&
OR
||
NOT
!
LIKE
Logical OR of the result of two conditions (the result is true if either condition is true).
For example, 'Status'=''New'' OR 'Assigned-to'=''Andy'' would find all new ARs and
all ARs assigned to Andy (no matter what their status). You can use the symbol ||
(two vertical lines) instead of the word OR.
Negates the condition that follows (if the condition is false, the result is true). For
example, NOT 'Status'=''New'' would find all ARs that are not new. You can use the
symbol ! (exclamation point) instead of the word NOT.
Performs a pattern search. For example, 'Submitter' LIKE ''Bob%ton'' would find all
ARs with a submitter name that begins with the letters “Bob” and ends with the
letters “ton” — such as Bob Compton and Bobby Fenton. The LIKE operator is useful
only with character and diary type fields.
Note, using square brackets and the LIKE operator works for flat files, Sybase, and
Ingres.Using square brackets and the LIKE operator does not work with Oracle or
Informix. Refer to Database Considerations in Chapter 4 of the Action Request System
Installation Guide for more information.
Reviewing and Modifying Action Requests
95
4
Table 4-3
96
Operators Used in the Query Bar (2 of 3)
Operator
Action
+
* Adds two integer or real values.
* Adds an integer interval to a time value.
* Concatenates two character strings.
For example, 'Create-date' > $DATE$ + (28800) would find all ARs that were
created after 8:00 am today. (28800 is the number of seconds in 8 hours.)
-
* Subtracts two integer or real values.
* Subtracts two time values (resulting in an integer).
* Subtracts an integer interval from a time value.
For example, 'Create-date' > $DATE$ - (604800) would find all ARs that were
created within the past week. (604800 is the number of seconds in one week.) This is
useful to include in a custom report that you run weekly that creates a report of all
ARs created in the past week.
*
Multiplies two integer or real values. For example,
'Quantity' * 'Price' > 50 finds all ARs where the contents of the Quantity field
multiplied by the contents of the Price field is over 50.
/
Divides two integer or real values. For example,
'Total Expenses' / 'Total Income' > 1 would find all ARs where the total amount
spent for expenses equaled the total amount brought in as income.
%
Modulo of two integer values (the remainder of a division of the values). Since a
percent sign is also a valid wild card symbol, the context when using a percent sign
determines how it is interpreted. For example, 'ID' % 2 = 1 finds all ARs with an odd
number in the ID field.
<
Matches contents that are less than the value. For example,
'Create-date' < ($DATE$ - 86400) would find all ARs created more than 24 hours
ago. (86400 is the number of seconds in 24 hours.)
>
Matches contents that are greater than the value. For example,
'Create-date' > "06/10/94 00:00:00" would find all ARs with Create-dates that are
newer than at midnight June 10, 1994.
!=
Matches contents that are not equal to the value. For example,
'Status' != "Closed" finds all ARs that aren’t closed.
<=
Matches contents that are less than or equal to the value. For example,
'Salary'<= 10000 would find all ARs where the contents of the Salary field is less
than or equal to 10000.
Action Request System User’s Guide for Windows—January 1996
4
Table 4-3
Operators Used in the Query Bar (3 of 3)
Operator
Action
>=
Matches contents that are greater than or equal to the value. For example, 'Createdate' >= "10/31/94" would find all ARs with Create-dates equal to or more recent
than October 31, 1994.
=
Matches contents that are exactly equal to the value. For example,
'Status' = 0 would find all ARs with a status value equal to the first selection value.
Operator Precedence
When you use multiple operators in constructing qualification criteria, they are
executed in the following order of precedence (in the following order that they
appear within the qualification):
1. ( )
2. !, NOT, - (unary minus)
3. *, /, %
4. +, 5. <, <=, >, >=, =, !=
6. && (AND)
7. || (OR)
If the same operator is included more than once in the same qualification (or
two operators of the same precedence are used in the same qualification), the
first time each operator is found going from left to right it is performed.
Query Bar Statement Conventions
Use the following conventions to construct a query statement in the query bar.
Reviewing and Modifying Action Requests
97
4
Fields
Enclose field labels in single quotes. Single quotes are automatically added
when you select fields from the Field List dialog box or when you select fields
by clicking on them in the query-by-example part of the window. For example:
'Short Description'
You can also reference fields by using their internal field ID. If you use the ID,
you must enclose it in single quotes. For more information about the field ID,
see the Action Request System Administrator’s Guide.
Note – If a field name contains a single quote, you must double the embedded
single quote (that is, use two single quotes). For example, if the field is named
“Submitter’s Phone Number” you need to enter it as 'Submitter''s Phone
Number'. This is done for you automatically if you select the field name from
the Field List dialog box or by selecting the label in the query-by-example
section.
Value
Enclose non-numeric values (including time and selection values) in double
quotes. For example: ''07/01/92''
You can use the special value $NULL$ (without quotes) to query for ARs that
have no value in a field. For example, to query for ARs that have not been
assigned (fields with no value in the Assigned-to field), you would enter:
'Assigned-to' = $NULL$
Selection field values can either be specified as the text value in quotes or the
numeric value or index not in quotes. For instance, if you have a Status field
with the following radio buttons: Open, Fixed, and Verified, to specify the
value of Open you can either enter Open or 0 since Open is the first selection
value in the selection field.
StatusHistory
Status History field items must have the following information and format
enclosed within single quotes:
• The name or ID of the Status History field (followed by a period).
• The name or index of the status value you want to match (followed by a
period).
The keyword USER (for the user who changed the AR to that status) or TIME
(for the time last changed to that status).
For example: 'Status-History.Fixed.TIME' < ''07/01/92''
or using field IDs: '15.3.1' < ''07/01/92''
98
Action Request System User’s Guide for Windows—January 1996
4
The correct syntax is entered for you automatically if you choose the Status
History field item from the Field List dialog box.
Examples of Query Statements
• Find all ARs that were submitted by someone other than the current user.
The example uses the not equal to operator (!=) to find instances where the
value in the Submitter field is not equal to the currently logged in user. Note
the use of the $USER$ keyword.
'Submitter' != $USER$
•
Find all ARs that were submitted after 10:00 am on the current day. The
example uses the greater than operator (>) to find ARs where the value of the
Create-date field is greater than the current day at 10:00.
'Create-date' > ''10:00:00''
•
Find all ARs that have been submitted for any problem having to do with
printing. The example uses the LIKE operator to perform a pattern search that
finds ARs with the word “Print” or “print” anywhere in the Submitted
Problem Type field. The example works for flat files, Sybase, and Ingres.
Using square brackets and the LIKE operator does not work with Oracle or
Informix. Refer to Database Considerations in Chapter 4 of the Action Request
System Installation Guide for more information.
'Submitted Problem Type' LIKE ''%[Pp]rint%''
•
Find all ARs with a Status of Released. Notice the spaces after the word
“Status” in the field specification. In this case, the spaces exist in the field
label as defined on the schema being used. Because the AR System
recognizes spaces that exist, the spaces must also be included in any
qualification statement for that field. If you use the Field List dialog box by
selecting the Fields button on the qualification bar, the spaces (and single
quotation marks) are added for you automatically.
'Status' = ''Released''
Query Operations
Once you specify the query criteria used to select the ARs on which you want
to perform an operation, you use the Query menu to select the operation. The
Query menu is shown in Figure 4-5.
Reviewing and Modifying Action Requests
99
4
Figure 4-5
Query Menu
You can select any of the following operations:
Table 4-4
Query Operations
Operation
Action
List
Displays a one-line summary of each AR.
Display
Displays a read-only view of each AR.
Modify
Individual
Displays an editable view of each AR.
Modify All
Displays a blank schema that allows you to make
modifications to all ARs that match the query criteria or
were selected.
Report
Opens a Report window that allows you to generate a
formatted report on the ARs that match the query criteria or
were selected.
Delete
Deletes ARs (administrator and subadministrator only).
When you select an operation, the system executes the search according to the
criteria you specified and opens a window that relates to the operation you
selected. Depending on the operation, you may need to perform additional
tasks. For example, if you select Report, you need to specify the report format.
(See Chapter 5, “Reports, for more information on report formats.)
100
Action Request System User’s Guide for Windows—January 1996
4
You can specify how your query operation results are sorted by selecting the
Sort Options menu item on the Actions menu. You can also specify the
maximum number of ARs to return in your query operation using the Max in
Query preference on the Preference dialog box which you can display by
selecting Preferences on the File menu and then selecting Query.
After performing an operation, you can return to the Query window and select
another operation (changing the criteria if you wish).
The results of each new query appear in a separate window, as illustrated in
Figure 4-6 on page -101. All windows remain open until you close them or log
in as a different user. You can also minimize any window.
Figure 4-6
Results of Multiple Query Operations
The following sections describe how to sort your query operation results as
well as how to specify the maximum number of ARs to return in your query
operation. They also describe the List, Display, Modify Individual, Modify All,
and Delete operations in detail. For more information about the Report
operation, see Chapter 5, “Reports.
Reviewing and Modifying Action Requests
101
4
Sorting Query Operation Results
You can specify a sorting order that affects how the results of your query
operations are displayed. You can specify up to five fields with each field
ordered either in ascending or descending order and you can define a different
sort order for each schema. Once you specify a sorting order, if you specified
Permanent in the Status field it remains in effect until you change it. You can
specify that the sort order take effect only in the next operation by specifying
Next Operation in the Status field. You can sort by any field with the exception
of status history, diary, or character fields with a maximum length of over 255
bytes.
Once you specify a sorting order, the next time any open Query List windows
with the Polling field set to On automatically reissues the query, the Query List
window changes to reflect the new sorting order. The next time you manually
reissue a query from a Query List window by selecting Refresh on the Query
menu, the Query List window changes to reflect the new sorting order. Also,
any Query List windows that you open after you specify or change the sorting
order reflect this new sorting order. For more information about opening new
Query List windows, or about automatically and manually reissuing a query
from a Query List window, see “Listing Action Requests” on page 106.
By default, all ARs are sorted by entry ID in ascending order, thereby listing all
ARs in ascending order by create date (oldest AR first with the newest AR
last). Once you specify a sorting order, you can disable it by selecting Disable
in the Status field. One example where you might want to sort the results of
your query operation is if you want the most recently entered AR at the top of
your query list, or to be the first AR in the Display or Modify Individual
window. To do this, you can list all ARs in descending order by entry ID or
create date. Figure 4-7 illustrates a Query List window with this type of
sorting.
102
Action Request System User’s Guide for Windows—January 1996
4
Figure 4-7
Query List Results in Descending Order
Another example would be if you were a Help Desk Manager and you needed
to produce a report that sorted all help call ARs first by who submitted them
(responsible employee), then by the status of the AR, and finally in descending
order by date (most recent AR first). To accomplish this, using the AR - HD
Calls schema, first sort by the Submitted by field, then by the Status field, and
finally by the Date field in descending order. (Since your AR System
administrator specifies the fields that are contained in a query list, to see all of
these fields in your Query List window, see your AR System administrator.)
Sorting like this allows you to see quickly the number of calls your employees
are logging and how many ARs they have in each status setting.
Figure 4-8 illustrates this type of sorting.
Reviewing and Modifying Action Requests
103
4
Figure 4-8
Sorted Report Results
If you needed to produce this report on a regular basis, you could create a
custom report and specify these sorting options to only go into effect when the
custom report is run. This way you can specify one sorting order for your
normal query operations and a separate sorting order for each of your custom
reports. For more information about specifying sorting options when creating
custom reports, see Chapter 5, “Reports.
To specify the sorting order in query operations:
1. Select Sort Options from the Actions menu to display the Field Sort Order
dialog box, as shown in Figure 4-9.
104
Action Request System User’s Guide for Windows—January 1996
4
Figure 4-9
Field Sort Order Dialog Box
2. Select the menu symbol to the right of the Field Name field.
All of the fields on the current schema that you can sort by are displayed.
3. Select the field you want to sort by.
4. Select either the Ascending or Descending Sort Order radio button next to
the Field Name field you just edited.
5. To delete a specified sorting criteria, delete the value in the Field Name
field.
6. Continue specifying up to five fields with their sort order.
The first field you select to sort by is the first criteria used for sorting, the
second field is the second criteria, the third field is the third criteria, the
fourth field is the fourth criteria, and the fifth field is the fifth criteria used
for sorting.
7. Select Permanent in the Status field to apply this sorting order to all
operations.
Select Next Operation to apply this sorting order to the next query operation
only, and then return to the previous sort order.
Select Disable to return to the default sort order. If no sort options are
specified or if Disabled is selected, the items in the query operations are
sorted in ascending order by entry ID.
8. Once you are finished specifying your field sort order, select the OK
button.
Reviewing and Modifying Action Requests
105
4
Specifying a Maximum Number of ARs
You can specify a maximum number of ARs that you want displayed when
doing one of the query operations. By doing this, you can control the number
of ARs that match your query criteria that are displayed at any one time.
Should you perform a query operation that matches more than this specified
maximum value, you receive a warning message letting you know that there
are more ARs that match your specified query criteria that are not being
returned in your results. Specifying a maximum number of ARs is useful if
issuing an unqualified query would return too many ARs and impact the
performance of your AR System by slowing down the server. For more
information about specifying a maximum number of ARs, see the Max in
Query desktop preference in the section entitled “Setting User Preferences” on
page 42 in Chapter 2.
Listing Action Requests
Select List from the Query menu (or select the List tool bar icon or type Ctrl+L)
to display a one-line description of each AR that matches the query criteria you
have defined, as shown in Figure 4-10.
Figure 4-10 Query List Window
106
Action Request System User’s Guide for Windows—January 1996
4
Your AR System administrator can specify which fields are displayed in the
Query List window for each schema and the order in which they are displayed.
Also any sorting options that you specify affect your Query List window. So, if
you perform a query list on two different schemas, they might not display the
same field contents. If your AR System administrator has not specified
different fields for display, and you haven’t specified any sorting options, you
see the contents of the Entry ID and Short Description fields. (The Entry ID and
the Short Description are required fields and therefore exist on all schemas.
Your AR System administrator may have changed the name of these fields, but
their contents still appear in the results of the List query operation when the
default list fields appear.)
Note – If a query operation results in a list of greater than 6000 items, a dialog
box appears asking if you want to view the first half of the list or the last half
of the list.
The number of matching ARs appears on the status bar below the list of
matching entries in the Query List window along with the time at which the
list was retrieved.
Selecting List is a convenient way to determine if the query criteria you have
specified produces too many ARs. If the number of ARs shown in the list is
unmanageable, you can return to the Query window to refine the query criteria
and re-display the query list until the list contains only the ARs you want to
work with.
You can manually or automatically update the list of ARs in a Query List
window to indicate any changes to the ARs that match the query criteria. You
can automatically update the list by selecting Polling Interval on the Query
menu and specifying after how many minutes you want the Query re-issued
and a new Query List displayed. You can manually update the list by selecting
Refresh on the Query menu or by pressing the Ctrl+Home key sequence. These
are useful if you use the list of matching ARs in a Query List window as your
list of things to do. For instance, by updating this list on a regular basis, it
always contains all new ARs that are assigned to you. Also, by updating this
list, you remove any ARs that have been assigned to someone else and are now
no longer your responsibility or that you have already addressed.
Reviewing and Modifying Action Requests
107
4
Note – Since updating your query list affects the performance of your server, we
recommend that under normal circumstances you automatically update your
query list at five minutes or greater intervals. If you find that you need to
update your query list more frequently, you can manually update it at any
time.
You can select specific ARs from the list and perform further Query operations
(Display, Modify Individual, Modify All, Report, or Delete) on just those
selected.
Like other Windows applications, you can use the up and down arrow keys
and the Page Up and Page Down keys to display different portions of the
Query list.
Note – You cannot edit information in the Query List window.
To use the Query List window:
108
•
•
To select an item in the list, click on the item. Selected items are highlighted.
•
To select more than one non-adjacent item, hold down the Ctrl key and click
on the items you want to select.
•
To select adjacent items, you can simply hold down the mouse button and
move the highlight from one item to the next.
•
To select a range of adjacent items, select the first item, then hold down the
Shift key as you select the last item in the range.
•
To perform another operation on selected items, with the items highlighted
select the operation you want from the Query menu. You can also open a
Display, Modify Individual, or Report window for an item by doubleclicking on the item. (Whether the double-click action opens a Display,
Modify Individual, or Report window is determined by your Double Click
on a Query List Item query preference. See “Setting User Preferences” on
page 42 in Chapter 2.)
To de-select an item, press Ctrl and click on the item to be
de-selected.
Action Request System User’s Guide for Windows—January 1996
4
To re-display query criteria:
To re-display the query criteria for this list, either:
•
Select Show Query from the Actions menu.
or
•
Type Ctrl+B.
This reloads the query criteria in to the Query window
You might want to do this to further refine the query criteria, if you found the
list included too many irrelevant ARs.
Note – When you select Show Query (or type Ctrl+B), the Query window
reappears in front of the Query List displaying the original query criteria.
To manually update the query list:
To manually update the query list to reflect any changes made to the ARs that
match the query criteria, either:
•
Select Refresh on the Query menu.
or
•
Press the CtrL+Home key sequence.
To automatically update the query list:
To automatically update the query list to reflect any changes made to the list of
ARs that match the query criteria, do the following:
1. Select Polling Interval on the Query menu.
2. On the Set Polling Interval dialog box select the On radio button in the
Polling field.
3. In the Polling Interval field specify the number of minutes after which
you want the query re-issued and the list updated. You can specify from 1
to 59 minutes.
The query list is automatically updated at the specified time interval as long
as the Query List window is displayed. Figure 4-11 illustrates the Set Polling
Interval dialog box.
Reviewing and Modifying Action Requests
109
4
Figure 4-11 Set Polling Interval Dialog Box
Displaying Action Requests
Select Display from the Query menu to view ARs that match the query criteria
defined in the active Query window or that are selected in an active Query List
window, as shown in Figure 4-12. You can also select the Display tool bar icon
or type Ctrl+D.
In a Query List window, you can display a subset of the listed items by
selecting only the items you want to display.
Figure 4-12 Display Window
110
Action Request System User’s Guide for Windows—January 1996
4
The Display window shows one AR at a time. Use the Previous and Next
Actions menu items to page through the list of ARs. You can also use the
Previous and Next tool bar icons or type the Ctrl+Left Arrow keys or Ctrl+Right
Arrow keys respectively. The total number of ARs to be displayed appears on
the status bar at the bottom of the window. If the number of ARs ready for
display is too large to be manageable, you can return to the Query window to
refine the query criteria and then re-display the ARs.
The Display window allows you to view the status history for each AR. The
status history shows the progress that has been made since the AR was
submitted. Select Show Status History from the Actions menu (or type Ctrl+H)
to view the status history.
You can trigger active links set up by the AR System administrator from within
the Display window. However, since the screen is read-only, the Set Fields
operation of active links will not be performed. For more information, see
“Using Active Links” on page 78 in Chapter 3.
Note – You cannot change information in the Display window. To modify an
AR, you must use the Modify Individual or Modify All operation (see
“Modifying Action Requests” on page 114).
To use the Display window:
To display the previous or next AR,
•
Select the Previous or Next tool bar icons or menu items from the Actions
menu.
or
•
Type Ctrl+Left Arrow keys or Ctrl+Right Arrow keys respectively.
To re-display query criteria:
To re-display the query criteria in the Query window,
•
Select Show Query from the Actions menu.
or
•
Type Ctrl+B.
Reviewing and Modifying Action Requests
111
4
To submit a similar AR:
To copy the contents of the Display window to a Submit window to submit a
new entry just like the current one,
•
Select Copy to Submit from the Actions menu
or
•
Type Ctrl+T.
A Submit window is opened and all field contents except any Diary fields are
copied from the Display window to the Submit window.
To review status history:
To review the history of status changes for the AR,
•
Select Show Status History from the Actions menu.
or
•
Type Ctrl+H.
To view the status history of an AR:
1. Display the AR in a Modify Individual or a Display window.
2. Select Show Status History from the Actions menu (or type Ctrl+H).
The Status History dialog box appears as shown in Figure 4-13.
3. To view the status history for other ARs, use the Previous and Next items
on the Actions menu, the Previous and Next tool bar icons, or type the
Ctrl+Left Arrow keys or Ctrl+Right Arrow keys while the Status History
dialog box is still open. The Status History dialog box changes to reflect
the status of the currently displayed AR.
112
Action Request System User’s Guide for Windows—January 1996
4
Figure 4-13 Viewing Status History
Reviewing Diary Entries
The Display window also lets you review all existing entries for a Diary field,
as shown in Figure 4-14 on page 114. Diary type fields are used to keep a
history of actions taken on an AR.
On the Display and Modify Individual windows, the diary symbol appears
different when the diary field contains information. The pages in the diary
symbol appear to contain text. This way, you can tell at a glance if the field
already contains information.
To review diary entries:
To display existing diary entries for a Diary field, use the mouse (or left button)
to select the diary symbol to the right of the field.
Reviewing and Modifying Action Requests
113
4
Select the Diary Editor
pop-up symbol.
The Diary Editor dialog box on Display
windows provides a view-only display of
previously entered diary items.
Figure 4-14 Viewing Diary Entries
Modifying Action Requests
Select Modify Individual or Modify All from the Query menu to modify the
contents of ARs that match the criteria defined in an active Query window or
that are selected in an active Query List window, as shown in Figure 4-15 on
page 115 (This illustration does not apply to Modify All). You can also select
the Modify Individual tool bar icon or type Ctrl+M to open a Modify Individual
window.
In the Query List window, you can select a subset of the listed items for
modification by highlighting only the items you want to modify.
114
Action Request System User’s Guide for Windows—January 1996
4
Figure 4-15 Modify Individual Window
You can choose to modify individual ARs or the entire group of ARs that
match the query criteria. The techniques used to modify information in an AR
are the same as the techniques for entering information in the Submit window.
For a detailed description, see “Filling in Fields” in Chapter 3.
If you choose to modify individual ARs, the Modify Individual window shows
one AR at a time. Use the Previous and Next tool bar icons, select the Previous
and Next items from the Actions menu or type the Ctrl+Left Arrow keys or
Ctrl+Right Arrow keys to page through the list of ARs to display the ones you
want to edit.
If you choose to modify all selected ARs, a blank AR template is displayed in
the Modify All Selected window. Fill in only the fields that you want updated
on every AR that meets the specified query criteria. For example, you may
want to change the status of all of the selected ARs to “Fixed”.
Reviewing and Modifying Action Requests
115
4
Note – Most active links set up by the AR System administrator may be
triggered from within either Modify window. However, active links that are
triggered when an AR is modified do not trigger from Modify All windows.
For more information, see “Using Active Links” in Chapter 3.
To modify individual ARs:
1. After defining the query criteria or selecting ARs from the Query List,
select Modify Individual from the Query menu, select the Modify
Individual tool bar icon, or type Ctrl+M.
The Modify Individual window appears (Figure 4-15).
2. Use the Previous or Next tool bar icons, select Previous or Next from the
Actions menu, or type the Ctrl+Left Arrow keys or Ctrl+Right Arrow keys to
display the AR you want.
3. Edit the AR as necessary.
4. When you have finished editing the AR, select Apply from the Actions
menu, select the Apply tool bar icon, or type Ctrl+A to save your changes.
Note – If you have made changes and not applied them and if you want to be
warned that you have not saved your changes when trying to look at another
AR, select the Confirm to Close Modify window confirm preference. For more
information about preferences, see the section entitled “Setting User
Preferences” in Chapter 2.
If you have not made any changes, the Apply menu item and tool bar icon
are grayed (not available).
5. After applying changes to an AR, you can use the Previous and Next
menu items, Previous and Next tool bar icons, or type the Ctrl+Left Arrow
keys or Ctrl+Right Arrow keys to display another AR to edit.
To modify all selected ARs:
1. After defining the query criteria or selecting ARs from the Query List,
select Modify All from the Query menu.
The Modify All Selected window appears showing a blank AR template.
2. Fill in the fields you want changed on every AR that meets the query
criteria or that is selected on the Query List.
116
Action Request System User’s Guide for Windows—January 1996
4
3. When you have finished filling in the fields that you want changed, select
Apply from the Actions menu, select the Apply tool bar icon, or type
Ctrl+A.
4. A message box appears showing the number of ARs that you are about to
modify. To complete the operation, select the Continue button. To exit
without changing the ARs, select the Cancel Modify button.
Note – The values you entered replace the currently defined values for every
AR that meets the query criteria or that is selected on the Query List.
Adding a New Diary Entry
Diary type fields are used to keep a history of actions taken on an AR.
Typically, you might want to update a diary field any time a notable change
has occurred that is not automatically captured in the Status History or in
another field.
Note – Diary entries from previous modifications of the AR cannot be edited;
they may only be viewed. If a diary field contains information, the diary
symbol looks like there is text written on the pages. If a diary field is empty,
the pages in the diary symbol look blank.
You can add new diary entries when you are modifying an AR using the Diary
Editor dialog box shown in Figure 4-16 on page 118.
Reviewing and Modifying Action Requests
117
4
This area of the Diary
Editor dialog box holds
previously entered items
that are now view-only.
This area is a text editor
for entering the new diary
item.
Figure 4-16 Diary Editor Dialog Box
To add a new diary entry:
If your text entry is short enough to be visible in the field, simply type into the
field. Otherwise:
1. Use the mouse (or left button) to select the diary symbol to the right of the
field. You can also press the F7 function key.
A Diary Editor dialog box appears (Figure 4-16).
2. To enter text, select in the Editor portion of the Diary Editor dialog box
and begin typing.
Note – You must select the Editor portion of the Diary Editor dialog box. The
Diary Text portion displays existing Diary entries and cannot be edited.
3. When you have finished, select the OK button in the Diary Editor dialog
box to save the new diary entry.
Deleting Action Requests
Select Delete from the Query menu to remove ARs from the database that
match the query criteria defined in the active Query window or that are
selected in the active Query List window. To specify the query criteria, see
“Defining Query Criteria” on page 86.
118
Action Request System User’s Guide for Windows—January 1996
4
Note – Only your AR System administrator or sub-administrator for a schema
can delete ARs. The Delete menu item is grayed out (not available) unless you
have administrator permission.
The Delete operation permanently removes ARs from the database. Deleted ARs
cannot be recovered unless a backup copy of the database is restored.
To delete ARs:
1. After defining the query criteria, select Delete from the Query menu.
The Delete dialog box appears, as shown in Figure 4-17, showing you how
many ARs will be deleted.
Figure 4-17 Delete Dialog Box
2. Select the OK button to permanently remove the selected ARs from the
database.
Selecting the Cancel button cancels the Delete operation and removes the
Delete dialog box. If you select the Cancel button, no ARs are removed from
the database.
Full Text Search Option
This section discusses some of the capability, performance, and administration
issues of full text search (FTS) in the AR System. The topics covered include the
following:
•
•
Introduction to FTS.
Who can perform a full text search.
Reviewing and Modifying Action Requests
119
4
•
How to use FTS to retrieve records, especially using the accrue operator (the
LIKE operator and comma separators) to search for matches.
What is Full Text Search?
Full text search (FTS) is an important and extremely useful feature of the AR
System. The FTS option lets administrators index character and diary fields for
faster searches and matches entries from FTS-indexed fields against the search
criteria you specify. Like database indexes, an FTS index can greatly decrease
the time required for a database search.
Having FTS capability allows you to search for key words regardless of the
underlying database, whether flat-file or relational. In contrast to only
searching fields in schemas that contain numeric data (for example, ID
numbers) or names (for example, submitters of tickets), indexing character and
diary fields for FTS lets you do searches of work diaries and long descriptions
of problems which some databases do not allow you to do directly.
Who Can Perform a Full Text Search?
You must have a floating or fixed FTS license to do searches in fields indexed
for FTS. FTS licenses are separate from AR System write licenses.
If you have a fixed FTS license, you can perform a search in an FTS-indexed
field without worrying about licenses not being available or license time-outs.
If you have a floating FTS license but no floating FTS licenses are currently
available, you will get a warning the first time you perform a database
operation in the User Tool. The system will then use the search capabilities of
the underlying database (if available). When a floating license becomes
available, you will be alerted with a note and will then be able to perform a full
text search.
Note – You can tell if a field is indexed for FTS by looking in context-sensitive
help. See Figure 4-18.
120
Action Request System User’s Guide for Windows—January 1996
4
Figure 4-18 Context-sensitive help showing full text options
How Do I Use FTS?
To use FTS to retrieve records, enter the search term in any field indexed for
FTS, just like an ordinary query. The big difference you will immediately notice
is how quickly the FTS operation retrieves records that match the search term.
Accruing and Weighting Results in an FTS
As mentioned earlier, accruing results of a search is a powerful FTS feature.
FTS does not limit you to searches for key words in FTS-indexed fields. You
also can use a special accrue operator (the LIKE operator with comma separated
words) to cause the AR System to “accrue” and retrieve from the database all
the ARs that contain any or all of the comma separated words. For more
information, “Using the Accrue Operator” on page 122.
Records that are retrieved in an FTS are assigned a “weight” by the FTS search
engine. WEIGHT is a number that varies from 0 to 100. With WEIGHT, the AR
System sorts the ARs in a query list using a “the more, the better” approach: if
you set the Field Sort Order in the User Tool to include WEIGHT in descending
order, the more search terms found in an AR, the earlier in the list it appears in
the set of retrieved ARs. The closer the weight number is to 100, the better it
matched the search criteria.
Reviewing and Modifying Action Requests
121
4
Sorting Records by Weight
Users can sort records retrieved in an FTS by weight, in descending or
ascending order, by selecting WEIGHT and the sort order in the Field Sort Order
window. For more information on setting the sort order, see “Sorting Query
Operation Results” on page 102.
Using the Accrue Operator
You can use the accrue operator (the LIKE operator with comma separators) to
search either in the Query bar or in any field indexed for FTS, as in the
following examples.
Note – You can use the accrue operator only with FTS-indexed fields.
122
Action Request System User’s Guide for Windows—January 1996
4
Query Bar Method
Use the accrue operator in the Query bar, according to the following syntax:
<field> LIKE "ntclientd, notifier, ntserverd"
The accrue operator causes the AR System to retrieve ARs that contain one or
more of the search terms, ntclientd or notifier or ntserverd. Remember that an
FTS also returns weight information that is a function of the number of
occurrences found.
You can also use the % wildcard for an FTS with the accrue operator, according
to the following syntax:
<field> LIKE "ntcli%, notifier, ntserv%"
You can include FTS and non-FTS fields in a query, as in the following:
<field> LIKE "ntclientd, notifier, ntserverd" AND ‘Create-date’ > "01/01/95"
This query would retrieve all ARs that contained any of the search terms
ntclientd or notifier or ntserverd and that were created after January 1, 1995.
Note – Remember that some queries work better than others. If you receive
unexpected results or an RPC time-out, try reformulating your query.
Query-by-Example Method
Enter a QBE in any field indexed for FTS, according to the following syntax:
ntclientd, notifier, ntserverd
Be aware that if the QBE Match property is set to Equal in the Field Properties
window, you must do one of the following to use the accrue operator:
•
•
Add a wildcard to the value, for example, ntclientd%, notifier%, ntserverd%.
Use the Query bar to enter the accrue operator.
Limits in Doing an FTS
There are certain limits in doing an FTS, including the following:
•
You cannot do an FTS search on periods, exclamation marks, question marks,
or double quotes.
Reviewing and Modifying Action Requests
123
4
•
Your search phrase cannot use words from the Ignore Words List. For
example, if the word the is in the Ignore Words List, searching on the phrase
the database in the Short-Description field would not return any records.
For more information, “Ignore Words List” on page 124.
•
If searching for punctuation like commas or dashes, you must use doublequotes to include them in the search string. For example, if you are
searching for the phrase database, remedy from the Short-Description field,
you would enter the following in the Query bar:
‘Short-Description’ LIKE "%" "database, remedy" "%"
Using Query By Example, you would enter the following:
"database, remedy"
An FTS treats any phrase in double quotes, including commas or dashes, as
a literal string and retrieves them accordingly.
•
In queries that use FTS, be aware that newly submitted or modified ARs
might not appear immediately in the query list. There are sometimes brief
delays from the time the AR is submitted or modified to the time that the
AR is available to access.
Ignore Words List
The AR System administrator can tell the FTS engine to ignore frequently-used
words (such as and, the, because, and so on) or words that you do not want
indexed. Adding entries to the Ignore Words List saves space in the index
directory as well as speeds up full text searches. The FTS option comes with a
default set of ignore words that you can modify as needed.
Be aware that searching for phrases that contain words from the Ignore Words
List will not find any matching entries. For restrictions on full text search, refer
to the Action Request System Administrator’s Guide.
Efficient Full Text Searching
When searches involve a combination of Full Text and fields not Full Text
indexed, it is most efficient to group the search clauses on Full Text indexed
fields together using parenthesis.
For example, the query:
124
Action Request System User’s Guide for Windows—January 1996
4
('Status' = "New" AND 'Short Description' LIKE "network%") AND 'Long
Description' LIKE "network%"
would be more efficient if arranged as follows:
'Status' = "New" AND ('Short Description' LIKE "network%" AND 'Long
Description' LIKE "network%")
Setting Query Window Preferences
You can control several aspects of how the Query window looks and acts by
selecting Preferences from the File menu in the User Tool Main window. Using
the Query preferences, you can set fields to be cleared, loaded with your
default values, or retain their previous contents after each successful query,
specify a maximum number of ARs to return in a query operation, control
whether or not the query bar is visible, and specify the action you want to take
place after double-clicking on a query list item. For more information on how
to set Query window preferences, see “Setting User Preferences” in Chapter 2.
Reviewing and Modifying Action Requests
125
4
126
Action Request System User’s Guide for Windows—January 1996
Reports
5
In addition to the query operations described in the previous chapter, you can
also generate reports and statistics based on the ARs that match your search
criteria. This chapter describes how to define the format for a report you want
to generate and how to send the report to the screen, to a printer, to a file, or to
another application. It also describes how to define a set of statistics that you
are interested in and generate a report of those results.
This chapter includes information about the following topics:
•
•
•
•
•
•
•
Selecting fields.
Setting report layout.
Specifying the sorting and grouping of fields.
Generating statistics.
Setting the page setup and report options.
Saving, using, and modifying custom reports.
Generating report output.
Generating Reports
For any query that returns at least one entry, you can generate a report by
doing one of the following:
•
Selecting Report from the Query menu.
127
5
•
•
Selecting the Report tool bar icon.
Typing Ctrl+R.
A Report window appears, as shown in Figure 5-1.
Figure 5-1
Report Window
The Report window lets you design a report, save and modify custom reports,
and specify the type of output you want. When designing, you can choose an
existing custom report or experiment with a new report until you are satisfied
with it. Once you are happy with your report, you can save the format as a
custom report or create your output and send it to the screen, a file, to the
printer, or to another application.
Note – If you want to create a report with a more sophisticated format, you can
export the report to a file and import the resulting file into a desktop
publishing application or third party SQL report writer. See the section
“Formatting a Report to use in Another Application” on page 133.
128
Action Request System User’s Guide for Windows—January 1996
5
To generate a report:
1. After defining the query criteria in a Query window or selecting ARs from
a Query List window, select Report from the Query menu, select the
Report tool bar icon, or type Ctrl+R.
The Report window appears (Figure 5-1).
2. To use a previously saved custom report, select the report name from the
Custom Report list. See “Using Custom Reports” on page 147 for more
information.
3. To create a new report, select <<<New Report>>> from the Custom Report
list. To specify fields to be included and to set the report layout for a new
report, select the Design button and enter information in the Report
Design dialog box as described in “Designing Reports” on page 129.
4. To specify how to sort and group the fields in a new report, select the Sort
button on the Report Design dialog box. See “Sorting and Grouping
Records in a Report” on page 136 for more information.
5. To generate statistical information about the ARs that match the query
criteria in a new report, select the Statistics button on the Report Design
dialog box. See “Generating Statistics” on page 139 for more information.
6. To change the default settings for the page layout of a new report, select
the Page Setup button on the Report Design dialog box. See “Defining
Page Setup and Report Options” on page 143 for more information.
7. Once you are satisfied with the report format, you can send the report
output to the screen, to a file, to a printer, or to another application. See
“Generating Report Output” on page 152 for more information.
Designing Reports
Each time you generate a new report you can select the fields that you want to
include in the report and choose whether to display the fields as a list of
records, in columns, or in a compressed text format. You can also determine
what each page of your report will look like by specifying fields to sort and
group by, generating statistics on the fields in your report, defining margins,
headings, footers, and other page layout specifications and output options. You
design reports using the Report Design dialog box, shown in Figure 5-2.
Reports
129
5
Figure 5-2
Report Design Dialog Box
Selecting Fields
The Report Design dialog box shows a list of the fields from the current
schema in the upper half of the dialog box. As you select the fields that you
want to include in the report you are designing, the selected fields appear in
the Selected Fields list in the lower half of the dialog box. As you select and
add fields to be included in the report, you can also specify an alternate label
to be used for the field and the output width of the field.
To select fields for a report:
1. In the Report window, select the Design button.
The Report Design dialog box appears (Figure 5-2).
2. In the Report Design dialog box, select the fields you want to include in
the report from the list of fields in the upper half of the dialog box using
any of the following methods:
•
130
Highlight the field name by clicking on it with the mouse and then select
either the Add Before button, to add it to the Selected Fields list before any
other fields that are already selected, or the Add After button, to add it to
the Selected Fields list after any other fields that are already selected.
Action Request System User’s Guide for Windows—January 1996
5
•
Double-click on the field name to add it to the Selected Fields list after any
other fields that are already selected.
•
You can highlight more than one adjacent field at once by holding down the
mouse button and dragging the mouse from one field to the next or by
selecting the first field, holding down the Shift key, and then selecting the
last field in the set of adjacent fields. (To de-select a single item when more
than one is selected, hold down the Ctrl key as you select the item you want
to de-select.) Use the Add Before or Add After button to add the selected
fields to the Selected Fields list.
•
You can highlight non-adjacent fields by highlighting the first field, then
holding down the Ctrl key as you select one or more additional fields. Use
the Add Before or Add After button to add the selected fields to the Selected
Fields list.
3. To delete fields from the Selected Fields list, highlight the field or fields in
the Selected Fields list then select the Delete button.
4. To modify the label or the width for a selected field, highlight the field in
the Selected Fields list. The current label and width appears in the Report
Label and Width fields. Modify the values as desired. The information is
updated as soon as you perform another operation, such as selecting or
adding another field.
5. Once you have selected the fields for your report, you can define sort
options or statistics, page setup, or print options. See the following
sections for information.
Setting the Report Layout
You can format a report as a list of records, in columns, as compressed text, in
a Comma Separated Value format, in AR Export format, or for use with
another application. You determine which format by selecting either Record,
Column, or Compressed Text from the Format drop down list box on the
Report Design dialog box, by saving it with the Comma Separated Report, or
AR Export file type on the Report File dialog box, or by selecting the
Application button on the Report window.
Reports
131
5
Formatting a Report by Records
The Record format lists the fields for each AR (record), using one or more
blank lines, a specified character, or a page break (depending on your Record
Separator character option setting) to separate each AR. You can select the
fields that you want to include in the report. Records appear as a list of field
labels followed by the field contents for that AR, as shown in the example in
Figure 5-3.
Figure 5-3
Report Formatted by Record
Formatting a Report in Columns
The Column format displays the field labels as column headings and displays
information from each AR in a separate row, as shown in the example in
Figure 5-4. You can select the fields that you want to include in the report. If
you specify Wrap for the Long Field Format field on the Report Options dialog
box, any information that does not fit on a single line is continued on the next
line within the same column. Therefore, a “row” may consist of more than one
line of actual output. If you specify Truncate for the Long Field Format field
and the information in a field does not fit in the column width you defined for
132
Action Request System User’s Guide for Windows—January 1996
5
the field, the information is truncated. For information about this and other
report options, see the section “Defining Page Setup and Report Options” on
page 143.
Figure 5-4
Report Formatted in Columns
Formatting a Report to use in Another Application
There are four ways to format a report:
•
•
•
•
By records.
By columns.
As Comma-separated values (CSV).
As compressed text.
After you choose a format you can send report to a file, to the screen, to the
printer, or to an application (File and Application buttons on the tool bar in
report window).
Using DDE allows you to format the report, start the other application, and
transfer your report to this other application ready to be manipulated.
Reports
133
5
Compressed Text and Comma Separated Reports
All report output files are in plain ASCII format and are suitable for loading or
importing into another application. If you want to create a report that will
produce results that you can import into another application, such as a desktop
publishing or spreadsheet application, you can save the report in a compressed
format with commas between the columns, or in a compressed format with
white space or any other specified character between the columns. Many
desktop publishing applications accept Comma Separated files as input.
You can create your custom report in a compressed format by:
•
Selecting Compressed Text in the Layout field on the Report Design dialog
box and then by specifying any character to appear between the columns
using the Column Separator Character Definitions field on the Report
Options dialog box.
You can save the report in a Comma Separated file by:
•
Saving it with a file type of Comma Separated Files (filename extension of
.csv) on the Report File dialog box. For information about saving a report
with a .csv filename extension, see the section “Saving a Custom Report” on
page 148.
Figure 5-5 shows a report with a Compressed Text layout with a comma
specified in the Column Separator Character Definitions field.
Figure 5-5
134
Report Formatted in Compressed Text Format
Action Request System User’s Guide for Windows—January 1996
5
Using DDE to send a Report to Another Application
If you want to create a report to send to another application using DDE, you
need to provide the appropriate information in the DDE.ini file, select the
Enable Report to Application report user preference, and then select the
Application button on the Report window. The other application’s window
becomes active, displaying your DDE formatted report ready for you to work
on. For more information on report user preferences, see Chapter 2, “Getting
Started with the User Tool,” and for more information on creating a DDE
formatted report, see the section “Generating Report Output” on page 152.
Formatting a Report in order to Export ARs
If you want to create a report in order to export ARs, save the report with the
file type of AR Export (filename extension of .arx) on the Report File dialog
box. This exports the records that match the query criteria. The records are in
an archive format that is compatible with the arimport program. For more
information about saving files in the AR Export format, see the section
“Saving a Custom Report” on page 148.
To set the report layout:
1. In the Report window, select the Design button.
The Report Design dialog box appears, as shown in Figure 5-2.
2. Add fields to the Selected Fields list as described in the previous section
“Selecting Fields.”
3. To specify the report format, select Record, Column, or Compressed Text
from the Format drop down list box at the bottom of the screen.
4. To define sorting and grouping options, see the next section “Sorting and
Grouping Records in a Report.”
5. To generate statistics, see the section “Generating Statistics” on page 139.
6. To define page layout or report options such as the column separator, refer
to “Defining Page Setup and Report Options” on page 143.
7. Select the OK button.
A prototype of your report format appears in the Sample Report area at the
bottom of the Report window, as shown in Figure 5-6.
Reports
135
5
Figure 5-6
Report Window with Prototype of Formatted Report
Sorting and Grouping Records in a Report
By default, the ARs in a report are sorted using the sorting order as defined by
selecting Sort Options from the Actions menu. You can change the sorting
order or specify grouping for a report by selecting Sort on the Report Design
dialog box. This is useful if you want to create a custom report that sorts fields
a certain way, visually separates each group in the report, or performs
statistical calculations on the ARs in the report.
You can sort by up to five fields in your reports with each field ordered either
in ascending or descending order.
You can also group by the same five fields that you can sort by in a report.
Grouping lets you visually separate each group and lets you perform statistical
calculations on each group. This allows for the creation of a more readable and
therefore more usable report. If you want to group by any of the subordinate
fields, all of the superior fields are also grouped (Group1 is the most superior
field while Group5 is the most subordinate field).
Figure 5-7 illustrates this type of report.
136
Action Request System User’s Guide for Windows—January 1996
5
Figure 5-7
Grouping Query Results in a Report
Using the Page break per Report option, you can create a report that places all
ARs with the same field value specified by Group1, Group2, Group3, Group4,
or Group5 on the same page, place each individual AR on a separate page, or
not specify any specific page break. This provides the visual separation that
helps to make a report easier to read.
Using the Column Titles per Report option, you can create a column formatted
report that prints column titles above Group1, Group2, Group3, Group4,
Group5, each AR, at the top of each page, or none at all. You can specify
column titles using the Column Title field on the Report Options dialog box.
Being able to print column titles where you want them adds to the usefulness
of your report. For more information about report options, see “Defining Page
Setup and Report Options” on page 143.
Along with being able to print different groups on different pages, you can
perform statistical calculations on the ARs within each group. You can perform
any of the five statistical operations on any of the five groups and you can
specify that the statistical results be printed on one line, on more than one line,
or under the appropriate column in the report. For more information about
calculating statistics, see “Generating Statistics” on page 139.
Reports
137
5
A good example of where grouping and performing statistic calculations
would be very useful is if you needed to check on the overall status of a
particular product. You could group first by the product (SW Version field),
then by the priority (Assigned-Priority field), and finally on the status (Ticket
Status field), and then you could print the total number of ARs in each
specified Status setting. You can do all of this by specifying the SW Version
field as the first field to sort by and then to be Group1, then sort by the
Assigned-Priority field and select it to be Group2, and finally sort by the Ticket
Status field and select it to be Group3. You can then specify that the statistical
Count operation be performed for each Status setting and that those results be
printed after the third group (Group3 being the Ticket Status field) in the
report. You can also specify that all ARs with the same Ticket Status setting be
printed on a separate page.
The sorting and grouping options specified by the Report Field Sort Order
dialog box are stored as part of the custom report, guaranteeing that the
custom report will be sorted the same way each time it is used regardless of
what the query sorting order is set to at the time the report is created. For more
information on specifying the query sort order see Chapter 4, “Reviewing and
Modifying Action Requests.”
To specify report sorting and grouping order:
1. Select Sort on the Report Design dialog box to display the Report Field
Sort Order dialog box, as shown in Figure 5-8.
Figure 5-8
Report Field Sort Order Dialog Box
2. Select the drop down list box symbol to the right of the Field Name field.
All of the fields on the current schema that you can sort by are displayed.
3. Select the field you want to sort by.
138
Action Request System User’s Guide for Windows—January 1996
5
4. Select either the Ascending or Descending Sort Order radio button next to
the Field Name field you just edited.
5. If you want to group by this field, select the Group By field (Group1,
Group2, Group3, Group4, or Group5) next to the Field Name and Sort
Order field you just edited.
6. Continue specifying up to five fields.
7. Once you are finished, select the OK button.
Generating Statistics
For any query that returns at least one entry, you can generate a statistical
summary by selecting the Statistics button on the Report Design dialog box.
There are five statistical operations you can perform:
Table 5-1
Statistical Operations
Operation
Description
Count
Tallies the number of ARs that were selected by the query
criteria.
Sum
Sums specified fields or the arithmetic relationship between
fields.
Average
Averages specified fields or an arithmetic relationship
between fields.
Minimum
Provides the minimum value for a specified field or an
arithmetic relationship between fields.
Maximum
Provides the maximum value for a specified field or an
arithmetic relationship between fields.
If you do specify a field and you specify Column for the report layout, the
statistical count result is displayed under the corresponding column. For all
other statistical operations, if the field is an expression with at least one
variable and you specify Column for the report layout, the statistical results are
displayed under the first field in the expression.
Reports
139
5
The other four operations can only be applied to numeric, and date and time
fields. The arithmetic operators (+, -, *, /, and %) are used the same way as in
the query bar (see “Using Operators in the Query Bar” in Chapter 4).
Specifying Statistics
You define statistics one at a time using the procedures that follow.
To specify statistics:
1. On the Report Design dialog box, select the Statistics button.
The Statistics dialog box appears, as shown in Figure 5-9.
Select the
operation.
Select the fields you Type arithmetic
operators, if
want from the
needed.
Expression menu.
Type a label for Select to
specify what
the statistic.
to compute
the statistics
on.
Select to
specify how to
display the
statistical
results.
Select Add
to add the
new statistic
to the list.
Figure 5-9
Specifying Statistics
2. Select an operation from the Operation drop down list box (Count, Sum,
Average, Minimum, Maximum).
140
Action Request System User’s Guide for Windows—January 1996
5
3. Select the fields you want as part of the statistic by displaying the
Expression drop down list box and selecting the field. The selected field
appears in the Expression field. Enter arithmetic operators, if appropriate,
between fields. If you are doing a Count operation and your report is
column oriented, you can use any field that is in the report even if it does
not appear in the Expression menu. In this case, the field you enter is the
column under which the statistic is printed. Just select the Expression
field and type.
For example, if you are finding the average time it took for an AR to go from
the New to Fixed status, you would specify:
'Status-History.Fixed.TIME' - 'Status-History.New.TIME'
4. In the Label field, type the label for this statistic.
For example:
Average Time to Fix =
Labels can be a maximum of 128 characters and can include any characters
(including blanks). Include blank spaces after the label to provide space
between the label text and the statistic in the actual display or printout. You
cannot use tabs since they take you to the next field. But you can include a
tab in the label by using the tab special character. You can use any of the
following special characters in the Label field:
\b
\n
\t
\\
\<nnn>
Backspace
Return
Tab
Backslash
ASCII character <nnn>
You can specify the value of a field by specifying the field name within
dollar signs ($fieldname$). This is especially good to show field values when
you have grouped by a field and are reporting statistics per group.
5. You can specify that the statistics be computed for the entire report, or for
any one of the five possible groups by displaying the Compute on drop
down list box and selecting the appropriate option.
Reports
141
5
6. Select Single Line in the Layout drop down list box to display the
statistical results for each value in the Compute on field in one line.
Select Multiple Lines to display the statistical results for each value in the
Compute on field each on their own line.
Select Column to display the statistical results for each value in the
Compute on field at the bottom of the column of the field specified by the
Expression field. Column is only valid for a column formatted report.
7. Select the Add button to add the statistic to the list of statistics you are
specifying.
The definition for the statistic is added to the window in the lower half of
the dialog box.
8. To modify a statistic you have previously specified, select the statistic in
the list in the window, make your modifications in the upper half of the
dialog box, and then select the Modify button.
9. To delete a statistic you have previously specified, select the statistic in
the list in the window and select the Delete button.
10. When you have finished specifying the statistics you want, select the OK
button.
11. Select the Cancel button to remove the Statistics dialog box without
applying any changes.
Note – Only fields with values are included in the statistical results. If some
ARs do not have a value for a field specified in a statistic, a message warns you
that one or more fields contain a NULL value. The statistic result you receive is
computed only for entries that have valid data for the fields in your statistics
request.
Exporting Statistics
If you are preparing to export a report with statistics to a spreadsheet or
desktop publishing application, you should choose labels and line spacing
appropriately. Commas, tabs, and spaces are commonly used field delimiters
for data to be imported into a spreadsheet.
142
Action Request System User’s Guide for Windows—January 1996
5
Defining Page Setup and Report Options
You can define the page setup and report options independently for each
report you generate. Page setup properties are basic page layout controls, such
as the title for the report, margin specifications, and page length and width.
Report options allow you to change the column, record, and column title
separator characters that are used for the report; specify titles for each column
in a column formatted report; specify whether to wrap or truncate the contents
of long fields; and specify whether or not you want a page break after each AR.
Defaults for some of the page setup properties and report options are defined
using the Preferences item on the File menu, as described in “Setting User
Preferences” in Chapter 2. You can override the defaults for any report by
selecting the Page Setup or Options button on the Report Design dialog box
before you generate the report.
Note – When sending a report to another application using DDE, the report
preferences, page setup, and options are ignored. If you specified a column
separator character as a report preference or report option, it is ignored and the
value in the Format field in the dde.ini file is used instead. For more
information about DDE formatted reports, see the section “Generating Report
Output” on page 152.
To define page setup:
1. In the Report Design dialog box, select the Page Setup button.
The Page Setup dialog box appears, as shown in Figure 5-10.
Figure 5-10 Page Setup Dialog Box
Reports
143
5
2. Specify the page setup properties you want for the report.
Note – When defining the header, footer, and title, you can use the keywords
mentioned in “Using Keywords” in Chapter 3, with the exception of $DEFAULT$
and $NULL$. In addition, a special reporting keyword, $PAGE$, is available so
that you can include a page number.
The Page Setup dialog box allows you to specify the following:
Title
The report title that appears only on the first page of your report
(centered). The maximum is 1024 characters. If the title is longer
than the number specified by the Char per Line property, the
title is truncated.
Header
The information that appears at the top of each page in your
report. The header may be a maximum of 1024 characters and is
left justified on the page. If the header is longer than the number
specified by the Char per Line property, the header wraps to the
next line.
Footer
The information that appears at the bottom of each page in your
report. The footer may be a maximum of 1024 characters and is
left justified on the page. If the header is longer than the number
specified by the Char per Line property, the footer wraps to the
next line.
Left Margin
Specifies the left text margin (the number of blank character
units from the left edge of the page).
Right
Specifies the right text margin (the number of blank character
Margin
units from the right edge of the page).
Top Margin
Specifies the number of blank lines at the top of each page of
your report (including the header, if any).
Bottom Margin
Specifies the number of blank lines at the bottom of each page of
your report (including the footer).
Number of Lines Specifies the number of lines for each page. This setting
determines the location of the header and footer on the page.
(This setting is used for reports sent to the screen or to a file. For
printed reports, this information is provided by the printer
setup.)
Char per Line
The line length (specified in character units). This setting is used
for reports sent to the screen or to a file. For printed reports, this
information is provided by the printer setup.
144
Action Request System User’s Guide for Windows—January 1996
5
3. Select the Printer Setup button to modify the print properties for this
report.
The Print Setup dialog box appears, as shown in Figure 5-11.
4. Modify the printer selection, paper size, page orientation, and printer
options as required then select the OK button.
Figure 5-11 Print Setup Dialog Box
5. When you have finished specifying page setup properties, select the OK
button to accept the settings. (Selecting the Cancel button closes the
dialog box without saving any changes.)
To set report options:
1. In the Report Design dialog box, select the Options button.
The Report Options dialog box appears, as shown in Figure 5-12.
Reports
145
5
Figure 5-12 Report Options Dialog Box
2. Specify the report options you want for the report.
The Report Options dialog box allows you to specify the following:
Page Break Per
Column Titles Per
Column
146
Specifies whether or not to force a page break (include a form
feed character) after each AR, after groups (Group1, Group2,
Group3, Group4, or Group5), after each Page as defined by the
Lines Page preference, or none at all (None). None is the default
value.
Specifies whether to provide a column title at the beginning of
each page (Page), each AR, each Group (Group1, Group2,
Group3, Group4, or Group5), or not at all (None). If you choose
None, your prototype report in the Report window appears
blank. This setting only works in column and compressed text
formatted reports.
Specifies the character that is used for this report as the
separator between columns in a column and compressed text
formatted report. The default value is a space. Besides any
alphanumeric character, you can use any of the following
special characters:
\bBackspace
\nReturn
\tTab
\\Backslash
\<nnn>ASCII character <nnn>
Action Request System User’s Guide for Windows—January 1996
5
Record
Column Title
Long Field Format
Specifies the character that is used for this report as the
separator between records (ARs) in a record formatted report. If
this is blank, the default is a blank line.
Specifies the character that is used for this report as the
separator between the column title and the rest of the report.
This setting only works in column formatted reports. The
default value is a - (hyphen).
Specifies whether or not long fields are wrapped to the next line
within the same column. Specifying Wrap causes long fields to
wrap to the next line within the same column, while Truncate
cuts off long field contents once it fills up the specified width of
the field as specified on the Report Selected Fields window. This
setting only works in column formatted reports.
3. When you have finished specifying report options, select the OK button
to accept the settings. (Selecting the Cancel button closes the dialog box
without saving any changes.)
You are now ready to send your report to the printer, to a file, to another
application, or to the screen. See “Generating Report Output” on page 152. You
can also save your report as a custom report that you can use at any time in the
future. See the section that follows, “Using Custom Reports.”
Using Custom Reports
Custom reports are reports that you design for a specific purpose and save so
that you can generate a report in that custom format at any time you desire.
You can create a new custom report any time you define a new report or after
you modify an existing custom report. Once you create a custom report, you
can recall and use it any time you are in the Report window.
You create a custom report simply by defining a report as you normally would,
then selecting the Save button in the Report window. The Save Custom Report
dialog box appears allowing you to save your report. The new report is added
to the Custom Report Name list in the Report window. You can then select and
run the custom report at any time.
You can share your custom reports by either copying your custom report files
or by accessing custom reports in any directory specified by your AR Path
preference. For more information about sharing custom reports and the AR
Path preference, see the section “Starting the User Tool” in Chapter 2.
Reports
147
5
Note – Custom report files that contain printer setup information (*.arp) are
not shareable. This is because the Printer Setup information may not be true
across all PC's.
Saving a Custom Report
At any time during the process of defining a report, even after viewing the
report output, you can save a report as a custom report.
To save a custom report:
1. In the Report window, select the Save button.
The Save Custom Report dialog box appears, as shown in Figure 5-13.
Figure 5-13 Save Custom Report Dialog Box
2. Enter the report name in the Name field.
If you use the name of an existing report, you receive a prompt asking if you
want to overwrite the existing file. If you say yes, the existing report will be
overwritten when you select OK. If you say no, the custom report is not
saved and you must supply a different report name.
3. Enter the directory where you want to save this custom report by either
typing directly into the Path field or by selecting the Browse button and
selecting a directory on the Browse Directories dialog box.
148
Action Request System User’s Guide for Windows—January 1996
5
Note – You can save a custom report in a directory that is not specified by your
AR Path preference. In this case, a dialog box appears, asking if you want to
add the new directory to your AR Path preference. If you select no, you can not
access your own custom report unless you later added the directory to your
AR Path preference definition.
4. Enter information that describes the report in the Help Text field. This
information appears next to the name of the custom report in the custom
report list.
5. Select the OK button to save the new custom report format.
The report appears with other custom reports in the Custom Report Name
list on the Report window, as shown in Figure 5-14.
Figure 5-14 Custom Report List
Note – The saved custom report includes the fields to be included in the report,
their order, labels, and size information, and any sorting options, statistics,
properties, and report options that you have defined.
Using a Custom Report
You can use a custom report any time you are in the Report window.
Reports
149
5
To use a custom report:
1. Select the report you want from the Custom Report Name list by clicking
on the report name.
The Custom Report Name list contains all custom report files that are in all
directories defined in your AR Path preference.
The custom report is loaded into the Report window with the report
prototype visible. The custom report layout and page setup are applied to
the set of ARs defined in your query criteria.
2. Select an output option. (See “Generating Report Output” on page 152.)
Modifying a Custom Report
You can modify a custom report at any time. Simply select the report you want
to start with and then make any changes you desire.
To modify a custom report:
1. Select the report you want from the Custom Report Name list by clicking
on the report name.
The Custom Report Name list contains all custom report files that are in all
directories defined in your AR Path preference.
The custom report is loaded into the Report window with the report
prototype visible. The custom report layout and page setup are applied to
the set of ARs defined in your query criteria.
2. Select Design button. Report Design dialog box appears. Modify any
aspects of the report as you would when first specifying a report.
3. Select the Save button to open the Save Custom Report dialog box.
4. Type the name or select the name from the Name drop down list box, edit
any help text for the new report, then select the OK button.
If you use the name of an existing report, the report is modified according to
the changes you just specified.
If you enter a new name for the report, a new report is added to the list of
reports in the Custom Report Name list.
150
Action Request System User’s Guide for Windows—January 1996
5
Modifying the Name or Help Text of a Custom Report
You can modify the name and help text of a custom report any time you are in
the Report window.
To modify a custom report name or help text:
1. Select the Manage button in the Report window.
The Manage Custom Reports dialog box appears, as shown in
Figure 5-15.
Figure 5-15 Manage Custom Reports Dialog Box
2. Select the directory to search for existing custom report files by selecting
the drop down list box symbol and selecting the custom report from the
drop down list box. The drop down list box displays all directories
defined in your AR Path preference.
Selecting All displays all custom reports found in all directories defined in
your AR Path preference.
The Reports list contains all custom report files found in the directories
displayed in the Search Path field.
3. Select the report whose name or help text you want to modify in the
Reports list. The current path, name, and help text appear in the Current
Path, New Name, and Help Text fields.
Reports
151
5
4. Modify the New Name and Help Text fields as appropriate and select the
Modify button.
5. When you have finished modifying report names and help text, select
Close to close the Manage Custom Reports dialog box. The report name
and help text you just modified appears in the Custom Report list.
Deleting a Custom Report
You can delete a custom report any time you are in the Report window and
have permission.
To delete a custom report:
1. Select the Manage button to open the Manage Custom Reports dialog box
as described previously.
2. Select the directory to search for custom report files by selecting the drop
down list box symbol and selecting the custom report from the drop down
list box. The drop down list box displays all directories defined in your
AR Path preference.
Selecting All displays all custom reports found in all directories defined in
your AR Path preference.
The Reports list contains all custom report files found in the directories
displayed in the Search Path field.
3. Select the report you want to delete from the Reports list and select the
Delete button to delete the custom report. (If you have selected the
Confirm to Delete Custom Report preference setting, a confirmation box
appears. Confirm to continue with the delete operation.)
The report is no longer listed in the Report window.
Generating Report Output
You can send reports to the screen, to a formatted ASCII file, to a printer, or to
another application. On the screen, a report appears in a scrollable window, as
shown in Figure 5-16. When you send reports to an ASCII file, you can choose
to append the report to a file or overwrite an existing file. When you send a
report to a file, you can save the file as a Report File (*.rep), Comma Separated
File (*.csr), or AR Export File (*.arx).
152
Action Request System User’s Guide for Windows—January 1996
5
To send a report to another application you should activate “Enable Report to
Application” option in the Report preferences.
Figure 5-16 Reporting to the Screen
To display a report to the screen:
1. Select the Screen button in the Report window.
The report appears in a Report to Screen dialog box (Figure 5-16).
2. When you are finished, close the Report to Screen dialog box.
Reports
153
5
To send the report to a file:
1. Select the File button in the Report window.
The Report File dialog box appears, as shown in Figure 5-17.
Figure 5-17 Report File Dialog Box
2. Specify the file name, drive, and directory for the report file.
3. To add the report information to an existing file, select an existing file
name and select the Append box.
4. To overwrite an existing file, select the file name and de-select the Append
box. If you are sending a report to a file as part of recording a macro, you
can specify to be prompted for a file name each time the macro is run.
5. To be prompted for a file name for a report when running a macro, select
the Prompt for File name box. This box only appears on the Report File
dialog box when you are recording a macro.
6. To use the same file name for a report each time a macro is run, de-select
the Prompt for File name box and specify a file name in the File Name
field.
7. To save the report as a Comma Separated Value file, select Comma
Separated Files (*.csv) from the Save File as Type drop down list box. Any
file with an extension of csv is saved in the Comma Separated file format.
8. To save in AR Export format, select AR Export Files (*.arx). Any file with
an extension of arx is saved in the AR Export file format.
154
Action Request System User’s Guide for Windows—January 1996
5
9. Select the OK button to save your report to a file.
To print a report:
1. Select the Print button in the Report window.
If you have specified the print setup for the report, the report is printed. If
you have not yet specified the print setup, the Print Setup dialog box
appears, as shown in Figure 5-18.
Figure 5-18 Print Setup Dialog Box
2. Specify whether you want to use the default printer or a specific printer
by selecting one of the radio buttons. If you are using a specific printer,
select the printer from the Specific Printer drop down list box.
3. Specify an orientation for the output by selecting either the Portrait or
Landscape radio button.
4. Select the size and source of the paper.
5. Select the OK button to send your report to the printer.
To send a report to another Windows application:
Before you can send a report to another application, you need to do two things:
•
Select the Enable Report to Application report preference by selecting
Preferences on the File menu.
•
Provide the appropriate information in the DDE.ini file.
Reports
155
5
Selecting the Enable Report to Application report preference displays the
Application button on the Report window allowing you to make use of the
DDE functionality. The DDE functionality needs certain information in order to
work correctly. You provide this information in the dde.ini file. The dde.ini file
can be found under your configuration directory (\Home by default). The
dde.ini file is similar to other Windows *.ini files. If you do not have a dde.ini
file, create one and include the appropriate information as shown in Table 5-2.
Note – When sending a report to another application using DDE, the report
preferences, page setup, and report options are ignored. If you specified a
column separator character as a report preference or report option, it is ignored
and the value in the Format field in the dde.ini file is used instead.
Using an editor, provide the fields that are required for DDE in the dde.ini file
as follows:
Table 5-2
156
Fields Required for dde.ini File (1 of 2)
Field
Description
Path
Specifies the full pathname where the application resides on
your system. Since this value is used to spawn or start the
application, specify any required parameters in this field
along with the pathname. An example is as follows:
Path = c:\excel\excel.exe
Application
Specifies the name of the application. Use the DDE server
name of this application. An example is as follows:
Application = excel
Topic
Each application has a series of DDE topics. For more
information, see the application’s DDE documentation. An
example is as follows:
Topic = system
Action Request System User’s Guide for Windows—January 1996
5
Table 5-2
Fields Required for dde.ini File (2 of 2)
Field
Description
Format
Specifies the column separator character. Enter Tab, CSV,
Record, or Current Format. This takes precedence over any
column separator character that you have specified on the
report preferences, page setup, or report options dialog box.
An example is as follows:
Format = Tab
Record format forces the report to be sent to the application
to be Record format. All the page setup information will be
reset. The user can also specify an optional parameter
CharsPerLine. If CharsPerLine is not given the default is 80.
Current Format uses whatever format and page setup
currently defined.
XFRDATA
Specifies how the other application needs to receive the
report. Enter either Clipboard or File. For more information,
see the application’s DDE documentation. An example is as
follows:
XFRDATA = Clipboard
Command
Use the Command fields to enter any specific commands an
application requires. You can enter as many commands as
needed by using the fields Commthe and1 through
Commandn, but they must be sequential. Since reports are
always written to a temporary file, you can supply the path
name of this temporary file on the command line. To do
this, you can use the %f and %N parameters. If you specify
%f, the AR System replaces the parameter with the full
pathname of the file containing the report. If you specify
%N, the AR System replaces the parameter with just the
filename of the file containing the report. For more
information, see the other Windows application’s DDE
documentation. An example is as follows:
Command1 = [NEW (1)] [PASTE ( )] [SAVE.AS (,0)]
Figure 5-19 on page 158 illustrates an example dde.ini file that sends a report to
Microsoft Excel using the clipboard. The example also shows Word for
Windows entries in record and current formats.
Reports
157
5
[excelrecord]
Path = c:\excel\excel.exe
Application = excel
Topic = system
Format = TAB
XFRDATA = Clipboard
Command1 = [NEW (1)] [PASTE ()] [SAVE.AS (,0)]
[wordrecord]
Path=c:\msoffice\winword\winword.exe
Application=winword
Topic=system
Format=Record
CharsPerLine=100
XFRDATA=Clipboard
Command1=[FileNew .Template = "Normal", .NewTemplate = 0]
Command2=[Editpaste]
[wordcurrformat]
Path=c:\msoffice\winword\winword.exe
Application=winword
Topic=system
Format=CurrentFormat
XFRDATA=Clipboard
Command1=[FileNew .Template = "Normal", .NewTemplate = 0]
Command2=[Editpaste]
Figure 5-19 Example dde.ini File
Once you have selected the Enable Report to Application report preference and
provided the appropriate information in the DDE.ini file, you are ready to create
a report and send it to another application.
1. From the Report window, select the Application button, as shown in
Figure 5-20.
158
Action Request System User’s Guide for Windows—January 1996
5
Application
Button.
Figure 5-20 Report Window with Application Button
The DDE Application dialog box appears asking you to provide the name of
the application you want to send your report to, as shown in
Figure 5-21. The application name is the name of the section in the DDE.ini
file (for example, [excel record]), not the name of the executable.
excel record
Figure 5-21 Application Dialog Box
2. Type the application’s name and select the OK button.
Note – This other application must already be installed on your system.
If it is not already running, the other application starts up, or if it is, it is
made active. The other application contains your report ready for you to
manipulate.
Reports
159
5
160
Action Request System User’s Guide for Windows—January 1996
Using Macros
6
A macro is a set of operations recorded for later execution. A macro can
include any operation that the User Tool can perform: querying the database,
submitting ARs, modifying ARs, setting user defaults, running macros,
running user commands, creating a report, changing schemas, and specifying
sorting options. You may want to create macros to automate frequently used or
complex query or submit operations.
You can execute a macro by selecting Run Macros from the Macros menu (or
typing Ctrl+I) then selecting the macro from the Execute Macros dialog box or
by selecting it from the Run Macros drop down list box in the tool bar.
This chapter provides information about the following:
•
•
•
•
•
Recording macros.
Executing macros.
Editing a macro’s directory path, name, and help text.
Deleting macros.
Sharing macros with other users.
Recording Macros
When you create a macro, you assign it a name and enter a description of its
function. The next time you select Edit Macros or Run Macros from the Macros
menu, or display the Run Macros drop down list box in the tool bar, the new
macro is listed along with any other macros you have access to.
161
6
Before recording a macro, it is a good idea to try the operation you intend to
record to make sure it produces the results you expect.
You can create a macro that leaves the contents in a Query window when the
macro ends. You might want to create a macro that does this if you find that
you perform many queries with much of the same criteria. By running a macro
that displays the query contents, you are left with the Query window filled in
with the common criteria waiting for you to add any additional criteria specific
to your current query task.
You can also create a macro that leaves a Submit window open containing
some field values. This is useful if you submit many ARs with some similar
information. By running a macro that leaves a Submit window open that
contains some field values, when the macro ends you are left with the Submit
window filled in with common field information waiting for you to add any
additional information specific to your current submit task.
This type of macro is very useful as part of an active link. It is also useful
because it allows you to select Dismiss on the Submit window, therefore,
cancelling the submit operation. For instance, suppose your AR System
administrator created an active link on your Customer Support Call Tracking
schema that copies the field contents of the customer call AR to a Submit
window containing the Bug Tracking schema. This is very useful if your
customer support call results in the submission of a software bug. For more
information about creating active links, see the Action Request System
Administrator’s Guide.
Note – When you first record a macro that submits an AR, you receive a
warning message informing you that the macro recording is active and that the
operation was recorded but that no database operation was performed (no AR
was actually submitted).
You can allow other users access to your macros by either letting them copy
your macro files or by saving your macros in any directory included in their
AR Path preference. For more information about sharing macros and the AR
Path preference, see the section entitled “Starting the User Tool” in Chapter 2.
162
Action Request System User’s Guide for Windows—January 1996
6
Note – You can create a macro that executes other macros. While recording,
simply select the macro you want to execute by selecting Run Macros from the
Macros menu (or by selecting the macro from the Run Macros drop down list
box on the tool bar). In this way, you can create powerful macros that can
perform a series of complex tasks.
While the following sections take you through the steps to record a macro
that performs a query operation, you can create a macro to do any task that
you can do using the User Tool.
To record a macro that performs a query:
1. Select Start Recording from the Macros menu.
Recording appears in the status area at the bottom of the User Tool Main
window, as shown in Figure 6-1.
Recording
status
message
Figure 6-1
Recording in Progress
2. Activate or open a Query window containing your desired schema. (The
macro records the schema that you are using.)
3. Select Clear All from the Edit menu (or type Ctrl+E) to clear the schema’s
fields.
Using Macros
163
6
4. Specify the search criteria you want as you would for any query
operation.
5. Select the operation(s) to be performed.
6. Select Stop Recording from the Macros menu to stop the recording
process.
A Stop Recording dialog box appears, as shown in Figure 6-2.
Figure 6-2
Stop Recording Dialog Box
If you want to continue recording, select the Close button.
If you want to cancel the recording operation, select the Cancel Recording
button.
7. Enter a name for the macro in the Macro Name field.
You might want to use a name that helps you to remember what the macro
does.
8. Select the directory where you want to save the macro by either typing the
directory pathname in the Path field or by selecting a directory from the
list of directories defined by your AR Path preference.
You can also select a directory by selecting the Browse button and selecting
a directory from the Browse Directories dialog box.
Note – You can save a macro in a directory that is not specified by your AR
Path preference. In this case, a dialog box appears asking if you want to add
the new directory to your AR Path preference. If you select no, you will not be
164
Action Request System User’s Guide for Windows—January 1996
6
able to access your own macro unless you later add the directory to your AR
Path preference definition. For more information about your AR Path
preference, see Chapter 2, “Getting Started with the User Tool.”
9. Enter a description of the macro in the Help Text field.
Help text is useful for telling other users what the macro does, as well as
reminding yourself what it does.
10. Select Yes for the Record open Query windows contents field to store the
final contents of the Query window as part of the macro.
The macro records any Query windows opened after the start of the macro
along with their contents. Then after the macro is run, the Query windows
remain containing the values specified by the macro.
11. Select Yes for the Record open Submit windows field to store any Submit
windows left open when the macro ended.
This allows you an additional way to record submissions. The macro records
any Submit windows opened after the start of the macro along with their
contents. After the macro is run, the Submit window is left open and you
can finish supplying information before submitting the AR.
12. Select the Store Macro button to save the macro.
The name of the new macro now appears in the Execute Macros dialog box
when you select Run Macros from the Macros menu, in the Edit Macros
dialog box when you select Edit Macros from the Macros menu, and in the
Run Macros drop down list box on the tool bar.
Recording Macros with Variables
You can record a more generic macro that lets you change some of the values
each time you execute the macro. These are macros which provide userspecified variables to be entered during the macro’s execution.
For example, suppose you want to create a macro that displays “Assigned”
ARs that have a “Critical” priority, but you want to specify the “Submitter”
each time you run the macro. To create this macro with variables, you record
the query operations as usual, but for the information that varies you enter
prompt text enclosed by dollar signs. In this example, to allow yourself to
specify the Submitter each time you run the macro, enter the prompt text $User
Name$ in the Submitter field instead of entering a specific name.
Using Macros
165
6
Note – You cannot include dollar signs as part of the variable.
As you continue recording the query, you are prompted to enter an example
value for this variable. Note that the values you enter are used in the recording
session, but are not retained as part of the macro.
Note – You cannot use the query-by-example section of the window to specify
variable values for selection fields. You must use the query bar for this task.
Figure 6-3 shows a Query window with a variable specified in the Submitter
field.
Promp
t text.
Figure 6-3
Specifying a Variable
To record a macro with variables:
1. Select Start Recording from the Macros menu.
Recording appears in the status area at the bottom of the Main window.
2. Activate or open a Query window that contains your desired schema.
166
Action Request System User’s Guide for Windows—January 1996
6
3. Select Clear All from the Edit menu (or type Ctrl+E) to clear the schema’s
fields.
4. Specify the search criteria you want. For criteria that have variable
information, enclosed in dollar signs ($), enter the text that is used to
prompt for input when the macro executes. For example, if the Submitter
field value varies, you could enter
$User Name$
as the prompt text in the Submitter field, as shown in Figure 6-3.
5. Select the operation(s) to be performed from the Query menu.
The Macro Parameters dialog box appears, prompting you to enter example
value(s) for any variables you have designated, as shown in Figure 6-4.
Macro
Parameters
dialog box.
Figure 6-4
Prompt to Enter Example Value
6. Enter an example for each of the prompted variables.
The examples you enter are not stored with the macro. They only allow you
to continue with the recording session.
Using Macros
167
6
7. Select Stop Recording from the Macros menu to stop the recording
process.
If you want to continue recording, select the Close button.
If you want to cancel the recording operation, select the Cancel Recording
button.
8. Enter a name for the macro in the Macro Name field.
You might want to use a name that helps you to remember what the macro
does.
9. Select the directory where you want to save the macro by either typing the
directory pathname in the Path field or by selecting a directory from the
drop down list box. The Path drop down list box contains all directories
defined by your AR Path preference.
You can also select a directory by selecting the Browse button and selecting
a directory from the Browse Directories dialog box.
Note – You can save a macro in a directory that is not specified by your AR
Path preference. In this case, a dialog box appears asking if you want to add
the new directory to your AR Path preference. If you select no, you will not be
able to access your own macro unless you later add the directory to your AR
Path preference definition. For more information about your AR Path
preference, see Chapter 2, “Getting Started with the User Tool.”
10. Enter a description of the macro in the Help Text field.
Help text is useful for telling other users what the macro does, as well as
reminding yourself what it does.
11. Select Yes for the Record open Query windows contents field to store the
final contents of the Query window as part of the macro.
The macro records any Query windows opened after the start of the macro
along with their contents. Then after the macro is run, the Query windows
remain containing the values specified by the macro.
12. Select Yes for the Record open Submit windows field to store any Submit
windows left open when the macro ended.
This allows you an additional way to record submissions. The macro records
any open Submit windows and their contents. After the macro is run, the
Submit window is left open and you can finish supplying information
before submitting the AR.
168
Action Request System User’s Guide for Windows—January 1996
6
13. Then select the Store Macro button to save the macro.
The name of the new macro now appears in the Execute Macro dialog box
when you select Run Macros from the Macros menu, in the Edit Macros
dialog box when you select Edit Macros from the Macros menu, and in the
Run Macros drop down list box on the tool bar.
Executing Macros
Follow these steps to execute a macro from the User Tool.
Note – When you execute a macro that sends a report to the printer, you are
always prompted to specify printer setup information.
To execute a macro:
1. Select Run Macros from the Macros menu (or type Ctrl+I).
The Execute Macros dialog box appears, as shown in Figure 6-5.
Figure 6-5
Execute Macros Window
Using Macros
169
6
2. Select the directory to search for existing macro files by selecting from the
drop down list box. The drop down list box displays all directories
defined in your AR Path preference.
Selecting All displays all macros found in all directories defined in your AR
Path preference.
The Macros list contains all macros found in the directories displayed in the
Search Path field.
3. Select the macro that you want to run from the Macros list and select the
OK button (or double-click on the macro name).
In place of performing steps 1, 2, and 3, you could select the Macro that you
want to execute from the Run Macros drop down list box in the tool bar.
If the currently active window contains the schema required by the macro,
the macro operation occurs in the active window. Otherwise, the macro
opens a new Query window displaying the required schema.
4. If you execute a macro with parameters, a window appears prompting you
to supply the information used for the current query, as shown in
Figure 6-6. Enter the information, then select the OK button to continue
executing the macro. Selecting the Cancel button cancels the macro.
Figure 6-6
Entering Parameters for a Macro
If you do not supply a value for a prompted variable, an empty string is
substituted in the macro. If the parameter is in the query-by-example section of
the Query window, it simply means that no qualification for the corresponding
field is specified. If the variable is in the query bar, however, failure to specify
a value often leads to a syntax error or unexpected results due to bad
comparisons.
170
Action Request System User’s Guide for Windows—January 1996
6
Note – If you are executing a macro that was recorded using an earlier version
of the AR System Windows User Tool (version 1.0), and the macro does not
explicitly open a schema, the AR System performs the macro operation using
the schema in the currently active window. If you are using such a macro, you
must be certain that the active window contains the schema you desire. To
avoid potential problems, it is a good idea to re-record existing macros using
the 2.0 User Tool.
Modifying the Macro Name or Help Text
Follow these steps to change a macro’s name or help text. The name identifies
the macro in the Macro list. The help text can include additional information
about how the macro operates.
Note – To change any of the operations performed by the macro, you must rerecord the macro.
To modify the name or help text:
1. Select Edit Macros from the Macros menu.
The Edit Macros dialog box appears, as shown in Figure 6-7.
Using Macros
171
6
Figure 6-7
Edit Macros Dialog Box
2. Select the directory to search for existing macro files by selecting from the
drop down list box. The drop down list box displays all directories
defined in your AR Path preference.
Selecting All displays all macros found in all directories defined in your AR
Path preference.
The Macros list contains all macros found in the directories displayed in the
Search Path field.
3. In the Macros list, select the macro you want to edit.
4. Modify the Macro’s New Name and Help Text fields.
5. Select the Modify button to save the changes.
Deleting Macros
Deleting a macro permanently removes it from the Macros list in the Execute
Macros or Edit Macros dialog boxes, and from the Run Macros drop down list
box as well as from the file system.
172
Action Request System User’s Guide for Windows—January 1996
6
To delete a macro:
1. Select Edit Macros from the Macros menu.
The Edit Macros dialog box appears (Figure 6-7).
2. Select the directory to search for all existing macro files by selecting from
the drop down list box. The drop down list box displays all directories
defined in your AR Path preference.
Selecting All displays all macros found in all directories defined in your AR
Path preference.
The Macros list contains all macros found in the directories displayed in the
Search Path field.
3. In the Macros list, select the macro you want to delete. (If you selected the
Confirm to Delete Macro user preference setting, a confirmation box will
appear. Confirm to continue delete operation.)
4. Select the Delete button.
Sharing Macros with Other Users
There are two ways that you can share macros. The first way is to copy the
macro files and place them in your <ar_config_dir>\arcmds directory. The
second way is to specify the directory that contains the files you want to access
in your AR Path desktop preference. For more information about sharing
macros, see “Starting the User Tool” in Chapter 2.
Using Macros
173
6
174
Action Request System User’s Guide for Windows—January 1996
Customizing the Environment
7
This chapter provides information about customizing your environment.
Customizing can include setting defaults for fields, adjusting the layout of
fields and active link buttons on your view of a schema (your view), or
changing the display properties of fields. You can customize your environment
only if your AR System administrator has given you customize permission
(placed you in a group that has customize privileges). Your customized views
and field defaults are saved in your personal configuration directory. For more
information about configuration directories, see Chapter 2, “Getting Started
with the User Tool.”
This chapter provides information about the following:
•
•
•
Defining default field values.
Personalizing views.
Saving and restoring views.
Defining Default Field Values
You can assign default values to any field for which you have been given
access by the AR System administrator. Your default values override any
defaults the AR System administrator may have defined when setting up the
schema. If your AR System administrator has specified a default value for a
field that you want to be clear (empty), you need to specify a default value of
175
7
These default values are automatically loaded when you select Set To Defaults
from the Edit menu (or type Ctrl+U) or when the Preferences setting for the
Submit or Query window is set to display default values.
Note – When the default values are loaded into the Query or Submit window,
any AR System administrator default values are loaded as well as your own. If
you specified a default value for a field that your AR System administrator
also specified, your default value takes precedence.
To define default field values:
1. Select Customize Defaults from the Actions menu.
The Select Schema - Customize Defaults window appears.
2. Select the schema for which you want to define default settings.
The selected schema is displayed in the Customize Defaults window, as
shown in Figure 7-1.
Figure 7-1
Customize Defaults Window
3. Enter new default values or replace existing values.
Note – Fields that are normally hidden on your view are visible on the
Customize Defaults window. Even though these fields are not normally visible,
they exist in the database and you may want to assign a default value to them
176
Action Request System User’s Guide for Windows—January 1996
7
(if you have write access). Any default values you assign to hidden fields are
preserved and applied when you perform any operation where default values
are used.
4. To save these defaults, select Apply from the Actions menu, click on the
Apply tool bar button, or type Ctrl+A.
If you have not made any changes, the Apply menu item and tool bar
button are disabled (not available).
Customizing Your Schema View
The AR System allows you to create your own custom view of each schema.
Your customizations can include changing the physical layout of your view
and changing various field and active link button properties, such as the field
label, location, and length. Your custom view characteristics are saved in a file
named <ar_config_dir>\<schema_name>.arv and can be exchanged with other
AR System users by copying the file.
When you customize a view, the system keeps a copy of the previous version
of the view so that you can restore it if necessary. You can also restore a view
you have archived. (See “Restoring Previous Views” on page 183.) You should
always save valuable views in backup files.
Note – Not all users have permission to customize their views of a schema. If
you do not have customize permission for a schema, you will receive an error
message telling you that you do not have permission to customize the schema.
You can use a view created by another user by copying their view file into your
configuration directory, but you cannot create a new view yourself.
Changing the Layout
If you have customize permission, you can change the physical layout of your
view of a schema by dragging fields and active link buttons within the schema
to reposition them, as illustrated by Figure 7-2. You can drag the field or active
link button past the bottom (or top) of the visible portion of the window to
move the field onto the area of the schema currently out of view.
Customizing the Environment
177
7
Select the field
and drag to a
new location.
Figure 7-2
Dragging a Field to a New Location
To move a field or active link button:
1. Select Customize View from the Actions menu.
The Select Schema - Customize View dialog box appears.
2. Select the schema for which you want to define a customized user view. If
you do not have permission to customize the selected schema, a dialog
box appears to inform you and the schema is not selected. If you do have
permission, the selected schema appears in the Customize View window
(Figure 7-2).
3. You can do any of the following:
• Enable the grid feature by selecting Alignment to Grid from the Layout
menu. A check mark will appear beside the menu choice when it is selected.
• Show the active grid by selecting Show Grid from the Layout menu. A
check mark will appear beside the menu choice when it is selected and the
grid will be visible.
• Specify the grid alignment method by selecting Drag Alignment to Grid
from the Layout menu and pulling to the right to select an option. See the
section that follows, “Selecting an Alignment Method” on page 179.
• Reposition a field or active link by clicking on it and moving it to another
area on the schema. The cursor becomes a four-way arrow to indicate the
field or active link button is selected and can be moved. (To reposition more
178
Action Request System User’s Guide for Windows—January 1996
7
•
•
•
than one field at a time, click on the first field then hold the shift key down
while you select one or more additional fields. Then, without releasing the
mouse button, move the fields to a different area on the schema.)
Reposition all the fields on the schema at one time by selecting Select All
from the Layout menu, clicking on one field, and moving it to another area
on the schema.
Increase or reduce the distance between all fields and buttons on the schema
by selecting Expand from the Layout menu. The Expand Control dialog box
appears. Enter percentage values for horizontal and vertical expansion.
Numbers less than 100% decrease the distance between fields, numbers
greater than 100% increase the distance between fields.
You can also move fields or active link buttons by pixels at a time by
pressing one of the arrow keys. The field (or active link button) moves the
number of pixels specified by the Arrow Key Step Size preference in the
direction of the arrow key. For more information about the Arrow Key Step
Size preference, see Chapter 2, “Getting Started with the User Tool.”
4. You can continue customizing the view by moving other fields or active
link buttons or by changing field or active link button properties (see
“Changing Field and Active Link Button Properties” on page 180).
5. When you are ready to save your changes, select Apply from the Actions
menu, select the Apply tool bar button, or type Ctrl+A.
When you save your changes, any open Submit and Query windows
immediately change to reflect this new view. This current view is saved in
the <ar_config_dir>\<schema_name>.arv file.
If you have not made any changes, the Apply menu item and tool bar
button are grayed (not available).
Selecting an Alignment Method
You can use the Drag Alignment to Grid choices from the Layout menu to
specify the way in which a field aligns itself to an enabled grid line when you
move a field.
Customizing the Environment
179
7
To select the alignment method:
•
Select Drag Alignment to Grid from the Layout menu and pull to the right
to select from the following choices:
Left
Value Left
Right
Value Right
None
Align the left edge of the field, including the field label,
to the grid line.
Align the left edge of the data entry portion of the field
to the grid line.
Align the right edge of the field, including any associated
field icons, to the grid line.
Align the right edge of the data entry portion of the field
to the grid line.
Disable the alignment feature, allowing you to reposition
the field on the schema without respect to the grid line.
Changing Field and Active Link Button Properties
You can change some of the properties of a selected field or active link button
by following the procedure below.
To change the properties of a field or active link button:
1. Select Customize View from the Actions menu.
The Select Schema - Customize View dialog box appears.
2. Select the schema for which you want to define a customized user view. If
you do not have permission to customize the selected schema, a dialog
box appears to inform you and the schema is not selected. If you do have
permission, the selected schema appears in the Customize View window
(Figure 7-2).
3. Select the field or active link button, then select Display Attributes from
the Actions menu (or double-click on the field).
A Display Attributes dialog box appears with the current settings for the
selected field, as shown in Figure 7-3.
180
Action Request System User’s Guide for Windows—January 1996
7
Figure 7-3
Display Attributes Dialog Box
If the Main window’s status bar is active, the X and Y coordinates for the
selected field or active link button are displayed in the status bar, along with
the height and width of the field in pixels.
4. Change the properties as appropriate. You can set any of the following
values:
Label
Lets you change the field label to one that may be more
familiar to you. Make sure the label you specify does not
suggest a different meaning for the field or active link
and is different than other fields and active links. A field
(or active link button) label can include any characters
(including blanks) and be up to 30 characters long.
Capitalization is retained since labels are case-sensitive.
Customizing the Environment
181
7
Location and Size
Display Length
Number of Rows
Label Location
Hide Symbol
Repositions the field or active link button according to
the X and Y coordinates that you specify. This option is
often used after dragging a field (or active link button) to
the approximate desired location. If you have a series of
fields or active link buttons on the same line, these fields
or active link buttons must have the same Y coordinate
in order for tabbing between them to work as you expect
(tabbing works from top to bottom, left to right). If the
Main window’s status bar is showing, the X and Y
coordinates of each field or active link button are
displayed in the status bar when the field is selected in a
Customize View window. The height and width of the
field in pixels is displayed.
Sets the length of the text field box.
Sets the number of rows used for radio button displays
or sets the number of rows shown for text fields.
Determines whether the field’s label will be positioned to
the left of the field or above the field.
Sets whether or not the field or active link button is
visible on the schema. A hidden field or active link
button is not deleted — it can be made visible at any
time by de-selecting this check box. Hidden fields and
active link buttons are shown with grayed labels in the
Customize View and Customize Defaults windows. They
are not visible on other windows.
5. Select the OK button in the Display Attributes dialog box.
6. You can continue customizing the view by selecting additional fields or
active link buttons and changing their properties or by moving fields or
buttons.
7. When you are ready to save all of your changes, select Apply from the
Actions menu, click on the Apply tool bar button, or type Ctrl+A.
Note – Once you select Apply, you can restore your old view by selecting User
from the View menu. But, once you Close the Customize View window, you
cannot restore your old view. You can always restore the Administrator’s view.
For more information see “Restoring Previous Views” on page 183.
When you save your changes, any open Submit and Query windows
immediately change to reflect this new view. The current view is saved in
the <ar_config_dir>\<schema_name>.arv file.
182
Action Request System User’s Guide for Windows—January 1996
7
Restoring Previous Views
When you save a customized view by selecting the Apply menu item, clicking
on the Apply tool bar button, or by typing Ctrl+A, the new view is stored in
<ar_config_dir>\<schema_name>.arv. The system also keeps a copy of the view
you had when you opened the Customize User View window. After making
changes to your view, but before closing the Customize User View window,
you can restore your previous user version. You can also restore a view that
you have archived (saved in a backup file) at any time.
Note – You should always save valuable views in a backup file at the system
level. To do this, copy the appropriate
<ar_config_dir>\<schema_name>.arv file to another file so that it won’t be
overwritten. Do not copy it to <ar_config_dir>\<schema_name>.bak since this
file name is used by the AR System.
To restore the previous view:
1. If you change your mind about changes you have made in the Customize
User View window before selecting Close, you can restore your previous
(original) view by selecting View from the Actions menu then pulling to
the right to select Previous.
Note – Once you select Close the Customize User View window, you cannot
restore your previous view.
2. Select Apply from the Actions menu, click on the Apply tool bar icon, or
type Ctrl+A to save the restored view you have selected.
To restore an archived view file:
•
At the DOS command line, copy the archived view file to the appropriate
<ar_config_dir>\<schema_name>.arv schema view file. Then, you must reselect the schema to restore this view.
Customizing the Environment
183
7
Exporting Views
If you have Administrator capabilities in the User Tool, you can export a
customized user view. That is, you can give the view a name and make it
available on the current AR System server so that it can be opened in the
Administrator Tool for further modification or for use as an administrator
view.
To export a customized view:
1. Open the customized view in the Customize View window.
2. With the Customize View window active, select the Export View
command from the View menu, as shown in Figure 7-4.
Figure 7-4
Export View Menu Command
Note – The Export View command is available to you only if you belong to the
Administrator access control group. Subadministrators for a schema have
access to the Export View command.
The Export View dialog box appears, as shown in Figure 7-5.
184
Action Request System User’s Guide for Windows—January 1996
7
Figure 7-5
Export View Dialog Box
3. In the Server View Name field, enter a name for the customized view.
4. Select the Apply button to save the view (or select the Dismiss button to
close the Export View dialog box without saving the view).
You can open the customized view in the Administrator Tool to modify it
further or use it as an administrator view.
Selecting a Administrator View
The AR System administrator that designed the schema you are using may
have designed more than one Administrator View of the schema. This
capability is particularly important for schemas that will be viewed on more
than one type of client, for example, both UNIX and MS Windows. You can set
a user preference specifying the default Administrator View you want to use
(see “Setting User Preferences” in Chapter 2). You can also select a specific
Administrator View by following the procedure below.
To select a different Administrator View:
1. With the schema you want to specify an Administrator View for in an
active Customize View window, select View from the Actions menu and
pull to the right to select Schema View.
The Choose Views dialog box appears, as shown in Figure 7-6.
Customizing the Environment
185
7
Figure 7-6
Choose Views Dialog Box
2. Select the view you want from the View Names list then select the OK
button.
The view you selected is now the active Administrator View for the schema.
186
Action Request System User’s Guide for Windows—January 1996
Using the Notification Tool
8
The Notification Tool allows for the prompt notification of users who need to
know when an AR has been submitted or when progress has been made in
resolving an AR. The AR System administrator determines what kinds of
changes initiate a notification when setting up the AR System.
The Notification Tool alerts you when specific changes are made to ARs, as
defined by your AR System administrator. The tool runs in the background
and waits for notifications to arrive from an AR System server. When a
notification is received for you, the Notification Tool can do any of the
following to alert you depending on the options you have set: beep, flash, open
the tool, or display a Notification Popup dialog box. The tool also maintains a
notification log for later reference.
Depending on how the filter is created, and on how your AR System
administrator specifies your default notification mechanism, you can be
notified by the Notification Tool or through email.
This chapter includes information about the following topics:
•
•
•
•
•
•
Starting and exiting the Notification Tool.
Changing current login information.
Receiving a notification.
Reviewing the notification log.
Deleting notifications from the log.
Setting Notification Tool properties.
187
8
•
Specifying an alternate configuration directory for the Notification Tool.
For information on starting and working with the User Tool, see Chapter 2,
“Getting Started with the User Tool.”
Starting the Notification Tool
Once the AR System is installed, your desktop automatically displays the
“Remedy AR System” group window containing the Notification Tool icon.You
can start the Notification Tool from any machine (or machines) on the network
with access to the AR System (AR and NT users) server. However, you may
only run one instance of the Notification Tool at any one time on each machine.
Your user name and password identify you to the AR System and give you the
appropriate access permissions.
To start the Notification Tool:
1. From the Remedy AR System group window, double-click on the
Notification Tool icon.
If you are starting the Notification Tool for the first time and you are not
currently logged into the User Tool, the Login dialog box appears, as shown
in Figure 8-1.
Figure 8-1
Notifier Tool - Login Dialog Box
2. Enter your registered user name and password, then select the OK button.
If you have modified your login information in the User Tool running on
this PC, your name has been added to the drop down list box associated
with the User Name field. In this case, select the drop down list box symbol
188
Action Request System User’s Guide for Windows—January 1996
8
next to the User Name field and select your user name from the drop down
list box, and then select the OK button. For information on modifying your
login information, see the section “Login Information” in Chapter 2.
Once you have logged into the Notification Tool, the Notification Tool
window appears with your login name is included in the title bar, as shown
in Figure 8-2. Notifications destined for you are sent to all machines where
you are running the Notification Tool.
Figure 8-2
Notification Tool Window
Changing the Current Login
If the Notification Tool was previously started by another user, you can change
the user name and password and log in as yourself. This means you can log in
at any machine on the network that has access to the AR System servers you
are interested in.
Note – If you haven’t modified your login information in the User Tool
running on this PC or if you kept the default Home directory when you
modified your login information, you share the same user preferences
(customizations), custom reports, macros, and notification log file with any
other user on this PC who did the same thing. Should other such users change
Using the Notification Tool
189
8
their user preferences, custom reports or macros, they may overwrite any
changes you have made. Also, since you share one notification log file, when
you start the Notification Tool, you see their notifications as well as your own.
By modifying your login information, you can create your own Home directory
where only your user preferences, custom reports and macros are saved. For
information on modifying your login information, see the section “Login
Information” in Chapter 2.
To change the current login:
1. Select Login from the Notification Tool File menu. The Login dialog box
appears as shown in Figure 8-1.
2. In the Login dialog box, enter the correct user name and password for the
new login.
If you have modified your login information in the User Tool running on
this PC, your user name has been added to the drop down list box
associated with the User Name field. In this case, you can select your user
name from the drop down list box.
3. Select the OK button to complete the login.
Making Menu Selections
You can choose options from the menu bar at the top of the Notification Tool
window in any of same three ways that you can from the menu bar at the top
of the Main window in the User Tool:
•
•
•
Use the mouse to display the menu and select the desired item.
Hold down the Alt key as you press the key that corresponds to the letter
that is underlined in the menu, then press the key that corresponds to the
letter that is underlined in the menu item. For example, to choose Get
Details from the Edit menu, type Alt + E, G.
Type the shortcut key sequences that are shown beside many of the items in
the menu. These key sequences are also called accelerator keys. For
example, to choose Get Details from the Edit menu, type Ctrl+G.
Table 8-1 shows the options available from each Notification Tool window
menu along with their corresponding accelerator key sequences.
190
Action Request System User’s Guide for Windows—January 1996
8
Table 8-1
Menu
File
Edit
Help
Notification Tool Menu Items
Item
Function
Login
Opens a Login dialog box.
Preferences
Sets options that control the behavior of
the Notification Tool for your user login.
Key
Sequence
Exit
Exits the Notification Tool.
Alt+F4
Get Details
Starts the User Tool, if it isn’t already
running, and either opens the ARs
associated with the selected notifications in
a Display or Modify Individual window.
You specify whether to open a Display or
Modify Individual window on the
Preferences window.
Ctrl+G
Delete
Selected
Deletes the selected notifications.
Del
Delete All
Deletes all of the notifications in the
Notification Tool window.
Index
Opens a window that contains a list of help
topics for selection. Each help topic may
have one or more levels of subtopics
available.
Using Help
Displays help on using the Windows help
system.
About
Displays information about the AR System
Windows Notification Tool. The About box
appears.
F1
Exiting the Notification Tool
You can exit from the Notification Tool in any of the following ways:
•
•
•
•
Select Exit on the File menu.
Type Alt+F4.
Select Close on the Control-menu box.
Double-click on the Control-menu box.
Using the Notification Tool
191
8
Receiving a Notification
When a notification arrives, the Notification Tool responds according to the
alert options you have selected (see “Setting Notification Tool Preferences” on
page 194). Figure 8-3 illustrates a Notification Popup dialog box.
Figure 8-3
Notification Popup Dialog Box
If you have not set an alert option, you are not alerted when a notification is
received. In either case, your notifications are stored in a notification log where
you can review them and display or modify the AR that generated the
notification (see “Reviewing the Notification Log” on page 192).
As long as you keep the Notification Popup dialog box displayed, it updates to
reflect the number of notifications that you receive while it is displayed.
To use the Notification Popup dialog box:
•
If you are alerted with a Notification Popup dialog box (Figure 8-3), either
leave it displayed letting it update to reflect the number of notifications sent
to your user name or simply acknowledge it by selecting the Close button.
Reviewing the Notification Log
The notification log, shown in Figure 8-4, lists each notification as it is received.
You can review the notification log at any time by opening the Notification
Tool. At any time you can select one or more notifications and request
additional information.
192
Action Request System User’s Guide for Windows—January 1996
8
Figure 8-4
Notification Log
To view the AR associated with a notification:
1. Open the Notification Tool to display the notification log.
2. Select the notifications.
Note – You can only request additional information on a maximum of eight
notifications at any one time. If you select more than eight notifications, you
receive a warning telling you that only the first eight selected notifications will
be returned and any additional selected notifications are ignored.
Using the Notification Tool
193
8
3. Select Get Details from the Edit menu or double-click on the notification.
If the notification is from the AR System (source is AR), selecting Get Details
starts the User Tool, if it is not already started. The AR that caused the
notification appears in a Display or Modify Individual window, depending
on how you have set the Preferences options (see “Setting Notification Tool
Preferences” on page 194).
An error message appears if there is an error accessing additional
information, such as not having a User Tool available on your desktop.
If the notification is from the Notification server (source is NT), selecting Get
Details displays a dialog box containing the message from the NT server.
Note – If you move the User Tool executable file (<ar_install_dir>\aruser.exe)
without using the installation procedure and the User Tool is not currently
running, selecting Get Details will not work.
To delete notifications:
1. Open the Notification Tool to display the notification log.
2. To delete all notifications, select Delete All from the Edit menu.
3. To delete selected notifications, select the notifications to be deleted and
select Delete Selected from the Edit menu.
Setting Notification Tool Preferences
You configure the behavior of the Notification Tool by selecting Preferences
from the File menu in the Notification Tool window. The Notifier Tool Preferences window appears, as shown in Figure 8-5.
194
Action Request System User’s Guide for Windows—January 1996
8
Figure 8-5
Notifier Tool Preferences Window
The following list describes the Notification Tool preference settings:
Table 8-2
Notification Tool Preference Settings (1 of 2)
Preference Setting
Description
Action on New Notification
Allows you to configure how the Notification Tool
reacts when a notification arrives. You can set the
Notification Tool icon to flash, beep, open the
Notification Tool, or display a pop-up notification
window. You can select more than one option or
none.
Log
Select this check box to save all notifications in an
audit trail log file.
Using the Notification Tool
195
8
Table 8-2
Notification Tool Preference Settings (2 of 2)
Preference Setting
Log File
Description
Provide a path and filename to be used as the audit
trail log file. When the Log check box is selected,
this field is available. This file holds an audit trail of
all notifications that you receive. If you do not
specify a name, no audit trail file is kept. If you
select the Log check box and specify a filename, all
notifications received are logged in this file as well
as in the Notification Tool window.
Note: The audit trail log file is an append-only
listing of every notification received and is useful as
an audit trail. It is different from the log that is
created when you save notifications between runs;
that log is simply an image of the list of
notifications not yet deleted in the Notification Tool
window.
Save Notification
Select to save the notifications in the Notification
Tool window between runs of the Notification Tool.
Confirm to Exit Notifier Tool
Select to cause a confirmation box to appear each
time you exit the Notification Tool.
Action for Get Details
Allows you to specify the action that takes place
when you select Get Details from the Edit menu for
a selected notification. You can choose to open the
AR in a Display window or in a Modify Individual
window.
Polling Interval
Allows you to select a time interval for the Flash
Action.
Specifying an Alternate Configuration Directory
The Notification Tool uses the same directory as the User Tool to hold your
personalized configuration information, including your notification log file. By
default, this directory is named Home. If you do not want to use the default
Home directory, you can set an alternate configuration directory either during
installation or at a later time. For information on specifying an alternate
configuration directory, see the section “Login Information” in Chapter 2.
196
Action Request System User’s Guide for Windows—January 1996
8
Displaying Help
We provide application help and version and environment information about
your Notification Tool.
Displaying Application Help
Help information is available on all User Tool and Notification Tool windows
and commands. Help is also available on many of the procedures that you
most commonly perform. Select Index from the Help menu or press the F1 key
to see an index of the available help topics.
Displaying Version and Environment Information
Select the About item from the Help menu to display information about the
product, as shown in Figure 8-6. You should be prepared to provide this
information whenever you call for Customer Support.
Figure 8-6
The About Dialog Box
Using the Notification Tool
197
8
198
Action Request System User’s Guide for Windows—January 1996
Using Electronic Mail
9
The Action Request System supports submitting ARs and receiving
notifications through electronic mail (email). Using email, you can submit ARs
even if you do not have access to a User Tool or if the AR System server is
inaccessible. Electronic mail is often the preferred communication tool in
environments where there is no direct high speed network link between the
user and the
AR System Server.
This chapter includes information about the following topics:
•
•
•
•
Understanding how email works with the AR System.
Constructing email templates.
Submitting ARs using mail templates.
Receiving notifications through email.
Overview of the AR System’s Use of Electronic Mail
When you cannot directly access the AR System server, the AR System allows
you to query or submit action requests through email using special email
templates. Templates are generated by AR System administrators from any
existing schema using the Export facility of the Administrator Tool. If you need
an email template for a schema, request it from your AR administrator.
To query or submit ARs through email, you need:
•
A mailbox address (default is ARSystem).
199
9
•
An email template containing fields to fill in.
Email is processed by the AR System mail handler (armaild). It watches the
mailbox of the AR System user for new messages. When messages are received
and processed, ARs are created. You cannot display or modify ARs by email.
You can only submit ARs.
The Email Template
The Export operation of the Administrator Tool generates a template that can
look like the example shown in Figure 9-1.
Comments
Template
header
Fields for text
entry
Possible
selection
values as
comments
Figure 9-1
#
# File exported Wed Jun 26 15:34:25
1991
#
Schema: TroubleTicket
Server: gemini
Login:
Password:
Short-Description ! 8!:
Description
! 9!:
Impact
!108!: Low
# Values: Low, Medium, Serious,
Critical
Submitter
! 2!:
Notify-submitter-method! 12!:None
# Values: None, Notifier, E-mail
Sample Email Template
Email templates have three components:
•
•
•
200
Comments. (optional)
Header block.
Fields and values.
Action Request System User’s Guide for Windows—January 1996
9
Comments
Comments are optional and must begin with a # in the first character column.
They can occur anywhere in the message. In the example shown in Figure 9-1,
the time stamp of the export operation and the listing of values (# Values:...)
are comments.
Using Electronic Mail
201
9
Header Block
The Header block contains the primary address information needed by the AR
System to identify the sender. It includes both mandatory and optional
information:
•
The header block contains a Schema: line. You can enter the name of the
schema you want to use on this line. (The schema name is often already
filled in when you get the template from your system administrator.) If you
do not enter a schema name or if the schema you enter does not exist, the mail
handler checks to see if a default schema was defined in the configuration file
specified when the mail handler was started. If not, the item is rejected since a
schema must be specified.
•
The Server: line contains the name of the server on which the schema is
located. (The server name is often already filled in when you get the
template from your administrator.) If you do not enter a server name or if the
server you enter does not exist, the mail handler first checks to see if a default
server was defined in the configuration file specified when the mail handler
was started. If not, then the machine running the armaild process is used as
the server.
•
You may enter values in the Login: and Password: lines if you desire. You
need to fill in these fields to identify yourself as the user performing the
operation. If you omit these values, the mail handler checks to see if defaults
were defined in the configuration specified when the mail handler was
started. If not, the user “Mailer daemon” is identified as the user.
Note – Using the Login: and Password: lines may give other users access to
your AR System account since your user name and password are visible. If this
is a problem for you, we suggest you use an alternate method of identifying
yourself.
Fields and Values
The main body of the email message consists of a set of fields that you need to
fill in. Fields that have default values are automatically filled in for you (you
can change these values if you need to).
202
Action Request System User’s Guide for Windows—January 1996
9
A field reference consists of a field name and field ID. The field name is
optional. The field ID is what the AR System actually uses to process the data;
it must be specified. The field ID value is placed within exclamation points. For
example, field ID 9 would be !9!. Only digits and blank spaces are valid
characters within the exclamation points. After the last exclamation point there
is a single character, usually a colon (:), to mark the end of the field name.
Guidelines for Entering Values into Fields
There are several rules to remember when entering values into fields:
•
The maximum size of any single line is 1024 bytes. If you enter a line that is
longer than 1024 bytes, it will be truncated.
•
Diary type fields and character type fields with the maximum length of over
50 characters can use multiple lines of text.
•
If you do not enter a value into a field but a default value is defined for the
field, then the default value is loaded. If you do not enter a value into a field
and there is no default value defined for it, and the field is a required field,
you will receive an error. See the section entitled Responses to Email
Submissions later in this chapter for information on receiving error messages.
•
Values can be entered any place after the delimiting character. Leading and
trailing blanks are ignored when a value is read by the Mail daemon.
Figure 9-2 is an example of a completed template, ready to be submitted to the
AR System. Text entered by the user is shown in bold type.
# File exported Tue May 8 9:48:22 1993
#
Schema: TroubleTicket
Server: gemini
Login: Joe User, Jr.
Password: <password>
Short-Description! 8!:Lost access to the print server
Description! 9!:Whenever I send a file to the print server, I get a
message back telling me “unknown host print”.
Impact!108!:Serious
# Values: Low, Medium, Serious, Critical
Submitter! 2!:Joe User, Jr.
Using Electronic Mail
203
9
Notify-submitter-method! 12!:E-mail
# Values: None, Notifier, E-mail
Keywords!295!:Printer
Figure 9-2
Completed Email Template
Querying or Submitting via Electronic Mail
You can fill in an email template using email tools or your favorite text editor
to either query or submit Action Requests by electronic mail.
Querying via Electronic Mail
queries can be made in three formats via email:
•
•
•
Query by Entry ID
Query by Field
Query Bar Command
Query by entry ID
The simplest method is the query by entry-id. This method requires that the
user email a specific entry-id value.
Query by Field
The query by field method allows the user to specify a selection on a field or
fields for the schema they wish to query, much like the functonality of the user
tool. This method can return multiple entries.
Query Bar Command
The query via a query bar request is the most powerful version of the query
via email functionality. This method provides an email-based query bar facility,
anything you can enter in the query bar can also be done via email.
204
Action Request System User’s Guide for Windows—January 1996
9
Formatting a Query via Electronic Mail
All matching requests are listed in the body of a message, one after another. In
full format, each entry is seperated by a line of dashes. If a request fails, an
error envelope is returned with an indication of the cause of the failure.
Table 9-1
If an email query...
Email Queries
Then the AR System...
Fails
Returns an error envelope with an indication of the
cause of the failure.
Finds only one match
Sends the entry to you via email.
Finds more than one match
Sends:
* The entries to you via email.
* A message indicates the total number of matches.
Finds more than the
maximum allowable matches
Sends:
* The maximum allowable number of entries to
you.
* A message indicating the total number of matches.
* A message indicating that the query exceeds the
configured query match limit and what that limit is.
Submitting Email
You can fill in an email template using email tools or your favorite text editor.
Using an Email Tool:
Follow these steps to create an AR for submission using an email interface:
1. Run your email tool.
2. Open the supplied template.
3. Fill in the appropriate fields.
Using Electronic Mail
205
9
Note – You can add additional fields to the template if you have permission to
access these fields. If you do so, you must specify a Login: field to have your
permissions take affect. But, be aware that using the Login: and Password: lines
may give other users access to your AR System account.
4. Direct your mail message to the user identified by your AR administrator
(usually this is simply ARSystem). Supply a subject if desired, although it
is ignored by the AR System mail handler.
5. Mail your message.
Using a Text Editor:
Follow these steps to create an AR for submission using a text editor such as vi
or ed:
1. Open the editor.
2. Load the supplied template.
3. Fill in the appropriate fields.
Note – You can add additional fields to the template if you have permission to
access these fields. If you do so, you must specify a Login: field to have your
permissions take affect. But, be aware that using the Login: and Password: lines
may give other users access to your AR System account.
4. Save the message you created by saving the modified template to a new
file.
5. Direct your mail message to the user identified by your AR administrator
(usually this is simply ARSystem). For example, where
mailfile is your mail message, you might use a command like this:
% mail ARSystem < mailfile
206
Action Request System User’s Guide for Windows—January 1996
9
Responses to Email Submissions
An email submission may be successfully received by the AR System or it may
be rejected and returned to you. If your submission is successful, you’ll receive
a confirmation message that includes the ID of the AR entry. If your
submission is rejected, you’ll receive a message identifying any errors and the
full text of the original submission. For example, an email submission may be
rejected because you failed to fill in a required field (and there was no default
set), because there was no Schema: line, or because the specified schema does
not exist.
Note – If you are not receiving confirmation or error messages, it may be
because the AR System administrator has set configuration values for the AR
System mail handler that cause it to send confirmation and error messages
elsewhere. If you are not receiving confirmation or error messages and believe
you should be, check with your AR System administrator.
Receiving Email Notifications
If you cannot directly access the AR System server, you may receive
notifications through email. If email is designated as the delivery mechanism
for notifications, the notification message text may be sent to your email
address. See the Action Request System Administrator’s Guide for information on
designating email as the delivery mechanism for notifications.
Using Electronic Mail
207
9
208
Action Request System User’s Guide for Windows—January 1996
AR System File Locations
A
This Appendix describes the various files needed by and created by the AR
System. The directory where the AR System executables are installed is
referred to here as <ar_install_dir> (by default, this directory is \remedy). The
directory specified to hold the user’s configuration information is referred to
here as <ar_config_dir> (by default, this directory is \Home).
AR System User Tool Files
User Tool Executable
<ar_install_dir>\aruser.exe
User Tool Control DLLs
<ar_install_dir>\miscdll.dll
<ar_install_dir>\sh20w16.dll
<ar_install_dir>\sh21w16.dll
Macros
<ar_config_dir>\arcmds\<macro_name>.arq
User Defaults
<ar_config_dir>\<schema_name>.ard
User Views
<ar_config_dir>\<schema_name>.arv
Schema Definitions
<ar_config_dir>\<schema_name>.arf
Configuration File
<ar_config_dir>\ar.ini
AR Servers
<ar_config_dir>\ar
Custom Report Design
<ar_config_dir>\arcmds\<report_name>.arr
209
A
Custom Report Printer
Setup
<ar_config_dir>\arcmds\<report_name>.arp
Default Printer Setup
<ar_config_dir>\prsetup.arp
Help Information
<ar_install_dir>\arindex.hlp
DDE File
<ar_config_dir>\dde.ini
AR System Notification Tool Files
210
Notification Tool
Executable
<ar_install_dir>\notifier.exe
Notification
Configuration File
<ar_config_dir>\ar.ini
Notify Servers
<ar_config_dir>\ar
Notification Tool
Message Log
<ar_config_dir>\config.lst
Help Information
<ar_install_dir>\ntindex.hlp
Action Request System User’s Guide for Windows—January 1996
Networking Notes
B
To run the AR System User and Notification Tools you must have installed one
of the following supported network stacks:
•
Windows Sockets certified on one of the following:
- Chameleon NFS by NetManage.
- LAN WorkPlace by Novell.
- Pathway by Wollongong.
- PC-NFS by SunSelect.
- PC/TCP by FTP.
- Super TCP/NFS by Frontier.
- TCP/IP by Microsoft.
- Reflection Network Series 4.0 by Walker Richer & Quinn
Requirements for Supported Stacks
Chameleon by NetManage
Supported Versions
4.0
211
B
Additional Considerations
You need to acquire and install the latest winsock.dll. This patch may be
obtained through the following:
•
Call NetManage support at (408) 973-7171.
LAN WorkPlace by Novell
Supported Versions
4.12
Additional Considerations
Purchase LAN WorkPlace or LAN WorkGroup from Novell.
Pathway by Wollongong
Supported Versions
3.0
Additional Considerations
You need to acquire and install the latest winsock.dll. This patch may be
obtained through the following:
•
Call Wollongong support at (415) 962-7140.
PC-NFS by SunSelect
Supported Versions
5.0, 5.1
212
Action Request System User’s Guide for Windows—January 1996
B
Additional Considerations
You need to 500K of conventional memory free before you start Windows.
PC/TCP by FTP
Supported Versions
2.3, 3.0
Additional Considerations
You need to acquire and install the latest winsock.dll. This patch may be
obtained through the following sources:
•
•
•
Anonymous ftp from vax.ftp.com.
BBS dial-in to (508) 659-6240.
Call FTP support at (800) 382-4FTP.
TCP/IP by Microsoft
Supported Versions
TCP/IP 1.1. Since TCP/IP comes bundled with other Microsoft software, you
need one of the following in order to install TCP/IP 1.1:
•
•
LAN Manager 2.2.
Win32 (TCP/IP).
Additional Considerations
You need to acquire and install the latest winsock.dll. This patch may be
obtained through the following:
•
•
•
Anonymous ftp from microsoft.com.
BBS dial-in to (503) 531-8100
Call Microsoft at (206) 882-8080.
Networking Notes
213
B
Super TCP by Frontier
Supported Versions
4.0
Reflection Network Series by Walker Richer & Quinn
Supported Versions
4.0
214
Action Request System User’s Guide for Windows—January 1996
DDE Functionality in the AR System
C
The Action Request System uses DDE (dynamic data exchange) to
communicate with third party Windows applications. This is how the
Windows User Tool integrates with other Windows applications like the Motif
User Tool uses the command line to integrate with other applications. There
are five different ways that the Action Request System can communicate with
third party applications using DDE.
•
Using DDE and active links in the User Tool, you can:
• Send commands to another Windows application.
• Change information in another Windows application.
• Send a request for specific information in another Windows application to
change the value of a field in a schema.
•
Using DDE and the User Tool, you can send a report to another Windows
application and cause the application to open containing the AR System
report.
•
Using DDE and a third party application, the third party application can
execute a macro in the User Tool.
The Action Request System DDE operations have a timeout setting associated
with them. The timeout setting is the amount of time that the Action Request
System waits for a response from the third party application. If there is no
response after this set time, the DDE operation times out and does not
complete.
215
C
Note – Warning:Before you change this value, you must understand that if you
specify a number that is shorter than the time it normally takes for the
operation to complete, the operation will always timeout. Also, if you specify a
number that is longer than necessary, you will find that you may be waiting
longer than is needed for the effected operations to timeout.
The default DDE timeout setting is 30 seconds. Until you add the [ DDE ]
section label and the timeout setting to your ar.ini file they do not exist in
your ar.ini file. The timeout setting gets its value when the User Tool is first
installed. If you want to change this value, you need to add the following
information to your ar.ini file.
[DDE]
TransactionTimeout=N
where N is the new DDE timeout setting in seconds.
For information about defining a DDE active link operation, see the Action
Request System Administrator’s Guide. For information about DDE and reports,
see Chapter 5, “Reports.” This appendix contains the information needed by
third party applications in order to execute a macro in the User Tool.
Third Party Applications and Macros
Third party applications can use a DDE program to send a request to execute a
macro in the User Tool. This program needs to include the following
information:
•
•
•
•
216
The DDE server name of the User Tool.
The pathname for the User Tool.
The DDE topic the User Tool supports.
The DDE function the User Tool supports.
Action Request System User’s Guide for Windows—January 1996
C
DDE Server Name and User Tool Pathname
The DDE server name and the pathname of the User Tool are added to your
win.ini file when you install the Action Request System for Windows version
1.2 or 2.0. This information is added to the [Remedy] section, as follows:
[Remedy]
Application=ARUSER-SERVER
where each field means the following:
Application
ProgramPath
This is the DDE server name for the User Tool.
This is the pathname for the User Tool.
Note – The pathname is needed in case the User Tool is not running when the
run macro request is sent so that the third party application can find and start
the User Tool. You must use this field exactly as shown.
Also, you must do one of the following in your program before executing the
User Tool: set your PATH environment variable to the User Tool directory or
change directories to the User Tool directory.
Supported DDE Topic and Function
The User Tool supports the DoExecMacro DDE topic and the RunMacro DDE
function. The RunMacro function creates a buffer that contains the path and
name of the macro along with any needed parameters. This buffer contains the
information that the User Tool needs in order to find and execute the macro.
The syntax of the buffer that is recognized by the User Tool is as follows:
RunMacro(<macro path>, <macro name>, [<ParamName1=ParamVal1>,
<ParamName2=ParamVal2>,...])
DDE Functionality in the AR System
217
C
where each parameter means the following:
macro path
macro name
ParamName
ParamVal
This is the path for the macro. This parameter is
required.
This is the name of the macro. You do not need to use
double quotes around the name. This parameter is
required.
This is the name of any prompt parameter in the macro.
This parameter is optional.
This is the value you want to substitute for the current
parameter. This parameter is required if you use the
ParamName parameter.
Example Program and Buffer
This example program sends a DDE message to the User Tool telling it to run a
macro called Send Message found in the c:\app\macro directory. This macro
requires two parameters. The first parameter is the name of the user who
receives the message. The second parameter contains the message text.
The RunMacro function within this program creates the example buffer, as
shown:
[RunMacro(c:\app\macro, Send Message,Name=John Smith,
Contents=Don't forget our meeting on friday)]
/* DoDDEInit -- This routine initializes dde conversation.
It must be called before any dde conversation can happen.
*/
BOOL WINAPI DoDDEInit(void)
{
BOOL bResult = FALSE;
// Read the path to the aruser.exe
218
Action Request System User’s Guide for Windows—January 1996
C
if (GetProfileString("REMEDY","ProgramPath","",szARuserPath,
sizeof(szARuserPath) - 1) == 0 ) {
// display an error message if aruser is not installed.
return FALSE;
}
// initialize the dde client
if (lpDdeProc = MakeProcInstance((FARPROC)DdeCallBack,
hInst)) {
idInst = 0;
if (DdeInitialize((LPDWORD)&idInst, (PFNCALLBACK)
lpDdeProc, DDE_INIT_FLAGS, NULL) == DMLERR_NO_ERROR){
Hszize();
bResult = TRUE;
}
else
FreeProcInstance((FARPROC)lpDdeProc);
}
return (bResult);
} // DoDDEInit()
/* DoDDEUnInit -- Uninitializes applications and frees call
back
*/
VOID WINAPI DoDDEUnInit(void)
{
if (hConv) {
DdeDisconnect(hConv);
DDE Functionality in the AR System
219
C
hConv = NULL;
}
if (lpDdeProc) {
DdeUninitialize(idInst);
FreeProcInstance((FARPROC)lpDdeProc);
}
UnHszize();
} // DoDDEUnInit()
/* Hszize -- This creates often used global hszs from
standard global strings.
It also fills the hsz fields of the topic and item tables.
*/
static void Hszize(void)
{
char szServerName[MAX_TOPIC + 1];
// get the name of server in string handle format
GetProfileString("REMEDY","AppName","",
szServerName,MAX_TOPIC);
hszServerName = DdeCreateStringHandle(idInst,
szServerName,0);
220
Action Request System User’s Guide for Windows—January 1996
C
// for the get details topic get its string handle format
hszExecMacroTopic = DdeCreateStringHandle(idInst,
"DoExecMacro", NULL);
} // Hszize()
/* UnHszize -- This destroys often used global hszs from
standard global strings.
*/
static void UnHszize(void)
{
DdeFreeStringHandle(idInst, hszServerName);
DdeFreeStringHandle(idInst, hszExecMacroTopic);
} // UnHszize()
/* DoDDERunMacro -- This routine starts a dde conversation
with aruser and sends its run macro command.
*/
VOID WINAPI DoDDERunMacro()
{
hConv = 0;
// start the connection for run macro with the aruser server.
DDE Functionality in the AR System
221
C
// NOTE: when we use NULL for the pCC parameter DDEMEL sends
// the default CONVECONTEXT.
while (TRUE) {
hConv = DdeConnect(idInst,hszServerName,
hszExecMacroTopic,NULL);
if (hConv)
break;
// a connection was established
if (DdeGetLastError(idInst) != DMLERR_NO_CONV_ESTABLISHED)
break;
// try again maybe by now aruser is up and running.
}
if (hConv) {
// build the a buffer that contains RunMacro function and
// send it to the aruser server
char szExecute[255];
HDDEDATA hddeExecute;
// construct the data to be passed to the data
wsprintf(szExecute,"[RunMacro(%s,%s,%s=%s,%s=%s)]",
(LPSTR)"C:\\app\\macro",
(LPSTR)"Send Message",
// to run
(LPSTR)"Name",
(LPSTR)"John Smith",
(LPSTR)"Content",
222
// the path where the macro is
// This is the name of the macro
// This is the parameter name
// This is the parameter value
// Parameter name
Action Request System User’s Guide for Windows—January 1996
C
(LPSTR)"Don't forget about our meeting on friday");
if (!(hddeExecute = DdeCreateDataHandle(idInst,
(LPVOID)szExecute,
lstrlen(szExecute)+1,0,NULL,CF_TEXT,NULL)))
// give an memory allocation error message
else {
DdeClientTransaction((LPBYTE)hddeExecute, -1, hConv,
NULL,CF_TEXT, XTYP_EXECUTE, TIMEOUT_ASYNC, &XactID);
DdeFreeDataHandle(hddeExecute);
}
}
else {
// failed to connect
}
} // end DoDDERunMacro()
DDE Functionality in the AR System
223
C
224
Action Request System User’s Guide for Windows—January 1996
D
List of Procedures
Here is a list of procedures with their page numbers.
To
To
To
To
To
To
To
To
To
To
To
To
To
To
To
To
To
To
To
To
To
To
To
install the AR System
start the User Tool
select a schema
specify alternate login information
modify login information
copy login information
modify the default login information
delete login information
change the current login
set desktop preferences
eliminate entries under Open Query windows section
set Submit window preferences
set Query window preferences
set confirmation preferences
set report preferences
set font preferences
set color preferences
set View Management window preferences
submit an action request
type and edit information in a field
use a drop down list box
use selection radio buttons
use numeric text fields with arrows
11
14
30
33
35
36
37
39
39
42
45
45
46
48
50
53
56
58
64
71
71
71
71
225
D
To
To
To
To
To
To
To
To
To
To
To
To
To
To
To
To
To
To
To
To
To
To
To
To
To
To
To
To
To
To
To
To
To
To
To
To
To
To
To
To
To
To
226
install the AR System
use the Text Editor dialog box
use the Diary Editor dialog box
use a Selection List dialog box
query the database
define query criteria
enter information in the query bar
specify the sorting order in query operations
use the Query List window
re-display query criteria
manually update the query list
automatically update the query list
use the Display window
re-display query criteria
submit a similar AR
review status history
view the status history of an AR
review diary entries
modify individual ARs
modify all selected ARs
add a new diary entry
delete ARs
generate a report
select fields for a report
set the report layout
specify report sorting and grouping order
specify statistics
define page setup
set report options
save a custom report
use a custom report
modify a custom report
modify a custom report name or help text
delete a custom report
display a report to the screen
send the report to a file
print a report
send a report to another Windows application
record a macro that performs a query
record a macro with variables
execute a macro
modify the name or help text
Action Request System User’s Guide for Windows—January 1996
11
74
76
81
84
88
94
104
108
109
109
109
111
111
112
112
112
113
116
116
118
119
129
130
135
138
140
143
145
148
150
150
151
152
153
154
155
155
163
166
169
171
D
To install the AR System
To delete a macro
To define default field values
To move a field or active link button
To select the alignment method
To change the properties of a field or active link button
To restore the previous view
To restore an archived view file
To select a different Administrator View
To start the Notification Tool
To change the current login
To use the Notification Popup dialog box
To view the AR associated with a notification
To delete notifications
Using an Email Tool
Using a Text Editor
List of Procedures
11
173
176
178
180
180
183
183
185
188
190
192
193
194
205
206
227
D
228
Action Request System User’s Guide for Windows—January 1996
Glossary
action request
AR. A collection of information that describes an event (transaction), such as a
problem or a service request.
access control
Security feature that lets you limit the access users have to specific fields
within a schema and to specific functions within the system.
See also access control group, permissions.
access control group
Facility of the Action Request System used primarily to define user access to
the contents of a schema field. Each group can have its own member list
defining users who belong to that group. The AR System defines five special
groups: Public, Administrator, Customize, Submitter, and Assignee. You can
define additional groups through the Group schema. Once you have defined a
group, you can specify the type of access that the group will have to specific
fields within a schema. See also access control, permissions.
access permissions
See permissions.
active link
A cause and effect relationship that you define on a per schema basis. Active
links cause the Action Request System to perform specific operations in
response to specific user actions. The AR System administrator can define
active links that run macros, set fields to specified values, run independent
229
system processes, send an interactive message to the user, change field
characteristics, or execute a DDE operation on a Windows User Tool. Active
links run on the client machine.
administrator
Individual responsible for the management of the AR System, including setting
up schemas, setting access rights for users, and designing the workflow
process.
administrator default
Value that the administrator assigns to a field while designing the schema.
When the user sets defaults, this value is used unless the user has assigned
their own default. When a user submits an AR, the AR System automatically
enters this value in the field unless the user has assigned their own default or
has entered a different value.
Administrator group
One of five special access control groups provided by the AR System. Members
of this group have full and unlimited access to the AR System. You must be a
member of this group to be able to create schemas, filters, active links, menus,
and administrator commands.
Administrator Tool
The part of the AR System used exclusively by administrators to set up the
system for use by support staff and end users. This includes setting up
schemas, setting access permissions (users and groups), and creating filters,
active links, menus, and administrator commands.
administrator view
The layout of a schema that was designed by the AR System administrator.
This is the view that users will see unless they customize their view.
API
Application program interface. A set of functions that provide application
programmers with access to the full functionality of a product. The AR System
API provides a complete interface to the AR System server.
AR
See action request.
230
Action Request System User’s Guide for Windows—January 1996
AR System client
1. Subset of AR System software necessary to allow a user to access an AR
System server on the network and run the AR System tools on the local
workstation.
2.Hardware (workstation, terminal, Macintosh, or PC) running the AR System
client software.
AR System server
1.Full set of AR System software. When installed on a workstation on the
network, the server software provides access to the full feature set of the AR
System and can be accessed by workstations, Macintoshs, terminals and PCs
on the network that are running the AR System client software.
2.Hardware (workstation) running the AR System server software.
ARWeb license
Fixed or floating license that allows a user access to the ARWeb product.
assignee
The person who is assigned responsibility for resolving an action request.
Assignee group
One of five special access control groups provided by the AR System. This is an
implicit group; users automatically belong to this group and, if they have a
valid AR System license, are granted change access for ARs for which they
have been assigned responsibility (their name is in the Assigned-to field).
character data type
Data type used for fields where you will be entering text data. The AR System
administrator can specify a maximum length for the field or leave the length
unlimited. The administrator can also specify a pattern to restrict the data that
users can enter or attach a character menu to the field.
character menu
A type of menu that opens up to different levels as you “pull” a selected item
to the right using the mouse. You can create a character menu and attach it to
any character-type data field.
client
See AR System client.
Glossary
231
command line options
Parameters that you can combine with the commands to start the User,
Administrator, and Notification Tools that allow you to specify how the tools
will run. For the User Tool, you can execute a macro or open to the Query or
Submit window. For the Administrator Tool, you can attach to a specific server
or open the tool with a specific category displayed.
core field
One of a set of basic fields that are common to all AR System schemas.
Additional limits, such as fixed or maximum sizes, are placed on some core
fields.
configuration
1.The process of setting up hardware and/or software so that it operates in a
manner consistent with the needs of a location.
2.The physical setup of a device or devices.
3.The operating characteristics of software.
Customize group
One of five special access control groups provided by the AR System. This
group grants users the right to customize their schema layout and create
custom commands in the User Tool.
database
A collection of information maintained in the form of individual entries. The
AR System allows you to create and maintain a history of trouble reporting
information.
data type
Property of a field that determines what type of information the field contains.
The choices are character, date and time, diary, integer, real, and selection.
date and time data type
Fields with this data type are limited to calendar dates and time.
DDE
Dynamic Date Exchange. This is a standard inter-application communication
feature used in Windows applications. For more information, see your
Windows documentation.
232
Action Request System User’s Guide for Windows—January 1996
default
System or user defined setting or value that automatically applies to a field if
users do not supply a different setting or value when submitting a new action
request.
diary data type
Fields with this data type allow you to capture a history of the actions taken
for an AR. Each multiple character entry is stamped with the time, date, and
name of the user who entered the item.
dynamic menu
Menu that performs a query at the time a user selects the menu icon and uses
the results of the query to build the list of menu items from which the user
chooses.
end user
In the AR System, an end user is the person who is responsible for notifying
support staff of problems and service requests by submitting ARs.
email
Electronic mail. The AR System allows you to set up an electronic mail handler
so that users can submit ARs through email if they do not have access to a User
Tool or if the AR server is inaccessible. (If you are running the client tools on a
PC, your PC must be equipped with an SMTP gateway to allow email
submissions.)
export
Facility that lets you move schemas, filters, active links, menus, administrator
commands, and mail templates to a file. Exporting is useful if you want to
share schemas with another server or generate mail templates.
filter
Facility that tests every server transaction to see if certain conditions are met
and responds to the conditions by taking a specific action or actions. The AR
System administrator can define filters that set fields to specified values, run
independent system processes, send an interactive message to the user, notify
the user when the state of an AR changes, or make an entry in an audit trail
log. Filters run on the server.
fixed license
Write license that is permanently assigned to a user so that the user always has
access to the AR System.
See also floating license, write license.
Glossary
233
Flashboards license
Fixed or floating license that allows a user access to the AR System
Flashboards product.
floating license
Write license that exists on a server and is allocated to any user who requests a
license and who is defined in the User database as having a floating license
type. If no floating license is available at the time of the user request, the user
must wait until a license becomes available.
See also fixed license, write license.
FTS
See full text search.
FTS license
Fixed or floating license that allows a user to perform a full text search in any
large text or diary field indexed for FTS.
full text search (FTS)
Facility that allows a user to quickly search for information in large text or
diary fields. The fields must be indexed and FTS-enabled by the AR System
administrator, and the user must have an FTS license.
group access
See group type.
Group schema
Schema that lets you add new groups and modify group permissions.
group type
The maximum permission type allowed for a group. May be None, View, or
Change. (Note that permission may be set below the group’s maximum at the
field level.)
guest user
An unregistered user with a limited set of capabilities (submit ARs and
possibly review those ARs). Unregistered users may not be allowed at your
site.
hidden field
A field that exists but is not visible in a user’s view of the schema.
234
Action Request System User’s Guide for Windows—January 1996
import
Facility that lets you share schemas, filters, active links, menus, and
administrator commands that were created on another server. First, you must
export the definitions from the server on which they were created to an ASCII
file, then you can import the file to your own server.
integer data type
Fields with this data type contain numeric values between
-2147483648 and 2147483647. (The range for a particular field may be limited
by the administrator.)
license
See fixed license, floating license, read license, write license.
login window
Window that allows you to login to the AR System when you first start an AR
System tool.
macro
A set of operations recorded for later execution. Macros are useful for
automating frequently used or complex query operations.
mail template
Template that contains the fields that you need to fill in to submit an action
request using electronic mail. Templates are generated by the administrator
from existing schema using the export facility. (If you are running the client
tools on a PC, your PC must be equipped with an SMTP gateway to allow
email submissions.)
notification
An alert that tells you that an AR System event has occurred. The alert may be
a system beep, flash, the display of a notice window, or the opening of the
Notification Tool.
Notification Tool
The part of the AR System that alerts you when specific changes are made to
ARs. Also referred to as the Notifier.
operator
One of a number of functions that let you define complex queries or build filter
qualifications. The AR System operators are available through use of the query
bar palette or the filter qualification palette or you can type them in directly.
Glossary
235
permissions
Field property setting that allows you to control who can view and change
individual fields of a schema. Permissions are defined for each access control
group. View permission limits group members to reading the contents of a
field. Change permission allows group members to read and write the contents
of a field. See also access control group.
pick list
See selection list.
property
An attribute that is defined. For example, the properties of a field include its
data type, physical characteristics such as length, and whether it is required or
optional.
Public group
One of five special access control groups provided by the AR System. Every
user is automatically a member of this view only group.
pull-right menu
See character menu.
query
Process that lets you select a subset of ARs according to search criteria that you
define and then perform one of several operations on the selected ARs. See also
query operation.
query bar
Part of the Query window that lets you define complex query criteria. Includes
a palette of operators that you can use in the query you build.
query list
A list that includes a one-line summary of each AR matching a query.
query operation
Action that you can perform on the entries that match the criteria defined in a
query. The possible operations are: Query List, Display, Modify, Report, and
Delete.
query statement
A complete definition of query criteria constructed in the query bar.
236
Action Request System User’s Guide for Windows—January 1996
Query window
The User Tool window that lets you search the database for ARs that match
specific criteria and display the results of the search. You also use the Query
window to view or modify an existing AR. See also Submit window.
range
Defines the upper and lower limits of acceptable values. For example, if a
field’s range is -10 to 100, you will be able to enter any number from negative
10 to positive 100 inclusive.
read license
License that allows a user to query the AR System schemas and submit new
ARs but does not allow the user to modify or save data on existing ARs. See
also write license.
real data type
Fields with this data type contain a floating-point number. The range is set by
the administrator.
report format
The layout that you specify when you generate a report from an AR System
query. You can format a report in columns or as a list of records. You can also
choose selected fields to print or print them all. To create a more sophisticated
layout, you can export the report to a file and import the file into a desktop
publishing application.
reserved field
One of a set of fields defined with specific interpretations. You can use these
fields in any schema, if desired.
schema
The definition of the data fields in a database. Each schema represents a
database on an AR System server. The AR System comes with several sample
schemas and you can build as many additional schemas as needed.
scroll bar
Window element that appears when there is more information to view than
will fit in the window. You use the mouse to slide the scroll bar and shift the
view area. A scroll bar at the bottom of the window lets you move the viewing
area left and right. A scroll bar on the right side of the window lets you move
the viewing area up and down.
Glossary
237
selection data type
Fields with this data type present a set of mutually exclusive choices from
which the user is to choose. The selections are displayed as checkbox items or
as options on a menu.
selection list
List that appears as a result of an active link that performs a query that returns
more than one AR. The selection list lets the user pick the appropriate AR.
server
See AR System Server.
status field
Core field that lets you keep a record as an AR moves through the various
stages of the process you are using to resolve ARs. The defined states should
reflect the workflow process.
status history
Information that shows the progress that has been made on an AR. You can
view status history from the Display or Modify window.
Submit window
The User Tool window that lets you enter the appropriate information to create
and submit a new AR. See also Query window.
submitter
The person who submits an action request. The submitter’s name is entered in
the Submitter field.
Submitter group
One of five special access control groups provided by the AR System. This is an
implicit group; users submitting ARs automatically belong to this group and, if
they have a valid AR System license, are granted change access for ARs that
are submitted with their name in the Submitter field.
support staff
Person or group responsible for resolving action requests. They assign and are
assigned ARs, log their progress in appropriate fields, and use information
stored in previous ARs to help resolve problems.
238
Action Request System User’s Guide for Windows—January 1996
tool bar
Part of the Main window that allows easy access to some of the more
commonly performed functions in the User Tool: Apply, Previous, Next, List,
Display, Modify Individual, Report, Run Macros, Open a Submit window,
Open a Query window, and display Help on fields, active links and on the
schema itself.
user default
Value that a user who has customize permission can assign to a field. When the
user sets defaults, the AR System loads this value into the field. When the user
submits an AR, the AR System automatically loads this value into the field
unless the user has entered a different value.
User schema
Schema that lets you add users to the AR System and specify the type of access
each user will have.
User Tool
The part of the AR System that lets users enter new ARs and track them
through the troubleshooting process. Users can also query the database for
ARs that match specified criteria, generate reports, and modify existing ARs
with the User Tool.
user view
What the user sees when they bring up a schema. If users have permission to
customize their views, they are able to change the physical layout and other
properties of the schema and schema fields as they appear for that user.
variable
Data element that changes according to user input. In macros, you can include
variable definitions that will cause the AR System to prompt the user for
certain information when the macro executes.
version
The system release number. To display the version of the AR System that you
are running, select About under the Help menu in the User Tool.
view layout
The location of fields in a user’s view of a schema.
Glossary
239
wild card
Character that you can enter to represent other characters in a search string. In
query statements, for example, you can use wild card characters to match
single characters, strings, or characters within a range or set.
write license
License that allows a user to modify and save data on existing ARs as field and
schema permission settings allow. Write licenses may be either fixed
(permanently attached to a single user) or floating (allocated to users as
required).
See also fixed license, floating license, read license.
240
Action Request System User’s Guide for Windows—January 1996
Index
Symbols
-, 96
!=, 89
" (double quote), 94
$DATE$, 72
$DEFAULT$, 72
$HARDWARE$, 72
$NULL$, 72
default value, 175
$OPERATION$, 72
$OS$, 72
$SCHEMA$, 72
$SERVER$, 72
$TIME$, 73
$TIMESTAMP$, 73
$USER$, 73
$WEEKDAY$, 73
%, 90, 96
*, 96
+, 96
/, 96
<, 89
<=, 89
=, 89
>, 89
>=, 89
[ ] (brackets), 91
[^] (brackets with caret), 91
_ (underscore), 90
” (single quote), 94
A
About
command, 25, 191
Accelerator Keys
command, 25
accelerator keys, 17, 190
access control, 3, 13, 188
customizing views, 177
fields, 66
see also Administrator’s Guide
access permissions, 3, 13, 188
see also Administrator’s Guide
access to fields, 66
accrue operator in full text searches,
using, 121, 122
Action for Get Details
Notification Tool preferences, 196
Action on New Notification, 195
Notification Tool preference, 195
action request
deleting, 100
241
displaying a summary, 100
editing, 100
modifying multiple, 100
Action Request System
see AR System
action requests
assigning, 6
definition, 28, 63
deleting, 20, 118
displaying, 110
listing, 106
modifying, 83, 114
reviewing, 83
specifying a maximum number
of, 106
status, 6
submitting, 63, 64
submitting similar, 112
actions
narrative history, 75
Actions menu, 21
active link, 3, 78
and DDE, 215
and multi-line text, 78
example, 79
help, 60
pick list, 80
selection list, 80
active link button
changing properties, 180
moving, 178
active schema list, 18
active window, 9
activities
administrator, 28
AR System, 4
user, 28
adding
a diary entry, 118
multiple users, 33
administrator, 1
activities, 28
commands, 3
default field values, 175
242
view, 183
Administrator Tool, 3
see also Administrator’s Guide
Administrator View, 186
alerting
users, 3
users of status of ARs, 3
alignment method, 180
Alt key, 17, 190
alternate configuration directory, 31
Always Prompt for Login
preference, 43
AND operator, 95
Anywhere search style, 86
Application
button, 159
DDE server name, 217
dialog box, 159
application help
displaying, 60, 197
Apply
command, 21
tool bar icon, 26
applying
current change, 21, 26
current operation, 26
AR
displaying, 26
moving to Next, 26
moving to next, 21
moving to previous, 21, 26
AR Export, 135
format, 154
AR Path
preference, 41, 45
AR System
administrator activities, 5
and DDE functionality, 215
conventions, 9
displaying information, 25, 191
tools, 2
tools for Windows
installing, 10
Action Request System User’s Guide for Windows—January 1996
AR System administrator, 1
AR System sub-administrator, 1
ar.ini, 11
ar_config_dir, 179
archived view file
restoring, 183
arcmds directory, 40
arithmetic operators, 96
Arrange Icons
command, 24
arranging
icons in a group, 24
windows, 24
arrow keys
moving with, 179
ARs
modifying, 116
modifying all selected, 116
see also action requests
specifying a maximum number
of, 106
ARSystem
activities, 4
ascending order, 102
sorting, 136
assigning
action requests, 6
automatic execution, 78
automatically updating
query list, 109
automating
operations, 161
average
statistical operation, 139
B
beeper
see Notification Tool, 3
begin recording a macro, 163
bold
required field, 67
Bottom Margin
Index
preference, 52
report property, 144
bottom margin of report, 52
box
drop down list, 71
button
Application, 159
Refresh, 109
button fonts
setting, 54
C
calling Customer Support, 61, 197
Cascade
command, 24
case-sensitive, 9
Chameleon, 211
changing
action requests, 114
active link button properties, 180
current login, 190
field or active link button
properties, 21
field properties, 180
key bindings, 42
login, 189
login information, 39
Char per Line
preference, 52
report property, 144
character
data type, 68
menu, 71
menus, 68
special, 52, 141
choice boxes
using, 71
Choose Views dialog box, 186
choosing an Administrator View, 186
Clear
command, 19, 71, 77
preference, 46, 48
Clear All
243
command, 19, 88
Clear command, 71
clearing
all fields, 88
all fields after query, 48
all fields after submission, 46
field contents, 19
clipboard
pasting, 19
Close
command, 18
Close All Windows
command, 24
closing
all open User Tool windows, 24
dialog boxes, 9
the active window, 18
color preferences
setting, 56
Column Separator Character
preference, 52
Column separator character
report option, 146
Column Title
preference, 53
Column Title separator character
report option, 147
Column Titles Per
preference, 53
report option, 137, 146
comma separated report, 134
command
About, 25, 191
Accerlerator Keys, 25
Apply, 21
Arrange Icons, 24
Cascade, 24
Clear, 19, 71
Clear All, 19, 88
Close, 18
Close All Windows, 24
Copy, 19
Copy All, 19
Copy to Submit, 112
244
Customize Defaults, 21
Customize View, 21
Cut, 19
Delete, 20
Display, 19
Display Attributes, 21
Edit Macros, 22
Exit, 18
Field/Schema Help, 25
Index, 25, 191
List, 19
Login, 18
Menu Items, 25
Modify All, 19, 114, 116
Modify Individual, 19, 114, 116
Next, 21, 111
Open Query, 18
Open Submit, 18
Paste, 19
Polling Interval, 20, 109
Preferences, 18
Previous, 21, 111
Procedures, 25
Refresh, 20
Report, 20
Run Macros, 22
Set To Defaults, 88
Set to Defaults, 19, 176
Show Query, 22
Show Status History, 111
Sort Options, 21, 101
Start Recording, 22
Stop Recording, 22
Tile Horizontally, 24
Tile Vertically, 24
Tool Bar, 25
Using Help, 25, 191
View, 21
commands
creating administrator, 3
sending to other applications, 215
text editing, 77
comments in email, 201
complex criteria, 88
complex query
Action Request System User’s Guide for Windows—January 1996
operations, 161
use the query bar, 83
compressed text report, 134
configuration directory, 31
alternate, 31
specifying alternate, 196
configuration, minimum, xxi
Confirm After Successful Submit
preference, 49
Confirm to Close Custom Defaults
Window
preference, 50
Confirm to Close Custom View Window
preference, 50
Confirm to Close Modify Window
preference, 49
Confirm to Close Report Window
preference, 49
Confirm to Exit AR System
preference, 49
confirmation message upon submit, 49
confirmation preferences
setting, 48
confirmation upon exiting, 49, 196
context-sensitive help, 60
controlling
size and position of window, 8
the behavior of the Notification
Tool, 191
the behavior of the User Tool, 18, 42
Control-menu box, 8
conventions
in query statements, 97
in the AR System, 9
Windows, 9
coordinates
X and Y, 181
Copy
command, 19, 77
Copy All
command, 19
Copy to Submit
command, 112
Index
copying
all field contents, 19
custom reports, 40
default field values, 176
Display window contents, 112
files, 40
highlighted text, 19
macros, 40, 173
views, 177
count
statistical operation, 139
creating
administrator commands, 3
an action request, 64
an action request, see also submitting
an active link, 64
dynamic menus, 3
reports, 127
static menus, 3
criteria
complex, 88
current login
changing, 190
custom reports
copying, 40
deleting, 152
modifying layout and page
setup, 150
saving, 148
sharing, 40
using, 147
using layout and page setup, 150
Customer Support
information to supply, 61, 197
Customize Defaults
command, 21
window, 176
Customize View
command, 21
customizing
default field values, 175
field display length, 182
field labels, 181
field location, 182
245
field X,Y coordinates, 182
hiding fields, 182
number of rows, 182
restoring views, 183
schema layout, 178
the environment, 175
your schema view, 21
Cut
command, 19, 77
D
data entry, 70
data type, 68, 71
character, 68
date/time, 69
diary, 68
integer, 69
real, 69
selection, 69
database
definition, 3
querying, 84
see also schemas
date
format, 69
searching for ARs created after, 90
date/time data type, 69
DDE
and active links, 215
Application, 156
Command, 157
example program, 218
executing macros, 215
Format, 157
formatted report, 135
function, 216
ParamName, 218
ParamVal, 218
Path, 156
server name, 216
timeout setting, 215
Topic, 156, 216
User Tool pathname, 216
XFRDATA, 157
246
DDE functionality
in the AR System, 215
DDE.ini file, 143, 155
decrementing
numeric text, 69
default
action, 9
configuration directory, 196
search style, 86
view
see views
default field values
administrator, 175
copying, 176
default login
using, 38
default value
$NULL$, 175
specifying, 21
default values
hidden fields, 48
setting, 19
defaults
Query window, 88, 176
Submit window, 176
defining
AR Path preference, 41
default field values, 175
queries, 92
query criteria, 88
report page setup, 143
Delete
command, 20
dialog box, 119
query operation, 100
deleting
a custom report, 152
action requests, 20, 100, 118
all notifications, 191
highlighted text, 19
login information, 38
macros, 172
notifications, 194
selected notifications, 191
Action Request System User’s Guide for Windows—January 1996
dependencies
hardware, xxi
operating system, xxi
descending order, 102, 136
desktop preferences, 42
setting, 42
dialog box
Application, 159
closing, 9
Delete, 119
Diary Editor, 68, 71, 73, 75, 76, 113,
117, 118
Display Attributes, 181
Edit Macros, 172
Export View, 185
Font, 55
listing all open, 24
Login, 14, 15
Login Information, 33
Manage Custom Reports, 151
Notice, 192
Notification Tool Preferences, 195
Page Setup, 143
Print Setup, 145, 155
Report Field Sort Order, 138
Report File, 154
Report Layout, 130
Report Options, 146
Save Custom Report, 148
Select Schema - Query, 85
Select Schema - Submit, 30, 64
Selection List, 81
Statistics, 140
Status History, 113
Stop Recording, 164
Text Editor, 68, 71, 73
User Preferences - Confirm, 49
User Preferences - Desktop, 43
User Preferences - Fonts, 54
User Preferences - Query, 47
User Preferences - Report, 50
User Preferences - Submit, 46
User Preferences - View
Management, 59
diary data type, 68
Index
Diary Editor
Clear command, 77
Copy command, 77
Cut command, 77
dialog box, 68, 71, 73, 75, 76, 113, 117,
118
Edit menu, 77
File menu, 77
Include File menu, 77
menu items, 77
operations, 77
Paste command, 77
Read File command, 77
Save As command, 77
Save command, 77
Select All command, 77
symbol, 71
Undo command, 77
Diary Editor dialog box
opening, 10
diary entry
adding, 118
reviewing, 113
Diary field pop-up icon, 117
diary symbol, 75
directory
ar_config_dir, 179
ar_config_dirarcmds, 40
arcmds, 40
configuration, 31
default configuration, 196
macros, 40
Windows, 10
Display
command, 19
query operation, 100
tool bar icon, 26
window, 110
Display Attributes
command, 21
dialog box, 181
Display window
opening, 19, 26
displaying
247
a confirmation box upon exit, 49, 196
a confirmation message upon
submit, 49
a summary of each action
request, 100
accelerator key help, 25
action requests, 110
action requests as read-only, 100
application help, 60, 197
ARs, 26
context-sensitive help, 60
details about notification, 191
environment information, 61, 197
field help, 25
help, 27, 60, 197
help on current field, active link and
schema, 60
help on help, 25, 191
help on procedures, 25
information about AR System, 25,
191
login dialog box when starting
tool, 43
menu, 10
menu help, 25
product version, 61, 197
query bar, 47, 93
query operation, 22
reports, 153
schema help, 25
search style information, 87
server information, 42
status bar, 44
tool bar, 44
tool bar help, 25
DoExecMacro
DDE topic, 217
double quotes, 94
double-clicking
with the mouse, 8
dragging
the mouse, 8
drop down list box, 71
dynamic menus, 3, 68
248
E
Edit Field
prerference, 54
Edit Macros
command, 22
dialog box, 172
Edit menu, 19, 77
Notification Tool, 191
editing
action requests, 100
fields, 71
information in a field, 71
macro name or help text, 171
macros, 22, 171
electronic mail, see email
email, 199
comments, 201
entering values in fields, 203
fields and values, 202
header block, 202
mail handler, 200
mail template, 199, 200
responding to submissions, 207
submitting, 205
submitting ARs, 199
template components, 200
using a text editor, 206
email notifications
receiving, 207
end user, 1
activities, 4
entering
data into fields, 70
field values using email, 203
information in a field, 71
information in the query bar, 94
environment
customizing, 175
information
displaying, 61, 197
Equal search style, 86
equal to operator, 89
escape key, 9
Action Request System User’s Guide for Windows—January 1996
exactly equal operator, 97
example
active link operation, 79
email template, 203
query statements, 99
example program
DDE, 218
executing
macros, 169
macros using DDE, 215
execution
automatic, 78
Exit
command, 18
exiting
Notification Tool, 191
the NotificationTool, 191
the User Tool, 18, 27
Export View dialog box, 185
exporting
statistics, 142
expressions, see query bar
F
F1 key, 10
F5 key, 10, 78
F6 key, 10, 71
F7 key, 10, 74, 76
field
moving, 178
field defaults
setting, 46, 48
field properties
changing, 21
field text font, 54
setting, 54
field types
by typeface, 66
field values
keeping, 46, 48
Field/Schema Help
command, 25
Index
fields
access, 66
and values in email ARs, 202
changing properties, 180
clearing, 19, 46, 48
clearing all, 88
copying, 19
customizing
default values, 175
labels, 181
layout, 178
location, 182
X,Y coordinates, 182
data entry, 70
data types, 68
defining default values, 175
editing, 71
font style, 66
help, 60
hidden, 177
hiding, 182
IDs, 98
layout in view, 177
length, 182
number of rows, 182
repositiong, 178
scientific notation, 69
selecting, 130
setting defaults, 88
to include in a report, 130
using choice boxes, 71
File
menu, 77
file
DDE.ini, 143, 155
File menu, 18, 77
Notification Tool, 191
files
copying, 40
Notification Tool, 210
User Tool, 209
filter, 3
fixed license, 15
floating license, 15
249
floating-point number, 69
Font
dialog box, 55
font
preferences, 53
style for fields, 66
Footer
report property, 144
format
query bar, 95
report, 131
time and date, 69
formatting
a report to export ARs, 135
a report to use in another
application, 133
new reports, 131
reports, 127
Frontier Super TCP, 214
FTS-indexed fields in queries, using, 121
full text search
accrue operator, using, 121
capabilities, 120
how to, 121
ignore words list, 124
licenses, fixed and floating, 120
limits, 123
function
DDE, 216
function key, 10
F1, 10
F5, 10, 78
F6, 10, 71
F7, 10, 74, 76
functions
tool bar, 26
G
gains
performance, 87
generating
a report, 20, 100
report output, 152
250
reports, 127
statistics in a report, 139
getting
details about notification, 191
getting started, 7
greater than operator, 89, 96
greater than or equal to operator, 89, 97
GROUP keyword, 72
grouping
icons, 24
report records, 136
groups, see access control and
Administrator’s Guide
guest
user, 32
guest user, 14, 15
H
hardware dependencies, xxi
Header
report property, 144
header
block (email), 202
Help
menu, 25
tool bar icon, 27
help
accelerator keys, 25
displaying, 27, 60, 197
field, 25
for macros, 172
menu, 25
on help, 25, 191
schema, 25
tool bar, 25
window
opening, 10
Help menu
Notification Tool, 191
hidden fields, 48, 177
hiding
fields, 182
query bar, 47, 88
Action Request System User’s Guide for Windows—January 1996
status bar, 44
the query bar, 93
tool bar, 44
history
of AR actions, 117
status, 98
I
icon
Notification Tool, 188
Remedy AR System group, 13
tool bar, 26
User Tool, 13
ID
field, 98
ignore words list
using, 124
Import Tool, 4
Include File menu, 77
incrementing
numeric text, 69
Index
command, 25, 191
installing
AR SystemTools, 10
integer data type, 69
internal field ID, 98
invalid
password, 15
user name, 15
italic
system field, 67
K
Keep Previous
preference, 46, 48
keeping
previous field values after query, 48
previous field values after
submission, 46
key
Alt, 17, 190
Index
function, 10
Return/Enter, 9
key bindings
changing, 42
keyword
$DATE$, 72
$DEFAULT$, 72
$HARDWARE$, 72
$NULL$, 72
$OPERATION$, 72
$OS$, 72
$SCHEMA$, 72
$SERVER$, 72
$TIME$, 73
$TIMESTAMP$, 73
$USER$, 73
$WEEKDAY$, 73
keywords, 72
in report headers and footers, 144
L
labels, 181
large query results, 107
Layout
menu, 23
layout
by columns, 132
by records, 132
of view, 177
report, 131
Leading search style, 86
left alignment of fields, 180
Left Margin
preference, 52
report property, 144
left margin of report, 52
length of text field, 182
less than operator, 89, 96
less than or equal to operator, 89, 96
license, 15
fixed, 15
floating, 15
read, 15
251
licenses
full text search, 120
LIKE operator, 95
List
command, 19
query operation, 100
tool bar icon, 26
list box
drop down, 71
listing
action requests, 106
all open windows, 24
most recently used schemas, 18
servers, 31
location
of fields, 182
logging
into Notification Tool, 189
into User Tool, 14
logical operators, 95
Login
command, 18
login
changing, 189, 190
Login dialog box, 14
displaying upon startup, 43
Notification Tool, 188, 191
opening, 18
User Tool, 15
Login Information
dialog box, 33
login information, 31
changing, 39
deleting, 38
modifying, 32, 35
Long Field Format, 147
M
macro help text
modifying, 171
macro name, 218
modifying, 171
macro path, 218
252
macros
and third party applications, 216
containing parameters, 165
copying, 40, 173
deleting, 172
directory, 40
editing, 22, 171
editing help text, 171
editing name, 171
executing, 22, 169
executing using DDE, 215
modifying, 171
modifying help text, 171
powerful, 163
providing help text, 172
recording, 161
running, 22, 169
sharing, 40, 162, 173
start recording, 22, 163
stop recording, 22
supplying parameters during
playback, 170
supplying variables duing
playback, 170
using prompts, 165
variables in, 165
Macros menu, 22
mail
handler, 200
template, 199
Main window, 16, 17
making
choices from the tool bar, 25
menu selections, 8, 17, 190
Manage Custom Reports dialog box, 151
manipulating
windows, 8
manually updating
query list, 109
matching
a single character, 90
any string, 90
Max in Query
preference, 47, 101
Action Request System User’s Guide for Windows—January 1996
Maximize AR System
preference, 43
maximum
number of ARs, 106
number of schemas in list, 45
statistical operation, 139
Maximum Number of Schemas to
Remember
preference, 45
menu
Actions, 21
bar, 16
character, 68, 71
creating, 3
displaying, 10
dynamic, 68
Edit, 19, 77
File, 18, 77
Help, 25
Layout, 23
Macros, 22
Query, 19, 20, 100
static, 68
Window, 24
Menu Items
command, 25
menu items, 18, 191
Diary Editor, 77
Text Editor, 77
Menu List Leaf
font preference, 55
menu list leaf font
setting, 55
Menu List Node
font preference, 55
menu list node font
setting, 55
menu selections
making, 8, 17, 190
menu symbol, 71
Microsoft Windows Sockets, 213
minimum
configuration, xxi
statistical operation, 139
Index
Modify All
command, 19, 114, 116
query operation, 100
Modify All Selected
window, 115, 116
opening, 19
Modify Individual
command, 19, 114, 116
query operation, 100
tool bar icon, 26
window, 19, 115
modifying
action requests, 83, 114
all selected ARs, 116
configuration directory, 31
custom report layout and page
setup, 150
individual ARs, 116
login information, 32, 35
macros, 22, 171
multiple action requests, 100
report help text, 151
report name, 151
see also querying
mouse
double-clicking, 8
dragging, 8
pressing, 8
pull-right, 8
selecting, 8
using, 8
moving
active link button, 178
field, 178
to the next AR, 21
to the previous AR, 21
multi-line text
active links, 78
multiple users
adding, 33
N
name
macro, 218
253
narrative history, 75
network stacks, 10
supported, xxi
networking
stacks
Chameleon, 211
Frontier Super TCP, 214
Microsoft Windows Sockets, 213
PC-NFS, 212
Next
command, 21, 111
tool bar icon, 26
not equal to operator, 89, 96
NOT operator, 95
Notice
dialog box, 192
notification
displaying details, 191
Notification Log
window, 193
notification log, 192, 193
Notification Tool, 3
configuration directory, 196
controlling behavior, 191
Delete All command, 191
Delete Selected command, 191
Edit menu, 191
Exit command, 191
exiting, 191
File menu, 191
files, 210
Get Details command, 191
Help menu, 191
icon, 188
logging into, 189
Login command, 191
Login dialog box, 188
menu items, 191
Preferences command, 191
Preferences dialog box, 195
setting preferences, 194
starting, 188
window, 189
Notification Tool preference, 195
254
Actions for Get Details, 196
Polling Interval, 196
notifications, 3
deleting, 194
deleting all, 191
deleting selected, 191
receiving, 192
reviewing, 192
viewing associated ARs, 193
notifier
see Notification Tool
NULL values in query statements, 98
number
floating-point, 69
of field rows, 182
Number of Lines
preference, 52
report property, 144
number of rows
radio buttons, 182
numeric text, 69
decrementing, 69
incrementing, 69
using, 71
O
Open Display Window
preference, 48
Open Modify Window
preference, 48
Open Query
command, 18
tool bar icon, 27
Open Submit
command, 18
tool bar icon, 26
opening
a Display window, 19, 26
a help topic window, 25, 191
a Login dialog box, 18, 191
a Modify All Selected window, 19
a Modify Individual window, 19
a Query List window, 19
Action Request System User’s Guide for Windows—January 1996
a Query window, 18
a Submit window, 18
Diary Editor dialog box, 10
help window, 10
Modify Individual window, 26
multiple submit windows, 63
Query List window, 26
Query window, 27
Report window, 26
Submit window, 26
Text Editor dialog box, 10
operating system dependencies, xxi
operation
applying, 26
automating, 161
performing, 21
operator, 89
AND, 95
in the query bar, 95
LIKE, 95
NOT, 95
OR, 95
precedence, 97
relational, 88
Optional Field
preference, 54
optional field font
setting, 54
OR operator, 95
overriding
search style, 87, 92
P
Page break per
preference, 53
report option, 137, 146
Page Setup dialog box, 143
parameters
recording with in macros, 165
supplying during playback, 170
ParamName, 218
ParamVal, 218
password, 10, 13
Index
invalid, 15
Paste
command, 19, 77
pasting
the clipboard contents, 19
path
macro, 218
PC-NFS, 212
performance gains, 87
performing
a query operation, 99
current operation, 21
permissions, 13
setting access, 3
pick list
in active link, 80
pixels, 179
Polling Interval
command, 20, 109
Notification Tool preference, 196
pop-up icon
Diary field, 117
position of windows, 8
powerful macros, 163
precedence of operators, 97
precise query, 88
preference
Always Prompt for Login, 43
AR Path, 45
Bottom Margin, 52
Char per LIne, 52
Clear, 46, 48
Column Separator Character, 52
Column Title, 53
Column Titles Per, 53
Confirm After Successful Submit, 49
Confirm to Close Custom Defaults
Window, 50
Confirm to Close Custom View
Window, 50
Confirm to Close Modify Window, 49
Confirm to Close Report Window, 49
Confirm to Exit AR System, 49
255
Edit Field, 54
Keep Previous, 46, 48
Left Margin, 52
Max in Query, 47
Maximize AR System, 43
Maximum Number of Schemas to
Remember, 45
Menu List Leaf, 55
Menu List Node, 55
Notification Tool, 194
Number of Lines, 52
Open Display Window, 48
Open Modify Window, 48
Optional Field, 54
Page break per, 53
Push Button, 54
Query List font, 55
Query window, 125
Radio Button, 54
Record Separator Character, 52
Required Field, 54
Right Margin, 52
Save All Open Windows
Position/Size, 44
Save Window Position/Size After
Close, 44
Set to Defaults, 46, 48
setting, 42
Show Query Bar, 47
Show Status Bar, 44
Show Tool Bar, 44
Submit window, 81
System Field, 54
Top Margin, 52
Preferences
command, 18
pressing
Return/Enter, 10
the mouse, 8
Previous
command, 21, 111
tool bar icon, 26
previous view, 183
Print Setup dialog box, 145, 155
printing a report, 155
256
Procedures
command, 25
procedures
help on, 25
product version
displaying, 61, 197
ProgramPath
DDE User Tool pathname, 217
prompt parameter, 218
prompt text, 165
prompting in macros, 165
protected server, 87
pull-right
using the mouse, 8
Push Button
preference, 54
Q
queries, using FTS-indexed fields in, 121
Query
menu, 19, 20, 100
query
conventions, 97
defining, 92
operations, 99
precise, 88
reissue, 20
reissuing, 20
using NULL values, 98
query bar, 83, 86, 88
and quotation marks, 94
and wildcard symbols, 92
conventions used in, 97
displaying, 47, 93
entering information, 94
format and syntax, 95
hiding, 88, 93
operators used in, 95
using, 92
query criteria
defining, 88
redisplaying, 109, 111
refining, 107
Action Request System User’s Guide for Windows—January 1996
Query List
font preference, 55
query list
manually updating, 109
query list font
setting, 55
Query List window, 106, 108
open Display window, 48
open Modify window, 48
open Report window, 48
opening, 19, 26
query operation
complex, 161
Delete, 100
Display, 100
displaying, 22
List, 100
Modify All, 100
Modify Individual, 100
Report, 100
sorting order, 104
query results
large, 107
sorting, 21
query sort order, 138
query statement
conventions, 97
examples, 99
Query window, 83
clearing all fields, 88
opening, 18, 27
preferences, 46, 125
using defaults, 88
query-by-example, 83, 86
defining, 86
querying, 83
defining a query-by-example, 86
defining query criteria, 86
general steps, 84
operations, 99
status history, 88
the database, 83
using NULL values, 98
using the query bar, 88
Index
quitting, see exiting
quotation marks
in the query bar, 94
R
Radio Button
preference, 54
radio buttons
fonts, 54
number of rows, 182
using, 71
range, 91
Read File command, 77
read license, 15
read-only
displaying action requests as, 100
real data type, 69
receiving
email notifications, 207
receiving notifications, 192
Record Separator Character
preference, 52
report option, 147
recording
a macro, 161
a macro performing a query, 163
a macro with variables, 166
macros with variables, 165
redisplaying
query criteria, 109, 111
refining query criteria, 107
Refresh
button, 109
command, 20
registered user, 14, 32
reissuing
the query, 20
relational operators, 88, 89
release notes, 11
Remedy AR System group icon, 13
removing, see deleting
Report
257
command, 20
query operation, 100
tool bar icon, 26
window, 128, 159
report and macro directories
specifying, 45
Report Field Sort Order
dialog box, 138
Report File dialog box, 154
report format
AR Export, 154
by columns, 132
by records, 132
report help text
modifying, 151
report layout, 131, 132
setting, 135
to export ARs, 135
to use in another application, 133
Report Layout dialog box, 130
report name
modifying, 151
report option, 143, 147
Column separator character, 146
Column Title separator character, 147
Column Titles Per, 146
Column Titles per, 137
Long Field Format, 147
Page break per, 137, 146
Record separator character, 147
setting, 145
special characters, 146
Report Options dialog box, 146
report output
generating, 152
report page setup, 143
defining, 143
report property
Bottom Margin, 144
Char per Line, 144
Footer, 144
Header, 144
Left Margin, 144
Number of Lines, 144
258
Right Margin, 144
Title, 144
Top Margin, 144
Report window
opening, 26
reports, 127, 147
bottom margin, 52
Column Title Separator Character, 53
Column Titles Per preference, 53
comma separated, 134
compressed text, 134
copying, 40
DDE Application, 156
DDE Command, 157
DDE Format, 157
DDE formatted, 135
DDE Path, 156
DDE Topic, 156
DDE XFRDATA, 157
displaying, 153
generating, 20, 100, 127
generating statistics, 139
grouping, 138
grouping records, 136
layout, 131
left margin, 52
margins, 52
number of characters per line, 52
number of lines per page, 52
Page break per preference, 53
page numbers, 144
preferences, 50
printing, 155
record separator character, 52
right margin, 52
sending to a file, 154
sending to another application, 155
setting report layout, 131
sharing, 40, 147
sorting order, 138
sorting records, 136
repositioning
fields, 178
request
sending to another application, 215
Action Request System User’s Guide for Windows—January 1996
Required Field
preference, 54
required field
bold, 67
font, 54
responding to email submissions, 207
restoring
administrator’s view, 183
archived view file, 183
default administrator view, 21
previous user view, 21
views, 177, 183
restricting
unqualified queries, 87
Return/Enter
key, 9
pressing, 10
reviewing
action requests, 83
diary entries, 113
notifications, 192
status history information, 112
right alignment of fields, 180
Right Margin
preference, 52
report property, 144
right margin of report, 52
Run Macros
command, 22
tool bar icon, 27
RunMacro
DDE function, 217
running
macros, 169
Notification Tool, 188
User Tool, 14
S
sample schemas, 29
Save All Open Windows Position/Size
preference, 44
Save As command, 77
Save command, 77
Index
Save Custom Report dialog box, 148
Save Window Position/Size After Close
preference, 44
saving
a report to a file, 154
custom reports, 148
open window sizes, 44
window position and size, 44
window size, 8
schema layout
customizing, 178
schemas, 28
active list, 18
customizing view, 21
help, 60
listing most recently used, 18
sample, 29
selecting, 30
setting up, 3
scientific notation fields, 69
scroll bars, 31, 66
search style
default, 86
information, 87
overriding, 87, 92
searching
for action requests, 83
for ARs created after date or time, 90
see also querying
Select All command, 77
Select Schema - Query dialog box, 85
Select Schema - Submit dialog box, 30, 64
selecting, 130
a menu item, 17, 190
a schema, 30
Administrator View, 185
query list items, 108
with the mouse, 8
selection data type, 69
Selection List
dialog box, 81
selection list
in active links, 80
259
sending
a report to another application, 155
a request to another application, 215
commands to other applications, 215
reports to a file, 154
server
list, 31
protected, 87
server Information, 41
server information, 18
Server Information dialog box
servers, 42
server name
DDE, 216
Set To Defaults, 88
command, 19, 88, 176
preference, 46, 48
setting, 54
access permissions, 3
color preferences, 56
confirmation preferences, 48
default field values, 19
desktop preferences, 42
field defaults after query, 48
field defaults after submisson, 46
font preferences, 53
fonts for buttons, 54
menu list leaf font, 55
menu list node font, 55
Notification Tool preferences, 194
optional field font, 54
preferences, 42
query list font, 55
Query window defaults, 88
Query window preferences, 46
radio button fonts, 54
report layout, 135
report options, 145
report preferences, 50
required fields font, 54
Submit window preferences, 45
system field fonts, 54
time to automatically reissue
query, 20
up filters and active links, 3
260
View Management window
preferences, 58
sharing
custom reports, 40, 147
macros, 40, 162, 173
shortcut key sequences, 17, 190
Show Query Bar preference, 47
Show Query command, 22
Show Status Bar preference, 44
Show Status History command, 111
Show Tool Bar preference, 44
simple search
query-by-example, 83
size of windows, 8
Sort Options
command, 21, 101
sorting, 136
in ascending order, 136
query operation results, 102
query results, 21
report records, 136
sorting order
query operation, 104
special characters, 52, 141
report option, 146
specifying
a maximum number of ARs, 106
alignment method, 180
alternate configuration directory, 196
default values, 21
directories to access report and macro
files, 45
number of characters per line, 52
number of lines per page, 52
report grouping, 138
report sorting order, 138
statistics, 140
the maximum number of ARs
returned in a query, 47
the maximum number of schemas in
list, 45
stack
network, 10
Action Request System User’s Guide for Windows—January 1996
Start Recording
command, 22
start recording a macro, 22
starting
Notification Tool, 188
to record a macro, 163
tool windows fills screen, 43
User Tool, 14
static menus, 3, 68
statistics, 137
exporting, 142
generating, 139
specifying, 140
Statistics dialog box, 140
status bar, 16
displaying, 44
status history, 98
querying, 88
viewing, 112
Status History dialog box, 113
status of actions requests, 6
Stop Recording
command, 22
dialog box, 164
stop recording a macro, 22
stop word list, see ignore words list
Submit window, 65, 67
opening, 18, 26
opening multiple, 63
preferences, 45, 81
submitting
action request, 64
action requests, 112
an action request, 63
email, 205
general steps, 64
sum
statistical operation, 139
support staff, 1
supported network stacks, xxi
symbol, 71
diary, 75
menu, 71
Index
text edit, 68
syntax
query bar, 95
System Field
preference, 54
system field
fonts, 54
italic, 67
T
text
copying, 19
deleting, 19
editing commands, 77
numeric, 69
pasting, 19
text edit symbol, 68
Text Editor
Clear command, 77
Copy command, 77
Cut command, 77
dialog box, 10, 68, 71, 73
Edit menu, 77
File menu, 77
Include File menu, 77
menu items, 77
operations, 77
Paste command, 77
Read File command, 77
Save As command, 77
Save command, 77
Select All command, 77
symbol, 71
Undo command, 77
third party applications
and macros, 216
Tile Horizontally
command, 24
Tile Vertically
command, 24
tile windows, 24
time
format, 69
261
searching for ARs created after, 90
timeout setting
DDE, 215
Title
report property, 144
title bar, 16
tool
Administrator, 3
import, 4
Notification, 3
User, 2
Tool Bar
command, 25
tool bar, 16, 25
displaying, 44
functions, 26
icons, 26
tool bar icon
Apply, 26
Display, 26
Help, 27
List, 26
Modify Individual, 26
Next, 26
Open Query, 27
Open Submit, 26
Previous, 26
Report, 26
Run Macros, 27
tools
AR System, 2
Top Margin
preference, 52
report property, 144
top margin of report, 52
Topic
DDE, 216
typing information in a field, 71
U
Undo command, 77
unknown user name, 15
unqualified queries
262
restricting, 87
unregistered user, 14, 32
updating
query list, 109
updating query list, 109
user
activities, 4, 28
end, 1
guest, 14, 15, 32
registered, 14, 32
unregistered, 14, 32
Windows conventions, 9
user name, 10, 13
invalid, 15
unknown, 15
user preferences
setting, 42
User Preferences - Confirm
dialog box, 49
User Preferences - Desktop
dialog box, 43
User Preferences - Fonts
dialog box, 54
User Preferences - Query
dialog box, 47
User Preferences - Report
dialog box, 50
User Preferences - Submit
dialog box, 46
User Preferences - View Management
dialog box, 59
User Tool, 2
controlling behavior, 18, 42
exiting, 18, 27
files, 209
icon, 13
Main window, 17
menu items, 18
starting, 14
User Tool pathname
DDE, 216
users
AR System sub-administrator, 1
Action Request System User’s Guide for Windows—January 1996
using, 147
active links, 78
custom report layout and page
setup, 150
custom reports, 147
default login, 38
Diary Editor, 77
Diary Editor dialog box, 75, 76
email tool, 205
function keys, 10
keywords, 72
numeric text fields, 71
query bar, 92
Query List window, 108
Query window defaults, 88
quotes in the query bar, 94
radio buttons, 71
relational operators, 89
Text Editor, 77
Text Editor dialog box, 73
the mouse, 8
the notice dialog box, 192
the query bar, 88
the tool bar, 25
variables in macros, 165
wildcard symbols, 90
wildcards as explicit characters, 91
Using Help
command, 25, 191
V
value left alignment of fields, 180
value right alignment of fields, 180
variable
in macros, 165, 166
recording with in macros, 165
supplying during playback, 170
View
command, 21
View Management
window preferences, 58
viewing
ARs associated with a
notification, 193
Index
status history information, 112
views
administrator’s, 183
copying, 177
customizing, 21, 175
layout, 177
restoring, 177, 183
W
wildcard symbol
(hyphen), 91
%, 90
[ ] (brackets), 91
[^] (brackets with caret), 91
_ (underscore), 90
in the query bar, 92
using, 90
window
active, 9
closing, 18
controlling size and position, 8
Customize Defaults, 176
Display, 110
help topic, 25, 191
listing all open, 24
Main, 16, 17
Modify All Selected, 115, 116
Modify Individual, 115
Notification Log, 193
Notification Tool, 189
position and size, 44
Query, 83
Query List, 106
Report, 128, 159
server information, 18, 41
size, 8
sizes, 44
Submit, 65, 67
Window menu, 24
Windows
directory, 10
user conventions, 9
windows
arranging, 24
263
closing all, 24
manipulating, 8
workflow processes, 3
X
X and Y coordinates, 181
264
Action Request System User’s Guide for Windows—January 1996