1
LargoTint Decorator Configuration
Toolkit
User's guide
Largo Innova AB 2003-01-01
Program version 1.1.10
Table of contents
Introduction ........................................................................................................................................1
Selecting photos ..................................................................................................................................1
General advice..................................................................................................................................1
Important information ......................................................................................................................1
Preparing the photos.........................................................................................................................2
The "Mother" photo...................................................................................................................................3
Preparing the "Child" photos .....................................................................................................................3
The configuration program ...............................................................................................................4
Creating a new configuration file.....................................................................................................5
Editing an existing file .....................................................................................................................6
The main editor Window..................................................................................................................7
Command buttons in the main editor window .................................................................................8
The "Save" command ................................................................................................................................8
The "Save as" command............................................................................................................................8
The "Add photo" command .......................................................................................................................9
The "Test object" command ......................................................................................................................9
The "Delete" command..............................................................................................................................9
The "Print" command ................................................................................................................................9
Defining general file settings .........................................................................................................10
Selecting a Language...............................................................................................................................10
Picture groups ..........................................................................................................................................10
Adding new photos.........................................................................................................................10
Configuring a picture set ................................................................................................................12
Picture name ............................................................................................................................................12
Picture group............................................................................................................................................12
"Child" picture settings ..................................................................................................................12
Object / "Child" picture name..................................................................................................................12
Reference colour......................................................................................................................................12
Restriction area ........................................................................................................................................13
Testing the settings ..................................................................................................................................13
Preparing data for distribution.......................................................................................................14
© Copyright Largo Innova AB 2003
Information in this manual is valid for the standard-version of the LargoTint Decorator
Configuration Toolkit, from program version 1.1.10. The software described in this document is
subject to change without notice. No parts of this document may be reproduced or transmitted in
any form or by any means, electronic or mechanical, including photocopying and recording, for any
purpose other than the purchaser’s personal use without the written permission of Largo Innova AB.
Göteborg, January 2003.
Program version 1.1.10
LargoTint Decorator configuration toolkit
Page 1
Introduction
The purpose of this document is to provide all necessary information about how to get the
LargoTint Decorator program configured and ready to use. You will find information about how to
prepare photo files for use and how to setup the configuration files used by the program to handle
the photos.
Together with the program provided by Largo to create configurations there are some sample
photos and configurations that you can use as a reference. We recommend that you take a look at
them before you start the work with building up your own system.
Selecting photos
The program can only work with photos in Windows bitmap format (.BMP). The maximum size of
the pictures is Width 465 pixels * Height 380 pixels. The toolkit provided by Largo can only be
used to manage the parameters used by LargoTint Decorator. The photos have to be prepared for
usage with a photo editing program - there are a lot of them available i.e. the Aldus Photostyler,
Adobe PhotoDeLuxe, Corel PhotoPaint and many other. The program uses a full original photo of
an object, and a number of copies of that photo where the different surfaces that should be coloured
have been extracted.
General advice
To get the program to perform nicely there are a couple of things you should consider when
selecting photos:
• Select photos that are as close as possible to the maximum allowed size (465 x 380 pixels).
• Avoid photos with a lot of objects interfering in the areas you want to mask out to be recoloured. It is very difficult to mask out tree branches and leaves in front of a house since
they often blend in with the background.
• Use photos that are as evenly lighted as possible - even if the program handles shaded areas
well it may be difficult for the user to get a good idea of the colour he/she has actually
selected.
• When formatting the final photos, set the resolution to 96 Dpi. That is the resolution used on
the screen and having it defined in the photos reduces the risk of having the distorted when
displaying them.
• Never use picture enhancement functions in the photo editing program (i.e. "Sharpen",
"Optimize", etc.) on "Child" pictures (see next page). You can do as much photo
enhancement as you like before you start defining the different surfaces, but if you modify
the pictures after that it will cause unpredictable effects when the LargoTint Decorator shall
put them together.
Important information
Together with the program there are a number of photos and configuration files provided in a data
directory named \EXAMPLES. These may only be used while learning to handle the configuration
toolkit.
These files may under no circumstances be used or distributed together with the LargoTint
Decorator program for actual use!
Largo Innova AB 2003-01-01
Page 2
LargoTint Decorator configuration toolkit
Preparing the photos
Each photo you want to use have to be prepared as a "Mother" photo that is the full unedited picture
and a number of "Child" photos with different objects from the "Mother" photo extracted. For each
"Mother" photo you can define up to six "Child" photos with different areas extracted.
To ensure that there are no compatibility problems between different Windows versions, network
systems, etc. the names of the "Mother" photos may not be longer than 6 characters. The program
will connect "Child" photos to a "Mother" photo by the file names. A "Mother" photo can be named
i.e. "HOUSE2.BMP" - for this file the program will look for "HOUSE2-1.BMP" to "HOUSE26.BMP" as possible "Child" photos.
Before you start working with your photos we recommend that you create a subdirectory on your
hard disc where you can place all photo files that you want to use together.
Program version 1.1.10
LargoTint Decorator configuration toolkit
Page 3
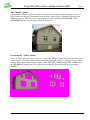
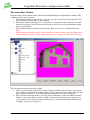
The "Mother" photo
You select the "Mother" photo as described in the previous sections of this document and save it
under a name that will help you identify it in the future (don't forget - maximum 6 characters for
"Mother" pictures). Below you see a typical photo (it can be found as HOUSE2.BMP in the
\EXAMPLES subdirectory on the Decorator Toolkit CD).
Preparing the "Child" photos
For each "Child" photo you have to create a copy of the "Mother" photo and extract the surface you
want to handle. All surfaces that should no be painted when the surface is selected have to be filled
with the pink colour shown in the examples below (HOUSE2-1.BMP and HOUSE2-4.BMP from
the \EXAMPLES subdirectory). The colour must be R=255, G=0 and B=255 (in hexadecimal
FF00FF).
Largo Innova AB 2003-01-01
Page 4
LargoTint Decorator configuration toolkit
The configuration program
Depending on how the editor program was installed there are different ways to start the program.
1. If the program was installed from an official installation CD you find the program in the
normal program menu in the group "Largo" as "LargoTint Decorator configuration toolkit".
2. If the program was manually installed the default directory for the program should be
"C:\LTDECEDT" and the program name you select to start should be "LTDecEdt.EXE".
3. If none of the two options above is available you have to use the "Find" option and search
for "LTDECEDT.EXE".
Program version 1.1.10
LargoTint Decorator configuration toolkit
Page 5
Creating a new configuration file
To create a new file you select the option "Create New Definition File" in the program menu.
You select the directory where you want to create the file and enter a valid filename. The default
file name is "LTWDECO.DEF", but to make it possible to handle different languages and different
configurations for the same set of pictures, you can also use "LTWDECO0" to "LTWDECO9" and
"LTWDECOA" to "LTWDECOZ".
The file must be created in a directory where you have valid BMP files to use for the program,
otherwise you will not be able to edit it and save it afterwards.
If you already have made definition files and just want to create a file with different language
settings and texts or a different picture selection, it is probably easier to select "Edit Existing
Definition File" - make the changes there and then use the "Save As" option to create a new file
with the edited settings.
When a file has been selected the program shows the main editor window (see page 7).
Largo Innova AB 2003-01-01
Page 6
LargoTint Decorator configuration toolkit
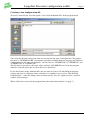
Editing an existing file
To edit an existing file you select "Edit Existing Definition File" in the program menu.
Select the file you want to use and click "Open" ("Öppna" is Swedish for "Open" - we used a
Swedish Windows version when writing this document).
When a file has been selected the program shows the main editor window (see page 7).
Program version 1.1.10
LargoTint Decorator configuration toolkit
Page 7
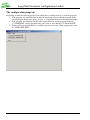
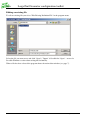
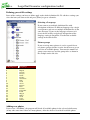
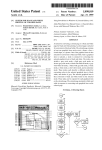
The main editor Window
From the main editor window all the actual work with building the configuration is handled. The
window has three main sections:
1. The data input frame on the left side - here you can enter and select data for your file. You
select objects with the mouse or the keyboard.
2. The picture frame on the right side - here pictures are displayed when selections are made
that refers to pictures and you can move the mouse cursor over it to get information about
colours and positions.
3. The command buttons below the picture frame. Here you can select different functions.
Note!
Which command buttons that are visible depends on your selections in the data input frame in the example below all available command buttons are displayed to provide an overview.
The data input frame has two main sections:
1. At the top you find the general File settings (You can double-click the "Disc" icon to open
up the section as shown in the example above). These should always be defined before you
start working with the file. You find information about how to do this on page 10.
2. The rest of the data input frame is used for picture information. (You can double-click the
"House" icon to open up the section). In this section you edit data for the used pictures or
select pictures to be checked or removed from the set. You find information about how to
configure a picture set on page 12.
Largo Innova AB 2003-01-01
Page 8
LargoTint Decorator configuration toolkit
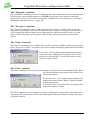
Command buttons in the main editor window
There are several command buttons available in the main editor window. Some of them are always
visible and some depend on the selections made in the data input frame.
The "Save" command
The save command is used to save the data in the selected file (the file name is displayed in the
main window caption.
When you select "Save" the file is saved. If the
directory you are working in is not
"\DECODATA"\ the program will offer the option
to copy the file and all pictures used into that
subdirectory (it is automatically created by the
program).
If you select to copy data to \DECODATA and this
subdirectory already contain data you will have the
option to clear the directory before copying new data
into it.
If you select to delete old files in
\DECODATA and there are LT Decorator
.DEF files there you will have to confirm
if you want to delete them as well.
When the file is saved (and copies made if so selected), you
get a final confirmation. If you select "Ok" here the main
editor window is closed and you are returned to the start
window. If you select "Cancel" (="Avbryt" in Swedish), you
remain in the editor window.
The "Save as" command
The "Save as" command allows you to create a new file with the current settings in the selected
subdirectory. You will be requested to enter a filename before the data are saved. The command is
not available if you started with "Create New Definition File" from the main menu. When you have
selected a file name the program go through the same steps as described for the "Save" command
above.
Program version 1.1.10
LargoTint Decorator configuration toolkit
Page 9
The "Add photo" command
The "Add photo" command can be used to link new files to the definition file you are working with.
It will scan the selected subdirectory for valid BMP files and open a new window from which
photos can be selected. You can only select photos available the current subdirectory. For detailed
information about this function, see page 10.
The "Test object" command
The "Test obj" command is only available when you have selected a "Child" picture in the data
input frame. This function can be used to check how your settings are working. You will be able to
select a number of different colours and test them with the same function that is used to re-paint
photos in the LT Decorator main program. You find more information about this function on
page 13.
The "Delete" command
The "Delete" command is only available when you have selected a "Mother" photo in the data input
frame. If you select "Delete" you will be requested to confirm deleting the photo from the list before
the command is executed.
If you select "Ok" the photo and the information about it is
removed from the configuration. The picture files on your
hard disc are still available - it is only the reference in the
current file that is deleted.
The "Print" command
The "Print" command can be used to print a summary of all data in the current definition file. When
you select the function the program will ask you if you
want to print photos.
If you select "Yes" (="Ja" in Swedish) the printout will
contain small copies of the "Mother" pictures together
with the picture data.
If you select "No" (=Nej in Swedish), the program will
only print a summary of data.
The "Print" command is only available if you have a default printer selected that can print on A5 or
larger paper. The print function will use the default printer from your Windows settings (no printer
selection is offered).
Largo Innova AB 2003-01-01
Page 10
LargoTint Decorator configuration toolkit
Defining general file settings
Some of the settings you have to define apply to the whole definition file. To edit these settings you
select the item you want to edit and press [Enter] to get to edit mode.
Selecting a Language
If you want to use multiple definition files with
descriptions of objects in different languages for a single
set of pictures you can use multiple definition files in the
same directory. If you set the language reference to 0
(zero) the file will be used always independent of the
language setting in LargoTint. You find the available
settings in the table below.
Picture groups
If you are using many pictures it can be a good idea to
use picture groups to make it easier for the user to get an
overview of available photos. You enter the number of
groups you want to use and the group titles as shown in
the example on the left side.
Language No
Language
1
2
3
4
5
6
7
8
9
10
11
12
13
14
15
16
17
18
19
20
Svenska
English
Deutsch
Français
Dansk
Español
Nederlands
Italia
Norsk
Suomi
Russian
Eesti
Latviski
Lietuviškai
Polski
Magyar
Türkçe
Greek
Cesky
Chinese
Adding new photos
If you select "Add Photo" the program will check all available photos in the selected subdirectory
(it may take some time if there are many photos). After the check a list with all available photos
Program version 1.1.10
LargoTint Decorator configuration toolkit
Page 11
will be shown in a new Window. The list will contain all photos accepted by the program (proper
size and at least one "Child" picture).
If you want to add a photo you select it and click "Add photo". When you are finished you click the
"Close" command.
Note! The list contains all pictures including the ones you are already using!
Largo Innova AB 2003-01-01
Page 12
LargoTint Decorator configuration toolkit
Configuring a picture set
For each picture set (a set being one "Mother" photo and all its "Child" pictures) there are a number
of settings available.
Picture name
Each picture must be given a name with up to 30
characters.
Picture group
If you have defined picture groups each picture can be
assigned to a group.
"Child" picture settings
For each "Child" picture you have to define a name, a
"reference colour" and a "Restriction area".
Object / "Child" picture name
For each object you have selected as a "Child" picture
you have to enter a name with up to 30 characters.
Reference colour
For each area extracted for colouring you have to select a reference colour. This colour is what the
program will use to re-paint the object with the different colours from your recipe files. The colour
you select should exist in the selected area and be selected as close as possible to the main colour of
the object. The easiest way to select a reference colour is to point in the picture with the mouse
cursor.
As you move the mouse cursor over the picture, the
program displays the coordinates and the colour at the
location of the mouse cursor. When you have found a
suitable colour you just click the left mouse button.
Program version 1.1.10
LargoTint Decorator configuration toolkit
Page 13
Restriction area
The restriction area is used for two purposes. It helps the program to repaint faster by defining the
part of the photo that may contain data that should be altered. It also helps avoiding repainting areas
that contain the same colour as the selected object. Although you can enter the coordinates for the
restriction area manually, we recommend that you let the program do it for you. Just select the line
"Restriction area", move the mouse cursor to any part of the picture and click the left mouse button.
If you select "Yes" ("Ja" is Swedish for "Yes"), the program
will analyse the picture and suggest ideal coordinates.
Testing the settings
When a "Child" object is selected the command button "Test obj." is displayed in the editor
window. If you click it you can see how the picture will be displayed in LargoTint Decorator.
A new window is displayed. When
the window appears the "Child"
object is first painted with the
"opposite" colour in relation to the
selected "Reference colour".
In the lower part of the window
there is a list with six different NCS
colours you can select to repaint the
object area and check that your
settings works.
To get back to the editor window
you click the "Close" command
button.
Largo Innova AB 2003-01-01
Page 14
LargoTint Decorator configuration toolkit
Preparing data for distribution
It is possible to include your own LargoTint Decorator data in the LargoTint 2000 installation discs
you distribute to your customers (if you have a valid license agreement with Largo Innova AB). The
installation of LargoTint Decorator and customer data files is supported by version 1.1.98 of the
LargoTint 2000 installation and later if you have an installation key with a valid Decorator license
key.
To prepare the data you place the pictures and configuration files (LTWDECO?.DEF) in a
subdirectory name \DECODATA (administrating this can be handled automatically by the toolkit or
manually by you if you are certain you know how to do it).
The directory should be placed in the root directory of the installation CD (or in the same directory
as the \INSTALL directory for LT 2000 if you are using a CD with multiple installation options).
If you are using multiple .DEF files the program will automatically select a file based on the
language settings in LargoTint 2000.
1. If no definition file for the selected language is found the program will look for a definition
file with Language=0 (supposed to be default).
2. If no file with Language=0 is found the program will look for Language=2 (English).
3. If no file with Language=0 or Language=2 is found the first .DEF file found will be used.
Program version 1.1.10