1
LPA²
Analyser
User Guide
www.mpfiltri.co.uk
200.053-EN
Covers Model Numbers
LPA²
SAFETY WARNING
Hydraulic systems contain dangerous fluids at high pressures and
temperatures. Installation, servicing and adjustment is only to be
performed by qualified personnel.
Do not tamper with this device.
Document Revision 15
Contents
1
Precautions
•Battery •Internal Cleaning
5
•LCD Visibility
2
Introduction
6
3
Online Operation
•Main / Test Progress Screen •Analyser Settings
For Test
•Interpreting Results •Further Tests
8
•Preparing Analyser
•Shutting Down
4
Continuous Sampling
•Continuous Sampling – Basic Operation
19
5
Moisture Sensor
26
6
Alarms
28
7
Wiring
31
8
Bottle Sampling
33
9
Data Logging
34
10 Battery Charging
35
11 Printer Paper
37
12 Computer Analysis
•Software Installation •Results Download
39
13 Warranty
•Recalibration
A
40
Measuring Water in Hydraulic and
Lubricating Fluids
41
B
ISO4406:1999 Cleanliness Code System
43
C
NAS1638 Cleanliness Code System
45
D
SAE AS4059 REV.E Cleanliness
Classification For Hydraulic Fluids
46
E
Recommendations
49
F
Hydraulic System Target Cleanliness Levels
51
G
New ISO Medium Test Dust and its effect
on ISO Contamination Control Standards
•Calibration •New Test Dust Benefits •Effect on Industry
lation
•Other Standards
53
•Corre-
H
Specification
60
I
Spare Product / Part Numbers
62
J
COM Ports
•Connection Using a USB Port
63
K
Fault Finding
•Determining the COM Port
65
1 Precautions
The default language setting for the LPA² Laser Particle Analyser is
English. To change the language setting refer to page 12.
1.1 Battery
It is recommended that the LPA² be charged for a minimum of 24
hours prior to first use, to fully charge the internal battery.
1.2 Internal Cleaning
Do NOT clean the LPA² or Bottle Sampler with Acetone or similar
solvents that are not compatible with the seals in the LPA². The
recommended cleaning fluid for internal flushing is Petroleum Ether
- see also Fault Finding, page 65.
The use of a 500μm coarse screen filter, screwed onto the HP connector, is recommended for heavily contaminated systems. Refer to
page 62 for the part number.
1.3 LCD Visibility
If the LCD screen remains blank then refer to page 35 for recharging
instruction. To improve the LCD screen visibility, the Analyser can
be inclined by unlatching the two extension feet fitted to the bottom
of the case.
Precautions
5
2 Introduction
The LPA² is designed to measure and quantify the numbers of solid
contaminants in Hydraulic, Lubrication and Transmission applications. The LPA² is designed to be a laboratory accurate instrument
suitable for "on-site’’ applications utilising mineral oil as the operating fluid. Please contact local sales office for other operating fluid
options.
The instrument uses the light extinction principle whereby 2 laser
light systems shine through the fluid and lands on photodiodes. When
a particle passes through the beam it reduces the amount of light received by the diode, and from this change in condition, the size of
the particle can be deduced.
Hydraulic and Lubricating Systems consists of sets of continuously
moving metal parts, which use hydraulic fluid as the power medium.
Hydraulic fluid is also used to create a lubrication film to keep the
precision parts separated and it is also used as a cooling medium.
The very nature of a hydraulic system is that it produces solid particulate contaminants and these are ever present in all hydraulic systems. There is a revised standard ISO cleanliness code ISO 4406:
1999 which classifies the numbers of particles that can be tolerated
within the system and it is these levels of contaminants that the particle counter is designed to measure. 1
1
ISO Cleanliness Code – The international standard for reporting solid contaminants is ISO4406:1999, this standard has been revised to incorporate the change
to ISO Medium Test Dust as the calibration standard.
6
Introduction
Introduction
7
3 Online Operation
1. Insert WASTE FLUID HOSE in to the waste disposal bottle provided.
Important! Do not connect Waste Fluid Hose to a pressurised
system, as this will cause the Analyser to malfunction and
could cause internal leakage. The Waste Fluid Hose must be
discharged into the waste disposal bottle provided, or into a
tank/vessel vented to atmosphere.
2. Connect WASTE FLUID HOSE to Analyser (waste connector). Push
back quick coupling outer ring before connecting / disconnecting
hose end.
3. Connect FLUID SAMPLING HOSE to Analyser (HP connector)
4. Connect FLUID SAMPLING HOSE to the system by means of the
minimess connector.
The system to be monitored must not exceed 400 bar or be less
than 2 bar
5. Press GREEN BUTTON to switch on Analyser the "Main / test progress screen’’ will be displayed.
8
Online Operation
To prolong battery life it is advisable to switch off the Analyser
when not in use.
3.1 Main / Test Progress Screen
Next Test Reference
Next Test Number
Normal Test
ISO Code is
Start Stop Print Paper Set Log Figure 3.1
Contrast
+ -
Main Test Screen
1 START - Starts sampling and emptying cycle
2 STOP - Stops test at any point in the sampling/ emptying cycle. Next
test will start with an emptying cycle before the test commences,
3 PRINT - Prints test results. If AUTO PRINT mode has been turned
off, a copy of the results is obtained by pressing PRINT button.
4 PAPER - Ejects printer paper by three blank lines.
5 SET - Selects settings screen – see page 11
6 LOG - Selects Data Logging screen – see page 34
Online Operation
9
•
•
•
•
•
Transfer log – downloads memory to software package 2
Clear log – Clears memory
Clear last – Clears last result 3
Recall – Recalls results from memory
Print – Prints recalled results
7 8 CONTRAST +/-: Adjusts the screen contrast. 7 Darker 8 Lighter.
LOW BATTERY INDICATOR – see page 35
2
3
This is not needed on new units
Provided unit has not been switched off
10
Online Operation
3.2 Analyser Settings
Press the SET button 5 to program the Analyser to your requirements. The main "Settings Screen’’ will be displayed. To alter the
Analyser settings progress through the following routine from this
screen.
1) Test Ref: machine one
2) Test Number: 123
3) Time and Date
4) Result Presentation Options
5) Test Type: Normal
6) Test Options
7) Alarm Options
Press a Key to Choose or 0 to Exit
Figure 3.2
Main Settings Screen
3.2.1 Test Ref
1 Press 1 , then input your reference details e.g. “MACHINE 1←”
(RETURN). 15 characters maximum.
3.2.2 Test Number
2 Press 2 , then input the required test number e.g. “123←”. The Test
Number will automatically increment for each successive test.
Online Operation
11
3.2.3 Time and Date
3 Press 3 , then use the keypad to set the time and date.
Cycle Count
A cumulative cycle count is also displayed on the Time & Date
screen. This count automatically increases by 1 each time a test
is taken. It is not possible to adjust/ reset this value.
3.2.4 Result Presentation Options
4 Press 4 to bring up the Presentation Options screen. Then press the
relevant key to switch between the option selections.
1 cycles between the various available formats for the test result.
These are ISO, NAS, AS4059E-2 and AS4059E-1. 4
2 turns on and off the printing of detailed counts with the test result.
3 turns on and off the printing of the user Test Reference.
4 turns on and off automatic result printing.
5 turns on and off the printing of an additional space for hand-written notes on the printout.
6 selects the display language.
Note the Analyser has 5 language options:
4
AS4059E-1 and AS4059E-2 denotes Table 1 and Table 2 of the AS4059E standard
respectively
12
Online Operation
0.
1.
2.
3.
4.
English (Default)
Italian
French
German
Chinese
For selection of language proceed as follows:
−
−
−
−
−
−
−
−
Press 6 .
Enter chosen value (e.g. 1←for Italian).
Press key 0 (zero)
Press key 0 (zero)
Wait 5 seconds
Switch OFF the unit
RESTART the unit.
The main screen will then be displayed in the language selected.
3.2.5 Test Type
5 Button 5 is used from the Settings Screen to cycle between the
available test types. These are "Normal’’, "Dynamic’’, "Triple/Bottle" "Continuous’’ and "Short Sample’’. The selection will be displayed on the Main test progression screen
Normal – Single Test: 15ml sample volume
Dynamic – A comprehensive triple test 5 with results average: 30
ml sample volume comprised of three 10ml sampling and emptying
cycles. Allows the effect of system fluctuations to be measured over
5
Results will be displayed upon completion of three tests – including emptying
cycle
Online Operation
13
a longer period of time. Unit is flushed in between tests to ensure
each sample is representative of its point in time.
Triple / Bottle Sampling – A triple test with results average and
quicker than the Dynamic Test: 24ml sample volume comprised of
three individual 8 ml samples tested consecutively. For Bottle Sampling refer to separate User Guide.
Continuous – for detailed instructions refer to Continuous Sampling,
page 19.
Short – Single Test: 8 ml sample volume. This provides results
in less time than the Normal Test. It is not recommended for oil
samples cleaner than ISO 17/15/12 (NAS 6), as the accuracy of the
result might be compromised by the ‘small’ sample volume
Press 5 repeatedly to select desired test type.
3.2.6 Test Options
Press 6 . The Test Options Screen will be displayed.
(The RH Test setting is not displayed if the option is not fitted)
This mainly applies to the continuous test mode. Option 3 only applies to the Continuous Test, alarm mode 1. For detailed instructions
refer to Continuous Sampling, page 19.
7 Alarm Options – refer to page 28
3.3 Preparing Analyser For Test
Taking sample – Normal, Dynamic, Triple/ Bottle, Short
14
Online Operation
8 Press flush valve push button to open flush valve – push button illuminates to indicate valve is open. Leave valve open for at least one
minute or 200ml of fluid, to remove any entrapped air and fluid from
the previous test ensuring no cross-contamination between samples.
9 Press flush valve push button to close flush valve – push button illumination is cancelled. Alternatively, proceed to step 10 – the action
of pressing Start button automatically closes the Flush valve before
sampling commences.
10 Press START button: The analyser will now commence the sampling
cycle.
11 The completion progress bar indicated the status of the sample.
•
Results will be automatically displayed on the screen.
•
Results will be automatically printed at the end of the sampling
cycle, if the Auto Print mode has been turned ON.
•
If the Auto Print mode has been turned OFF, then press Print
key to obtain printed results.
12 Following the sampling results the Analyser automatically discharges
the sample fluid to waste. Test status is shown as Emptying.
13 When the Sampling and Emptying cycle has been completed the test
status is shown as Idle.
Results are automatically stored to memory. To download results
follow instructions on page 34.
3.4 Interpreting Results
Refer to page 49 for hydraulic component manufacturers recommendations on standard cleanliness requirements for various applications. ISO4406:1999 and NAS1638 cannot be directly compared.
Online Operation
15
ONLINE – Normal
ONLINE – Dynamic
Particle count
ISO and NAS Code complete
and ISO code to
with average analysis
ISO4406:1999 standard
ONLINE – Normal
Particle counts displayed –
NAS code 1638 standard
16
Online Operation
The Analyser upper operating
limit is set at 24/22/20.
Tests that result in particle counts
exceeding any scale number in
the three part ISO code upper
limit has the scale number replaced by an asterisk. Also,
the associated particle counts
on the printout are replaced by
X’s. Refer to the example on
the left.
3.5 Further Tests
3.5.1 Same Sampling Point
To repeat a test on the same sample point press START button 1 .
Note that the test number will automatically increment.
Online Operation
17
3.5.2 Different Sampling Point/ Same System
To carry out this new test repeat steps 8 to 13 on page 14.
To change test reference/ test mode data, repeat steps 1 to 13 on
page 11.
3.5.3 New System
To carry out this test repeat steps 1 to 13 on page 11.
3.6 Shutting Down
1. Disconnect the Fluid Sampling Hose from the system by means of
the Minimess connector. This isolates the fluid supply.
2. Operate the Flush Valve to release the pressure.
3. Switch off the Analyser by Pressing the Red Button.
4. Remove the Fluid Sampling Hose from the Analyser
5. Remove the Waste Fluid Hose from the Analyser
6. Replace the Hose End Caps on sampling hose, wipe clean and store
7. Connect the Waste Fluid Hose quick coupling end fittings together,
wipe clean and store.
18
Online Operation
4 Continuous Sampling
The LPA² can be selected for continuous testing at set time intervals.
Once continuous sampling has started the LPA²’s flush valve automatically opens and closes before each test. This allows representative fluid to reach the sensing arrangement before the 15ml sampling
test commences.
The flush valve automatically opens at the end of the sampling cycle
and remains open whilst the LPA² is emptying to waste the sample
fluid from the previous test. Additionally, depending on the time set
for Minutes Between Tests, the flush valve operates as follows:•
Time set to 0:
At the end of the Analyser’s emptying cycle the Flush valve automatically closes and the next sampling test immediately starts.
•
Time set to between 1 and 5:
After the Analyser’s emptying cycle has finished the Flush valve
remains open for the time set, then automatically closes before
the next sampling test.
•
Time set to between 6 and 30000:
Flush valve automatically closes after the emptying cycle has
finished and remains closed until 5 minutes before the next sample test is programmed to start.
The Flush valve status is indicated by the push button illumination.
Not illuminated means valve closed, illuminated means valve open.
The servo motor operating the Flush valve exhibits a slight ‘ticking’
noise, both when it is open and closed. This is normal.
Continuous Sampling
19
Important! Do not connect Waste Fluid Hose to a pressurised
system, as this will cause the LPA² to malfunction and could cause
internal leakage. The Waste Fluid Hose must be discharged into
a tank/ vessel vented to atmosphere.
To conserve battery life, the LPA² should be permanently connected
to the power adaptor when it is operated in the continuous sampling
mode.
4.1 Continuous Sampling – Basic Operation
1 See page 11, instructions 1 to 5 inclusive, to select the appropriate
LPA² settings.
On the Settings Screen, press 5 repeatedly until CONTINUOUS is
selected.
2 Test Option – Press 6 :
Then press the relevant key to switch between option selections:
1 Sets the MINUTES BETWEEN TESTS
Press 1 then input the time in minutes that is required between
the end of a test and the beginning of a new test. Input a value
between 1 and 30000 followed by ←RETURN.
2 selects between LOG EVERY TEST: ON and LOG EVERY TEST: OFF
Selecting LOG EVERY TEST: OFF will store none of the test results
in the LPA²’s memory.
4 used to input the Clean Alarm Level (ISO). Enter a value of 0
(zero) if not used.
20
Continuous Sampling
5 used to input the Clean Alarm Level when using the NAS1638
/ AS4059E-1 format. Enter 0 if not used.
6 used to enter the Clean Alarm Level when using the AS4059E-2
format. Enter 0 if not used. (This Alarm Level will now be
displayed as *A/*B/*C/*D/*E/*F).
3 Press the flush valve push button to open the flush valve. The push
button illuminates to indicate that the valve is open. Leave valve
open for at least 1 minute or 200ml of fluid, or more if the HP sampling hose is greater than 1.5m long.
4 Press flush valve push button to close flush valve – push button illuminates is cancelled. Alternatively, proceed to Step 5 below – the
action of pressing Start button automatically closes the flush valve
before sampling commenced.
5 Press the START button 1
The LPA² will now commence the sampling procedure.
6 The completion progress bar indicates the status of the test.
•
Results will be automatically displayed on the screen after each
test.
•
Results will be automatically printed at the end of the emptying
cycle, if the Auto Print mode has been turned ON
7 The status is shown as Waiting between the ending of one test and
the starting of the next
8 Press Stop button 2 at any point in the cycle to end continuous
sampling. The test status will show Idle.
Continuous Sampling
21
4.1.1 Continuous Sampling – with Clean Alarm Levels –
Alarm Mode 1
This operating mode is similar to the Basic Operation, but in this
mode the LPA² will stop testing when the specified clean alarm level
is achieved.
A status of COMPLETED is shown on the LCD when the specified
clean alarm level is achieved.
(For other Alarm Modes refer to page 30).
9 Follow the section “Analyser Settings” (page 11), instructions 1 to
5 inclusive, to select the appropriate LPA² settings.
On the Settings Screen, press 5 repeatedly until CONTINUOUS is
selected
10 Test Options 6
Press relevant key to switch between option selections
1 Enter MINUTES BETWEEN TESTS
Press 1 then input the time in minutes that is required between
the end of a test and the beginning of a new test. Input a value
between 1 and 30000 followed by ←RETURN.
2 Selects between LOG EVERY TEST: ON and LOG EVERY TEST: OFF
Selecting Log Every Test: Off will only store the results of the
test when the Clean alarm Level is achieved – this saves memory
space.
3 Confirm Cleanliness Level
Press 3 to turn CONFIRM CLEANLINESS LEVEL On and Off.
22
Continuous Sampling
Selecting CONFIRM CLEANLINESS LEVEL: ON instructs the Analyser to repeat the sampling cycle until the Clean alarm level has
been achieved in two consecutive samples, before the Completed
status is displayed. Selecting CONFIRM CLEANLINESS LEVEL:
OFF permits the Clean alarm to be achieved only one time before the Completed status is displayed.
4 Clean Alarm Level (ISO)
Press 4 then input desired Clean Alarm Level in the Code format Number/ Number/ Number – any code number combination
can be input, from code 5 to 24, example 10/9/5 ←RETURN
For continuous testing until the ISO Code is achieved, selected
ISO Format, as described under the previous section on page 11
“Analyser Settings” instruction 4, 1.
Testing will automatically continue until each of the three numbers in the Code have been achieved (or better).
5 Clean Alarm Level (NAS1638 / AS4059E-1)
Press 5 then input desired Clean Alarm Level, as a single Class
number in the range 2 to 12 inclusive, example 6←RETURN
For continuous testing until the (NAS1638 / AS4059E-1) Class
is achieved, select NAS Format or AS4059E Table 1, as described in “Analyser Settings” page 11 instruction 4, 1. Testing will automatically continue until the Class number has been
achieved at each of the five micron size ranges covered by NAS
1638 & AS4059E Table 1. Note: AS4059E-1 denotes Table 1
of the AS4059E standard.
6 Clean Alarm Level (AS4059E-2)
Continuous Sampling
23
Press 6 then input desired Clean Alarm Level in the format
1A/2B/3C/4D/5E/6F in the following range:
Size Code A: 000to 12
Size Code B: 00 to 12
Size Code C: 00 to 12
Size Code D: 2 to 12
Size Code E: 4 to 12
Size Code F: 7 to 12
Example, 4A/4B/5C/6D/6E/7F
For continuous testing until the AS4059E Table 2 size codes
are achieved, select AS4059E TABLE 2 FORMAT, as described in
“Analyser Settings” page 11 instruction 4, 1. Testing will automatically continue until the Class number has been achieved at
each of the six Size Codes.
Also, the LPA² will handle deviations from the above format
intelligently. The size code can be out of order: 7F / 4A / 5C /
4B / 6E / 6D
If any sizes are missing, they will be assigned the “*” value. The
effect of this is a “don’t care” value when used as the cleanliness
target. For example, 6B/6C/7D is translated as *A/6B/6C/7D/*E/*F.
In this case, testing will continue until the B, C and D Classes are
less than or equal to 6, 6, 7 respectively. The A, E and F Classes
are effectively ignored since they cannot ever be “ worse” than a
“*” Class. Note: AS4059E-2 denotes Table 2 of the AS4059E
standard.
11 Press flush valve push button to open flush valve – push button illuminates to indicate valve is open. Leave valve open for at least one
24
Continuous Sampling
minute or 200ml of fluid, to remove any entrapped air and fluid from
the previous test ensuring no cross-contamination between samples.
12 Press flush valve push button to close flush valve – push button illumination is cancelled. Alternatively, proceed to step 13 – the action
of pressing Start button automatically closes the Flush valve before
sampling commences.
13 Press START button 1
The Analyser will now commence the sampling cycles
14 The completion progress bar indicates the status of the test.
•
Results will be automatically displayed on the screen after each
test.
•
Results will be automatically printed at the end of the emptying
cycle, if the Auto Print mode has been turned ON.
15 The status is shown as Waiting between the ending of one test and
the stating of the next test.
16 Press Stop button (key 2) at any time in the cycle to end continuous
sampling. The test status will show Idle.
Continuous Sampling
25
5 Moisture Sensor
The LPA² version fitted with the optional moisture sensor module
allows both measurement of % saturation of water in oil (Relative
Humidity) and temperature. These are displayed as RH % and °C
on the main/test progress screen and on the printed results.
Temperature measurement provides a reference temperature for the
RH reading.
Due to the temperature gradient existing between the system
tapping point and the RH/temperature module, the temperature reading can be 5°C to 10°C less than the actual system
temperature, depending on operating conditions.
The LPA² can be configured to do a test with or without the moisture
sensor selected. If the moisture sensor has been selected, the flush
valve will open automatically for a period of 3 minutes before the
particle count test commences. This is to allow the moisture sensor
to stabilise and give an accurate reading.
To switch the moisture sensor ON or OFF, select the Test Option
Screen, as described on page 14. The Test Options Screen will be
displayed.
26
Moisture Sensor
1) Minutes Between Tests: 0
2) Log Every Test: On
3) Confirm Cleanliness Level: Off
4) Clean Alarm Level (ISO): 0
5) Clean Alarm Level (NAS1638/AS4059E-1):0
6) Clean Alarm Level (AS4059E-2):
1A/2B/3C/4D/5E/6F
7) RH Test: On
Press a Key to Choose or 0 to Exit
Press 7 to change RH Test status to ON or OFF.
Moisture Sensor
27
6 Alarms
Access the Operations screen as described on page 11 and press 7
ALARM OPTIONS. The Alarm Options screen will be displayed.
1) Alarm Mode: 1
2) Dirty Alarm Level (ISO): 0
3) Dirty Alarm Level (NAS1638 / AS4059E-1):
0
4) Dirty Alarm Level (AS4059E-2):
1A/2B/3C/4D/5E/6F
Press a Key to Choose or 0 to Exit
The LPA² includes two solid state relays for connections to an external circuit. These can be arranged to function as follows:
1 Alarm Mode: 0
Selecting option 0 switches relays 1 and 2 always off.
2 Alarm Mode: 1
Selecting option 1 will configure relays 1 and 2 as described on
page 31 - refer to the examples given on the simple wiring diagrams.
28
Alarms
Clean alarm levels are set in accordance with the instructions starting on page 22. Alarm mode 1 is used in conjunction with the Continuous Sampling test type, enabling the Analyser to operate continuously until the specified clean alarm level is achieved.
3 Alarm Mode: 2
Selecting option 2 arranges the relays to operate when the Clean
and Dirty alarm levels are reached/exceeded. Alarm mode 2 will
normally be used in conjunction with the Continuous test type (refer
to page 20), but can be used with all other test types as well.
Set the Clean and Dirty alarm levels by inputting the desired levels
in to both the Test options screen (page 14) and the Alarm options
screen, also setting the appropriate result format to ISO, NAS or
AS4059, as described on page 12.
Both relays are initially off and remain off until an alarm level has
been reached/exceeded.
The following illustrates the switching logic of the Relays :Relay 1 (Dirty)
NAS/AS4059E-1 single number
ISO/AS4059E-2 multi-part
result > set limit
result <= set limit
any result > corresponding set limit
all results <= corresponding set limit
On
Off
On
Off
result <= set limit
result > set limit
On
Off
Relay 2 (Clean)
NAS/AS4059E-1 single number
Alarms
29
ISO/AS4059E-2 multi-part
all results <= corresponding set limit On
any result > corresponding set limit Off
Alarm Modes: 3 and 4
These are reserved for future development.
30
Alarms
7 Wiring
The LPA² contains two solid state relays which can be used to switch
an external circuit, when using the Continuous Test mode. The function of these relays for Alarm Mode 1 is shown in the following simple wiring diagrams, using a battery and bulb circuit for illustrative
purposes.
Each relay is designed for a maximum current of 1 amp at 24 volt
nominal AC or DC (absolute maximum 60 volt peak). Operation
above these limits will cause irreparable damage to the relays.
If the User needs to switch voltages/currents in excess of the above
maximum limits, then separate higher rated interposing relays will
need to be incorporated into the final electrical scheme designed by
the User.
Wiring
31
Example 1: Bulb illuminates
Example 2: Bulb illuminates during
when Clean alarm level is
sampling and extinguishes
achieved (completed status),
when Clean alarm level is
and is off during sampling.
achieved (completed status
is shown on LPA²). (Relay 1
is also closed during Normal,
Dynamic, Triple & Bottle and Short
test types. Relay will open
when stop button is pressed)
32
Wiring
8 Bottle Sampling
An alternative to operating on-line is to use MP Filtri UK’s Bottle Sampling
Unit to test oil contained in bottles. Refer to the separate User Guide for
details.
Bottle Sampling
33
9 Data Logging
Press the Log button 6 to access results stored within the LPA²’s
memory, the Log Screen will be displayed.
1) Transfer Log
2) Clear Log
3) Clear Last
4) Recall
5) Print
Press a Key to Choose or 0 to Exit
To view the contents of the LPA²’s memory progress through the
following routine -
• Select 4 Recall and enter the number of the test to be retrieved.
• If the test number is not known enter the last test number and
scroll through the memory, using + Next or - Previous to select the required result.
• To print the result press 0
the result will then be
6
EXIT,
printed. 6
then 5 Print. A hard copy of
The result printed will be viewed in the Result Presentation Options format from
the Set function.
34
Data Logging
10 Battery Charging
The LPA² is equipped with an internal rechargeable battery capable of sustaining 8 hours continuous operation following a 24 hour
charging period (approximately 100 tests).
To conserve battery power the LCD screen is illuminated at a reduced level when the LPA² is operated without an external power
supply connected.
When the Low battery level indicator
quires recharging as soon as possible.
is displayed the LPA² re-
BEFORE COMMENCING RECHARGING always press RED
button to switch off the Analyser.
To recharge, connect lead from power adaptor to the DC power input socket on the LPA². Observe that the battery charging indicator
illuminates on the LPA².
Battery power may be conserved by:
• Operating LPA² whilst connected to power adaptor
• Switching LPA² OFF between samples
• Turning Auto Print Mode OFF
Should the battery become completely discharged it is advisable to
allow a minimum of 15 minutes charge time prior to commencing a
test. The LPA² must remain connected to the power adaptor during
subsequent tests until the battery has had time to recharge.
Battery Charging
35
Total discharge will shorten the battery lifetime so should be avoided
where possible.
36
Battery Charging
11 Printer Paper
To access the thermal printer, remove the four thumbscrews securing
the cover and serrated paper cutter. Thermal printer paper is sensitised on one side only and must be fed into the printer mechanism
as shown below.
SERRATED CUTTER
THERMAL PRINT HEAD
ROLLER
Figure 11.1
Printer Mechanism
Using a finger, press down on the print head spring at position A and
tilt the print head to the open position by pulling it back at point B.
B
A
C
Figure 11.2
Print Head Spring
Feed the paper under the roller and pull the paper end out of the
mechanism. Return the print head back to its normal position by
pressing on the green lever at point C. Ensure that the print head
spring has returned to the position shown above.
Printer Paper
37
IMPORTANT The thermal printer must not be operated without paper, as this will damage the printer. Therefore, replace
the roll when the "end of the roll’’ indication appears on the
paper.
38
Printer Paper
12 Computer Analysis
12.1 Software Installation
Install software on to a suitable PC running Windows XP or later.
Follow instructions as detailed in the LPA-View User Manual.
12.2 Results Download
1 Connect RS232 cable to LPA² and PC via an appropriate port. 7
2 Switch ON the LPA².
3 Switch ON the PC.
•
•
•
•
•
Launch LPA-View software.
From File select Upload.
Data Transfer Screen will be displayed.
Select appropriate COM Port.
Select Transfer Data.
The Analyser will download all stored results from memory into the
software package. Upon completion of upload the Analyser memory
can be automatically deleted - if this option has been selected from
the PC menu.
4 When the transfer is complete switch OFF the Analyser.
7
See Appendix on page 63 for more information on the RS232 connection options.
Computer Analysis
39
13 Warranty
The LPA² is guaranteed for 12 months upon receipt of the Analyser,
subject to it being used for the purpose intended and operated in
accordance with this user guide. Please fill in online
13.1 Recalibration
MP Filtri UK will only verify the accuracy of the LPA² if the unit is
recalibrated every 12 months.
Please ensure that the test results in the Log are downloaded to
LPA-View before the LPA² is despatched, in case action taken
by MP Filtri UK during the service / recalibration causes the
Log to be cleared.
It is requested that only the LPA², not the support case or any other
ancilliaries, be returned for recalibration.
MP Filtri UK will not be held responsible for any items returned as
such.
Ensure that the LPA² is packed appropriately for transportation.
40
Warranty
Appendix A
Measuring Water in Hydraulic
and Lubricating Fluids
From North Notts Fluid Power Centre
In mineral oils and non aqueous fire resistant fluids water is undesirable. Mineral oil usually has a water content of 50-300 ppm which it can support without adverse consequences.
Once the water content exceeds about 500ppm the oil starts to appear hazy.
Above this level there is a danger of free water accumulating in the system in
areas of low flow. This can lead to corrosion and accelerated wear. Similarly,
fire resistant fluids have a natural water content which may be different to
mineral oils.
Saturation Levels
Since the effects of free (also emulsified) water is more harmful than
those of dissolved water, water levels should remain well below the
saturation point. However, even
water in solution can cause damage and therefore every reasonable
effort should be made to keep saturation levels as low as possible.
There is no such thing as too little
water. As a guideline, we recommend maintaining saturation levels
below 50% in all equipment.
Measuring Water Content
41
Appendix A
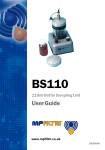
Typical Water Saturation Levels For New Oils
Figure I
Examples:
42
Hydraulic oil @ 30°C = 200ppm = 100% saturation
Hydraulic oil @ 65°C = 500ppm = 100% saturation
Measuring Water Content
Appendix B
ISO4406:1999 Cleanliness Code System
The International Standards Organization standard ISO 4406:1999
is the preferred method of quoting
the number of solid contaminant
particles in a sample.
The code is constructed from the
combination of three scale numbers selected from the following
table.
The first scale number represents
the number of particles in a millilitre sample of the fluid that are
larger than 4 µm(c).
The second number represents the
number of particles larger than 6
µm(c).
The third represents the number
of particles that are larger than 14
µm(c).
ISO4406:1999 Cleanliness Code System
43
Appendix B
Microscope counting examines the
particles differently to APCs and
the code is given with two scale
numbers only. These are at 5 µm
and 15 µm equivalent to the 6
µm(c) and 14 µm(c) of the APCs.
44
ISO4406:1999 Cleanliness Code System
Appendix C
NAS1638 Cleanliness Code System
The NAS system was originally developed in 1964 to define contamination
classes for the contamination contained within aircraft components. The application of this standard was extended to industrial hydraulic systems simply
because nothing else existed at the time. The coding system defines the maximum numbers permitted of 100ml volume at various size intervals (differential counts) rather than using cumulative counts as in ISO 4406:1999. Although there is no guidance given in the standard on how to quote the levels,
most industrial users quote a single code which is the highest recorded in all
sizes and this convention is used on the LPA² software.
Figure C.I
CONTAMINATION LEVEL CLASSES
according to NAS1638 (January 1964).
The contamination classes are defined by a number (from 00 to 12) which
indicates the maximum number of particles per 100 ml, counted on a differential basis, in a given size bracket.
NAS1638 Cleanliness Code System
45
Appendix D
SAE AS4059 REV.E Cleanliness
Classification For Hydraulic Fluids VIII
This SAE Aerospace Standard (AS) defines cleanliness levels for particulate
contamination of hydraulic fluids and includes methods of reporting data relating to the contamination levels. Tables 1 and 2 below provide the Maximum Contamination Limits (Particles/100ml) of differential and cumulative particle counts respectively for counts obtained by an automatic particle
counter, e.g. LPA².
VIII
The information reproduced on this and the previous page is a brief extract from SAE
AS4059 Rev.E, revised in May 2005. For further details and explanations refer to the full
Standard.
46
SAE AS4059 REV.E Cleanliness Classification For . . .
Appendix D
Size range μm(c):
6 - 14
14 - 21
21 - 38
00
125
22
0
250
44
1
500
89
2
1,000
178
3
2,000
356
4
4,000
712
5
8,000
1,425
6
16,000
2,850
7
32,000
5.700
8
64,000 11,400
9
128,000 22,800
10
256,000 45,600
11
512,000 91,200
12 1,024,000 182,400
4
8
16
32
63
126
253
506
1,012
2,025
4,050
8,100
16,200
32,400
38 - 70
>70
Class
1
0
2
0
3
1
6
1
11
2
22
4
45
8
90
16
180
32
360
64
720
128
1,440
256
2,880
512
5,760 1,024
Table D.I AS4059E Table 1 - Cleanliness Classes for Differential
Particle Counts
SAE AS4059 REV.E Cleanliness Classification For . . .
47
Appendix D
Size μm(c)
>4
>6
>14
>21
>38
>70
Size Code
A
B
C
D
E
F
195
390
780
1,560
3,120
6,250
12,500
25,000
50,000
100,000
200,000
400,000
800,000
1,600,000
3,200,000
76
152
304
609
1,217
2,432
4,864
9,731
19,462
38,924
77,849
155,698
311,396
622,792
1,245,584
14
27
54
109
217
432
864
1,731
3,462
6,924
13,849
27,698
55,396
110,792
221,584
Classes
000
00
0
1
2
3
4
5
6
7
8
9
10
11
12
3
1
0
5
1
0
10
2
0
20
4
1
39
7
1
76
13
2
152
26
4
306
53
8
612
106
16
1,224
212
32
2,449
424
64
4,898
848
128
9,796 1,696
256
19,592 3,392
512
39,184 6,784 1,024
Table D.II AS4059E Table 2 - Cleanliness Classes for Cumulative Particle
Counts
48
SAE AS4059 REV.E Cleanliness Classification For . . .
Appendix E
Recommendations
Unit
Type
ISO 4406:1999 Code
PUMP
Piston (slow speed, in-line)
Piston (high speed, variable)
Gear
Vane
22/20/16
17/15/13
19/17/15
18/16/14
MOTOR
Axial piston
Radial piston
Gear
Vane
18/16/13
19/17/13
20/18/15
19/17/14
VALVE
Directional (solenoid)
20/18/15
Pressure control (modulating) 19/17/14
Flow control
19/17/14
Check valve
20/18/15
Cartridge valve
20/18/15
Proportional
18/16/13
Servo-valve
16/14/11
ACTUATOR
Table E.I
20/18/15
Typical Manufacturers Recommendations for Component
Cleanliness (ISO 4406:1999) IX
Most component manufacturers know the proportionate effect that increased
dirt level has on the performance of their components and issue maximum
permissible contamination levels. They state that operating components on
IX
It should be noted that the recommendations made in this table should be viewed as starting
levels and may have to be modified in light of operational experiences or user requirements.
Recommendations
49
Appendix E
fluids which are cleaner than those stated will increase life. However, the diversity of hydraulic systems in terms of pressure, duty cycles, environments,
lubrication required, contaminant types, etc, makes it almost impossible to
predict the components service life over and above that which can be reasonably expected. Furthermore, without the benefits of significant research
material and the existence of standard contaminant sensitivity tests, manufacturers who publish recommendations that are cleaner than competitors may
be viewed as having a more sensitive product.
Hence there may be a possible source of conflicting information when comparing cleanliness levels recommended from different sources.
The table gives a selection of maximum contamination levels that are typically issued by component manufacturers. These relate to the use of the
correct viscosity mineral fluid. An even cleaner level may be needed if the
operation is severe, such as high frequency fluctuations in loading, high temperature or high failure risk.
50
Recommendations
Appendix F
Hydraulic System Target
Cleanliness Levels
Where a hydraulic system user has been able to check cleanliness levels over
a considerable period, the acceptability, or otherwise, of those levels can be
verified. Thus if no failures have occurred, the average level measured may
well be one which could be made a bench mark. However, such a level may
have to be modified if the conditions change, or if specific contaminant-sensitive components are added to the system. The demand for greater reliability
may also necessitate an improved cleanliness level.
The level of acceptability depends on three features:
•
the contamination sensitivity of the components
•
the operational conditions of the system
•
the required reliability and life expectancy
Hydraulic System Target Cleanliness Levels
51
Appendix F
Contamination
Codes
ISO 4406:1999
Corresponding
Codes
NAS 1638
Recommended
Filtration
Degree
Typical
Applications
4
μm(c)
6
μm(c)
14
μm(c)
Bx200
14
12
9
3
3
17
15
11
6
3-6
18
16
13
7
10-12
Very sensitive - high
reliability systems
20
18
14
9
12-15
Sensitive - reliable
systems
21
19
16
10
15-25
General equipment of
limited reliability
23
21
18
12
25-40
Low - pressure equipment not in continuous service
High precision and
laboratory servo-systems
Robotic and
servo-systems
The table above is a guide to the recommended filtration level for various
hydraulic components, together with typical target system cleanliness levels.
52
Hydraulic System Target Cleanliness Levels
Appendix G
New ISO Medium Test Dust and its effect on
ISO Contamination Control Standards
When General Motors gave advance warning to the International Standards
Organization (ISO) that it was intending to stop the production of AC Fine
Test Dust (ACFTD), work commenced immediately on finding an improved
replacement dust. ACFTD was used extensively within the fluid power and
automotive industries for calibrating Automatic Particle Counters (APCs)
and for the testing of components.
APCs are used for testing oil filters, and also for contaminant sensitivity testing of hydraulic components. For 25 years, APCs have been the main stay in
the measurement of solid particles in hydraulic fluids. The growth in demand
for measuring fluid cleanliness in a variety of industrial processes, including
fluid power, has resulted in APCs moving from the laboratory environment
out into the factory. In fact, they are now a critical part of many production
processes. It is therefore essential that the data they provide is both accurate
and consistent.
Calibration
ACFTD has been used as an artificial contaminant since the 1960s and its
original particle size distribution was determined using an optical microscope. This particle size distribution subsequently formed the basis of ISO
4402, the method for calibrating APCs. Due to the limitations of that method
of measurement, the particle size distribution was questioned below about
5µm. It was also not traceable to any national standard of measurement - a
critical requirement for today’s quality management systems.
There was also an absence of formal controls over the distribution of the
test dust, and batch-to-batch variability was much greater than is acceptable
nowadays.
New ISO Medium Test Dust and its effect on ISO . . .
53
Appendix G
ISO therefore defined the requirements for the replacement for ACFTD and
asked the National Institute of Standards and Technology (NIST) in the USA
to produce a standard, traceable reference material. The new dust’s particle size distribution has been accurately determined with the aid of modern
scanning electron microscope and image analysis techniques.
New Test Dust Benefits
The new ISO Medium Test Dust (ISO MTD) consists of similar materials to
the old ACFTD, but to minimize particle counting errors, it is of a slightly
coarser grade because ACFTD included too many particles smaller than 5µm
which gave problems during testing.
ISO MTD is produced to a standard distribution and stringent quality control
procedures, thereby ensuring excellent batch-to-batch repeatability. These
procedures, combined with a revised ISO APC calibration method give:
• A traceable and controlled reference test dust with greatly reduced vari•
•
•
•
•
ation in particle size distribution. This gives the trace-ability required by
ISO 9000, QS9000 and similar quality management systems.
A procedure for determining the performance of APCs so that minimum
acceptable levels can be set by the user.
Improved calibration techniques and procedures.
More accurate calibration.
Improved levels of particle count reproducibility with different equipment.
More accurate and consistent filter test results.
Effect on Industry
The introduction of ISO MTD has necessitated changes to certain ISO standards.
54
New ISO Medium Test Dust and its effect on ISO . . .
Appendix G
The standards affected include:
ISO 4402:1991
Hydraulic fluid power
Calibration of liquid automatic particle counters.
ISO 4406:1987
Hydraulic fluid power
Code for defining the level of contamination by solid particles.
ISO 4572:1981
Hydraulic fluid power – Filters
Multi-pass method for evaluating filtration performance of
a filter element.
In order that users are not confused by the changes to these standards, particularly by reference to them in technical literature, ISO is updating 4402 to
ISO 11171, and 4572 to ISO 16889.
Two standards which concern our industry are the ISO 4406 coding system
and the new ISO 16889 Multi-pass test. As APCs will henceforth count particles more accurately, there will now be a change in the way sizes are labelled.
In the new ISO 4406:1999, new calibration sizes are used to give the same
cleanliness codes as the ‘old’ calibration sizes of 5 and 15 µm. In this way,
there will be no necessity to change any system cleanliness specifications.
It is proposed that the cleanliness codes (for APCs) will be formed from
three X particle counts at 4, 6 and 14 µm, with 6 and 14 µm corresponding
very closely to the previous 5 and 15 µm measurements. This will ensure
consistency in data reporting.
As the counts derived by microscope counting methods are not affected, the
particle sizes used for microscopy will remain unchanged (i.e. at 5 and 15
µm).
X
The option of quoting just two counts of 6µm and 14µm for APCs remains.
New ISO Medium Test Dust and its effect on ISO . . .
55
Appendix G
To clarify matters still further, ISO standards written around the new test dust
will utilize a new identifier, ‘(c)’. Hence µm sizes according to the new ISO
11171 will be expresses as ‘µm(c)’ and Beta ratios according to ISO 16889
will be expressed as ‘Bx(c)’, e.g.‘B5(c)’.
However, it must be stressed that the only real effect users will experience
will be the improved accuracy in particle counts - there will be no change
in the performance of filters, nor in the ISO cleanliness levels that they will
achieve.
The following charts shows the correlation between the old ACFTD and the
new ISO MTD.
The LPA² is calibrated with ISO Medium Test Dust (to ISO 11171). The
correlation between particle sizes and the ACFTD (old standard) to the ISO
MTD (new standard) is as follows :
ACFTD
ISO MTD
XI
XII
<1 5 15 25 30 50
75
4 6 14 21 25 38 50 XI
100
70 XII
Not verified by NIST
acftd
56
New ISO Medium Test Dust and its effect on ISO . . .
Appendix G
Correlation
The table shows the correlation between Particle Sizes Obtained using
ACFTD (ISO 4402:1991) and NIST
(ISO 11171) Calibration Methods
This table is only a guideline. The exact
relationship between ACFTD sizes and the
NIST sizes may vary from instrument to instrument depending on the characteristics
of the particle counter and original ACFTD
calibration.
Particle Size Obtained Using
ACFTD ISO/NIST MTD
(ISO 4402:1991) (ISO 11171)
µm
µm(c)
1
4.2
2
4.6
3
5.1
4
5.8
5
6.4
6
7.1
7
7.7
8
8.4
9
9.1
10
9.8
11
10.6
12
11.3
13
12.1
14
12.9
15
13.6
16
14.4
17
15.2
18
15.9
19
16.7
20
17.5
21
18.2
22
19.0
23
19.7
24
20.5
25
21.2
26
22.0
27
22.7
28
23.5
29
24.2
30
24.9
31
25.7
32
26.4
33
27.1
34
27.9
35
28.5
36
29.2
37
29.9
38
30.5
39
31.1
40
31.7
Other Standards
Although the ISO 4406:1999 standard is being used extensively within the
hydraulics industry other standards are occasionally required and a comparison may be requested. The following table gives a very general comparison
New ISO Medium Test Dust and its effect on ISO . . .
57
Appendix G
but often no direct comparison is possible due to the different classes and
sizes involved.
XIII
All section headings indicated with [] are reproduced by kind permission of British Fluid
Power Association from BFPA/P5 1999 issue 3 Appendix 44
58
New ISO Medium Test Dust and its effect on ISO . . .
Appendix G
ISO 4406:1999
13/11/08
14/12/09
15/13/10
16/14/09
16/14/11
17/15/09
17/15/10
17/15/12
18/16/10
18/16/11
18/16/13
19/17/11
19/17/14
20/18/12
20/18/13
20/18/15
21/19/13
21/19/16
22/20/13
22/20/17
23/12/14
23/21/18
24/22/15
25/23/17
DEF.STD 05/42 [7] XIII
NAS 1638[5]
Table A
ISO 11218[6]
Table B
SAE 749[8]
2
3
4
0
1
5
2
6
3
7
4
8
5
9
6
400F
400
800F
800
1,300F
1,300
2000F
2,000
4,400F
4,400
6,300F
10
6,300
11
15,000
12
21,000
100,000
Table I
New ISO Medium Test Dust and its effect on ISO . . .
59
Appendix H
Specification
As a policy of continual improvement, MP Filtri UK reserve the right to alter the specification
without prior notice.
Technology
Automatic Optical Particle Analyser
Optical Package
Twin Laser and Twin Optical Diode Detectors
Display
Backlight graphical LCD
Sensitivity
>4,6,14,21,25,38,50,70 μm(c) sizes to revised
ISO 4406: 1999 Standard
Accuracy / repeatability
Better than 3% typical
Calibration
Each unit is individually calibrated with ISO
Medium Test Dust (MTD) based on ISO 11171:
1999 on equipment certified by I.F.T.S.
Analysis Range
ISO 8 to ISO 24 to ISO 4406: 1999
NAS 1638: 2 to 12
AS4059E Table 1: 2 to 12
AS4059E Table 2: Size Codes A: 000 to 12, B:
00 to 12, C: 00 to 12, D: 2 to 12, E: 4 to 12, F: 7
to 12
Report / Print Format
ISO4406:1999, NAS1638 and AS4059E codes
/ classes with individual particle counts as a
built-in option
Printer
Fixed head thermal printer (384 dots per line)
60
Specification
Appendix H
LPA² Sample volume
15 ml. (normal) 30 ml. (dynamic) 24 ml. (bottle
sampler) 15 ml. (continuous) 8ml. (short)
Operation
Max. system working pressure: 400 bar.
Min. working pressure: 2 bar
Viscosity range
to 400 centistokes
Operating temperature
+5 to +80°C
Fluid compatibility
Mineral oil & petroleum based fluids (consult
MP Filtri UK for other fluids)
Typical test time
Result in <2.5 mins. (normal test)
Power
Internal rechargeable battery (mains charger) or
External 12/24 volt DC power supply.
Data storage
600 tests
Computer interface
RS 232 communication port
Hose connections
Minimess fittings
Microbore hose 1.5 metres long
Waste fluid hose
Dimensions
Height 210mm Depth 260mm
Width 430mm Weight 7.6kg
Specification
61
Appendix I
Spare Product / Part Numbers
For spares and part numbers please see the website:
www.mpfiltri.co.uk
62
Spare Product / Part Numbers
Appendix J
COM Ports
The LPA² uses the RS232 connection standard to interface with a computer.
If the computer does not have a built-in RS232 ("COM’’) port, a USB:RS232
adaptor can be used.
Connection Using a USB Port
This is used when a built-in RS232 port is not available. When using a USB
Adaptor provided with the LPA²:
• Install the Prolific driver from the file:
PL2303_Prolific_DriverInstaller_v110.exe
on the provided CD.
• You will need to accept any warnings about making changes to your computer.
• Follow the installer Wizard, accepting the defaults.
• When the installer has completed, plug in the USB to Serial Adaptor.
• A message should pop up indicating successful hardware installation.
Note any COM port number indicated in the message.
• Connect the LPA² to the computer using the Serial lead and the USB to
Serial Converter.
• If neccessary, determine the COM port allocated by the computer for this
device using the procedure following.
COM Ports
63
Appendix J
Determining the COM Port
To check the COM port number allocated by the computer for the Serial lead
or the USB to Serial Connector:
•
Windows 2000, Windows XP, Windows Vista
− Right click on My Computer icon and then left click on Properties.
− Click on the Hardware tab and then click on the Device Manager Button.
− Click on the plus sign next to Ports (COM & LPT).
Windows 7
− View the installed devices using Start Button/Devices and Printers.
• You should see an icon representing the port.
− "Communications port’’- if using the Serial lead.
− "ATEN USB to Serial Cable’’ or "Prolific USB-to-Serial Comm Port’’
if using an adaptor cable.
Either of these will have a COM number after it. This is the number you
should use when selecting the Com Port.
64
COM Ports
Appendix K
Fault Finding
FAULT
CHECK
LCD Screen remains
blank after switching
on
Check that Analyser had been put on charge previously
Unexpected results
obtained from sample
Check that the fluid sampling hose has been fully
connected at both the system and Analyser ends
Check that LED illuminates when power adaptor
is connected to Analyser DC Power Input Socket
Confirm that there is a free flow of fluid to the
Analyser, by depressing the Flush Valve and observing fluid passing into the waste disposal bottle
High water/aeration levels. (If suspected contact
MP Filtri UK for further advice)
Fault Finding
65
Appendix K
If excessive system contamination is suspected, flush out the Analyser
using a Bottle Sampling Unit in conjunction with a suitable solvent.
The standard LPA² and the standard Bottle Sampling units are both fitted
with Nitrile seals, so Petroleum Ether may be used for this purpose.
Petroleum Ether is not compatible with seals manufactured from EPDM,
which are used in the Phosphate Ester version of the 250 Bottle Sampling unit. Iso-propyl alcohol should be used as the flushing fluid.
Please consult the website for other compatible fluids.
DO NOT USE ACETONE
66
Fault Finding
Produced by MP Filtri UK
Revision 15
As a policy of continual improvement, MP Filtri UK reserve the right to alter specifications without prior notice.
Except as permitted by such licence, no part of this publication may be reproduced,
stored in retrieval system or transmitted, in any form or any means, electronic, mechanical, recording, or otherwise, without prior written permission of MP Filtri UK.
MP FILTRI UK Limited,
Bourton Industrial Park,
Bourton-on-the-Water,
GL54 2HQ, U.K.
Tel: +44.1451-822522
Fax: +44.1451-822282
Email: [email protected]
Website: www.mpfiltri.co.uk
www.mpfiltri.co.uk
ITALY - HEADQUARTERS
MP FILTRI S.p.A.
Tel: +39.02/95703.1
Fax: +39.02/95741497-95740188
Email: [email protected]
Website: www.mpfiltri.com
FRANCE
MP FILTRI FRANCE
Tel: +33.1.40-86-47-00
Fax: +33.1-40-86-47-09
Email: [email protected]
Website: www.mpfiltri.com
CANADA
MP FILTRI CANADA INC.
Tel: +1.905-303-1369
Fax: +1.905-303-7256
Email: [email protected]
Website: www.mpfiltricanada.com
INDIA
MP FILTRI INDIA
Tel: +91 9945599899
Email: [email protected]
Website: www.mpfiltri.com
CHINA
MP FILTRI (Shanghai) Co Ltd
Tel: +86.21-58919916
Fax: + 86.21-58919667
Email: [email protected]
Website: www.mpfiltrichina.com
GERMANY
MP FILTRI D GmbH
Tel: +49.6806-85022.0
Fax: + 49.6806-85022.18
Email: [email protected]
Website: www.mpfiltri.com
RUSSIAN FEDERATION
MP FILTRI RUSSIA INC
Phone mobile: +7.095-502-5411
Fax: +7.095-205-9410
Email: [email protected]
Website: www.mpfiltri.ru
USA
MP FILTRI USA Inc.
Tel: +1.215-529-1300
Fax: +1.215-529-1902
Email: [email protected]
Website: www.mpfiltriusa.com
UAE
MP FILTRI UEA
Tel: +91 9945599899
Email: [email protected]
Website: www.mpfiltri.com