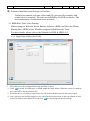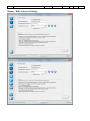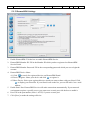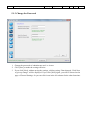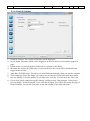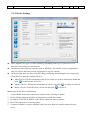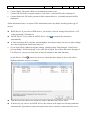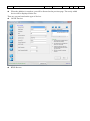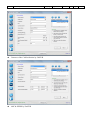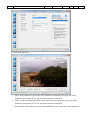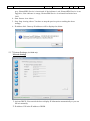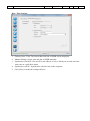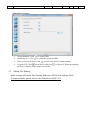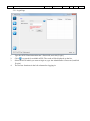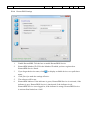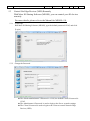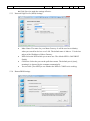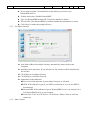
1
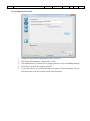
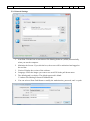
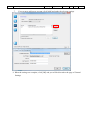
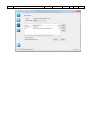
User Guide for UniGate IOT Controller V3.0 UniSVR Global Information Technology Corporation 2014 Copyright. All rights reserved. No.01 UniGate-Quick-User-Guide Language: English Version: 3.0 Page: 1/28 Contents A. B. C. Product Introdcutions ................................................................................................. 2 Items in the Package ................................................................................................... 3 Install UniGate ........................................................................................................... 4 1. Indicators on the Front Panal ...................................................................................................... 4 2. Specifications and Functions....................................................................................................... 4 Basic Installation and Settings of UniGate ........................................................................ 6 1. How to Connect Cables ............................................................................................................... 6 2. Preperation .................................................................................................................................. 6 D. Software Installation and Settings of UniGate ........................................................... 7 5.1 HISB Real-Time Video Sharing ................................................................................... 7 5.1.1 Login Page of Hercules Tools ................................................................................... 7 5.1.2 HermesDDS Settings ................................................................................................................ 9 5.1.3 Change the Password.............................................................................................................. 10 5.1.4 General Settings ..................................................................................................................... 11 5.1.5 Device Settings ....................................................................................................................... 12 5.1.7 System Settings (for HISB only) ............................................................................................ 17 5.2 Athena File Sharing ................................................................................................. 20 5.2.1 Login Page ............................................................................................................... 21 5.2.2 Change the Password.............................................................................................................. 22 5.2.3 General Settings ..................................................................................................................... 23 5.2.4 HermesDDS Settings .............................................................................................................. 26 5.3 Control Net Edge Devices (NED) Remotely ........................................................... 27 5.3.2Change the Password ............................................................................................... 27 5.3.3Network Edge Device (NED) Settings .................................................................... 28 5.3.4HermesDDS Settings................................................................................................ 28 5.3.5Use Muse Gateway................................................................................................... 29 5.3.6Muse Control ............................................................................................................ 29 No.01 UniGate-Quick-User-Guide Language: English Version: 3.0 Page: 2/28 This manual will guide you to intall and understand the functions of UniGate. A. Product Introdcutions UniGate is a powerful server to build your private cloud. You can use it to control other devices on a LAN or the Internet with UniSVR’s HermesDDS Cloud Service. You can share your devices to your friedns and relatives easily and securely. UniGate, a versatile server for smart homes, with integrated application software, can be regarded as a plaftorm to connect devices such as smartphones, laptops, and smart TVs. HermesDDS AP HermesDDS Service is a cloud IoT service which enables users to view and share real-time videos, transfer files, print out files remotely, and control NEDs (Network Edge Device) remotely. HermesDDS AP is a user-friendly interface for you to enjoy the service and use various devices remotely and securely. No complicatd firewall and DDNS settings are required. UniGate contains versatile application software. AFSS (Athena File Sharing Software) APSS (Athena Printer Sharing Software) HWSS (Hercules Webcam Sharing Software) HISS (Hercules IPCam Sharing Software) MIOSS (Muse I/O Sharing Software) PS: You can find manuals for these products on the Start Menu / All Programs / Manual. UniGate Wizard can help you to make relevant settings before using the software. No.01 UniGate-Quick-User-Guide Language: English Version: 3.0 Page: 3/28 B. Items in the Package 1. When you unpack UniGate, you will find the items as follows. - UniGate IoT Controller Power Cable Warranty Card UniGate User Guide 2. Take out UniGate and inspect if its appearence. If it is damaged, please contact the store where you purchased it or consult UniSVR’s service support team [email protected] No.01 UniGate-Quick-User-Guide Language: English Version: 3.0 Page: C. Install UniGate 1. Indicators on the Front Panal 2. Specifications and Functions RJ-45 connector: 10/100 Base T Ethernet port RS-232 connector: Up to 3.25Mbps with hardware flow control USB port: USB 2.0 host controller Micro SD Power External power adapter 12VDC, 1.5Amp Power consumption: 3W Environment Conditions Temperature: Ambient operating: 0°C ~ 40 °C Ambient storage: -20 °C ~ 70 °C Humidity: Interface Ambient operating and non-operating: 5% ~ 95%, non-condensing Video Surveillance and Sharing Support video compression formats such as MPEG-4, H.264, MJPEG Up to 4 video sources Support megapixel cameras Support ONVIF Support RTSP Support real-time surveillance on smartphones Support remote and real-time video viewing on devices simultaneously File Storage and Sharing Upload and download files/folders remotely. The format of uploaded/downloaded files is not limited. The size of uploaded/downloaded files is not limited. Users’ accessibilities are granted by the administrator. Basic resource sharing via Network Neighborhood on the 4/28 No.01 UniGate-Quick-User-Guide Language: English Version: 3.0 Page: 5/28 LAN. Network Remote Control I/O Control Login to HermesDDS AP (an integrated management interface) locally or remotely to view the status and connection of devices. Users can also control various devices on the private cloud via the Internet. Avoid complicated DDNS and firewall settings with the techniques of multi-layered NAT and Firewall transversal. Support I/O Controllers chained to an alarm system. Can be used with UBox-2 Smart I/O Controller to connect various standard Network Edge Devices (NEDs) such as sensors (emergency buttons and switches) to the Ethernet. Can be connected to various Network Edge Devices such as sensors (emergency buttons, door/window magnets, smoke sensors), meters (thermometers and galvanometers), switch controllers, and information-input processors (barcode scanners and GPSs), and information-output processors (LED displays) via RS-232/RS-485, Bluetooth, and RF. No.01 UniGate-Quick-User-Guide Language: English Version: 3.0 Page: 6/28 Basic Installation and Settings of UniGate 1. How to Connect Cables (1) Please plug your audio / video cable into the corresponding port on the back panel. (2) Please plug your network calbe into the Lan Port on the back panel. 2. Preperation Install the driver for your web camera and printer. Please refer to the instructions given by the device providers. (You can skip this step if you don’t want to use your web camera and printer remotely.) No.01 UniGate-Quick-User-Guide Language: English Version: 3.0 Page: 7/28 D. Software Installation and Settings of UniGate UniGate can transfer real-time videos and file, print out file remotely, and control devices remotely. The tasks are fulfilled by UniSVR’s software. The brief instructions of each function are as below. 5.1 HISB Real-Time Video Sharing Make settings of Hercules IPcam Sharing Software (HISS) and Hercules IPcam Sharing Box (HISB) with a Windows program called Hercules Tools. For more details, please refer to the Manual for HISS & HISB v3.0. 5.1.1 Login Page of Hercules Tools 1. Fill in the Server IP and Admin Password and click [Login]. 2. Click to search for HISB and / or HISB within the same subnet. When the search is complete, the result will be displayed on the list. 3. Select the device you want to login on the list, fill in the Admin Password, and click [Login]. 4. Once you have successfully logged in, you can click the function icons in the left column, as well as the [IP Address Info] button. You can click . for displaying Advanced Settings. No.01 UniGate-Quick-User-Guide Display / Hide Advanced Settings Language: English Version: 3.0 Page: 8/28 No.01 UniGate-Quick-User-Guide Language: English Version: 3.0 Page: 9/28 5.1.2 HermesDDS Settings 1. 2. Enable HermesDDS: Tick the box to enable HermesDDS Service. HermesDDS Member ID: Fill in the Member ID which you have registered on HermesDDS Service Portal. 3. HermesDDS Member Password: Fill in the corresponding password which you use to login the account. HermesDDS Device Name 4.1 Click to search for registered devices on HermesDDS Portal. 4.2 Device Register: Name your device and click to register it. 4.3 Share Device: Select your registered device which you want to share with your friend. Click to display your friend list. If your friend is not on the list, you can fill in his / her e-mail address. Enable Static Port: HermesDDS Service will make connections automatically. If your network environment requires a specific port or you want to use a static port, tick the box to enable it. Port: Fill in the port number (from 1~65535) if you use a static port. Click [Save] to make the settings effective. 4. 5. 6. 7. No.01 UniGate-Quick-User-Guide Language: English Version: 3.0 Page: 10/28 5.1.3 Change the Password 1. Change the password of administrator and / or viewer. 2. Click [Save] to make the settings effective. 3. If you click [Next] without saving the settings, a dialog saying “Data changed. Click Next to give up change” will be displayed. If you click [Next] again, you will be directed to the page of General Settings. Or you can click icons in the left column for the other functions. No.01 UniGate-Quick-User-Guide Language: English Version: 3.0 Page: 11/28 5.1.4 General Settings 1. 2. 3. 4. 5. 6. 7. 8. Firmware Version: The version of firmware will be displayed. Server Name: The name which will be displayed on the auto-discovery list and the logged-in page. Enable Audio: If you tick the box, audio will be collected by the device. Minimize the Screen (for HISS only): If you tick the box, the screen will be minimized and tagged to the tool bar. Auto Run (for HISS only): Tick the box to start HISS automatically when you run the computer. Tools Language: Select the langue you want to use on Hercules Tools in the pull-down menu. Preview Quality: Select the quality of real-time video viewing. It is relevant to the video size. If you click [Next] without saving the settings, a dialog saying “Data changed. Click Next to give up change” will be displayed. If you click [Next] again, you will be directed to the page of Device Settings. Or you can click icons on the left column for the other functions. No.01 UniGate-Quick-User-Guide Language: English Version: 3.0 Page: 12/28 5.1.5 Device Settings There might be two types of video streaming, depending on the type of your device. It is relevant to the quality of Local Preview. Connected to more than one cameras (such as HWSS-4): The former version is applicable to only one camera; the latest version is applicable to up to 4 cameras. On the up right, there are three icons for adding, modifying, and deleting devices respectively. Click [Save] to make the settings effective. Add a Device: Fill the information of the device which you want to add into the blank and click to add it to the device list. Modify a Device: Modify the information of a device and click Delete a Device: Select the device on the list and click to update it to the list. to delete it. Instructions for the Device Information 1 2 3 4 5 Camera Brand: Select the brand of your camera before selecting its model. Device Model: Supported models are displayed on a pull-down menu. IP Address: Fill in the IP address of the device which you want to connect. Port: Fill in the port for receiving videos. Connected Channel: It can be modified if there are more than one camera connected to the server. No.01 UniGate-Quick-User-Guide Language: English Version: 3.0 Page: 6 Camera Name: The name which is to be displayed on the server. 7 8 Connect ID: Fill in the account to login to view videos. (A default ID will be displayed.) Connect Password: Fill in the password of the connected device. (A default password will be displayed.) 13/28 All the information above is required. The information below may differ according to the type of devices. 9. RTSP Device: If you select a RTSP device, you will see a box for setting General Device CGI (video streaming CGI and port). ONVIF Device: If you select an ONVIF device, click to acquire the parameters automatically. If video streaming for a computer and smartphone are both provided, you have to make settings for video compression format and video size. If you click [Next] without saving the settings, a dialog saying “Data changed. Click Next to give up change” will be displayed. If you click [Next] again, you will be directed to the page of Local Preview. Or you can click icons on the left column for the other functions. Search Device: Click to search for device(s) within the same subnet. A device list will be displayed when the search is complete. Tick the box before the device which you want to add and click [OK] to add it. If the device you select is an ONVIF device, the software will acquire its relevant parameters automatically. If parameters cannot be acquired, the device cannot be connected to the server. No.01 UniGate-Quick-User-Guide English Version: 3.0 Page: When the addition is complete, you will be directed to the previous page. The newly added device will be displayed on the list. There are screens based on the type of devices. ONVIF Devices Language: RTSP Devices 14/28 No.01 UniGate-Quick-User-Guide Cameras of the CAM collection by UniSVR eMC & HWSS by UniSVR Language: English Version: 3.0 Page: 15/28 No.01 UniGate-Quick-User-Guide Language: English Version: 3.0 Page: 16/28 5.1.6 Local Preview 1. Video: If the indicator is green, the video function is activated; if it is grey, the video function is inactivated; if it is red, the video function is abnormal. 2. Audio:If the indicator is green, the audio function is activated; if it is grey, the audio function is inactivated; if it is red, the audio function is abnormal. 3. HermesDDS: If the indicator is green, HermesDDS Service is activated; if the indicator is No.01 UniGate-Quick-User-Guide Language: English Version: 3.0 Page: 17/28 grey, HermesDDS Service is inactivated; if the indicator is red, HermesDDS Service is not logged in; if the indicator is orange, HermesDDS Service is activated but limited on a LAN. 4. Start: Start to view videos. 5. Stop: Stop viewing videos. You have to stop the preview prior to making the above settings. 6. IP Address Info: Gateway IP addresses will be displayed as below. 5.1.7 System Settings (for HISB only) Network Settings 1. Activate DHCP: You can tick the box to display IP information automatically or you can fill in it manually. 2. IP Address: Fill in the IP address of HISB. No.01 UniGate-Quick-User-Guide Language: English 3. Subnet mask: Set the subnet mask of HISB. 4. Gateway: Set the gateway of HISB. 5. DNS 1: Set the IP address of the DNS server of HISB. 6. DNS 2: Set the IP address of the DNS server of HISB. 7. Click [Save] to make the settings effective. Version: 3.0 Page: 18/28 No.01 UniGate-Quick-User-Guide Language: English Version: 3.0 Page: 19/28 Date / Time Settings 1. Gateway Date / Time: The current date and time of HISB will be displayed. 2. Manual Settings: Set the time and date of HISB manually. 3. Synchronize with NTP: You can fill in the address of server which you use and select the time zone on a pull-down menu. 4. Synchronize with PC: Synchronize with the time on the computer. 5. Click [Save] to make the settings effective. No.01 UniGate-Quick-User-Guide Language: English Version: 3.0 Page: Maintenance Settings 1. 2. 3. 4. Restart Machine: Click to restart HISB. Restart Service: Click to restart the system of HISB. Reset to Factory Default: Click to reset to the factory default settings. Upgrade FW: Click select the file and click to upload it. When the uplading has been complete, please restart the machine. 5.2 Athena File Sharing Make settings of Athena File Sharing Software (AFSS) with Athena Tools. For more details, please refer to the Manual for AFSS v3.0. 20/28 No.01 UniGate-Quick-User-Guide Language: English Version: 3.0 Page: 21/28 5.2.1 Login Page 1. 2. 3. 4. Type the AFSS IP and Administrator’s Password, and click [Login]. Click to search for available AFSS. The result will be displayed on the list. Select the AFSS which you want to login to, type the Administrator’s Password, and lick [Login]. You can use functions in the left column after logging in. No.01 UniGate-Quick-User-Guide Language: English Version: 3.0 Page: 22/28 5.2.2 Change the Password 1. 2. 3. Change the password of administrator and / or viewer. The default Administrator’s Password is 12345. The Administrator’s Password is for logging into the server and making settings. 4. 5. Click [Save] to make the settings effective. If you click [Next], you will be directed to the page of General Settings. Or you can click icons in the left column for the other functions. No.01 UniGate-Quick-User-Guide Language: English Version: 3.0 Page: 23/28 5.2.3 General Settings 1. 2. 3. 4. 5. 6. Auto Run: Tick the box to start Athena File Sharing Software (AFSS) automatically when you run the computer. Minimize the Screen: If you tick the box, the screen will be minimized and tagged to the tool bar. Version: Display the version of the software. Language: Select the langue you want to use on AFSS in the pull-down menu. The default path is as below. The default password is blank. C:\Athena File Sharing Software\FileSharePath You can select a Share Path Name to modify the authorization, password, and / or path. No.01 UniGate-Quick-User-Guide 7. Language: English Version: 3.0 Page: 24/28 If you want to add a new account, click [Add] and make the relevant settings. 8. When the settings are complete, click [OK] and you will be directed to the page of General Settings. No.01 UniGate-Quick-User-Guide Language: English Version: 3.0 Page: 25/28 No.01 UniGate-Quick-User-Guide Language: English Version: 3.0 Page: 26/28 5.2.4 HermesDDS Settings 1. Enable HermesDDS: Tick the box to enable HermesDDS Service. 2. HermesDDS Member ID: Fill in the Member ID which you have registered on HermesDDS Service Portal. 3. If you forget the device name, click to display available devices on a pull-down menu. Click [Save] to make the settings effective. The software will be run. HermesDDS Indictor: If the indicator is green, HermesDDS Service is activated; if the indicator is grey, HermesDDS Service is inactivated; if the indicator is red, HermesDDS Service is not logged in; if the indicator is orange, HermesDDS Service is activated but limited on a LAN. 4. 5. 6. No.01 UniGate-Quick-User-Guide Language: 5.3 Control Net Edge Devices (NED) Remotely English Version: 3.0 Page: With Muse IO Sharing Software (MIOSS), you can control your IO devices remotely. For more details, please refer to the Manual for MIOSS v3.0. 5.3.1 Login Page Run Muse IO Sharing Software (MIOSS), type the default password 12345, and click [Login]. 5.3.2 Change the Password The default Administrator’s Password is 12345; the default Client’s Password is 12345. The Administrator’s Password is used to login to the Server to make settings The Client’s Password is used to login to the Client to control Network Edge Devices (NED). 27/28 No.01 UniGate-Quick-User-Guide Language: English Version: 3.0 Page: 28/28 Click [Save] to make the settings effective. 5.3.3 Network Edge Device (NED) Settings Muse Name: The name for your Muse Gateway. It will be used as an identity when you search for devices on a LAN. The default name is Muse-x. X is the last subset of the IP address of Muse Gateway. NED: Select the NED which you want to use. The default NED is UniSVR BT Switch. COM Port: Select the port on the pull-down menu. The default port is [auto], meaning it is detected by the computer automatically. You can click [Test NED] to test whether the NED or COM Port is working. 5.3.4 HermesDDS Settings No.01 UniGate-Quick-User-Guide Language: English Version: 3.0 Page: 29/28 If you want to upload / download files on the Internet, you have to use HermesDDS Service. Tick the box before “Enable HermesDDS.” Type you HermesDDS Member ID / Password, and Device Name. You can click [Test HermesDDS] to confirm whether the information is correct. Click [Save] to make the settings effective. 5.3.5 Use Muse Gateway Auto Start on Boot: Run Muse Gateway automatically when you boot the computer. Minimize After Auto Start: If you tick the box, the window will be minimized to the tool bar. Click [Start] to run Muse Gateway. Click [Stop] to exit Muse Gateway. Instructions to the Indicators Power On: If the indicator is green, Muse Gateway is activated. NED: If the indicator is green, you NED is connected; if it is red, the NED is disconnected. Hermes DDS: If the indicator is green, HermesDDS Service is activated; if it is red, HermesDDS Service is not activated. Local User: If it is red, UE Server / UE Software / Muse Client on LAN are connected. 5.3.6 Muse Control No.01 UniGate-Quick-User-Guide Language: English Version: 3.0 Page: When you click on a MIOSS icon on HermesDDS AP, Muse Control will be installed automatically. Type the password and click [Connect], then you can control the device remotely. 30/28