1
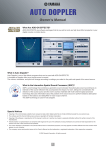
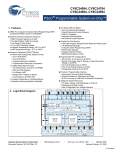
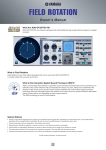
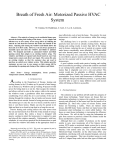
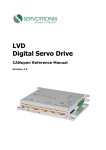
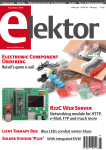
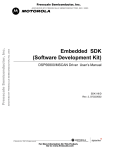
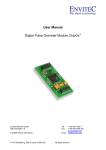
MPX-2515 User’s Guide
Rev 0101
MPX-2515 User’s Guide
MPX-2515 CAN 2.0B USB card features USB 2.0 full speed to CAN 2.0B bus
interface in Mini-PCIe form factor. This MPX-2515 User's Guide describes how to
use MPX-2515 card.
Taiwan Commate Computer Inc.
1
Commell MPX-2515 User’s Guide
Rev 0101
Contents
1
Technical Guide .......................................................................................................... 4
1.1
Introduction......................................................................................................... 4
1.1.1
Features ....................................................................................................... 4
1.1.2
Supported Operating Systems..................................................................... 5
1.2
MPX-2515 Block Diagram ................................................................................. 5
1.3
CY8C24794 Programmable System-on-Chip..................................................... 6
1.4
MCP2515 Stand-Alone CAN Controller With SPI Interface ............................. 7
1.5
MCP2551 High-Speed CAN Transceiver......................................................... 11
1.6
MPX-2515 ISO OSI Model .............................................................................. 11
1.6.1
Introduction............................................................................................... 11
1.6.2
ISO11898-1 Physical Signaling................................................................ 13
1.7
MPX-2515 Card vs. ISO-11898-2 .................................................................... 14
1.7.1
ISO-11898-2 Overview............................................................................. 14
1.7.2
Bus Levels................................................................................................. 15
1.7.3
Comparison ............................................................................................... 16
1.8
MPX-2515 I/O Interfaces ................................................................................. 17
1.8.1
Mini Card Golden Finger.......................................................................... 18
1.8.2
CN_USB Connector.................................................................................. 19
1.8.3
Jumper for Line Termination .................................................................... 20
1.8.4
CN_CAN Connector................................................................................. 21
1.8.5
CN_ISSP Connector ................................................................................. 23
1.9
MPX-2515 Card Properties............................................................................... 23
1.9.1
USB Properties.......................................................................................... 23
1.9.2
LED Indicators.......................................................................................... 26
1.10 OAL-2515 Cable............................................................................................... 27
1.11 OALUSB-H4-1 Cable....................................................................................... 28
1.12 OALUSB-H4 Cable .......................................................................................... 28
1.13 How to Connect ................................................................................................ 29
1.13.1 Connect to USB Host via Mini-PCIe Slot ................................................ 29
1.13.2 Connect to USB Host via Cable................................................................ 29
1.13.3 Connect to CAN Bus ................................................................................ 31
2
Device Drivers .......................................................................................................... 33
2.1
Device Drivers for Windows ............................................................................ 33
2.1.1
Windows 2000 .......................................................................................... 34
2.1.2
Windows XP (32-bit) Device Driver ........................................................ 35
2.1.3
Windows XP (64-bit) Device Driver ........................................................ 35
2.1.4
Windows Vista (32-bit) and Windows 7 (32-bit) Device Driver ............. 35
2.1.5
Windows Vista (64-bit) and Windows 7 (64-bit) Device Driver ............. 36
2.2
How to Install Device Driver............................................................................ 36
3
Firmware Update ...................................................................................................... 37
3.1
Introduction....................................................................................................... 37
3.2
Enter Boot Loader............................................................................................. 37
3.3
Install Boot Loader Device Driver.................................................................... 39
3.4
Boot Loader Host Application .......................................................................... 40
3.5
In Case Failed ................................................................................................... 44
Taiwan Commate Computer Inc.
2
Commell MPX-2515 User’s Guide
4
Rev 0101
Reference .................................................................................................................. 46
Taiwan Commate Computer Inc.
3
Commell MPX-2515 User’s Guide
Rev 0101
1 Technical Guide
1.1 Introduction
The MPX-2515 CAN 2.0B USB card is a USB 2.0 compliant device, which
implements Controller Area Network (CAN) version 2.0B interface. This card is
made in Mini-PCIe form factor so that this module is able to insert into motherboards
that provide Mini-PCIe slot, like most Commell motherboards do. In addition, users
are able to connect this card to an USB Type A receptacle that most PC has by using
the OALUSB-H4-1 optional cable. MPX-2515 CAN 2.0B USB card provides the
following features.
1.1.1 Features
•
•
•
•
•
•
•
•
•
•
•
•
•
•
•
•
•
•
•
•
•
•
•
•
•
USB 2.0 Full Speed compliant
Controller Area Network (CAN) version 2.0B
Implement ISO-11898 Standard Physical Layer
Supports 1 Mb/s operation (recommend 125 Kbps)
Default to 125 Kbps
On board 120 Ohm line terminator (enabled/disabled by jumper)
0 to 8 byte length in the data field
Standard and extended data and remote frames
Two receive buffers with prioritized message storage
Six 29-bit filters
Two 29-bit masks
Data byte filtering on the first two data bytes
One-shot mode ensures message transmission is attempted only one time
Typical 5 mA active current
Typical 1 uA standby current (sleep mode)
Externally-controlled slope for reduced RFI emissions
Detection of ground fault (permanent Dominant) on TXD input
Power-on Reset and voltage brown-out protection
Protection against high-voltage transients
Automatic thermal shutdown protection
Up to 112 nodes can be connected
High-noise immunity due to differential bus implementation
IEC 61000-4-2 (ESD) ± 15kV (air/contact) protection
IEC 61000-4-4 (EFT) 50A (5/50ns) protection
Produced in Mini-PCIe card form factor (easily locked on motherboard)
Taiwan Commate Computer Inc.
4
Commell MPX-2515 User’s Guide
Rev 0101
Figure 1 MPX-2515 CAN 2.0B USB Card
1.1.2 Supported Operating Systems
The following operating systems are supported by MPX-2515:
•
Microsoft Windows XP 32-/64-bit versions
•
Microsoft Windows Vista 32-/64-bit versions
•
Microsoft Windows 7 32-/64-bit versions
No Microsoft Windows 64-bit versions digital signature included.
1.2 MPX-2515 Block Diagram
The MPX-2515 CAN 2.0B USB card is composed of a System on Chip, a stand-alone
CAN controller, and a high-speed CAN transceiver.
Cypress
CY8C24794
SoC
USB bus
Taiwan Commate Computer Inc.
Microchip
MCP2515
CAN
Controller
Microchip
MCP2551
CAN
Transceiver
CAN bus
5
Commell MPX-2515 User’s Guide
Rev 0101
Figure 2 MPX-2515 Block Diagram
The above figure shows the components diagram of the MPX-2515 CAN 2.0B USB
card. The Cypress CY24794 controller implemented a USB device that interacts with
a USB host to perform requests and return responses. A Microchip MCP2515 CAN
controller is connecting to CY24794 via SPI and other signals. Another Microchip
MCP2551 CAN Transceiver is interfacing to the CAN bus to send and receive CAN
messages.
1.3 CY8C24794 Programmable System-on-Chip
We uses Cypress CY8C24794 PSoC Programmable System-on-Chip as the general
purpose controller for MPX-2515 card. A firmware has implement for CY8C24794 to
support full speed USB, SPI master, timers, and others for MPX-2515 functionalities.
The full speed USB interface is used to communicate with a USB host to perform
request packets and return response packets. The SPI master interface however is
used to communicate to the MCP2515 CAN bus controller for CAN activities. Please
refer to the CY8C24x94 PSoC Programmable System-on-Chip Technical Reference
Manual for detail information.
The following figure shows the block diagram of CY8C24794.
Taiwan Commate Computer Inc.
6
Commell MPX-2515 User’s Guide
Rev 0101
Figure 3 CY8C24794 Block Diagram
1.4 MCP2515 Stand-Alone CAN Controller With SPI Interface
Microchip Technology's MCP2515 is a stand-alone Controller Area Network (CAN)
controller that implements the CAN specification, version 2.0B. It is capable of
Taiwan Commate Computer Inc.
7
Commell MPX-2515 User’s Guide
Rev 0101
transmitting and receiving both standard and extended data and remote frames. The
MCP2515 has two acceptance masks and six acceptance filters that are used to filter
out unwanted messages. Thereby reducing the host MCUs overhead. The MCP2515
interfaces with CY8C24794 microcontroller via an industry standard Serial Peripheral
Interface (SPI).
The following figure shows the block diagram of MCP2515
Figure 4 MCP2515 Block Diagram
The MCP2515 has three transmit and two receive buffers, two acceptance masks (one
for each receive buffer) and a total of six acceptance filters. The following figure
shows the MCP2515 buffers and protocol engine block diagram. Please refer to
MCP2515 data sheet for detail information.
Taiwan Commate Computer Inc.
8
Commell MPX-2515 User’s Guide
Rev 0101
Figure 5 MCP2515 Buffers and Protocol Engine Blcok Diagram
The following table shows the MCP2515 Controller Register Map. Please refer to the
MCP2515 data sheet for detail information.
Taiwan Commate Computer Inc.
9
Commell MPX-2515 User’s Guide
Rev 0101
Figure 6 MCP2515 Controller Register Map
The following table shows the MCP2515 Control Register Summary. Please refer to
the MCP2515 data sheet for detail information.
Figure 7 MCP2515 Control Register Summary
Taiwan Commate Computer Inc.
10
Commell MPX-2515 User’s Guide
Rev 0101
1.5 MCP2551 High-Speed CAN Transceiver
The MCP2551 is a high-speed CAN, fault-tolerant device that serves as the interface
between a CAN protocol controller and the physical bus. The MCP2551 device
provides differential transmit and receive capability for the CAN protocol controller,
and is fully compatible with the ISO-11898 standard, including 24V requirements. It
will operate at speeds of up to 1 Mb/s.
The following figure shows the MCP2551 block diagram. Please refer to the
MCP2551 data sheet for detail information.
Figure 8 MCP2551 Block Diagram
1.6 MPX-2515 ISO OSI Model
1.6.1 Introduction
This section defines the MPX-2515 card in the ISO OSI reference model. The
following figure shows this model.
Taiwan Commate Computer Inc.
11
Commell MPX-2515 User’s Guide
Rev 0101
Figure 9 MPX-2515 ISO/OSI Reference Model
The Controller Area Network (CAN) protocol defines the Data Link Layer and part
of the Physical Layer in the OSI model. Therefore, all the undefined layers can be
defined by the system designer, or can be implemented using existing non-proprietary
High Layer Protocols (HLPs) and physical layers.
Data Link Layer The Data Link Layer is defined by the CAN specification. This
Data Link Layer is divided into Logical Link Control (LLC) Layer and Medium
Access Control Layer (MAC). The Logical Link Control (LLC) manages the overload
control and notification, message filtering and recovery management functions. the
Medium Access Control (MAC) performs the data encapsulation/decapsulation, error
detection and control, bit stuffing/destuffing and the serialization and deserialization
functions.
Physical Layer The Physical Medium Attachment (PMA) and Medium Dependent
Interface (MDI) are the two sub-layers of the physical layer which are not defined by
CAN. However, the Physical Signaling (PS) sub-layer of the physical layer is defined
by the CAN specification. The system designer can choose any driver/receiver and
transport medium as long as the PS requirements are met.
The International Standards Organization (ISO) has defined a standard which
incorporates the CAN specification as well as the physical layer. The standard, ISO11898, was originally created for high-speed in-vehicle communication using CAN.
ISO-11898 specifies the physical layer to ensure compatibility between CAN
transceivers.
Taiwan Commate Computer Inc.
12
Commell MPX-2515 User’s Guide
Rev 0101
1.6.2 ISO11898-1 Physical Signaling
The bit encoding/decoding and synchronization shall meet the requirements defined
in ISO-11898-1 and it is recommended to follow the definitions as given in the
Recommended bit timing settings table. The according bus length estimations are
therefore shown in the table follows it.
Table 1 Recommended bit timing settings
The following table shows the according bus length estimations.
Taiwan Commate Computer Inc.
13
Commell MPX-2515 User’s Guide
Rev 0101
Table 2 Estimated bus lengths
1.7 MPX-2515 Card vs. ISO-11898-2
1.7.1 ISO-11898-2 Overview
ISO-11898-2 is the international standard for high-speed CAN communications in
road vehicles. ISO-11898-2 specifies the PMA and MDA sub-layers of the ISO/OSI
Physical Layer.
The following figure shows a representation of a common CAN node/bus as
described by ISO-11898.
Taiwan Commate Computer Inc.
14
Commell MPX-2515 User’s Guide
Rev 0101
Figure 10 CAN Node on Bus
1.7.2 Bus Levels
CAN specifies two logical states: recessive and dominant. ISO-11898 defines a
differential voltage to represent recessive and dominant states (or bits), as shown in
the following figure.
Taiwan Commate Computer Inc.
15
Commell MPX-2515 User’s Guide
Rev 0101
Figure 11 CAN Differential Bus
Recessive State
In the recessive state (i.e., logic '1' on the MCP2551 TXD input), the differential
voltage on CANH and CANL is less than the minimum threshold (< 0.5V receiver
input or < 1.5V transmitter output).
Dominant State
In the dominant state (i.e., logic '0' on the MCP2551 TXD input), the differential
voltage on CANH and CANL is greater than the minimum threshold. A dominant bit
overdrives a recessive bit on the bus to achieve nondestructive bitwise arbitration.
1.7.3 Comparison
The ISO-11898-2 specification requires that a compliant or compatible transceiver
must meet a number of electrical specifications. The following table shows the major
Taiwan Commate Computer Inc.
16
Commell MPX-2515 User’s Guide
Rev 0101
ISO-11898-2 electrical requirements vs. Microchip MCP2551 specification (and of
course MPX-2515 card).
Table 3 MPX-2515 (MCP2551) vs. ISO-11898-2
1.8 MPX-2515 I/O Interfaces
This section defines all input/output ports for MPX-2515 CAN 2.0B USB card. It
includes ports for connection and jumper for control.
Taiwan Commate Computer Inc.
17
Commell MPX-2515 User’s Guide
Rev 0101
Figure 12 I/O Ports and Jumper
•
Mini card golden finger - The USB signals of this industrial standard miniPCIe interface are used to connect to a USB host.
•
CN_USB connector - The connector for connecting to a USB host by cable.
Please refer to its corresponding section for detail information.
•
J1 - The Line Termination jumper.
•
CN_CAN connector - The connector for connecting to the CAN bus.
•
CN_ISSP connector - The connector for firmware uploading.
1.8.1 Mini Card Golden Finger
The MPX-2515 CAN 2.0B USB card implements only the USB D+ and USB D-,
ground, and 3.3V voltage supply of the mini card golden finger. Users can use this
mini card golden finger to connect to a USB host of the motherboard.
The following figure shows the location of golden finger of MPX-2515 card.
Figure 13 MPX-2515 Golden Finger
Taiwan Commate Computer Inc.
18
Commell MPX-2515 User’s Guide
Rev 0101
The following figure shows the I/O pins definitions of MPX-2515 CAN 2.0B USB
card.
Figure 14 Golden Finger Pins Definitions
1.8.2 CN_USB Connector
This connector is provided to as an alternate to connect the MPX-2515 CAN 2.0B
USB card to a USB host. Users can connect OALUSB-H4-1 cable from this
connector to a USB Type A receptacle to connect to a USB host.
The following figures shows/defines the pins definitions.
Taiwan Commate Computer Inc.
19
Commell MPX-2515 User’s Guide
Rev 0101
Figure 15 MPX-2515 OALUSB
Connector
Figure 16 CN_USB Pins Definitions
Please refer to the OALUSB-H4-1 section for the cable information.
1.8.3 Jumper for Line Termination
Users apply this line termination jumper to enable 120 Ohm line termination if the
MPX-2515 CAN 2.0B USB card is connecting to a CAN bus at the end side. Users
need to apply this 120 Ohm line terminator in order to increase the signaling quality
on the bus.
Taiwan Commate Computer Inc.
20
Commell MPX-2515 User’s Guide
Rev 0101
The jumper is enabled by default. Remove the connector if your node is not at the end
side of the bus.
J1 Status
Close
Open
120 Ohm Line Termination
Enabled
Disabled
Table 4 J1 Line Termination
The following figure shows the location of the jumper.
Figure 17 MPX-2515 Line Termination Jumper
1.8.4 CN_CAN Connector
CN_CAN connector provides signals for CAN bus. The OAL-2515 cable connects
this port to the CAN bus via D-SUB9 connector, which compliant to the industrial
standard.
The following figures show/define the pins definitions of CN_CAN connector.
Taiwan Commate Computer Inc.
21
Commell MPX-2515 User’s Guide
Rev 0101
Figure 18 MPX-2515 CN_CAN Connector
Figure 19 CN_CAN Pins Definitions
Taiwan Commate Computer Inc.
22
Commell MPX-2515 User’s Guide
Rev 0101
Please refer to the OAL-2515 Cable section for cable information.
1.8.5 CN_ISSP Connector
CN_ISSP connector is used to upload MPX-2515 firmware. MPX-2515 users are
normally not using this connector.
Figure 20 CN_ISSP Connector
1.9 MPX-2515 Card Properties
This section describes all other properties that are not listed above.
1.9.1 USB Properties
This sub-section defines MPX-2515 card USB properties, which include device
identifier, device attribute, and endpoints.
•
Vendor ID = 0xCECE
•
Product ID = 0x2515
•
USB Device Instance Id: USB\VID_CECE&PID_2515\1234567, for example.
Taiwan Commate Computer Inc.
23
Commell MPX-2515 User’s Guide
Rev 0101
•
Device String: "MPX1515 USB-CAN20B Card" is the string shown in the
Microsoft Windows platforms.
•
USB Serial Number: This is a seven digits number, which starts with digit
number 1. It looks like 1001234. Every MPX-2515 card has its unique serial
number. This serial number can be retrieved by USB default command. Please
refer to the example in the SDK chapter.
•
Endpoint 0: USB default endpoint. USB vendor specific command is
implemented in this endpoint.
•
Endpoint 1: MPX-2515 card implements BULK IN transfer at this endpoint.
Application issues a BULK IN transfer to return a response packet from the
MPX-2515 card.
•
Endpoint 2: MPX-2515 card implements BULK OUT transfer at this endpoint.
Application then issues a BULK OUT transfer toward this endpoint to ask MPX2515 firmware to carry out a request packet.
•
Endpoint 3: INTERRUPT IN transfer. MPX-2515 keep its status in an eight
bytes packet so that the application can keep informed by issuing an INTERRUPT
IN transfer over this endpoint. Please refer to the CCP chapter for details.
•
Endpoint 4: BULK IN transfer. Application issues BULK IN transfer over this
endpoint to receive all MPX-2515 received CAN messages in a bulk. Please refer
to the CCP chapter for details.
The following figure shows the General Properties of the MPX-2515 successfully
installed on a Windows system.
Taiwan Commate Computer Inc.
24
Commell MPX-2515 User’s Guide
Rev 0101
Figure 21 General Properties of MPX-2515
The following figure shows the Device Instance ID of the MPX-2515 on a Windows
system.
Taiwan Commate Computer Inc.
25
Commell MPX-2515 User’s Guide
Rev 0101
Figure 22 Device Instance ID of MPX-2515
1.9.2 LED Indicators
The following table defines the LED indicators that are used in the MPX-2515 card.
Please be noted that these LED indicators can be turned off by the software. CCP
provides a command that the application can issue to command MPX-2515 card to
either turn on or turn off these LED indicators. Please refer to the CCP section for the
format of this command.
POSITION
Q2
Q3
Q5
COLOR
Red
Green
Yellow
DESCRIPTION
CAN bus errors
System timer blinking
CAN bus received/transmit activities
Table 5 MPX-2515 LED Indicators
Taiwan Commate Computer Inc.
26
Commell MPX-2515 User’s Guide
Rev 0101
1.10 OAL-2515 Cable
OAL-2515 cable is used to connect the MPX-2515 CAN 2.0B USB card to the CAN
bus. This cable has D-SUB9 standard connector for CAN bus. The OAL-2515 cable
is compliant to CiA 303 CANopen Recommendation Par1 Cabling and connector pin
assignment.
The following figure shows the drawing of OAL-2515 cable. Please refer to the
GSE1205001.pdf (comes in the product CD) for detail information.
Figure 23 OAL-2515 Drawing
The 9-pin D-SUB male connector is used to connect to a CAN bus network. The
following figure shows the 9-pin D-SUB male connector pin outs.
Figure 24 D-SUB Male 9-Pin Connector
The following table defines the pin outs of the 9-pin D-SUB connector for CAN bus.
PIN
1
2
3
4
5
6
NAME
N/C
CAN_L
CAN GND
N/C
N/C
CAN GND
Taiwan Commate Computer Inc.
DESCRIPTION
No Connect
CAN LOW
CAN Ground
No connect
Optional CAN_SHIELD
Optional CAN Ground
27
Commell MPX-2515 User’s Guide
7
8
9
CAN_H
N/C
N/C
Rev 0101
CAN HIGH
No Connect
No Connect
Table 6 OAL-2515 D-SUB9 Male Pin Outs
1.11 OALUSB-H4-1 Cable
The OALUSB-H4-1 cable is used to connect the MPX-2515 CAN 2.0B USB card to
a USB host Type A receptacle. The following figure shows its drawing.
Figure 25 OALUSB-H4-1 Drawing
1.12 OALUSB-H4 Cable
The OALUSB-H4 cable is used to connect the MPX-2515 CAN 2.0B USB card to a
USB host pin header on the motherboard. The following figure shows its drawing.
Figure 26 Cable OALUSB-H4 Drawing
Please be noted that the P1 end connects to a USB host pin header on a motherboard
while P2 end connects to the CN_USB connector of MPX-2515 card.
Taiwan Commate Computer Inc.
28
Commell MPX-2515 User’s Guide
Rev 0101
1.13 How to Connect
1.13.1
Connect to USB Host via Mini-PCIe Slot
One of the two ways to connect to a USB host is inserting the MPX-2515 card into a
Mini-PCIe slot.
You simply insert the MPX-2515 card golden finger portion into an industrial
standard Mini-PCIe slot makes this MPX-2515 card connecting to a USB host.
The following figure shows of how to insert MPX-2515 card into a Mini-PCIe slot so
that it connects to a USB host.
Figure 27 MPX-2515 Card Inserted Into a Mini-PCIe Slot
1.13.2
Connect to USB Host via Cable
You can connect the MPX-2515 card to a USB host by using OALUSB-H4-1 or
OALUSB-H4 cable alternatively if a Mini-PCIe slot is not available or you prefer to
connect to a USB Host Type A receptacle or your motherboard (like most Commell
motherboards) that has USB Host pin header.
Simply connect OALUSB-H4-1 cable to CN_USB connector of MPX-2515 card and
the other Type A plug is used to connect to a USB Type A receptacle.
Taiwan Commate Computer Inc.
29
Commell MPX-2515 User’s Guide
Rev 0101
The following figures shows how you use OALUSB-H4-1 cable to connect MPX2515 card to a PC USB host.
Figure 28 Connect to a USB Host Type A Receptacle
The following figure shows how to use the OALUSB-H4 cable to connect MPX-2515
card to a USB host pin header on a motherboard.
Taiwan Commate Computer Inc.
30
Commell MPX-2515 User’s Guide
Rev 0101
Figure 29 Usage of OALUSB-H4 Cable
1.13.3
Connect to CAN Bus
The following figure shows an example of the CAN bus node connection.
Figure 30 High-Speed CAN Networking
OAL-2515 cable is the cable that connects MPX-2515 card to the CAN bus. OAL2515 one ends with a 9-pin D-SUB connector for connecting to the CAN bus
networking.
Taiwan Commate Computer Inc.
31
Commell MPX-2515 User’s Guide
Rev 0101
Figure 31 MPX-2515 Card Connects to CAN bus
Line Termination
It's important that you need to enable the Line Termination provided on the MPX2515 card if you are happening to connect the MPX-2515 card to the end of a CAN
bus networking. Users enable/disable the line termination by closing/opening the Line
Termination Jumper on the MPX-2515 card.
Line Termination
For high-speed CAN, both ends of the pair of signal wires (CAN_H and CAN_L)
must be terminated. The termination resistors on a cable should match the
nominal impedance of the cable. ISO 11989 requires a cable with a nominal
impedance of 120 Ohm. MPX-2515 card provides 120 Ohm resistor for
termination. Users enable/disable 120 Ohm line termination by closing/opening
the jumper.
Taiwan Commate Computer Inc.
32
Commell MPX-2515 User’s Guide
Rev 0101
2 Device Drivers
This chapter describes how to install the corresponding drivers for your target
operating system.
2.1 Device Drivers for Windows
The following figure shows the MPX-2515 card device drivers file organization for
different Microsoft Windows systems.
Figure 32 Device Drivers Organization
The following figure shows the Device Driver Properties after the MPX-2515 card
has successfully installed.
Taiwan Commate Computer Inc.
33
Commell MPX-2515 User’s Guide
Rev 0101
Figure 33 MPX-2515 Card Device Driver Properties
2.1.1 Windows 2000
The following figure shows the MPX-2515 card device driver for Windows 2000.
File path is .\mpx2515.driver.v347\bin\w2k\x86.
Figure 34 Device Driver for Windows 2000
Taiwan Commate Computer Inc.
34
Commell MPX-2515 User’s Guide
Rev 0101
2.1.2 Windows XP (32-bit) Device Driver
The following figure shows the MPX-2515 card device driver for Windows XP 32-bit
version. File path is .\mpx2515.driver.v347\bin\wxp\x86.
Figure 35 Windows XP 32-bit Device Driver
2.1.3 Windows XP (64-bit) Device Driver
The following figure shows the MPX-2515 card device driver for Windows XP 664bit version. File path is .\mpx2515.driver.v347\bin\wxp\x64.
Figure 36 Windows XP 64-bit Device Driver
2.1.4 Windows Vista (32-bit) and Windows 7 (32-bit) Device Driver
The following figure shows the MPX-2515 card device driver for Windows Vista and
Windows 7 32-bit version. File path is .\mpx2515.driver.v347\bin\wlh\x86.
Taiwan Commate Computer Inc.
35
Commell MPX-2515 User’s Guide
Rev 0101
Figure 37 Windows Vista and Windows 7 Device Driver (32-bit)
2.1.5 Windows Vista (64-bit) and Windows 7 (64-bit) Device Driver
The following figure shows the MPX-2515 card device driver for Windows Vista and
Windows 7 64-bit version. File path is .\mpx2515.driver.v347\bin\wlh\x64.
Figure 38 Windows Vista and Windows 7 Device Driver (64-bit)
2.2 How to Install Device Driver
This section describes the procedure to install the MPX-2515 card device driver for
your target Microsoft Windows platform.
Have your product CD ready to be accessed by your Windows. Connect the MPX2515 card through USB via one of the three methods mentioned in the previous
sections and following the device driver setup instructions. The following screen
shots will give you a detail ideal of the device driver setup procedure.
Taiwan Commate Computer Inc.
36
Commell MPX-2515 User’s Guide
Rev 0101
3 Firmware Update
3.1 Introduction
The MPX-2515 implements a bootloader that can reprogram the CY8C24794 device
over the USB interface. The bootloading information can be sent through Cypress
USB Bootloader Host interface
The USB bootloader supports a fully functional device reprogramming ability with
built in error detection and an industry standard communication interface.
This chapter describes the steps of updating the firmware for MPX-2515 card via
Cypress bootloader feature.
•
Have bootloader device drivers ready. bootloader device drivers are different
with MPX-2515 device drivers. Bootloader device drivers are come with the
production CD. This procedure runs only at the first time firmware update.
•
Enter bootloader mode. Please refer to 3.2 for detail description.
•
Install bootloader device driver. Only in the first time update.
•
Execute bootloader host application. Please refer to 3.4 for detail information.
This completes the update procedure.
3.2 Enter Boot Loader
The MPX-2515 firmware needs to be in the bootloader mode in order to take
bootloader commands from the PC USB host application.
Commell provides a DOS utility to put MPX-2515 firmware into bootloader mode.
Please have the MPX-2515 card well connecting to the PC USB host platform
before proceeding the update process.
The following figure shows where the enter bootloader DOS utility locates in the
production CD.
Taiwan Commate Computer Inc.
37
Commell MPX-2515 User’s Guide
Rev 0101
The following figure shows how this mpx2515-bootload.exe is running.
Taiwan Commate Computer Inc.
38
Commell MPX-2515 User’s Guide
Rev 0101
You check whether the MPX-2515 is in bootloader mode or not via checking the
"USB Bootloader" device in USB category of the Device Manager. The following
figure shows the MPX-2515 has been changed to the "USB Bootloader" mode.
3.3 Install Boot Loader Device Driver
You will be prompted by the Windows if the MPX-2515 card is entering the
bootloader mode in the first time.
The following figure shows all possible USB Bootloader mode device drivers for
Microsoft Windows Systems. Please pick up the one that meets your installing
operating system.
Taiwan Commate Computer Inc.
39
Commell MPX-2515 User’s Guide
Rev 0101
Please follows the Device Driver Installation Wizard to install a appropriate device
driver from the provided USB Bootloader device drivers folders.
3.4 Boot Loader Host Application
The MPX-2515 firmware now is ready to be updated. Launch the Cypress
Bootloader host application. The following figure shows where is this bootloader
host application.
Taiwan Commate Computer Inc.
40
Commell MPX-2515 User’s Guide
Rev 0101
The following figure shows how the PSoC1_USB_Bootloader_Host_Application is
running.
List devices ---> This program lists devices that are in bootloader mode by
clicking the "List devices" button.
Download Configuration to device ---> Click on this button to choose the new
configuration file to reprogram the MPX-2515 firmware. The following file dialog
shows after this button has been clicked.
Taiwan Commate Computer Inc.
41
Commell MPX-2515 User’s Guide
Rev 0101
Choose the .DLD file that released from Commell to proceed the new firmware
updating process.
The following figures show the updating messages during the update process.
Taiwan Commate Computer Inc.
42
Commell MPX-2515 User’s Guide
Taiwan Commate Computer Inc.
Rev 0101
43
Commell MPX-2515 User’s Guide
Rev 0101
You are now completed the MPX-2515 firmware update process.
3.5 In Case Failed
Here is the steps to following if the firmware update process is failed.
•
Keep the Cypress Bootloader Host Application running still.
•
Disconnect the MPX-2515 card from the USB receptacle.
•
Re-insert the MPX-2515 card into the same USB receptacle.
Taiwan Commate Computer Inc.
44
Commell MPX-2515 User’s Guide
•
Rev 0101
Repeat the update procedures.
Taiwan Commate Computer Inc.
45
Commell MPX-2515 User’s Guide
Rev 0101
4 Reference
[1] CY8C24x94 PSoC Programmable System-on-Chip Technical Reference Manual
(TRM). Cypress Document No. 001-14463 Rev. *E.
[2] MCP2515 Stand-Alone CAN Controller With SPI Interface DS21801F,
Microchip.
[3] MCP2551 High-Speed CAN Transceiver DS21667F, 2010 Microchip.
[4] Microsoft Visual Studio 2010 Help, Microsoft.
[5] CiA 301 CANopen application layer and communication profile version 4.2.0, 21
February 2011, CAN in Automation.
[6] CiA 103 Intrinsically safe capable physical layer version 1.0.0, February 2010,
CAN in Automation.
[7] CiA 303 CANopen Recommendation Part 1 Cabling and connector pin
assignment Version 1.8.0, 27 April 2012, CAN in Automation.
[8] A CAN Physical Layer Discussion, AN228, DS00228A, 2002 Microchip.
Taiwan Commate Computer Inc.
46