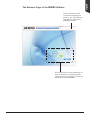
1
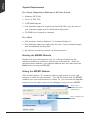
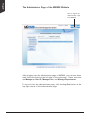
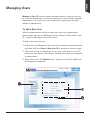
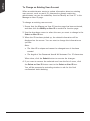
Document
Management
System
User's Manual for
Administrator
www.microtek.com
Preface
Copyright
Copyright © 2013, Microtek International, Inc., all rights reserved. This document
may not be reproduced or copied in any way, stored electronically, or translated
into any language, without the permission of Microtek International, Inc.
Trademarks
Microtek, DocWizard, MiDMS, ScanMaker, ArtixScan, ScanWizard and
ColoRescue are trademarks or registered trademarks of Microtek International,
Inc. All other trademarks or registered trademarks are the property of their
respective holders. Specifications, software and hardware bundles are subject to
change without notice. Not responsible for typographical errors.
Disclaimer
The contents of this manual have been checked carefully for accuracy, and every
effort has been made to ensure that there are no errors. However, Microtek
makes no guarantee as to the accuracy of the contents of this document and
reserves the right to make changes to the contents without prior warning.
I49-004901, A2
April 2013
Microtek International, Inc.
6, Industry East Road 3, Science Based Industrial Park, Hsinchu, 30077, Taiwan
Tel: 886-3-5772155, Fax: 886-3-5772598, http://www.microtek.com
2
MiDMS User’s Manual for Administrator
Contents
Introduction.................................................................................... 5
System Requirements................................................................. 6
Entering the MiDMS Website...................................................... 6
Exiting the MiDMS Website......................................................... 6
The Entrance Page of the MiDMS Website.................................... 7
The Administrator Page of the MiDMS Website............................. 8
Managing Users.............................................................................. 9
To Add a New User................................................................... 9
To Change an Existing User Account . ....................................... 10
To Modify an User’s Authority.................................................. 12
A. To Modify an User’s Authority......................................... 12
B. To Copy Authority from an User....................................... 14
Managing Files.............................................................................. 15
1. Create................................................................................ 15
2. User Authority..................................................................... 15
3. Rename.............................................................................. 16
4. Delete................................................................................ 17
5. Department......................................................................... 18
6. Password............................................................................ 18
Managing Departments.................................................................. 19
To Add a New Department....................................................... 19
To Rename a Department.................................................... 20
To Delete an Existing Department......................................... 20
To Review and Download the Authority Information of a
Selected User . ....................................................................... 22
To Review and Download the Authority Information for Folders/Files
in a Selected Department . ....................................................... 24
System Backup and Recovery......................................................... 26
Back up the Data Manually....................................................... 28
Back up the Data Automatically................................................. 29
Restore the Data..................................................................... 30
Apendix....................................................................................... 33
Initiating and Setting up MiDMS................................................ 33
Setup for Uploading of Files...................................................... 33
Setup for Protecting the Directory.............................................. 34
Q & A.................................................................................... 35
MiDMS User’s Manual for Administrator
3
4
MiDMS User’s Manual for Administrator
Introduction
Microtek MiDMS (Data Management System) is a file scan and
management system, which is specifically designed and provides the best
solutions for small and medium-sized corporations. Through an easy-touse interface, users can scan, digitize and upload files to the web server
in few steps. Later, everyone can overview, search or download these
digitized files directly through the access and connection with the web
server.
This manual is created for the people who are classified as an
administrator, controlling and distributing the authority levels of the users
toward using the MiDMS application. The contents here only focus on
the managements of users, web-access authority levels and directories in
the server. If your concern is about how to use the MiDMS application,
refer to “MiDMS User’s Manual” for the details.
MiDMS User’s Manual for Administrator
5
System Requirements
For a Server (Supporting a Maximum of 30 Users On-line)
• Windows XP 32-bit
• Core 2 2 GHz CPU
• 2 GB RAM required
• Free hard disk space as required (at least 500 GB) or by the size of
your scanned images and for additional working files
• CD-ROM drive (internal or external)
For a Client
• Web browser: Internet Explorer 7 or Internet Explorer 8
• Free hard disk space as required by the size of your scanned images
and for additional working files
• An internet connection to hook up with the server
Entering the MiDMS Website
Double-click your web browser icon (i.e. Internet Explorer) on the
Windows desktop or toolbar to extend your web browser. Enter the
assigned server address in the website address box and then press the
Enter button to enter the MiDMS.
Exiting the MiDMS Website
Click the Exit button “X” located at the top right corner of your web
browser to close the web browser. You will be directly exit the MiDMS
website once your web browser is closed. Or, you can click the Log Out
button at the top right corner of the webpage to log out from MiDMS.
Click to exit
MiDMS and close
web browser
Click to logout from
MiDMS
6
MiDMS User’s Manual for Administrator
The Entrance Page of the MiDMS Webiste
Use the drop-down menu
to select the language you
prefer to use. The supported
languages are English and
Simplified Chinese.
After entering the correct Administrator’s
User ID, Password and Verifying Code,
please click the Log In button to enter the
administrator page of MiDMS.
MiDMS User’s Manual for Administrator
7
The Administrator Page of the MiDMS Webiste
Click to logout the
Administrator page
from MiDMS
After logging into the administrator page of MiDMS, you can see three
main functions listed at the left side of the web page. These functions
are Manage an User ID, Manage Files, and Manage Departments.
To log out from the administrator page, click the Log Out button at the
top right corner of the administrator page.
8
MiDMS User’s Manual for Administrator
Managing Users
Manage an User ID function allows an administrator to add a new user
to a wanted department, remove an existing user from his/her assigned
department or to modify an user’s authority on going over files and
folders in departments.
To add a New User
When an administrator wants to add a new user into a department,
administrator can use an affiliation function named "Create a New User
ID" under the Manage an User ID function.
To add a new user account:
1.Ensure that the Manage an User ID function page has been activated,
and then click the Create a New User ID to extend its function page.
2.Take turns to key in information for an user in the boxes of User ID,
Password, User Name, Department, domain restriction and assigment
of adminisrator.
3.When done, click the Submit button, and the user will be added into
the department assigned.
MiDMS User’s Manual for Administrator
9
To Change an Existing User Account
When an administrator wants to update information about an existing
user account, such as user's ID, password or domain restriction,
administrator can use the subsidiary function"Modify an User ID" in the
Manage an User ID page.
To change an existing user account:
1.Ensure that the Manage an User ID function page has been activated,
and then click the Modify an User ID to extend its function page.
2.Use the drop-down menu to select the user you want to change in the
Select an User ID box.
3.When the ID has been picked up, the related information will be
displayed on the screen. You can start to change the information as
you like.
Note:
• The User ID is unique and cannot be changed once it has been
created.
• The length of the Password should fall between 5 to 15 characters.
When done, click the Submit button to execute the changes.
4.If you want to remove the selected user from the list of users, click
the Delete an User ID button next to the Select an User ID box.
10
You will be prompted a reminding window to ask for the final
confirmation about deleting.
MiDMS User’s Manual for Administrator
The User
ID cannot
be changed
when it is
built up
Modify the boxes of information for
the selected User ID if needed.
MiDMS User’s Manual for Administrator
11
To Modify an User's Authory
The last affliated function button in the Manage an User ID page is
"Modify the Authority". When this button is click, an administrator
can assign different authority levels to users for looking up, changing,
dowloading or deleting files in a department. Also, an administrator can
also use this button to copy one user authority into another user account.
A. To Modify an User's Authority
1.Ensure that the Manage an User ID function page has been activated,
and then click the Modify the Authority to extend its function page.
2.Use the drop-down menu to select the user you want to modify in the
Select an User ID box.
3.When the ID has been picked up, click the Modify Authority button.
12
A window appears on the screen immediately.
MiDMS User’s Manual for Administrator
4.In the window, click the Change button in the Put to Use column of
the selected folder.
You are prompted a table of authorities to choose. Make your
selection and click the Confirm button to put it into action.
You will see the selected user with a table that shows the modified
authority level for the selected folder on the screen.
Shows the assigned
authority level for the
selected folder
MiDMS User’s Manual for Administrator
13
B. To Copy Authority from an User
1.Ensure that the Manage an User ID function page has been activated,
and then click the Modify the Authority to extend its function page.
2.Use the drop-down menu to select the user you want to modify in the
Select an User ID box.
3.When the ID has been picked up, click the Copy Authority button.
A window appears on the screen immediately.
4.In the Source Account box, select the another user whose authority
you want to copy.
When done, click the Copy Authority button. The authority of the
selected user will be copied and pasted to the user you specified in
step 2 .
When finished, click "X" button to go back to the previous window.
Select the user whose
authority you want to
copy
14
MiDMS User’s Manual for Administrator
Managing Files
Manage Files function allows an administrator to manipulate files in
departments as administrator wants.
To use this function:
When logging into MiDMS as an administrator on web, click the Manage
Files button to extend its function page.
Key in the name for the new folder
A
Click to
build up
a new
folder on
the web
server
Click to extend
a table of
folders on the
web server
C
D
E
F
B
There are six ways you can deal with files on the server. They are
Create, Rename, Delete, Department, Password, and User Authority.
A. Create
Use this function to create a new folder on the web server.
To do so, when the Manage Files function page is activated, key in the
name you want to use for the new folder in the Create a new folder box.
When done, click the Confirm button next to the box, and you will
see that the newly named folder appear in the table of folders below
immediately.
MiDMS User’s Manual for Administrator
15
B. User Authority
Use this button to assign users different authority levels on manipulating
the selected folder.
To assign users authority on a selected folder, when the Manage Files
function page is activated, click the User Authority button in the Put to
Use column of the selected folder.
A setup window containing all departments pops up on the screen
immediately. To check users classified into each department, click the
Plus (+) sign next to each department. A lists of users will be displayed
on the screen. Then,take turns to assign different authority levels to each
user on using the selected folder.
When done, click the Complete button to execute the action.
Click the Plus (+)
sign to extend the
list of users for each
department
16
MiDMS User’s Manual for Administrator
Click to exit
and return to
the Manage
Files function
page
C. Rename
Use this function to give a new name to a selected folder.
To give a new name to a selected folder, when the Manage Files function
page is activated, click the Rename button in the Put to Use column of
the selected folder.
A window pops up on the screen. Key in the new name for the selected
folder in the box below, and then click the Confirm button to execute the
action.
D. Delete
Use this button to remove a selected folder from the web server.
To delete a selected folder, when the Manage Files function page
is activated, click the Delete button in the Put to Use column of the
selected folder.
A confirmation window appears on the screen immediately. Click the OK
button to execute the deleting action; click the Cancel button to return to
the previous page without taking any action.
MiDMS User’s Manual for Administrator
17
E. Department
Use this button to assign a selected folder to a named department.
To assign a selected folder to a specific department, when the Manage
Files function page is activated, click the Department button in the Put to
Use column of the selected folder.
A window appears on the screen immediately. Use the drop-down menu
to choose a department where you want to assign your folder to. When
done, click the Confirmation button to execute the action.
F. Password
Use this button to assign a password to protect a selected folder when
others want to explore it.
To set up a password to a selected folder, when the Manage Files
function page is activated, click the Password button in the Put to Use
column of the selected folder.
A window pops up on the screen. Key in the password set for the
selected folder in the box below, and then click the Confirm button to
execute the action.
18
MiDMS User’s Manual for Administrator
Managing Departments
Manage Departments function allows an administrator to add a new
department on the web server. Also, an administrator can use it to
have a preview of users' authority levels and all files and their related
information in a selected department. If needed, an adminstrator can also
download tables of the information from the web server.
To Add a New Department
When an administrator wants to add a new department on the
web server, administrator can use a affiliation named "Add a New
Department" under the Manage Departmens function.
To add a new department:
1.Ensure that the Manage Departments function page has been
activated, and then click the Add a New Department to extend its
function page.
2.You can see a table of departments which have been created on the
web server. Under the bottom of the table, key in the name for the
new department in a vacant box.
MiDMS User’s Manual for Administrator
19
Key in the name for the new
department here
3.When done, click the Submit button to execute the action. You can
see the newly created department appear on the screen immediately.
The newly created department
Also, you can rename or delete an existing department on the web server
when you are in the page of the Add a New Department function.
20
MiDMS User’s Manual for Administrator
A. To Rename a Department
Use this function to change the department name to a built
To rename a department, when the page of the Add a New Department
function is activated, click the Rename button in the Put to Use column
of the selected department.
A window pops up on the screen.
Key in the new name for the selected
department in the box, and then click the
Confirm button to execute the action.
B. To Delete a department
Use this function to remove an exising department from the web server.
To delete an exising department, when the page of the Add a New
Department function is activated, click the Delete button in the Put to
Use column of the selected department.
A confirmation window appears on the screen immediately. Click the OK
button to execute the deleting action. The selected department will be
removed from the web server when it is returned to the page of the Add
a New Department function.
The folder named "PKMTMAIN" has been removed and
cannot be found in the table
anymore
The selected folder has not
been deleted yet
MiDMS User’s Manual for Administrator
21
To Review and Download the Authority Information of a
Selected User
When an administrator wants to review the authority information of
an existing user, he/she can use the subsidiary function "An User's
Authority" in the Manage Departments function page. An adminisrator
can also use this function to downlaod the search reslut of authority
information to a local computer in a file.
To review and download the authority information of the selected user:
1.Ensure that the Manage Departments function page has been
activated, and then click the An User's Authority button to extend its
function page.
2.Use the drop-down menu "Department" to select a department you
want to explore.
22
MiDMS User’s Manual for Administrator
3.Then, use the other drop-down menu "User ID" to pick up the user
you want to review in the selected department.
4.When done, click the Submit button. The search result of the selected
user will be displayed in the table below.
5.If needed, click "Download the table below" to retrieve the table from
the web server and save it to a local computer in an Excel format.
A table containing the authority information of
the selected user
MiDMS User’s Manual for Administrator
23
To Review and Download the Authority Information for
Folders/Files in a Selected Department
The last affliated function button at the Manage Departments page is
"Files to Be Overviewed". When this button is clicked, an administrator
can review and then download the authority information for folders/files
in a selected department.
To review and download the authority information for folders/files in a
selected department:
1.Ensure that the Manage Departments function page has been
activated, and then click the Files to Be Overviewed button to extend
its function page.
2.Use the drop-down menu "Department" to select a department you
want to explore.
24
MiDMS User’s Manual for Administrator
3.When done, click the Submit button. The search result of the selected
department will be displayed in the table below.
4.If needed, click "Download the table below" to retrieve the table from
the web server and save it to a local computer in an Excel format.
A table containing the authority information for folders
or files in a selected department
MiDMS User’s Manual for Administrator
25
System Backup and Recovery
It is important to back up the data and information saved in the server
periodically in case if they are damaged and lost some day. MiDMS offers
users a quick and easy-to-use backup solution, named System Backup
and Recovery and bundled with the software package purchased, saving
users lots of time and money on searching for a suitable backup and
recovery software utility program.
Launching System Backup and Recovery
To launch System Backup and Recovery: Double-click the System Backup
and Recovery icon on the desktop, or choose it from the Toolbar at the
bottom of the Windows system.
Shutting Off System Backup and Recovery
To close System Backup and Recovery, click the Exit button “X” located
at the top right of the window of the System Backup and Recovery
program.Please take note that this action only shuts off the window of
the System Backup and Recovery program. It keeps on working in your
workstation.
Click to close
the window
of the Bakup
and Recovery
program
26
MiDMS User’s Manual for Administrator
Exiting System Backup and Recovery
To exit System Backup and Recovery,
1.Point the cursor to the icon in the Toolbar at the bottom of the
Windows system.
2.Click the right button of the mouse on the icon to extend the option
menu. Select “Exit” to exit the program.
MiDMS User’s Manual for Administrator
27
Back up the Data Manually
When the System Backup and Recovery utility program is launched, users
can choose to back up their data manually or automatically.
To back up the data manually,
1.In the Backup Data layer, click the Overview button in the Manual
Backup section to toggle through possible folders and assign one of
them as your target folder for backing up the data.
Manual
Backup
Section
2.When done, click the Instant Backup button to start the backup
process. The system will pop up a reminding message when it finishes
running of the backup.
Note: Please perform the backup of the data only when most users are
not in use of the system; otherwise, the backup data may not be used as
real-time and correct information.
28
MiDMS User’s Manual for Administrator
Back up the Data Automatically
More conveniently, System Backup and Recovery program allows users
to set up an auto backup based on their preferred time intervals. Once
users finish the setup, the system perform the backup automatically
based on the time users required.
To back up the data automatically,
1.In the Auto Backup Section, click on time intervals to decide how
often you want the system to perform the backup. The possible
choices are Day, Week and Month.
For each time interval, you can assign specific time, date, week, and
month for the system backup. For example, if you choose “Week”
as your backup time, you can pick up time, days of week and how
often in numbers of weeks you like the system to perform the backup
automatically.
2.After finishing setting up the time for the backup, click the Overview
button to toggle through possible folders and assign one of them as
your target folder for backing up the data.
3.Check the box in front of the description at bottom if you like that the
old data will be overwritten by the new one when the disk space is
not enough.
4.When done, click the Setup button to start the backup process. The
system will pop up a reminding message when it finishes running of
the backup.
The setup
for time
intervals
for the auto
backup
Note: Please perform the backup of the data only when most users are
not in use of the system; otherwise, the backup data may not be used as
real-time and correct information.
MiDMS User’s Manual for Administrator
29
Restore the Data
An useful function offered by the System Backup and Recovery program
is that it allows you to retrieve the backup data and restore it back to
your server. This function ensures the safety of your precious data.
1.When the System Backup and Recovery utility program is launched,
click the Restoring Data tab to switch to the system recovery layer.
2.Click the Overview button to toggle through files which you want to
retrieve and restore. When it is found, click to open it and look for a
folder named “SQL”.
Click to
open
30
MiDMS User’s Manual for Administrator
3.Click “SQL” to open, select the file inside the folder, and then click
the Open button.
The selected file will appear in the column named “Data Path” at the
window.
Highlight to
select
Click to
open
4.When done, click the Instant Recovery button. Click the Yes button to
start the restoring process.
MiDMS User’s Manual for Administrator
31
32
The system will check whether select the correct file for the data
recovery. If yes, you will be returned with a successful message as
the following.
If not, you will be returned with a failure message as the following.
MiDMS User’s Manual for Administrator
Appendix
Initiating and Setting up MiDMS
If you want to open MiDMS website as a sever site, please open the web
browser and type "http://localhost/midms". Then, you will see the log-in
page appear on the screen.
If you want to open MiDMS website as a client site, please open the web
browser and type "http://Server's IP/midms". Then, you will see the login page appear on the screen.
Please log in MiDMS as an administrator for the first time, so you can
proceed the following settings. Both of the User ID and Password for the
administrator are "root".
After logging in MiDMS successfully, in order to change the log-in
password and server's IP address, please go to "Manage an User ID"
function page and then select the subsidiary function "Modify an User
ID".
Setup for Uploading of Files
Please open "C:\xampp\php\php.ini" in Word Pad. First, look for "upload_
max_filesize" and change its value to 50M" (shown in pic 1). Then, look
for "post_max_size" and change its value to 50M (shown in pic 2).
When the change is done, please restart your computer.
pic 1
pic 2
Note: If this directory is not the default directory used to install the
program, please find the same command and open it in a corresponding
directory.
MiDMS User’s Manual for Administrator
33
Setup for Protecting the Directory
Please open "C:\xampp\apache\conf\httpd.conf" in Word Pad. Look for
“Options Indexs FollowSymLinks Includes ExecCGI" (as shown in pic 1)
and then change it as “Options FollowSymLinks Includes ExecCGI” (as
shown in pic 2).
pic 1
pic 2
Note: If this directory is not the default directory used to install the
program, please find the same command and open it in a corresponding
directory
34
MiDMS User’s Manual for Administrator
Q&A
Q:When I use the Website "phpMyAdmin" to modify the password for
MySQL, why can I not continue to use phpMyAdmin website after
modifying my password successfully?
A:Please open "C:\xampp\phpMyAdmin\config.inc" in WordPad and
change your password there. Fill in "$cfg[‘Servers’][$i][‘password’] =
‘root’” there and then save the result of the modification.
After refreshing the website and you are supposed to be able to finishe
the rests of other settings. If you still cannot log in phpMyAdmin
Website after refreshing, please restart phpMyAdmin website again.
Q:How can I build up a file management system?
A:Step1 After loggin in MiDMS, activate the Manage Departments function page and create departments there.
Step 2 Shift to the Manage Files function page. Next, set up folders, their assigned departments and related settings there.
Step 3 Next, move to the Create an User ID function page. Create new user IDs and finish the rests of related settings.
Step 4 Finally, change to the Modify the Authority or Manage Files function page to set up authority levels for users.
Q: When I log in MiDMS as an administrator, why is there always a
prompted window on the screen in which a message shows "Contact
your administrator"?
A: Make sure you have inserted the SensualKey properly in the computer
before activate MiDMS website. If the warning window continues
appearing on the screen, contact the technique department of
Microtek immediately.
MiDMS User’s Manual for Administrator
35