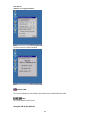
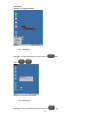
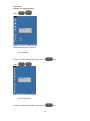
1
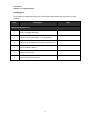
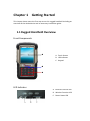
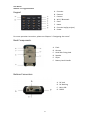
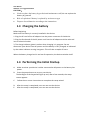
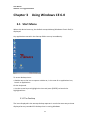
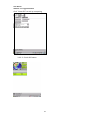
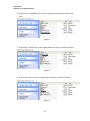
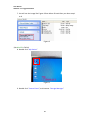
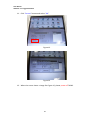
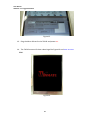
User Manual for Winmate 3.7" Rugged Handheld (R03TACH-RT) Winmate Communication INC. Revision History Version Description Date Author 1.0 First Released 28.07.2011 Shin Ku 1.1 Update 20.12.2011 Seven 1.2 New add 3.3 “Update WinCE Image to ROM” 22.03.2012 Shin Ku User Manual Winmate 3.7" Rugged Handheld IMPORTANT SAFETY INSTRUCTIONS Please read these instructions carefully before using the product and save for later reference. Follow all warnings and instructions marked on the product. Unplug this product from the wall outlet before cleaning. Clean the product with a damp soft cloth. Do not use liquid or aerosol cleaners as it may cause permanent damage to the screen. Do not place this product on an unstable cart, stand, or table. The product may fall, causing serious damage to the product. This product should be operated from the type of power indicated on the marking label. If you are not sure of the type of power available, consult your dealer or local power company. Do not allow anything to rest on the power cord. Do not locate this product where persons will walk on the cord. Never push objects of any kind into this product through cabinet slots as they may touch dangerous voltage points or short out parts that could result in a risk of fire or electric shock. Never spill liquid of any kind on the product. Do not attempt to service this product by yourself, as opening or removing covers may expose you to dangerous voltage points or other risks and will void the warranty. Refer all servicing to qualified service personnel. Unplug this product from the wall outlet and refer servicing to qualified service personnel under the following conditions: When the power cord or plug is damaged or frayed. If liquid has been spilled into the product. If rainy or water has been exposed to the product. If the product does not operate normally that the operating instructions are followed. Adjust only those controls that are covered by the operating instructions since improper adjustment of other controls may result in damage and will often require extensive work by a qualified technician to restore the product to normal operation. If the product has been dropped or the cabinet has been damaged. If the product exhibited a distinct change in the performance, that indicates a need for service. 1 User Manual Winmate 3.7" Rugged Handheld Copyright Notice Copyright © 2008 Winmate Communication Inc., ALL RIGHTS RESERVED. No part of this document may be reproduced, copied, translated, or transmitted in any form or by any means, electronic or mechanical, for any purpose, without the prior written permission of the original manufacturer. Trademark Acknowledgement Brand and product names are trademarks or registered trademarks of their respective owners. Disclaimer Winmate Communication Inc. reserves the right to make any product changes without notice, including circuits and/or software described or contained in this manual in order to improve design and/or performance. Winmate Communication assumes no responsibility or liability for the use of the described product(s), conveys no license or title under any patent, copyright, or masks work rights to these products, and makes no representations or warranties that these products are free from patent, copyright, or mask work right infringement, unless otherwise specified. Applications that are described in this manual are for illustration purposes only. Winmate Communication Inc. makes no representation or warranty that such application will be suitable for the specified use without further testing or modification. Warranty Winmate warrants that each of its products will be free from material and workmanship defects for a period of one year from the invoice date. If the customer discovers a defect, Winmate will, at its option, repair or replace the defective product at no charge to the customer, provided it is returned during the warranty period of one year, with transportation charges prepaid. The returned product must be properly packaged in it’s original packaging to obtain warranty service. If the serial number and the product shipping data differ by over 30 days, the in-warranty service will be made according to the shipping date. In the serial numbers the third and fourth two digits give the year of manufacture, and the fifth digit means the month (e. g., with A for October, B for November and C for December). For example, the serial number 1W08Axxxxxxxx means October of year 2008. 2 User Manual Winmate 3.7" Rugged Handheld Customer Service We provide service guide for any problem as follow steps:First, visit the website at http://www.winmate.com.tw to find the update information about the product. Second, contact with your distributor, sales representative, or our customer service center for technical support if you need additional assistance. You may have the following information ready before you call: Product serial number Peripheral attachments Software (OS, version, application software, etc.) Description of complete problem The exact wording of any error messages In addition, free technical support is available from our engineers every business day. We are always ready to give advice on application requirements or specific information on the installation and operation of any of our products. Please do not hesitate to call or e-mail us. Notice 1. Do not touch the LCD panel surface with sharp or hard objects. 2. Do not use abrasive cleaners, waxes or solvents for cleaning, use only a dry or damp, soft cloth. 3. Use only with a high quality, safety-approved, AC/DC power adapter. 3 User Manual Winmate 3.7" Rugged Handheld Safety Precautions Warning! Always completely disconnect the power cord from your chassis whenever you work with the hardware. Do not make connections while the power is on. Sensitive electronic components can be damaged by sudden power surges. Only experienced electronics personnel should open the PC chassis. Caution! Always ground yourself to remove any static charge before touching the CPU card. Modern electronic devices are very sensitive to static electric charges. As a safety precaution, use a grounding wrist strap at all times. Place all electronic components in a static-dissipative surface or static-shielded bag when they are not in the chassis. 4 User Manual Winmate 3.7" Rugged Handheld Packaging List This product is shipped with the items list below. Please make sure that all are in your package. Item Description Note Default Packing Accessories 1 1 piece of Rugged Handheld. 2 1 piece of CD for WinCE BSP & Users Manual. 3 1 piece of 5V 3A Adapter with Power Plug Connector. 4 1 piece of Battery Built-in 5 1 piece of hand strap 6 1 piece of Resistive Touch Pen 5 User Manual Winmate 3.7" Rugged Handheld Table of Contents Chapter 1 1.1 1.2 1.3 1.4 Chapter 2 2.1 Chapter 3 3.1 Getting Started ........................................................................................... 7 Rugged Handheld Overview....................................................................... 7 Inserting the SIM Card and Battery.......................................................... 10 Charging the battery ................................................................................ 11 Performing the Initial Startup .................................................................. 11 Basic Operations....................................................................................... 12 Navigating around the Screen .................................................................. 12 Using Windows CE 6.0 ............................................................................. 14 Start Menu ............................................................................................... 14 3.1.1 The Desktop ................................................................................. 14 3.1.2 3.1.3 Start Programs ............................................................................. 15 Taskbar ......................................................................................... 26 3.1.4 Keypad .......................................................................................... 29 3.2 Device ....................................................................................................... 33 3.2.1 Wi-Fi Function.............................................................................. 33 3.2.2 Bluetooth ..................................................................................... 41 3.2.3 GPS ............................................................................................... 44 3.2.4 3G Module ................................................................................... 48 3.2.5 RFID (Optional) ............................................................................. 51 3.2.6 Barcode Reader (Optional) ........................................................... 51 3.3 Update WinCE Image to ROM .................................................................. 52 3.3.1 Note.............................................................................................. 52 3.3.2 Steps ............................................................................................. 53 6 Chapter 1 Getting Started This chapter shows users the first step to use this rugged handheld including an overview of the whole device and an accessory installation guide. 1.1 Rugged Handheld Overview Front Components A A. Touch Screen B. LED Indicator C. Keypad A A LED Indicator A. External Function LED B. Wireless Function LED C. Power Status LED User Manual Winmate 3.7" Rugged Handheld A. Function Keypad B. C. D. E. F. G. H. External Camera Wi-Fi/ Bluetooth Enter Home Function key(by project) Power For more operation instruction, please see Chapter 2 “Navigating the screen” Back Components A. B. C. D. E. F. Flash Camera Hand Belt Fixing Hole Speaker Stylus Battery Latch Handle Bottom Connectors A. B. C. D. 8 DC Jack DC Docking Mini USB RS232 User Manual Winmate 3.7" Rugged Handheld (Optional) With Barcode Reader A. Barcode Reader (Optional) RFID A 9 A. RFID User Manual Winmate 3.7" Rugged Handheld 1.2 Inserting the SIM Card and Battery A. Lift the latch handle of the battery cover and turn it to unlock position. Then, open the cover from the device. B. (Optional) Users who need 3G function need to install the SIM card provided by mobile operator. With the SIM card chip side facing up, insert the card fully into the bottom slot. C. (Optional) Users who need to extend memory should install the SD card. With the SD card chip side facing up, insert the card fully into the upper slot. The first way to install the battery is to attach the upper side of the battery to battery connector and then lower the bottom side to fit into the compartment. D. E. Recover the battery cover and secure the latch by turning it to lock position. 10 User Manual Winmate 3.7" Rugged Handheld CAUTION: Need to replace the battery by professional maintenance staff, do not replace the battery by yourself Risk of explosion if battery is replaced by an incorrect type Dispose of used batteries according to the instructions 1.3 Charging the battery Before beginning Make sure the battery is correctly installed in the device. 1. Plug the DC cord of the AC adapter into the power connector of the device. 2. Plug the female end of the AC power cord into the AC adapter and the male end into an electrical outlet 3. The charge indicator glows in amber when charging is in progress. Do not disconnect your device from AC power until the battery is fully charged, as indicated by the amber indicator turning into green. This will take a couple of hours. When the battery charge level is too low for operation, the device switches itself. 1.4 Performing the Initial Startup A. Make sure that your device is either connected to AC power or the battery has power. B. Press the power button to turn on your device. The backlight of the keypad will light up and, after a few seconds, the setup screen appears. C. Follow the on-screen instructions to complete the setup wizard. D. E. After the setup is completed, user can now use the device. After the setup is completed, user can now use the device. 11 User Manual Winmate 3.7" Rugged Handheld Chapter 2 Basic Operations 2.1 Navigating around the Screen There are three ways for users navigating on the screen: Using Touch screen The device comes equipped with a stylus—a pointing tool that looks like a pen. The stylus is used to select objects on the touch screen It is convenient for users to take it from the back of the device. To choose an icon, open a file, launch an applet or open a folder: • Double-tap on the appropriate icon. Using Keypad The table below shows functions of each key. Some of the keys have different functions when they are under different situations. Key Name Function Power Power ON/OFF Home Exit program, back to desktop Enter Normal: Confirm Wireless Wireless enable/disable Camera Camera enable/disable Phone Function key enable/disable Ext. External module enable/disable Fn Enable/disable orange key function Fn disable: 1 1 Fn enable: Brightness 12 User Manual Winmate 3.7" Rugged Handheld Fn disable: 2 2 Fn enable: Up Fn disable: 3 3 Fn enable: Brightness + Fn disable: 4 4 Fn enable: Left Fn disable: 5 5 Fn enable: None Fn disable: 6 6 Fn enable: Right Fn disable: 7 7 Fn enable: Volume Fn disable: 8 8 Fn enable: Down Fn disable: 9 9 Fn enable: Volume + Fn disable: 0 0 Fn enable: None Fn disable: * * Fn enable: None Fn disable: # # Fn enable: None 13 User Manual Winmate 3.7" Rugged Handheld Chapter 3 Using Windows CE 6.0 3.1 Start Menu When this device boots up, the default startup desktop (Windows Classic Shell) is displayed. Any applications stored in the Startup folder start up immediately. To access desktop icons: • Double-tap on the icon to open a window or, in the case of an application icon, launch an application. On the keyboard: • Use the arrow keys to highlight the icon and press *ENTER+ to launch the highlighted icon. 3.1.1 The Desktop The icons displayed in the startup desktop operate in much the same way as those displayed on any standard PC desktop that is running Windows. 14 User Manual Winmate 3.7" Rugged Handheld My Device Choosing this icon displays the contents of your device. Recycle Bin This option temporarily stores items that were deleted, allowing you to either permanently delete or restore these items. Internet Explorer Choosing this icon launches Internet Explorer—a standard Windows Embedded CE version. Keep in mind that your supervisor will need to set up access using the Internet Options and the Network and Dial-up Connections icons in the Control Panel. Microsoft WordPad WordPad is a basic word processor used to create, edit, and print .rtf, .doc, and .txt files. My Documents The My Documents folder is a standard location for storing user-created files. The folder is located under the root of the hard drive on which Windows is installed. 3.1.2 Start Programs The Start Menu lists the operations you can access and work with. It is available from the startup desktop or from within any application. • To display the menu, tap on the Start Menu. 15 User Manual Winmate 3.7" Rugged Handheld 3.1.2.1 Run Choosing the Run option from the Start Menu displays a dialog box in which you can enter the name of the program, folder or document you want to open or launch. 16 User Manual Winmate 3.7" Rugged Handheld 3.1.2.2 Setting The Settings sub-menu includes the following settings: Control Panel, Network and Dial-up Connections and Taskbar and Start Menu. Control Panel The Control Panel contains applets used to configure hardware, the operating system and the shell. Network and Dial-Up Connections The Network and Dial-up Connections window allows you to configure the handheld network interfaces or execute an existing configuration. Taskbar and Start Menu The Taskbar and Start Menu option displays a dialog box in which you can customize the taskbar, choosing which options will be displayed. 17 User Manual Winmate 3.7" Rugged Handheld 3.1.2.3 Documents 3.1.2.4 Favorites Favorites include the web links that users save for convenience. 18 User Manual Winmate 3.7" Rugged Handheld 3.1.2.5 Programs Choose Programs to display a sub-menu of options. The programs displayed will be those residents in the Windows\Programs folder of the computer. This sub-menu allows you to choose Camera, Command Prompt, Internet Explorer, Media Player, installed applications (e.g., Microsoft WordPad), RegEdit, RFID_Barcode_Reader, TestTool and Windows Explorer. Camera Camera can only support pre-view now. Command Prompt Command Prompt is used to access the DOS command prompt. At the prompt, you can type DOS commands such as dir to display all the directories in the drive. Internet Explorer 3.7” Handheld is equipped with Microsoft Internet Explorer for Windows Embedded CE. You can access the Internet Options icon through the Start Menu under Settings>Control Panel or by double-tapping on the desktop icon My Device and then, double-tapping on the Control Panel icon. Media Player The installed Media Player can play video files. 19 User Manual Winmate 3.7" Rugged Handheld Microsoft WordPad WordPad is a basic word processor used to create, edit, and print .rtf, .doc, and .txt files. RegEdit Regedit To revise registry setting via regedit.exe 20 User Manual Winmate 3.7" Rugged Handheld RFID_Barcode_Reader The program can test value of RFID or Barcode Reader. Customized prefix and suffix can be set and then will be shown in the list after users scan. Various type of linear or matrix barcode can be selected. 21 User Manual Winmate 3.7" Rugged Handheld Test Tool The tool is for test all of the functions. LCD Test if the colors, blue/ white/ green/ red, are shown normally. Wi-Fi To check if MAC address and Wi-Fi work normally 22 User Manual Winmate 3.7" Rugged Handheld Touch To test if touch function is normal Battery To examine power status and value, and confirm MCU version 23 User Manual Winmate 3.7" Rugged Handheld Keypad Test each key is correct or not. When press one certain key, the screen will show its corresponding function. 3G To check if 3G function is normal 24 User Manual Winmate 3.7" Rugged Handheld After test is done, users can check Logo file within “My DeviceWindows”. The default file is named as “MAC Address.” Windows Explorer The Windows Explorer installed on your 3.7” Handheld is consistent with all Windows Embedded CE devices. 25 User Manual Winmate 3.7" Rugged Handheld 3.1.3 Taskbar The taskbar at the bottom of the screen displays a variety of system status indicators, including the Input Panel button if you have chosen to show that option in the Taskbar and Start Menu settings. The taskbar changes dynamically, and only those icons that are applicable are displayed. For example, if a radio is not installed in your device, the radio signal icon is not displayed in the taskbar. Battery The battery shaped icon displayed in the taskbar provides quick access to the charge state of the battery. Tapping on the icon once will show the percentage of power left in the battery. 26 User Manual Winmate 3.7" Rugged Handheld Scheme To set up power scheme and state AP Settings 1) Low Battery Warning: Users can set up low battery warning level. 2) GPS/ Wi-Fi default status setup 27 User Manual Winmate 3.7" Rugged Handheld To check version of OS and MCU Wireless LAN This icon displayed in the taskbar represents the installed Wireless LAN. Time This icon shows current time. ShungPin IM 3D (for MSPY3) 28 User Manual Winmate 3.7" Rugged Handheld 3.1.4 Keypad 3.1.4.1 Function Key Function Key is used to facilitate to apply more functions for users. After function key is pressed, some keys have different functions from number functions. For example, the specific keys can be used to adjust brightness and volume. When function key is activated, there is a mark shown in top right as below. 29 User Manual Winmate 3.7" Rugged Handheld 3.1.4.2 ESC/ EXT The ESC/ EXT key is used to enable Barcode reader/ RFID function. 3.1.4.3 Wireless LAN When taping Wireless LAN key, the window showing Wi-Fi information will appear. 3.1.4.4 Camera The Camera key can activate camera function. 3.1.4.5 Enter Users can confirm their actions by pressing the Enter key 3.1.4.6 Home Home key is a shortcut to show start screen. 30 User Manual Winmate 3.7" Rugged Handheld 3.1.4.7 Backlight- Backlight- can be activated after users press Fn Step: key. > Brightness has been decreased. 3.1.4.8 Backlight+ Backlight+ can be activated after users press Fn 31 key. User Manual Winmate 3.7" Rugged Handheld Step: > Brightness has been increased. 3.1.4.9 Sounds- Sound- can be activated after users press Fn Step: key. > 3.1.4.10 Sounds+ Sound- can be activated after users press Fn 32 key. User Manual Winmate 3.7" Rugged Handheld Step: > 3.1.4.11 Power To turn on and turn off the device 3.2 Device 3.2.1 Wi-Fi Function The Wi-Fi application is used to configure the 3.7” Handheld 802.11b/g radio for one or more wireless network profiles. A network profile contains settings for SSID (Service Set Identifier) and security options. 3.2.1.1 How to activate and inactivate Wi-Fi When the device boots up, the Wi-Fi screen is automatically displayed. In addition, users can press Wireless LAN key to start the same function. 33 User Manual Winmate 3.7" Rugged Handheld The Wi-Fi screen is displayed. Tap “Wireless Information” tab This tab displays existing networks to which you can connect, and it allows you to add a new network or modify the settings for an existing network. • Connect button: To force connection to a specific, existing network, highlight the network to which you want to connect, and tap on the Connect button and a “Wireless Network Properties” tap jumps. 34 User Manual Winmate 3.7" Rugged Handheld Wireless Network Properties • Ad Hoc And Infrastructure: If you are using an Infrastructure network—one in which the handhelds must pass data through an access point—leave the checkbox next to This is an ad hoc network blank. If you are using an Ad Hoc network—a network in which the handhelds pass data directly to other Ad Hoc devices without an access point—add a checkmark in the checkbox next to This is an ad hoc network to enable Ad Hoc. • Encryption: WEP (Wired-Equivalent Privacy) encryption prevents others from accidentally accessing your network. If you are not using encryption, you can choose Disabled from the drop-down encryption menu. Otherwise, leave this field as is. AES (Advanced Encryption Standard) is a standard for protecting data through encryption. AES supports key sizes of 128 bits, 192 bits and 256 bits and will serve as a replacement for the Data Encryption Standard (DES), which has a key size of 56 bits. In addition to the increased security that comes with larger key sizes, the AES algorithm is a symmetrical block cipher that can encrypt (encipher) and decrypt (decipher) information. • Authentication: 802.11 support several subtypes of network authentication services: Open, Shared, WPA, and WPA-PSK. Under Open authentication, any wireless station can request authentication. The station that needs to authenticate with another wireless station sends an authentication management frame that contains the 35 User Manual Winmate 3.7" Rugged Handheld identity of the sending station. The receiving station then sends back a frame that indicates whether it recognizes the identity of the sending station. Under Shared authentication, each wireless station is assumed to have received a secret shared key over a secure channel that is independent from the 802.11 wireless network communications channel. Under WPA and WPA-PSK authentication, the use of 802.1x authentication is required. For wireless networks without a Remote Authentication Dial-In User Service (RADIUS) infrastructure, WPA supports the use of a preshared key. For wireless networks with a RADIUS infrastructure, Extensible Authentication Protocol (EAP) and RADIUS is supported. • Network Key: This text box is used to specify a 5 or 13 ASCII character sequence or an equivalent 10 or 26 Hexadecimal digit sequence that matches the active WEP key on the access point. To assign a Network key, highlight The key is provided automatically, and uncheck the checkbox to disable this option. • Enable 802.1x authentication: 802.1X is the IEEE standard that offers additional security for local area networks. It provides authentication for user devices attached to an Ethernet network, whether wired or wireless. A security protocol packet such as TLS or MD5 encapsulated in an EAP is used in conjunction with the 802.1X standard to authenticate users at the MAC layer. Available EAPs are listed in the drop-down menu next to the EAP option. To activate 802.1X, highlight 802.1x authentication, and check the checkbox. • EAP Type (Extensible Authentication Protocol): This drop-down menu lists the EAP types available on your system. The items in this drop-down menu will vary depending on your network setup. Keep in mind also that some authentication protocols require that you select a Certificate. By selecting the Properties button, you will be able to select a Certificate. “Certificates” on page 88 provides a website that outlines how to create certificates for your network. • Saving and exiting the radio setup: Once you have completed the configuration, 36 User Manual Winmate 3.7" Rugged Handheld press [ENTER], or tap on OK. The connection you created will be listed in the Wireless Information tab as a preferred network. The radio will search for the SSID and compare the WEP and authentication information you specified. If there is a match between the hand-held settings and the access point settings, the hand-held will communicate on the network through the access point. When there is no available or suitable network • To add a new configuration, tap on the Add New button. A blank Wireless Properties dialog box is displayed. • Type the appropriate SSID (Service Set Identifier) in the Network name (SSID): dialog box. The Network name field can contain a maximum of 32 characters. The name assigned here is listed as a preferred network. 37 User Manual Winmate 3.7" Rugged Handheld 3.2.1.2 Check IP Information/ Wireless Information 3.2.1.3 Advanced settings To display the Advanced Wireless Settings dialog box: • Tap on the Advanced button in the Wireless Information tab. This window lists the available preferred networks. 38 User Manual Winmate 3.7" Rugged Handheld Rearranging Preferred Networks 3.7” Handheld attempts to connect with the networks listed in this dialog box in sequence, beginning at the top of the list. If you need to rearrange this list of networks—move networks up and down in the list: • Tap in the Networks List, and highlight the network that you want to move up or down in the list. • To move the highlighted item in the list upward or downward, tap on the Up or Down button. Deleting A Preferred Network To delete a network from this list: • In the preferred networks list, highlight the network you want to remove. • Tap on the Delete button. Changing Network Properties To change the properties of an existing preferred network: • Highlight the network that you want to modify. • Tap on the Properties button. • Make any necessary changes in the Wireless Properties dialog box and press [ENTER] to save the changes. 3.2.1.4 View Log 39 User Manual Winmate 3.7" Rugged Handheld 3.2.1.5 IP Address setting To assign an IP address for your device: Tap on Start>Settings>Network and Dial-up Connections. Tap on the radio icon for which you want to assign an IP address—in the sample screen below, the icon is labeled TIWLNAPI1. The Wireless Statistics screen is displayed. 40 User Manual Winmate 3.7" Rugged Handheld Tap on the radio button next to Specify an IP address to select it. • Type an IP, Subnet Mask and Default Gateway address in the appropriate fields. Press [ENTER] to save your information. 3.2.1.6 Name Servers In the TIWLNAPI1 IP Information tab, tap on the Configure button. Tap on the Name Servers tab. The DNS and WINS fields in the Name Servers tab allow you to specify additional WINS and DNS resolvers. The format for these fields is ###.###.###.###. 3.2.2 Bluetooth Bluetooth is a global standard for wireless connectivity for digital devices and is intended for Personal Area Networks (PAN). The technology is based on a short-range radio link that operates in the ISM band at 2.4 GHz. When two Bluetooth-equipped devices come within a 10 metre range of each other, they can establish a connection. Because Bluetooth utilizes a radio-based link, it does not require a line-of-sight connection in order to communicate. 41 User Manual Winmate 3.7" Rugged Handheld 3.2.2.1 How to activate and inactivate Bluetooth Start> Settings> Control Panel> Bluetooth Device Properties The Bluetooth Manager screen displays. In this tab, users can discover and display Bluetooth devices. Discovering and Removing Devices Scan discovers Bluetooth devices in range of your device and lists them in this tab. 42 User Manual Winmate 3.7" Rugged Handheld Any existing devices previously discovered and listed will also be displayed. Clear removes all Bluetooth devices listed except those with currently paired and connected services. 3.2.2.2 Trusted and Active Device Tap the selected item twice and a trusted window appears. Tap “Trusted” and a confirmation window jumps. 43 User Manual Winmate 3.7" Rugged Handheld Enter your customized PIN When the other device accepts the match invitation and enters the right PIN, the Bluetooth is activated. 3.2.3 GPS This applet allows you to define how the GPS module operates. You can determine when the GPS module is powered and operating, and choose from a set of GPS profiles built into the modem. 44 User Manual Winmate 3.7" Rugged Handheld 3.2.3.1 How to activate and inactivate GPS Tap on Start>Programs>mGPSCmd 45 User Manual Winmate 3.7" Rugged Handheld 3.2.3.2 GPS Setting Choose “COM3” for Com Port and “4800” for Baudrate Click “Open GPS” and GPS values will start to be read. 46 User Manual Winmate 3.7" Rugged Handheld Click” Close GPS” to end up computing 3.2.3.3 Check GPS status 47 User Manual Winmate 3.7" Rugged Handheld 3.2.4 3G Module 3.2.4.1 How to activate and inactivate 3G module Tap on Start> Settings> Control Panel> Network and Dial-up Connection Tap on Start> Settings> Network and Dial-Up Connections Select “Modem Connection” icon 48 User Manual Winmate 3.7" Rugged Handheld 3.2.4.2 Make new connection 49 User Manual Winmate 3.7" Rugged Handheld 3.2.4.3 Modem dial-up connection 50 User Manual Winmate 3.7" Rugged Handheld 3.2.5 RFID (Optional) Tap on Start> Programs> Serial_Port_Test Click “Open” tab to start calculating and the value will be in Receiver Zone. 3.2.6 Barcode Reader (Optional) Tap on Start> Programs> Serial_Port_Test Click “Barcode” tab to start calculating and the value will be in Receiver Zone. 51 User Manual Winmate 3.7" Rugged Handheld 3.3 Update WinCE Image to ROM 3.3.1 Note 1. Format Micro SD card to FAT32. Figure 1 2. Make sure the Micro SD card is cleanly. 52 User Manual Winmate 3.7" Rugged Handheld 3.3.2 Steps 1. Go to the image folder and find the file “MLO” and copy it to Micro SD card. ※The “MLO” must be the first file what you copy it to Micro SD card. Figure 2 2. Find the file “WMFlash.nb0” at the image folder and copy it to Micro SD card. Figure 3 3. Find the file “logo.bmp” at the image folder and copy it to Micro SD card. Figure 4 53 User Manual Winmate 3.7" Rugged Handheld 4. Find the file “XLDRNAND.nb0” at the image folder and copy it to Micro SD card. Figure 5 5. Find the file “EBOOT.nb0” at the image folder and copy it to Micro SD card. Figure 6 6. Find the file “NK.bin” at the image folder and copy it to Micro SD card. Figure 7 54 User Manual Winmate 3.7" Rugged Handheld 7. You will see the image like Figure 8 from Micro SD card after you done step 1 to 6. Figure 8 ※At WinCE in TACH3 8. Double click “My Device” Figure 9 9. Double click “Control Panel”, and execute “Storage Manager” 55 User Manual Winmate 3.7" Rugged Handheld Figure 10 Figure 11 10. Click “Dismount” button when you see the image like Figure 12. Figure 12 56 User Manual Winmate 3.7" Rugged Handheld 11. Click “Format” button and select “OK” Figure 13 Figure 14 12. When the screen shows a image like Figure 15, please power off TACH3 57 User Manual Winmate 3.7" Rugged Handheld Figure 15 13. Plug the Micro SD card in the TACH3 and power on. 14. The TACH3 screen will show a boot logo like Figure 16 and start to erase ROM. Figure 16 58 User Manual Winmate 3.7" Rugged Handheld 15. About 20 seconds later, it will show an image like Figure 17. It means the erase function finishes. Then re-start TACH3. Figure 17 16. The screen will show an image like Figure 18, and it will start to format ROM. After 15 seconds, the image will change to another like Figure 19, and the WinCE image is flashing now. Figure 18 59 User Manual Winmate 3.7" Rugged Handheld Figure 19 17. About 70 seconds, the screen will show an image like figure 20, and it means the flash function is finish. Please re-start TACH3. Figure 20 60 User Manual Winmate 3.7" Rugged Handheld 18. If the screen is show an image like Figure 21, that is mean the flash function is successful. Figure 21 19. After WinCE boot success, it will show an image like Figure 22. Figure 22 61