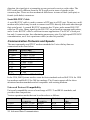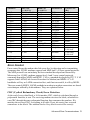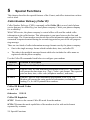
1
Comet 3356
User’s Manual
Version 1.0
JiH5<
$&&(66,1*7+(,17(51(7$1',175$1(7
Limited Warranty
ZyXEL warrants to the original end user (purchaser) that this product is free from any defects in
materials or workmanship for a period of up to two (2) years from the date of purchase. During
the warranty period, and upon proof of purchase, should the product have indications of failure
due to faulty workmanship and/or materials, ZyXEL will, at its option, repair or replace the
defective products or components without charge for either parts or labor, and to whatever
extent it shall deem necessary to restore the product or components to proper operating
condition. Any replacement will consist of a new or remanufactured functionally equivalent
product of equal value, and will be solely at the option of ZyXEL. This warranty shall not apply
if the product is modified, misused, tampered with, damaged by an act of God, or subjected to
abnormal working conditions.
Note: Repair or replacement, as provided under this warranty, is the exclusive remedy of the
purchaser. This warranty is in lieu of all other warranties, express or implied, including any
implied warranty of merchantability or fitness for a particular use or purpose. ZyXEL shall in no
event be held liable for indirect or consequential damages of any kind or character to the
purchaser.
Acknowledgments
The trademarks and brand names mentioned in this manual are used for plain informational
purposes. Trademarks and brand names are the property of their respective owners.
FCC Part 15 Information
This device complies with Part 15 of FCC rules. Operation is subject to the following two
conditions:
1.
This device may not cause harmful interference.
2.
This device must accept any interference received, including interference that may cause
undesired operations.
This equipment has been tested and found to comply with the limits for a CLASS B digital
device pursuant to Part 15 of the FCC Rules. These limits are designed to provide reasonable
protection against harmful interference in a residential installation. This equipment generates,
uses, and can radiate radio frequency energy, and if not installed and used in accordance with
the instructions, may cause harmful interference to radio communications. However, there is no
guarantee that interference will not occur in a particular installation.
If this equipment does cause harmful interference to radio/television reception, which can be
determined by turning the equipment off and on, the user is encouraged to try to correct the
interference by one or more of the following measures:
•
Reorient or relocate the receiving antenna.
•
Increase the separation between the equipment and the receiver.
•
Connect the equipment into an outlet on a circuit different from that to which the receiver
is connected.
•
Consult the dealer or an experienced radio/TV technician for help.
ii
Changes or modifications not expressly approved by the party responsible for compliance could
void the user’s authority to operate the equipment. Shielded RS-232 cables are required to be
used to ensure compliance with FCC Part 15, and it is the responsibility of the user to provide
and use shielded RS-232 cables.
FCC Requirements
This equipment complies with Part 68 of the FCC Rules. On the base unit of this equipment is a
label that contains, among other information, the FCC Registration Number and the Ringer
Equivalence Number (REN) for this equipment.
IF REQUESTED, THIS INFORMATION MUST BE GIVEN TO THE TELEPHONE
COMPANY.
The REN is useful to determine the quantity of the devices you may connect to your telephone
line and still have all of those devices ring when your telephone number is called. In most, but
not all areas, the sum of the RENs of all devices connected to one line should not exceed five
(5.0). To be certain of the number of devices you may connect to your line, as determined by
the total RENs, you should contact your local telephone company to determine the maximum
REN for your calling area.
If your equipment causes harm to the telephone network, the telephone company may
discontinue your service temporarily. If possible, they will notify you in advance. But if advance
notice isn’t practical, you will be notified as soon as possible. You will be informed of your right
to file a complaint with the FCC.
Your telephone company may make changes in its facilities, equipment, operations, or
procedures that could affect the proper functioning of your equipment. If they do, you will be
notified in advance to give you an opportunity to maintain uninterrupted telephone service.
If you experience trouble with this telephone equipment, please contact the Address and Phone
number listed in the warranty card for information on obtaining service or repairs.
The telephone company may ask that you disconnect this equipment from the network until the
problem has been corrected or until you are sure the equipment is not malfunctioning.
The user is not authorized to repair or modify the equipment.
This equipment may not be used on coin service provided by the telephone company.
Connection to party lines is subject to state tariffs.
You will find also this information on a sticker on the bottom of the modems case.
The modem is connected to a public switched line using a USOC (Universal Service Order
Code) RJ-11C modular jack.
Contacting ZyXEL
If you have questions about your ZyXEL product or desire assistance, contact ZyXEL
Communications Corporation in one of the following ways:
•
Phone: In North America call between 8:00 AM and 5:00 PM PST at
(714) 693-0808.
iii
Outside North America, you can dial +886-3-5783942 EXT 252 between 8:00AM
and 5:00PM Taiwan time (GMT +8:00).
•
Fax: ZyXEL in North America: (714) 693-8811 or Taiwan: +886-3-5782439.
•
E-mail:
•
Sales inquiries: [email protected] in North America.
[email protected] outside North America.
•
Technical support: [email protected] in North America.
[email protected] outside North America.
•
Product information: Visit our site on the World Wide Web:
http://www.zyxel.com.
•
FTP: Information , such as ZyXEL software and ROM updates for North America
can be found at this FTP address: ftp.zyxel.com
For European versions and related files, use the address: ftp.zyxel.co.at
•
Postal Service: You can send written communications at the following address:
ZyXEL Communications Corporation
6, Innovation Road II, Science-Based Industrial Park
Hsinchu, Taiwan 300, ROC
or
ZyXEL Communications Inc.
4920 E. La Palma Avenue
Anaheim, CA92807, USA
iv
Table of Contents
Limited Warranty ii
FCC Part 15 Information ii
FCC Requirements iii
Contacting ZyXEL iii
1 Introduction 1
Unpacking Your Modem 1
Becoming a Registered Owner 1
2 Installation 3
Optional Steps for Comet Installation 3
Telephone Jack 4
Microphone 4
Speaker 4
Driver and Software Installation 4
Windows 95 Driver Installation 4
Windows 95 Dial-up Networking 6
Setup for DOS Fax/Modem Software 10
3 Basic Modem Operation 12
Understanding AT Commands 12
Using the Windows 95 Hyper Terminal Program 12
Dialing and Answering Techniques 13
Dialing using the ATD Command 13
Auto-Answer and Hook Controls 14
Making Your First Connection 14
Quick Tips when issuing AT Commands 14
Modem Result Codes 15
Viewing S Register Values 16
Changing S Register Values 16
Non-Volatile Memory 16
v
Storing Phone Numbers 16
Dialing Stored Phone Numbers 16
Saving Settings and User Profiles 17
Default Modem Settings for PC’s 17
4 Advanced Data Communications 19
Front Panel LEDs 19
DTE Interface 19
UART 19
Serial Port 19
Serial RS-232C Cable 20
Communication Protocols and Speeds 20
Universal Protocol Compatibility 20
Error Control 21
CRC (Cyclical Redundancy Check) Error Detection 21
Data Compression 22
Run Length Encoding 22
Adaptive Frequency Encoding 22
String Coding 22
Hardware or Software Flow Control 23
Hardware CTS/RTS 23
Software XON/XOFF 23
5 Special Functions 24
Caller Number Delivery (Caller ID) 24
Caller ID Result Codes 24
Caller ID Inquiries 24
Caller ID Formatted Form Reporting 25
Distinctive Ring 25
6 AT Command Set Summaries 28
7 +MS Modulation Commands 34
vi
8 Status Registers & Result Codes 40
S-Registers "ATSn=x" 40
S-Register Definitions 40
Result Code Options 45
"ATXn" Result Code Option Table 45
9 Fax Operation 48
Modem as Fax Machine 48
ITU-T T.30 Fax Protocol 48
Fax Command sets 48
Defining the Fax Command Sets 49
Flow Control 49
FAX Class 1 AT Command Set 49
FAX Class 2 AT Command Set 50
10 Voice Operation 54
Voice AT Command Set 66
vii
1
Introduction
Congratulations on the purchase of your Comet 3356 modem - one of ZyXEL's premier
high-performance products. The Comet is world renown for its ability to maintain ultra
high speeds and clear, quality connections while communicating around the globe.
Unpacking Your Modem
Before you proceed, check all items you received with your modem against this list to
make sure nothing is missing. The complete package should include:
•
One (1) Comet 3356 modem
•
One (1) AC power adapter (external model)
•
One (1) RJ-11 modular telephone cable
•
One (1) Comet 3356 User’s Manual
•
One (1) ZyXEL modem driver diskette with Windows 95 INF file and Comet 3356
User’s Manual
•
One (1) Data/Fax software for Windows environments
•
One (1) warranty/registration card
•
One (1) ZyCD
•
One (1) standard RS-232 cable
Contact your dealer or the store where you bought the modem if anything is missing.
Check the modem for shipping damages. If you find any damage, contact the shipping
agency immediately.
Retain shipping and packaging materials for future storage or shipping needs.
Becoming a Registered Owner
Complete the pre-addressed Warranty Registration Card and place it in the mail.
Registered owners will receive future product information and update announcements.
Warranty registration is not necessary for product repair/or replacement - please also
save your dated invoice as proof of purchase.
Introduction 1
2 Introduction
2
Installation
This chapter covers the steps required to install your modem and install and configure
the Windows 95 driver.
1.
Turn off your computer.
2.
Open the rear panel on the back of your modem.
3.
Connect the power adapter. Plug one end of the power adapter to the round
POWER JACK on the back of the modem. Plug the other end to an AC wall outlet.
You can leave the power adapter plugged in when you are not using the modem. To
prevent power surges from damaging your modem and computer, it is recommended
that you connect the power adapter to a surge protector.
4.
Connect the serial cable. Plug one end of the serial cable into the SERIAL PORT
connector on the back of the modem. Plug the other end of the serial cable to the
back of your computer. Your Comet comes with a high-speed serial interface
capable of reaching DTE speeds of 115.2Kbps. Be sure that your PC serial port has
a high-speed 16550 compatible Universal Asynchronous Receiver Transmitter
(UART).
5.
Connect the telephone cord. Plug one end of the supplied telephone (RJ-11) cord
into the LINE jack on the back of the modem. Plug the other end into a telephone
wall jack, just as you would a standard telephone.
6.
Turn the Comet on by raising the blue power switch. The PWR LED should come
on and the modem performs a self-test procedure.
7.
Turn the computer back on.
&DX
DXWWLRQ
RQ
8VH RQO\ WKH SRZHU DGDSWHU VXSSOLHG ZLWK \RXU PRGHP 1HYHU XVH D
SRZHUDGDSWHUGHVLJQHGIRUDGLIIHUHQWSURGXFW
1RWH
0DQ\ ROGHU FRPSXWHUV XVH D VORZ 8$57 7KLV 8$57 ZDV QRW
GHVLJQHGIRUKLJKVSHHGFRPPXQLFDWLRQVDQGZLOOVLJQLILFDQWO\LPSHGHWKH
SHUIRUPDQFH RI WKH &RPHW 7R FKHFN ZKHWKHU \RXU FRPSXWHU KDV D
FRPSDWLEOH 8$57 XVH D XWLOLW\ VXFK DV 0LFURVRIW 'LDJQRVWLFV
06' WR YHULI\ WKH W\SH RI 8$57 LQVWDOOHG LQ \RXU FRPSXWHU ,I \RXU
FRPSXWHU KDV D 8$57 HLWKHU UHSODFH LW ZLWK D 8$57 RU
DGGDVHULDOFDUGZLWKD8$57WR\RXUV\VWHP
Optional Steps for Comet Installation
The Comet is equipped with a telephone jack and speaker and microphone jacks on the
back panel. The following sections briefly describe how to take advantage of these
features.
Installation 3
Telephone Jack
Connect a telephone to the PHONE jack on the back panel of the modem to manually
dial and answer calls when the modem is not exchanging data.
Microphone
To connect an external microphone, connect it to the modem’s MIC jack on the back of
the modem.
Speaker
To connect an external speaker, connect it to the modem’s SPK jack found on the back
of the modem. To connect two speakers, obtain a dual-plug adapter that allows the
modem speaker jack to drive both speakers. This adapter can be found at most
electronics stores.
Driver and Software Installation
This section contains step by step procedures for installing the Windows 95 and NT
drivers, and configuring Dial-up Networking for the Comet.
Windows 95 Driver Installation
1.
From the Windows 95 desk top click the Start button, then choose Settings, then
click Control Panel.
2.
Double click on the Modem icon.
3.
From the Modem Properties dialogue box click the Add button.
4.
Select Don’t connect my modem; I will select it from a list. Then click Next.
4 Installation
5.
Click the Have Disk button.
6.
Insert the ZyXEL Windows 95 driver disk into your floppy drive and click OK.
If you have downloaded an updated INF file from ZyXEL’s FTP, Website, or BBS,
click the Browse button to find the location of the updated .INF file, then click
Open, Then click OK.
7.
Select ZyXEL Comet 3356 from the list. Then click Next.
Installation 5
8.
Select the COM port your modem is connected to and click Next. A final dialog
box will appear. Click Finish. You should see a window similar to the one below:
9.
Click Close.
This completes the installation of your Comet modem driver. You may now use
programs such as Dial-Up Networking with your ZyXEL modem.
Windows 95 Dial-up Networking
If you have not installed the Dial-Up Networking feature in Windows 95, please install
it before you continue.
6 Installation
1.
From the Windows 95 desk top click the Start button, then click Programs,
Accessories, and Dial-up Networking.
2.
From the Welcome to Dial-Up Networking dialogue box click Next.
3.
Choose a name for your connection and select your modem type from the drop
down window. Then click on the Next button.
4.
Enter the phone number to your ISP or whatever host you are calling. Then click the
Next button.
Installation 7
5.
Click on the Finish button. A new icon is created in the Dial-up Networking folder.
6.
Right click on the new icon. Then select Properties from the menu.
7.
Make sure your Comet modem appears in the Connect Using field. Then click on
the Server Type Tab.
8 Installation
These options are mostly host or server specific.
•
If you are using PPP, use the default settings shown above.
•
If you are logging on to an Internet connection, then select TCP/IP.
•
If you are connecting to a LAN, then select Log on to network.
•
If you are logging on to a Microsoft Windows network, select NetBEUI.
• If you are logging on to a Novell network, then select IPX/SPX Compatible.
Once complete click on TCP/IP Settings.
If your host requires you to specify an IP address (Static IP), then click on the
Specify and IP address option button and enter your IP address. If your host
Installation 9
assigns an IP when you log in (Dynamic IP), then leave the Server assigned IP
address option button checked. Most servers assign an IP to you when you log in.
8.
Click the Specify name server addresses option button and enter your primary and
secondary DNS (Domain Name Server) IP.
In most cases, you should leave Use IP header compression and Use default remote
gateway checked. When all of the selections have been made, click the OK buttons
on all three opened dialog boxes.
This completes the remote connection definition. Locate the new connection icon in your
Dial-up Networking folder, and double click on it.
If the User name and Password are incorrect or missing, type them in. Click on the
Connect button and your Comet will dial the number and establish a connection to your
Internet Service Provider.
1 RW H
7KH GHIDXOW SURWRFRO IRU 'LDOXS 1HWZRUNLQJ LV 3RLQWWR3RLQW 3URWRFRO
333 ,I \RXU ,63 UHTXLUHV \RX WR XVH 6HULDO /LQH ,QWHUIDFH 3URWRFRO
6/,3\RXPD\QHHG WR FUHDWH D VSHFLDO ORJRQ VFULSW ILOH %HFDXVH WKH
SURFHGXUHV IRU ORJJLQJ RQ ZLWK 6/,3 DFFRXQWV YDU\ JUHDWO\ IURP ,63 WR
,63\RXVKRXOGFRQVXOWWKHWHFKQLFDOVXSSRUWGHSDUWPHQWRI\RXUVHUYLFH
SURYLGHUIRUWKLVLQIRUPDWLRQ
Setup for DOS Fax/Modem Software
After installing the Comet, use the following procedures to verify your modem
connections.
1.
Install and load your communications software. If you need assistance, refer to the
manual that came with the software.
2.
Select the following communication settings:
10 Installation
Setting
Baud rate
Data bits
Parity
Stop bits
Flow control
Initialization string
Port
1 RW H
Value
115,200bps
8
None
1
Hardware
AT&F
COMn*
:KHQVSHFLI\LQJDSRUWDVVLJQPHQWWKH‘Q’LQGLFDWHVWKHFRPSXWHUVHULDO
SRUWWRZKLFK \RXU PRGHP LV DWWDFKHG )RU H[DPSOH LI \RXU PRGHP LV
FRQQHFWHGWRVHULDOSRUW\RXZRXOGVHOHFW&20
4.
Place your communications software in terminal or direct connect mode (your
communications software manual will explain how).
5.
Look at the modem’s front panel and verify the TR LED is ON. If this LED is OFF,
your communications software is not addressing your modem at the correct COM
port. Make sure your software is set up for the same COM port to which your
modem is connected.
6.
Type AT and press the Enter key. You should see the AT characters you typed,
followed by an OK result code. If you do not see an OK result code, turn the
modem off and on, then repeat this step.
7.
Type ATDT number and press Enter, where number is your modem’s telephone
number. You should see a BUSY result code. If you do not see a BUSY result code
contact ZyXEL technical support.
Installation 11
3
Basic Modem Operation
This chapter covers the basic commands and techniques involved in modem operation.
In many cases, this is the only information you will need in order to get your Comet up
and running with communication software, and to start making connections with your
Comet.
Understanding AT Commands
The Comet communicates asynchronously with computers using AT commands. AT
commands are used to configure and control the Comet. Commands are usually sent to
the modem by way of communication software, but can also be entered manually with
the computer keyboard.
Command statements must be written in a specific form in order for the Comet to
recognize them. A command statement always begins with the letters AT or at. It is then
followed by one or more commands and the <Enter> key.
AT commands can only be issued when the Comet is in “command mode” or “off-line.”
Once the Comet has established a connection with another modem it is said to be “online” or in “data mode.” In this mode, the characters sent to the Comet by your computer
are transmitted to the remote modem rather than being interpreted by the Comet as
commands.
Using the Windows 95 Hyper Terminal Program
In order to issue an AT command statement, you first need to run a communication
program such as the Microsoft Windows “Hyper Terminal” program. This program
provides a simple method to manually enter AT commands so you can do such things as
“customize” the settings of your Comet, or store phone numbers you will commonly
connect to.
Once the Comet is connected to your computer’s serial port and telephone line, Open
the Windows 95 “Accessories” program group, and open the Hyper Terminal Program.
The program will prompt you for a name and Icon to use for your new connection. Type
the name Test Connection and press <Enter>.
Next, you will be prompted for country information, area code and phone number, and
the device used to make the connection. For this test purpose, do not enter a phone
number; simply choose the COM port your Comet is connected to from the “Connect
Using” list. Click “OK” when finished.
The next window sets the COM port settings. The settings used for The Comet should be
as follows:
Bits per second:
115200
12 Basic Modem Operation
Data bits:
Parity:
Stop bits:
Flow Control:
8
None
1
Hardware
Click “OK” when finished. After you have done this, save your new connection by
selecting “Save” from the “File” menu and click “OK.” A new connection icon will be
added to your Hyper Terminal folder.
You are now ready to start entering AT commands.
In the terminal window, type:
AT<Enter>
Comet responds
OK
This confirms that the modem and your computer are communicating correctly.
To test the telephone line connection issue the manual answer command.
Type:
ATA<Enter>
The Comet will pick up the phone line, and try to communicate. Normally, this
command is only used to answer an incoming call made from another modem. Thus the
high pitched noise you will hear from the speaker. To abort the operation, press any key,
or select “Disconnect” from the “Call” menu.
Dialing and Answering Techniques
Depending on what communications software you use to make modem connections, you
may not have as much control of how the modem dials the telephone number. This
section shows some useful examples of the AT commands used for dialing and
answering operations. The command characters specific to each function are shown in
bold type.
Dialing using the ATD Command
Touch Tone Dialing:
ATDT 555 1212
Pulse Dialing:
ATDP 555 1212
Tone and Pulse Dialing:
ATDP 555 1212 WT 24
Pausing During Dialing:
ATDT 9,,555 1212
Dialing Without Waiting for Dial Tone:
ATX0D, 555 1212
Originating a call using an Answer Tone:
ATDT 555 1212,,,,,,R
Basic Modem Operation 13
Redialing the Last Number Called:
ATDL
Waiting for Five Seconds of Silence:
ATDT 800 555 1212 @
123456,1 714 555 1212
Transferring a Call (using flash hook):
ATDT! 2468
Auto-Answer and Hook Controls
Enabling Auto-Answer:
1 RW H ATS0=n
,Q WKLV H[DPSOH Q LV D QXPEHU IURP WR WKDW FRUUHVSRQGV WR WKH
QXPEHURIULQJVDIWHUZKLFK\RXUPRGHPDQVZHUVDQLQFRPLQJFDOO
Disabling Auto-Answer:
ATS0=0
Manually Answering a Call:
ATA
Take modem off-hook:
ATH1
Hang up modem (on-hook):
ATH0
Manually Disconnecting a Call:
+++ATH
Making Your First Connection
For this example, we will use the connection you created in the Hyper Terminal
program to dial the ZyXEL BBS. If you are using a different terminal program, run the
program according to the instructions provided with it.
Start the terminal program by double-clicking the Test Connection icon. When the
terminal window appears, enter the dial command with ZyXEL’s BBS
(+88635776274) as the phone number.
Type:
ATDT<Phone number> <enter>
The modem will go off-hook, dial the number, and after a few seconds of negotiation
tones, you should be connected to our BBS.
You will receive a login message asking for your name. For the purposes of this
example you need not continue. Just click the “disconnect” icon on the toolbar.
Quick Tips when issuing AT Commands
•
The ENTER or RETURN key must be pressed to execute a command.
•
Multiple AT commands can be combined into one line. For example, AT&D2 and
AT&K0 can be combined into one line AT&D2&K0.
14 Basic Modem Operation
The Comet processes commands from left to right. The AT command that appears to the
right might over-write the command to the left if they are trying to accomplish tasks or
set modes that cannot coexist.
•
If you see duplicated characters for each one you type, your Comet and software
both have their “echo” feature turned. The Comet command echo state is switched
off using ATE0 and on using ATE1 (default). To eliminate the double characters,
turn off the software’s command echo rather than using the ATE0 command. If you
see no characters in your terminal window when you type, the modem’s echo
setting is probably set to off. In this case, issue the ATE1 command.
•
When a command is successfully issued and accepted, a modem responds with
what is called a “Result Code.” The Comet supports both “verbose” result codes
(i.e. “OK”), and “numerical” result codes (i.e. “0").
You can use the ATV command to set it one way or the other as follows:
Command
ATV0
ATV1
Description
Select numerical result code
Select verbose result code
There are a few basic commands that do not require the “AT” command prefix. These
are as follows:
Command
A/
<any key>
+++
Description
Repeats the last issued AT command once
Terminates the current connection attempt, if pressed
while modem is handshaking.
Escape code sequence. Entered while the modem is in
Data Mode. Returns modem to Command Mode.
Modem Result Codes
When you execute or try to execute an AT command, your modem sends a result code to
let you know whether the command was executed. An OK result code means the AT
command you sent was executed. If you receive an ERROR code, it means the command
was invalid.
The Comet also provides result codes that show:
•
Whether or not a Dial Tone was detected when the modem originated a call.
•
If a busy signal was detected when the modem originated a call.
•
The speed, protocol, and error control/data compression method used.
•
If your modem has detected an incoming ring.
Basic Modem Operation 15
Result codes can originate from any of eight result code sets. The ATXn command lets
you choose which set of result codes your modem uses. By default, your modem uses
result codes equivalent to the ATX4 command.
Viewing S Register Values
Status registers (or "S-registers") contain values that determine the modem’s operating
characteristics. Whenever you send an AT command to your modem, you are actually
changing the value of an S-register.
You can use the Sr? command to view the value of S-register ‘r’. For example, to view
the value of S-register S0, which controls auto-answering, type ATS0? and press Enter.
The modem responds with a three-digit character showing the value of this register,
followed by OK. A value of 002, for example, means your modem will auto-answer
incoming calls after the second ring.
Changing S Register Values
You can use the ATS0=n command to change the value of an S-register.
For example, to have your modem auto-answer an incoming call after two rings, set Sregister 0 to 2. Be sure the n value is between 1 and 255. If n is set to 0, your modem
will not answer incoming calls.
Non-Volatile Memory
The Comet has non-volatile memory set aside for storing user information such as
frequently used phone numbers and default command settings. This latter is particularly
useful when you use your modem to call a variety of different locations that require
different settings. For this reason, the Comet provides a number of user “Profiles” that
can be accessed through simple AT commands. This section covers the topics of storing
phone numbers, and saving default settings in the power-on profile.
Storing Phone Numbers
The AT command to store a phone number is in the format AT&Zs=n.
The ‘s’ is a number from 0 to 3 that represents the location in memory that the phone
number is to be stored, and the ‘n’ is the phone number itself.
Example: To store the number ‘1-714-555-1212’ in memory location ‘2’, type:
AT&Z2=17145551212<Enter>
You can store up to 4 telephone numbers.
Dialing Stored Phone Numbers
The AT command syntax used to dial a store number is ATDS=n.
16 Basic Modem Operation
The ‘n’ is the memory location of the stored number you want to dial.
1 RW H
$VDJHQHUDOUXOHZKHQDOHWWHULQDQ$7FRPPDQGGHILQLWLRQLVVKRZQLQ
LWDOLF W\SH WKH OHWWHU LV QRW WR EH HQWHUHG DV SDUW RI WKH FRPPDQG EXW
UDWKHU LV UHSUHVHQWDWLYH RI D QXPEHU RU VWULQJ H[SHFWHG DV LQSXW )RU
H[DPSOH 7KH OHWWHU ‘6’ LQ WKH $7'6 Q FRPPDQG LV DFWXDOO\ W\SHG
XQOLNHWKH‘V’LQWKH$7=V QFRPPDQGZKLFKUHSUHVHQWVDQXPEHU
Saving Settings and User Profiles
There are some cases where you may wish to save the settings you have made as the
default settings that are recalled when the Comet is powered up. The AT&W&Y
command selects the current settings as the power-on profile.
There are two profiles that can be changed by the user. The following table lists the
syntax for the command involved in storing, recalling, and viewing the profile settings.
AT&V
Views the settings in profile.
AT&Wn
Stores the current settings in user profile. ‘n’; n=0 or 1
ATZn
Resets the current settings with the settings in profile. ‘n’, n=0 or 1
AT&Fn
Resets the current settings with the factory settings. n=0 or 1
Default Modem Settings for PC’s
The Comet factory settings are configured for operation with PC type computers and
communications software. In most cases, no additional settings will be required. The
following are some of the default settings that are used for operation with PC computers
and software:
AT Command
E1
&C1
&D2
%C3
Description
Echoes command characters
Carrier detect follows remote carrier
Modem disconnects on DTR on-to-off transition
Use both V.42bis and MNP 5 data compression.
Basic Modem Operation 17
18 Basic Modem Operation
4
Advanced Data Communications
This chapter is included as a general reference to the connectors, interfaces, protocols,
and standards used by the Comet, including definitions of many of the communicationsrelated terms used in this manual.
Front Panel LEDs
The Comet has 9 front panel LEDs. Refer to the following tables for details on the LED
status indicators and their meanings.
LED
MR
HS
CD
OH
SD
State
Modem Ready
or Self-Test in
progress.
High Speed
Carrier Detect
Off Hook
Send Data
RD
Receive Data
TR
Terminal
Ready
Auto Answer
Power
AA
PWR
Indicates Status
Modem is ready for data communications.
Modem is operating at 2400bps or higher
Modem has detected a valid carrier signal, or &C0 is set.
Modem is accessing telephone line.
Flashes on/off rapidly when data is being transmitted from
modem to your computer.
Flashes on/off rapidly when data is being transmitted from
computer to your. modem
Computer is ready for data communications.
Modem will automatically answer incoming calls.
The modem is on and has power to operate.
DTE Interface
DTE and DCE are terms used in data communication. DTE stands for Data Terminal
Equipment and DCE stands for Data Communication Equipment. The computer or
terminal is the DTE and the modem is the DCE. The DTE interface used by the Comet is
an RS-232 with throughput speeds up to 115.2 Kbps.
UART
A UART (Universal Asynchronous Receiver Transmitter) is the device used in a DTE
or DCE for asynchronous data reception and transmission. The standard UART device
used in PCs is of the NS16450 type. For high-speed serial data transfers (38400 bps
and up), the PC may not serve the UART fast enough and data may be lost. In this case, a
UART with data buffer is needed, such as the NS16550A type device.
Serial Port
A serial port is the serial data connector together with its internal circuit on the DTE or
DCE with electrical and mechanical characteristics according to RS-232C. Since some
signals travel from the DTE port to DCE port, and some signals travel in the opposite
Advanced Data Communications 19
direction, the signal pin is a transmitter on one port and a receiver on the other. The
DTE serial port is different from the DCE serial port in terms of signals on the
connector pins. There are also mechanical differences in terms of male (with pins) or
female (with holes) connectors.
Serial RS-232C Cable
A serial RS-232C cable is used to connect a DTE port to a DCE port. Do not use a nullmodem cable (which may be used to connect two DTEs directly with each other through
their serial ports). A normal RS-232C connector has 25 pins, and a normal RS-232C
cable has 25 wires. Many signals in the RS-232C are not used in common applications,
and a 9-wire RS232C cable is sufficient in most applications. The PCAT's serial port
has only 9 connector pins, thus eliminating unnecessary pins. For high-speed DTE-DCE
communication, use a low-capacitance cable (as short as possible).
Communication Protocols and Speeds
The most commonly used ITU-T modem standards for 2-wire dial-up lines are
summarized in the chart below:
Standard
Speed (bps)
K56flex*
56,000 ~ 32,000
V.34bis
33,600 / 31,200
V.34
28,800 ~ 2,400
V.32bis
14,400 / 12,000 / 7,200
V.32
9,600 / 4,800
V.22bis
2,400 / 1,200
V.22
1,200
V.21
300
V.23
1,200
* K56flex is upgradable to ITU-T 56Kbps.
In the USA, Bell Systems used to create de facto standards such as Bell 212A for 1200
bps modems and Bell 103 for 300 bps modems. The Comet supports all the above
mentioned modem standards and are compatible with existing modems.
Universal Protocol Compatibility
Universal compatibility covers a broad range of ITU-T and BELL standards, and
provides data compression.
Various operation modes that can be achieved are as follows:
Standard
K56flex
V.34bis
V.34
BPS rate
(+/-0,01%)
56,000 - 32,000
33,600/31,200
28,800 - 2,400
Baud rate
(+/-0,01%)
multiple
2,400
multiple
20 Advanced Data Communications
Modulation
PCM
TCM
multiple
Carrier Freq
[Hz]
multiple
1,800
multiple
Standard
K56flex
V.34bis
V.32bis
V.32bis
V.32bis
V.32
V.32 uncoded
V.32
V.29*
V.29*
V.29*
V.27bis*
V.27bis*
V.26bis*
V.23
V.23
V.22bis†
BPS rate
(+/-0,01%)
56,000 - 32,000
33,600/31,200
14,400
12,000
7,200
9,600
9,600
4,800
9,600
7,200
4,800
4,800
2,400
2,400
1,200 / 75
600 / 75
2,400
Baud rate
(+/-0,01%)
multiple
2,400
2,400
2,400
2,400
2,400
2,400
2,400
2,400
2,400
2,400
1,600
1,200
1,200
1,200 / 75
600 / 75
600
Modulation
Carrier Freq
[Hz]
multiple
1,800
1,800
1,800
1,800
1,800
1,800
1,800
1,700
1,700
1,700
1,800
1,800
1,800
PCM
TCM
128-TCM
64-TCM
16-TCM
32-TCM
16-QAM
4-DPSK
16-QAM
8-QAM
4-DPSK
8-PSK
4-DPSK
4-DPSK
FSK
FSK
16-QAM
V.22†
1,200
600
4-DPSK
V.21
BELL 103
G3 FAX
300
300
FSK
300
300
FSK
Implemented according to T.30, V.17,V.29 and V.27ter.
1,200 Orig.
2,400 Ans.
1,200 Orig.
2,400 Ans.
Error Control
Error control keeps the modem data link error-free by detecting and re-transmitting
erroneous data. ZyXEL modems support both MNP and V.42 error control protocols.
The MNP protocol was an industry de facto standard developed and licensed by
Microcom, Inc. ZyXEL modems support level 4 and 3 error control protocols,
commonly denoted as MNP4 and MNP3. V.42 is a standard developed by ITU-T. V.42
supports both LAPM (Link Access Procedure for Modem) and MNP4. A V.42
handshake will try an LAPM connection first, and if not successful, it will try MNP4.
The error control (MNP4, LAPM) methods in modem to modem connections are based
on techniques utilized by both modems. They are explained below.
CRC (Cyclical Redundancy Check) Error Detection
At the end of every data block, a 16-bit number CRC, which is calculated through a
polynomial function, is sent. The receiving modem receives the block, calculates its
own CRC through the same polynomial function, then compares the numbers. If it
matches the received CRC, everything is all right. If not, an error(s) has occurred
somewhere in the block. The modem checks every block received for error(s).
Advanced Data Communications 21
Data Compression
The Comet supports both V.42bis and MNP5 data compression protocols. Data
compression works by representing the original data information in less bits and
transmitting the reduced data bits through the data link. The receiver recovers the
original information by reversing the representing process. The process of representing
original data in less bits is called redundancy removal.
Data compression needs an error-free data link to work correctly. MNP5 is used with
MNP4 error control and V.42bis is used with V.42 error control.
MNP5 data compression utilizes the run-length encoding and adaptive frequency
encoding techniques. V.42bis uses a string coding algorithm.
The compression efficiency of V.42bis is generally higher than that of MNP5. In some
cases it can be 50% to 100% higher and in other cases it is just slightly higher. In
general, it is about 50% more efficient.
Run Length Encoding
Run-length encoding is applied in an attempt to avoid sending long sequences of
repeated characters (data). When three or more repeated characters appear in
succession, only the first three tokens (representing the compressed format of that
character) and a repetition count will be sent.
Adaptive Frequency Encoding
Adaptive frequency encoding is applied after removing repeated characters (data). In
adaptive frequency encoding, a token is substituted in the data stream for the actually
occurring character in an attempt to send fewer than 8 bits for each character. The token
is generated from a dynamic tabulation of character appearance frequency. The total
number of available tokens is 256, of which only the first 32 tokens are smaller than 8
bits, so random data will gain no advantage from this technique.
String Coding
Instead of sending each data character individually, a token for a character string is sent.
The modem adaptively builds a dictionary of string tokens according to data that
appears. Comet modems support a dictionary size up to 2K string tokens. The input data
characters are combined and checked for a matching string in the dictionary. The token
is sent for the longest matched string. Compressibility is high if there are some
regularities of character pattern in the data.
AT&K4 enables data compression negotiation. For some applications, like BBSs,
where transmission of compressed files is common, the MNP5 data compression
process actually produces more redundant data and slows down transmission.
22 Advanced Data Communications
Hardware or Software Flow Control
Flow control determines how data will be transferred between your computer and
modem. Your modem supports two flow control methods. But regardless of which flow
control method you use, make sure your communications software is configured to use
the same flow control method that your modem is using. Otherwise, you may experience
erratic data transfer where portions of received data are lost, or you will receive
frequent errors during data transfers.
The flow control option is set by AT&Kn as follows:
&K0
Disables flow control.
&K3
Enables CTS/RTS flow control.
&K4
Enables XON/XOFF DTE/DCE flow control.
&K5
Enables transparent XON/XOFF DTE/DCE flow control.
&K6
Enables CTS/RTS and XON/XOFF DTE/DCE flow control. (default)
Hardware CTS/RTS
This is a bi-directional flow control where CTS and RTS are RS232 signals which
must be available on your computer. When the modem's transmission buffer is almost
full, the modem will drop CTS to signal the DTE that it cannot accept any more data.
Turn ON the CTS to notify the DTE that it can keep sending data to the modem. On the
computer software side, when the receiving buffer of the software is almost full, it will
drop RTS to signal the modem to stop sending data to the DTE. Turn ON the RTS and
the modem will start sending data again to the DTE. In asynchronous full-duplex
applications, the Comet always responds to the RTS signal as a flow control signal. The
Comet defaults automatically to this hardware flow control setting and it is a better
choice.
Software XON/XOFF
This is a bi-directional flow control. XON and XOFF character defaults are decimals
17 and 19. Both the modem and the DTE will treat XOFF as a signal to stop transmitting
data, and will treat XON as a signal to restart sending data. Modems will not send these
characters received from the local DTE to the remote modem.
Advanced Data Communications 23
5
Special Functions
This chapter describes the special features of the Comet, and offers instructions on how
each is used.
Caller Number Delivery (Caller ID)
Caller Number Delivery (CND), commonly called Caller ID, is a new kind of phone
service that may be offered by your local phone company. Check your phone company
for availability.
With CND service, the phone company’s central office will send the coded caller
information to the called station. This information is sent once between the first and
second rings. The Comet modem can decode this caller information and present it to the
connected computer/terminal during the second ring period as part of the call progress
ring message.
There are two kinds of caller information message formats sent by the phone company:
•
One is the single message format which includes date, time, and caller ID
•
The other is the multiple message format which also includes the caller name as
registered with the phone company.
Use the Caller ID commands listed below to configure your modem:
Command
Function & Description
#CID=0
Disables caller ID. (default)
#CID=1
Enables caller ID with formatted presentation to the DTE. The modem
will present the data items in a <Tag><Value> pair format. The expected
pairs are data, time, caller code (telephone number), and name.
#CID=2
Enables Caller ID with unformatted presentation to the DTE. The
Modem will present the entire packet of information, excluding the
leading U’s, in ASCII printable hex numbers.
Caller ID Result Codes
n = 0-2 OK
Otherwise
ERROR
Caller ID Inquiries
#CID? Retrieves the current Caller ID mode from the modem.
#CID=? Returns the mode capabilities of the modem in a list with each element
separated by commas.
24 Special Functions
Caller ID Formatted Form Reporting
The modem presents the data in the <tag> = <value> pair. Spaces are present on both
sides of the equal sign.
Tag
Function & Description
DATE
DATE = MMDD where MM is the month number (01 to 12) and DD is
the day number (01..31).
TIME
TIME = HHMM where HH is the hour number (00 to 23) and MM is the
minute number (00 to 59).
NMBR
NMBR = <number> or P or O where <number> is the telephone number
of the caller, where P indicates that the calling number information is not
available since the originating caller has requested private service, and
where O indicates that the calling number information is not available or
out of service at the calling location.
NAME
NAME = <listing name> where <listing name> is the subscription name.
MESG
MESG = <data tag> <length of message> <data> <checksum> in printable
ASCII hex numbers. This tag indicates a data item not listed above. The
message is only possible for Multiple Message Format.
The modem does not present any Caller ID information if the DCE detects a checksum error in
the Caller ID packet.
In the event of an unrecognized data tag, the modem will present the data in ASCII hex numbers
following the MESG tag.
Setting AT#CID=2 will cause the modem to report CND information in its ASCII coded
hexadecimal raw data format. The DTE software is responsible for explaining the data.
Distinctive Ring
Distinctive Ring is a phone service that may be offered by your phone company. Check
your phone company for availability. With this service, you can have several phone
numbers assigned to the same phone line. The phone company will send a different type
of ring signal for each phone number being called. The subscriber can distinguish which
number is called by which type of ring is received.
A simple use of this feature is that you can have three numbers on the same line and you
can list the three numbers for voice, data, and fax, respectively. You can then have your
fax machine answer only the ring corresponding to the fax number and have your modem
answer only the ring corresponding to the data number. The voice call will not be
answered by either fax machine or data modem and it will only be answered when
someone picks up the phone. Or you can have the answering machine answer only the
voice ring. A more complicated use is that you can have one number for multiple uses,
such as one number for both data and fax.
Special Functions 25
The ring types supported and the corresponding ring cadence detect criteria are:
Type
1
2
3
Ring Sequence
2s on; 4s off
0.8s on, 0.4s off, 0.8s on; 4s off
0.4s on, 0.2s off, 0.4s on, 0.2s off, 0.8s on; 4s off
The ring indicate (RI) output does not toggle on the first ring if AT-SDR≠0.
The RI output waveform is the same for all ring types detected, e.g., RI is on for the
total duration of the ring period.
26 Special Functions
Special Functions 27
6
AT Command Set Summaries
Command
A
B0
B1(default)
C1
D
DL
DS=n
E0
E1(default)
H0
H1
I0
I1
I3
I4
I5
I6
I7
L0
L1(default)
L2
L3
M0
M1(default)
M2
M3
N0
N1(default)
O0
O1
P
Q0(default)
Q1
Sn?
Sn=v
T
Function
Go on-line in answer mode
Select ITU-T 300bps or ITU-T V.22 1200bps protocol
Select Bell 300bps or Bell 212A 1200bps protocol
Normal transmit carrier switching
Go on-line in originate mode
Dial the number contained in the following dial string
Dial the last-dialed number
Dial the number stored in NVRAM at location n (0-3)
Disable command echo
Enable command echo
Go on-hook,hang up
Go off-hook,ready to dial
Report the product code
Report firmware checksum and product information
Report firmware revision
Report manufacturer information
Report the country code
Report data pump model and code revision
Report the DAA code
Low speaker volume
Low speaker volume
Medium speaker volume
High speaker Volume
Speaker is always off
Speaker is off while receiving carrier,but on during
handshaking
Speaker is always on
Speaker is off during dialing and receiving carrier,but on
during answering
Automode detection is disabled
Automode detection is enabled
Return to on-line data mode without a retrain
Return to on-line data mode with a retrain
Set pulse dialing as the default
Allow the modem to send result codes to the DTE
Prohibit the modem from sending result codes to the DTE
Read the contents of the S-register specified by ‘n’
Set S-register n to value v
Set DMTF (tone) dialing as the default
28 AT Command Set Summaries
Command
V0
V1(default)
W0(default)
W1
W2
Xn
Connect
Message
Dialtone
Monitor
Busy Tone
Monitor
Y0(default)
Y1
Zn
&C0
&C1(default)
&D0
&D1
&D2(default)
&D3
&Fn
&G0(default)
&G1
&G2
&K0
&K3
&K4
&K5
&K6(default)
&P0(default)
&P1
&P2
&P3
Function
Display result code in digital format
Display result code in verbose format
Connect message report only the DTE speed
Connect message report the line speed, the error correction
protocol, and the DTE speed
Connect message report only the DCE speed
Select extended result code
X0
X1
X X3
X4(default)
2
Partial
Full
F Full
Full
ul
l
Off
Off
O Off
On
n
Off
Off
O On
On
ff
Disable long-space disconnect
Enable long-space disconnect
Perform a soft reset and load user profile n (n=0 or 1)
DCD remains ON at all times
DCD follows carrier state
DTR is ignored
DTR drop causes the modem to return to the command state
without disconnecting
DTR drop causes the modem to hang up, inhibit auto-answer
DTR drop causes the modem to perform a soft reset (to profile
set with &Y)
Restore factory-default profile n (n=0 or 1)
Disable guard tone (for US models)
Disable guard tone
Select 1800Hz guard tone
Disable flow control
Enable RTS/CTS flow control
Enable XON/XOFF flow control
Enable transparent XON/XOFF flow control
Enable both RTS/CTS and XON/XOFF flow control
10 pulses/sec, 39/61 make-break ratio
10 pulses/sec, 33/67 make-break ratio
20 pulses/sec, 39/61 make-break ratio
20 pulses/sec, 33/67 make-break ratio
AT Command Set Summaries 29
Command
&Q0
&Q5(default)
&Q6
&S0(default)
&S1
&T0
&T1
&T8
&V
&Wn
&Yn
&Zn=x
%C0
%C1
%C2
%C3(default)
%E0
%E1
%E2(default)
%E3
%L
%Q
\A0
\A1(default)
\A2
\A3
\Bn
\G0(default)
\G1
\Kn
\K0
\K1
\K2
Function
Asynchronous mode selection
Select direct asynchronous operation
Try to negotiate an error-corrected link (using S36)
Select asynchronous operation in normal mode (speed
buffering)
DSR is always ON
DSR is active from answer tone detected to carrier drop
Terminate test in progress
Initiate a local analog loopback test
Initiate a local analog loopback with self-test
Display current configuration and saved profiles
Store the active profile as NVRAM profile n (n=0 or 1)
Set power-up default profile to n (n=0 or 1)
Store dial string x (up to 35 digits) to NVRAM (n=0 to 3)
Disable data compression
Enable MNP5 data compression negotiation
Enable V.42bis data compression
Enable both V.42bis and MNP5 data compression
Disable line quality monitor and auto-retrain
Enable line quality monitor and auto-retrain
Enable line quality monitor and fallback/fall forward
Enable line quality monitor and auto-retrain, but hang-up
immediately when EQM reaches hang-up threshold
Report received line signal level
Report line signal quality
64 characters maximum MNP block size
128 characters maximum MNP block size
192 characters maximum MNP block size
256 characters maximum MNP block size
Send break of length n * 100ms (n=1 to 9,default=3)
Disable modem to modem flow control (XON/XOFF)
Enable modem to modem flow control (XON/XOFF)
Set break handling:
Break
\B command
Break received from
transmitted from received
remote
PC
Enter command
Clear buffers and
Clear buffers and send
mode
send break
break to PC
Clear buffers and Clear buffers and
Clear buffers and send
send break
send break
break to PC
Enter command
Immediately send
Immediately send
mode
break to remote
break to PC
30 AT Command Set Summaries
Command
\K3
\K4
\K5 (default)
\N0
\N1
\N2
\N3
\N4
\N5
\V0
\V1
**0
**1
**2
#CID=0
(default)
#CID=1
#CID=2
#CID?
#CID=?
+FCLASS=n
+FAE=n
+FRH=n
+FRM=n
+FRS=n
+FTH=n
+FTM=n
+FTS=n
+FCLASS=n
+FAA=n
+FAXERR
+FBOR
Function
Immediately
Immediately send
Immediately send
send break to
break to remote
break to PC
remote
Enter command
Send break to
Send break to PC in
mode
remote in sequence sequence
Send break to
Send break to
Send break to PC in
remote in
remote in sequence sequence
sequence
Select normal (speed buffering) mode
Select direct (pass-through) mode
Select reliable link mode
Select auto-reliable mode
Select LAPM error-correction mode
Select NMP error-correction mode
Connect messages are controlled by the command settings
X,W,and S95
Connect messages are displayed in the single line format
Download to flash memory at last sensed line speed
Download to flash memory at 38.4 kbps
Download to flash memory at 57.6 kbps
Disable caller ID
Enable caller ID with formatted presentation
Enable caller ID with unformatted presentation
Retrieve the current Caller ID mode
Return the mode capabilities
Set fax service class, n=0: data mode (default), n=1: Fax Class
1, n=Fax Class 2
Fax/data auto answer; n=0: fax modem only, n=1: fax or data
auto-detection
Receive data with HDLC framing
Receive data
Receive silence
Transmit data with HDLC framing
Transmit data
Stop transmission and wait for n * 10ms
Set fax service class, n=0: data mode (default), n=1: Fax Class
1, n=Fax Class 2
Adaptive answer
Fax error value
Phase C data bit order
AT Command Set Summaries 31
Command
+FBUF?
+FCFR
+FCON
+FCIG
+FCIG:
+FCR
+FCR=
+FCSI:
+FDCC=
+FDCS:
+FDCS=
+FDIS:
+FDIS=
+FDR
+FDT=
+FDTC:
+FET:
+FED=n
+FHNG
+FK
+FLID=
+FLPL
+FMDL?
+FMFR?
+FPHCTO
+FPOLL
+FPTS:
+FPTS=
+FREV?
+FSPL
+FTSI:
#BDR
#CLS
#MDL?
#MFR?
#REV?
#TL
#VBQ?
#VBS
#VBT
#VCI?
Function
Report buffer size
Report confirmation to receive
Fax connection response
Set polled station identification
Report polled station identification
Capability to receive
Capability to receive
Report called station ID
DCE capabilities parameters
Report current session
Current session results
Report remote capabilities
Current session parameters
Begin or continue phase C receive data
Data transmission
Report polled station capabilities
Post page message response
Transmit page punctuation
Call termination with status
Session termination
Local ID string
Document for polling
Identify model
Identify manufacturer
Phase C time-out
Polling request
Page transfer status
Page transfer status
Identify revision
Enable polling
Report transmit station ID
Select baud rate (turn off autobaud)
Select data, fax, or voice
Identify model
Identify manufacturer
Identify revision level
Audio output transmit level
Query buffer size
Bits per sample
Beep tone timer
Identify compression method
32 AT Command Set Summaries
Command
Function
#VGT
Set playback volume in command state
#VLS
Voice line select
#VRA
Ringback goes away timer (originate)
#VRN
Ringback never came back timer (originate)
#VRX
Voice receive mode
#VSD
Enable silence deletion
#VSK
Buffer skid setting
#VSP
Silence detection period (voice receive)
#VSR
Sampling rate selection
#VSS
Silence deletion tuner (voice receive)
#VTD
DTMF/tone reporting
#VTM
Enable timing mark placement
#VTS
Generate tone signals
#VTX
Voice transmit mode
Fax commands are located in Chapter 9 of the floppy disk edition of the Comet 3356
User’s Manual.
Voice commands are located in Chapter 10 of the floppy disk edition of the Comet 3356
User’s Manual.
AT Command Set Summaries 33
7
+MS Modulation Commands
This extended-format command selects the modulation and, optionally, enables or
disables automode, specifies the lowest and highest connection rates, selects u-Low or
A-Low codec type, and enables or disables robbed bit signaling generation (server
modem) or detection (client modem) using one to five subparameters. The command
format is:
+MS=<mod>
[,[<automode>][,[<min_rate>][,[<max_rate>][,
[<x_law>][,[<rb_signaling>]]]]]]<CR>
Notes:
1. For 14400 bps and lower speeds, the Nn command and S37 register can
alternatively be used, in which case the +MS subparameters will modified to
reflect the Nn and S37=x settings. Use of the Nn and S37=x commands is not
recommended but is provided for compatibility with existing communication
software. (S37 is not updated by the +MS command.)
2. Subparameters not entered (enter a comma only or <CR> to skip the last
subparameter) remain at their current values.
Reporting Selected Options
The modem can send a string of confirmation to the DTE consisting of selected options
using the following command:
+MS?
The response is:
+MS:
<mod>,<automode>,<min_rate>,<max_rate>,<x_law>,
<rb_signaling>
For example,
+MS:
56,1,300,56000,0,0
[RC56 default values]
Reporting Supported Options
The modem can send a string of information to the DTE consisting of supported options
using the following command:
+MS=?
The response is:
34 +MS Modulation Commands
+MS:
(list of supported <mod> values), (list of supported <automode> values), (list
of supported <min_rate> values), (list of supported <max_rate> values), (list
of supported <x_law> values), (list of supported <rb_signaling> values)
For example,
+MS:
(0,1,2,3,9,1`0,11,56,64,69), (0,1), (300-33600), (300-56000), (0,1), (0,1)
Subparameter Definitions
1. <mod>= A decimal number which specifies the preferred modulation (automode
enabled) or modulation (automode enabled) to use in originating or answering a
connection. The options are:
<mod>
0
1
2
3
9
10
11
Modulation
V.21
V.22
V.22 bis
V.23
V.32
V.32 bis
V.34
Possible Rates (bps)1
300
1200
2400 or 1200
1200
9600 or 4800
14400, 12000, 9600, 7200 or 4800
33600, 31200, 28800, 26400, 24000,
Notes
See Note 2
default
21600, 19200, 16800,
14400, 12000,
9600, 7200, 4800, or 2400
56000, 54000, 52000, 50000, 48000,
46000, 44000, 42000, 40000, 38000,
36000, 34000, 32000
64
Bell 103
300
69
Bell 212
1200
Notes : 1. See optional <automode>, <min_rate>, and <max_rate> subparameters.
2. For V.23, originating modes transmit at 75 bps and receive at 1200 bps;
answering modes transmit at 1200 bps and receive at 75 bps. The rate is always
specified as 1200 bps.
56
K56flex
The modem may also automatically switch to another modulation (automode), subject to
the following constraints:
a.
The modem may not be able to automatically switch from the current
modulation (specified by <mod>) to some other modulation. For example
there is no standard way to automode from Bell 103 to V.23.
+MS Modulation Commands 35
b. The DTE may disable automode operation (see <automode> below).
c. The DTE may constrain the range of modulations available by specifying the
lowest and highest rates (see <min_rate> and <max_rate> below).
2. <automode> is an optional numeric value which enables or disable automatic
modulation negotiation using V.8 bis/V.8 or V.32 bis Annex A. The options are:
<automode>
0
1
Option Selected
Notes
Automode disabled
Automode enabled using V.8 bis/V.8 or V.32
Annex A
default
The default value is 1, which enablesautomode. Note, however, there are
modulations for which there is no automode negotiation, e.g., Bell 212
(<mod>=69).
For <automode> = 0 (automode disabled,i.e., fixed modulation):
a. If <max_rate> is within the rates supported by the selected modulation, the
selected rated is that specified by <max_rate>. For example,
+MS=10, 0, 1200, 4800 selects V.32 bis 4800 bps fixed rate.
b. If <max_rate> is greater than the highest speed supported by the modulation
specified by <mod>, the starting rate is the highest rate supported by the
selected modulation. For example,
+MS=10, 0, 2400, 14400 selects V.32 bis 14400, 12000, 9600, 7200, or 4800 bps.
c. To emulate issuance of the N0S37=x command sequence to select fixed mode
operation, specify the <max_rate>and<min_rate> both to be the (same)
requested speed, and <mod> to be the modulation for that speed. For
example,
+MS=11, 0, 16800, 16800 selects V.34 16800 bps fixed mode (no comparable S37
command).
+MS=10, 0, 12000, 12000 selects V.32 bis 12000 bps fixed mode (same as
N0S37=10).
For <automode> = 1 (automode enabled, i.e., automatically selected speed and
modulation) :
36 +MS Modulation Commands
The modem connects at the highest possible rate in accordance with V.8 bis/V.8,
or V.32 bis Annex A if V.8 bis/V.8 is not supported by the remote modem.
a. If <max_rate> is greater than the highest rate supported by the modulation
specified by <mod>, the modem automodes down from the highest rate of the
selected modulation. For example,
+MS=10, 1, 1200, 24000 selects automoding down from V.32 bis 14400 bps.
b. To emulate issuance of the N1S37=x sequence command, specify the
modulation and the rate to start automoding down from using <mod> and
<max_rate>, respectively. Set <min_rate> to 300 to allow automoding all the
way to V.21 300 bps. For example:
+MS=11, 1, 300, 16800 selects automodestarting at V.34 16800 bps (no comparable
S37 command).
+MS=9, 1, 300, 12000 selects automode starting at V.32 bis 12000 bps same as
N1S37=10).
3. <min_rate> is an optional number specifies the lowest rate at which the
modem may establish a connection. The value is decimal coded, in units of
bps, e.g., 2400 specifies the lowest rate to be 2400 bps. The default is 300
for 300 bps.
4. <max_rate> is an optional number specifies the highest rate at which the
modem may establish a connection. The value is decimal coded, in units of
bps, e.g., 14400 specifies the highest rate to be 14400 bps. The default is
28800 for 28800 bps.
5. <x_law> is an optional number which specifies the codec type. The options
are:
0=µ-Law
1=A-Law
Note that ATZ will reset the <x_law> selection to 0 (µ-Law).
6. <rb_signaling> is an optional number which enables or disables robbed bit
signaling generation in a server modem or enables or disables robbed bit
signaling detection in a client modem. The options are:
0=Robbed bit signaling generation (server modem) or detection (client modem)
disabled. (default)
+MS Modulation Commands 37
1=Robbed bit signaling generation (server modem) or detection (client modem) enabled.
Note that ATZ will reset the <rb_signaling> selection to 0. (default)
Result Codes:
OK
Valid subparameter string
ERROR
Otherwise.
38 +MS Modulation Commands
+MS Modulation Commands 39
8
Status Registers & Result Codes
S-Registers "ATSn=x"
Command
S0
S1
S2
S3
S4
S5
S6
S7
S8
S9
S10
S11
S12
S18
S24
S25
S26
S29
S30
S32
S33
S36
S37
S38
S46
S48
S86
S91
S92
S95
Function & Description
Number of rings before Auto Answer. 0 value disables autoanswer.
Ring counter.
ASCII value of Escape character.
ASCII value of Carriage Return character.
ASCII value of Line Feed character.
ASCII value of Backspace character.
Waiting time before blind dialing. (seconds)
Wait for carrier after dial. (seconds)
Pause time for comma. (seconds)
Carrier detect response time. (1/10 seconds)
Delay between loss of carrier and hang-up. (1/10 seconds)
DTMF (Touch-tone) tone duration. (1/1000 seconds)
Escape guard time. (1/50 seconds)
Test timer. (seconds)
Sleep inactivity timer. (seconds)
Delay to DTR. (1 second for sync mode 1; 0.01 for otherwise)
RTS to CTS delay interval. (0.01 seconds)
Flash dial modifier time (0.1 seconds)
Inactivity disconnect timer. (10 seconds)
XON character
XOFF character
LAPM failure control
Desired line connection speed
Delay before forced-disconnect. (seconds)
Data compression protocol Selection
V.42 negotiation action
Call failure reason code
PSTN transmit attenuation level (- dBm)
Fax transmit attenuation level (- dBm)
Extended result codes
Range (default)
0-255 (0)
0-255 (0)
0-255 (43)
0-127(13)
0-127 (10)
0-32 (8)
2-255 (2)
1-255 (50)
0-255 (2)
1-255 (6)
1-255 (14)
50-255 (95)
0-255 (50)
0-255 (0)
0-255 (0)
0-255 (5)
0-255 (1)
0-255 (0)
0-255 (0)
0-255 (17)
0-255 (19)
(7)
(0)
0-255 (0)
136/138 (138)
0,7,128 (7)
0-15 (10)
0-15 (10)
S-Register Definitions
S0 - Number of Rings to Auto-Answer
Sets the number of the rings required before the modem automatically answers a call.
Setting this register to zero disables auto-answer mode.
S1 - Ring Counter
S1 is incremented each time the modem detects a ring signal on the telephone line. S1 is
cleared if no rings occur over an eight second interval.
40 Status Registers & Result Codes
S2 - Escape Character
S2 holds the decimal value of the ASCII character used as the escape character. The
default value corresponds to an ASCII '+'. A value over 127 disables the escape
process, i.e., no escape character will be recognized.
S3 - Carriage Return Character
Sets the command line and result code terminator character. Pertains to asynchronous
operation only.
S4 - Line Feed Character
Sets the character recognized as a line feed. Pertains to asynchronous operation only.
The Line Feed control character is output after the Carriage Return control character if
verbose result codes are used.
S5 - Backspace Character
Sets the character recognized as a backspace. Pertains to asynchronous operation only.
The modem will not recognize the Backspace character if it is set to a value that is
greater than 32 ASCII. This character can be used to edit a command line. When the
echo command is enabled, the modem echoes back to the local DTE the Backspace
character, an ASCII space character and a second Backspace character; this means a
total of three characters are transmitted each time the modem processes the Backspace
character.
S6 - Wait Time for Dial Tone Before Blind Dialing.
Sets the length of time, in seconds, that the modem will wait before starting to dial after
going off-hook when blind dialing. This operation, however, may be affected by some
ATX options according to country restrictions. The “wait for Dial Tone” call progress
feature (W dial modifier in the dial string) will override the value in register S6.
The modem always pauses for a minimum of 2 seconds, even if the value of S6 is less
than 2 seconds.
S7 - Wait Time For Carrier After Dial, For Silence, or For Dial Tone After “W” Dial
Modifier (US Models)
1. Sets the length of time, in seconds, that the modem will wait for carrier before
hanging up. The timer is started when the modem finishes dialing (originate), or 2
seconds after going off-hook (answer). In originate mode, the timer is reset upon
detection of answer tone if allowed by country restrictions.
2. Sets the length of time, in seconds, that modem will wait for silence when
encountering the @ dial modifier before continuing with the next dial string parameter.
S8 - Pause Time For Dial Delay
Sets the time, in seconds, that the modem must pause when the “,” dial modifier is
encountered in the dial string.
Status Registers & Result Codes 41
S9 - Carrier Detect Response Time
Sets the time, in tenths of a second, that the carrier must be present before the modem
considers it valid and turns on RLSD. As this time is increased, there is less chance to
detect a false carrier due to noise from the telephone line.
S10 - Lost Carrier To Hang Up Delay
Sets the length of time, in tenths of a second, that the modem waits before hanging up
after a loss of carrier. This allows for a temporary carrier loss without causing the local
modem to disconnect.
S11 - DTMF Tone Duration
Sets the duration of tones in DTMF dialing. This value has no effect on pulse dialing.
S12 - Escape Prompt Delay (EPD)
Defines the maximum period, in fiftieths of a second, allowed between receipt of the
last character of the three escape character sequence from the DTE and sending of the
OK result code to the DTE. If any characters are detected during this time, the OK will
not be sent. Note that sending of the OK result code does not affect entry into command
mode.
S18 - Test Timer
Sets the length of time, in seconds, that the modem conducts a test (commanded by &Tn)
before returning to the command mode. If this register value is zero, the test will not
automatically terminate; the test must be terminated from the command mode by issuing
an &T0 or H command. When S18 is non-zero, the modem returns the OK message upon
test termination.
S24 - Sleep Inactivity Timer
Set the length of time, in units of 10 seconds, that the modem will operate in normal
mode with no detected telephone line or DTE line activity before entering low power
sleep mode.
S25 - Delay To DTR
Sets the length of time that the modem will ignore DTR for taking the action specified by
&Dn. Its unit is one hundredth of a second.
S26 - RTS to CTS Delay
Sets the time delay, in hundredths of a second, before the modem turns CTS ON after
detecting an OFF-to-ON transition on RTS when &R0 is commanded.
S29 - Flash Dial Modifier Time
Sets the length of time, in units of 10ms, that the modem will go on-hook when it
encounters the flash (!) dial modifier in the dial string. The time can be limited as it is a
country dependent parameter.
42 Status Registers & Result Codes
S30 - Disconnect Inactivity Timer
Sets the length of time, in tens of seconds, that the modem will stay online before
disconnecting when no data is sent or received. In error-correction mode, any data
transmitted or received will reset the timer. In other modes, any data transmitted will
reset the timer. Set S30=0 to disable the timer.
S32 - XON Character
Sets the value of the XON character.
S33 - XOFF Character
Sets the value of the XOFF character.
S36 - LAPM Failure Control
This register is read when the S48 register contains the value 128 or if an attempted
error correction link fails. These fallback options are initiated immediately upon
connection if S48=128.
Bit
bit 0,1,2
Value
000
001
010
011
100
101
110
111
Action
Modem disconnect.
Modem stays on-line and Direct mode connections established.
Reserved.
Modem stays on-line and a Normal mode connection is established.
An MNP connection is attempted and if it fails, the modem disconnects.
An MNP connection is attempted and if it fails, a direct mode connection is established.
Reserved.
An MNP connection is attempted and if it fails, the normal mode connection is established.
(default)
S37 - Desired Line Connection Speed
Sets the value of the line connection speed.
bit 0-4
bit 5-7
Desired line connection speed. This is interlinked with the Fn command. If an invalid number is entered,
the number is accepted into the register, but S37 will act as if the default value has been entered.
0 = Attempt auto mode connection. (default)
1-3 = Attempt to connect at 300 bps.
4 = Reserved.
5 = Attempt to connect at V.22 1200 bps.
6 = Attempt to connect at V.22bis 2400 bps.
7 = Attempt to connect at V.23.
8 = Attempt to connect at V.32 bis/V.32 4800 bps.
9 = Attempt to connect at V.32 bis/V.32 9600 bps.
10 = Attempt to connect at V.32 bis 12000 bps.
11 = Attempt to connect at V.32 bis 14400 bps.
12 = Attempt to connect at V.32 bis 7200 bps.
Reserved.
S38 - Delay Before Forced Hang Up
Status Registers & Result Codes 43
This register specifies the delay between the modem's receipt of the H command to
disconnect (or ON-to-OFF transition of DTR if the modem is programmed to follow the
signal), and the disconnect operation. Applicable to error-correction connection only.
This register can be used to ensure that data in the modem buffer is sent before the
modem disconnects.
1. If S38 is set to a value between 0 and 254, the modem will wait that number of
seconds for the remote modem to acknowledge all data in the modem buffer before
disconnecting. If time expires before all data is sent, the NO CARRIER result code will
be issued to indicate that data has been lost. If all data is transmitted prior to time-out,
the response to the H0 command will be OK.
2. If S38 is set to 255, the modem does not time-out and continues to attempt to deliver
data in the buffer until the connection is lost or the data is delivered.
S46 - Protocol Selection
This register controls whether the modem tries to use data compression when the
modem establishes an error corrected link. The default is for the modem to use data
compression (138).
Value
136
138
Description
Execute error correction protocol with no compression.
Execute error correction protocol with compression. (default)
S48 - V.42 Negotiation Action
The V.42 negotiation process determines the capabilities of the remote modem.
However, when the capabilities of the remote modem are known and negotiation is
unnecessary, this process can be bypassed.
Value
0
7
128
Description
Disable negotiation: bypass the detection and negotiation phases.
Enable negotiation. (default)
Disable negotiation: bypass the detection and negotiation phases.
S86 - Call Failure Reason Code
When the modem issues a NO CARRIER result code, a value is written to this SRegister to help determine the reason for the failed connection. S86 records the first
event that contributes to a NO CARRIER message.
S86 =
S86 =
S86 =
S86 =
S86 =
S86 =
S86 =
0
4
5
9
12
13
14
Normal disconnect, no error occurred.
Loss of carrier.
V.42 negotiation failed to detect an error-correction modem at the other end.
The modems could not find a common protocol.
Normal disconnect initiated by the remote modem.
Remote modem does not respond after 10 retransmission of the same message.
Protocol violation.
S91 - PSTN Transmit Attenuation Level
44 Status Registers & Result Codes
Sets the transmit attenuation level from 0 to 15 dBm for the PSTN mode resulting in a
transmit level from 0 to -15 dBm.
S92 - Fax Transmit Attenuation Level
Sets the transmit attenuation level from 0 to 15 dBm for the fax mode resulting in a
transmit level from 0 to -15 dBm.
S95 - Extended Result Codes
This register can override some of the W command options. Set the appropriate bit to 1
to enable the corresponding result code, regardless of the W command setting Set the bit
to 0 to disable the result code.
Bit
0
1
2
3
4
5
6
7
Description
CONNECT indicates DCE speed.
Append /ARQ to the CONNECT result code if the protocol is other than NONE.
CARRIER result code.
PROTOCOL: result code.
Reserved.
COMPRESSION: result code.
Reserved.
Reserved.
Result Code Options
"ATXn" Result Code Option Table
The following table shows the different options available when setting the ATXn
command:
ATV0
0
1
2
3
4
5
6
7
8
9
10
11
12
13
14
15
16
17
18
ATV1
OK
CONNECT
RING
NO CARRIER
ERROR
CONNECT 1200
NO DIALTONE
BUSY
NO ANSWER
CONNECT 600
CONNECT 2400
CONNECT 4800
CONNECT 9600
CONNECT 7200
CONNECT 12000
CONNECT 14400
CONNECT 19200
CONNECT 38400
CONNECT 57600
X0
V
V
V
V
V
X1
V
V
V
V
V
V
X2
V
V
V
V
V
V
V
V
V
V
V
V
V
V
V
V
V
V
V
V
V
V
V
V
V
V
V
V
V
V
X3
V
V
V
V
V
V
V
V
V
V
V
V
V
V
V
V
V
V
X4
V
V
V
V
V
V
V
V
V
V
V
V
V
V
V
V
V
V
V
Status Registers & Result Codes 45
19
20
22
23
24
32
33
35
40
44
45
46
47
48
49
50
51
52
53
54
55
56
57
58
59
61
62
63
64
66
67
69
76
77
78
79
80
81
84
91
150
151
152
153
154
155
156
157
CONNECT 115200
CONNECT 230400
CONNECT 1200RX/75TX
CONNECT 75RX/1200TX
DELAYED
BLACKLISTED
FAX
DATA
CARRIER 300
CARRIER 1200TX/75RX V.23
CARRIER 75TX/1200RX V.23
CARRIER 1200
CARRIER 2400
CARRIER 4800
CARRIER 7200
CARRIER 9600
CARRIER 12000
CARRIER 14400
CARRIER 16800
CARRIER 19200
CARRIER 21600
CARRIER 24000
CARRIER 26400
CARRIER 28800
CONNECT 16800
CONNECT 21600
CONNECT 24000
CONNECT 26400
CONNECT 28800
COMPRESSION CLASS 5
COMPRESSION V.42BIS
COMPRESSION NONE
PROTOCOL:NONE
PROTOCOL:LAPM
CARRIER 31200
CARRIER 33600
PROTOCOL:ALT
PROTOCOL:ALT-CELLULAR
CONNECT 33600
CONNECT 31200
CARRIER 32000
CARRIER 34000
CARRIER 36000
CARRIER 38000
CARRIER 40000
CARRIER 42000
CARRIER 44000
CARRIER 46000
46 Status Registers & Result Codes
V
V
V
V
V
V
V
V
V
V
V
V
V
V
V
V
V
V
V
V
V
V
V
V
V
V
V
V
V
V
V
V
V
V
V
V
V
V
V
V
V
V
V
V
V
V
V
V
V
V
V
V
V
V
V
V
V
V
V
V
V
V
V
V
V
V
V
V
V
V
V
V
V
V
V
V
V
V
V
V
V
V
V
V
V
V
V
V
V
V
V
V
V
V
V
V
V
V
V
V
V
V
V
V
V
V
V
V
V
V
V
V
V
V
V
V
V
V
V
V
V
V
V
V
V
V
V
V
V
V
V
V
V
V
V
V
V
V
V
V
V
V
V
V
V
V
V
V
V
V
V
V
V
V
V
V
V
V
V
V
V
V
V
V
V
V
V
V
V
V
V
V
V
V
V
V
V
V
V
V
V
V
V
V
V
V
V
V
V
V
V
V
V
V
V
V
V
V
V
V
V
V
V
V
V
V
V
V
V
V
V
V
V
V
V
V
V
V
V
V
V
158
159
160
161
162
165
166
167
168
169
170
171
172
173
174
175
176
177
+F4
CARRIER 48000
CARRIER 50000
CARRIER 52000
CARRIER 54000
CARRIER 56000
CONNECT 32000
CONNECT 34000
CONNECT 36000
CONNECT 38000
CONNECT 40000
CONNECT 42000
CONNECT 44000
CONNECT 46000
CONNECT 48000
CONNECT 50000
CONNECT 52000
CONNECT 54000
CONNECT 56000
+FCERROR
V
V
V
V
V
V
V
V
V
V
V
V
V
V
V
V
V
V
V
V
V
V
V
V
V
V
V
V
V
V
V
V
V
V
V
V
V
V
V
V
V
V
V
V
V
V
V
V
V
V
V
V
V
V
V
V
V
V
V
V
V
V
V
V
V
V
V
V
V
V
V
V
V
V
V
V
V
V
V
V
V
V
Status Registers & Result Codes 47
9
Fax Operation
The Comet can be used as a fax machine, and this chapter explains how. In the sections
below, we will describe how the modem works as a fax machine, the ITU-T T.30 fax
protocol and the Class 1 and 2 fax commands. The instructions for using the included
modem/fax/voice utility program are included on the software disk. Some distributors
and dealers also include other software with the Comet. For help with such software,
refer to the documentation that came with it.
Modem as Fax Machine
Modems can also be designed to include a fax transmitting and receiving function
similar to a fax card. Since the modem's interface with the computer is the standard
serial RS-232 interface, this interface is used for both modem and fax operations. Fax
image coding and decoding must be done in the computer. Modem/Fax, also called
fax/modem, can be either an external stand-alone unit or a plug-in card. External standalone units can be connected to any computer with a standard RS-232 serial port.
The Comet supports Group 3 send and receive facsimile functions. For normal fax
operation, you must connect the modem to a computer, usually a PC. The computer
serves as the input/output device for the fax function. The RS-232 serial connection or
the ZyXEL serial port interface connects the Comet to the computer. The Comet uses
the same interface for both data and fax applications. In fax operations, the modem
performs protocol handshaking and image data transfer. The computer handles image
data creation, capturing, conversion, compression, decompression, retrieving, and
storing.
ITU-T T.30 Fax Protocol
The ITU-T T.30 fax protocol is known as the G3 fax handshake signals and procedures.
The modem takes full control of this protocol - initiating and terminating fax calls,
managing the communication session, and transporting the image data. Therefore, the
modem relieves the computer fax software of the T.30 protocol handling.
The Comet allows for fax speeds up to 14400 bps when transmitting to a fax machine
which complies with the V.17 fax standard. Speeds will fall back to 12000, 9600, or
7200 bps in poor line conditions. When connecting to a G3 fax device, the Comet
allows for fax speeds up to 9600 bps and will automatically fall back to 7200, 4800,
and 2400 bps if the line quality is poor.
Fax Command sets
The Comet supports four command sets for fax operation:
•
Class 1 command set
48 Fax Operation
•
TIA PN-2388 Class 2 command set
Defining the Fax Command Sets
The EIA Class 1 and Class 2 fax commands are a set of AT fax commands defined by
EIA/TIA (Telecommunications Industry Association) for controlling fax/modems from a
computer through the serial RS-232 interface. All fax/modems and fax software
supporting this standard will be compatible with each other.
Class 1 commands control how the modem does on-line negotiation while Class 2
commands allow the modem to do many negotiations at once. The Class 1 protocol uses
the modem to transmit fax data only. The complete organizational overhead for this
protocol is handled by the connected computer. The Class 1 command set is also called
the TIA-578 standard.
Several revisions of the class 2 standard exist. Implementations conforming to different
revisions may not work together. A formally approved version is the Class 2.0
command set, also called the TIA-592 standard.
Flow Control
In extended fax AT command mode, the Comet always uses hardware (CTS/RTS) flow
control. The flow control signaling used sending a fax is:
•
CTS is used by the Comet to flow control the DTE. When the modem turns CTS off,
the buffer inside the modem is full and cannot accept any more data. The computer
should send data only when CTS is ON.
•
RTS is used by the computer to signal the Comet that the fax message is finished.
As soon as RTS off is detected, the modem starts the post message handshaking to
make sure that the remote facsimile has received the fax message successfully. Then
it hangs up the phone and sends a status report to the DTE.
If you want to send a multi-page fax, just add the RTC signal between the fax message of
two pages. The modem detects the RTC signal automatically, handshakes the multi-page
procedure with the remote facsimile and sends the next page message.
The following flow control signaling is used while receiving a fax:
•
CTS is not used when receiving fax.
•
RTS is used to inform the Comet that the computer cannot accept data at this
moment. The modem will not pass received data to the DTE if RTS is turned off.
When finished receiving the fax message, the Comet will turn off CD then send a status
report result code to the DTE.
FAX Class 1 AT Command Set
Command
Options
Function & Description
Ref.
Fax Operation 49
+FCLASS=n
n=0 *
n=1
n=2
n=8
+F<command>
?
+F<command>
=?
+FAE=n
Service Class ID.
Select Data Mode.
Select Facsimile Class 1.
Select Facsimile Class 2.
Select voice mode.
Report Active Configuration.
Report Operating Capabilities.
n=0 *
n=1
+FRH=n
n=3
n=24
n=48
n=72
n=73
n=74
n=96
n=97
n=98
n=121
n=122
n=145
n=146
+FRM=n
n=…
+FRS=n
+FTH=n
n=…
+FTM=n
n=…
+FTS=n
Data/Fax Auto Answer.
Disable data/fax auto answer mode.
Enable data/fax auto answer mode.
Receive Data with HDLC Framing.
V.21 channel 2 300 bps.
V.27 ter 2400 bps.
V.27 ter 4800 bps.
V.29 7200 bps.
V.17 7200 bps long.
V.17 7200 bps short.
V.29 9600 bps.
V.17 9600 bps long.
V.17 9600 bps short.
V.17 12000 bps long.
V.17 12000 bps short.
V.17 14400 bps long.
V.17 14400 bps short.
Receive data.
(Same as +FRH).
Receive silence. Report with an OK
result code after n 10 ms-intervals of
silence.
Transmit data with HDLC framing.
(Same as +FRH).
Transmit data.
(Same as +FRM).
Stop transmission and wait. Terminate
and wait for n 10-ms intervals before
responding OK.
FAX Class 2 AT Command Set
Command
Options Function & Description
+FCLASS=n
50 Fax Operation
Service Class ID.
Ref.
n=0 *
n=1
n=2
n=8
+F<command>
?
+F<command>
=?
+FAE=n
Report Operating Capabilities.
n=0
n=1
+FAA=n
n=0 *
n=1
+FAXERR
+FBOR
+FBUF?
+FCFR
+FCON
+FCIG
+FCIG:
+FCR
+FCR=
+FCSI:
+FDCC=
+FDCS:
+FDCS=
+FDIS:
+FDIS=
+FDR
+FDT=
+FDTC:
+FET:
+FET=N
+FHNG
+FK
+FLID=
+FLPL
+FMDL?
+FMFR?
Select Data Mode.
Select Facsimile Class 1.
Select Facsimile Class 2.
Select voice mode.
Report Active Configuration.
Data/Fax Auto Answer.
Disable data/fax auto answer mode
Enable data/fax auto answer mode
Adaptive answer.
Constrains the DCE to answer as set by
+FCLASS.
Auto answer as a facsimile or a data
modem depending on the call.
Fax error value.
Phase B data bit order.
Buffer size (read only).
Indicate confirmation to receive.
Facsimile connection response.
Set the polled station identification.
Report the polled station identification.
Capability to receive.
Capability to receive.
Report the called station ID.
DCE capabilities parameters.
Report current session.
Current session results.
Report remote capabilities.
Current sessions parameters.
Begin or continue phase C receive data.
Data transmission.
Report the polled station capabilities.
Post page message response.
Transmit page punctuation.
Call termination with status.
Session termination.
Local ID string.
Document for polling.
Identify model.
Identify manufacturer.
Fax Operation 51
+FPHCTO
+FPOLL
+FPTS:
+FPTS=
+FREV?
+FSPL
+FTSI:
+FBADLIN:
+FBADMUL:
+FBUG:
+FCQ:
+FCTCRTY:
+FDFFC:
+FECM:
+FLNFC:
+FLO:
+FMINSP:
+FRBC:
+FREL:
+FTBC:
+FVRFC:
+FWDFC:
52 Fax Operation
Phase C time out.
Indicates polling request.
Page transfer status.
Page transfer status.
Identify revision.
Enable polling
Report the transmit station ID.
# of consecutive bad line.
Error rate multiplier.
Session message reporting.
Copy quality capability.
CTC retry value.
Data compression format conversion.
Error correction mode.
Page length format conversion
Flow Control
Minimum phase C speed
Phase C data rcv byte count
Phase C EOL alignment
Phase C xmit byte count
Vertical resolution format conversion
Page width format conversion
Fax Operation 53
10
Voice Operation
Voice mode refers to the Comet’s ability to digitize incoming voice messages, which the
computer stores and forwards. It also means the modem can playback the recorded
digitized voice either off-line for local message listening or on-line for a message
announcement. For interactive voice applications, DTMF tone detection capability is
important so a computer can react according to the remote caller's touch tone input.
The modem is configured into Voice Mode (modem models not supporting business
audio) or Voice/Audio Mode (modem models supporting business audio) in response to
the AT #CLS=8 command, and this mode is composed of the Voice and Audio subconfigurations as described in this section. Additional voice/audio AT commands are
available to support selection of operational parameters from both inside and outside
the Voice/Audio Mode.
a) Voice Sub-Configuration. Enhanced Adaptive Differential Pulse Code Modulation
(ADPCM) coding and decoding of analog voice is accomplished with a 7.2 kHz
sampling rate and 2 or 4 bits/sample quantization, and supports efficient compression
and decompression of digitized voice. Additionally, the Voice Configuration supports
concurrent tone generation/detection capabilities.
b) Audio Sub-Configuration (Available Only for Modem Models Supporting Business
Audio). Linear PCM coding and decoding of analog audio is accomplished with 7.2
kHz or 11.025 kHz sampling rates and 8 bits/sample quantization, and supports superior
sound quality as compared to ADPCM. With a sampling rate of 7.2 kHz, the Audio Subconfiguration supports concurrent tone generation/detection capabilities. With a
sampling rate of 7.2 kHz or 11.025 kHz, this sub-configuration can be used to record
and playback monophonic data in 8-bit unsigned linear PCM format.
1 RW H
7KH WHUP YRLFH LV XVHG WR UHIHU WR ERWK YRLFH DQG DXGLR IXQFWLRQV
H[FHSWZKHUHRWKHUZLVHQRWHG
The Voice/Audio Mode (i.e., either sub-configuration) supports three submodes once a
voice connection has been established (refer to the descriptions of the #CLS command):
Online Voice Command Mode, Voice Receive Mode, and Voice Transmit Mode.
Determination of whether operation takes place in the Voice sub-configuration or the
Audio sub-configuration is made by use of the #VBS and #VSR commands (refer to the
descriptions of these commands).
9.1 VOICE/AUDIO SUBMODES
9.1.1 Online Voice Command Mode
Online Voice Command Mode is the default Voice submode entered when the #CLS=8
command is issued, and may also be entered from Voice Receive Mode or Voice
Transmit Mode. Entry into Online Voice Command Mode is indicated to the DTE via
54 Voice Operation
the VCON message, after which AT commands can be entered without aborting the
telephone line connection.
If the modem is the answerer, it enters Online Voice Command Mode immediately after
going off-hook, and can report instances of DTMF tones and calling tones to the DTE. If
the modem is the originator, it enters Online Voice Command Mode based on detection
of the ringback cadence going away, upon expiration of the ringback never came timer,
or upon detection of answer tone, and the modem can report DTMF tones, answer tones,
busy tone, and dial tone to the DTE. (Note that DTMF tone reporting is supported in this
mode if DTMF reporting is enabled via the #VTD command.)
When this mode is entered as a result of going off-hook with the D or A command,
VCON is always sent to the DTE, after which the modem accepts commands. If this
mode is entered from Voice Transmit Mode, the DTE has issued the <DLE><ETX>,
and the modem responds with VCON. If this mode is entered from the Voice Receive
Mode because of a key abort, the modem issues the <DLE><ETX> followed by VCON.
If the #VLS command has switched in a handset or other device in place of the
telephone line, Online Voice Command Mode is immediately entered, whereas if the
telephone line is selected, a physical connection with another station must occur before
entering this mode.
9.1.2 Voice Receive Mode
Voice Receive Mode is entered when the DTE issues the #VRX command in order to
receive voice data. This typically occurs when either recording a greeting message, or
when recording voice messages from a remote station.
In Voice Receive Mode, voice samples from the modem analog-to-digital converter
(ADC) are sent either to the ADPCM coder for compression, or to the PCM coder for
linear PCM coding, and can then be read by the host. AT commands control the voice
sampling rate as well as codec bits-per-sample rates, and can also be used to select
adjustment of the silence detection period and sensitivity level when ADPCM
compression is selected.
In this mode, and when the sampling rate is 7.2 kHz, the modem detects and reports
DTMF, dial tone, and busy tone cadence as enabled by the #VTD command.
additionally, the modem detects and reports inactivity (periods of silence) as enabled
by the #VSS command. The modem can exit the Voice Receive Mode only via a DTE
Key Abort, or via Disconnect Inactivity timer (S30) expiration.
9.1.3 Voice Transmit Mode
Voice Transmit Mode is entered when the DTE issues the #VTX command in order to
transmit voice data. In this mode, when the sampling rate is 7.2 kHz, the modem
continues to detect and report DTMF and calling tones if enabled by the #VTD
Voice Operation 55
command. This mode is typically used when playing back greeting messages or
previously received/recorded messages.
In this mode:
1. If the Voice Sub-configuration is in operation, voice decompression is provided by
the ADPCM codec, and the decompressed ADPCM voice data is then reconstituted into
analog voice by the DAC at the original compression quantization sample-per-bits rate.
2. If the Audio Sub-configuration is in operation, PCM decoding is provided by the
linear PCM decoder, and the decoded audio data is then reconstituted into analog voice
by the DAC at the original 1 sample/8 bits rate.
9.2 VOICE/AUDIO CAPABILITIES
9.2.1 Call Establishment - Originate
Directed Originate (Dial as a specific modem type)
For most call originations, it is known ahead of time what type of call is being
attempted, and it is acceptable to disconnect if the remote side of the connection does
not cooperate. In this case, the modem can be configured ahead of time with the existing
+FCLASS (and +FAE=0 or +FAA=0) or the #CLS command to be a data, fax, or
voice/audio modem. For Data and Fax Modes, the modem subsequently either succeeds
with the desired type of connection, or eventually hangs up.
For the Voice/Audio Mode, the DTE has the option of hanging up if there are
indications that the remote station has not answered in voice, thus implementing a
directed originate for voice. The following are the three connection type choices:
Voice/Audio
The modem dials and reports call progress to the DTE, which reduces to reporting “NO
DIALTONE”, “BUSY”, or “NO ANSWER”.
The modem allows the DTE to program a time period, which if elapsed after any
ringback is detected, forces the modem to assume the remote has gone off-hook. A
secondary time period (safety valve) can define a maximum elapsed time after dialing
for receiving no ringback before the modem assumes that the remote has gone off-hook.
This safety valve is devised in case the remote picks up the telephone before any
ringback is generated, and no other tones are detected. In this mode, the modem is
attempting to make a voice connection only and therefore, while waiting for ringback to
disappear, it is also feasible to disconnect upon detection something which is definitely
not voice from the remote, such as any answer tone. The modem provides detection of
ringback went away or never came.
Fax
The modem dials and reports call progress to the DTE as in all modes. A Fax Class 1
or Fax Class 2 handshake is pursued according to the current configuration.
56 Voice Operation
Data
The modem dials and reports call progress to the DTE as in all modes. A data
handshake is pursued according to the current configuration.
Adaptive Originate (Dial with Voice/Data/Fax Discrimination)
The DTE may wish to originate a call which adapts to the remote answerer. For
instance, the user may wish to send a voice message if a human picks up the telephone,
but a facsimile if a fax machine answers. The modem can facilitate this type of adaptive
originate by extending what it does for the directed originate modes. After determining
that the remote station has picked up the line, the modem goes back to Online Voice
Command Mode, thus terminating the connecting state. Once in this mode, the modem
reports what it receives from the answerer via specific result codes to the DTE. The
DTE can then have the option of pursuing a data, fax, or voice/audio connection.
9.2.2 Call Establishment - Answer Directed Answer (Answer as a specific modem
type)
If the DTE wants to be only one kind of answerer (i.e., voice/audio, fax, or data), it can
configure the modem to answer exclusively in the chosen mode.
Voice/Audio
The modem is configured to answer in Voice/Audio Mode only and assumes the caller
will cooperate. After going off-hook, the voice VCON is issued, no answer tone is
generated, and the modem is immediately placed in Online Voice Command Mode. The
DTE typically responds by sending a greeting message of some type, and DTMF tone
recognition/reporting can be enabled. Eventually, an incoming voice message can be
recorded by the host. (Unpredictable results occur if the caller is not prepared for a
voice call.)
Fax
The modem is configured to answer in Fax Class 1 or Fax Class 2 Mode only, and it
assumes the caller is going to cooperate. This configuration has the effect of disabling
Voice/Audio Mode, forcing +FCLASS to either 1 or 2, and forcing both +FAA and
+FAE to 0.
Data
The modem is configured to answer in Data Mode only and assumes the caller is going
to cooperate. This configuration has the effect of disabling Voice/Audio Mode, forcing
+FCLASS = 0, and forcing both +FAA and +FAE to 0.
Adaptive Answer (Answer with Voice/Data/Fax Discrimination)
In normal operation, it is desirable for a modem supporting fax and voice to provide the
ability to discriminate between the two when answering unsolicited or unattended calls.
(It is most often the case that a fax is received or a voice message recorded when
nobody is present.)
Voice Operation 57
Data/Fax Discrimination
If the DTE wishes to allow for a data or fax call, the +FCLASS and +FAA or +FAE
commands can be configured for adaptive answer between data and Class 1 or Class 2
fax.
Voice/Fax Discrimination
This is the most important discrimination capability needed from the user's standpoint.
The modem must be configured for Voice/Audio (#CLS=8), causing the modem to enter
Online Voice Command Mode immediately upon going off-hook. In Voice/Audio Mode,
the DTE automatically receives indications of DTMF tones and Calling Tones. The
DTE can now switch to Voice Transmit Mode in order to play a greeting message,
perhaps one which instructs the caller how to enter specific DTMF sequences to switch
modes. The DTE can then react to the response, or the lack thereof, to such a message.
The modem supports switching to Class 1 or Class 2 answer mode by virtue of the
#CLS=1 or #CLS=2 command, and if such a switch is made and fails, the modem
reports the failure but does not hang up, allowing the DTE further experimentation time.
If the user wishes to switch to Class 1 or Class 2, but also wants the DTE to indeed
hang up the line if the fax fails, the +FCLASS command should be used instead of the
#CLS command. The only difference between these commands is that issuing +FCLASS
cancels the modem's memory of voice, whereas #CLS causes the modem to remain offhook, even if a fax or data handshake fails, until it receives an H command.
Voice/Data/Fax Discrimination
The DTE can try data modem operation after an answer by changing the #CLS setting to
0. A data handshake attempt can be added based upon DTMF responses or lack thereof.
9.2.3 Voice/Audio Data Transfer
A significant area of concern when handling the transfer of voice/audio data is the data
transfer rate on the modem/DTE interface. Data transfer rates can be expressed as the
number of interrupts which must be serviced per time period to keep up. This is a
function of the sampling rate and compression method (if any) used by the modem, and
the DTE interface speed required to handle the data flow on the telephone line side.
Tables 9-1a and 9-1b demonstrate the relationship between the sampling rate, interrupt
rate, and DTE speed necessary for the modem to support various compression ratios.
The built-in 16C550A UART-compatible interface in the MCU hardware is required to
support Voice/Audio Mode operation in the Microsoft Windows environment.
Table 9-1. DTE Speeds a. 9.2 kHz Sample Rate
Modem Samples per 8-bit Byte
Required Asynchronous DTE Speed (8N1 Format)
Implied DTE Speed Supported
1 (8-bits)
58 Voice Operation
72,000 bps
115.2 kbps
2 (4-bits)
36,000 bps
38.4 kbps
4 (2-bits)
18,000 bps
19.2 kbps
b. 11.025 kHz Sample Rate
Modem Samples per 8-bit Byte
Required Asynchronous DTE Speed
(8N1 Format)
Implied DTE Speed Supported
1 (8-bits)
110,250 bps
115.2 kbps
9.2.4 Tone and Status Monitoring Shielded <DLE> Statuses
The modem can detect specific tones and other status information, and report these to
the DTE while in any of the three voice submodes. The modem simultaneously looks for
1300 and 1100 Hz calling tones when answering, and for CCITT and Bell answer tones
when originating. The modem can also detect dial or busy tones in any of the three voice
submodes. All detected tones, as well as certain other statuses addressed in Table 9-2
such as silence and telset off-hook (i.e., handset off-hook) are reported as shielded
codes.
When in Online Voice Command Mode or Voice Transmit Mode, the codes in Table 92 are sent to the DTE immediately upon verification by the modem of the associated
tone, status, or cadence. In this mode, the 2-character code is not buffered, nor does the
Voice Operation 59
DTE have the ability to stop the code with flow control. If the DTE has started (but not
completed) sending any AT command, the Tone Monitoring function is disabled until the
command has been received and processed.
The modem can discriminate between single and multiple DTMF tones received. If
calling tone, dial tone, busy tone, or answer tone is detected, this detection is reported
repeatedly (at reasonable intervals) if the DTE takes no action, and the tone continues to
be detected.
Table 9-2. Codes Sent to the DTE
Code Sent to DTE
Meaning
<DLE>0 Ð
<DLE>9, <DLE>*,
<DLE>#, <DLE>A
Ð<DLE>D
DTMF. Digits 0 through 9, *, #, or A through D detected by the modem, i.e., user has
pressed a key on a local or remote telephone. The modem sends only one <DLE> code
per DTMF button pushed.
<DLE>a
Answer Tone (CCITT). Send to the DTE when the V.25/T.30 2100 Hz Answer Tone
(Data or Fax) is detected. If the DTE fails to react to the code, and the modem continues
to detect Answer tone, the code is repeated as often as once every half second.
<DLE>b
Busy. Sent in Voice Receive Mode when the busy cadence is detected, after any
remaining data in the voice receive buffer. The modem sends the busy <DLE>b code
every 4 seconds if busy continues to be detected and the DTE does not react. This
allows the DTE the flexibility of ignoring what could be a false busy detection.
<DLE>c
Calling Tone. Sent when the T.30 1100 Hz Calling Tone (Fax Modem) is detected in
any of the voice operating modes. The modem assumes that the calling tone is valid and
sends this code only after 4 seconds of proper cadence has been detected. If the DTE
does not react to the <DLE>c, and calling tone continues, the code is sent again as often
as once every 4 seconds.
<DLE>d
Dialtone. Sent in Voice Receive Mode when dial tone is detected after any remaining
data in the voice receive buffer. The modem sends the <DLE>d code every 3 seconds if
60 Voice Operation
dial tone continues to be detected and the DTE does not react. This allows the DTE the
flexibility of ignoring what could be a false dial tone detection.
<DLE>e
European Data Modem Calling Tone. Sent when the V.25 1300 Hz Calling Tone (Data
Modem) is detected in a voice submode. The modem assumes that the calling tone is
valid, and sends this code only after 4 seconds of proper cadence has been detected. If
the DTE does not react to the <DLE>e and calling tone continues, the code is sent again
as often as once every 4 seconds.
<DLE>f
Bell Answer Tone. Sent when Bell 2225 Hz Answer Tone (Data) is detected. If the
DTE fails to react to the code and the modem continues to detect Answer tone, the code
is repeated as often as every 1/2 second.
<DLE>h
Hung Up Handset. Sent immediately when the modem detects that the local handset has
hung-up (i.e., has transitioned from off-hook to on-hook) while in any of the three voice
submodes.
<DLE>o
Overrun. Sent in Voice Receive Mode if the voice receive data buffer overflows, in
which case, the latest data is lost in favor of retaining the oldest data in the buffer. (The
DTE may not have been reading data from the modem lately.) The modem inserts the
<DLE>o at the end of the buffer, thus marking the location where data was lost by the
DTE. The modem does not append <DLE>o codes to the buffer contiguously. If more
than one data byte is lost before the DTE begins reading again, there is only on <DLE>o
code in the data stream. However, if the DTE resumes reading, and then once again
allows the buffer to overflow, a new <DLE>o is appended to the data by the modem.
Thus, the <DLE>o does not indicate how many bytes of contiguous data has been lost,
but may report multiple gaps of lost data in the data stream.
<DLE>q
Quiet. Sent in Voice Receive Mode following any remaining data in the receive voice
buffer when the silence detection timer (#VSP) expires and there has been voice data
passed to the DTE. Note that with #VSS=0, the Quiet message never occurs. In general,
<DLE>q is sent if first there was sound, and now there is no sound, and means that
somebody has stopped talking, and according to the criteria selected in the #VSP and
#VSS settings, is probably not going to start again. If the DTE ignores the <DLE>q
code, the modem automatically resets its timer and sends the code again if the #VSP
time period again expires. This allows the DTE time to react to what may be a false
silence detection.
Table 9-2. Shielded Codes Sent to the DTE (Contd)
Voice Operation 61
Code Sent to DTE
Meaning
<DLE>s
Silence. Sent in Voice Receive Mode after the silence detection timer (#VSP) expires
and if valid voice has not been detected (#VSS). In general, <DLE>s is sent if no sound
was detected at all. This differs slightly from Quiet (<DLE>q) in that it can be used by
the DTE in its discrimination algorithms as a means of determining if anything at all is
coming from the remote station. If the DTE ignores the <DLE>s code, the modem
automatically resets its timer and sends the code again if the #VSP time period again
expires. This allows the DTE time to react to what may be a false detection of silence.
<DLE>t
Handset Off-Hook. Sent one time when the local handset transition from on-hook to offhook is detected in any of the three voice submodes.
<DLE>u
Underrun. Sent in Voice Transmit Mode when the voice transmit buffer becomes empty
without receiving a <DLE><ETX> or <DLE><CAN> command first. The modem
remains in transmit mode, but issues the <DLE>u to indicate that silence is being
generated. When the DTE resumes sending bytes, the modem allows a small number of
bytes to build up in the buffer before re-enabling the transmitter
to avoid repeated underruns. However, with the underrun condition, the modem does not
wait for the XOFF threshold (or timer) to be met before resuming, as it does on an
initial transmit or resume operation because the remote listener may be unaware of the
underrun, and keeping the silence short may serve to mask the underrun altogether.
<DLE>T
Timing Mark. Sent in Voice Receive Mode, and placed in the data stream at 1 second
intervals, when enabled by #VTM = 10.
<DLE><ETX>
End of Stream. <DLE><ETX> is sent to denote the end of a voice data stream, similar
to fax Class 1 and 2. This occurs in Voice Receive Mode only after the DTE issues the
key abort.
9.2.5 Shielded <DLE> Commands from the DTE Most commands issued for voice are
implemented as extensions to the AT command set, and are accepted only if the modem
is in a valid command mode, such as Online Voice Command Mode. However, there
are some operations which are available to the DTE without necessitating a switch to
Online Voice Command Mode. The most obvious of these is the <DLE><ETX> which
the DTE issues during Voice Transmit Mode to terminate an output message. Table 9-3
lists shielded <DLE> commands recognized by the modem.
62 Voice Operation
Table 9-3. Shielded DTE Codes
Code Sent to Modem
Meaning
<DLE>p
Pause. Sent during Voice Transmit Mode to force the modem to suspend sending voice
data to the selected output device(s). Any data currently in the voice transmit buffer is
saved until either a resume (<DLE>r), or cancel <DLE><CAN>, is received, in which
case the data is lost. If a <DLE><ETX> is received during the paused state, the modem
processes it normally, and also automatically resumes transmission of the data left in the
buffer (appended with <DLE><ETX>). Any other data received from the DTE while in
this paused state is placed in the transmit buffer according to available space, with flow
control active. (This command is ignored in other voice submodes.)
<DLE>r
Resume. Sent during Voice Transmit Mode to force the modem to resume sending voice
data to the selected output device(s). Any data currently in the voice transmit buffer is
now played. (This command is ignored in other voice modes.) The pause and resume
commands are different than a simple suspension of data; data in the buffer is frozen and
not played when the DTE pauses.
<DLE>E
Purge DCE Buffer. Sent during the transmission or reception of voice/audio data, by
embedding the command in the voice data stream, to purge the corresponding DCE
buffer. (See the <DLE><EOT> code.)
<DLE>u
Increment Playback Volume. Sent during audio mode to increment the playback volume.
The <DLE>u action command allows the application to increase the playback volume of
the headphone and speaker outputs during playback while in the data state. Each
<DLE>u will increment the transmit level by 1 unit. Adjustment by a value greater than
1 may be achieved by transmitting a string of <DLE>u codes. For example, a string
consisting of "<DLE>u <DLE>u <DLE>u <DLE>u <DLE>u" increases the playback
volume by a value of 5 units. The <DLE>u code can be used to adjust the volume within
the range of 128-228. (See <DLE><u> and <DLE><d> in Section 9.3.2.)
<DLE>d
Decrement Playback Volume. Sent during audio mode to decrement the playback
volume. The <DLE>d action command allows the application to decrease the playback
volume of the headphone and speaker outputs during playback while in the data state.
Each <DLE>d will decrement the transmit level by 1 unit. Adjustment by a value greater
than 1 may be achieved by transmitting a string of <DLE>d codes. For example, a string
consisting of "<DLE>d <DLE>d <DLE>d <DLE>d <DLE>d" decreases the playback
Voice Operation 63
volume by a value of 5 units. The <DLE>d code can be used to adjust the volume within
the range of 128-228. (See <DLE><u> and <DLE><d> in Section 9.3.2.)
<DLE><CAN>
Cancel. Sent during Voice Transmit Mode to indicate that the DTE has finished
transmitting a voice message and wants the modem to discard any remaining data in the
voice transmit buffer. The modem immediately purges its buffer, and then responds with
the VCON message entering Online Voice Command Mode. (This command is ignored
by the modem when not in Voice Transmit Mode.)
<DLE><EOT>
Voice Bytes Buffered Query. Sent during the transmission or reception of voice/audio
data, by embedding the command in the voice data stream, to learn the number of
corresponding bytes buffered by the DCE at the moment the <DLE><EOT> command is
received by the DCE. <DLE>XZBBC=n<DLE> is returned by the DCE, in which "n"
represents the number of bytes buffered as a two byte hexadecimal value.
<DLE><ETX>
Terminate. Sent during Voice Transmit Mode to indicate that the DTE has finished
transmitting a voice message. The modem completes transmission of any remaining data
in the voice transmit buffer before responding with the VCON message and entering
Online Voice Command Mode. (This command is ignored by the modem when not in
Voice Transmit Mode.)
9.2.6 Voice Record
To effect recording of a message received via a handset or microphone, the DTE must
configure the modem for Voice Mode (#CLS=8), and select the proper relay setup
(#VLS) to instruct the modem whether to use the auxiliary device. The modem responds
to the #VLS command by issuing a relay activate command to select the input device.
When a device other than the telephone line is selected, the modem immediately enters
Online Voice Command Mode (indicated by VCON). DTMF detection is therefore
enabled as soon as the DTE selects the device, such as a handset, although the user still
needs to physically pick up the telephone and press buttons. Even if the DTE has not
entered Voice Receive or Transmit Modes (#VTX or #VRX), these DTMF tones are
delivered via shielded codes identically to when a physical telephone connection exists
but the DTE has not yet commanded receive or transmit. When the DTE decides to
record the message, it issues the #VRX command and upon command receipt, the
modem immediately switches to Voice Receive Mode. Since the microphone or handset
is switched in, the modem immediately issues the CONNECT message indicating that
the modem has switched to Voice Receive Mode and is beginning the transfer of
ADPCM voice or PCM audio data as well as shielded DTMF tones, and other tones
and statuses.
In this recording state, the modem (if so configured) monitors for line silence. If the
#VSP period expires, the modem sends the <DLE>q or <DLE>s code to the DTE.
64 Voice Operation
Recording can be canceled only via two events:
1. The DTE sends any character to the modem. This is the key abort, and is the normal
method of terminating the receive mode.
2. The S30 Disconnect Inactivity timer expires, which is generally an undesired event.
9.2.7 Voice Playback
To effect playback of a message recorded via a handset or microphone, or of a message
recorded during a voice call, the DTE must configure the modem for Voice Mode
(#CLS=8) and select the proper relay setup (#VLS) to instruct the modem whether to
use the handset or speaker. The modem responds to the #VLS command by issuing a
relay activate command to select the input device. The hardware must provide a means
of selecting a handset and/or microphone instead of the telephone line, as this input
device. When a device other that the telephone line is selected, the modem immediately
enters Online Voice Command Mode (indicated by VCON). DTMF detection is thus
enabled as soon as the DTE selects the device, such as a handset, although the user still
needs to physically pick up the telephone before he can issue DTMF tones. Once
selected, however, the user can indeed pick up the telephone and press buttons. Even if
the DTE has not entered Voice Receive or Transmit Modes (#VTX or #VRX), these
DTMF tones are delivered via shielded codes, identically to when a physical telephone
connection exists but the DTE has not yet commanded receive nor transmit.
When the DTE decides to play the message, it issues the #VTX command, and the
modem immediately switches to Voice Transmit Mode. Since the speaker or handset is
already switched in, the modem immediately issues the CONNECT message indicating
that the modem is in Voice Transmit Mode and is expecting voice data from the DTE.
A subsequent <DLE><ETX> has to be issued to switch back to Online Voice Command
Mode.
Volume Adjustment During Record
The record volume is adjusted automatically by an automatic gain control (AGC)
circuit.
Volume Adjustment During Playback
The playback volume of the headphone and speaker outputs and handset can be adjusted
by the #TL command (Section 9.3.2).
9.2.8 Voice Call Termination
Local Disconnect
The DTE can disconnect from a telephone call by commanding a mode change to Online
Voice Command Mode (if not already in it), and by issuing the H command.
Remote Disconnect Detection
Voice Operation 65
When in Voice Receive Mode, the modem sends the proper shielded <DLE> code when
dial tone or busy tone is detected. The modem stays in Voice Receive Mode, however,
until the DTE issues a key abort to force Online Voice Command Mode. The DTE must
issue the H command if it wishes to hang up.
9.2.9 Mode Switching
Voice to Fax
If the modem is in Online Voice Command Mode (i.e., it has gone off-hook with
#CLS=8 in effect), the DTE can attempt a fax handshake by setting #CLS=1, followed
by the A or D command corresponding to fax receive or send. This has the effect of
beginning a fax Class 1 handshake (see #CLS command).
Unsuccessful Fax Connection Attempt to Voice A fax handshake which does not
succeed, attempted as the result of the DTE modifying the #CLS setting from voice (8)
to fax (1), does not result in the modem hanging up, allowing the DTE the flexibility of
commanding a switch back to Voice Mode with #CLS=8.
Voice to Data
If the modem is in the Online Voice Command Mode, the DTE can attempt a data
handshake by setting #CLS=0 followed by the A or D command. This has the effect of
beginning a Data Mode handshake according to the current Data Mode S-register and
command settings.
Unsuccessful Data Connection Attempt to Voice
A data handshake which does not succeed, attempted as the result of the DTE modifying
the #CLS setting from voice (8) to data (0), does not result in the modem hanging up,
allowing the DTE the flexibility of commanding a switch back to
Voice Mode with #CLS=8.
9.2.10 Caller ID
The modem supports Caller ID by passing the information received in Bell 202 FSK
modulation to the DTE after the first RING detect. The modem supports both formatted
and unformatted reporting of Caller ID information received in ICLID (Incoming Call
Line ID) format as supported in certain areas of the U.S. and Canada. The DTE enables
this feature via the #CID command.
Voice AT Command Set
Command
Options
Function & Description
n=0 *
n=1
n=2
n=8
Service Class ID.
Select Data Mode.
Select Facsimile Class 1.
Select Facsimile Class 2.
Select voice mode.
+FCLASS=n
66 Voice Operation
Ref.
#V<command>
?
#V<command>
=?
A
D
H
Z
#BDR
#CLS
Report Active Configuration.
Report Operating Capabilities.
n=0
n=1
n=2
n=8
#MDL?
#MFR?
#REV?
#SPK=mu,sp,
mic
#TL
#VBQ?
#VBS
n=2
n=4
n=8
#VBT
n=0
n=1-40
#VCI?
#VGT
#VLS
n=0 *
Answering command in voice mode.
Dial command in voice mode.
Hang up in voice mode.
Reset from voice mode.
Select baud rate (turn off autobaud).
Select data, fax, or voice.
Data.
Class1 Fax.
Class 2 Fax.
Voice mode.
Identify model.
Identify manufacturer.
Identify revision level.
Speakerphone setting.
mu:
sp
mic
Audio output transmit level (n=0000-7FFF).
Query buffer size.
Bits per sample.
Select 2 bits per ADPCM (valid for
#VSR=7200).
Select 4 bits per ADPCM (valid for
#VSR=7200).
Select 8 bits per ADPCM (valid for
#VSR=7200).
Beep tone timer.
Disable the tone generation capability.
Set tone duration time.
Identify compression method.
Set playback volume in the command state.
N=128-228. Default:153.
Voice line select.
The telephone line interface should be routed
through the modem. The OK response is sent
to the
DTE, and any previous connection is lost.
Voice Operation 67
n=1
n=2
n=3
n=4
n=5
n=6
n=7
n=8
n=9
#VRA
#VRN
#VRX
#VSD
n=0,1
#VSK
n=255
68 Voice Operation
Route only the handset through the modem.
Can be chosen before recording a greeting
message.
route only the speaker through the modem.Can
be chosen before playing back any message.
only the auxiliary input device (microphone)
should be routed through the modem. Can be
chosen before recording a greeting message.
the same as #VLS =0, except that the modem
enables the internal speaker as well as the
telephone line/handset circuit.
selects telephone emulation mode while in
#CLS=8 mode. Speakerphone operation is
entered during Voice On-line (VCON) mode
after completing dialing (ATD) or answering
(ATA).
Selects speakerphone mode while in #CLS=8
mode. Telephone emulation operation is
entered during Voice On-line (VCON) mode
after completing dialing (ATD) or answering
(ATA).
valid after Voice On-line mode, mutes the
local handset by switching the handset or
speakerphone out of the telephone line path if
in #VLS=0 or #VLS=6 mode.
Valid after Voice On-line mode. Engages the
Caller ID relay to allow recording of
conversation when using a handset by routing
the signal to the audio codec (if populated).
Routes the handset to the sound codec to
allow recording/playback of audio through
the local handset.
Ringback goes away timer (originate).
n=0-255 (0 - 2.55 sec), default:70
Ringback never came timer (originate).
n=0-255 (0 - 2.55 sec), default:100
Voice receive mode.
Enable silence deletion (no function,
command response only).
Provide no function other than command
respond compatibility.
Buffer skid setting.
#VSP
#VSR
n=7200 *
n=11025
#VSS
n=0 *
n=1
n=2
n=3
#VTD
#VTM
n=0 *
n=10
#VTS
#VTX
#FPP:
#VGR:
Silence detection period (voice receive).
n=0-255 (0 - 2.55 sec), default:55
Sampling rate selection.
7200 Hz sampling rate for ADPCM or PCM.
11025 Hz sampling rate for PCM only.
Silence detection tuner (voice receive).
Disables silence detection in Voice Receive
Mode
Least sensitive setting.
Midrange setting.
Most sensitive setting.
DTMF/tone reporting.
Enable timing mark placement.
Disabled.
1 second interval
Generate tone signals.
Voice transmit mode.
Select packet protocol
Voice Receive gain
Voice Operation 69