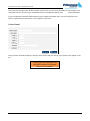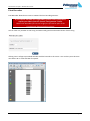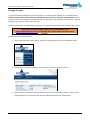
1
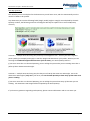
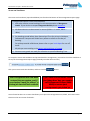
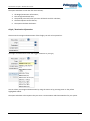
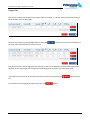
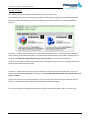
Followmont Website
User Guide
eSmart
v9.5
Followmont Transport – Website User Guide
Contents
Welcome!
3
Features
3
System Requirements
3
Esmart Limitations
3
Logging In
4
Menus
6
Consignment Menu Options
Consignment Express – Main Screen
7
7
Quote Calculator
21
Search Consignments
29
Consignment Preferences
32
Sender / Receiver Setup
33
Product Type Setup
34
Print Barcodes
36
My Account
37
Change Account
38
Account Status
39
Account Statements
40
User Log
41
Print Tax Invoices
41
Change Password
41
Followmont Transport – Website User Guide
Page 2
Followmont Transport – Website User Guide
Welcome!
Thank you for applying for Followmont's Online Services. With your Followmont Online account, we hope
to make your relationship with Followmont stronger and easier to manage.
Features
With your Followmont Online account you will be able to;
1. Get a quote, and turn that quote into a pick-up.
2. Book a pick-up…
3. …and print out the consignment note and labels for it…
4. ...and while you are booking in freight, gradually create a database of your customers that will save
you from putting in their details each time.
5. You can also organise regularly sent freight into ‘products’ that can be selected with a single click,
saving you from putting in dimensions and weights every time you send that same item.
6. View and print Proofs Of Delivery.
7. View and print any Quoted Rates for your account.
8. Switch between multiple Followmont accounts quickly and easily.
System Requirements
Booking consignments online requires internet access and printing capability.
eSmart works best on the latest stable version of Internet Explorer – at this point that version is Internet
Explorer 9.
eSmart should only be run in one instance – running multiple instances of eSmart can lead to session
corruption and booking failures.
You will also need Adobe Reader installed – you can download it at http://get.adobe.com/reader/
Esmart Limitations
eSmart cannot process bookings where are receiver or third party are to pay. The account that is logged in
will be charged. For receiver/third party charges, please use handwritten consignment notes.
eSmart cannot process bookings or quotes for Dangerous Goods.
Followmont Transport – Website User Guide
Page 3
Followmont Transport – Website User Guide
Logging In
Your eSmart Username and Password are in the accompanying email. Please go to
http://www.followmont.com.au/Portal.aspx and login using those details.
If you lose or forget your password, please contact Followmont Support via
[email protected] and we can reissue your account information.
If you go to the main homepage www.followmont.com.au, you can access the Client Portal by selecting the
‘Client Login’ button;
eSmart can be accessed via the blue ‘ESmart’ button;
Followmont Transport – Website User Guide
Page 4
Followmont Transport – Website User Guide
eSmart will open, and here you can enter your eSmart username and password.
Usernames and passwords are case sensitive so please ensure you enter
these details correctly!
eSmart Usernames are generally set as your account code, and should be entered as they appear in the
email (usually all capital letters with two numbers at the end, like ABCD12).
Passwords are randomly assigned and are case-sensitive – enter them exactly as they appear in the email.
Followmont Transport – Website User Guide
Page 5
Followmont Transport – Website User Guide
Menus
There are two menu sections; Consignment and My Account. Hovering your mouse over either one
displays the menu options below each one;
The rest of this guide explains the various sections in detail.
Followmont Transport – Website User Guide
Page 6
Followmont Transport – Website User Guide
Consignment Menu Options
Consignment Express – Main Screen
Consignment Express allows you to book most pickups quickly and easily on the web, and also allow you to
print consignment notes and packing labels to go with your freight. Consignment Express cannot be used
for Dangerous Goods.
Consignment Express does not support Receiver-To-Pay or charging
third parties – the account that is logged in is charged. To charge
the Receiver, please use a handwritten consignment note.
The first screen is shown directly below; each section is detailed in the following pages.
Followmont Transport – Website User Guide
Page 7
Followmont Transport – Website User Guide
Sender and Receiver
Enter the Sender and Receiver details here; please enter as much information as possible.
Required fields are marked by the
logo and by a red asterisk *.
When entering the phone number please format with the area code and number e.g. (07) 3608 4900. For
mobiles please ensure to space out like the following 0429 555 444. This will ensure that your saved
sender and receiver details to do not get altered.
If you are always sending from the same address, see the ‘Consignment Preferences’ section
further on – you can set a default set of information to save you typing it in or selecting it
every time.
The Suburb field will prompt you to select a suburb based on what you type; if you are typing ‘BRISBANE’
the dropdown box will show the choices available as you enter letters. By the time you have ‘BRIS’ typed
in, the selection will be down to suburbs that start with BRIS (see below)
You can select from the dropdown box
at any time. Click the suburb you want
with the mouse, or press Enter on the
yellow highlighted suburb.
The suburb choice must contain the bracketed information after the suburb name (see below.)
Once you have entered the details, you can tick the corresponding tick box to save the entered details as a
Sender or Receiver. These details can then be quickly selected by typing in the first letters of the
Sender/Receiver Name, and by choosing them from the dropdown (exactly like the Suburb field.)
These saved Senders and Receivers are stored in a database, accessible only with
your account. This database is editable via the ‘Sender/Receiver Setup’ feature.
Followmont Transport – Website User Guide
Page 8
Followmont Transport – Website User Guide
Freight Description, Special Delivery Instructions, Booking Date/Time
This field is ideal for Sender’s
Reference information and an overall
description of the freight.
Anything entered here will appear on
your printed consignment note.
You can forward date/time the pickup
booking here. If you untick this box,
please ensure you call Followmont to
book your pickup(s) in.
Freight Description – This should be a concise description of the entire consignment, no more than 35
characters.
Special Delivery Instructions – This should be any special instructions for the driver. This could be side
entrances, access instructions, gate numbers; anything extra that the driver should know to help expedite
delivery. Anything entered here will appear on your consignment note.
Booking Date/Time
1. If the consignment is ready to go now, you can ignore this section. The fields will populate with
the correct date and time automatically.
2. If the consignment is to be picked up in the future, please set the Booking Date or time to the
required date and time but it can only be set for one week in advance.
3. If the consignment is one of many (3 or more) that will be picked up at the same time un-tick the
‘ready to be picked up’ box for every consignment. Please then let our pickups department know
by phone (3608 4960) or email ([email protected]) if you have a large number of
consignments that will need to be picked up.
Followmont Transport – Website User Guide
Page 9
Followmont Transport – Website User Guide
Pickup Details
This section helps us make sure our trucks have enough room to accommodate your pickup.
While there is only one * required field (Pallet Spaces) it is important that you complete these fields fully.
This tells our fleet controllers exactly what we are picking up ensuring our drivers will definitely be able
to accommodate your pickup entirely.
Pallet Spaces is the only mandatory
field. Please estimate this (based on a
standard 1.2 x 1.2 x 1.8 pallet size) if
you are not sending pallets.
Please enter all applicable values.
Followmont Transport – Website User Guide
Page 10
Followmont Transport – Website User Guide
Freight lines
This section is where the details of your freight itself are entered. It is broken down into sections that will
be discussed in the next few pages.
You have the option of entering additional lines using the
All fields need to be filled out for each line used.
button at the end of each freight line.
Everything you enter will be aggregated for charging, so there is no difference between entering all items
together as one large single-line consignment OR entering each item type as its own distinct line.
If you add too many lines or wish to quickly remove the values, simply click the
line.
button for that
If you are always sending certain types or
combinations of freight, rather than type the same
information in every time, you can use the ‘Setup
Product Details’ feature to create pre-set Product
Types.
You enter the details of the freight in, save it as a
Product Type, and you’re done.
These Product Types can then be selected with two
clicks and the dimensions and weight will
automatically fill in. No more typing the same info
in every time!
Followmont Transport – Website User Guide
Page 11
Followmont Transport – Website User Guide
Freight Lines
For the majority of customers this field should remain as GENERAL FREIGHT.
If you have quoted rates for certain Product Types, you can select them from the dropdown menu.
If you have set up Product Types (see the Product Type Setup section) you can select them from the
dropdown menu.
Description
This should be a concise description of the item(s) entered on this Line Product Type line.
Anything entered here will display on the printed consignment note in the ‘DESCRIPTION OF FREIGHT’
column.
Item Ref (reference)
This is often a specific product number or reference.
Anything entered here will display on the printed consignment note in the ‘Senders Reference’ column,
along with the dimensions you will enter.
Items
This field does not affect charging unless you have quoted rates per-item. This field should reflect how
many items you are sending.
Consignment Express requires that you print as many labels as there are items.
The maximum value for this field is 1000.
Labels
This field can be skipped – any number entered into the Pack Qty field will automatically set the same
number of labels to be printed.
If you wish to print more labels than the Pack Qty value, you will need to manually go back to this field and
update it.
Followmont Transport – Website User Guide
Page 12
Followmont Transport – Website User Guide
Pack Qty (quantity)
Pack Quantity acts as a multiplier for the dimensions you will enter next, and also automatically sets the
number of labels to be printed.
Any dimensions put into the following fields (length, width, height or weight) are multiplied by the Pack
Quantity number; the following scenarios and diagram will help to explain how to use Pack Quantity
correctly.
Scenario 1 – multiple items are being sent, and they are all different sizes. Put all of the items together
(onto a pallet, for example) and supply us with the weight and dimensions of the pallet. Because you are
entering the combined weight and dimensions of all the items, your Pack Quantity will be 1.
If you enter more than 1 in the Pack Quantity, you are telling the system that you are sending more than 1
pallet of these dimensions and weight.
Scenario 2 – multiple items are being sent, but they are all exactly the same size and weight. Put in the
dimensions and weight of only one of the items, and set the Pack Quantity to how many of that same item
you are sending.
If you enter more than 1 in the Pack Quantity, you are telling the system how many of that item you are
sending. The dimensions and weight will be multiplied by the Pack Quantity.
If you have any questions regarding Pack Quantity, please contact Followmont and we can assist you.
Followmont Transport – Website User Guide
Page 13
Followmont Transport – Website User Guide
Length, Width, Height
Please enter the dimensions of your item(s) here, bearing in mind the Pack Quantity (see above).
All information for these fields must be entered in metres.
(An item with a dimension of 50cm should be entered as .5 in the relevant field.)
There are maximum length, height and width measurements that the website can process; if you encounter
a pre-set limit please call the Followmont Sales Team on (07) 3608 4940 to discuss out-of-gauge freight
movements.
Weight
Please enter the deadweight of your item(s) here, bearing in mind the Pack Quantity (see the section on
Pack Quantity).
This field must be entered in kilograms.
There is a pre-set kilogram limit on the website; if you encounter this limit please call the Followmont Sales
Team on (07) 3608 4940 to discuss out-of-gauge freight movements.
Followmont Transport – Website User Guide
Page 14
Followmont Transport – Website User Guide
Terms and Conditions
The Terms and Conditions (reproduced below) are found at the bottom of the Consignment Express page.
Consignment Express Terms and Conditions;
1. Not to be used to create bookings for the transportation of Dangerous
Goods. If you wish to transport Dangerous Goods please contact us.
2. All dimensions are to be entered in metres (100cm = 1 metre, 66cm =
.66m).
3. For bookings made before 2pm Queensland Time for pickup in Brisbane,
Followmont Transport will make every effort to collect on the day of
Booking.
For pickups outside of Brisbane please refer to your local depot for cut-off
times.
All pickups are according to the terms and conditions of cartage.
4. Please ensure goods are ready for collection at specified Booking Time.
5. It is to be understood that all freight consigned as a result of this quotation
To accept the Terms and Conditions and proceed with the consignment, you need to check the checkbox at
is subject to the Terms & Conditions of Contract of Followmont Transport
the top of the Consignment Express page (located just under the menu bar)
Pty Ltd.
Click your mouse inside the checkbox, and then click the
Your consignment has now been
entered into our system, and if
you checked ‘ready for pickup’, a
pickup job has also been entered.
button.
If you have unchecked the ‘Ready
for Pickup Now’ box, you need to
call Followmont Pickups (3608
4960) to ensure your
consignments get picked up.
You will now be taken to a screen that allows you to print the consignment note, labels, and a tax invoice.
Please see the next section for details.
Followmont Transport – Website User Guide
Page 15
Followmont Transport – Website User Guide
Consignment Express – Booking Confirmation Screen
Once you click submit, your consignment details are submitted and you will be shown the Booking
Confirmation Screen. There are 3 main parts to this screen; the header section and the Consignment
Details.
Booking Confirmation Header and Paperwork Print Buttons
The booking confirmation header contains;
-
Your Consignment note number and a note that it has been successfully booked – this number
starts with C.
-
A Pickup reference number (if you marked ‘ready for pickup’) and a note that it has been
successfully booked – this number starts with P.
-
A request to print the Consignment and present it to the driver upon pickup. Please ensure
that you print out the consignment note using the button (see below)
-
A link to go back to Consignment Express and enter
another consignment;
Three buttons, that you can use to print your
paperwork.
-
- Print PDF Consignment Note
- Print PDF Packing Labels
- Print Tax Invoice
The three buttons will open a different popup window each;
Followmont Transport – Website User Guide
Page 16
Followmont Transport – Website User Guide
Print PDF Consignment Button
will open the following screen; in it you will find a barcoded side-by-side
con note that will print on standard A4 paper.
Followmont Transport – Website User Guide
Page 17
Followmont Transport – Website User Guide
Print PDF Packing Labels
will open the Print Labels screen.
If you have an available, installed thermal label printer you can select ‘1-up continuous feed thermal labels’
and print your stickers onto labels.
If you do not, you can print your labels onto A4 paper.
Make your selection and click the
button.
A PDF display window will open, and you can print your labels. The example below is from an A4 label print
selection.
Followmont Transport – Website User Guide
Page 18
Followmont Transport – Website User Guide
Print Tax Invoice
will open a window with a printable Tax Invoice.
If you scroll down this page, you will be shown line by line rating information.
Followmont Transport – Website User Guide
Page 19
Followmont Transport – Website User Guide
Consignment Details
The Consignment Details section (below the header) has a summary of your consignment.
Followmont Transport – Website User Guide
Page 20
Followmont Transport – Website User Guide
Quote Calculator
The Quote Calculator screen can be used to obtain quotes on freight movements, and can also be set to
allow you to take the quote information directly through to a booking in Consignment Express.
Followmont Transport – Website User Guide
Page 21
Followmont Transport – Website User Guide
The Quote Calculator screen has five main sections;
1.
2.
3.
4.
5.
the Origin/Destination information;
The consignment detail lines;
The quoted price itself, after you enter all details and click calculate;
The Saved Quotes search feature;
The Quote Calculator disclaimer.
Origin / Destination information
Please enter the Origin and Destination of the freight you wish to be quoted on.
The Origin and Destination fields will suggest locations as you type;
You can select your Origin and Destination by using the mouse or by pressing Enter on the yellow
highlighted suburb.
The Quote Calculator also requests that you enter a Contact Name and Phone Number for your quote.
Followmont Transport – Website User Guide
Page 22
Followmont Transport – Website User Guide
Freight Lines
This section is where the details of your freight itself are entered. It is broken down into sections that will
be discussed in the next few pages.
You have the option of entering additional lines using the
All fields need to be filled out for each line used.
button at the end of each freight line.
Everything you enter will be aggregated for quoting, so there is no difference between entering all items
together as one large single-line consignment OR entering each item type as its own distinct line.
If you add too many lines or wish to quickly remove the values, simply click the
line.
To clear the quote completely and start fresh, click the
Followmont Transport – Website User Guide
button for that
button.
Page 23
Followmont Transport – Website User Guide
Freight Lines
For the majority of customers this field should remain as GENERAL FREIGHT.
If you have quoted rates for certain Product Types, you can select them from the dropdown menu.
If you have set up Product Types (see the Product Type Setup section) you can select them from the
dropdown menu.
If you are always sending certain types or
combinations of freight, rather than type the same
information in every time, you can use the ‘Setup
Product Details’ feature to create pre-set Product
Types.
You enter the details of the freight in, save it as a
Product Type, and you’re done.
These Product Types can then be selected with two
clicks and the dimensions and weight will
automatically fill in. No more typing the same info
in every time!
Item Ref (reference)
This is often a specific product number or reference. If you enter this information now, you can activate
the quote and not have to re-enter the information when you get to Consignment Express.
If you do activate the quote, anything entered in Item Ref will display on the printed consignment note in
the ‘Senders Reference’ column, along with the dimensions you will enter.
Items
This field does not affect the quoted price unless you have quoted rates per-item. This field should reflect
how many items you are sending.
The maximum value for this field is 1000.
Followmont Transport – Website User Guide
Page 24
Followmont Transport – Website User Guide
Pack Qty (quantity)
Pack Quantity acts as a multiplier for the dimensions you will enter next.
Any dimensions put into the following fields (length, width, height or weight) are multiplied by the Pack
Quantity number; the following scenarios and diagram will help to explain how to use Pack Quantity
correctly.
Scenario 1 – multiple items are being sent, and they are all different sizes. Put all of the items together
(onto a pallet, for example) and supply us with the weight and dimensions of the pallet. Because you are
entering the combined weight and dimensions of all the items, your Pack Quantity will be 1.
If you enter more than 1 in the Pack Quantity, you are telling the system that you are sending more than 1
pallet of these dimensions and weight.
Scenario 2 – multiple items are being sent, but they are all exactly the same size and weight. Put in the
dimensions and weight of only one of the items, and set the Pack Quantity to how many of that same item
you are sending.
If you enter more than 1 in the Pack Quantity, you are telling the system how many of that item you are
sending. The dimensions and weight will be multiplied by the Pack Quantity.
If you have any questions regarding Pack Quantity, please contact Followmont and we can assist you.
Followmont Transport – Website User Guide
Page 25
Followmont Transport – Website User Guide
Length, Width, Height
Please enter the dimensions of your item(s) here, bearing in mind the Pack Quantity (see above).
All information for these fields must be entered in metres.
(An item with a dimension of 50cm should be entered as .5 in the relevant field.)
There are maximum length, height and width measurements that the website can process; if you encounter
a pre-set limit please call the Followmont Sales Team on (07) 3608 4940 to get a quote on an out-of-gauge
freight movement.
Weight
Please enter the deadweight of your item(s) here, bearing in mind the Pack Quantity (see the section on
Pack Quantity).
This field must be entered in kilograms.
There is a pre-set kilogram limit on the website; if you encounter this limit please call the Followmont Sales
Team on (07) 3608 4940 to discuss an out-of-gauge freight movement.
Once you have entered all of the information above, click the ‘calculate’ button.
Your quoted price will be generated; this quote is subject to the Quote Calculator
disclaimer mentioned at the bottom of the Quote Calculator page and at the end of
the Quote Calculator section of this guide.
Followmont Transport – Website User Guide
Page 26
Followmont Transport – Website User Guide
Your Quoted Price
After clicking ‘calculate’, your quote will be generated. An example appears below;
Please note;
The Quote Number at the top of the page - Q15767144 in this example.
The Print button at the top right hand corner The Activate button just below the quoted price -
- if you are happy with this quote, you can
click the activate button and proceed to making a booking via Consignment Express.
Followmont Transport – Website User Guide
Page 27
Followmont Transport – Website User Guide
Saved Quotes Feature
The Quote Calculator ‘View saved quotes’ feature allows you to access any quotes generated in the past
month.
There are two ways to access these quotes;
Enter a specific Quote Number
You can either enter a Quote Number (Qxxxxxxxx) if you know exactly which quote you want to retrieve;
View a list of saved quotes
Or you can click ‘View saved quotes’ and you will be taken to a search screen;
Click the search button here and you will see a list of your past quotes, from most recent quote backwards;
Followmont Transport – Website User Guide
Page 28
Followmont Transport – Website User Guide
Search Consignments
Search Options
Followmont provides a variety of ways to help you access your information.
The four boxes give you different ways to search for your consignment information. These are explained
separately below.
Consignment Date; Enter a specific date (either by typing in
the date or selecting it via the calendar button) and set a
range either side of that date by up to 30 days;
Consignment Date Range; select a date range using the
‘From’ and ‘To’ date fields or calendars;
Simply enter a Consignment Number into the
‘Consignment No.’ field;
(The Senders Ref., Item Ref. and Special Instructions fields
are optional. The Manifest No. field only applies to specific
EDI customers.)
Enter a range of Consignment Numbers (if you have been
using consignment note book pads, for example)
Once you have selected your search method, click the corresponding ‘Search’ button.
Followmont Transport – Website User Guide
Page 29
Followmont Transport – Website User Guide
Search Results
Any results from your search will appear in the ‘Search Results’ section below the Search boxes.
Each Search Result displays basic information, and displays a set of buttons that access more detailed
information or documents;
View – opens a new window, displaying the details of the con note as well as rating lines and pricing
information. Also contains links to Print PDF Consignment, Print PDF Packing Labels, Print Tax Invoice and
View POD Scan.
Print – opens a new window, displaying the printable, and barcoded side-by-side con note.
Labels – opens the Print Labels dialog, where you can select to print either A4 or 1-up continuous feed
thermal labels.
POD – opens a window displaying the Proof Of Delivery (if it has been scanned and loaded yet.) This is
a scanned image of the paperwork; it is printable, saveable and can be emailed.
Followmont Transport – Website User Guide
Page 30
Followmont Transport – Website User Guide
Working with large volumes of Search Results
Below the Search Results are features that will allow you to download or print large amounts of data;
Please note: Tax Invoices printed from eSmart are not accurate. Please visit the Followmont Account Portal
for accurate Tax Invoices (http://www.followmont.com.au/Portal.aspx).
All of these features work with search results you have generated using the search options.
For example;
If you need to print all the consignments for a month, you can set a
date range search from 01/08/2011 to 31/08/2011; once you have
the search results back, you can select the ‘Print all Consignments’
option above. All of the Consignments will be compiled and displayed
in one PDF document that you can save or print.
(A CSV file is a ‘Comma Separated Values’ file – this file type can be imported into Microsoft Excel (or any
other spreadsheeting program) quickly and easily. It is essentially an open-source XLS file.)
Followmont Transport – Website User Guide
Page 31
Followmont Transport – Website User Guide
Consignment Preferences
The Consignment Preferences screen lets you set default information for Consignment Express; anything
you enter and save here will automatically appear in Consignment Express whenever you use it.
Most customers will find entering their Default
Sender Details useful.
If you enter your details here, you will not have
to type in or select your business address
whenever you open Consignment Express.
Followmont Transport – Website User Guide
Page 32
Followmont Transport – Website User Guide
Sender / Receiver Setup
Whenever you use Consignment Express, you can elect to save the Sender or Receiver information; this
information is stored in a database that is accessible only by your account.
You can access these stored Senders and Receivers via the Sender / Receiver Setup screen.
You can search through this database using the Business Name search field at the top of the screen.
Individual entries can be edited or deleted using the Delete or Edit options at the right hand side of the
screen.
You can even enter Senders or Receivers ahead of time using the ‘Add’ button.
Followmont Transport – Website User Guide
Page 33
Followmont Transport – Website User Guide
Product Type Setup
If you frequently send specific items of freight, you can avoid having to enter details of those items every
time. Below you can see an example screen; a few products have already been entered.
To add your own product, click on the ‘Add’ button.
To edit a product you have made previously, click the Edit on the corresponding line.
Any products you enter will be selectable from the ‘Product Type’
dropdown in either Consignment Express or Quote Calculator.
Any products you enter are accessible only by your account.
Followmont Transport – Website User Guide
Page 34
Followmont Transport – Website User Guide
The screen will change to the ‘Product Details’ screen; here you can enter the details of your freight so it is
selectable from the ‘Product Type’ dropdown boxes in Consignment Express and
Quote Calculator.
If you are editing a previously made Product Type, its details will appear here; you can simply type over
them to update them to new values. Don’t forget to click ‘Save’.
Once you have entered the details, click the ‘Save’ button and you will see your Product Type appear in the
list.
Please ignore the ‘Barcode’ and
‘Serialised’ options on this page;
they are not available.
Followmont Transport – Website User Guide
Page 35
Followmont Transport – Website User Guide
Print Barcodes
Print Barcodes allows direct access to eSmart’s built in barcode generator.
If you require barcodes for freight labels, please ensure you print or
reprint your labels from the ‘Search Consignments’ screen.
Labels with barcodes (for use on freight) are printed as part of the
Consignment Express booking system.
You can enter any number or text string and eSmart will generate a barcode version of that string.
Clicking ‘Print’ will pop up an Adobe window with the barcode in the centre. You can then print this item
onto either A4 or a thermal label if required.
Followmont Transport – Website User Guide
Page 36
Followmont Transport – Website User Guide
My Account
The ‘My Account’ menu provides access to information related to your Followmont Account and your
Followmont Online Account.
Features such as:
Linked accounts – Do you have multiple Followmont accounts? Followmont can link your accounts
together in eSmart for easier accessibility.
Account information – fuel levies and quoted rates can be accessed. Any other Account information
may be inaccurate in eSmart – please use the Followmont Account Portal for up-to-date information
(http://www.followmont.com.au/Portal.aspx)
Statements – Old monthly invoice statements prior to April 2013 are available in either spread sheet
or document format. Up-to-date Statements and Weekly Invoices can be found via the Followmont
Account Portal (http://www.followmont.com.au/Portal.aspx).
Changing your password
These features are discussed in the following sections.
Followmont Transport – Website User Guide
Page 37
Followmont Transport – Website User Guide
Change Account
If you have multiple Followmont Transport Accounts, we can link them together for you within eSmart.
Linking accounts saves you the hassle of remembering more than one username and password; instead,
you log in with one set of details, and you can then move between your accounts as you choose – without
having to log in and out of each one as you go.
Linking accounts does not affect billing, charging, or any eSmart functionality other than the login process.
To have your accounts linked, please contact Followmont IT via
[email protected] and provide the account codes you wish to link
together.
To switch between linked accounts:
1. Go to the ‘My Account’ menu option, and select ‘Change Account’ from the dropdown menu.
2. From the list of accounts presented, choose which account you wish to move to.
3. Click on the blue underlined ‘Business Name’ of the account you wish to move to. That account
will be swapped to, and you can now view any eSmart information for that account.
Followmont Transport – Website User Guide
Page 38
Followmont Transport – Website User Guide
Account Status
Please note: Account Status information in eSmart is not accurate. Please refer to the Followmont
Account Portal for accurate Account information (http://www.followmont.com.au/Portal.aspx).
The Account Status page displays information relating to your account. To access it, go to ‘My Account –
Account Status’.
An example is shown below;
This area shows standard
information about your account.
This area shows financial
information about your account,
including your account payment
terms, your fuel levy and current
account balance.
This area contains links that allow
you to access Quoted rates
information (past, present and
future if available) if applicable to
your account.
For more information on Quoted
Rates, please contact Followmont
Sales at [email protected]
Followmont Transport – Website User Guide
Page 39
Followmont Transport – Website User Guide
Account Statements
Followmont now provides weekly invoices to its customers, and a monthly statement.
For Weekly Tax Invoices and Monthly Statements, please visit the Followmont Account Portal.
(http://www.followmont.com.au/Portal.aspx)
Invoice statements prior to April 2013 can be accessed via the ‘My Account – Account Statements’ menu
option.
A list of all your past statements will be presented; from this list you can select to view (and then print,
email etc.) an Excel spread sheet version or a PDF document version of your statement.
Followmont Transport – Website User Guide
Page 40
Followmont Transport – Website User Guide
User Log
The user log feature is not currently active for Followmont users.
All Followmont eSmart users log in using the same credentials; the user log information does not show any
information that would identify individual users of the account username.
Print Tax Invoices
For Weekly Tax Invoices and Monthly Statements, please visit the Followmont Account Portal.
(http://www.followmont.com.au/Portal.aspx)
Change Password
You can change your password by selecting ‘My Account – Change Password’ from the My Account menu.
If you change the password to your
account, any other users who use
the same account will need to be
notified of the new password.
You can then enter your new password. Please enter it twice to avoid any typing errors, and click the Save
button. Your new password will be saved and activated.
If you lose or forget your password,
please contact Followmont Support
via [email protected]
and we can reissue your account
information.
If you need it urgently, please call
(07) 3608 4950.
Followmont Transport – Website User Guide
Page 41