1
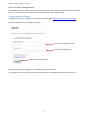
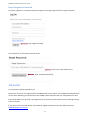
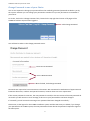
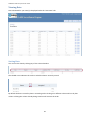
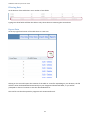
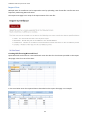
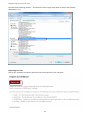
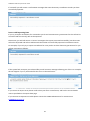
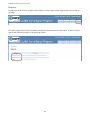
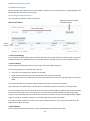
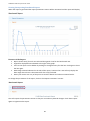
CLABSI Surveillance System User Guide (November 2013) CLABSI Surveillance System User Guide Contents Abbreviations ........................................................................................................................................ 2 System Overview ................................................................................................................................... 3 Purpose .......................................................................................................................................................... 3 Data Definitions ............................................................................................................................................. 3 User Types ..................................................................................................................................................... 3 System Functions ........................................................................................................................................... 4 User Account Management .................................................................................................................... 5 Logging onto the System ............................................................................................................................... 5 Reset Forgotten Password............................................................................................................................. 6 Change Password to one of your Choice ....................................................................................................... 7 Logging Off..................................................................................................................................................... 8 Navigating within the System ................................................................................................................. 9 Viewing Data ....................................................................................................................................... 10 Sorting Data ................................................................................................................................................. 10 Filtering Data ............................................................................................................................................... 11 Export Data .................................................................................................................................................. 11 Data Entry Options ............................................................................................................................... 12 Enter Data .................................................................................................................................................... 12 Import Data ................................................................................................................................................. 13 Editing or Deleting Data .............................................................................................................................. 16 Editing Data ............................................................................................................................................. 16 Deleting Data ........................................................................................................................................... 17 Reports ................................................................................................................................................ 18 Benchmark Report ....................................................................................................................................... 19 Generating Benchmark Report ................................................................................................................ 19 Viewing/Interpreting Benchmark Report ................................................................................................ 20 Printing or Exporting Benchmark Report ................................................................................................ 21 Comparative Report .................................................................................................................................... 22 Generating Comparative Report ............................................................................................................. 22 Viewing/Interpreting Graphical Comparative Report ............................................................................. 23 Printing or Exporting Graphical Comparative Report.............................................................................. 24 Viewing Tabular Comparative Report ..................................................................................................... 25 Exporting the Tabular Comparative Report ............................................................................................ 27 My Sites Report ........................................................................................................................................... 28 Abbreviations ICU HAI CLAB CLABSI ANZICS CCR POG UY Intensive Care Unit Healthcare Associated Infections Central Line Associated Bacteraemia Central Line Associated Bloodstream Infection Australian and New Zealand Intensive Care Society Critical Care Resources Private Ownership Group Unit Years 2 CLABSI Surveillance System User Guide System Overview Purpose The CLABSI Surveillance Program is part of a national project to prevent central line associated bloodstream infection (CLABSI) in Australian ICUs. The Surveillance Program is a database and reporting system that can collect CLABSI infection data, and provide de-identified comparative results of CLABSI rates for all contributing ICUs throughout Australia, allowing local and national benchmarking not previously available. Data Definitions Definitions for both CLABSI Count and Line Days are provided by the Australian Commission on Safety and Quality in Health Care. Details can be found in the ‘Implementation Guide for Surveillance of Central Line Associated Bloodstream Infection’: http://www.safetyandquality.gov.au/wpcontent/uploads/2012/02/Implementation-guide-CLABSI-Consultation-Edition-November-2011.pdf CLABSI rate is calculated as infections per 1,000 line days: Number of CLABSI infections Central Line Days * 1000 The comparative report displays Poisson Confidence Intervals. The confidence intervals represent the range of values within which the rate is expected to fall 95% of the time if the rate was calculated from an infinite number of values of the same sample size from the same total population, ie it is the range of values within which the ‘true’ value of the rate is expected to occur (with 95% probability). User Types There are two levels of permission; Read Only and Data Entry: Read Only - Read Only permissions allow a user to view submitted surveillance data and reports for the unit(s) that they have Read Only permissions for. Data Entry - In addition to viewing submitted surveillance data and reports, Data Entry permissions allow a user to enter, edit and delete surveillance data for the unit(s) that they have Data Entry permissions for. The permissions are set per unit, so a user could have Read Only access for one unit, and also Data Entry access for another. Generally there will be one user with Data Entry permissions for a unit, but there may be multiple users with Read Only permissions. Data Entry users may be staff members within an ICU, from the infection control department of a hospital, or representatives from the unit’s jurisdiction. Read Only users may be staff members within an ICU, or other relevant hospital staff members as determined by the unit director. 3 CLABSI Surveillance System User Guide System Functions Below is a list of the functions available within the CLABSI Surveillance System. If you want to familiarise yourself with the system you may wish to use this list as a checklist. Manage User Account o Reset forgotten/unknown password o Change password to one of your choice View Data o View and filter entered data o Export entered data to csv Provide Data o Enter single data points o Import multiple data points o Edit submitted data View Reports o Benchmark Report Choose unit(s) and time period for report View, export or print graphical report o Comparative Report Choose unit(s) and time period for report View, export or print graphical report View and export tabular report o My Sites Report (all users, page 5) (all users, page 10) (data entry users only, page 12) (all users, page 18) Details of how to perform each of the above functions is included in this user guide on the pages indicated above. 4 CLABSI Surveillance System User Guide User Account Management The CLABSI surveillance system utilises the same login system as the ANZICS Critical Care Resources (CCR) Survey, so users with access to both systems will use the same login and password. Logging onto the System To log onto the system, navigate to the CLABSI surveillance page: https://surveillance.anzics.com.au You will be greeted with a login page as follows: Enter your email address here Enter your password here When finished, click Log On When you’ve successfully logged on you will be taken into the system. If your logon is unsuccessful a red error message will appear indicating information about the issue. 5 CLABSI Surveillance System User Guide Reset Forgotten Password To reset a forgotten or unknown password navigate to the logon page and click ‘Forgot Password’: Click Forgot Password You will then be on the Reset password screen: Enter your email address here Then, click Reset Password A new password will be emailed to you. Please note, if you are also registered for the ANZICS CCR survey system, your CLABSI and CCR passwords are the same. Resetting your password in the CLABSI system will also mean your CCR password is reset. If the email address you provide is not registered in the system you will receive an error message stating ‘User not found!’. If you receive this error and believe you should be registered please contact the administrator on [email protected] 6 CLABSI Surveillance System User Guide Change Password to one of your Choice You are not required to change your password from the randomly generated password emailed to you by the system. However you can change your password to another one you may find easier to remember if you wish to. To do this, click on the ‘Change Password’ link, located in the top right hand corner of all pages of the CLABSI Surveillance System when logged in: Click Change Password You will then be taken to the change password screen: Enter Current Password Enter a New Password When finished, click Change Password Passwords are required to have at minimum 6 characters. We recommend a combination of uppercase and lowercase characters, numbers and special characters, however these are not a requirement. If the current password is incorrect, the new password is invalid, or the two entries of the new password do not match you will receive an error message, if this occurs your password has not been changed. If successful, you will receive the message ‘Your password has been changed successfully.’ Please note, as the logons for the CLABSI surveillance system and the CCR survey are linked, if you change your password in the CLABSI system, the new password will now also be the password required to logon to the CCR system. 7 CLABSI Surveillance System User Guide Logging Off If you wish to log off the CLABSI Surveillance system, the link for doing this is in the top right hand corner of all pages when logged in: When you have successfully logged off you will be taken back to the login page. 8 CLABSI Surveillance System User Guide Navigating within the System Once logged into the system, you can navigate between the different sections by use of the tabs near the top of all the pages. For users with Data Entry permissions for any units the tabs will look like this: For users with only Read Only permissions the tabs will look like this: Please click on the tabs to navigate to that section of the CLABSI Surveillance system. 9 CLABSI Surveillance System User Guide Viewing Data Data submitted for your unit(s) is displayed under the ‘View Data’ tab: Sorting Data You can sort the data by clicking any of the column headers: The shaded arrow indicates the order in which the data is currently sorted: By default the data is sorted by date in ascending order. Clicking on a different column will sort by that column. Clicking the column already being sorted on will reverse the order. 10 CLABSI Surveillance System User Guide Filtering Data At the bottom of the table there are a number of text fields: Typing into these fields will filter the table to only show columns containing the entered text Export Data At the top right hand corner of the table there is a CSV icon: Clicking on this icon will export the contents of the table as a CSV file. Depending on your browser, the file will then either be downloaded automatically to your designated downloads folder, or you will be prompted to choose a location to save the downloaded file to. This CSV file can then be opened in programs such as Microsoft Excel. 11 CLABSI Surveillance System User Guide Data Entry Options There are two options available for entering CLABSI surveillance data; entering or importing data. Entering data requires manual entry of individual pieces of surveillance. Importing data allows the mass import of multiple pieces of surveillance at once. Both of these options are only available to users with data entry permissions. Enter Data To enter a piece of CLABSI surveillance, select the ‘Enter Data’ tab. The enter data page looks as follows: Select Hospital from drop down list Select month for surveillance Type CLABSI count for selected month Type total Line Days for selected month When finished, click Create When you have successfully entered data you will be returned to the ‘View Data’ tab, where you are able to view the newly entered surveillance in the table. If there is an error in the data you have tried to enter a red error message will display. Scenarios where this may happen include: Duplicate data is entered - data cannot be entered for a month where data already exists in the system One of the fields is left blank - all fields must be completed More CLABSI infections entered than Line Days If a red error displays, the data has not been entered into the system. 12 CLABSI Surveillance System User Guide Import Data Multiple items of surveillance can be imported at once by uploading a CSV format file. CSV files are most frequently made using Microsoft Excel. The Import Data page has a recap of the requirements of the CSV file: Creating CSV file using Microsoft Excel Open Microsoft excel and start a new workbook. Enter the titles for the columns provided on the import data page in the first row of the sheet: In the rows below enter the required data as described on the import data page. For example: 13 CLABSI Surveillance System User Guide Save the file by selecting ‘Save As...’ and from the ‘Save as type’ drop down list select ‘CSV (Comma delimited) (*.csv)’: Importing CSV File Click on the ‘Upload a file’ button and locate the saved CSV file on your computer: 14 CLABSI Surveillance System User Guide If successful you will receive a confirmation message that states how many surveillance records you have successfully imported: Issues with Importing Data If you try to import surveillance for a siteID that you do not have Data Entry permissions for this will not be successful and the record(s) will not be imported. Please note, you will still receive a ‘success’ message as the import processed successfully, but those rows will not be imported and will not add towards the number of successfully imported surveillance records. For example, if you only try to import surveillance for units you do not have data entry permissions for you will get a message as follows: If the system fails to import your selected file you will receive a message informing you of this. For example, this will happen if you try and load a file that is not in the CSV format: If you receive an import error please confirm that your file is in CSV format, and has the correct header rows as specified on the import data page. If you continue to experience trouble please contact the CLABSI Administrator for assistance on [email protected]. 15 CLABSI Surveillance System User Guide Editing or Deleting Data Entered surveillance data can be edited or deleted by users with Data Entry permissions. Data should only be edited or deleted if errors in the entered data are identified. All edits and deletions are automatically logged. Data Entry users will have Edit and Delete links on the ‘View Data’ page: Editing Data To edit a surveillance entry, click on the Edit link next to the entry that needs to be edited. This will bring up the Edit Surveillance page, containing the currently entered data: Review entered data and make required change(s) When finished, click Save 16 CLABSI Surveillance System User Guide When you have successfully edited the data in a surveillance entry you will be returned to the ‘View Data’ screen, where you will be able to see the updated data. The requirements for editing data are the same as for entering data (see page 12). If there is an error in the data you have tried to enter you will receive a red error message and the changes will not have been saved. Deleting Data To delete a surveillance entry, click on the Delete link next to the entry that needs to be deleted. This will bring up the Delete Surveillance page, which shows the data that will be deleted: Review the data that will be deleted When reviewed, click Delete Please review that data that is to be deleted on the confirmation screen. Clicking Delete will delete the record and take you back to the View Data screen, where you can confirm that the data is no longer present. 17 CLABSI Surveillance System User Guide Reports To select any of the reports, navigate to the ‘Reports’ section of the system using the tab near the top of the page: The reports page lists the reports available, along with a brief description of the report. To select a report, click on the name of the report in the left hand column: 18 CLABSI Surveillance System User Guide Benchmark Report The benchmark report allows you to view CLABSI rate data for your unit(s) over time, compared against the benchmark rate in the form of a line chart. Generating Benchmark Report First, the Report Parameters must be selected: When parameters selected, click Show Report Select date range Select unit(s) 1- Select Date Range You can select any date range, with the earliest start date of Jan 2012, and the end date of the most recent complete month. The default values are 12 months with the end date the most recent complete month. 2- Select Unit(s) Select unit(s) by clicking the check box next to the row in the table listing units. If you have permissions for multiple units you can: Sort the list by clicking on the headers of the table Filter the list by entering text in the text boxes at the bottom of the table Filter/Search the list by entering text in the ‘search all columns’ box in the top right hand corner of the table. If you have checked a unit and then it gets hidden by the filters, it will remain checked. The check box in the table header row will select (or unselect) only the units that are currently visible. If you have permissions for more than 10 units only the first 10 will display by default; this will be indicated in the bottom left hand corner of the table. You can increase the number displayed by selecting a larger number in the drop down list in the top left hand corner of the table. You can also navigate between pages using the ‘previous’ and ‘next’ buttons in the bottom right hand corner of the table. If you wish to view a report for all of the units you have permissions for, you can use the ‘check all on all pages’ button above the table. 3- Show Report Once you have selected the parameters, click on Show Report to generate the report. 19 CLABSI Surveillance System User Guide Viewing/Interpreting Benchmark Report When the report is generated the report parameters section will be minimised and the report will display: Features of the Report Report shows line(s) for each unit selected along with a line for the benchmark rate. Legend for displayed lines indicated to the right of the graph. Lines on the report can be hidden by clicking on the legend entry for that line. Click again to show the line again. Date Range selected indicated in the title of the report, however the x-axis will only display the date range where there is data entered for the unit(s) selected. Hover your mouse over any of the points to view the details and values associated with it. To change the parameters of the report, click on the ‘Report Parameters’ section: This will reopen the parameters section so that you can make any desired changes. Click ‘Show report’ again to regenerate the report. 20 CLABSI Surveillance System User Guide Printing or Exporting Benchmark Report The generated graphical report can be printed or exported using the icons in the top right hand corner of the report: Print Export To print the graphical report click on the print icon. This will load the print dialogue to print a page only containing the graphical report. Graphs print better in landscape format. To export the graphical report click on the export icon and then select the export format from the drop down list: Available export formats are: png image jpg image pdf document svg vector image Depending on your browser, the file will then either be downloaded automatically to your designated downloads folder, or you will be prompted to choose a location to save the downloaded file to. 21 CLABSI Surveillance System User Guide Comparative Report The Comparative Report allows you to compare CLABSI rate data for your unit(s) against other similar hospitals. The report allows you to view data for a period of a year or more, and generates comparison bars for the peer group your unit(s) belong to for the comparison types classification, ICU level, region, nationally and for private units Private Ownership Group (POG). Generating Comparative Report First, the report parameters must be selected: When parameters selected, click Show Report Select date range Select unit(s) 1- Select Date Range The selected date range can be for 1 year or longer, with the earliest start date of Jan 2012, and the end date of the most recent complete month. You will not be able to select a period of less than 12 months. The default values are for 12 months with the end date the most recent complete month. 2- Select Unit(s) Select unit(s) by clicking the check box next to the row in the table listing units. This table has the same features as the table in the Benchmark Report Parameters section, as described on page 19 3- Show Report Once you have selected the parameters, click on Show Report to generate the report. 22 CLABSI Surveillance System User Guide Viewing/Interpreting Graphical Comparative Report When the report is generated the report parameters section will be minimised and the report will display: Features of the Report: Report shows bar(s) (with confidence intervals) for each unit selected, along with all relevant comparison bars. Confidence intervals shown are Poisson Confidence Intervals, as described in the ‘Data Definitions’ section on page 3. Date range selected is indicated in the title of the report. The number of datapoints contributing to each bar is indicated next to the labels as UY (Unit Years), where 1 UY = 12 datapoints The benchmark rate is indicated by a dashed line. Hovering your mouse over any of the bars will reveal a box containing the details and values associated with it. 23 CLABSI Surveillance System User Guide The comparison bars that display are the ones relevant to the unit(s) selected: Jurisdiction (public units only) Private Ownership Group (private units only) CICM Level - Level 1, 2 or 3/PICU Classification - Tertiary, Metropolitan, Rural/Regional, Private or PICU Country - Australia or New Zealand Australia and New Zealand combined If a comparison group does not contain data for 3 or more units in the time period selected then it will not display in the comparative report. To change the parameters of the report, click on the ‘Report Parameters’ Section: This will reopen the parameters section so that you can make any desired changes. Click show report again to regenerate the report. Printing or Exporting Graphical Comparative Report The generated graphical report can be printed or exported using the icons in the top right hand corner of the report: Print Export To print the graphical report click on the print icon. This will load the print dialogue to print a page only containing the graphical report. Graphs print better in landscape format. 24 CLABSI Surveillance System User Guide To export the graphical report click on the export icon and then select the export format from the drop down list: Available export formats are: png image jpg image pdf document svg vector image Depending on your browser, the file will then either be downloaded automatically to your designated downloads folder, or you will be prompted to choose a location to save the downloaded file to. Viewing Tabular Comparative Report A tabular version of the data displayed in the comparative report is available to view. To view the tabular report click on the ‘Data’ section below the graphical report: 25 CLABSI Surveillance System User Guide This will open the tabular report: Features of the Report: Report shows a table of the details of the bars displayed in the graphical comparative report. Table can be sorted (by clicking on the table headers), filtered (by entering text in the text boxes at the bottom of the table) and searched (by entering text in ‘search all columns’ box in the top right hand corner of the table). If more than 10 rows are displayed only the first 10 will display by default, the total number of rows is indicated in the bottom left hand corner of the table. To increase the number displayed, select a larger number from the drop down list in the top left hand corner of the table. Navigate between pages using the ‘previous’ and ‘next’ buttons in the bottom right hand corner of the table. Table can be exported as a CSV file(see below) You can click on the ‘Report Parameters’ section to change the report parameters, or the ‘Report’ section to view the graphical report again. 26 CLABSI Surveillance System User Guide Exporting the Tabular Comparative Report To export the contents of the table click on the CSV icon above the top right hand corner of the report: Depending on your browser, the file will then either be downloaded automatically to your designated downloads folder, or you will be prompted to choose a location to save the downloaded file to. The CSV file can then be opened in programs such as Microsoft Excel. 27 CLABSI Surveillance System User Guide My Sites Report The My Sites report allows you to view the unit(s) that you have permissions for, along with details in the system for those unit(s). The report is a tabular report, and displays the following information: Site ID Hospital Region Jurisdiction/POG ICU Level Classification Permission The ID required for importing surveillance data The Hospital Name used throughout the system The physical region of the unit (Australian State) The Jurisdiction (public units) or Private Ownership Group (private units) The CICM level recorded for the unit. This is used to determine the relevant peer group for the comparative report. It can be 1, 2 or 3/PICU. The classification of the unit. This is used to determine the relevant peer group for the comparative report. It can be Tertiary, Metropolitan, Rural/Regional, PICU or Private. This displays the permission level that you have for this unit. It can be either Data Entry or Read Only. You can sort the data in this report by clicking on the table headers. The shaded arrow indicates what the table is sorted by and the order in which it is sorted (ascending or descending). You can filter the data in this report by entering text into the fields at the bottom of the table. You can also search the entire report by entering text into the ‘Search all columns’ box in the top right hand corner of the table. If more than 10 rows are displayed only the first 10 will display by default, the total number of rows is indicated in the bottom left hand corner of the table. To increase the number displayed, select a larger number from the drop down list in the top left hand corner of the table. Navigate between pages using the ‘previous’ and ‘next’ buttons in the bottom right hand corner of the table. If you believe any of the information listed on this page is incorrect (eg ICU Level or Classification), please contact the CLABSI administrator on [email protected] 28