1
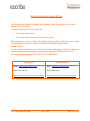
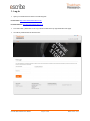
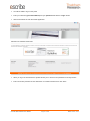
Please familiarise yourself with this document Copyright © The Motor Insurance Repair Research Centre (“Thatcham Research”) 2014. The reproduction or transmission of all or part of this guide, whether by photocopying or storing in any medium by electronic means or otherwise, without the written permission of Thatcham is prohibited. The commission of any unauthorised act in relation to this guide may result in civil or criminal actions. Version 3: March 2014 CONTENTS 1. Log In ..................................................................................................................................................... 4 2. Home Screen Overview ......................................................................................................................... 6 3. Starting a new Repair Specification ....................................................................................................... 7 4. 5. 6. 7. 8. 3.1. Vehicle selection .............................................................................................................................. 8 3.2. Elements of a workflow ................................................................................................................... 9 Workflow Selection ............................................................................................................................. 10 4.1. General Details ............................................................................................................................... 10 4.2. Reference Details ........................................................................................................................... 10 4.3. Generic Documentation ................................................................................................................. 11 Damage Appraisal ............................................................................................................................... 12 5.1. Appraisal Zone................................................................................................................................ 12 5.2. Damage View ................................................................................................................................. 13 5.3. Adding Combinations of Damage................................................................................................... 13 5.4. Viewing Individual Methods ........................................................................................................... 15 5.5. Viewing Available Method Types ................................................................................................... 15 5.6. Selecting/Deselecting Individual Methods ..................................................................................... 16 Core Operations .................................................................................................................................. 18 6.1. Selecting Repair/Refinish ............................................................................................................... 18 6.2. Removing Panels from the Final Repair Specification .................................................................... 19 Supporting Operations ........................................................................................................................ 20 7.1. Jig Type ........................................................................................................................................... 20 7.2. Available Blends ............................................................................................................................. 20 Summary ............................................................................................................................................. 21 8.1. View Methods Pack ........................................................................................................................ 21 8.2. View Summary Report – Times Only Workflow ............................................................................. 22 8.3. View Summary Report – Mehods Only Workflow ......................................................................... 23 8.4. View M.E.T. Strip and Refit Report................................................................................................. 24 8.5. Finalise Repair Specification ........................................................................................................... 24 escribe Quick Start User Guide Page 2 of 25 Date: March 2014 ESCRIBE UPDATES, HINTS & TIPS THIS GUIDE IS DESIGNED TO TAKE YOU THROUGH THE CREATION OF YOUR FIRST REPAIR SPECIFICATION. IT TAKES YOU STEP BY STEP THROUGH: THE USER LOGGING IN THE USER STARTING A REPAIR SPECIFICATION FURTHER DETAILS ON ACTIONS FOR ADMIN USERS AND END USERS ARE AVAILABLE IN THE FAQ’S DOCUMENT, ADMIN USER GUIDE AND END USER GUIDE RESPECTIVELY. IF YOU HAVE ANY FEEDBACK OR FURTHER DIFFICULTIES WHICH THESE DOCUMENTS CANNOT ANSWER (FOR EXAMPLE LOGGING IN, ASSESSING PDF METHODS OR GETTING ERROR MESSAGES) PLEASE USE THE HELPDESK: AUSTRALIA NEW ZEALAND Email: [email protected] Email: [email protected] Phone: 1300 769 362 Phone: 0800 786925 www.thatchamescribe.com.au/escribe/help-centre www.thatchamescribe.co.nz/escribe/help-centre escribe Quick Start User Guide Page 3 of 25 Date: March 2014 1. Log In Open your web browser and enter in the following URL: For Australia: http://www.thatchamescribe.com.au For New Zealand: http://www.thatchamescribe.co.nz From this screen, please click on the Log in button located in the top right hand side of the page. You will be presented with the Portal screen: escribe Quick Start User Guide Page 4 of 25 Date: March 2014 You will be asked to log in to the portal. Enter your username (your email address) and your password and click the “Login” button. Click the escribe tile to enter the escribe application: When you log in for the first time the System will ask you to choose a new password for security reasons. Enter new chosen password in “New Password” & “Confirm Password” then click “Save”. escribe Quick Start User Guide Page 5 of 25 Date: March 2014 2. Home Screen Overview There are two main operations which can be carried out on the Home screen; viewing an existing repair specification and creating a new repair specification. When you first log into the system you will see the following screen: Here you can see where any saved repair specifications are stored, and below it, where to create a new repair specification. escribe Quick Start User Guide Page 6 of 25 Date: March 2014 3. News This section will advise on Thatcham updates, i.e. new vehicles that have been researched during the last month. News items can be marked as critical, if they are, and the first time you enter the News screen the item which has been added it will show a pop-up which you will need to accept before you carry on working with escribe. You only be required to confirm each critical item once. Click on “Clcik here” to access the latest news on Thatcham Research. escribe Quick Start User Guide Page 7 of 25 Date: March 2014 4. Starting a new Repair Specification First make sure the “Create a new repair specification” section of the Home screen is expanded. 4.1. Vehicle selection Fill out each highlighted dropdown and once you have selected your derivative from the last dropdown you will be presented with a selected vehicle and details in the Vehicle Information table: This is now your “selected vehicle”. escribe will tell you the Thatcham times source used: It will also show what types of information Thatcham hold for the vehicle. This can be one or all of the following: Times Methods If the vehicle currently only has a technical profile style document available then the only option open to you will be “General Details Only”. This will allow you to access the available document for the vehicle. escribe Quick Start User Guide Page 8 of 25 Date: March 2014 4.2. Elements of a workflow Based on the types of information that Thatcham holds and the subscription level which you hold, the system will give you a choice of workflows: The guide will now run through the single workflow types. Workflows made of combinations of information types can also be selected. escribe Quick Start User Guide Page 9 of 25 Date: March 2014 5. Workflow Selection “Times and Methods” will be selected by default, click on the blue “Start” button in the bottom right of the page: 5.1. General Details This step captures some basic details about the vehicle and repair. It also shows you some generic documents which may assist with any repair: 5.2. Reference Details There are 3 fields here which must have details in them: Reference – Please enter a meaningful reference for your repair specification here. This can be used to search for the repair specification in the future. For example this could be job card number or claim number. Registration Number – Please fill in this mandatory field to keep the repair vehicle specific. VIN –Please fill in this mandatory field to keep the repair vehicle specific. escribe Quick Start User Guide Page 10 of 25 Date: March 2014 When you are happy click on the blue button in the bottom right of the screen “Damage Appraisal” to advance. 5.3. Generic Documentation For each vehicle you select there are 3 types of general documents you can view: General Technical Documents (These are Thatcham Newsletters containing either generic information or information specific to your selected vehicle). Supporting Methods Technical Profile There may be more than one page of documents for each area; you can scroll through these page by page. If you want to view any of these documents just click on the description and a PDF will be opened in a new tab for you: Once you are happy with all the details on the screen you can press the button “Damage Appraisal” to advance to the next stage. If there are any parts of the screen which haven’t been added but are needed to move on, the System will find them and ask you to fill them in. escribe Quick Start User Guide Page 11 of 25 Date: March 2014 6. Damage Appraisal This step is where you can add the various panels which you need methods for to complete a repair specification. You can also view each individual method as a PDF, where present, by clicking on the description link. Overview of the step: 6.1. Appraisal Zone Select your list of panels by clicking on an appraisal zone of the vehicle. The vehicle is split into 9 different areas: escribe Quick Start User Guide Page 12 of 25 Date: March 2014 You can see which area of the vehicle is highlighted as it will show with an orange outline. Once you have highlighted an area all the panels for that area of the vehicle will be shown on the bottom half of the screen. 6.2. Damage View There is a dropdown which allows you to select how you view the panels for selection: List View is good for easily seeing what you have selected at a glance. Service Condition Image View is good for selecting by Thatcham produced panel images – particularly handy if you are using a tablet. 6.3. Adding Combinations of Damage escribe can gather a combination of suggested panels for you for either a Light, Medium or Heavy collision on one of the 9 appraisal zones of the vehicle. The System will add panels across the vehicle which Thatcham believes will need to be reviewed following the impact. For example a heavy collision on the Right Front of the Vehicle will also pull in panels from the Centre Front of the vehicle. escribe Quick Start User Guide Page 13 of 25 Date: March 2014 Select from the Combination dropdown: Light: Low speed/energy Medium: Medium/moderate speed/energy Heavy: High speed/energy The “Add” button will now become active. Click the “Add” button and click “Yes” to accept and add the panels to your repair specification: You can review/update/deselect each panel for the selected appraisal zone in the list underneath. You do not have to use the Combination selector – if you want to select individual panels you are able to do this. You can also double check everything that has been added for the vehicle in Core Operations. escribe Quick Start User Guide Page 14 of 25 Date: March 2014 6.4. Viewing Individual Methods When selecting methods for your repair specification you can view each individual method quickly by clicking on the blue description hyperlink. A new tab will open in your web browser which will show you the PDF of the method. You can save and/or print any PDF. Please note that saving or printing PDF will mean that you may not have the most up to date versions of the methods in the future. Every time you download a method from escribe you can be sure that this is the most up to date version that Thatcham have published. 6.5. Viewing Available Method Types Where more than one method type is available you will be able to select a drop down list for the selected panel and tick the method type you need. The methods types available depend on what have been researched for your chosen vehicle. Possible method types are: o Thatcham Methods: A practically researched panel replacement method that provides Safe, efficient, best practice processes, which are consistent across all manufacturers. o Thatcham Methods Extra: A panel replacement method that is provided as a quick response to coverage analysis or customer feedback. Manufactures data is researched and provided in a consistent format. o Thatcham Ready2Repair: A vehicle specific recommendation document, to raise awareness of considerations and issues that may occur when repairing a panel. escribe Quick Start User Guide Page 15 of 25 Date: March 2014 When you click on the blue description hyperlink you will be shown the method matching your selection. If you have ticked two options they will both be displayed together when you click the link. Where only one type of method is available this will be selected by default. Your selected method option will be included in your final method selection. If you have ticked two options they will both be included in the final methods selection. 6.6. Selecting/Deselecting Individual Methods You can select or unselect any panels using by ticking/unticking the Include checkbox You may also see two terms appear in the information column – Conflict and Recommended. Conflict against a panel means that it is a sub panel of an already selected panel. This means it is greyed out and unavailable for selection. This prevents the user from accidently including the same panel (or sub panel) twice which would have an implication on the Times calculation later on in the Repair specification. A panel showing as Conflict (conflict is with Chassis Leg Front RH above it): escribe Quick Start User Guide Page 16 of 25 Date: March 2014 The other term is recommended. These appear following the addition of a collision Combination (such as Heavy) where Thatcham believe the panel is absolutely necessary for the repair specification at the level of damage. These panels can be removed in Step 3 should you need to remove them. There is a check to make sure you definitely want to add a level of collision damage when you click “Add”. If you have added these in error you must go to the Home screen and return to this repair specification. The System will return you to a blank Step 3 allowing you to make a new submission. A panel showing as Recommended: When you are happy with the panels you have added for your repair specification click on the “Core Operations” button in the bottom right of the page to advance. escribe Quick Start User Guide Page 17 of 25 Date: March 2014 7. Core Operations This is a chance for you to review the panels selected for the repair specification. It also allows you to select the Repair/Refinish option (if applicable). Overview of the Step: 7.1. Selecting Repair/Refinish You will see that some panels have an option for Repair/Refinish. Here you can click the checkbox and your repair specification will include the time and materials cost for repainting a repaired panel (No MET or Panel time will be included). The panel will be Repaired/Refinished rather than replaced and the Method Is removed from the pack (if available). escribe Quick Start User Guide Page 18 of 25 Date: March 2014 7.2. Removing Panels from the Final Repair Specification You can choose to remove panels if you want at this stage. To do this you need to untick the Include checkbox and the panel will be removed. If you have a large number of panels selected you may need to view multiple pages on this step to see all the panels you require. When you are happy with the information on this Step click Supporting Operations in the bottom right of the screen to proceed to the next step. escribe Quick Start User Guide Page 19 of 25 Date: March 2014 8. Supporting Operations This step allows you to add 2 extra options to your summary report: JIG Type and any panel paint blending you may need to do during the repair. Overview of the step: 8.1. Jig Type If you need to add a JIG type to your repair specification you can choose here from either Bracket or Universal: This will add the standard Thatcham jig time for the chosen system. Any opinion times such as pulling is not included 8.2. Available Blends Here the System will display to you any panels which you may wish to select for blending as a part of the repair specification. Just tick the checkbox and these will be selected for your summary report: This will generate a paint and material cost along with the paint time. Any MET time required is not included Once you are happy with the information filled in for any supporting operations you have, then click on the blue button to continue to the Summary step. escribe Quick Start User Guide Page 20 of 25 Date: March 2014 9. Summary This Step displays back to you all the information you have entered for your repair specification together with calculations the System has made and demonstrable breakdowns of how any Times have been achieved. You will find three different options: View Methods Pack View Summary Report View M.E.T. Strip and Refit Report 9.1. View Methods Pack Here you can select what sections you view in your Methods Pack. The checkbox list shows you all the panels you have selected plus all the standard and safety sections based on the choices which you made in Damage Appraisal. The default selection is to include only the selected panels from Damage Appraisal section. If you want to include some of the standard sections, or don’t want to view all the Methods for panels you have selected, all you need to do is tick or untick the checkbox: When you are happy with your selection click on the button to view all the latest methods you have selected in your repair specification in a single PDF file. The PDF will open in a new tab on your internet browser. You can choose to save or print this file; however the only way to guarantee the latest Thatcham methods is to click on the “View Methods Pack” button of your saved repair specification. You can update your selection and view an updated Methods Pack as many times as you need escribe Quick Start User Guide Page 21 of 25 Date: March 2014 When you save or move to another screen you current selections will be retained so that the next time you view the page your settings will be remembered Safety sections relating to a selected panel will always be shown to you as this is important information for you to be aware of every time you view the Methods Pack. 9.2. View Summary Report – Times Only Workflow This is exactly the same information offered in Summary presented in a printer friendly format with an option on the screen to print: 9.2.1. Details Summary The Details Summary provides an overview of all the information you need to know on your repair specification. Some of the information provide includes: 9.2.2. Repair Specification Reference Date of repair specification (this will be locked in by finalising the repair specification) TTS version used for calculations TPS version used for calculations Vehicle used by the System as the times source for calculations Paint type Jig information Total time Panels Summary This section shows all of the panels selected in the repair specification. If you have selected any panels for repair/refinish these will show with an X in the Repair/Refinish column. Sizes and any corrosion information are also displayed here. 9.2.3. M.E.T. Times Breakdown Summary This section shows the Times breakdown for M.E.T. To view the contents of each area you can click on the ‘+’ to expand the selection. If there are any overlapping operations for a panel these can also be viewed by clicking on the ‘+ ”Overlap” option. escribe Quick Start User Guide Page 22 of 25 Date: March 2014 9.2.4. Panel Times Breakdown Summary This section shows the Times breakdown for Panels. To view the contents of each area you can click on the ”+“ to expand the selection. If there are any overlapping operations for a panel these can also be viewed by clicking on the “+ Overlap” option. 9.2.5. Methods Operation Detail Summary Here you can see any method operational detail for selected panels to successfully complete your job. Just click on the panel to see the operation advice. 9.2.6. Blends Summary If you selected any panel blends then you will see them here with an X marked in the Selected column. Panel and reference are also given. 9.3. View Summary Report – Methods Only Workflow This is exactly the same information offered in Summary presented in a printer friendly format with an option on the screen to print: 9.3.1. Details Summary The Details Summary provides an overview of all the information you need to know on your repair specification. Some of the information provide includes: Repair Specification Reference Date of repair specification (this will be locked in by finalising the repair specification) Vehicle used by the System as the times source for calculations 9.3.2. Panels Summary This section shows all of the panels selected in the repair specification. If you have selected any panels for repair/refinish these will show with an X in the Repair/Refinish column. Sizes and any corrosion information are also displayed here. 9.3.3. Methods Operational Detail Here you can see any method operational detail for selected panels to successfully complete your job. Just click on the panel to see the operation advice: escribe Quick Start User Guide Page 23 of 25 Date: March 2014 9.4. View M.E.T. Strip and Refit Report This is exactly the same information offered in Summary presented in a printer friendly format with an option on the screen to print: 9.5. Finalise Repair Specification Once you are happy with your Repair Specification click this button to lock in all System calculations including all Times calculations. To begin a new repair specification or search for an existing specification just click the “Home” option at the top of the screen. escribe Quick Start User Guide Page 24 of 25 Date: March 2014 10. Log Out Whenever you need to log out of the product, all you need to do is click on the dropdown menu in the top right of the screen: You will be presented with the following options: Just click on the “Logout” option and you will exit the application escribe Quick Start User Guide Page 25 of 25 Date: March 2014