1
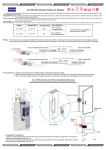
User
Installation manual
RFID Access control kit
<Proximity card / lock control kit >
External Features
External appearance
PC
Power
LED
Door/
Patrol
LED
Push
Button
Relay,
Box
Embedded
ANT.
Proximity
Card
(RFID card)
Comm. cable
Power contacts; Electric lock (wire)
Proximity Reader
Relay box
This is an innovative electronic security product which provides very
secure entry whilst at the same time being simple to operate. This kit
forms the basis of a highly flexible system. Installations can range from
a stand-alone lock (when link with any electric lock on the market) to a
network of locks that, when connected to a PC, can be monitored,
controlled and administered from a central point. Individual lock
installations can be upgraded to network installations at a later date.
Or, just use it as an access control system for attendance management.
; Proximity reader
In general, you can mount this unit on the wall, side of the door, Entry,
Exit or any position for electric door control, attendances / employees’
-
2
registration, access control related application.
Feature
Detail
Power LED (right)
One colour – Yellow
Door/ Patrol LED (left)
Two Colours, as follows:Green : for Entry Card / User card acceptance
Orange : for Programming mode.
Red
: for Patrol Card acceptance
Communication Cable
Mounting Bracket
Proximity cards: (RFID
card)
Plug into Relay box
Aluminum, Base plate of the reader unit, mounted
on the wall or door (metal door allowed)
(1) Only valid for the enclosed reader unit
(2) Only valid for the enclosed lock reader unit
(1)Master programming
card ;
(2)Patrol master
programming card ;
(option)
(3)Patrol card (option)
(4)Entry card (user card)
(3) Programmable to the enclosed unit; 20 patrols
allowed per reader(kit); prohibit to open the
door. Patrol card can re-register on several
readers.
(4) Programmable to the enclosed reader;
300 users allowed for registration per proximity
reader kit; each card allowed to open the
specified door or re-register on several readers.
; For private house, small office application, just
use (1) Master programming card and several
Entry cards.
; Relay box
The box can link with proximity reader, power adapter and power line
to enable the specified electric door. No matter to the application on
electric lock control, access control, time/attendances’ registration, this
box can mounted on the wall, inner of the door, hidden in the corner, or
directly fixed side of the proximity reader. Embedded RS232/485
-
3
interface reserved on this box allowed for connection to any computer
for network, real time monitor or data download.
When people want to leave this room, he can push the “Button” on
relay box to open the door. Either for access control, employees’
registration or Time attendant application, system integrator can free
choice of whether use this push button function or not.
Remark: If the office with reception table and receptionist, user can
extend a wire, link a push-button to relay box for remote open the door.
;Communication cable
Communication cable between relay box and proximity reder can
extend longer than two or few meters through an extension cable. User
had better test the comm. result when he extends the distance over 2-3
meters. Any intruder, theft can’t detect the comm. protocol of this cable.
; cross wire type 232 serial link cable (not pin-to-pin type; option)
The default 232 cable offered is a cross wire type cable for direct link
between relay box & PC. For distance concern, user must add another
pin-to-pin type 232 cable from this default cable for extension.
Otherwise, the signal will changed again and can’t success link with
PC.
If this proximity kit is a RS422 version, this serial link cable offered can
link with other 422 version proximity kit. But, we must use another
422-232 convert box at the end of change signal back to 232 and link to
PC’s com port. System contractor or sophisticated engineer can clarify
these concern points before installation.
Remark: For stand-alone user, no need this serial cable.
; Electric lock head
This relay box can easily link any 12V power enabled solenoid lock,
shear lock, electric strike, dropbolt, deadbolt and indoor/outdoor
magnet on the market. If user’s system integration includes link a
-
4
electric lock unit, he must ready the specified lock & take care all test &
network with this RFID access control kit. Please see the spec. and
drawing table in the later pages of this manual to learn how to link the
specified lock head.
Original maker also provide a specified, small magnetic, power
enabled lock head. It is a low cost solution either to (1) link relay box;
see right picture as below or (2) direct link proximity lock, reader unit,
see left picture as below.
If this magnetic lock (option item) without link relay box, user can’t link
these proximity kits together as a network system. User can apply this
kind proximity kit (with 12V, DC power supplier or adapter) onto a
stand-alone, private door or use it to replace traditional key based
cabinets. Details of wiring method provided on request.
< This magnetic lock doesn’t include in standard pack.>
Contents of this RFID Access control kit
This User Installation manual provides operating information for set up
& manage an individual RFID access control kit either it is link with an
electric lock or not.
Not only describe the method of stand-alone operation, following
contents also includes relate concerns of build a serial type computer
network.
; If you want to build a delicate s/w for time attendance application or
-
5
others, user must reference to PC communication protocol for further
develop. If the said comm. Protocol doesn’t include in the optical
diskette, user can check with seller of availability.
; When this kit is being installed as part of a network, or separately
linked with electric lock for strict access control application, please refer
to the application software for on time operation.
If necessary, you can parallel use a camera based surveillance system
with this access control solution to double monitor the visitor of each
door. Then, security guard can remote open the specified door for
individual control.
; Packing List
When supplied as an individual lock, each box is supplied with the
following items:
Item
Proximity reader unit.
*attached with comm. cable; sticker(label it after installation)
*mounting bracket (aluminium, base plate)
Relay box.
serial 232 cable / or 422 cable
(option item)
Master Programming card (valid for the enclosed lock).
Patrol Programming card
(option item)
Entry cards (pre programmed to the lock).
Mounting Screws
User Guide(or optical disk)
-
6
Q’ty
1
1
1
4
6
1
System Overview.
The kit must be installed according to the requirements of the
installation instructions. Once installed and powered up, whole system
will be ready for immediate use. The device is activated by using the
proximity Entry/User Cards (RF ID card) of the type supplied with the
pack. When an Entry Card is offered to the reader, if found to be valid by
the reader, the electric lock unit will release & door will open. If not,
warning beeps will be heard and the lock, door will not open. Operation
is as simple as that. Security is maintained by the allocation and
retrieval of cards to personnel and the programming and deletion of
Entry Cards where necessary.
For convenience, the Entry Cards supplied with the kit have been
pre-programmed to the reader unit. The Master Programming card is
used to carry out administrative functions such as adding and deleting
Entry Cards from the reader’s memory. For management convenience,
the Master Programming Card can print & labelled in red (Example as
below). Entry Cards can print & labelled in green.
Master Programming Card
Entry Card
Master Programming Card
Entry Card
01002F9B7D
10002F8E4F
Lock Serial No.
Sequence No.
Lock Serial Number: 00110100680
; Master Programming card: If user lost this master programming
card, please contact the original supplier for immediate help of replace
a new proximity reader.
; Entry card: If user lost his entry card (user card), please request
-
7
house owner, office manager to delete the original ID and release a new
entry card. If user needs to buy more Entry cards, contact the original
supplier.
; For management convenience, user can stick, print color logo or
picture on the surface of these entry cards. (Check dealer or do it
yourself)
; Patrol card permits to read on Proximity reader and keep record in
the memory. Then, manager can download these records through
network to review patrols’ cruise activities. Patrol card without the
function to open any door lock which equipped with access control
system.
z
For DIY, independent user, this patrol card may not provide in the
pack.
This kit is easy to install in DIY. It is a simple solution with highest RFID
technology for stand-alone operation. User can direct link it with an
electric lock and power supply for security, access control.
If user with problem to manage a PC link application software, or with
intension to build a PC network solution with 10 or hundreds RFID
access control kits in a building, villa, factory, --- etc.,, please contact
seller for delicate service.
-
8
Installation (DIY)
;Step 1:Check the power supply of whole configuration; make sure this
proximity reader, relay box and RFID cards fully work before
installation.
Requirement of power supply described as below. If the specified
application no relate to electric door control, please use 200mA,
12V DC power adapter to enable whole system.
12V J3
GND
(see 12V, GND
printed on
Circuit board)
Wiring hole
*open relay box (use coin), see the wiring hole and green circuit
board.
*right corner on the green circuit board Æ 2 power connector (12V &
GND)
-
9
*screw up power wire.
* Check max. value of power requirement.
If you intend to merge power supply of electric lock of the door
together with this RFID access control kit from one source, please
check fuse unit in the relay box or directly upgrade the fuse to 2A.
<see J3, J2 & FS1 as below>
z Alternatives to link with the interface on Electric lock?
Please check the wiring instruction of the electric lock.
Then, you can reference the wiring example as below:
Electric Lock; Strike
SAMPLE 1
NC CM
NO
J3
J2
+12V DC
GND
Relay Box (open case) *All cables wire through the hole on back case.
Electric Lock; Strike
SAMPLE 2
NC CM
J2
NO
J3
+12V DC
GND
Relay Box (open case) *All cables wire through the hole on back case.
-
10
Any RFID cards are prohibit to put aside of the RFID proximity
reader when we power on the whole configuration.
If we just use this kit as to a registration unit for time attendance
purpose and without connection to any electric lock, the power wire
on J3 should direct link to a 12V enabled power supply to power on
whole RFID access control kit.
;Step 2:Decide the position of fix RFID proximity reader and relay box.
User must well confirm the cabling method, cable distance of
whole configuration, how to keep decoration materials back to
original, ----etc.,
a) Metal / wooden door: Mounting bracket of the proximity reader
can properly mounted on any metal door and no hurt to Radio
operation. Cable can hide inside the door.
b) Wall: If the distance between proximity reader and relay box
quite long, please get suitable connector, cable from electric
shop for extension. Power wire and communication cable
had better hidden inside of the wall or through pipe.
;Step 3 : Wiring all needed cables through wiring hole in relay box:
open relay box (use coin), see the wiring hole and several
terminal blocks surrounded on the green circuit board with
printed indicators:
-
11
J5
J1
J4
J6
J2
OPEN
V+
TX
RX
DO
DE
GND
NC CM NO
FS1(fuse)
12V J3
Hole
GND
JP1
: Do you need wire link a remote push button (push & open door)
to relay box? < Please use J5 >.
: Do you need a RS232 or a RS422 serial link cable?
Before you buy this cable, you must make sure which kind
system configuration (232 type or 422 type) will be.
<J6 for serial cable; JP1 be short for 232 networking; 2 pins JP1
located upper of J6; >
: Connect cables between proximity reader and relay box.
<Use J1 & J4>.
} V+
Å Red cable
} TX
Å Yellow cable
} RX
Å White cable
} DO
Å Blue cable
} DE
Å Green cable
} GND Å Black
-
12
;Step 4:Choose the right pneumatic drill machine to dig the holes on the
door, wall before screw up the bracket of lock (reader), relay box.
;Step 5 :Fix all cables in the wall, door or ceiling.
Preliminary test of whole function before fix cable !!
;Step 6 :Fix back plate (aluminum) on the wall/ door. If necessary, insert a
rubber plate back of the plate to prevent water or humidity.
Screw up front cover of RFID reader onto back plate.
Hook up front cover onto relay box. < Finish! >
*For security concern, user can buy a special, vandal resistant screw
(prevent front cover reopen by drill) from shop. Installer had better use glue
to fill the hole. Then, label the sticker to the screw/LED area on RFID reader.
This outdoor use RFID reader with water spray feature. The
front cover of this reader will not broken even crashed by hammer.
Installer can fix it on the metal door and no influence to RFID
card’s radio detection. If intruder use hammer, drill & long period
to open the case, he still has no way to detect the comm. protocol
between reader & relay box.
REMARK :
; How to link 232 serial cable to PC?
This kit allows stand-alone operation & serial link to a computer.
-
13
<Only the economic, special version without 232 network function.>
If user intends to build a 485/422 based networking and manage several
RFID reader kits under a PC for central management, please aware this
basic 232 version Access control kit was allowed to link “one” personal
computer & not suggest for 485 networking directly.
Now, you have one 232 version access control reader kit in hand. Please
see this special made 3 wires 232 cable (cross wire type) packed in the
box. It is a cable with 4 pins plug and 9 pin, female type 232 connector
on each end. If user with engineer experience in computer field, he can
build a longer, cross wire type, 232 cable by himself !
User can directly plug this 9 pin connector to the COM port on PC.
Before plug the 4 pins plug on J6 of relay box, please measure the
dimension of hole on the case. If necessary, please use drill to enlarge
this hole for smoothly wiring. Then, you can fix the 4 wire plug onto J6
and re-cover the case back to Relay box.
Use a coin to open the cover case on Relay box. Then, you will see J6
port on left corner of PCB. It is a white color, 4 pins socket.
Please make sure the JP1 position be short for 232 networking. JP1, 2
pins, located just side of J6.
Experienced engineer can buy a 232/485 convert box from the
market. He can check the instruction manual, clarify relate wiring issues
(need cross wire or not) of this convert box & confirm whole system’s
structure. Then, this 232 version access control kit still capable for 485
type networking. In the other hand, system designer can direct order a
485 version access control kit for network (max. link 4096 locks) instead
of use this 232 version.
; How to extend this “232 cable” from Relay box to a PC which located
100 meters away this access conytrol kit ?
Manufacturer warning: Total length of RS232 cable had better less than
100-200 meters. Quality of the extension cable is an important factor to
whole system’s communication.
-
14
For distance extension, you can buy a 232 serial cable from shop or find
it from your working place.
In general, there are 2 kinds 232 cables have been widely used. If you
use a pin to pin match 232 cable to link with original “cross-wire” type
232 cable , it will be correct for this kit’s PC networking. But, if user use
another “cross wire” type 232 cable to link original “cross-wire” type
232 serial cable for distance extension, you will fail the communication
between this kit and PC. If user ignores mentioned concerns, the
application software on PC will error, fail to work.
“Cross wire” type 232 cable: It means the pin 2 & pin 3 was exchanged
from one end to the other end on this cable.
; How to link several access control kits to a PC?
Please refer to the Appendix for 485/422 version networking.
; Further problem may have of PC networking?
If you still with problem of full work 232 type PC network, please check:
(1) Reader number of this kit: Each kit with a pre set ID number: default
value from “0001” or “4096”. If you want to change reader number,
please refer to Appendix. If operates ok, ID /lock no. will showed on
PC software.
(2) Any unsafe point during cabling? Any unfinished procedure of install
application software? COM port status of PC?
(3) Measure J3 connector(12V & GND) power supply provided on the
relay box.
(4) EMI / RMI interference between data wire and power wire?
In general, this issue may happen during the wiring of 485/422 cable
from floor to floor.
User can separates data wire & power wire, expose these wires on the
table, open floor. Then, we can test RFID cards, electric lock, pc software
& result on PC comm. Software. This kind test is a good evidence to
compare performance difference before or after fix these wires into the
pipeline.
When you use an extended 232 cable, please avoid closely locates this
232 cable to any other cable (EX.: video cable) which may generate or
carry high power, high noise.
-
15
Test & Programming
For convenience, the Entry Cards supplied with the kit have been
pre-programmed to the memory of this unit. The Master Programming
card is used to carry out administrative functions such as adding and
deleting Entry Cards from the locks memory. User can easily identify
The Master Programming Card by a red label or mark it with a logo.
1) A register before programming Entry card
Any additional Entry Cards required must be programmed to the reader
before being issued to a cardholder. If one or more Entry Card’s are
required to open more than one Access control kit, then the
programming procedure detailed within this manual must be repeated
for each additional Entry Card, on each access control reader, for which
it is required to control. Each time a card is successfully programmed
it's unique card number is copied to the internal memory of the reader.
The arrangement of the internal memory for storing valid Entry Cards
can be shown as follows;
Memory location 1
Card Serial Number
Memory location 2
Memory location 3
Card Serial Number
Card Serial Number
Memory location 4
Card Serial Number
Memory location 5
Card Serial Number
Memory location 299
Card Serial Number
Memory location 300
Card Serial Number
The Card Serial Number is pre-programmed into each Entry Card when
manufactured. This in turn must then be programmed into the reader
unit to allow the Entry Card to open the lock.
The first card is entered into memory location sequence 1. The second
card is entered into memory location sequence 2 and so on until all
cards required have been programmed into the reader unit.
-
16
It is very important to note the Memory Location Sequence for each
Entry Card that has been programmed to the reader. The Entry Cards
packed in this box that are bundled with the kit already occupy memory
location sequence 1, 2, 3, 4 and 5, ----.
It is strongly recommended that a register be kept of the Memory
Location Sequence number, serial number and to whom the Entry Card
has been allocated for each Entry Card that has been programmed to
the reader. This will ensure the security of the installation as well as
efficient allocation, retrieval and administration of Entry Cards. A
recommended format for this register is shown below.
Lock Serial No.
Installation Date
00110101711
01/07/2001
Master programming
card Serial No.
Memory Location
Sequence
1
2
3
4
5
Unit Location
Area 101 (xxxxx)
Name:
Entry Card Serial Number
Holder Name
01002F8E4A
01002F9B78
01002F3C61
John Smith
Adam Watts
David Wells
When programming additional cards, the Master Programming Card is
used to skip memory locations already occupied to ensure that the
additional new cards are placed into sites not occupied. Following the
correct programming procedures described in this manual will ensure
that cards are programmed without deleting previously programmed
cards.
-
17
The Master Programming Card is vital to the security of the installation.
It must be kept secure at all times. It’s use should be monitored and
restricted to individual named personnel.
Should a Master
Programming Card be lost or stolen, contact your supplier immediately.
; Additional Entry Cards
This reader is capable of storing up to 300 Entry Cards. Your local
distributor can supply additional Entry Cards.
; Patrol master programming card & patrol cards:
Following pages focus on the stand-alone operation method of Mater
programming card & Entry / User cards. The method of program patrol
cards same as to the logic of Entry / user cards.
It is prohibit to cross register Entry / user card into patrol programming
mode.
2) Basic Operation
To unlock the door.
a) Hands Entry Card approximately 10cm, or less than 10cm, to
the reader.
b) If two short beeps are heard, then this card is not an authorised
Entry Card and the linked electric lock unit will remain locked.
c) If an authorised Entry Card has been used then three events will
occur.
i)
Ten continuous short beeps will be heard
ii)
The Door / Patrol LED (right on the reader unit) will
illuminate in green. After beeping, right side LED will off in
seconds. Under stand-by mode, only left LED lighted in
green
iii) door can be opened.
d) The door can be closed at any time. Before leaving, check that
the door is locked by trying to pull the door open.
e) Patrol programming card & patrol card:
Following pages focus on stand-alone programming method.
-
18
Same of operation logic to patrol application. Patrol card and
Entry / User card prohibit to cross register under different
programming mode.
3) Programming Entry Cards to the reader for the first time. (Not
required if Entry Cards already register & packed as a kit)
a) It is advised that a registration log is used to record which cards
have been programmed to each reader as detailed above.
b) Make sure that the Master Programming Card is to hand. Also
make sure that all of the Entry Cards to be programmed are to
hand.
c) Check reader is powered up. This will be confirmed by power LED
being on.
d) Hands the Master Programming Card to the reader, this will put
the reader into programming mode. If this has been successful
this is confirmed by Door/Patrol LED changing to an red colour. A
long beep (du – du) tone will be heard.
e) Offer the first Entry Card to the reader. A single confirmation beep
tone should be heard. This card has been programmed to the
reader. Record this as Card No1 along with Card's serial number
in log book against Memory Location No1(Site 1) also noting the
authorised card holder and the date. Offer the next Entry Card to
the reader and again a confirmation beep should be heard. This
Entry Card should be recorded similarly as Card No 2 in Memory
location 2 (Site 2). This procedure should continue until all the
Entry Cards have been programmed.
f) Once all cards have been programmed it is necessary to end
programming mode. To do this offer the Master Programming
Card once again to the reader. Two long beeps (du-du ; du-du)
should be heard confirming that Programming Mode has ended.
The right side Door/Patrol LED will go out.
g) All of the Entry Cards you have programmed allowed to open this
Lock.
-
19
The diagram below illustrates how to program 4 Entry cards as described in
section 3
Action
Detail
LED configuration
Offer Master Programming
Card to the reader
Enter programming mode.
Entry confirmed by a long beep (du-du)
tone.
Check Door/Patrol LED comes on
(Yellow).
Offer the first Entry Card to
the reader
First Card used becomes Card No 1
Programming confirmed by short beep
tone.
Offer the second Entry Card
to the reader
Second Card used becomes Card No
2.
Programming confirmed by short beep
tone.
Offer the third Entry Card to
the reader
Third Card used becomes Card No 3.
Programming confirmed by short beep
tone.
Offer the fourth Entry Card
to the reader
Fourth Card used becomes Card No 4.
Programming confirmed by short beep
tone
Offer Master Programming
Card to the reader
Exit programming mode.
Hear 2 long beeps (du-du ; du-du)
Check Door/Patrol LED goes out
4) Programming additional cards to a reader.
a) A registration log should already exist showing the current Entry
Cards registered to the reader.
b) Make sure that the Master Programming Card is to hand. Also
make sure that all of the additional Entry Cards to be programmed
are to hand
-
20
c) Check whole configuration is powered up . This will be confirmed
by power LED being on.
d) The first step is to check log book and make note of how many
Entry Cards have already been programmed to the lock. For this
example four Entry Cards are already programmed to the reader.
This means that the internal memory of the lock has card
numbers stored in memory locations 1,2,3,and 4 (site 1 to 4). For
this example we will program two more Entry Cards to the reader.
These two additional Entry cards must be located in memory
locations 5 and 6. (site 5 , 6 )
e) Offer the Master Programming Card to the reader to enter
programming mode. This will be confirmed by the Door/Patrol
LED changing to an red colour. A long beep (du-du) tone will also
be heard.
f) We must now start programming at memory location 5. Offer the
Master Programming Card to the lock four times. A single beep
should be heard each time. This will move to Memory location 5
g) Offer the first of the additional Entry Cards to be added to the
reader. A single confirmation beep should be heard. Record the
serial number of this Card in the Registration log as card number
5 for the lock together with the authorised user and date.
h) Repeat step (g) for each further additional Entry Card required
for this reader.
i) Once all cards have been programmed it is necessary to end
programming mode. To do this offer the Master Programming
Card once again to the reader. Two long beeps (du-du; du-du)
should be heard confirming that Programming Mode has ended.
The Door/Patrol LED will go out.
Special Note:
During step (f) when using the Master Programming Card to skip over
memory locations, care must be taken to ensure that the correct number of
memory locations has been skipped. If there is any doubt then the
programming procedure must be re-started. To do this, do nothing further
and wait 30 seconds for the reader to exit programming mode (with du-du
beep sound). When out of Programming Mode go back to step (e)
-
21
The diagram below illustrates how to program 4 Entry cards as described in
section 4.
Action
Detail
Offer Master Programming
Card to the reader
Enter programming mode.
Entry confirmed by a long beep
tone. (du-du)
Offer Master Programming
Card to the reader
LED configuration
Check Door/Patrol LED comes on
(Yellow).
Skip Memory Location 1 containing
Card No1
Confirmed by short beep tone.
Offer Master Programming
Card to the reader
Skip Memory Location 2 containing
Card No2
Confirmed by short beep tone.
Offer Master Programming
Card to the reader
Skip Memory Location 3 containing
Card No3
Confirmed by short beep tone.
Offer Master Programming
Card to the reader
Skip Memory Location 4 containing
Card No 4
Confirmed by short beep tone
Offer the first additional
Entry Card to the reader
First additional Card used becomes
Card No 5
Programming confirmed by short
beep tone.
Offer the second additional
Entry Card to the reader
Second additional Card used
becomes Card No 6
Programming confirmed by short
beep tone
Offer Master Programming
Card to the reader
Exit programming mode.
Hear two long beeps (du-du; du-du)
Check Door/Patrol LED goes out
-
22
5) Removing or Replacing an Entry Card from a reader
In the event that an Entry Card has been lost or stolen, the following
procedure will allow the Card to be eliminated from the reader and
replaced by a new Entry Card.
If an Entry Card is required to be removed from a reader for any reason
then the Memory Location for that Entry Card must be overwritten with
another card. It is only possible to delete Entry Cards from a reader by
overwriting the serial number in that Memory Location with another
Card's serial number. It is recommended that one Entry Card is solely
designated to delete other cards. In this way it is then possible to
remove Entry Cards when it is not necessary to allocate a replacement
card to an additional person for example when a person leaves the
company. This Entry Card could be Entry Card No 1. In this case both
Entry Card No1 and the Master Programming Card should be
controlled and used by personnel responsible for issuing the cards.
a) Check whole kit powered up . This will be confirmed by power LED
being on.
b) Check Registration Log for the reader and locate the memory location
of card which needs to be removed and replaced. For this example,
Card No3, in Memory Location 3 needs to be replaced.
c) Make sure that the Master Programming Card is to hand. Also make
sure that all of the additional Entry Cards to be programmed are to
hand.
d) Offer the Master Programming Card to the reader to enter
programming mode. This is confirmed by the Door/Patrol LED
changing to an red colour. A long beep tone (du-du) will be heard.
e) Offer the Master Programming Card to the reader twice. A single
beep should be heard each time. This will move to Memory location 3
the location of the card to be replaced.
f) Offer the replacement Entry Card to the reader. A single beep should
be heard. Record the Entry Card serial number as Card No 3 and
note it's serial number (10 digit long) in log book against Memory
Location 3 (site 3) for the lock. This will replace the original entry for
this Memory Location in the Registration Log.
-
23
g) Once all cards have been programmed it is necessary to end
programming mode. To do this offer the Master Programming Card
once again to the reader. Two long beeps (du-du; du-du) should be
heard confirming that Programming Mode has ended.
The
Door/Patrol LED will go out.
The diagram below illustrates how to remove and replace an Entry Card
as described in section 5.
Action
Detail
LED configuration
Offer Master Programming
Card to the reader
Enter programming mode.
Entry confirmed by a long beep
tone. (du-du)
Check Door/Patrol LED comes on
red.
Offer Master Programming
Card to the reader
Skip Memory Location 1 containing
Card No1
Confirmed by short beep tone.
Offer Master Programming
Card to the reader
Skip Memory Location 2 containing
Card No2
Confirmed by short beep tone.
Offer the Replacement
Entry Card to the reader
Replacement Entry Card used
becomes Card No 3
Programming confirmed by short
beep tone.
Offer Master Programming
Card to the reader
Exit programming mode.
Hear two long beeps (du-du; du-du)
Check Door/Patrol LED goes out
6) Restoring this access control kit to Factory state .
When using the “Direct Proximity method” (or called stand-alone type
programming) for programming cards, there is no way of deleting all
Entry Cards from a reader. However it is possible to take a single Entry
Card such as Entry Card No1 and program it into all of the memory
locations previously occupied by other cards. This will leave Entry Card
-
24
No 1 as the only Entry Card for the kit.
If you need to restore thus kit to factory defaults, please contact the
supplier of the product.
7) How to programming many Entry cards into the specified RFID
access control kit or the network type solution.
It is quite easy to programming, add, remove or replace any entry card
when total user cards been registered under the specified proximity
reader kit quite limited (For instance: 5 to 20 users).
If the user group under one kit up to 50, 100 or more (max. 300 cards
holder), it will be complicated to manage these cards by a notebook.
Then, we suggest you had better use computer based access control
software to manage all card holders. If your order include a PC base
access control software, please double confirm your original product
supplier.
8) Can I parallel use direct programming method & PC base access
control software to manage all registration affairs?
Yes. You can test after finish installation the hardware & spftware of
this access control kit.
9) Is it feasible to get support from original maker of offer a copy of
the master programming card?
Sorry. Each RFID access control kit attached with a unique master
programming card. If owner lost the master programming card belongs
to this reader, he had better call help to replace this reader. This
programming card is prohibited to cross use onto another reader (lock).
11) Once power supply failure, any battery back-up for emergency?
This is a concern point for fire, emergency case. Otherwise, their is no
way release the lock head for door open.
This issue depends on the working logic of electric lock & the wiring
design of enable battery unit.
Most electric lock suppliers always provide many options on battery
unit. Or, check this kit’s original seller for help.
-
25
Specification:
Proximity reader
Frequency of Operation:
Card detect distance
Open door card memory size:
(or named User card, Entry card)
Patrol card memory size:
Record memory size
Internal 1 second timer duration
Dimension:
Bracket
Communication cable
RS-422 Address
LED mode indicators
125 KHz ; Antenna embedded
>7cm
300 (Max.)
20 (Max.)
600 or 2700(opt.)
11 days (Max.)
40mm (W) x 18mm (H) x 100mm (L)
Aluminum
std. 20cm length;
4096
2 LEDs for Power, Door, Patrol,
programming
Relay box
Operating Input voltage
Current consumption
Current consumption (idle)
Lock interface
Comm. interface
Dimension
External indicator
DC 12V
200mA (Max.)
150mA (Nom.)
Max. 24V 15A on Relay contact point
To lock ; to PC ; to remote push button
58 (W) x 23(H) x 108mm (L)
Push button, LED,
Proximity card / RFID card
Operating Frequency
Dimension:
Reading distance from Lock:
Card number :
Card memory type :
Card operating mode:
125kHz :
ISO7816-1(Standard credit card size)
10 cm (Max.)
64 bit binary.
One time EEPROM
Read only
All electric and radio spec. satisfy CE related specification.
-
26
Appendix
Address & set address (reader/lock number)
of RFID access control kit
In general, user can set max. 4096 RFID reader no. (or we can say “reader
ID”, “reader address”) and network max. 4096 electric locks under this
solution. Default address of each RFID kit will be a no. from 4096 to 0001.
Before testing or real site installation, user still with lead time to check,
change this address as he wish. Procedure described as below:
After the installation of supplier’s standard application software for network
management, user can open window tables and with icon “Address”. Just
key in the specified address number into the said column and get related
data for further operation. Or, hold a pre-programmed Entry card to
reader, user can see the correct lock no. jump out & showed on the real time
monitoring menu.
Following procedure & description are important to system user especially
request each kit set on a specified no. to logic their management.
1) Open the case of RFID proximity card reader.
Take off the PCB circuit inside the case. Please see U8 & U9 position on
the component side.
2) There are printed, white color indicators showed on the right side U9 IC
(S1 to S8) & left side of U8 IC (S9-S12). If the default status of this
address is 4096, all points from S1 to S12 are “OPEN” without solder.
-
27
See below.
3) We can simply soldering these 12 positions either in “OPEN or SHORT”
mode to specified the address of this RFID card reader. We treat “OPEN”
as to numeric word “1”; “1” means open without solder. Then, we can
treat “0” means close, short after soldering.
U9
HC573
S8
S1
U8
HC573
S9
S10
S11
S12
open
Layout on PCB
Short; close
-
28
4) How to calculate the address of the specified RFID proximity reader:
position
S1
S2
Value of
each
position
Address:
4096
Address
1024
1
1
open
1
Address
1234
Address
0001
Address
0037
Address
0128
2
S
3
4
S
4
8
S
S
5
6
16 32
S
S8 S9 S10 S11
7
64 128 256 512 1024
1
1
1
1
1
1
1
1
1
1
1
1
1
1
1
1
1
1
0
0
0
1
0
1
1
0
0
0
0
0
0
0
0
0
0
0
0
0
1
0
0
0
0
0
0
1
1
1
1
0
0
0
0
0
open
1
1
S12
2048
1
0
0
close; close;
short
short
1
0
Short
0
0
0
1
1
0
1
1
1
User can combination the mode of each positions (from S1 to S12); plus
the value of each “OPEN” position ( see 2nd line of above table) and add
“1” for total. Then, you get the address of this specified proximity reader
unit.
For instance:how to fix, calculate address/ lock number “0128” on this
proximity card reader
1+2+4+8+16+32+64=127 + 1=128
We can see last line in above table. Use the specified value positioned in
2nd line of above table to get a total number from S1 – S7 for ‘127”. We
can use same way to get address 0037, 1234 & 0001 which listed in
above table.
5) Soldering the pin on these selected positions to fix address of this RFID
proximity reader.
Finish wiring & fix this reader unit on the wall.
6) Network service engineer can test & see this reader’s “address” showed
-
29
on a computer which already installed application software. For
convenience, user can write, or type this specified address on a sticker.
Then, labelling this sticker onto the back of metal case or inner of the
cover case for after service.
-
30
APPENDIX
REFERENCE FOR RS485 PC NETWORKING
General
Only the 485 version RFID Access control kit suits for following
network method. Any problem causing from engineer change of 232
version to 485 version will responsible by user.
According to the definition, user can extends maximum 32 nodes under a
RS485 interface based connection. The cables adopted in this kind network
can be no.22-24 wire or no. 5 shield LAN cable. All these wiring cables should
twist and no over 3000-4000 feet.
Please adds a 120Ω resistor on the end node (proximity card reader/ lock)
before insert the cable into J6 of relay box. No needs short the pins of JP1. All
the said RFID reader kits networked together must use RS485 version.
If the organization totally over 32 nodes (it means over 32 proximity
Readers / locks network together), we must ready one piece RS485 box
(directly link to PC) and other repeat, extension used 485 boxes
Following draft showed the wire of 485 networking. Draft 1 allowed for
network up to 32 nodes. Draft 2 allowed for network up to 63 nodes.
The first 485 box links with PC’s COM port can name with MASTER. Other
485 box can name with REPEATER. Each box should connect with power
supply to support long range communication.
The serial 232 cable between PC & 485 box (master) should take care by
experienced engineer.
Any further problem or unstable of communication may have, please check
radio interference of the environment or get consult from nearest Cabling
Service Company.
-
31
-
32
-
33