Transcript
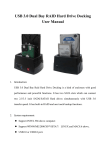
Flyout:
Specifications:
• USB Interface: 2.0
• SATA Interface: II V1.0a
• Transfer Speed: up to 30Mbps
• Connector: 40 & 44 pin IDE
SATA II
• HDD Support:
IDE 2.5" HDD
IDE 3.5” HDD
SATA 2.5" HDD
SATA 3.5” HDD
IDE 5.25” CD/DVD Drives
• Supported HDD Type: NTFS & FAT32
• Compliant: USB Mass Sotrage Class Bulk Only
• Compatibility: Windows 8.1, 8, 7, Vista, XP, 2000, 98,
Mac OS X® 10.0+, Linux
SATA/IDE to USB 2.0
Hard Drive Adaptor
XC-4150
Connection Diagram:
6.After the backup is
completed,
PCCloneEX diagram
in the notification
area will say
"backup finished".
1.
2.
3.
4.
Quick Launch.
File Backup.
File Manager.
Setup.
5.
6.
7.
8.
5.Please click “OK”
to backup on the
dialog screen.
Steps:
-------------------------------------------------------------------------------------1.Please plug in the hard drive
adaptor and turn on the
power.
2.Please right click "My
computer", and click on
"manage".(Alternatively
click on "Start"->"
Control Panel"-> "
Administrative Tools"->
"Computer management")
4
File Backup:
6.When backup is
in progress, the
window shows
progress time.
1.Please plug the
external HDD into
the PC and turn
on the power.
2.Open PCClone
EX.
3.Go to the PCClone
EX/Quick Launch
screen.
4.Click “File Backup”.
(Users can also use
the hot key they
previously set to
backup.)
11
6
7.When backup is
complete, click
“OK” to finish the
backup.
(The file backup
has been
successfully done
through
PCCloneEX on to
the HDD.)
12
13
3.Confirm the “ USB
Device” and “Drive
to Format” in the
FAT32 Format
Utility, and then
press “start”.
1.Please plug in the
HDD and turn
on the power.
2.Open PCClone EX.
3.Go on the PCClone
Ex screen.
4.Click “File Backup”.
5.Select folders/files
of USB device you
would like to restore.
8.The selected folders
have been moved
from the fixed device
to the USB device
successfully.
14
15
Erase File Backup:
(The selected HDD has been
formatted by this program to be FAT32
file system.)
8
5.Alternatively,
delete the root
directory F:
FNet directly; it
will also work.
Setup:
File Manager:
PCClone EX
Manager function
is the same as
Windows Explorer.
Users can
directly drag the
files forward and
backward between
the fixed device &
USB device.It is
convenient for
users who
manage
or check their files
without clicking
the icon of “
Windows Explorer”
or “My Computer”.
1.Please plug in the
HDD and turn it on.
2.Open PCClone EX.
3.Go to the PCClone Ex
screen.
4.Select the “File backup”
of USB Device, then,
right click the mouse to
click “Delete select
Files”, all selected files
in the USB device will
be deleted.
16
6.The formatting is completed. Please
press “OK”.
7
Steps:
------------------------------------------------------------------------------------
1. File Backup.
2. File Restore.
Steps:
------------------------------------------------------------------------------------1.Please plug the
HDD into the
computer and turn
on the power.
2.Open PCClone EX.
3.Click“File backup”.
4.Select folders / drives
from the device.
5.Set one of the USB
devices for backup.
(Please refer to “Setup”,
for first time use.)
5. The window shows the
current progress.
2.Click "Start" -> "All
programs" -> "
PCClone EX" -> "
FNet FAT32
Format
9.There is a hidden root
directory F: FNet in
the USB device, all
tfile backups are
kept in there.
Do not delete these
files.
File Restore:
(Please Note: all data in the HDD will
be deleted if you use this function)
1.Please plug in the
HDD and turn on
the computer.
(For detail format
steps please refer to
the section of "FNet
FAT32 Utility".)
7.When “Restore” is
finished,please press
“OK”.
4.Tick “ Quick Format” and click “Start
” for executing.
Steps:
---------------------------------------------------------------------------------------
6.Click “Restore”, then
press “OK” to start
7.Backup is completed,
please press “OK”.
Steps:
--------------------------------------------------------------------------------------
The Fat32 Format Utility in Windows 2000 / XP is not able to
support the HDD size exceeding 32GB. FNet recommends
FNet Fat 32 Format Utility, which can format large capacity HDD’s
to be FAT32 format. The supported size is up to 4TB.
(Please Note: all data in USB HDD will be deleted if you use this
function)
6.Also, you can format
the hard drive by the
"FNet FAT32 Utility"
and then you can
start the backup
function.
5
6.Select “Backup” and
press “OK” to start.
Users can directly execute “File Backup” from Quick Launch, or
use their own “hot key” and the system data will be backed up
easily. (For the first time using,please refer to the
subject of “File Backup”, or setup your own hot key in “Setup”.)
FAT32 Format Utility
5.Follow the
installation of "
Partition Wizard" to
operate the HD disk
and complete the
partition.
If your USB HDD has been managed already, please skip this
part and move on to the next step.
Quick File Backup:
Quick Launch:
10
File Backup.
Minimized.
About.
Help.
6.The installation is
completed, please
click “ OK” to exit.
3.Please read the
license agreement
in detail.
4.If you accept the
agreement, please
click “Agree” to
install.
3
4.Please right click the
"unallocated" HDD,
right click and click
on "new Partition".
(If you are unsure
which disk you need to
reformat, unplug and
replug the the HDD
in so you know which
one is correct).
How To Create A Partition:
2. Click “install”.
2
1
5.When the backup is
in progress,
PCClone EX
diagram will be
blinking in the
notification area.
There is a dialog box
that will display the
progress every
10% increments.
1.Please put PCClone
EX CD into the CD
ROM drive, the
program will appear
automatically on the
screen of your PC.
Note: In case the
screen does not
show automatically
then open windows
explorer and
manually click on the
setup file.
Please Note:
• One touch backup is applied to the USB port only, it is not
available through the other ports.
• When users operate the PCClone EX Lite software, the login
must be from Administrator; it can not login from the Guest or
any authorized account.
• One touch backup is not supported on Windows 98 & ME.
The hot key can be programmed, please refer to quick file
backup.
User Manual
5.Please setup the
installation path,
and then click
“Install” to next.
Steps:
3.Please click "disk
management" in
the left window.
7.“PCClone Ex” icon
will display in the
notification area
after setup; users
can double click
the icon or press
right click of your
mouse to execute
PCClone EX.
Software Installation:
17
File Backup:
-------------------------------------------------------------------------------Hot Key Setup:
When users click “ Edit”, which can be made up of their own hot
key by choosing “Ctrl”, “shift”, “Alt” and select a number, letter
or function key.
File Backup Mode:
There are two modes for file backups; one is “Add~”, this
function only backs up additional files to the external USB HDD;
the other one is “Discard~”, this function reduplicates all data
from your PC to the external USB HDD.
Confirmation:
When users back up using their hot key, a default dialog box will
pop up to asking for confirmation. If users want to backup
directly, please cancel the default.
18