1
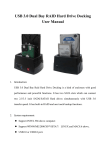
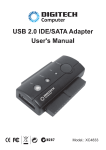
HDD Docking Station for 2.5”/3.5” SATA HDD with eSATA Connector User Manual Declaration Thank you for purchasing . Please read these instructions carefully before use.
Notice •
•
•
•
•
•
Make sure that all cables are connected before turning the power on. Do not use the Docking station in extreme hot, cold, dusty or wet environments. Place the Docking station on a flat stable surface away from the edge. Do not remove hard drives or other devices from the Docking station if it is being accessed by the computer as this may corrupt data or damage the drive or device. Please use the Safe removal tool to stop devices before removal. Do not drop hard drives in the bays. Place them gently on to the connecters. Make sure that you are protected against static discharge before handling bare hard drives Main features •
•
•
•
•
•
Plug and Play. No drivers required when used on Windows 2000 or later or MAC OS9 or later Allows quick change over of drives USB 2.0 High Speed interface eSATA connection Stable base Back Up Software Layout A B C D E Description 3.5”& 2.5” SATA / SATA II DRIVE BAY Power LED HDD activity LED Backup Button (Requires software) HDD Ejector Lever F G
H
I Description USB Connection DC POWER SOCKET POWER SWITCH eSATA Connection Page 1 of 7 HDD Docking Station for 2.5”/3.5” SATA HDD with eSATA Connector User Manual Connecting the docking station with the USB cable Connect the supplied USB cable to the rear of the Docking station and the other end to a spare USB 2.0 port on your computer. Connect the AC adaptor to a power point and to the socket on the rear of the Docking station. Do not turn the Docking station on until the hard drive has been fitted. Connecting the docking station with the eSATA cable. eSATA ports allow you to connect a hard drive on the outside of the computer but have it perform the same way as it would if it was fitted to the computer as normal. eSATA allows for the auto detection of drives as they are fitted, were as normal SATA ports will not detect drive being attached after the start up of the operating system. If your computer is fitted with an eSATA connection, plug one end of the eSATA cable in to the rear of the docking station and the other in to the eSATA port on your computer. If there is no eSATA port on your computer, the supplied eSATA bracket and socket may be fitted to your computer. Please refer to the mother manual to locate the eSATA header on the board before fitting. Connecting hard drives Turn the Docking station off at the power switch on the rear. Pick the Hard drive up and position the drive so the label is facing toward the right hand side of the station and the drives contacts are facing down. Carefully lower the drive in to the correct bay and ensure that drive is fitted snugly in to the bay. Do not jar the hard drive. Turn the power switch on. The computer should detect the station and the drive and assign the next available drive letter to the hard drive. Page 2 of 7 HDD Docking Station for 2.5”/3.5” SATA HDD with eSATA Connector User Manual Removing the drive from USB connection To remove the hard drive from the docking station, use the “safely remove hardware” tool in the System Tray in the lower right hand side of the screen to unmount the drive. Select the drive to stop and click on the stop button. Turn the Docking Station OFF and allow a minute or so for the hard drive to spin down before removing it from the station. Take hold of the drive with one hand and slowly rotate the HDD Ejector lever clockwise until the drive is free of the contacts. Removing the drive from eSATA connection While eSATA allows you to hot plug a drive when connecting it, there is no simple way of disconnecting the drive once connected. It is recommended that the computer be turned off before removing the drive from the Docking station. The Drive can be stopped through the Device Manager applet in the following manner. Open the Device Manager window and expand the “Disk Dives” group to display all attached hard drives. Locate the drive attached with the docking station and right click on the drive. Select “Uninstall” from the options menu and then click on the OK button in the confirmation box. The device manage will refresh and show that the drive is no longer connected. You should always ensure that no programs are accessing the driver before it is removed in this method. Do not remove the drive from the Docking Station if the Hard Drive activity light is red. Disconnecting a hard drive during the read/write process may cause corruption of data or damage the drive Page 3 of 7 HDD Docking Station for 2.5”/3.5” SATA HDD with eSATA Connector User Manual Backup software instillation 1. Insert the supplied CD in to the CD/DVD reader and open the folder called [PCCLONEEX_LITE_2_00_08_JM329] and then the folder named [PcCloneEx]. 2. Double Click on the SETUP.EXE program to begin the instillation. Click on the Install button to proceed. 3. Click on the “Next” button to accept the license agreement and continue with the instillation 4. Select your preferred instillation options and click on the “Install” button 5. Click on the “OK” button to finish the installation Page 4 of 7 HDD Docking Station for 2.5”/3.5” SATA HDD with eSATA Connector User Manual Basic use of PCLoneEX software 1. To launch the software Double click on the desktop icon. 2. In the Quick Launch Window click on the Back up button (As circled right). 3. The message box “Please select file(s)!” will appear. Please click on the “OK” button 4. Use the left panel to select the folder or files that you want to back up and click on the icon to start the back up and then click the start button on the confirmation box. 5. During the backup information about the progress of the files being backed up will be displayed. You can stop the back up at any time by clicking on the “Cancel” button. A pop up box will be shown when the backup is complete. Click on the OK button. 6. The backed up files will be now shown in the right hand panel of the widow for confirmation. 7. Click on the icon to minimise the window to the system tray. Page 5 of 7 HDD Docking Station for 2.5”/3.5” SATA HDD with eSATA Connector User Manual For more detailed instructions for using this program please read the instruction manual located in the “PCClone EX Lite_ENG_.pdf” file located in the [Guide] folder of the CD Technical specifications Model Name Product Code Supported Drives Internal Interface HDD Docking Station SSX‐35S 1 X 3.5” SATA / SATA II SATA USB 2.0 External Interface eSATA HDD Capacity UP TO 1 TB Input = 240 VAC 50Hz Power Supply Output= 12V DC 2.0A Casing Material Plastic System Requirements Hardware Windows 2000/XP/Vista and Mac OS 9.0 and above Software Windows 2000/XP/Vista Troubleshooting Problem No power to Docking Station Drive inserted in Docking Station but not shown on computer Hard Drive in Docking Station gets hot even when the drive is not being accessed. Back Up software not working when connected by eSATA. Cannot find drivers for Windows 98/ME Solution Check the AC adaptor is plugged in and the switch is on. Check the switch on the back of the Station. Hard drives must be partitioned and formatted before they can be accessible by the Computer. Partition and reformat drive. Drive has been formatted with a non compatible file system. Reformat drive. Hard drives fitted to the Docking station are constantly spinning the platters. This where the heat is generated. Remove the drive from the Docking Station when not required. There are some issues with the PCClone EX Lite software when used on Motherboards with VIA or SIS chipsets. We are unable to support these at this time. Drivers for Win98/ME are not available. The use of the Docking station on operating system other those specified is not supported. Page 6 of 7