1
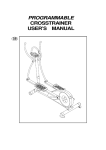
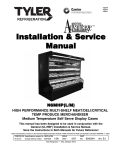
RECUMBENT BIKE USER’S MANUAL GB This quality product is designed, manufactured, tested and certified for enhanced Fitness Training. Dear Customer, We want to thank you for having chosen a RECUMBENT BIKE. Wish you a lot of fun and success during training. Please note and follow the enclosed safety and assembly instructions carefully. If you have questions, please do not hesitate to contact us. Table of Content: 1. 2. 3. 4. 5. 6. 7. 8. Safety Instructions ............................... P. 2 Exploded Drawing ................................ P. 3 Hardware Package............................... P. 4 Assembly Instructions ........................ P. 5 Computer Instructions .......................... P. 8 Training Instructions ............................. P. 10 Parts List .............................................. P. 11 Training pulse rate .................................P. 13 Safety Instructions GB Before you start training on your RECUMBENT BIKE, please read the instructions carefully. Be sure to keep the instructions for information, in case of repair and for spare part delivery. The HM-9080 is made for home use only and tested up to a max.body weight of 100 kgs. assembly and inspection of the item. Follow the steps of the assembly instructions carefully. For all adjustable parts, be aware of the maximum positions to which they can be adjusted/tightened to. The exerciser is designed for adults. Please ensure Use only original parts as delivered. that children use it only under the supervision of an For assembly, use only suitable tools and asks for adult. assistance if necessary. Place the bike on an even, non-slippery surface. Because of possible corrosion, the usage of the hazards, e.g. movable parts during training. Consult your physician before starting with any recumbent bike in moist areas is not recommended. exercise programme. He can advise on the kind of Check before the first training and every 1-2 months training and which impact is suitable. that all connecting elements are tight fitting and are Warning: incorrect/excessive training can cause in the correct condition. health injuries. Replace defective components immediately and/or keep the equipment out of use until repair. For repairs, use only original spare parts. In case of repair, please ask your dealer for advice. Avoid the use of aggressive detergents when Please follow the advice for correct training as detailed in training instructions. The load/work level can be adjusted by adjusting tension control knob on the handlebar stem. cleaning the exerciser Ensure that those present are aware of possible Ensure that training starts only after correct -2- Exploded Drawing GB -3- Hardware Package GB -4- Assembly Instructions Step 1 GB GB 1. Insert rear support frame (2) into main frame (1), secure with 5 bolts & washers (59) firmly. Step 3 GB 1. Connect wire-A (65) with wire-B (66) securely. 2. Insert end of seat rail (7) into main frame (1) and place another end of seat rail (7) on rear support frame (2), screw with 8 bolts (46) & washers (59) firmly. Step 2 GB 1. Attach front stabilizer (3) & rear stabilizer (4) to main Step 4 GB 1. Attach seat post (9) to seat bracket (8), screw with 4 frame (1); secure with 4 carriage bolts (45), bolts (48) firmly. washers (58) & capnuts (67) firmly. 2. Screw supporter (35) to main frame (1). -5- Step 5 GB 1. Place seat (21) on seat post (9), secure with 4 Step 7 GB 1. Attach tension control (15) to handlebar post (5) by washers (58) & bolts (47) tightly. bolt (57) & washer (61) securely. 2. Place backrest (20) to seat post (9); secure with 4 2. Plug upper computer cable (13) to lower computer washers (58) & bolts (46) tightly. cable (14), and connect hand pulse sensor wire (lower) (64) with wire-A (65). 3. Insert handlebar post (5) into main frame (1), screw with 3 bolts (46) & washers (58) firmly. Step 6 1. 2. GB Release T knob (11) from fastener at seat post (9). Step 8 1. Plug upper computer cable (13) to cable at back of Open fastener and place handlebar (10) onto the computer (12) securely. Attach computer (12) on fastener. bracket at top of handlebar post (5) by 4 bolts (74). Select the desired position for handlebar (10), and 2. Attach T bar (6) to handlebar post (5), screw with 2 fasten the T knob (11) with sleeve (55). Ensure it is bolts (49) & washers (60). tightened very well. 3. GB Attach hand pulse sensor wire (upper) (17) to hand pulse sensor wire (middle) (32) securely. -6- Step 9 1. GB Screw pedal (19) onto crank (29). The pedals are marked with R and L at the screw. Tighten the left pedal counter-clockwise, the right pedal clockwise. -7- Computer Instructions GB Display Console Overview: The things you should know before exercise A. User Data: You should input your personal data before workout. Press BODY FAT key to enter your personal data of sex, age, height and weight then the computer can save the data unless take out the batteries. B. Clock Mode: a. The computer will enter the clock mode when there is no signal input or no keys be pressed after 4 minutes. You can press ENTER key to switch the clock and temperature at the clock mode or press other keys to quit the clock mode. b. You can set up the TIME or ALARM by holding ENTER key for over 2 seconds then you can set up TIME and ALARM by UP or DOWN keys. c. By holding the ENTER and UP keys together for over two seconds, you can check the current clock at “NO SPEED” mode. Functions and Features: 1. TIME: Shows your elapsed workout time in minutes and seconds. Your computer will automatically count up from 0:00 to 99:59 in one second intervals. You many also program your computer to count down from a set value by using the UP and DOWN keys from 0:00 to 99:00. If you continue exercising once the time has reached 0:00, the computer will begin beeping, and reset itself to the original time set, letting you know your workout is done. 2. SPEED: Displays your workout speed value in KM/MILE per hour. 3. DISTANCE: Displays the accumulative distance traveled during each workout up to a maximum of 99.9KM/MILE. 4. CALORIES: Your computer will estimate the cumulative calories burned at any given time during your workout. 5. PULSE: Your computer displays your pulse rate in beats per minute during your workout. 6. RPM: Your pedal cadence. -8- Key function: There are 6 button keys and the function description as follows: 1. UP key: During the setting mode, press the key to increase the value of Time, Distance, Calories, Age, Weight, Height etc. and to select sex. During the CLOCK mode, you can set up clock and alarm by this key. 2. DOWN key: During the setting mode, press the key to decrease the value of Time, Distance, Calories, Age, Weight, Height etc. and to select sex. During the CLOCK mode, you can set up clock and alarm by this key. Note: During the setting mode, you can hold UP and DOWN keys together for over two seconds then the setting value will reset to Zero or default value. 3. ENTER/RESET key: a. Press the key to accept the current data entry. b. During the no speed mode, by holding this key for over two seconds then the computer will re-power-on. 4. BODY FAT key: Press the key to enter your personal data before measure your body fat ratio. 5. MEASURE key: Press the key to get your body fat ratio and BMI and BMR. a. FAT %: Indicate your body fat percentage after measurement. b. BMI (Body Mass Index): BMI is a measure of body fat based on height and weight that applies to both adult men and women. c. BMR (Basal Metabolic Rate): Your Basal Metabolic Rate (BMR) shows the number of calories your body needs to operate. This doesn’t account for any activity, it’s simply the energy needed to sustain a heartbeat, breathing and normal body temperature. It measures the body at rest, not sleep, at room temperature. 6. PULSE RECOVERY key: Press the key to activate heart rate recovery function. F=1.0 means OUTSTANDING 1.0<F<2.0 means EXCELLENT 2.0≦F≦2.9 means GOOD 3.0≦F≦3.9 means FAIR 4.0≦F≦5.9 means BELOW AVERAGE F=6.0 means POOR Error Message: E: The speed over than 999.9 MPH/KPH then the computer will display “E”. Err: When measure the body fat function or pulse recovery function, if there is no pulse signal input within 20 seconds then the computer will display “Err”. You can repress any keys to quit the Err message. -9- Training Instructions To achieve a considerable improvement of your physical resistance and your health, some aspects of how to find the most efficient amount of training should be followed: If you have not been physically active for a longer period of time and also to avoid health risks, you should consult your general physician before starting to exercise. During the first week, it is advisable to start with a pulse rate of 101. Afterwards, increase it to 117. With increasing improvement of fitness, the training intensity should be increased to 70% - 85% of your maximum pulse rate. This can be done by increasing the resistance, a higher frequency or longer training periods. Training Organization Intensity To achieve maximum results, the right intensity has to be chosen. The heart rate is used as guideline. As a rule of thumb the following formula is commonly used: Maximum pulse rate = 220 - Age While exercising, the pulse rate should always be between 60% - 85% of the maximum pulse rate. For your personal training rates please see the attached pulse rate chart on page 13. When starting to exercise, you should keep your rate at 60% of your maximum pulse rate in the first couple of weeks. With increasing improvement of fitness, the pulse rate should be slowly increased to 85% of your maximum pulse rate. Fat burning The body starts to burn fat at approx. 60% of the maximum pulse rate. To reach an optimum at burning rate, it is advisable to keep the pulse rate between 60% – 70% of the maximum pulse rate. The optimum training amount consists of three workouts per week 30 minutes each. Example: You are 52 years of age and would like to start exercising. Maximum pulse rate = 220 - 52(age) = 168 pulse/min Minimum pulse rate = 168 x 0.6 = 101 pulse/min Highest pulse rate = 168 x 0.7 = 117 pulse/min Warm-up: Before every training you should warm-up for 5-10 minutes. Training session: During the actual training, a rate of 70% -85% of the maximum pulse rate should be chosen. The time-length of your training session can be calculated with the following rule of thumb: daily training session: approx. 10 min. per unit 2-3 x per week: approx. 30 min. per unit 1-2 x per week: approx. 60 min. per unit Cool down: To introduce an effective cool-down of muscles and metabolism, the intensity should be drastically decreased during the last 5 – 10 minutes. Stretching is also helpful for the prevention of muscle aches. Success Even after a short period of regular exercises, you will notice that you constantly have to increase the resistance to reach your optimum pulse rate. The units will be continuously easier and you will feel a lot fitter during your normal day. For this achievement, you should motivate yourself to exercise regularly. Choose fixed hours for your training session and do not start training too aggressively. An old quote amongst sportsmen says: “The most difficult thing about training is to start it.” Wishing you lots of fun and success with your bike, - 10 - Parts List No. GB Description Quantity 1 Main frame 1 2 Rear support frame 1 3 4 5 6 Front stabilizer Rear stabilizer Handlebar post T bar 1 1 1 1 7 8 9 Seat rail Seat bracket Seat post 1 1 1 10 Handlebar 1 11 T knob 1 12 Computer 1 13 Upper computer cable 1 14 Lower computer cable 1 15 Tension control 1 16 Hand pulse sensor 2 17 Hand pulse sensor wire (upper) 2 18 Flywheel 1 19 Pedal (L&R) 1 20 Backrest 1 21 Seat 1 22 Foam grips 2 23 Foam grips (for T bar) 2 24 End cap (for handlebar) 2 25 End cap (for T bar) 2 26 Sensor holder 1 27 Magnet 1 28 Belt 1 29 Belt wheel 1 30 Chain cover (R & L) 1 31 Protector (for chain cover) 2 32 Hand pulse sensor wire (middle) 2 33 Protector (for flywheel) 2 34 Spring knob 1 35 Supporter ( for main frame) 1 36 Square cap (for seat post & seat rail) 3 37 Fastener (for seat rail) 2 38 Fastener (for main frame) 1 39 3 40 Ring (for handlebar post) 1 41 Front stabilizer cap 2 42 Rear stabilizer cap 2 43 Idle wheel 1 44 Ball bearing set 1 45 Carriage bolt (for front & rear stabilizer) Bolt Bolt (for seat post) 4 46 47 20 4 - 11 - 48 Bolt (for seat bracket) 4 49 Bolt (for T bar) 2 50 Bolt (for idle wheel) 1 51 Screw (for chain cover) 6 52 Screw (for chain cover) 4 53 Screw (for fastener #37) 4 54 Bolt (for sensor holder) 1 55 Steel sleeve (for handlebar) 1 56 Screw (for hand pulse sensor) 2 57 Bolt (for tension control) 1 58 Washer 15 59 Washer 13 60 Wave washer (for T bar) 2 61 Washer (for tension control) 1 62 Washer (for flywheel & idle wheel) 3 63 Washer (for flywheel) 2 64 Hand pulse sensor wire (lower) 1 65 Wire-A 1 66 Wire-B 1 67 Capnut (for front & rear stabilizer) 4 68 Nut (for flywheel) 2 69 Nut (for idle wheel) 1 70 Steel sleeve (for idle wheel) 1 71 Belt adjustor (set) 2 72 Screwdriver 1 73 Allen key wrench 1 74 Bolt (for computer) 4 75 End cap for front post 1 - 12 - Training Pulse Rate GB The owner’s manual is only for the customer reference. - 13 -