1
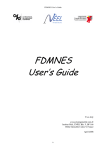
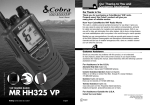
 ROUND SERIES
USER MANUAL
WARNING
CHILDREN HAVE DROWNED IN PORTABLE SWIMMING POOLS.
ENSURE ACTIVE ADULT SUPERVISION AT ALL TIMES.
DO NOT LEAVE CHILDREN UNSUPERVISED IN OR AROUND THE POOL
– KEEP THEM WITHIN ARMS’ REACH.
POOL FENCING LAWS APPLY TO THIS POOL.
CONSULT YOUR LOCAL GOVERNMENT AUTHORITY FOR FENCING
REQUIREMENTS
USE ONLY UNDER
COMPLETE SUPERVISION
NO DIVING
NO JUMPING
NO UNEVEN OR
SLOPING GROUND
READ USER MANUAL CAREFULLY BEFORE USE
•
FOR HEALTH REASONS, PURIFY WATER AND EMPTY WATER FREQUENTLY.
•
WHEN NOT IN USE STORE SAFELY IN DRY CONDITION OUT OF SUNLIGHT.
•
KEEP AWAY FROM FIRE AND FLAME.
•
USE ONLY IN AREAS FREE FROM OBSTRUCTION AND SHARP OBJECTS.
•
NEVER PLACE POOL IN ANOTHER BODY OF WATER.
•
POOL MAY BE SLIPPERY, WHICH CAN CAUSE FALLS.
•
DO NOT FILL THE POOL WITH WATER SURPASS THE WATER LINE.
•
FOLLOW ALL SAFETY RULES TO AVOID BROKEN BONES, DROWNING,
SUFFOCATION OR OTHER SERIOUS INJURIES.
•
LOCK SPA COVER AFTER EACH USE.
•
HOT WATER IN CONJUNCTION WITH ALCOHOL, DRUGS OR MEDICATION CAN
CAUSE UNCONSCIOUSNESS. IMMEDIATELY LEAVE SPA IF FEELING
UNCOMFORTABLE OR SLEEPY.
•
DURING PREGNANCY, SOAKING IN HOT WATER MAY CAUSE DAMAGE TO THE
FOETUS. LIMIT USE TO 10 MINUTES AT A TIME.
INFLATABLE SPA
N-IS-RS-4P
220-240V~ 50Hz 1600W 7A
IPX5
SAA090860EA
RATED CURRENT
7A (HEATING + AIR BLOWER + FILTER CIRCULATION)
FOR HEATING: 4.5A
FOR AIR BLOWER: 2.5A
RATED POWER INPUT
FOR HEATING: 1000W
FOR AIR BLOWER: 600W
Maximum water temperature: 40OC (104OF)
The Air Blower will stop automatically after 30minutes of operation.
Continuous Filter Circulation should not exceed a maximum of 48 hours.
Continuous Heating operation should not exceed a maximum of 48 hours.
Made In China
Nobäl - Best Choice Imports Pty Ltd
Shanghai Qinxu Plastic Co. Ltd.
PH050017
WARNINGS
WARNING: RISK OF ELECTRIC SHOCK. Insert the plug only to a properly grounded socket.
WARNING: This product is provided with a ground-fault circuit-interrupter (integrated in the power plug). The GFCI
must be tested before each use. With the product operating open the service door. When the products stops
operating, this merely indicates that the door is equipped with an electrical interlock. Next push the test button on the
GFCI and close the service door. The product should not operate. Now open the service door, push the reset button
on the GFCI and close the service door. The product should now operate normally. When the product fails to operate
in this manner, there is a ground current flowing indicating the possibility of an electric shock. Disconnect the power
until the fault has been identified and corrected.
WARNING: To reduce the risk of electric shock, do not use extension cord to connect unit to electric supply; provide
a properly located receptacle.
WARNING: No part of the appliance is to be located above the spa pool during use.
DANGER: Risk of injury. The suction fittings in this spa are sized to match the specific water flow created by the
pump. Should the need arise to replace the suction fittings or the pump, be sure that the flow rates are compatible.
WARNING: Never operate spa if the suction fittings are broken or missing. Never replace a suction fitting with one
rated less than the flow rate marked on the original suction fitting.
WARNING: The outlet of Spa must not be connected to any tap or fitting other than those specified.
WARNING: TO AVOID THE ELECTRIC SHOCK, DO NOT USE THE SPA WHEN IT IS RAINING.
WARNING: To reduce the risk of injury, do not permit children to use this product unless they are closely supervised
at all times.
WARNING: Water attracts children. Always have the Spa locked with its cover after each use.
WARNING: Do not overexert, press down or uplift the control panel device. Do not put anything heavy on control
panel device after installation.
WARNING: Pets should be kept away from spa to avoid damage.
WARNING: The cover of Spa must be open, when the air blower function is in the on mode & functioning.
WARNING: Do not switch on the spa if there is any possibility that the water in the spa is frozen.
WARNING: Use only approved accessories. Use of non-approved accessories could void the warranty.
DANGER: Risk of Accidental Drowning. Extreme caution must be exercised to prevent unauthorized access by
children. To avoid accidents, ensure that children cannot use this spa unless they are supervised at all times.
DANGER: RISK OF ELECTRIC SHOCK. Never operate any electrical appliance when you are in the spa or when
your body is wet. Never place any electric appliance, such as a light, telephone, radio or television, within 5 feet (1.5
m) of a spa.
WARNING: During pregnancy, soaking in hot water may cause damage to the fetus. Limit use to
10 minutes at a time.
DANGER: TO REDUCE THE RISK OF INJURY:
A. Replace damage cord immediately.
B. Do not bury cord.
C. Connect to a grounded, grounding type receptacle only.
D. The use of alcohol, drugs or medication before or during spa use may lead to unconsciousness with the possibility
of drowning.
E. Obese persons and persons with a history of heart disease, low or high blood pressure, circulatory system
problems, or diabetes should consult a physician before use of a spa.
F. Persons using medication should consult a physician before using a spa since some medication may induce
drowsiness while other medication may affect heart rate, blood pressure and circulation.
WARNING: TO REDUCE THE RISK OF INJURY:
A. The water in a spa should never exceed 40ºC (104ºF). Water temperature between 38ºC
(100ºF) and 40ºC (104ºF) are considered safe for a healthy adult. Lower water temperatures are recommended for
young children and when spa use exceeds 10 minutes.
B. Since excessive water temperatures have a high potential for causing fetal damage during early months of
pregnancy, pregnant or possibly pregnant women should limit spa water temperatures 38ºC (100ºF).
C. Before entering a spa, the user should measure the water temperature with an accurate thermometer since the
tolerance of water temperature regulating devices varies.
WARNING: TO REDUCE THE RISK OF INJURY: Never pour water which is higher than 40ºC
(104ºF) into the spa pool directly.
WARNING: HYPERTHERMIA WARNING!
The use of alcohol, drugs or medication can greatly increase the risk of fatal hyperthermia.
Hyperthermia occurs when the internal temperature of the body reaches a level several degrees above the normal
body temperature of 37ºC (98.6ºF). The symptoms of hyperthermia include an increase in the internal temperature of
the body, dizziness, lethargy, drowsiness and fainting. The effects of hyperthermia include failure to perceive heat;
failure to recognize the need to exit the spa; unawareness of impending hazard; fetal damage in pregnant women;
physical inability to exit the spa and unconsciousness resulting in the danger of drowning.
WARNING: People with infectious diseases should not use a spa.
WARNING: Do not use a spa immediately following strenuous exercise.
WARNING: Prolonged immersion in a spa may be injurious to your health.
CAUTION: Maintain water chemistry in accordance with manufacturer’s instruction.
CAUTION: Do not use the spa alone.
CAUTION: Always enter and exit the spa slowly and cautiously. Wet surfaces are slippery.
CAUTION: To avoid damage to the pump, the spa must never be operated unless the spa is filled with water.
CAUTION: Immediately leave spa if uncomfortable or sleepy.
CAUTION: Never add water to chemicals. Always add chemicals to water to avoid strong fumes
or violent reactions that may result in hazardous chemical spray.
INSTALLATION
CAUTION: Place only on surface that INSTALLATION
canINSTALLATION
withstand the floor loading
requirements of your spa.
INSTRUCTION
INSTRUCTION
INSTALLATION INS
PACKAGE
Verify
all parts
are present.CONTENTS: Verify that all parts are
PACKAGE
thatthat
all parts
are
present.
PACKAGE CONTENTS:
CONTENTS: Verify
PACKAGE CONTENTS: Verify that all parts are pr
INSTALLATION INSTRUCTION
PACKAGE
CONTENTS: Verify that all
parts
are
present.
Spa
Spa
Cover
SpaPool
Pool
Spa
Cover
Spa Pool
ALLATION INSTRUCTION
Spa Cover
Spa
Pool
Inflation
Inflation
Spa Pool
Hose Hose
Cover
Filter
Filter Spa
Spa Cover
Cartridge(2)
Cartridge(2)
Inflation Lid
Ground Sheet
ATION INSTRUCTION
all parts are present.
parts are present.
ver
t
Inflation
Inflation
Hose
Hose
Filter
FilterCartridge
Cartridge
Inflation Hose
Cover
Cover
Cover
Cover
Cover Lock
LockLock
SITE
SITEREQUIRMENTS:
REQUIRMENTS:
Filter
Filter
Cartridge(2)
Filter
Cartridge
Cartridge(2)
Filter
Cartridge
Repair
Cover
Repair
Kit Kit
Cover
Filter Cartridge
Filter Cover
Cartridge
Cover
Cover
Lock Lock
Storage Bag
Repair
Repair
KitKit
Repair Kit
Co
Lo
SITE REQUIRMENTS:
REQUIRMENTS:
SITE
WARNING: The
capable
of support
WARNING:
The floor
floorhas
hastotobebe
capable
of sup
bathers).
The
weight
filled
is 1800
lbs.
WARNING:
floorhas
hastoto
capable
ofbathers).
supporting
theSpa’s
total total
expected
load
(filled
plus
WARNING: The
The floor
bebe
capable
of supporting
the The
total
expected
load
(filled
spa
plus
Spa’s
total
weight
filled
isspa
1800
lbs.
bathers).
totalweight
weight
filled
is 1800
bathers).The
The Spa’s
Spa’s total
filled
is 1800
lbs. lbs.
WARNING: An
system
hashas
to be
WARNING:
An adequate
adequatedrainage
drainage
system
to
WARNING:
adequatedrainage
drainage
system
be provided
deal
with overflow
water.
WARNING: An
An adequate
system
has has
to beto
provided
to dealto
with
overflow
water.
IMPORTANT: Because of the combined weight of
IMPORTANT: Because of the combined weigh
important that the base where the spa is installed is
important
that
the
base
where
theit time
spa
is
IMPORTANT:
Becauseofofthe
the
combined
weight
the
spa,
water
and
is extremely
IMPORTANT: Because
combined
weight
of theofspa,
water
and
users;
it users;
isentire
extremely
supporting
this
weight
for
the
theinstalled
spa is
supporting
this
weight
for
the
entire
time
the
spa
important
basewhere
where
is installed
is
smooth,
flat,
level
and
capable
of
uniformly
importantthat
that the
the base
thethe
spaspa
is installed
is
smooth,
flat,
level
and
capable
of
uniformly
which does not meet these requirements, any
dama
which
not
these
requirements,
anytoda
supporting
weightfor
for
the
entire
time
the
spa
isdoes
installed.
Ifresponsibility
the
spa ison
placed
a owner
surface,
supporting
this
weight
the
entire
time
the plus
spa
is
installed.
the
spa
is placed
a surface,
of supporting
the totalthis
expected
load
(filled
spa
warranty.
It Ifis
themeet
of
theon
spa
a
warranty.
Itcaused
is
the
responsibility
of
the
spa
owner
t
which
does
not
meet
these
requirements,
any
damage
by
improper
support
will
void
the
which
does
not
meet
these
requirements,
any
damage
caused
by
improper
support
will
void
the
800
lbs.
able of supporting the total expected load (filled spa plus
warranty.
responsibility
owner
to assure
the integrity
of at
the
at all times.
warranty.ItIt is
is the
the responsibility
of of
thethe
spaspa
owner
to assure
the integrity
of the site
allsite
times.
is 1800 lbs.
INDOOR INSTALLATION:
m has to be provided to deal with overflow water.
INDOOR INSTALLATION:
Be aware of special requirements if you install the sp
INDOOR
INSTALLATION:
INDOOR
INSTALLATION:
stem has to be
provided
to deal with overflow water. Be aware of special requirements if you install the
weight of the spa, water and users; it is extremely
The
floor
must be able to withstand the capacity
BeBeaware
of
requirements
if you
install
the
spa
indoors.
aware
of special
specialand
requirements
install
the1.
spa
indoors.
nstalled is smooth,
flat,
level
capableif you
of
uniformly
level
surface.
ined
weight
of the spa,
water
and
users;
extremely
1.
The
floor must be able to withstand the capa
the spa
is installed.
If the
spa is
placed
onit aissurface,
level
surface.
aany
is installed
is
smooth,
flat,
level
and
capable
of
uniformly
damage1.caused
bymust
improper
support
will the
void
the
beable
able
withstand
the
capacity
theThe
spa.
The
floorbe
should
be a non-slip,
1.The
Thefloor
floor
must
be
toto
withstand
capacity
of theofspa.
floor
should
a non-slip,
2. Proper drainage is essential for indoor spa installat
ime
thetospa
is
installed.
If theofspa
placed
a surface,
owner
assure
the
integrity
theis
site
at all on
times.
level
surface.
level
surface.
SITE REQUIREMENTS
WARNING: The floor has to be capable of supporting the total expected load (filled spa plus bathers). The Spa’s total
weight filled is 1800 lbs.
moisture
on exposed wood, paper, etc. in the proposed location. To minimize these effects it is
WARNING: An adequate drainage system has to be provided to deal with overflow water.
best to provide plenty of ventilation to the selected area. An architect can help determine if more
ventilation
is needed.
IMPORTANT:
Because of the combined weight of the spa, water and users; it is extremely important that the base
where the spa is installed is smooth, flat, level and capable of uniformly supporting this weight for the entire time the
spaDo
is installed.
If the
placed
on aorsurface,
which does
notcan
meetbe
these
requirements,
any damage caused by
NOTE:
not install
thespa
spaison
carpet
other material
that
damaged
by moisture.
improper support will void the warranty. It is the responsibility of the spa owner to assure the integrity of the site at all
times.
OUTDOOR INSTALLATION:
INDOOR
INSTALLATION
No matter
where
you install the spa, it is important you have a solid support foundation which
Be aware
of special
supports
the filled
spa. requirements if you install the spa indoors.
1. The floor must be able to withstand the capacity of the spa. The floor should be a non-slip, level surface.
2. Proper drainage is essential for indoor spa installation. When building a new room for the spa it is recommended
1. If you
installing
the spa outdoors, ensure there are no sharp objects that could damage it
that are
a floor
drain is installed.
3. Humidity
is a natural
side
with spa
and that
the location
is level
soeffect
the spa
sits installation.
stably andDetermine
properly.the effects of airborne moisture on exposed wood,
paper, etc. in the proposed location. To minimize these effects it is best to provide plenty of ventilation to the selected
area. An architect can help determine if more ventilation is needed.
2. During filling, emptying or when in use, water may spill out of the spa. Therefore the spa
should
be installed
near the
a ground
drain.or other material that can be damaged by moisture.
NOTE:
Do not install
spa on carpet
OUTDOOR INSTALLATION
GFCINo
TEST:
matter where you install the spa, it is important you have a solid support foundation, which supports the filled spa.
1. If you are installing the spa outdoors, ensure there are no sharp objects that could damage it and that the location
is level so the spa sits stably and properly.
WARNING:
Insert
GFCI or
plug
into
a properly
grounded
receptacle
2. During
filling,the
emptying
when
in use,
water may
spill out power
of the spa.
Thereforeonly.
the spa should be installed near a
ground drain.
WARNING: Before inserting the plug into a power receptacle, make sure the current rate of the
powerGFCI
receptacle
and the fixed wiring are suitable for the spa. Contact a qualified electrician if
TEST
you can
not verify.
WARNING:
Insert the GFCI plug into a properly grounded power receptacle only.
WARNING: Before inserting the plug into a power receptacle, make sure the current rate of the
power1.receptacle
and into
the fixed
wiring
are suitable
for the light
spa. Contact
qualified
Plug GFCI
power
outlet,
the indicator
should aturn
on. electrician if
you can
verify.
2. not
Press
TEST button, the indicator light should turn off.
1. Plug GFCI into power outlet, the indicator light should turn on.
3. Press
RESET
again
for use.
2. Press
TEST button,
thebutton
indicator
light should
turn off.
3. Press RESET button again for use.
WARNING: Do not use the spa if the above test fails.
WARNING: Do not use the spa if the above test fails.
1
2
3
6
ASSEMBLY:
1. Remove the spa from the packaging. Verify that all parts are present. Unfold and spread out
ASSEMBLY
the spa
pool the
andspacover.
Make
sureVerify
boththat
areallright
side
up. Unfold and spread out the spa pool and
1. Remove
from the
packaging.
parts are
present.
cover. Make sure both are right side up.
aging. Verify that all parts are present. Unfold and spread out
e both are right side up.
1
2. Open the air outlet on the spa located next to the Control Panel. Screw one end of th
hose Verify
ontothat
it. all parts are present. Unfold and spread out
ove the spa from the packaging.
1
pool and cover. Make sure
both
are
right
3. Open theside
airup.
valve on the spa wall. Connect the other end of the inflation hose into th
MBLY:
2. Open the air outlet on the spa located next to the Control Panel. Screw one end of the inflation
2. Open the air outlet on the spa located next to the Control Panel. Screw one end of the inflation hose onto it.
hose onto it.
3. Open the air valve on the spa wall. Connect the other end of the inflation hose into the valve.
1
ocated next to the Control Panel. Screw one end of the inflation
2
wall. Connect the other end of the
2 inflation hose into the valve.
3
3
1
4. As previously outlined under the GFCI Test section, test the spa’s GFCI plug.
3. Open the air valve on the spa wall. Connect the other end of the inflation hose into the valve.
4. spa
As previously
under
the Screw
GFCI one
Testend
section,
test the spa’s GFCI plug.
the air outlet on the
located next outlined
to the Control
Panel.
of the inflation
to it.
the air valve on the spa wall. Connect the other end of the inflation hose into the valve.
2
3
3
eviously
outlined
Test
section,
testGFCI
theGFCI
spa’s
GFCI
plug.test the spa’s GFCI plug.
e GFCI
Testunder
section,
test
the
spa’s
plug.
4.the
As GFCI
previously
outlined
under
the
Test
section,
7
7
properly inflated, press the “BUBBLE” button to shut off the bubble function.
5
5. Inflate the spa pool by pressing the “AIR BLOWER” button on the control panel. When the spa is properly inflated,
press the “AIR BLOWER” button to shut off the air blower function.
ATTENTION: Do not over inflate the spa pool.
NOTE: If you need to add additional
5 air to the spa pool after it has been fi
must first turn on the bubble function for 2-3 minutes by pressing the “BUB
ATTENTION:
Do not overininflate
the 2-5
spa pool.
follow
instructions
steps
above accordingly.
NOTE: If you need to add additional air to the spa pool after it has been filled with water, you
first turn on
theinflation
bubble function
for from
2-3 minutes
by pressing
6.must
Remove
the
hose
the air
valve the
on“BUBBLE”
the spabutton.
wall Then
and
follow instructions in steps 2-5 above accordingly.
replac
Do
not overfrom
inflate
the spa
pool.
Remove theATTENTION:
inflation
hose
the
air
valve on
spaoutlet
wall andand
replace
the valvethe
cap outlet
tightly. cap
7.6. Remove
the
inflation
hose
from
thetheair
replace
NOTE: If you need to add additional air to the spa pool after it has been filled with water, you must first turn on the
AIR BLOWER function for 2-3 minutes by pressing the “AIR BLOWER” button. Then follow instructions in steps 2-5
accordingly.
7. Remove theabove
inflation
hose from the air outlet and replace the outlet cap tightly.
8a. Place the filter cartridge cover on the filter cartridge. 8b. Screw the
6. Remove the inflation hose from the air valve on the spa wall and replace the valve cap tightly.
8a. Place
the on
filterthe
cartridge
filter cartridge.
8b. Screw the filter cartridge onto the
water
inlet
spacover
wallon
bytheturning
it clockwise.
water inlet on 7.the
spa wall by turning it clockwise.
Remove the inflation hose from the air outlet and replace the outlet cap tightly.
8. Place the filter cartridge cover on the filter cartridge. Then screw the filter cartridge onto the water inlet on the spa
wall by turning it clockwise.
8a
8b
9. Using a garden 8a
hose, fill the spa with water to the water level fill line printed on the spa wall.
9. Using a garden hose, fill the spa with water to the water level fill line printed on the spa wall.
8b is not a safety
10. Place the cover onto the spa and fasten the zipper. WARNING: This cover
cover and is not a replacement for adult supervision.
8 pr
9. Using a garden hose, fill the spa with water to the water level fill line
9
10
10. Place the cover onto the spa and fasten the zipper. WARNING: This
nstall
coverand
lock.is
The
combination
lock is factory
preset
to open
at 0-0-0. If you want to
cover
not
a replacement
for
adult
supervision.
ge the combination, push and hold the button down, then advance each number to the
ed combination. Once a new combination is chosen, insert the lock wire and release button.
GER: Risk of Accidental Drowning. Always leave the cover locked and in place when
10. Place the cover onto the spa and fasten the zipper.
9
10
WARNING: This cover is not a safety cover and is not a replacement for adult supervision.
11. Install cover lock. The combination lock is factory preset to open at 0-0-0. If you want to change the combination,
push and hold the button down, then advance each number to the desired combination. Once a new combination is
chosen, insert the lock wire and release button.
mbination lock is factory preset to open at 0-0-0. If you want to
DANGER: Risk
of Accidental
Always
leavenumber
the cover locked
and in place when the spa is not in
h and hold the button
down,
then Drowning.
advance
each
to the
use. Extreme caution must be exercised to prevent unauthorized access by children. To avoid accidents,
ew combination ensure
is chosen,
insert
the
wire
and
button.
that children
cannot
uselock
this spa
unless
theyrelease
are supervised
at all times.
Drowning. Always leave the cover locked and in place when
e caution mustOPERATION
be exercised to prevent unauthorized access
nts, ensure that children cannot use this spa unless they are
Before operating the spa, you must ensure the water level in
the spa is at the water level fill line printed on the spa wall.
Never dry-run the power pack as such type of operation will
void the warranty.
CONTROL PANEL FUNCTIONS:
1. “AIR BLOWER”
Activates air jet system. Press this button to activate the air
jet system which has a 30-minute auto shut off for 10 minutes
feature.
must ensure the water level in the spa is at the water level fill line
r dry-run the power pack as such type of operation will void the
NS:
air jet system.
er system.
2.“CIRCULATE & FILTER”
Activates filter system. This button turns the filter pump on and off. The light of the water filtration button
displays green when the filtration system is activated.
3.“HEAT”
Activates heating and filtering system at the same time. Use this button to activate the heating system. The heater
does not stop heating the spa until the current water temperature reaches the set temperature. After the current
water temperature drops 2°C below the set point temperature, the heating system will restart. When the light of the
heat button displays green, the heating system is activated. Heating system is capable of increasing approximately
1.0°C (2.0°F) per hour. When the heating system is activated the filtration system will automatically start. This is
normal.
4.“TEMP”
heating and filtering
system
Sets and displays set temperature.
5.“ ▲ ” button: Higher temperature.
6.“ ▼ ” button: Lower temperature.
Pressing the temperature increase or temperature decrease buttons will cause the LED to flash. When it is flashing,
you can enter the desired temperature setting. If you hold these buttons down the values will rapidly increase or
decrease. The new and desired temperature setting will remain on the LED display for 5 seconds to confirm the new
value.
plays set temperature.
ture.
ure.
7. LED Display: Once powered-up, the LED displays the current water temperature automatically.
NOTE:
1. The set point temperature defaults to 40°C (104°F).
2. Temperature adjustment ranges from 20°C (68°F) to 40°C (104°F).
3. After turning off the heating system the filtration system will turn off. This is normal. But if you press the “FILTER”
on before pressing “HEATER” on, by pressing the “HEATER” button once, you can switch off heating function only.
-up, the LED displays the
matically.
CONTROL PANEL
9
MAINTENANCE
Maintaining Water:
1. Clean your filter cartridge (see below instructions) at least once a week or more often if necessary. The filter
cartridge media eventually wears out and reduces its function. Replace the filter cartridge at least every 6 months to
maintain water clarity.
resulting
fromrequire
improper
water
chemistrypool
or imbalance
not covered
by thethewarranty.
dealer
2. All spas
the use
of appropriate
chemicals toisbalance
and sanitize
spa water.Your
We recommend
the
canuse
supply
youOrganic
with kits
of these
products.
of Nobal
Water
Treatment
System or Bromine Tablets. Please consult your local pool supply retailer for
more information about the chemical maintenance of your spa. It is very important to follow the chemical
manufacturer’s
Spa damage
resulting
from misuse
of chemicals
andthe
mismanagement
of spa water is not
Water
sanitation instructions.
is the responsibility
of the
spa owner,
achieved
through
regular and periodic
covered
by
the
warranty.
Drain,
clean
and
refill
your
spa
at
least
every
three
months.
Chlorine
and
Chlorine
based
(daily, if necessary) addition of an approved sanitizer. The sanitizer will chemically control the
products are not to be used in the spa.
bacteria and viruses present in the fill water or introduced during use of the spa.
Water Chemistry:
Cleaning
the filter cartridge:
Purchase
Nobal
Organic
chemicals,
clarifier,
sanitizer,
and testtostrips
from
your dealer. It is
1. Unplug
the
GFCI
powerWater
cordTreatment
from the System
electrical
receptacle
before
attempting
clean
filter.
essential
that
your
spa’s
water
chemistry
be
maintained
as
follows:
pH
between
7.4
and
7.6,
Total
Alkalinity
between
2. Unscrew the filter cartridge by turning counterclockwise.
80 and 120 ppm. An EPA listed sanitizer is also required: Maintain bromine at 4 to 6 ppm using brominating tablets in
3. Remove
the
filter
cartridge
cover.
a floating dispenser, or use an EPA listed alternative liquid sanitizing system. Test your water chemistry before each
use of the spa, but no less than once per week, and adjust as necessary. Low PH will cause damage to the spa and
pump. Any damages resulting from improper water chemistry or imbalance is not covered by the warranty. Your
of the spa owner, achieved
through the regular and periodic (daily, if necessary) addition of an approved sanitizer. The sanitizer will chemically
control
the bacteria
and viruses
present
in the
fill water
or introduced
during
use of the spa.
Water
sanitation
is the responsibility
of the
spa owner,
achieved
through
the regular and
periodic
resulting from improper water chemistry or imbalance is not covered by the warranty. Your dealer
dealer can supply you with kits of these products. Water sanitation is the responsibility
can supply you with kits of these products.
(daily, if necessary) addition of an approved sanitizer. The sanitizer will chemically control the
bacteria and viruses present in the fill water or introduced during use of the spa.
Cleaning
The
Filterby
Cartridge:
water chemistry or imbalance
is not
covered
the warranty. Your dealer
Cleaning
the filter
cartridge:
1. Unplug
the GFCI
power cord from the electrical receptacle before attempting to clean filter.
1. Unplug the GFCI power cord from the electrical receptacle before attempting to clean filter.
of these products.
Unscrew
cartridge
by counterclockwise.
turning counterclockwise.
2.2.Unscrew
the the
filterfilter
cartridge
by turning
Remove
cartridge
3.3.Remove
the the
filterfilter
cartridge
cover. cover.
esponsibility of the spa owner, achieved through the regular and periodic
dition of an approved sanitizer. The sanitizer will chemically control the
esent in the fill water or introduced during use of the spa.
tridge:
2
3
wer cord from the electrical receptacle before attempting to clean filter.
tridge by turning counterclockwise.
4. The filter cartridge can be rinsed off with a garden hose and reused. However, if the filter
tridge cover.
cartridge remains soiled and discolored the filter cartridge should be replaced.
5. Replace the filter cartridge cover on the filter cartridge. Then screw the filter cartridge onto the
2
3
water
inletfilter
on cartridge
the spa can
wallbebyrinsed
turning
it clockwise.
4. The
off with
a garden hose and reused. However, if the filter cartridge remains soiled
4.and
Thediscolored
filter cartridge
canfilter
be rinsed
off with
a garden
and reused. However, if the filter
the
cartridge
should
behose
replaced.
cartridge remains soiled and discolored the filter cartridge should be replaced.
5. Replace the filter cartridge cover on the filter cartridge. Then screw the filter cartridge onto the
water inlet on the spa wall by turning it clockwise.
2
3
n be rinsed off with a garden hose and reused. However, if the filter
d and discolored the filter cartridge should be replaced.
4 filter cartridge onto the
5
tridge cover on the filter cartridge. Then screw
the
4
5
all by turning it clockwise.5. Replace the filter cartridge cover on the filter cartridge. Then screw the filter cartridge onto the water inlet on the
6.spa
Plug
the GFCI
power
cord back into the power outlet, the indicator light should turn on.
wall
turning
it clockwise.
6. Plug
thebyGFCI
power
cord back into the power outlet, the indicator light should turn on.
Perform the GFCI Test and reset the desired temperature set point.
Perform the GFCI Test and reset the desired temperature set point.
11
11
5
er cord back into the power outlet, the indicator light should turn on.
and reset the desired temperature set point.
11
NOTE: The filter
cartridge media eventually wears out and reduces its function. Replace the filter
6. Plug the GFCI power cord back into the power outlet, the indicator light should turn on. Perform the GFCI Test and
cartridge at least
every
months set
to point.
maintain water clarity.
reset the
desired6temperature
NOTE: The filter cartridge media eventually wears out and reduces its function. Replace the filter
Draining your
Spa:at least every 6 months to maintain water clarity.
cartridge
Spa: cord from the electrical receptacle before attempting to drain the spa.
1. Unplug theDraining
GFCIYour
power
1. Unplug the GFCI power cord from the electrical receptacle before attempting to drain the spa.
2. Open the outlet in the outer wall of the spa, located under the power pack at the floor of the spa,
2. Open
outlet in the the
outer nut.
wall ofScrew
the spa, located
underof
thethe
power
pack at thehose
floor ofon
the to
spa,the
by unscrewing
by unscrewing
andthe
removing
one end
inflation
outlet.
and removing the nut. Screw one end of the inflation hose on to the outlet.
2
3. After the spa’s pool has drained, you must run the air blower function 2-3 minutes to drain the water trapped in the
spa’s air pipeline. Plug the GFCI power cord back into the power outlet, the indicator light should turn on. Perform the
GFCI Test and then press the “AIR BLOWER” button to drain the water trapped in the spa’s air pipeline.
3. After the spa’s pool has drained, you must run the bubble function 2-3 minutes to drain the
Important:
runair
in this
mode until
waterthe
stops
exitingpower
the inflation
hose.
Never
dry-run
power outlet,
pack as the
water trapped
in the Only
spa’s
pipeline.
Plug
GFCI
cord
back
into
the the
power
such type of operation will void the warranty.
indicator light should turn on. Perform the GFCI Test and then press the “BUBBLE” button to
4. Once the above steps are completed, unscrew the inflation hose from the outlet and replace the nut. Ensure the
drain the water
trapped in the spa’s air pipeline. Important: Only run in this mode until water
nut is properly tightened.
stops exiting the inflation hose. Never dry-run the power pack as such type of operation
will void theCleaning
warranty.
your Spa:
Detergent residues and dissolved solids from bathing suits and chemicals will gradually accumulate in the spa’s
and on the liner of the spa. To clean, first drain the spa and then use a mild soap solution to remove any soil or
4. Once the water
above
steps
are rinse
completed,
unscrew
therefilling.
inflation
hose
from
the outlet
and
residues.
After
cleaning,
thoroughly with
water before
Note: do
not use
brushes,
scrub pads
or replace
abrasive
This will damage
your spa’s liner.
the nut. Ensure
the cleaners.
nut is properly
tightened.
Cleaning your Spa:
Detergent residues and dissolved solids from bathing suits and chemicals will gradually
REPAIR
AND
STORAGE
accumulate in
the spa’s
water
and on the liner of the spa. To clean, first drain the spa and then
use a mild soap
solution
to
remove
any soil or residues. After cleaning, rinse thoroughly with
Spa Repair
If
the
spa
is
torn
or
punctured
use
the provided
repair patch.
Dry the
area to
repaired. Apply
the glue in the
water beforeaccessory
refilling.bagNote:
do not use
brushes,
scrub
pads
orbeabrasive
cleaners.
This will
to the repair patch and then attach it onto the damaged area. Smooth the surface to remove any air
damage your
spa’s
liner.
bubbles. A secure unnoticeable repair can usually be made.
REPAIR
Spa Storage
Make sure all water is drained from the spa and control box. This is essential to extend the life of the spa. Remove
AND
STORAGE:
the filter
cartridge. It is recommended you store the spa in the storage bag provided in the box. Store in a warm dry
place.
Spa Repair
Note: Plastic becomes brittle and susceptible to breakage when exposed to subzero temperatures. Freezing can
severely damage the spa. Improper winterization of your spa may void your warranty.
If the spa is torn
or punctured use the provided repair patch. Dry the area to be repaired. Apply
DISPOSAL:
The
marking
indicates
thatto
this
product
shall patch
not be disposed
with the
generalithousehold
waste.
Please contact
your
the glue in the accessory
bag
the
repair
and then
attach
onto the
damaged
area.
local community about collection points or ask your dealer. This product contains valuable materials that can be
Smooth the surface
tocontribute
remove
air bubbles.
A secure unnoticeable repair can usually be
recycled and
to aany
sustainable
environment.
made.
TROUBLE SHOOTING:
The next page highlights some helpful tips to help you to diagnose and rectify some common sources of trouble.
12
The marking indicates that this product shall not be disposed with the general household waste.
Please contact your local community about collection points or ask your dealer. This product
contains valuable materials that can be recycled and contribute to a sustainable environment.
TROUBLE SHOOTING:
Here are some helpful tips to help you to diagnose and rectify some common sources of trouble.
Problem
Power pack
does not
operate
Bubble system
does not
operate
Heating system
does not
operate
Filtering system
does not
operate
Spa leakage
Water not clean
Probable causes
-Power failure
-GFCI tripped
Solutions
-Check power source
-Reset GFCI. Check if the homes fixed wiring is
too thin to afford 1500W
-30 minute auto shut off -Press the bubble button to reactivate.
feature activated
-Air pump is too hot
-Unplug the air pump. After the air pump has
cooled, insert the plug and press the bubble
button to activate.
-Dirty filter cartridge
-Improper water levels
-Temperature set too
low
-Clean or replace the filter cartridge
-Add water to specified levels.
-Set to a higher temperature (20-40°C).
-Dirty filter cartridge
-Clean or replace the filter cartridge
-Spa is torn or
punctured
-Insufficient filtering
time
-Dirty filter cartridge
-Improper water
maintenance
-Use provided repair patch
-Increase filtration time.
-Clean or replace the filter cartridge.
-Refer to the chemical manufacturer’s
instructions.
13
WARRANTY
1.Definitions
"Agreement" means the purchase of the product as governed by the terms and conditions;
"BCI Brands" means Best Choice Imports Pty Ltd trading as BCI Brands;
Address:164 Victoria Street, North Geelong VIC 3215
Phone:1300 985 008
Email:[email protected];
"Customer" includes the purchaser of the product and any User;
"Product" means the Nobal Inflatable Spa and any parts;
"Spa" means the Inflatable Spa purchased by the Customer giving rise to the Agreement.
"User" means any third party that uses the Product with or without the consent of the Customer;
“Nobal” a brand owned by BCI.
2. Conditions of purchase
In purchasing the Product the Customer agrees to enter the Agreement and be bound by the terms and conditions as
set out herein and with in the supplied user manual.
3. Warranty
(a) In relation to the Inflatable Spas that the Customer has purchased from BCI, BCI warrants to the best of its
knowledge (subject to clause 3(k)) that the Spa is free from manufacturing defects and that it will remain free from
defects caused by ordinary usage (within the guidelines provided) throughout the warranty period (as defined in
clause 3(b)).
(b) The warranty applies during the warranty period. The warranty period for the Nobal 4 person, Round Series is 1
year (12 Months) from the date of purchase from BCI.
(c) If the Customer's claim relates to a manufacturing defect the Customer must notify BCI of its claim within 7 days
of the product being assembled. For the purposes of this clause 3, manufacturing defects include, but are not limited
to, matters such as cuts or holes in the Spa shell /pool or control unit not starting, poor quality stitching and missing
or incorrectly sized components.
(d) If the Customer's claim relates to a defect that is not a manufacturing defect the Customer must notify BCI of its
claim within the warranty period and within 7 days of becoming aware of the alleged defect.
(e) Upon receiving a warranty claim BCI may require the Customer to return the Spa or the allegedly defective
component to BCI for examination and/or testing at the Customers expense. All warranty claims must be made with a
proof of purchase. Provided that the Customer complies with any reasonable requests that BCI might make, BCI
undertakes to respond to the Customer's claim within 21 days from the date on which it has all of the evidence that it
reasonably requires.
(f) If the Customer's warranty claim is accepted, BCI may either:
(i) Provide a replacement component(s) or Spa; or
(ii) Repair any defects that are reasonably capable of being repaired; or
(iii) Provide a full refund of the price paid for the Spa.
(g) If any component is repaired or replaced the warranty period in relation to that component will start over from the
date of supply of that component, as defined in clause 3(b).
(h) BCI does not accept responsibility for any costs, losses or damages that the Customer might suffer in making a
warranty claim and in making a warranty claim the Customer agrees unconditionally not to seek to recover any such
sums from BCI.
(i) This warranty is non-transferable. All warranty claims must be made by the person who made the original
purchase of the Spa from BCI.
(j) Nothing in this document is intended to limit any warranty that is implied by law to the extent that any such
limitation would be unlawful. Our goods come with guarantees that cannot be excluded under the Australian
Consumer Law. You are entitled to a replacement or refund for a major failure and compensation for any other
reasonably foreseeable loss or damage. You are also entitled to have the goods repaired or replaced if the goods fail
to be of acceptable quality and the failure does not amount to a major failure.
(k) The warranty set out in clause 3(a) is subject to the following exclusions:
(i) The warranty does not cover any damage that may be caused to the Spa as a result of improper or
incomplete assembly, want of maintenance, other failure to follow instructions or exercise due care
including, but not limited to the assembly, use or supervision of the Product.
(ii) Except where provided in clause 3(b), the warranty does not include or extend to any accessories that
might be purchased in connection with the Spa.
(iii) The warranty does not include or extend to any costs that the Customer may incur in having the Spa or
any of its components repaired or replaced otherwise than by a warranty claim.
(iv) The warranty does not include any alleged defects that are the subject of a warranty claim after the
Spa or any of its components have been replaced with components not supplied by BCI or repaired by a
party other than BCI.
(v) The warranty does not include or extend to any defects that have been caused in whole or in part by the
commercial use of the Spa.
(vii) The warranty does not cover any damage that may be caused to the Spa after being erected or dug
into a hole, decking or other fixture or any costs directly or indirectly incurred in construction of the hole,
decking or other fixture.
(l) The warranty does not include or extend to any indirect loss or damage that may be suffered.
(m) To claim under this warranty please email ([email protected]) with the following information
(i) A brief description of the suspected defect or item being claimed; and
(ii) A close up photo of the suspected defect; and
(iii) A wide shot photo of the entire Spa and control unit; and
(iv) A scanned copy of your purchase receipt or other proof of purchase.
4. Liability
4.1 Limitation of liability
(a) Subject to clause 4.1(b) and to the extent permitted by the Competition and Consumer Act and relevant state
legislation, the sole obligation of BCI under this Agreement is to use its best endeavours to provide the Product or
repair or replace (at BCI’s discretion) any part of the Product which is found to be defective during the warranty
period and in no event shall BCI be liable for any other claims or damages including, but not limited to, claims for
faulty design, negligent or misleading advice, damages arising from loss or use of the products, and any indirect,
special or consequential damages or injury to any person, corporation or other entity.
(b) If any products supplied pursuant to this Agreement are supplied to the Customer as a ‘consumer’ of goods or
services within the meaning of that term in the Competition and Consumer Act as amended or similar state legislation
the consumer will have the benefit of certain non-excludable rights and remedies in respect of the products or
services and nothing in these terms and conditions excludes or restricts or modifies any condition, warranty, right or
remedy which pursuant to the Competition and Consumer Act or similar legislation is so conferred. However, if the
product is a product not ordinarily acquired for personal, domestic or household use or consumption pursuant to s
68A of the Competition and Consumer Act and similar provisions of relevant state legislation, BCI limits its liability to
payment of an amount equal to the lowest of:
(i) the cost of replacing the goods;
(ii) the cost of repair of the goods;
(iii) the cost of having the goods repaired or replaced.
(c) Subject to clause 4.1 (b) BCI is not be liable for default or failure in performance of its obligations pursuant to this
Agreement resulting directly or indirectly from acts of God, civil or military authority, acts of public enemy, war,
accidents, fires, explosions, earthquakes, floods, the elements, strikes, labour disputes, shortage of suitable parts,
components, materials including ink, chemicals and paper, labour or transportation or any other cause beyond the
reasonable control of BCI.
(d) Subject to clause 4.1 (b), BCI is not responsible for any loss, injury or damage caused by an error or defect in the
products or errors or faults caused by alteration, modification, misuse, neglect and unauthorised repair supplied by
any person, or in the event that the Customer uses the Product in a manner inconsistent with the safety instructions
as set out in these terms and conditions.
4.2 Exclusion of negligence
BCI is not liable to the Customer in contract or in tort arising out of, or in connection with, or relating to:
(a) the performance of the Product or any breach of these terms and conditions; or
(b) any fact, matter or thing relating to the Product; or
(c) any error (whether negligent or in breach of contract or not) in information supplied to the Customer or a User
before or after the date of the Customer’s or User’s use of the Product.
5. Waiver
5.1 Indemnity
(a) The Customer waives on a continuing basis any rights against BCI for any liability, loss, expense or demand for or
arising from any false, misleading, deceptive or misdescriptive representation or statement made by BCI in respect of
the products to any person. This waiver survives termination of this agreement by either party for any reason.
(b) The Customer waives any rights against BCI for any losses, damages, claims, demands, suits, actions,
proceedings, orders or judgments whatsoever arising out of or in respect to the supply of the Product by BCI to the
Customer and BCI is not liable for any loss arising in the course of its conduct as supplier of the Product to the
Customer including without limiting the generality of the foregoing in respect of:
(i) any breach of any conditions or warranty given by BCI expressly or by operation of any statute in respect of the
Product;
(ii) BCI being deemed ‘manufacturer’ of the products by operation of the Competition and Consumer Act;
6. Safety Instructions
6.1 Prior to use
(a) Prior to use a safety check should be undertaken of the Spa and all surrounding areas to ensure the Spa and its
component parts are in good repair and properly fitted, there are no overhead obstructions, there is nothing
underneath the Spa, and that the areas surrounding the Spa are free of any hazards;
(b) Remove any debris from the ground below the Spa prior to use;
(c) Heavy or unsuitable footwear / clothing including but not limited to boots or heeled shoes should be removed prior
to use;
(d) Loose articles including but not limited to jewellery, spectacles, and items in pockets should be removed prior to
use;
(e) Do not use the Spa when tired;
(f) Do not use the Spa when injured;
(g) Do not use the Spa in wet and/or windy conditions;
(h) Do not use the Spa whilst under the influence of drugs or alcohol;
6.2 During use
(a) Do Not over fill or try to fit more than the recommended number and size of occupants in the Spa;
(b) Do not allow any bystanders to sit on or lean against the Spa whilst in use;
(c) Any child using the Spa should be under supervision from an adult or mature person;
6.3 After use
(a) Do not dismount the Spa by rolling out of it or squashing the sides;
(b) Secure the Spa from unauthorised or unsupervised use.
(c) Drain the water from the Spa and pack the Spa away when not in use.
164 Victoria Street, North Geelong VIC 3215
Phone:
1300 985 008
Email:
[email protected]
|
[email protected]
BCI Brands - Nobäl
a. 164 Victoria Street
North Geelong
Victoria 3215
Australia
p. +61 1300 985 008