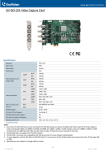
1
New Feature Guide V8.5.7.0 FGV8570-A © 2013 GeoVision, Inc. All rights reserved. Under the copyright laws, this manual may not be copied, in whole or in part, without the written consent of GeoVision. Every effort has been made to ensure that the information in this manual is accurate. GeoVision, Inc. makes no expressed or implied warranty of any kind and assumes no responsibility for errors or omissions. No liability is assumed for incidental or consequential damages arising from the use of the information or products contained herein. Features and specifications are subject to change without notice. GeoVision, Inc. 9F, No. 246, Sec. 1, Neihu Rd., Neihu District, Taipei, Taiwan Tel: +886-2-8797-8377 Fax: +886-2-8797-8335 http://www.geovision.com.tw Trademarks used in this manual: GeoVision, the GeoVision logo and GV series products are trademarks of GeoVision, Inc. Windows and Windows XP are registered trademarks of Microsoft Corporation. May 2013 Feature Guide V8.5.7 Feature Guide for V8.5.7 GeoVision Surveillance System This Guide provides an overview of key features in V8.5.7 GV-System. It also includes information about how the features differ from similar features in earlier versions. Cards Supported V8.5.7 only supports the following GV video capture cards: GV-600(S) V3.20 and later GV-600A, GV-600B GV-650(S) V3.30 and later GV-800(S) V3.30 and later GV-804A V3.10 and later GV-650A, GV-650B GV-800A, GV-800B GV-900A GV-1120, GV-1120A, GV-1120B GV-1240, GV-1240A, GV-1240B GV-1480, GV-1480A, GV-1480B GV-3008 GV-4008, GV-4008A GV-5016 GV-SDI-204 Note that GV-600 (V4), GV-650 (V4) and GV-800 (V4) and GV-804 (V4) Cards are renamed to GV-600A, GV-650A, GV-800A and GV-804A. These V4 and A Cards are the same video capture cards. i Contents Cards Supported .......................................................................i Contents ....................................................................................ii 1. 2. 3. 4. 5. 6. New Supports and Specifications.......................................................................1 1.1 Support for Windows 8 and Windows Server 2012 .......................................1 1.2 Support for New IP Devices...........................................................................2 Main System .........................................................................................................4 2.1 Advanced PIP Function for Fisheye Single View...........................................4 2.2 Digital PTZ for Cameras without Physical PTZ Functions .............................7 2.3 Maximum Recording Frame Rate upon I/O Trigger.......................................9 2.4 Dual Streaming through ONVIF Protocol.....................................................10 2.5 Extended System Idle Protection Time........................................................12 2.6 Frame Rate Setting for GV-SD200 ..............................................................13 2.7 Network Failure Detection ...........................................................................14 ViewLog...............................................................................................................15 3.1 Support for GV-Device Server in Remote ViewLog Service ........................15 3.2 PIP Mode When Video Resolution Exceeds ViewLog Panel.......................16 WebCam Server..................................................................................................17 4.1 Support for Multi Windows on Chrome, Safari and FireFox ........................17 4.2 Enhancing Live View Quality on Mobile Devices .........................................19 Center V2 ............................................................................................................20 5.1 Notifying with Pre-Event and Post-Event Recordings..................................20 5.2 Scheduling Event Notifications ....................................................................24 Vital Sign Monitor ...............................................................................................27 6.1 ii Scheduling Event Notifications ....................................................................27 Feature Guide V8.5.7 1. New Supports and Specifications 1.1 Support for Windows 8 and Windows Server 2012 Starting from V8.5.7.0, GV-NVR System, the following GV-Video Capture Cards and remote applications now supports 32 and 64-bit Windows 8 operating system and 64-bit Windows Server 2012 operating systems. GV-Video Capture Cards GV-600A, GV-600B GV-1120A, GV-1120B GV-650A, GV-650B GV-800A, GV-800B GV-900A GV-1240A, GV-1240B GV-1480A, GV-1480B GV-3008 GV-4008, GV-4008A GV-5016 GV-SDI-204 Remote Applications GV-Vital Sign Monitor GV-Center V2 GV-Dispatch Server GV-Authentication Server GV-Audio Broadcast GV-E-Map Server GV-Bandwidth Control Client Site GV-Backup Viewer GV-Dynamic DNS Service GV-Multicast GV-Webcam Server GV-DMMultiview 1 1.2 Support for New IP Devices The following GeoVision and third-party IP devices will now be supported in V8.5.7. Audio: A “” mark indicates the GV-System supports the two-way audio communication with the device; “X” indicates the function is unavailable in the device. Codec: The video codec supported by GV-System are listed. PTZ: A “” mark indicates the GV-System supports the PTZ function of the device; “X” indicates the function is unavailable in the device. Brand Model Audio Codec PTZ AXIS M3007 * X H.264 / MJPEG X P3354 * X H.264 / MJPEG X P3364 * ○ H.264 / MJPEG X Q1604 * ○ H.264 / MJPEG X Q6035-E X H.264 / MJPEG ○ Bosch NBN-921-P * ○ H.264 / MJPEG X GeoVision GV-FE2301 ○ H.264 / MJPEG X GV-FE4301 ○ H.264 / MJPEG X GV-BL1200 ○ H.264 / MJPEG X GV-BL1300 ○ H.264 / MJPEG X GV-BL1210 ○ H.264 / MJPEG X GV-BL2410 ○ H.264 / MJPEG X GV-BL3410 ○ H.264 / MJPEG X GV-BL5310 ○ H.264 / MJPEG X GV-BL2400 ○ H.264 / MJPEG X GV-BL3400 ○ H.264 / MJPEG X GV-PT130D ○ H.264 / MJPEG ○ GV-PT220D ○ H.264 / MJPEG ○ GV-PT320D ○ H.264 / MJPEG ○ GV-UBX1301 Series ○ H.264 / MJPEG X GV-UBX2301 Series ○ H.264 / MJPEG X GV-UBX3301 Series ○ H.264 / MJPEG X GV-UBL1211 X H.264 / MJPEG X GV-UBL2411 X H.264 / MJPEG X GV-UBL3411 X H.264 / MJPEG X GV-UBL1301 Series X H.264 / MJPEG X GV-UBL2401 Series X H.264 / MJPEG X 2 Feature Guide V8.5.7 Brand VIVOTEK Model Audio Codec PTZ GV-UBL3401 Series X H.264 / MJPEG X FD8135H ○ H.264 / MJPEG / MPEG4 X FD8162 ○ H.264 / MJPEG / MPEG4 X FD8372 ○ H.264 / MJPEG / MPEG4 X FE8172 ○ H.264 / MJPEG / MPEG4 X IP8172 ○ H.264 / MJPEG / MPEG4 X IP8335H ○ H.264 / MJPEG / MPEG4 X IP8362 ○ H.264 / MJPEG / MPEG4 X IP8372 ○ H.264 / MJPEG / MPEG4 X MD8562 ○ H.264 / MJPEG / MPEG4 X SD8323E ○ H.264 / MJPEG / MPEG4 ○ SD8362E ○ H.264 / MJPEG / MPEG4 ○ Note: IP devices marked with * were tested using ONVIF connection. 3 2. Main System 2.1 Advanced PIP Function for Fisheye Single View In the original Picture-in-Picture (PIP) view, you can zoom in or crop the video for a close-up view. However, the PIP view in fisheye cameras can only be displayed on the hemispherical source image. In V8.5.7, an advanced PIP function in Fisheye Single View allows you to have a close-up dewarped image of any selected place within the surveillance area without missing the entire view. The advanced function includes navigating with a red point and cropping the live view for a closer image. Figure 2-1 Fisheye Picture-in-Picture (PIP) View (without being dewarped) V8.5.6 Single View (without PIP view) Figure 2-2 4 V8.5.7 Single View (with PIP view) Feature Guide V8.5.7 1. Click Camera Name and select Geo Fisheye, in which the default view mode is Quad View. 2. Right-click in Quad View mode, find Fisheye Option, select Camera Mode and select Geo Fisheye: Single View. 3. A round in-set window with a red point in the middle appears at the lower right corner. Within the round window, click any desired place to get the image on the live view. Figure 2-3 4. To get a close-up view, click the into a crisscross. button at the top right corner, and the cursor will turn Figure 2-4 5 5. Move the crisscross to the selected area and drag to crop the video. When the cropping size is smaller than 1/4 camera view, zoom-in function will be applied. If the size of selected area is larger than 1/4 camera view, zoom-out function will be applied. Figure 2-5 6. Roll the mouse wheel or click the To disable the cropping function, click the 6 / button to zoom in / out. button again. Feature Guide V8.5.7 2.2 Digital PTZ for Cameras without Physical PTZ Functions In V8.5.6, Visual PTZ (Pan, Tilt and Zoom) is only available in PTZ Cameras and Speed Domes. GV-System now supports the Digital PTZ (DPTZ) function, allowing non-PTZ cameras to simulate the PTZ movement on the screen. 1. Right-click the live view, find Camera Name and select Digital PTZ. The Visual Automation View window for DPTZ control appears. Figure 2-6 2. To zoom in / out, click the corresponding buttons or use the mouse scroll. To bring the Visual Automation View back to its default image, click Home. 7 3. To pan and tilt the Visual Automation View, zoom in on the image first, and then click and hold the arrow. The arrow appears when you place the cursor in one of the eight directions, i.e. up, down, left, right, left up, left down, right up and right down. Figure 2-7 Visual Automation View (zoom-in function applied) Figure 2-8 Visual Automation View (tilt function applied by holding the arrow in the upper left corner) 4. To adjust the transparency level of the Control Panel, click the green DPTZ button on the top left corner of the window and select Transparency. Ten levels range from 10% (fully transparent) to 100% (fully opaque). Note: The functions of Focus In / Out and the speed level are not supported in Digital PTZ. 8 Feature Guide V8.5.7 2.3 Maximum Recording Frame Rate upon I/O Trigger In V8.5.7, a maximum recording frame rate can be set for recording during I/O trigger using software compression video capture cards. Previously, you can only set a maximum recording frame rate set for motion detected events and when there is no motion or I/O trigger. In addition, you can now specify whether to apply the setting for motion or I/O trigger when both I/O trigger and motion detection occur at the same time. V8.5.6 Recording Frame Rate Setting V8.5.7 Recording Frame Rate Setting Figure 2-9 1. Click the Configure button, select System Configure, and select Camera Configure. 2. Click the arrow button after Rec Video and select Rec. Frame Rate Setting. A dialog box appears. 3. To set a maximum recording frame rate during I/O trigger, select Max. recording frame rate of I/O Trigger and select a frame rate. 4. Under Priority, select I/O First if you want to apply the Max. recording frame rate of I/O Trigger when both I/O trigger and motion detection occur at the same time. Select Motion First if you want the maximum recording frame rate of motion to override the I/O trigger settings when both conditions occur at the same time. 5. Click OK to apply the settings. 9 2.4 Dual Streaming through ONVIF Protocol Previously, third-party cameras connected through ONVIF protocol only support single stream. In V8.5.7, GV-System now supports dual streaming of IP cameras connected through ONVIF protocol. For each stream, you can set codec, resolution, maximum bit rate, maximum frame rate, image quality and GOV values. To add and set up an IP camera through ONVIF protocol: 1. Click the Configure button, select System Configure, select Camera Install, and select IP Camera Install. 2. Click Add Camera. This dialog box appears. Figure 2-10 3. Type the IP address, User name, and Password of the camera. 4. For Brand, select Protocol and for Device, select ONVIF. A dialog box appears. 10 Feature Guide V8.5.7 5. To set the second stream if available, select Dual Stream for Stream Type. Figure 2-11 6. The following settings are available for each stream. Codec: Select a codec type. Resolution: Set a resolution. The maximum resolution for stream 2 is limited to 800 x 600. Bitrate Limit: The current bit rate setting of the IP device will be displayed. You can adjust the bit rate limit within the device’s supported bit rate range if needed. Frame Rate Limit: Set a maximum frame rate. Quality: Adjust the image quality. The range of image quality varies for different brands. Gov: Set the number of frames between each key frame. For example, a Gov of 10 means there will be 1 key frame every 10 frames. 7. Click Submit. The IP camera is now added to the camera list. 8. You can right-click the device in the camera list to access additional settings. 11 2.5 Extended System Idle Protection Time The maximum idle protection time is now extended from 300 seconds to 14400 seconds. If the system is idle for more than the specified time period, the system will be logged out or automatically start recording according to your setting. To enable system idle protection: 1. Click the Configure button, select System Configure and click System Idle Protection Setting. This dialog appears. Figure 2-12 2. Select Auto Logout or Switch to Startup Login User if available or Auto Monitoring. 3. In the System Idle Over field, type a time between 10 and 14400 seconds. 4. Click OK. For details on System Idle Protection, see System Idle Protection, Chapter 1, GV-DVR User's Manual on the Software GV-DVR User's Manual. 12 Feature Guide V8.5.7 2.6 Frame Rate Setting for GV-SD200 You can now set the frame rate of GV-SD200 from GV-System. To access the frame rate settings, click the Configure button, select System Configure, select Camera Install, and select IP Camera Install. Next, add the GV-SD200 to the camera list, and then right-click the GV-SD200 to access the following new settings. GV-SD200 in Dual Streams Set frame rate (main stream): Set a frame rate limit for the main stream of GV-SD200. The main stream is used for recording and watching live view in single view. Set frame rate (sub stream): Set a frame rate limit for the sub stream of GV-SD200. The sub stream is used when watching live view in multi-channel screen division with On-Demand display enabled. Figure 2-13 GV-SD200 in Single Stream Set frame rate (single stream): Set a frame rate limit for GV-SD200 when only single stream is connected. The frame rate settings above will be applied to the GV-SD200 source video received by the GV-System, as well as the recorded videos. The settings are only available before the camera is connected. 13 2.7 Network Failure Detection The Network Failure Detection function triggers an output device when network connection between GV-System and the specified network host has failed. You can set a time interval, which specifies how often GV-System will send a ping message to the network host to check if the connection is still active. 1. Click the Configure button, select Tools and click Network failure detection. This dialog appears. Figure 2-14 2. Under IP Address, type the IP address or domain name of a remote host. 3. Next to Interval, type the time interval between each ping in minutes. If the interval is 5 minutes, GV-System will ping the network host every 5 minutes. 4. Under Action, enable Output Module and select the output module and pin number. 5. Click OK. The select output device will be triggered when the network host does not respond to GV-System’s ping message. 14 Feature Guide V8.5.7 3. ViewLog 3.1 Support for GV-Device Server in Remote ViewLog Service You can now retrieve files from a remote GV-Recording Server, GV-Backup Server, and GV-Backup Center using Remote ViewLog Service. Previously, Remote ViewLog Service only supported remote playback of GV-System and GV IP devices. 1. Click the ViewLog button and select Video / Audio Log. 2. In ViewLog, click Tools and select Remote Viewlog Service. The Connect to Remote ViewLog Service dialog box appears. 3. Type the IP Address, ID and Password of the remote server. Modify the default port 5552 if necessary. 4. For Host Type, select GV-Server to connect to GV-Recording Server, GV-Backup Server or GV-Backup Center. Figure 3-1 5. Click OK. For details on Remote ViewLog Service, see Remote ViewLog Service, Chapter 4, GV-DVR User's Manual on the Software DVD. 15 3.2 PIP Mode When Video Resolution Exceeds ViewLog Panel In ViewLog, if the resolution of the recorded video exceeds the panel resolution, the video will be automatically switched to Picture-in-Picture (PIP) mode when you zoom in. For recordings higher than D1 resolution, you can zoom up to 32 times the original image size. For recordings lower than D1 resolution, you can zoom up to 8 times the original image size. When playing back videos in ViewLog, you can click the + or – buttons on the Playback Control Panel to zoom in or out. Figure 3-2 When the video resolution is higher than the panel size, the PIP view will appear after clicking button. You can drag navigation box inside the inset window to have a the zoom in close-up view of the selected area. Figure 3-3 16 Feature Guide V8.5.7 4. WebCam Server 4.1 Support for Multi Windows on Chrome, Safari and FireFox The user can select and display up to 16 live views out of 32 channels through the WebCam server using Chrome, Safari and FireFox. Figure 4-1 17 Before you start, make sure you: 1. Activate the WebCam server. Once enabled, the main screen shows “Web” and “CCS”. Figure 4-2 2. Enable the 3GPP function on the WebCam server. 3. Log in the WebCam server using Chrome, Safari or FireFox. For details on WebCam server, see WebCam Server Settings, Chapter 8, GV-DVR User's Manual on the Software DVD 18 Feature Guide V8.5.7 4.2 Enhancing Live View Quality on Mobile Devices Apart from the CIF (320 x 240) display of live views since the previous versions, the latest GV-AView V1.3.1 (for Android devices) and GV-iView V2.3 (for iPhone and iPod Touch) also support live view in VGA (640 x 480). For details, see corresponding document from our web site http://www.geovision.com.tw/english/5_4.asp 19 5. Center V2 5.1 Notifying with Pre-Event and Post-Event Recordings The Center V2 V8.5.6 can receive up to 15 minutes of pre-event and post-event recordings (respectively) in notifications when a Motion, I/O Trigger or Scene Change event occurs. With Center V2 V8.5.7, you can utilize this function for 9 more event types: Video Lost Video Signal Resumption Intruder Missing Object Unattended Object Crowd Detection Advanced Unattended Object Advanced Scene Change Advanced Missing Objection Note: 1. Configurations for the following event types are not applicable: Post-event recordings for Video Lost event Pre-event recordings for Video Signal Resumption event 2. This feature is also supported by GV-Dispatch Server V8.5.7 Follow the steps below to access this feature: 1. Make sure you have configured the GV-System to be: recording round-the-clock connected to Center V2 For details, see Adjusting Camera Configurations and Customize Startup Settings respectively, Chapter 1, GV-DVR User's Manual on the Software DVD. 20 Feature Guide V8.5.7 2. Access the subscriber settings on Center V2: A. On Center V2’s main window, select the Accounts button. This dialog box appears. Figure 5-1 B. Locate the subscriber from the tree on the left and select the Subscriber Setting button. The Subscriber Settings dialog box appears. 3. Configure the subscriber’s record settings. A. Select Attachment Mode and click the Settings button. The Record Settings – Attachment Mode dialog box appears. Figure 5-2 21 B. Under the Subscriber’s Recorded Files section, select the Event Types and click to select the number of clips for Pre-Event and Post-Event attachment files from the drop-down menu. If the GV-System is set to record for 1 minute per clip, and the pre-event attachment is set to 15 (as illustrated in Figure 2-3), you will receive 15 notifications with attachments when the selected event occurs. However, if the GV-System is set to record for 5 minutes per clip, you will receive 3 notifications with attachments. Figure 5-3 22 Feature Guide V8.5.7 C. Click OK to save the configuration. The configuration takes effect immediately. When the specified events occur, attachment notifications appear on the Event List and are indicated as “Pre-Event Attachment” and “Post-Event Attachment”. Figure 5-4 23 5.2 Scheduling Event Notifications For the previous Center V2, you can restrict event notifications to be sent only when events occur within the defined times. However, this function is only accessible when at least an I/O device is installed at the subscriber’s side. Now, with the latest Center V2, the user can set up a schedule for sending notifications without installing any I/O device. Follow the steps below to access this feature: 1. On the GV-System, select the Network button and select Connect to Center V2. This dialog box appears. Figure 5-5 2. Type the Center V2’s IP address, subscriber’s user ID and password, and only change the port setting when necessary. Click OK. The Connect to Center V2 dialog box appears. 3. Unselect the Monitor all type events option. Figure 5-6 24 Feature Guide V8.5.7 4. Click the Configure button and select Advanced Settings. The Advanced Settings dialog box appears. Figure 5-7 5. Select the Monitoring Schedule tab and click the Schedule Setting button. The Monitoring Schedule dialog box appears. Figure 5-8 25 6. Set up a time schedule. Center V2 will only receive notifications when events occur within the defined times. You can set up to 4 time spans. Figure 5-9 7. 26 Click OK to save the settings. Feature Guide V8.5.7 6. Vital Sign Monitor 6.1 Scheduling Event Notifications For the previous VSM, you can restrict event notifications to be sent only when events occur within the defined times. However, this function is only accessible when at least an I/O device is installed at the subscriber’s side. Now, with the latest VSM, the user can set up a schedule for sending notifications without installing any I/O device. Follow the steps below to access this feature: 1. On the GV-System, select the Network button and select Connect to VSM. The Login dialog box appears. 2. Type the subscriber’s IP address, user ID and password and select OK. The Connect to Vital Sign Monitor dialog box appears. Figure 6-1 27 3. Unselect the Monitor all type events option and click the Configure button. The Advanced Settings dialog box appears. Figure 6-2 4. Select the Monitoring Schedule tab and click the Schedule Setting button. The Monitoring Schedule dialog box appears. Figure 6-3 5. Set up a time schedule. VSM will only receive notifications when events occur within the defined times. For more details, see step 5 in 5.2 Scheduling Event Notifications. 28