1
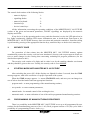
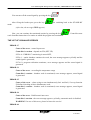
User manual of the microprocessor controller „MIKSTER MCC 100 FUTURE”
Sp. z o.o.
41 - 250 Czeladź ul. Wojkowicka 21
Tel. +48(32) 265-76-41; 265-70-97; 763-77-77
FAX.: +48(32) 763-75-94
www.mikster.com [email protected]
(21.06.2004 r.)
User manual of the microprocessor controller „MIKSTER MCC 100 FUTURE”
TABLE OF CONTENTS
2.
CONTROL DESK OF THE MIKSTER MCC 100 FUTURE _____________________________ 3
3.
SECURITY CODE _______________________________________________________________ 4
4.
STARTING WORK WITH MIKSTER MCC 100 FUTURE _____________________________ 4
4.1. PROGRAMMING OF MANUFACTURING PROCESSES ______________________________________ 4
4.2. RUNNING THE MANUFACTURING PROCESS' ROUTINE ON THE MIKSTER MCC 100 FUTURE _ 7
4.2.1.
OPERATING THE PROGRAM _______________________________________________________ 7
4.3. MANUAL CHANGES OF THE MANUFACTURING PROCESS PARAMETERS DURING THE WORKTIME OF THE SMOKE-CHAMBER _____________________________________________________________ 8
4.4. MANUAL MODE ______________________________________________________________________ 9
5.
ERRORS AND FAILURES MESSAGES _____________________________________________ 9
THE LIST OF SIGNALLED ERRORS ___________________________________________________________ 10
6.
SOUND SIGNALS _______________________________________________________________ 11
7.
PROGRAM BREAK -PAUSE-_____________________________________________________ 11
8.
CALIBRATION OF TEMPERATURE PROBES_____________________________________ 11
The probe should be put into boiling water and after putting the probe into boiling water adjust the
potentiometer until 100 is displayed in the relevant channel __________________________________ 12
9.
PROGRAM TERMINATIN _______________________________________________________ 12
10.
CONTROL OF THE TEMPERATURE INCREMENT 'DELTA' ________________________ 13
11.
RESPONSE TO THE TEMPERATURE LIMIT EXCEEDING _________________________ 13
12.
AUTO-START FUNCTION _______________________________________________________ 13
13.
THE REAL TIME CLOCK SETTING ______________________________________________ 14
-2-
21.06.2004
User manual of the microprocessor controller „MIKSTER MCC 100 FUTURE”
1. TECHNICAL DATA
POWER SUPPLY (range 0–999 °C)
- working devices control (contactors, electrovalves, etc.),
- failures signalling and analysis,
- digital registration of the technological process parameters,
- automatic control of processes in the smoke-chamber and control of the additional working
devices.
With the MIKSTER MCC 100 FUTURE you can program up to 49 (1–49) separate
technological routines, which can be changed optionally by user and 49 programs written permanently
to the EPROM (programs 50–99) including the automatic chamber washing program(99). Switching
the power OFF does not cause deleting of the routines. Running one of the routines allows for fully
automatic heat treatment of meats and sausages in the smoke-chamber.
Manual mode allows direct control of the working devices and you can operate one-cycle
technological routine(it is helpful during the maintenance works).
2.
CONTROL DESK OF THE MIKSTER MCC 100 FUTURE
All the operations involved with starting the controller, programming, manual changes, etc. are
being performed using the control desk (fig. 1.)
%
1 1
1
9
1 1 2
02
3
8
4
7 6 5
h :m in
?
?
F u tu r
-3-
21.06.2004
User manual of the microprocessor controller „MIKSTER MCC 100 FUTURE”
The control desk consists of the following blocks:
- numeric displays
-1-
- signalling diodes
-2-
- numeric keyboard
-3-
- function keys
-4-
- devices' status keys
-5-
All the information concerning the operating conditions of the MIKSTER MCC 100 FUTURE
(values of the given and measured parameters, ON/OFF signalling) are displayed by the numeric
displays and LEDs.
If any device is in the operating mode or any particular function is active the LED placed on its
key lights continuously, blinking LED means instantanous state or break-down. Data input to the
MIKSTER MCC 100 FUTURE memory, data correction and particular controller's functions calling
is performed by pressing of the appropriate function keys, numerical keys or the devices' status keys.
3.
SECURITY CODE
For protection of data written into the MIKSTER MCC 100 FUTURE memory against
unauthorised persons the security code has been introduced. Security code request appears when one
tries to make changes in the existing data concerning technological program parameters (for the
detailed description see 4.1.)
The security code consists of 6 digits and its value is set by the smoking chamber serviceman
and they should be given to the user. Usually, the security code is set to 222 222.
4.
STARTING WORK WITH MIKSTER MCC 100 FUTURE
After switching the power ON, all the displays are lighted for about 2 seconds, then the STOP
message appears, what is the certificate of a proper operation of the system.
When the STOP message appears - it means STAND-BY mode, and now you can change it to
one of below described modes and start appropriate functions:
- program mode - to start programming of the manufacturing routines,
- set-up mode - to enter constant parameters,
- manual mode - for manual control of the working devices,
- automatic mode - to start realisation of one of the earlier programmed manufacturing routines.
4.1.
PROGRAMMING OF MANUFACTURING PROCESSES
There is a possibility in the MIKSTER MCC 100 FUTURE to use up to 49 programmed by user
routines for the manufacturing processes (Nos. 1-49). Each program consists of 10 (20) cycles with a
possibility of a programming of one's choice, e.g.:
-4-
21.06.2004
User manual of the microprocessor controller „MIKSTER MCC 100 FUTURE”
0 - HEATING,
1 - DRYING,
2 - SMOKE-CURING,
3 - VENTILATING,
4 - SMOKE-CURING,
5 - VENTILATING,
6 - SMOKE-CURING,
7 - VENTILATING,
8 - BURNING,
9 - VENTILATING.
Programming is based on the appropriate data input (chamber temp., core temp., humidity, etc.)
for the above sequence of cycles.
If you want to start programming, you must switch the MIKSTER MCC 100 FUTURE to the
programming mode pressing the key
symbol 000 000.
. It results in displaying CODE message and the
Now, pressing the numeric keys:
type the first 3 digits of the security code.
Then press the key
again. Pressing the key
, and type the next 3 digits of the security code and press the key
changes the active field of the entered parameter.
When the security code is completed, press the key
.
If the code is correct the programming mode starts, and the displays show the cycle number 00
and the program number, which has been chosen for programming. In case of mistyping the security
code, MIKSTER MCC 100 FUTURE returns to the STAND-BY mode.
When the security code is correct, you can enter the program number(00-49), you will program,
by pressing the numeric keys:
-5-
21.06.2004
User manual of the microprocessor controller „MIKSTER MCC 100 FUTURE”
( the display is flashing at the position of actually inputted digit)
When the program number is set, approve it by pressing the key
.
Now, using the n0umeric keys, type the values of the parameters below, in the following order:
TEMPERATURE INSIDE THE CHAMBER [°C]
CORE TEMPERATURE
[°C]
TEMPERATURE INCREMENT „DELTA” [°C/min.]
RELATIVE HUMIDITY
[%]
CYCLE DURATION
[h.min]
In the case of going over the range of the parameter, in the editing field appears 0, and you
must input the parameter value again.
When the entered value is correct, approve it pressing the key
.
When programming the technological routine, you must define the work state(ON/OFF) of
working devices by pressing the devices state keys below:
.
When the parameters of a particular cycle are already set and accepted as correct, press the key
, what allows for programming of the next cycle.
You must repeat the above procedure for all the cycles, up to the 09(19) cycle. After the 09(19) cycle
programming, the device returns to 00 cycle.
- When all the cycles are programmed press the key
. As a result all the data are stored
into controller’s memory and STOP message appears - it means the controller state is STAND-BY.
When all the cycles are already programmed, press the key
routine programming.
-6-
. Now you can start next
21.06.2004
User manual of the microprocessor controller „MIKSTER MCC 100 FUTURE”
4.2.
RUNNING THE MANUFACTURING PROCESS' ROUTINE ON THE
MIKSTER MCC 100 FUTURE
The automatic realisation of a chosen routine (chamber initiation) can begin when
MIKSTER MCC 100 FUTURE is in the STAND-BY mode(displayed STOP).
If you want to start realisation of a chosen routine, you must press the key
result the message READY is displayed and the program number display starts blinking.
. As a
Then pressing the numeric keys:
enter the chosen program number you want to realise and the cycle
number you want to start its realisation.
Pressing the key
changes the actual entered field.
(Now, you can abandon chamber initiation by pressing the key
. After pressing
that key MIKSTER MCC 100 FUTURE returns to the STAND-BY mode and the STOP
message is displayed.)
- When the program number is correct, press the key
4.2.1.
(the chamber starts work)
OPERATING THE PROGRAM
When the program runs, MIKSTER MCC 100 FUTURE, basing on the given parameters,
operates the working devices and checks conditions of the program realisation for counting the time
of each cycle.
The following conditions should be satisfied for the cycle time counting:
1.
if (CORE temperature (given)>0 and Cycle duration (given)>0)
the cycle ends when:
- CORE temperature (measured) >= CORE temperature (given)
or
- cycle duration (measured) >= cycle duration (given)
-7-
21.06.2004
User manual of the microprocessor controller „MIKSTER MCC 100 FUTURE”
2.
if (CORE temperature (given)>0 and cycle duration (given)=0)
the cycle ends when:
- CORE temperature (measured) >= CORE temperature (given)
3.
(CORE temperature (given)=0 and cycle duration (given)>0)
the cycle ends when:
- cycle duration (measured) >= cycle duration (given)
After fulfilling the above conditions, on the display showing time of the program realisation
appears the value of the time of realisation of the particular cycle.
The processes in the chamber terminate after all the cycles of the routine have been performed.
If you want to omit any cycle, you have to set:
- CORE temperature (given) = 0
- cycle duration (given) = 0
4.3.
MANUAL CHANGES OF THE MANUFACTURING PROCESS PARAMETERS
DURING THE WORK-TIME OF THE SMOKE-CHAMBER
During the automatic realisation of any of the previously programmed routines, you can still make
manual corrections. Manual corrections can be made during the smoke-chamber automatic work-time
after pressing the key
.
(as a result, all the parameters values of the actual cycle are displayed),
- Now you can start the procedure described earlier(see p.4.1) to make the needed corrections in the
routine, by pressing the key
.
Parameters of the succeeding cycles of the realised routine are displayed (at the same time there
are no read-outs of the CHAMBER temperature and the CORE temperature).
If the cycle number blinks, it means that this cycle is not processed at the moment.
- When all the manual correction of the data are finished, press the key
again.
After pressing that key, all the modified data are stored into the controller's memory and the
controller responds to the entered changes.
If the terminating of the manual data correction took place in the other cycle than that
previously realised, MIKSTER MCC 100 FUTURE starts realisation of a cycle in which the
terminating of the data correction took place.
-8-
21.06.2004
User manual of the microprocessor controller „MIKSTER MCC 100 FUTURE”
4.4.
MANUAL MODE
(WARNING: You can start this function when the controller’s mode is STAND-BY, i.e.,
STOP message is displayed.)
For manual initiation of the working devices press the key
,
(„null” given parameters are displayed)
- pressing the devices status keys:
- set the devices you want to be active after pressing the key
.
(blinking LED on such a device means that the device will be active)
- Set the given parameters values of the realised process like it was described earlier in 4.1.
Press the key
starts its work.
when working devices are set as needed. After that the smoke chamber
The circumstances of terminating the program realisation in the manual mode are the same as
described in 4.2.1.
When the program is realised in manual mode you can arbitrary switch ON/OFF the working
devices.
The automatic program realisation terminates after pressing the key
.
You can continue the interrupted program by pressing the key
- The manual mode terminates after pressing the key
5.
.
.
ERRORS AND FAILURES MESSAGES
In case of failure during the work-time of the MIKSTER MCC 100 FUTURE, program
realisation terminates. Displays show ERROR message and the error number (in the same time
controller generates the sound signal).
-9-
21.06.2004
User manual of the microprocessor controller „MIKSTER MCC 100 FUTURE”
You can turn off the sound signal by pressing the key
After fixing the broken part, press the key
mode.
.
for switching back to the STAND-BY
(After that, the message STOP appears)
Now, you can continue the terminated routine by pressing the key
work from that instruction of a routine at which the program was terminated.
. Controller starts
THE LIST OF SIGNALLED ERRORS
ERROR 17
Cause of the error - control input error
Controller's reaction - depends on F26 (SET-UP)
if F26=0 - ERROR-17 monitoring is turned OFF,
if F26=1 - smoke chamber continues its work, the error message appears cyclically and the
sound signal is generated,
if F26=2- program realisation terminates, error message appears and the sound signal is
generated.
ERROR 21
Cause of the error - exceeding the temperature range
Controller’s reaction - chamber work is terminated, error message appears, sound signal
is generated.
ERROR 25
Cause of the error - when trying to run simultaneously fan1 and fan2, if set-up function
F4 defines blocking of their simultaneous work.
Controller’s reaction - chamber work is terminated, error message appears, sound signal
is generated.
ERROR 30
Cause of the error - RAM control sum error
Controller’s reaction - the error message appears cyclically, automatic mode is disabled.
WARNING ! In case of this error, please let know the service !
ERROR 40
- 10 -
21.06.2004
User manual of the microprocessor controller „MIKSTER MCC 100 FUTURE”
Cause of the error - instantaneous power decay when automatic mode or manual mode or
AUTO-START function is running
If the power decay is longer than the value set in the set-up function F23, controller
terminates work and its mode is changed to STAND-BY (STOP message appears). If the
power decay duration is shorter then F23, controller continues its work from the point the
power decay occurred.
Controller’s reaction - error message appears cyclically.
deletes error message displaying. In case of
WARNING ! Pressing the key
temperature sensor damage, symbol
is displayed in its field.
If the above symbol appears in the humidity sensor field when the temperature sensor
„dry” is efficient, it means that the temperature sensor „wet” is damaged.
6.
SOUND SIGNALS
During the normal work of the chamber, sound signalling device is turned on when passing to
the next cycle. The duration of sound signal is set by service and written to the SET-UP memory.
When passing to the 09 cycle the sound signal duration is twice longer.
During the failures, signalling device generates discontinuous signal, till manual switching off
by pressing the key
7.
.
PROGRAM BREAK -PAUSE-
When MIKSTER MCC 100 FUTURE realises automatic process, you can use PAUSE option
for opening the door to the chamber or for temporary ventilation of the chamber if it is necessary.
Pressing the key
makes controller mode changes to PAUSE.
(PAUSE message appears on the display)
Press again the same key to exit PAUSE option.
If the PAUSE key was not pressed again, the PAUSE process terminates after the certain time
programmed by service.
8.
CALIBRATION OF TEMPERATURE PROBES
Temperature probes calibration should be performed as follows:
- 11 -
21.06.2004
User manual of the microprocessor controller „MIKSTER MCC 100 FUTURE”
• PRESS AND HOLD THE KEY
• PRESS AND HOLD THE KEY
• LET THE KEY
• LET THE KEY
By pressing the key
proceed to the following tests of the controller.
If in the cycle field of the display, „0” is displayed it means that the controller is ready for temperature
probe calibration.
The probe should probe put into water ice mix.
After temperature 0oC is set press the key 2
.
Then you can follow to the calibration of the second probe by pressing the
key.
Calibration is performed as above.
, the parameters will be stored in the controller
After calibration is completed press
memory.
Calibration of temperature probe for 100oC is performed by adjusting the potentiometers located at the
back of the controller.
The probe should be put into boiling water and after putting the probe into boiling
water adjust the potentiometer until 100 is displayed in the relevant channel
9.
PROGRAM TERMINATIN
For terminating of the automatic process press the key
- 12 -
.
21.06.2004
User manual of the microprocessor controller „MIKSTER MCC 100 FUTURE”
10.
CONTROL OF THE TEMPERATURE INCREMENT 'DELTA'
MIKSTER MCC 100 FUTURE has a possibility of regulation of the temperature increment as a
function of time (fish smoke-curing) or as a function of „CORE” temperature (parzenie w ró¿nicy
temperatur).
During programming of the manufacturing process, type the value of temperature increment
[°C/min] or difference between „CORE” and „CHAMBER” temperature [°C ] in the field with a label
[DEL].
In case of giving the value of DELTA = 0.0°C, regulation of temperature increment is not
active.
Temperature increment regulation depends on F22 SET-UP function settings. Below are listed
F22 values:
F22=0 - DELTA regulation is not active,
F22=1 - DELTA regulation as a function of time is active,
F22=2 - DELTA regulation as a function of „CORE” temperature is active.
11.
RESPONSE TO THE TEMPERATURE LIMIT EXCEEDING
Controller reacts for temperature limit exceeding signalling the ERROR 21.
Temperature limit is set in the SET-UP function F29. This function allows to set the tolerance
[°C] of the temperature limit.
EXAMPLE: if given temperature is equal 60°C and the value of the function F29 is
equal 10°C, then error signalling turns on, when the temperature read-out exceeds 70°C.
12.
AUTO-START FUNCTION
You can set the time MIKSTER MCC100 FUTURE will start the chosen routine realisation.
The AUTO-START function is activated by pressing the key
.
Then you must enter in sequence the parameters below:
- the chosen program number,
- the cycle number,
- time, when you want the process to start, i.e.:
- hours:
HH,
- minutes:
MM.
Use the numeric keypad to enter all the above parameters values:
- 13 -
21.06.2004
User manual of the microprocessor controller „MIKSTER MCC 100 FUTURE”
After entering each parameter, you must approve its value by pressing the key
.
It makes possible entering the next parameter value in sequence:
program number ⇒ cycle number ⇒ AUTO-START hh⇒ AUTO-START mm
When you have set all the above parameters, press the key
.
as a result LEDs placed on the keys AUTO-START and START are blinking and AUTOSTART and STOP LEDs green light.
You can break the AUTO-START setting by pressing the key
13.
.
THE REAL TIME CLOCK SETTING
If you want to change the real time clock settings, press the key
. As a result SET CLO
message is displayed. Now enter the actual time (HH:MM), using the numeric keypad:
.Then press the key
to approve the entered time.
- 14 -
21.06.2004