1
TROUBLESHOOTING
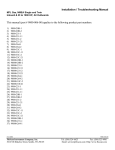
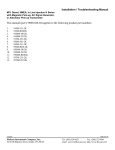
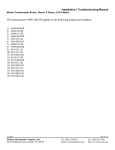
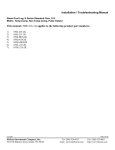
Series 5800-58000, 6500/65000, 6600/66000 CruiseMaster GPH/LPH Instrument
BEFORE CALLING FOR ASSISTANCE, COMPLETE THESE TROUBLESHOOTING CHECKS AND RECORD YOUR FINDINGS.
TECHNICAL SUPPORT REQUIRES THIS INFORMATION BEFORE A RETURN AUTHORIZATION WILL BE ISSUED. IT TAKES ABOUT
20 MINUTES AND IS VERY IMPORTANT IN ANALYZING SYSTEM PROBLEMS.
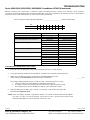
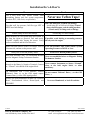
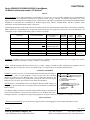
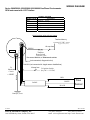
Before starting record the Instrument MODEL # ________________________ and all Switch settings.
ON
OFF
Switch Settings
1
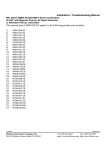
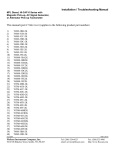
FAULT
Blank LCD Display.
No Back-Lighting.
Low Totalizer Reading, more than 10%.
High Totalizer Readings, more than 10%.
Fluctuating GPH readings.
No GPH or Totalizer reading.
No Forward or Return Sensor readings.
High Forward or Return Sensor readings.
2
3
4
5
6
7
8
9
PROBABLE CAUSE
SEE SECTION:
Wiring
Wiring/bulb failure
Calibration
Sensor orientation/failure
Incorrect/defective sensor
Incorrect switch settings
Suction leak
Suction leak
Low RPM operation
Wiring/Instrument failure
Sensor orientation/failure
Wiring
Sensor failure
Suction leak
Wrong switch settings
Sensor orientation
Section I
Section III
Calibration sheet
Installation Sheet
Operations
Manual page
Section VI
Section VI
Section VIII
Section IV and V
Installation sheet
Section IV and V
Section II
Section VI
Calibration sheet
Section VII
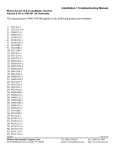
I. INSTRUMENT HEAD DIAGNOSTIC TEST:
1.
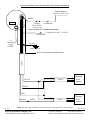
Referring to the wiring diagram, verify that Instrument & Sensor(s) are wired correctly.
2.
Verify that all wiring connections are tight and not corroded. Check continuity with an ohmmeter.
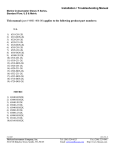
3.
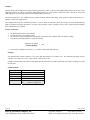
With power switched ON, measure voltage between the RED and BLACK wires,
(Take readings on the Instrument side of the butt splice connections).
__________VDC
The voltage reading should be between 12 and 14.5 VDC. Proceed to step 4 if it is, if not:
a. Check for voltage between the RED wire and another ground point.
b. If voltage is present, trace along the BLACK wire until its’ open connection is found.
c. If no voltage is present, trace the RED wire until its’ open connection is found.
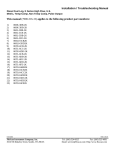
4.
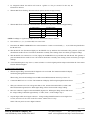
With switched power ON slide, “Dip” switches 1-9 to the ON, or UP position. This places the
Instrument into diagnostic mode.
NOTE: If the LCD display is blank, verify that the totalizer reset switch, (Connected between the GREEN
wire and +12 volts) is in the ON position. Verify that 12 VDC is present between both switch
terminals and the Black wire. Next check the, “Green wire” fuse.
4/17/2003
FloScan Instrument Company, Inc.
3016 NE Blakeley Street, Seattle, WA 98105
4001-103-00F
Tel: (206) 524-6625
Fax: (206) 523-4961
email: [email protected] http://www.floscan.com