1
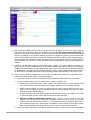
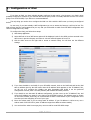
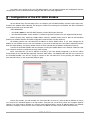
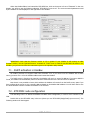
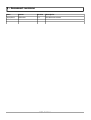
KISS-BOX
RTP-MIDI INTEGRATION GUIDE
FOR IOS DEVICES
Page 1 of 14
Page 2 of 14
Contents
1 - Introduction.......................................................................................................... 4
2 - What is RTP-MIDI ?............................................................................................... 4
3 - System requirements............................................................................................. 5
4 - Hardware installation............................................................................................ 6
4.1 - MIDI Merging..........................................................................................................6
5 - Configuration of the WiFi router/access point.......................................................7
5.1 - What is my network setup ?......................................................................................7
5.2 - Checklist for WiFi router configuration....................................................................... 7
6 - Configuration of iPad........................................................................................... 10
7 - Configuration of the RTP-MIDI KissBox..............................................................11
7.1 - DHCP activation in KissBox...................................................................................... 12
7.2 - RTP-MIDI node configuration.................................................................................. 12
8 - How can I check that my RTP-MIDI link is working ?.........................................13
9 - Document revisions............................................................................................. 14
Page 3 of 14
1 - Introduction
Apple has introduced CoreMIDI support since iOS 4.2 in his iPad/iPhone/iPod product range, allowing to run
MIDI applications on these marvelous devices. The internal driver recognizes both USB and RTP-MIDI (called
“Network MIDI” by Apple).
The biggest problem with USB connection is that you need either to use the USB Camera Adapter Kit from
Apple to have a USB plug where to connect your USB MIDI interface. This adapter is big, does not have any
mechanical locking system, and can not provide a lot of current to the USB MIDI interface connected to it, making
a lot of them fail when they are used with the iPad.
Some companies are also offering MIDI USB Class Compliant product with a dock connector (basically a USB
MIDI interface with dock connector rather than standard USB connector), but once again, these modules are big,
still not mechanically locked (so a slight pull on the cable can disconnect the complete thing), and in most case,
MIDI connectors are attached with small 3.5mm jacks.
And in both case, you have to deal with MIDI wires hanging from your iPad... which was designed as
wireless device primarily.
But iPad also supports RTP-MIDI, which is an open standard, supported by multiple companies in the world.
The biggest difficulty up to now was that RTP-MIDI on iPad was requiring a computer to make a bridge between
the WiFi connection used by the iPad and the MIDI world. Up to now...
Because you now have the RTP-MIDI KissBox!
The RTP-MIDI KissBox is an innovative product, created by KissBox in 2006, to perform direct interface
between Ethernet networks and MIDI world, based on RTP-MIDI standard.
In 2012, we upgraded our design to a completely new one (known as V3), and this new design allows direct
connection between iPad and MIDI world, without needing a computer anywhere in the setup (the RTP-MIDI
KissBox is a completely autonomous system)
2 - What is RTP-MIDI ?
RTP-MIDI is a worldwide open and completely free standard, listed in RFC documents (RFC4695 / RFC6295).
This guarantees that anybody can use RTP-MIDI without needing to pay any license and ensures that no company
can claim RTP-MIDI to be its proprietary product. It is based on the well-known RTP protocol (listed as RFC3550
standard), which is based in turn on standard IP stack. This allows any RTP-MIDI product to use standard
networks components.
RTP-MIDI does not necessarily relies on Ethernet and can be used over wireless links (iPad is using RTPMIDI in this way). However, the use of Ethernet guarantees extremely low latency over the complete network.
RTP-MIDI benefits from all RTP advantages, like clock synchronization, detection of loss packets, etc...
Moreover, RTP-MIDI provides a recovery mechanism, which allows a receiver to detect missing informations due to
lost packets. This innovating mechanism allows to recover MIDI data without needing any retransmission.
RTP-MIDI is natively integrated in Mac OS X since 2006 (no need to install any driver on this platform), and
free Windows drivers are now available for all Windows platforms from XP to Seven, in 32 and 64 bits versions.
Note that the drivers are needed only to emulate MIDI ports from system point of view. Since RTP-MIDI is
running on the top of open, mature standards (IP / UDP / RTP), an application can also perfectly run directly an
RTP-MIDI engine without needing any complex driver to install. RTP-MIDI are also compatible with any existing
router or network device, since it does not use any reserved/proprietary communication code.
A legend about RTP-MIDI reports that this solution introduces more latency than others, because it is based
on IP technology. This is of course completely false, and extremely low latency can be easily be achieved with RTPMIDI (for example, the latency within the MIDI2TR and RTP-MIDI OEM modules from KissBox is less than 1
millisecond, and it is perfectly controlled). The latency due to the operating systems like Windows or Mac OS is
exactly the same, whatever you use IP or pseudo-direct Ethernet access (technically speaking, this is called
Page 4 of 14
“threading model” and you can not change it... apart if your name is Microsoft or Apple)
Another legend about RTP-MIDI claims that the configuration is awfully complex. In fact, the configuration of
a RTP-MIDI setup is exactly the same as the configuration process you used for your Internet access on your
computer. It's true that there is a configuration tool to use (the KissBox Editor), but you should then ask yourself
“why do solutions supposed to be Plug&Play and without configuration need also a configuration tool to be run
before they can be used ?”
3 - System requirements
The following devices and software are required in order to create a RTP-MIDI WiFi connection with iOS
devices:
•
iPad/iPhone/iPod Touch running iOS 4.2 minimum (designed hereafter as “iPad”)
•
CoreMIDI compatible application installed on the iPad (e.g: TouchOSC, MIDIPads, MIDIPads Lite, etc...)
•
RTP-MIDI KissBox or RTP-MIDI OEM board, running RTP-MIDI firmware V5.5 minimum
•
KissBox Editor for Mac OS or Windows (available freely on KissBox website)
•
IEEE 802.11 b/g WiFi router (with its user's manual)
•
PoE switch or PoE power supply
Page 5 of 14
4 - Hardware installation
VERY IMPORTANT : we highly recommend you to keep the WiFi network used for RTP-MIDI separated from
the WiFi network used for Internet access. Otherwise, your router may react badly in case another system (or even
the iPad itself) connects to Internet and starts to use a lot of bandwidth. This will require two WiFi routers, one for
RTP-MIDI and one for Internet access, but the traffic on Internet WiFi will not be able to disturb RTP-MIDI traffic.
The previous remark also applies to wired networks, but in a less critical level (saturating a 100BaseTX wired
network with Internet traffic is quite hard to do, apart if you have a very high number of devices connected to the
network)
4.1 - MIDI Merging
Reading some webpages can be very funny sometimes, when people knowing nothing about RTP-MIDI are
talking about it... A common urban legend pretends that RTP-MIDI devices are not able to perform any merge.
This is of course absolutely false, merging MIDI streams is even one of the tasks RTP-MIDI devices can achieve
very easily. And of course, the RTP-MIDI can merge MIDI streams too!
To be absolutely precise, the RTP-MIDI KissBox is able to merge up to 8 streams (yes, that means that up to
8 computers can be connected over the network to each MIDI port). In other terms, when an iPad is connected to
the RTP-MIDI KissBox, up to seven other computers can connect to the same Box. And all MIDI data transmitted
by each of them will be merged on the MIDI OUT connector. So, if your sequencer runs over RTP-MIDI (and do not
forget that Mac OS implements RTP-MIDI in a native way... And for Windows users, there is also a Windows driver
available), it can send data to your hardware synthesizer connected to the KissBox MIDI OUT, while the same
synthesizer is being driven over WiFi with your iPad!
Page 6 of 14
5 - Configuration of the WiFi router/access point
The first thing to do is to configure your WiFi access point (or router) in order to define the different network
parameters.
We can not describe in this manual the exact configuration procedure for each existing model of WiFi router,
so you will need first to read the user's manual provided with your router.
In most cases, the configuration of modern WiFi routers and access points is done via a webpage loaded in
your browser. You will need to connect to the router with your computer, using the WiFi router default address. The
router will then probably ask you some credentials in order to accept the connection. These credentials are given in
the user's manual too (they are typically logins like “admin” with password like “password”...)
5.1 - What is my network setup ?
Before doing anything, prepare a simple sketch of any existing network installation, to see where you will
connect what, and also to make sure that you will disturb any existing setup.
Do not forget that WiFi access points are now very common, and you may have them anywhere. For
example, if you have an ADSL Box in your studio, the probability to have a WiFi access point in it is around 95%
nowadays.
Take the time to see where your current wired and wireless networks are going, and what is connected to
them, even if you decide to use a separated network (the WiFi access point you will install shall be configured to
avoid any conflict with another one)
Write down on your sketch paper what are the devices already connected to your network, and what are the
IP addresses used by them, and keep them for future reference. You may need to log into your existing WiFi
routers (or ADSL Boxes) to see how they are configured.
5.2 - Checklist for WiFi router configuration
As we have said before, it is impossible to describe in this document how each router has to be configured.
There are hundreds of different models, each with some specific setup requirements. You have to read the user's
manual provided with your router, it's the best (and probably the only) thing to do.
However, we will provide here a list of the different points you have to set/check, in order to have the best
working WiFi configuration for RTP-MIDI. The sequence described hereafter is roughly the one you will have to
follow for most WiFi routers.
1) If your router is not a new one, we recommend to perform a factory reset on it. The previous
configuration/user may have configured the router in a state which makes it unreachable even if you
follow the user's manual instructions (typically: different IP address, different username or password,
etc...). In most case, factory reset is obtained by pressing and handling a small button for a given
amount of time (like what we do with the KissBox). Once again, check the exact procedure which shall
be described in the user's manual
2) Connect the router to your computer using a network cable and log in it using either a configuration
tool which is provided by the router manufacturer or using the default IP address (typically
192.168.0.1 or 192.168.1.1) via your web browser (Firefox, Safari, IE, etc...). Make sure that the
network card of the computer is configured to be on the same network (if the router is using
192.168.0.1 for example, then the computer shall be using an address between 192.168.0.2 to
192.168.0.254).
3) Once you have entered the router IP address on your web browser, you generally get a popup window,
asking you to enter a login and a password. They are always given in the router user's manual (and
that's why it's better to make a factory reset when you do not know who used the router before... and
maybe changed the password). The following screenshot shows you how look the WGR614 router user
interface (the model that we use for our tests) under Firefox
Page 7 of 14
4) Now, locate in the different menus where you can define the IP address of your router (this is typically
in a menu called “LAN setup”. Enter the IP address you want for the router/access point itself. As
said before, we highly recommend you to have two distinct networks between RTP-MIDI and Internet
access. For example, if your Internet network is located on 192.168.1.x domain, you can set the WiFi
router for RTP-MIDI on 192.168.0.x domain (for example 192.168.0.1 address). We recommend you to
use this domain when KissBox products are used, since this is the default domain used during factory
reset (otherwise you will have to switch between the two configurations when you will configure the
KissBox)
5) If there is a DHCP server inside the router (this is quite common), you can configure it. However, we
recommend to use static IP addresses for all RTP-MIDI networks. The reason is that you may loose the
complete RTP-MIDI network functionnalities if the DHCP server would not respond (devices would get
no IP addresses). The best thing to avoid any conflict is then to simply switch off the DHCP server in
the WiFi router. The DHCP server setup is also generally located in the LAN Setup menu of the router.
6) Locate now the Wireless settings menu of the router. This part of the setup is very important, since it
is the way the iPad will talk with the rest of the network.
1. First thing to do is of course to check that the WiFi (sometimes called “radio link”) is enabled.
2. Locate the radio settings. They are named “Area”, “Channel”, “Mode”, etc..
1. Select first the world area where you are located. This will give access to some channels. Take
care : each area has reserved channels (for example, channel 11 is not allowed in France)
2. Select a channel valid in your area. The tricky thing is to find a channel which is not too much
used in your surroundings. If you find that the WiFi is not very responsive during your tests,
you may choose a different channel
3. Choose a transmission mode (these modes are identified by a letter). If possible, use “b and
g”, this is the most common mode, and what works the best with iPad
4. Activate a Security Transmission option! Never ever use an open access for any WiFi
network (aka “No security”). Otherwise, everybody would be able connect to your WiFi
network and send whatever they want on it. The security level we recommend is WPA, since it
gives excellent results, and is protected by a passphrase, which is easier to enter into the iPad.
WEP uses hexadecimal codes which can be a pain to enter into the iPad without fault
3. Locate the SSID configuration. The SSID is simply the name your WiFi access point will broadcast
Page 8 of 14
to say “there is an access with this name here” (a nice name suggestion : “RTP-MIDI”). The nice
thing with SSID is that it is very easy to locate the WiFi access points. The bad thing is that
everybody will be able to see your WiFi access point. If you are configuring a WiFi network for the
first time, keep the SSID activated, it will be easier for you to work with it. However, if you intend
to use a WiFi access point for RTP-MIDI on stage for example, we recommend you to deactivate
the SSID broadcast. Your WiFi network will then become invisible for all people with mobile WiFi
devices (just think about Android and iPhone telephones...). So, nobody will be tempted to try to
connect to your network (and this seriously limits the risk of disturbances on RTP-MIDI, since there
is almost no risk to have the router overloaded by connection requests)
4. When you will master completely the WiFi configuration process, you can also restrict WiFi access
to known devices, typically based on the MAC address. In that case, only devices that you have
selected will be enable to connect to the WiFi access point.
7) Basically, your WiFi access point configuration is finished now (and this was the hardest job). You may
have to reboot your router to take the new configuration into account.
Page 9 of 14
6 - Configuration of iPad
If you have an iPad, you have probably already configured it and used it a lot! However, your iPad is quite
probably configured to connect to your Internet WiFi access point, which is normally different from the one we are
going to use for RTP-MIDI, if you follow our recommendations.
The only thing you need to do to configure the iPad is to link it with the WiFi router you have just configured
before.
Do not worry, if you have already a WiFi configuration you use to access the Internet, it will not be lost. The
iPad will keep the two configurations that you use, and you will be able to switch from RTP-MIDI configuration and
Internet configuration very easily.
To configure the iPad, just follow those steps:
1) Start Setup application
2) Select WiFi tab. A list of WiFi access points will be displayed. Look for the SSID you have entered in the
WiFi router in previous chapter, and select it. A check mark will appear in front of it
3) Click the blue arrow on the right side to access to network setup. You will then see the different
settings
4) If you have decided to use DHCP for your RTP-MIDI network, click on the DHCP tab and let the iPad
take an address given by the WiFi router. Note the IP address which appears on the “IP Address” line,
we will use it to configure the KissBox just after. Remember that DHCP is not the preferred
configuration however, even if it works perfectly with KissBox RTP-MIDI products.
5) If you decide to use the static IP address configuration, put the cursor on the “IP Address” line, and
enter the IP address you want for your iPad on the RTP-MIDI network. This address must be unique
on the whole network, that's why we recommended to draw a small sketch of your configuration to be
sure that you have everything in front of your eyes.
6) Enter the subnet mask if you are using static IP address. If your IP address is 192.xx.xx.xx, use a
subnet mask of 255.255.255.0 (other IP address ranges have different subnet masks)
7) You can let all the other lines empty, they are not used for most RTP-MIDI setups
Page 10 of 14
Your iPad is now configured for your RTP-MIDI network. You can switch between this configuration and the
configuration you use to browse Internet using the WiFi tab in the Setup application.
7 - Configuration of the RTP-MIDI KissBox
We are almost done! The last thing to do is to configure your RTP-MIDI KissBox, and this is quite easy to do,
thanks to the KissBox Editor. Basically, this step just consists into entering into the KissBox the same information
entered in the WiFi router and the iPad.
VERY IMPORTANT:
•
the KissBox must run the RTP-MIDI firmware, not the MIDI legacy firmware
•
the RTP-MIDI firmware version shall be 5.5 minimum (previous versions were not supported iOS devices)
Before anything else, install the KissBox Editor software, available freely both for Mac OS and Windows
platforms on KissBox website. RTP-MIDI configuration requires Editor V10.8.0 minimum.
All KissBox products use 192.168.0.253 IP address as factory default value. If you have changed the IP
address of your KissBox and you can not remember it, just power it and keep the reset button depressed until the
blue LED stops blinking. The factory default values are then restored into the KissBox configuration memory.
Connect the RTP-MIDI KissBox and the computer running the KissBox Editor to the network. Make sure that
your computer network is configured correctly (same subnet).
Enter “192.168.0.253” (or the IP address of the Box if you have already configured it) in the four edition
boxes located in the “Add Kiss-Box manually” and click “Add” button. The KissBox Editor will then try to connect to
the RTP-MIDI KissBox. You will see “Trying to connect to Box 192.168.0.253” (more precisely, the address you
have entered before ) in the log window (bottom right).
After a few seconds, you will normally see “Found Kiss-Box xx.xx.xx.xx” (with the Box IP address of course,
not “xx.xx.xx.xx”) indication appear in the log window. If the Box can not be found, check your computer network
settings. The most common problem is a network card configured with a wrong IP address and/or in a different
subnet (for example, it does not work if the computer has address 192.168.1.20 on subnet 255.255.255.0)
Page 11 of 14
When the KissBox Editor has located the RTP-MIDI Box, click on the arrow in front of “Network” in the tree
display. You will then see the following indication “RTP-MIDI @ xx.xx.xx.xx”. The current network parameters used
by the KissBox are also displayed on the right side of the window.
IMPORTANT: check that the firmware version is 5.5 or greater. If your KissBox is still running an older
firmware version, use the “Upload firmware” command in “Tools” menu to load the last RTP-MIDI firmware in the
KissBox (you just need to follow the instructions given in the uploader utility window)
7.1 - DHCP activation in KissBox
All KissBox products now support DHCP since firmware V5.0. If you want to use the KissBox with a DHCP
server, just enter 0.0.0.0 for the KissBox address and restart the KissBox.
If a DHCP server is found on the network, the KissBox will use it to get an IP address. If no server DHCP is
found, the KissBox will automatically switch to ZeroConf mode and will use a 169.254.xx.xx IP address.
Note that it is not possible to know which address the KissBox will receive from the DHCP server, apart if you
have configured the server to give a specific address based on the KissBox MAC address. You will then need to use
the Scan Network function to locate the KissBox in the network.
7.2 - RTP-MIDI node configuration
The last thing to do is to define the KissBox RTP-MIDI node configuration, in order to let it connect to your
iPad.
Double click on the RTP-MIDI entry in the tree (where you see “RTP-MIDI (Single/Dual) @ xx.xx.xx.xx”). The
following window will then appear
Page 12 of 14
Enter the IP address used for the iPad in the top four edition boxes (we have entered 192.168.0.25 on the
screenshot, which is the address that you can see on the iPad screenshot before)
IMPORTANT : you must enter exactly the same address, since there is no way to define RTP-MIDI
parameters within the iPad!
The “Bonjour / Session name” is not important for the iPad application, since it is only displayed on Mac OS
and Windows RTP-MIDI drivers. However, it's a good idea to change it into a meaningful name, in order to help
you to remember what is the application of the current RTP-MIDI KissBox.
Click then on “Upload” button to activate the configuration. The KissBox will then restart automatically and
attempts to establish an RTP-MIDI session with the iPad.
8 - How can I check that my RTP-MIDI link is working ?
The most difficult thing with RTP-MIDI on iPad is that there is absolutely no control panel to check if the
wireless RTP-MIDI link is active or not. You can only rely on the applications themselves, if the programmer has
added a signaling feature.
An easy way to test your RTP-MIDI setup is to use the free MidiPads Lite application, available on AppStore.
This application includes small LED on bottom of the screen which is green when the RTP-MIDI link is active, and
red when session is not opened.
Once you have configured everything, start the KissBox and wait for a few seconds (you should see the red
LED on the KissBox blinking a few times). The “MIDI” LED on the MidiPads application should then turn green.
If it's the case, start touching the different pads: you will see the MIDI OUT LED on the KissBox blinking,
meaning that you are receiving MIDI data over the wireless RTP-MIDI link. Congratulations, and welcome in the
marvelous field of RTP-MIDI.
If the “MIDI” LED on Midipads remain red, it means that the KissBox can not open the RTP-MIDI session
with the iPad. The most common error (and then the first thing to check) is the IP addresses of the different
devices.
Do not forget also that the iPad automatically switch to an active WiFi access point when the current one is
deactivated (because it is reset for example). Just go back to “Setup” application and check what is the SSID
displayed on the “WiFi” line. If you do not see anymore the SSID of your RTP-MIDI WiFi router, it's because the
iPad jumped to another “known network” (see the explanation on the bottom of iPad “WiFi networks” page). If you
are afraid of loosing your RTP-MIDI session (during live use especially), the best thing to do is to “forget” all WiFi
networks you have already activated in your iPad (select the SSID of the network you want to deactivate, touch the
blue arrow to open the control panel and touch “Forget this network”)
Page 13 of 14
9 - Document revisions
Date
Auteur
Version
Description
19/01/2013
B.Bouchez
1.0
First document release
Page 14 of 14