1
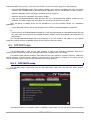
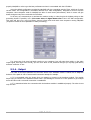
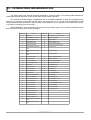
COMPACT CV TOOLBOX
PROGRAMMABLE HD CONTROL ENGINE
FOR ANALOG SYNTHESIZERS
USER'S MANUAL
COPYRIGHT
2013 KISS-BOX
0.3
DOCUMENT REVISION
Page 1 of 39
Contents
1 - What is the CV Toolbox?........................................................................................ 4
2 - The HD engine....................................................................................................... 5
3 - A few words about RTP-MIDI................................................................................ 5
4 - How to use the CV Toolbox?.................................................................................. 6
4.1.1 - System integration of the CV Toolbox................................................................. 6
4.1.2 - Use with modular synthesizer.............................................................................. 6
4.1.3 - Use with desktop or rack-mount analog synthesizer..........................................6
4.1.4 - Use with RTP-MIDI devices..................................................................................7
5 - CV Toolbox hardware description and installation................................................8
5.1 - Front panel.............................................................................................................. 8
5.2 - Back panel............................................................................................................... 8
6 - RTP-MIDI Network configuration.......................................................................... 9
6.1 - Understanding the IP address concept in a few words................................................ 9
6.2 - What is my network setup ?....................................................................................10
6.3 - Network configuration on Windows XP.....................................................................10
6.4 - Network configuration on Windows Vista / Seven..................................................... 11
6.5 - Network configuration on Mac OS-X.........................................................................12
7 - RTP-MIDI configuration of the CV Toolbox.........................................................13
7.1 - DHCP/Zeroconf activation in CV Toolbox...................................................................15
7.2 - RTP-MIDI node configuration.................................................................................. 15
8 - VSTizer CVToolbox plugin.................................................................................... 16
8.1 - System requirements.............................................................................................. 16
8.2 - Mac installation...................................................................................................... 16
8.3 - Windows installation............................................................................................... 16
8.4 - Using the plugin as a standalone editor...................................................................16
8.5 - RTP-MIDI page...................................................................................................... 17
8.5.1 - RTP-MIDI setup..................................................................................................17
8.5.1.1 - RTP-MIDI manual setup.......................................................................................... 18
8.5.1.2 - RTP-MIDI plug&play setup..................................................................................... 18
8.5.2 - Retrieving program banks from CV Toolbox...................................................... 18
8.5.3 - Uploading program banks to CV Toolbox...........................................................18
8.5.4 - Uploading one program into the CV Toolbox..................................................... 19
8.5.5 - Using VSTizer plugins with Akai MPC software................................................. 19
8.6 - VCO / Setup page...................................................................................................21
8.6.1 - CV outputs configuration................................................................................... 21
8.6.1.1 - VCO Control............................................................................................................. 21
Page 2 of 39
8.6.1.2 - VCF Control.............................................................................................................. 21
8.6.1.3 - VCA Control..............................................................................................................21
8.6.1.4 - VCO LFO / LFO1....................................................................................................... 21
8.6.1.5 - VCF LFO / LFO2........................................................................................................22
8.6.1.6 - VCA LFO / LFO3....................................................................................................... 22
8.6.1.7 - VCF Envelope........................................................................................................... 22
8.6.1.8 - VCA Envelope........................................................................................................... 22
8.6.1.9 - Note gate................................................................................................................. 22
8.6.1.10 - Resonance............................................................................................................. 22
8.6.1.11 - 16 bits direct CV.................................................................................................... 22
8.6.1.12 - MIDI Control Change.............................................................................................23
8.6.1.13 - MIDI Sequencer Clock........................................................................................... 23
8.6.1.14 - MIDI Sequencer Control........................................................................................23
8.6.2 - VCO Control Block.............................................................................................. 23
8.7 - VCF page............................................................................................................... 24
8.8 - VCA page...............................................................................................................25
9 - USING CV TOOLBOX WITH MAX/MSP..................................................................26
9.1 - Using CVToolbox as a MIDI device...........................................................................26
9.2 - Using CVToolbox VSTizer plugin with Max/MSP.........................................................27
9.3 - Using the CVToolbox Max/MSP external................................................................... 28
9.3.1 - Arguments.......................................................................................................... 29
9.3.2 - Messages............................................................................................................ 29
9.3.3 - Getting the best time resolution from Max/MSP...............................................30
9.3.4 - Output.................................................................................................................31
10 - CV TOOLBOX MIDI IMPLEMENTATION.............................................................. 32
11 - CV TOOLBOX SYSTEM EXCLUSIVE IMPLEMENTATION.......................................33
11.1 - Common parameters............................................................................................ 35
11.2 - VCO Parameters................................................................................................... 35
11.3 - VCF Parameters.................................................................................................... 36
11.4 - VCA Parameters....................................................................................................36
12 - VSTIZER MIDI IMPLEMENTATION..................................................................... 38
13 - Document revisions........................................................................................... 39
14 - Copyrights / Trademarks................................................................................... 39
Page 3 of 39
1 - What is the CV Toolbox?
The Compact CV Toolbox and its associated software package form a complete hardware and software
solution, designed to simplify integration of any modern or vintage analog hardware synthesizer within your
favorite Digital Audio Workstation or sequencer software environment, both for studio and live applications.
The CV Toolbox is much more than a simple CV interface driven over a network: it's a complete synthesizer
control engine which generates all complex control signals for analog synthesizers. It can also be controlled directly
from Max/MSP software, thanks to a dedicated external, making your analog synthesizer an extension of the
software.
The CV Toolbox is equivalent to:
•
24 Low Frequency Oscillators
•
16 ADBSSR Envelope Generators
•
24 Modulation Matrices pre-configured for VCO, VCF and VCA control
It supports up to 8 voices of polyphony, and is designed to be used with modular synthesizers as with rackmount or desktop versions of analog machines.
The CV Toolbox stores 32 programs in a non-volatile memory, which allows you to use the CV Toolbox
without needing a computer. The CV Toolbox then transforms any synthesizer, even a modular one, into
a programmable machine.
The CV Toolbox offers 8 high-resolution analog outputs. All signals are computed on 32 bits in the internal
processor using the first HD synthesizer control engine written for an embedded target. Output resolution is 16 bits
without any multiplexing, to ensure maximum signal quality. Each output can be connected to any internal signals
(LFO, Envelope Generator, Modulation Matrix Output, etc...), and the 16 bits resolution is also available in MIDI
directly, without needing any proprietary protocol.
And of course, the CV Toolbox is fully compatible with all other RTP-MIDI devices, and it can be easily
controlled by a classical MIDI keyboard over a KissBox MIDI2TR or KissBox Compact MIDI module for example.
The CV Toolbox is delivered with complete software support for Windows and Mac computers, thanks to
various software modules specifically written for it:
•
VSTizer VST plugin, used as:
◦
Librarian: all programs of the CV Toolbox are compiled into standard VST banks, that can be
downloaded/uploaded easily.
◦
Editor: you can easily modify any program in any bank from a graphic visual interface. All changes
made in the local editor are transmitted immediately to the CV Toolbox, and they can be stored with a
simple click to create new banks
◦
VSTi MIDI interface: the VSTizer plugins present themselves as virtual instruments to the VST host.
They can receive MIDI events like any other VSTi and transmit them to the synthesizer. You do not
have to deal with your system MIDI ports configuration anymore, since all the VSTizer plugins are
using network based RTP-MIDI communication
•
Max/MSP control object for Max5 and Max6. This object allows you to send any signal generated on a
Max/MSP patch directly to a CV output of the CVToolbox. You can then create any modulation matrix, with
as many LFO, enveloper generators, or anything else you want. Only your imagination is the limit. And last
but not least, using this control object is simple! You do not need any driver, external configuration tool
and other weird thing like a proxy to control the CVToolbox from Max/MSP. We are Max users and
programmers, and we know how other Max users are working...
•
TouchOSC configuration file for remote control over WiFi using an iPad
All software modules are available on Windows and Mac OS-X platforms, in 32 and 64 bits versions.
Page 4 of 39
2 - The HD engine
The CV Toolbox is the first hardware control engine created specifically for the new HD protocol being
developed by the MMA. The complete engine has been designed for 32 bits processing, which means that all MIDI
data are transformed into 32 bits HD data, for maximum processing precision.
The complete data path within the CV Toolbox is 32 bits wide, with 64 bits support for some critical
computations. The only place where the resolution is lowered to 16 bits is the digital to analog converter (DAC),
simply because 16 bits is the highest resolution that exists for these high speed converters.
In order to keep the maximum accuracy, the DAC is a specific model, without any sample-and-hold circuitry.
This guarantees that the control voltage remains perfectly stable and without any sampling noise.
The RTP-MIDI communication software internally translates the standard MIDI commands transported by
RTP-MIDI into HD commands.
When HD protocol will become public, you will have the choice of controlling the CV Toolbox directly by HD
protocol or by RTP-MIDI protocol. The only thing needed at this moment will be an update of the CV Toolbox
firmware.
3 - A few words about RTP-MIDI
RTP-MIDI is a worldwide open and completely free standard, listed in RFC documents (RFC6295). This
guarantees that anybody can use RTP-MIDI without needing to pay any license and ensures that no company can
claim RTP-MIDI to be its proprietary product. It is based on the well-known RTP protocol (listed as RFC3550
standard), which is based in turn on standard IP stack. This allows any RTP-MIDI product to use standard
networks components.
RTP-MIDI does not necessarily relies on Ethernet and can be used over wireless links. However, the use of
Ethernet guarantees extremely low latency over the complete network.
RTP-MIDI benefits from all RTP advantages, like clock synchronization, detection of loss packets, etc...
Moreover, RTP-MIDI provides a recovery mechanism, which allows a receiver to detect missing informations due to
lost packets. This innovating mechanism allows to recover MIDI data without needing any retransmission.
RTP-MIDI is natively integrated in Mac OS X since 2006 (no need to install any driver on this platform), and
free Windows drivers are now available for all Windows platforms from XP to Seven, in 32 and 64 bits versions.
Note that the drivers are needed only to emulate MIDI ports from system point of view. Since RTP-MIDI is
running on the top of open, mature standards (IP / UDP / RTP), an application can also perfectly run directly an
RTP-MIDI engine without needing any complex driver to install. RTP-MIDI are also compatible with any existing
router or network device, since it does not use any reserved/proprietary communication code.
Page 5 of 39
4 - How to use the CV Toolbox?
4.1.1 - System integration of the CV Toolbox
As you can see in the diagram here, the CV Toolbox is designed to integrate easily into any modern Digital
Audio Workstation setup, both for studios and live environments. RTP-MIDI networking turns the complete setup
into a distributed MIDI patch-bay system in which it is not necessary anymore to move cables between devices in
order to change configuration. MIDI Mergers are not necessary too: as you can see in the diagram, multiple
devices can connect at the same time to the CV Toolbox, so you can easily share its power between multiple users.
4.1.2 - Use with modular synthesizer
The CV Toolbox is the ideal companion for all modular synthesizers, since it replaces many expensive
modules and does not take any room in your rack. Its small size allows the CV Toolbox to stand on the top of your
modular rack.
The CV Toolbox also transforms your modular synthesizer in a programmable unit, since it has the capability
to store the complete configuration of its internal LFO, envelope generators, modulation matrix, etc..
The most common configuration is to have the analog outputs of the CV Toolbox to be connected to control
voltage inputs of your VCO, VCF and VCA modules. With only three cables between the CV Toolbox and your
modules, you have a completely programmable synthesizer voice.
4.1.3 - Use with desktop or rack-mount analog synthesizer
Page 6 of 39
The CV Toolbox is not limited to the use with modular synthesizers. It can also be used with any synthesizer
or effect box with voltage control inputs, like Moog Moogerfoogers, Moog Minitaur, Arturia Minibrute, Korg MS20,
etc...
If you think that you reached the limits of your favorite machine, the CV Toolbox will make you rediscover it
with its HD modulation matrices and modules. And for most of them, the CV Toolbox will turn your analog machine
into a fully programmable device.
4.1.4 - Use with RTP-MIDI devices
The CV Toolbox is ideally associated with a VSTizer plugin, which allows to configure and edit your
synthesizer patches, but it can also work with any other RTP-MIDI devices, like the KissBox RTP-MIDI interfaces.
Do not forget that RTP-MIDI allows you to create dynamic patches between devices (called “Virtual
patchbay”). You do not need anymore to connect/disconnect MIDI IN, MIDI OUT and MIDI THRU, you can
configure which device connect to any other device in the network, using the KissBox Editor.
Moreover, you can also use the RTP-MIDI Configurator to manage your network setup in your studio and
recall any configuration without needing to touch any MIDI or network cable.
The CV Toolbox supports up to 8 parallel sessions, which means that you can control a CV Toolbox from its
VSTizer plugin, while a MIDI keyboard is used to play the synthesizer. Just connect your RTP-MIDI interface to the
network, configure it to open a session with the CV Toolbox, and it's done!
Page 7 of 39
5 - CV Toolbox hardware description and installation
The CV Toolbox is a small robust metallic module (150x85x35mm), designed to be used both with modular
synthesizers and desktop analog synthesizers.
It requires a external 12 volts power supply (wall-mount type), able to provide at least 200mA. The DC
power supply is connected over a classical “2mm power jack” (center pin = positive supply). The CV Toolbox is
protected against power supply polarity inversion.
It is mandatory to use a good-quality filtered power supply. Use of a regulated power supply is not
mandatory.
5.1 - Front panel
The front panel of the CV Toolbox is dedicated to network connection and status indicator.
The LINK LED (green) indicates that a valid Ethernet signal is found. This LED activates when the CV Toolbox
is connected to a network switch or router.
The ACT LED (red) activates itself when the CV Toolbox is receiving messages from the network.
The RUN LED (blue) reports the CV Toolbox software status. It blinks every second when the firmware is
running normally, and blinks ten times per second when the firmware is being updated. If this LED blinks in a
different manner, it indicates that a problem has been detected. Please report to “Problem resolution section” at
the end of this user's manual in this case.
WARNING : compared to other KissBox products, the CV Toolbox does not support Power Over Ethernet. It
must be powered by the 12VDC connector on the back panel.
5.2 - Back panel
You will find the power connector and eight high-resolution analog outputs on the back panel. The outputs
connectors are 3.5mm standard mono jacks.
The analog outputs provide control signals between 0 and +10V for analog signals. They can also provide
digital gate signals (0/+5V) when a logic signal is selected for a given output.
The outputs are short-circuit protected and can be deliver up to 10mA each.
Assignation of signals to each output is done using the VSTizer plugin. It can be done also using any System
Exclusive compatible software.
Page 8 of 39
6 - RTP-MIDI Network configuration
6.1 - Understanding the IP address concept in a few words
Configuring devices on a RTP-MIDI network is far from being difficult. There are basically two important
parameters to know:
•
the IP addresses used by the different devices connected to the network
•
the subnet mask used on your network
The IP address is nothing else than a number used by the different computers to identify themselves on the
network. You can easily understand how it works if you imagine that your network is a city, and the
computers/printers/etc.. connected to the network are buildings in this city.
If you want to locate a specific building in a street, you just need a simple information: its number. That's
exactly what the IP addresses are: a way to locate a computer in a network.
An IP address is formed of four numbers, between 0 and 255, separated by dots (We will not speak of IPv6
here. If you know already that there are IPv4 and Ipv6 addresses, this tutorial about IP addresses is probably
useless for you...). For example, the computer on which I am typing this text right now has address 192.168.0.6.
You can easily understand that each computer must have a unique IP address in a given network (or how
would you distinguish two houses with the same number in a street?)
When the IP address concept was created, it was noticed that different use-cases were encountered: in
some cases, it was better to have only a few very big networks with many computers in the same network domain,
but for some other cases, it was better to have multiple small networks, with a limited number of possible
computers in the same network domain.
If you look from Internet point of view, the first solution is the best (basically one network per country with
many users), but if you look from your studio point of view, the second solution is the best. So, what can we do?
That's where the second parameter (the subnet mask) comes into the game. It defines simply your network
domain size. The subnet mask is also formed of four numbers, separated by dots. These parameters are related to
the four numbers of the IP address, and define what numbers are the network domain, and what numbers are the
computer number.
Let's take a practical example: the 255.255.255.0 subnet mask says that the 3 first numbers are the network
domain definition, and that the last number is the computer number. Since each number in the IP address ranges
from 0 to 254 (255 has a special meaning), you see that you can have up to 255 computers in this domain, and
you can have 255 x 255 x 255 network domains. This setup is very common for domestic and middle sized setups
(like a music studio for example)
Another example? Let's take another common subnet mask: 255.0.0.0. This subnet mask allows you to have
“only” 255 network domains, but this time, each domain can contain 255 x 255 x 255 computers! This is typically
what you find at Internet levels or in very big companies.
Let's concentrate on the typical subnet mask you will find (the first one described here). Most of the time,
they will be associated with the following domains: 192.168.0.xx and 192.168.1.xx (remember the three 255
numbers in the subnet mask: they define what the domain numbers are, so 192.168.0.x and 192.168.1.x here).
As we have seen, each of these domains can contain up to 255 computers. However, a computer located at
address 192.168.0.1 can not talk with another computer located at 192.168.1.1 for example, because they do not
belong to the same domains (these are separate networks from IP point of view. Going from one network to
another would require a specific device named a router or a gateway. We will not talk about these devices here)
As you can see, the setup rules are extremely simple:
•
Make sure that all devices on the network have the same subnet mask
•
Make sure that all devices on the network belong to the same domain
•
Make sure that each device in a given domain has a different IP addresses than all the others
Page 9 of 39
For example, if you decide to use 192.168.0.x domain (with subnet mask 255.255.255.0), you can use
addresses from 192.168.0.0 to 192.168.0.254.
Subnet mask
255
255
255
0
IP address
192
168
0
xx
All fields of IP address matching with
a 255 in the subnet mask must be the
same for all computers / devices in the
network
The field in IP address matching with
a 0 in the subnet mask must be
different for every computer / device
in the network
Let's finish by saying that there are standard systems to give automatically addresses to devices once they
are connected to the network (these systems are called DHCP and Zeroconf). However, we recommend you to use
static IP addresses each time you can, because you will then keep everything under control.
6.2 - What is my network setup ?
Now that you know how addresses are working, before doing anything else, prepare a simple sketch of your
network installation, to see where you will connect what, and also to make sure that you will not disturb any
existing setup.
Take the time to see where your current wired and wireless networks are going, and what is connected to
them, even if you decide to use a separated network. Write down on your sketch paper what are the devices
already connected to your network, and what are the IP addresses used by them, and keep them for future
reference.
We highly recommend you to keep the network used for RTP-MIDI separated from the network used for
Internet access or office use (if possible, use two different network cards. Or use WiFi for Internet and wired
network for RTP-MIDI on laptops). This will guarantee the lowest possible latency on RTP-MIDI even if a computer
starts to use a lot of bandwidth (to access Internet or access a printer for example), since it will use a different
network than the RTP-MIDI.
6.3 - Network configuration on Windows XP
Click on “Start” button, then click on “Configuration panel”
Double-click on “Network connections”
Select the network interface you want to use for the RTP-MIDI network and double-click on it (wired
networks appear under the name “Local network connection”. You can also make a right-click and choose
“Properties”
Page 10 of 39
Scroll down the elements list, and double-click on “Internet Protocol (TCP/IP)”
Click on “Use the following IP address” button and enter the IP address and subnet mask you want to use
for your computer (here we have used IP address 192.168.0.4 with subnet mask 255.255.255.0). Remember that
this configuration method is the one we recommend for RTP-MIDI.
If you want to use a DHCP server to get automatically an IP address, click on “Get automatically an IP
address” button. Remember that you may have some difficulties to find what address will be used by your
computer in that case.
Click on “Ok” button to activate the new configuration (you will have to do it on the different windows which
have been opened, until you get back to the configuration panel)
6.4 - Network configuration on Windows Vista / Seven
Click on the Windows button, then click on “Configuration panel”
Locate the “Network and Internet” group and click on it
Click then on “Network and sharing”
Click on “Display the network status”
You will then get a different menu on the left of your screen. Click on “Modify the network card parameters”.
The computer will now display a list of all network connections available on your computer. The LAN connections
are identified by the icon of computers with a network plug (WiFi connections show a bargraph in place of network
connector)
Page 11 of 39
Double click on the network connection you want to use for RTP-MIDI. You will get the connection status
window on your screen.
Click on “Properties” button to open the network interface control panel
Double click on “Internet protocol version 4 (TCP/IPv4).
Click on “Use the following IP address” button and enter the IP address and subnet mask you want to use
for your computer (here we have used IP address 192.168.0.90 with subnet mask 255.255.255.0). Remember that
this configuration method is the one we recommend for RTP-MIDI.
If you want to use a DHCP server to get automatically an IP address, click on “Get automatically an IP
address” button. Remember that you may have some difficulties to find what address will be used by your
computer in that case.
Click on “Ok” button to activate the new configuration (you will have to do it on the different windows which
have been opened, until you get back to the configuration panel)
6.5 - Network configuration on Mac OS-X
Network configuration on the Macintosh is done with “System Preferences” application (the icon with gears).
Open the “System Preferences” then click on “Network” icon. You will get the following window:
Page 12 of 39
The static configuration (recommended for RTP-MIDI) is activated by choosing “Manually” in the “Configure
IPv4” list.
Enter the IP address you want for your computer, then enter the subnet mask. In the screenshot, you can
see that we have selected address 192.168.0.6 with a subnet mask 255.255.255.0. This means that all IP devices
must have an IP address starting with 192.168.0 if you want to connect with them using this configuration.
If you want to use dynamic IP address, select “Using DHCP” in the “Configure IPv4” list. You may need to
click on “Advanced” button, and click on “Renew DHCP lease” if your computer was already using a static IP
address.
Click on the “Apply” button to activate the configuration.
7 - RTP-MIDI configuration of the CV Toolbox
This simple step just consists into entering into the CV Toolbox its IP address. You can also define your own
Bonjour name, if you want to use this feature.
Before anything else, install the KissBox Editor software, available freely both for Mac OS and Windows
platforms on KissBox website. RTP-MIDI configuration requires Editor V10.9.0 minimum.
All KissBox products use 192.168.0.253 IP address when they leave the factory. If you have changed the IP
address of your KissBox and you can not remember it, just power it and keep the reset button depressed until the
blue LED stops blinking. The factory default values are then restored into the KissBox configuration memory.
Connect the RTP-MIDI KissBox and the computer running the KissBox Editor to the network. Make sure that
your computer network is configured correctly (same subnet).
Enter “192.168.0.253” (or the IP address of the Box if you have already configured it) in the four edition
boxes located in the “Add Kiss-Box manually” and click “Add” button. The KissBox Editor will then try to connect to
the RTP-MIDI KissBox. You will see “Trying to connect to Box 192.168.0.253” (more precisely, the address you
have entered before ) in the log window (bottom right).
Page 13 of 39
After a few seconds, you will normally see “Found Kiss-Box xx.xx.xx.xx” (with the Box IP address of course,
not “xx.xx.xx.xx”) indication appear in the log window. If the Box can not be found, check your computer network
settings. The most common problem is a network card configured with a wrong IP address and/or in a different
subnet (for example, it does not work if the computer has address 192.168.1.20 on subnet 255.255.255.0)
When the KissBox Editor has located the RTP-MIDI Box, click on the arrow in front of “Network” in the tree
display. You will then see the following indication “RTP-MIDI @ xx.xx.xx.xx”. The current network parameters used
by the KissBox are also displayed on the right side of the window.
Page 14 of 39
7.1 - DHCP/Zeroconf activation in CV Toolbox
All KissBox products based on V3 CPU (like the CV Toolbox) support DHCP. If you want to use the CV Toolbox
with a DHCP server, just enter 0.0.0.0 for the address and restart the CV Toolbox.
If a DHCP server is found on the network, the CV Toolbox will use it to get an IP address. If no server DHCP
is found, the CV Toolbox will automatically switch to ZeroConf mode and will use a 169.254.xx.xx IP address.
Note that it is not possible to know which address the CV Toolbox will receive from the DHCP server, apart if
you have configured the server to give a specific address based on the KissBox MAC address. You will then need to
use the Scan Network function to locate the CV Toolbox in the network.
We recommend to use static IP configuration for RTP-MIDI devices rather than DHCP or Zeroconf based
configuration.
7.2 - RTP-MIDI node configuration
The last thing to do is to define the CV Toolbox RTP-MIDI node configuration... which is nothing to do!
Double click on the RTP-MIDI entry in the tree (where you see “RTP-MIDI (Single/Dual) @ xx.xx.xx.xx”). The
following window will then appear
The address indicated on this window is used if you want the KissBox to start a RTP-MIDI session
automatically. You can for example use it to create automatically a RTP-MIDI path between the CVToolbox and a
KissBox MIDI2TR or MIDICompact interface (a keyboard connected to the MIDI interface will then be able to
control directly the CVToolbox without any computer involved except for configuration phase). If you do not want
to activate the Session Initiator functionality, keep 0.0.0.0 value in the dialog box.
The “Bonjour / Session name” is used to identify the CV Toolbox in Bonjour service. It's a good idea to
change it into a meaningful name, in order to help you to remember what is the application of CV Toolbox.
Click then on “Upload” button to activate the configuration. The CV Toolbox configuration is now done.
Page 15 of 39
8 - VSTizer CVToolbox plugin
VERY IMPORTANT: the VSTizer plugins do not generate any sound or any control signals, even via the
network connection. All synthesizer control signals are generated by the CV Toolbox internal engine!
The plugin is used as an editor, librarian and it transmits the MIDI data from the VST host to the CV Toolbox
hardware (the CV Toolbox being then integrated like any other software synthesizer in modern production
environment)
8.1 - System requirements
The CVToolbox VSTizer plugin requires a 32 bits VST2.4 host, or a 64 bits VST2.4 host. The host must run
under Windows XP, Windows Vista, Windows 7 and Windows 8, or Mac OS-X (minimum version : 10.4 for 32 bits
version, 10.6 for 64 bits version)
This plugin is designed to work with any VST host software because RTP-MIDI uses network
communication channels, and does not require any driver to be installed on your computer. The VSTizer never
transmit any data to the native MIDI interfaces declared in your sequencer, it uses only RTP-MIDI communication
paths.
8.2 - Mac installation
Double-click on the installation package file and follow the instructions given on the different screens. You
need a Mac running OS-X 10.4 minimum (OS-X 10.6 minimum for 64 bits version)
The installer will copy the modules in the computer's VST directory, along with the other installed plugins.
We highly recommend that you do not change the destination folder, since all VST compatible applications will look
in this folder to find installed plugins. Placing the VSTizer modules in a different folder may make them unreachable
from your VST hosts.
8.3 - Windows installation
We provide an installer application, compatible with any 32 bits version of Windows from XP. This application
also run in 32 bits mode if you have a 64 bits version of Windows. Start the setup application and follow the
instructions given in the different screens.
Note that there is not really a standard folder for VST plug-ins on the Windows platform. Most applications
look for /Program Files/steinberg/vstplugins folder by default. However, this default folder can be changed at
any moment, so it is possible that the plug-ins are located in a different folder on some computers.
The installer offers you to install the VSTizer plugin in that folder by default, but you can change it during
installation if necessary. The installer also create the necessary key in the registry base to allow the VST hosts to
find the plugins in the standard directory.
Advanced users should note that the default directory created for VST plug-ins is defined in the following
registry key HKEY_LOCAL_MACHINE\Software\VST. If you experience problems to load VST plug-ins within your
host, please check if this registry key has not been modified by another audio software or plug-in installer using
regedit utility.
8.4 - Using the plugin as a standalone editor
You may prefer to use the CVToolbox VSTizer as a standalone editor rather than as a plugin within a VST
host. You may also have a sequencer or DAW which does not support VST format (like Logic, which supports only
AU plugins)
In that case, we provide the possibility to run the VSTizer in a standalone application thanks to a specifically
Page 16 of 39
created Max patch (do not worry, if you do not know Max, you will not need to program or buy anything)
•
Download the Max/MSP runtime from Cycling'74 website. The runtime is completely free, does not require
a license, and is available both for Windows and OS-X platforms. You can use the Max 5 or Max 6 runtime.
•
Install the Max/MSP runtime following instructions given by Cycling'74
•
Install the VSTizer like indicated in the previous chapter
•
Copy the CVToolboxStandalone.maxpat file (from the CD or downloaded from KissBox website) on your
hard disk. The exact location does not matter, you can put the file wherever you want
Once everything is installed, there are two possibilities to run the CVToolbox VSTizer as a standalone
application:
•
Launch Max/MSP runtime, click on the File/Open menu, load the CVToolboxStandalone.maxpat file
Or
•
Double-click on CVToolboxStandalone.maxpat file. It will start automatically the Max/MSP Runtime and load
the patch (this works because the Max/MSP Runtime installer creates automatically the association for
maxpat files)
The CVToolboxStandalone.maxpat file is not protected, so you can modify it and adapt it to your specific
needs (this requires however a Max/MSP license to have access to the patch editor)
8.5 - RTP-MIDI page
The RTP-MIDI page is used for two main purposes. It defines the connection parameters with the CV
Toolbox, and it controls how banks are exchanged between the VSTizer and the CV Toolbox.
The Instance Name edit box contain a name defined by the user, typically to remind to which CV Toolbox the
VSTizer software. It can be used for example if you have two or more same CV Toolbox in your setup, and you
want to remember which of them is being controlled by the plugin instance.
8.5.1 - RTP-MIDI setup
The RTP-MIDI setup is performed using the RTP-MIDI target edition box, the Scan RTP button and the
Connect button.
These buttons allow you to perform either a completely manual setup (in case you like to control everything
Page 17 of 39
by yourself), or a fully plug&play setup. RTP-MIDI has the great advantage to let you decide what is the best
approach for your setup, compared to other solutions supposed to do everything “by magic”.
By the way, did you notice that some competitors to RTP-MIDI claim to be “100% Plug&Play, with no
configuration”. So why do you need a configuration tool for them too ?
8.5.1.1 - RTP-MIDI manual setup
If you have configured your CV Toolbox in manual mode (static IP address), you can directly enter the IP
address in the “RTP-MIDI target” edition box.
Once the destination address has been entered, the VSTizer will try to open a session with the remote
device. When the session is opened, the “Connected” LED will be active. If the LED remains off, check the following
points:
•
IP address is the correct one
•
the computer network card is correctly configured
Note that the entered address is stored in the plugin configuration file. Each time the plugin is loaded in the
VST host, it will then automatically reconnect to the RTP-MIDI interface.
8.5.1.2 - RTP-MIDI plug&play setup
If you have configured your CV Toolbox interface in DHCP or ZeroConf mode (Plug&Play mode), you can not
enter the target IP address in the edition box since the address is dynamically attributed. Since the VSTizers
supports mDNS (also known as “Bonjour” protocol), it can locate very easily any RTP-MIDI interface in Plug&Play
mode.
Click first on “Scan RTP” button. The LCD display on bottom will then indicate “Scanning RTP-MIDI
network...”, while the LED on the “Scan RTP” button remains active. After a few seconds, the button will deactivate,
and the LCD display indicates “Network scan is finished”.
Click then on the box under the “Scan RTP” button. You will then see a list of all RTP-MIDI devices available
on your network (the names displayed here are the one given in the Kiss-Box Editor as “Session name”. That's why
we recommend to choose meaningful names when configuring the Kiss-Box RTP-MIDI devices). Choose the RTPMIDI device to which your synthesizer is connected (it will be displayed in the box) and click on Connect button.
The VSTizer will then open a session with the remote device. When the session is opened, the “Connected”
LED will become active.
Note that the selected device name is recorded in the VSTizer configuration file. The plugin will then
automatically try to reconnect to the selected device the next it is loaded in the VST host.
8.5.2 - Retrieving program banks from CV Toolbox
The CV Toolbox VSTizers are able to dump completely the module memory and transform it into a VST bank
file.
Click on the “Download from CV Toolbox” button to start the transfer.
When the transfer is finished, the button LED goes off and the LCD display will indicate “Downloading from
CV Toolbox is finished”.
Once you have performed a complete download, you can use the “Save VST bank” functionality of your VST
host to save the .fxb file on your computer's hard disk. Please refer to the host documentation to know how to
save a VST bank file, since the procedure differs from one host to another.
IMPORTANT: when you download the program bank from the CV Toolbox, the local program data in the
VSTizer plugin are replaced with the data coming from the CV Toolbox! Do not forget to save the plugin bank
before downloading a new one (see VST host user's manual to know how to save a VST bank. If you use a Akai
MPC, please see following chapter)
8.5.3 - Uploading program banks to CV Toolbox
Page 18 of 39
The VSTizer plugin is able to upload a complete program bank (32 programs) into the CV Toolbox.
You need first to load the VST bank file in the VSTizer. The procedure depends on the host, please check
your host's user's manual. For example, on Reaper, you need to click on the '+' sign just over the VSTizer editor
window, and then choose “Import VST patch/bank file”.
IMPORTANT: the RTP-MIDI Target IP Address and the RTP-MIDI device name (for Plug&Play mode) are
stored within the VST banks. When you load a new bank into the VSTizer, you may notice that the “Connected”
LED goes off. This occurs if the device address (or name) stored in the bank is not the one you are using in your
configuration (and this will probably occur the first time you load a completely new bank within the plugin). Just
reconnect the VSTizer using manual or Plug&Play method (see before) by entering the destination IP address or
selecting the device in the list. Then save the bank under a new name. This bank is now configured for your setup,
and will reconnect automatically the next time you use it.
Click then on the “Upload all programs to CV Toolbox” button... and simply wait until the complete bank is
loaded in your synthesizer When the upload is complete, the “Upload” button will go off and the LCD display will
indicate “Uploading to CV Toolbox is finished”.
You can abort the upload procedure at any moment (in case you notice that you are not loading the correct
bank for example), by clicking a second time on the “Upload” button.
VERY IMPORTANT: when you upload a bank in the CV Toolbox, all programs inside the CV Toolbox are
replaced by the new bank. These programs are automatically stored in the non-volatile memory. You do
not then need to press the “Store current program” button.
8.5.4 - Uploading one program into the CV Toolbox
When you use the “Upload all programs to CV Toolbox” button, the whole bank from the VSTizer plugin is
transferred to the CV Toolbox (32 programs), and all programs are automatically stored in the non-volatile memory
of the CV Toolbox module.
During sound design session, it may be interesting to send only one program to the CV Toolbox, without
storing it in the non-volatile memory. The program data are then used like a scratchpad.
When you click on “Upload current program to CV Toolbox”, you transfer the current program data being
edited within the VSTizer into the edition buffer of the CV Toolbox. However, the program data are not stored in
the non-volatile memory.
When you are satisfied with the sound created with the program data, click on “Store current program”
button. Only the current program data will be saved in the non volatile memory.
8.5.5 - Using VSTizer plugins with Akai MPC software
The Akai's MPC Software (for MPC Studio and MPC Renaissance) only have a limited VST host
implementation. Basically, you can only load a plugin, open its editor and select a program in the list.
The MPC does not support user controlled bank importing / saving, which means that most plugins will be
able to use only their default banks when instantiated in MPC. As a result, you can edit sounds within the plugin
editor, they will be saved automatically by the MPC software, but you can not export the sound from one plugin
instance to another.
In order to help MPC user's with the VSTizer series, we have added two specific functionalities inside our
plugins: “Import VST bank” and “Export VST bank”. You can use these functions in any VST host, but you should
remember that most VST host implement these functions normally (in other terms, we recommend you to use in
priority the import/export functions from your host in priority)
Page 19 of 39
Here are the steps to use the VSTizer CV Toolbox within a MPC project, with the factory bank:
–
Start MPC software
–
Select the track you want to use to drive your hardware synthesizer and select the “Plugin” type
–
Click on the dropdown list named “Plugin” in the area just under, and choose the VSTizer you want to use.
You will notice that the preset list is filled with default program names coming from the VSTizer.
–
Click on the “e” button to open the VSTizer editor window
–
Click on the “Import VST bank” button in the VSTizer editor window, and choose the VST bank you want to
load in the VSTizer.
The VST bank is now loaded in the plugin, and can be edited, transferred to the synthesizer, etc..
However, you will notice that the program list has not been updated in the MPC (it's still filled with default
program names)
To update the preset list within MPC, just close and reopen your MPC project. The list within MPC will be
updated automatically when your project reloads.
Page 20 of 39
8.6 - VCO / Setup page
The VCO / Setup page has two usages: it defines what signal you want to send to each output of the CV
Toolbox, and it allows you to configure the VCO Modulation matrix.
8.6.1 - CV outputs configuration
In this group, you will find a signal selector for each analog output. Each signal selector is linked with a
voice/parameter number.
You will also find a polyphony selector, which defines how many parallel voices the synthesizer connected to
the analog outputs support.
8.6.1.1 - VCO Control
This is the output of the VCO Control modulation matrix, as defined by the “VCO Control Block” controls. The
Voice/Parameter number indicates the polyphony voice for the output. For example, if Polyphony is set to 4, each
VCO Control Block is activated every 4 Note On message, in a round robin fashion.
8.6.1.2 - VCF Control
This is the output of the VCF Control modulation matrix, as defined by the “VCF Control Block” controls on
the “VCF” page. The Voice/Parameter number indicates the polyphony voice for the output.
8.6.1.3 - VCA Control
This is the output of the VCA Control modulation matrix, as defined by the “VCA Control Block” controls on
the “VCA” page. The Voice/Parameter number indicates the polyphony voice for the output.
8.6.1.4 - VCO LFO / LFO1
This is the output of the VCO LFO. This signal allows you to pick the LFO signal directly, without using the
VCO Modulation Matrix. This allows to share the internal LFO signal directly on an hardware synthesizer. Only
Delay, Frequency and Waveform parameters are taken into account.
Signal range : 0 .. +10V
Page 21 of 39
8.6.1.5 - VCF LFO / LFO2
This is the output of the VCF LFO. This signal allows you to pick the LFO signal directly, without using the
VCF Modulation Matrix. This allows to share the internal LFO signal directly on an hardware synthesizer. Only Delay,
Frequency and Waveform parameters are taken into account.
Signal range : 0 .. +10V
8.6.1.6 - VCA LFO / LFO3
This is the output of the VCA LFO. This signal allows you to pick the LFO signal directly, without using the
VCA Modulation Matrix. This allows to share the internal LFO signal directly on an hardware synthesizer. Only
Delay, Frequency and Waveform parameters are taken into account.
Signal range : 0 .. +10V
8.6.1.7 - VCF Envelope
This is the output of the VCF 6 points (ADBSSR) Envelope Generator. This signal allows you to pick the
envelope signal directly, without using the VCF Modulation Matrix. This allows to share the internal signal directly
on an hardware synthesizer.
Signal range : 0 .. +10V
8.6.1.8 - VCA Envelope
This is the output of the VCA 6 points (ADBSSR) Envelope Generator. This signal allows you to pick the
envelope signal directly, without using the VCA Modulation Matrix. This allows to share the internal signal directly
on an hardware synthesizer.
Signal range : 0 .. +10V
8.6.1.9 - Note gate
This signal is simply a digital gate signal which is activated when a note is being played. This kind of signal is
typically used to control external envelope generators.
Signal range : 0 / +5V
8.6.1.10 - Resonance
Resonance control signal for analog synthesizer with voltage control resonance.
This signal is computed from two sources: the Resonance control on VCF page and the MIDI Control Change
71. When a program is loaded in the CV Toolbox, the Resonance value is the one defined on the VCF page. The
value is updated when a new note is played.
It is also possible to change dynamically the Resonance during a live performance using MIDI CC 71. This
controller defines an offset of +/-50% around the value defined in the program parameters.
Note that the Resonance control is smoothed automatically to avoid any zipper noise when the MIDI value
changes.
Signal range : 0 .. +10V
8.6.1.11 - 16 bits direct CV
When using this function, analog outputs are being controlled directly from the network (like on the
HDCV88) with 16 bits resolution. The 16 bits resolution can be accessed even under MIDI mode, thanks to a
specific SYSEX message (MIDI perfectly supports more than 7 or 14 bits resolution using standard MIDI messages
over RTP-MIDI! No need for an exotic proprietary protocol to do that...)
When used with the VSTizer plugin, the 16 bits outputs are directly controlled by VST parameters 1 to 8,
which allows full automation with high resolution from the VST host.
Page 22 of 39
Note that these outputs are smoothed, in order to avoid any zipper noise when controlling synthesizers
modules. You can then avoid to use VST parameters ramps and simplify your sequence programming.
Signal range : 0 .. +10V
8.6.1.12 - MIDI Control Change
This function allows you to control directly an analog output from a MIDI Control Change message. Under
this mode, the parameter associated is Control Change number (1..120), not the polyphony voice.
Note that these outputs are smoothed, in order to avoid any zipper noise when controlling synthesizers
modules.
Signal range : 0 .. +10V
8.6.1.13 - MIDI Sequencer Clock
This function generates a 2ms pulse on the output each time the CV Toolbox receives a MIDI PPQN24 (24
pulses per Quarter Note). It is typically used to drive an external step sequencer or drum machine.
Maximum tempo rate = 250 Quarter Notes per Minute
Note that this signal is generated only when the MIDI PPQN24 signal is received on RTP-MIDI. Most VST
hosts do not transmit this signal to VST plugins over the VST interface. If you want to produce this signal when the
VSTizer plugin is used, you need to configure the VST host to send the MIDI Clock signal to a RTP-MIDI port, and
then connect the RTP-MIDI port to the CV Toolbox. This is done very easily since RTP-MIDI supports natively the
dynamic patch-bay concept.
Signal range : 0 / +5V
8.6.1.14 - MIDI Sequencer Control
This function is simply an ON/OFF signal, controlled by the MIDI Start, Stop and Continue signals. It is
typically used to to control an external step sequencer or drum machine.
Signal range : 0 / +5V
8.6.2 - VCO Control Block
The VCO Control block generates a 1V/oct standard output signal directly from Note On messages.
The Coarse Tune control has a +/-1 octave range, while the Fine Tune control has a +/-1 semitone range.
The modulation depth is +/- 1 octave (for Modulation Intensity set to 100%)
The LFO connected to the VCO Modulation Matrix is labelled “LFO1” and can be used to modulate VCF and
VCA Control Blocks too. This allows the VCF and VCA control signals to be sync-modulated with the VCO if
necessary.
Page 23 of 39
8.7 - VCF page
The VCF page allows you to control a complete VCF control modulation matrix. It's typically used to control a
VCF module, but it can of course be used for anything else.
The VCF Control Block contains:
•
1 ADBSSR envelope generator (with exponential phases)
•
1 LFO (LFO 2)
•
1 modulation matrix
This control block generates two control voltages: one for the Cutoff frequency (generated at modulation
matrix output point), and one for Resonance control (for VCF filter modules with voltage controlled resonance)
Note that Cutoff and Resonance MIDI Control Change (CC 74 and 71) are not acting directly on the
parameters defined on this page. They are defined as offsets (+/-50%) around the program parameters. These
two parameters are smoothed in order to avoid any “zipper” noise when the values are changing.
Page 24 of 39
8.8 - VCA page
The VCF page allows you to control a complete VCA control modulation matrix. It's typically used to control a
VCA module, but it can of course be used for anything else.
The VCF Control Block contains:
•
1 ADBSSR envelope generator (with exponential phases)
•
1 LFO (LFO 3)
•
1 modulation matrix
The VCA Control Block generates a control voltage from the modulation matrix output.
By default, the LFO sent to the VCA modulation matrix is the local one (also named LFO 3), but it is also
possible to use the LFO from VCO Control Block (LFO 1) or the LFO from VCF Control Block (LFO 2).
The VCA LFO has a specific property: it runs only when the Envelope Generator is in Sustain phase. If you
use this LFO in the VCF Control Block, remember that it will not oscillate immediately when key is depressed.
The same comment applies in the other way: if you use LFO1 or LFO2 (from VCO Control Block or VCF
Control Block), do not forget that they start immediately when key is depressed. They may then be out of phase
when the Sustain phase starts on the VCA Control Block.
Note that most modulation matrix parameters are taken into account when a new note is being played. For
example, you can not change the VCA Total Level parameter of a voice while a note is being played on this voice.
If you want to modify dynamically the VCA control signal, you have to define an amount of control via the
dedicated knobs (e.g. the Mod. Wheel knob in Modulation section defines the depth of modulation being applied
via the modulation wheel)
Page 25 of 39
9 - USING CV TOOLBOX WITH MAX/MSP
The CV Toolbox has been designed with Max/MSP users in mind. It can be used under Max 5 and Max 6
environments in different ways, either as a standard MIDI device, via the VSTizer, or via a dedicated Max external.
The CVToolbox hardware being a MIDI device, Max can control it like any other device, the only difference
being that MIDI will be carried over RTP-MIDI network connection. You can also use the VSTizer directly within a
Max patch, like any other VST plugin.
But the CVToolbox can also be used in a very innovative way: it can become very simply an hardware
extension of Max/MSP, thanks to a specifically written object (We made the use of our external really simple:
we have no driver to install and no external software to use to configure the connection between the
Max/MSP object and the CVToolbox!)
With this Max object, you can generate any command signal directly on a Max/MSP patch and send them to
the CVToolbox, connected to an analog synthesizer. Your analog synthesizer can then directly controlled by any
modulation system you can create in Max/MSP, with as many LFO, ADSR, matrices combination as you want.
9.1 - Using CVToolbox as a MIDI device
The CVToolbox uses the standard RTP-MIDI protocol, which is nothing else than transporting MIDI over
network links. Since Max is specialized into generating MIDI data, it will naturally be able to control the CVToolbox
like any other MIDI device in the world.
The RTP-MIDI driver is part of OS X since version 10.4, there is no driver to install to control the CVToolbox
from Max on this platform.
If you are using Max on Windows, you will need to install the free rtpMIDI driver in order to allow Max to
communicate over RTP-MIDI. This driver is available for free on KissBox and Tobias Erichsen's website.
We have published a guide for RTP-MIDI users, explaining how to to configure a RTP-MIDI link between
computers and RTP-MIDI devices (including iPad). You can find this document on the download page on the
KissBox website (RTP-MIDI integration guide for Windows and MacOS.pdf ). Please refer to this document
for all details related to the driver installation and configuration.
Once you have created a RTP-MIDI session using the RTP-MIDI driver control panel, this session will appear
as a standard MIDI port in Max. You can then send any standard MIDI command generated by the Max patch to
the CVToolbox (using midiout or makenote objects for example)
Page 26 of 39
9.2 - Using CVToolbox VSTizer plugin with Max/MSP
The VSTizer plugin is directly compatible with the vst~ object in Max. The VSTizer plugin must have been
installed on the computer as explained previously in this document.
Here are the steps to create a Max patch using the VSTizer plugin:
•
Start Max/MSP and open a new Patcher window (File / New Patcher)
•
Double-click or type Ctrl+Shift+O to create a new object and choose “Object” in the list that appears. A
empty object is then created on the Patcher workspace.
•
Enter “vst~” (without the quotes) in the Object box, followed by VSTizerCVToolbox. Click outside of the
vst~ object to load the VSTizer module (the enter key would create a new line in the object).
You are now ready to use the plugin to control and configure the CVToolbox. You do not need to connect any
audio input or output to the vst~ object, since the VSTizer does not perform any audio processing (the VSTizers
only copy incoming audio data to the audio output).
Keep in mind that Max/MSP “freezes” all VST modules until the audio engine is started. Your Patch must then
contain an audio object that activates the audio engine. This audio object can be placed anywhere in your project
(even on a different sub-patch), but it must exist.
The following screen-shot shows an example of automatic activation of the audio engine when a patch is
loaded, based on an ezdac~object (other audio objects like ezadc~ can also be used. Please refer to Max/MSP
user's guide).
Page 27 of 39
9.3 - Using the CVToolbox Max/MSP external
The software package for the CVToolbox also includes a Max/MSP external, named kissbox.cvtoolbox
which allows to control the module directly from a Max/MSP patch, with 16 bits resolution. This object allows you
to control any output of the CVToolbox directly from Max/MSP objects, like adsr~.
The Max external is available for Mac and Windows platforms, and is compatible with Max5 and Max6.
kissbox.cvtoolbox switches automatically the controlled CV channels to the 16 bits mode. You do not need
then to specifically configure the channels on the VCO/Setup page to be able to control these channels from Max.
When a channel is being controlled from Max, it is automatically disconnected from the internal source.
IMPORTANT: the channels being operated from Max in high-resolution mode are automatically released
when the Max patch closes or when the CVToolbox is reset.
Only channels being operated from Max are disconnected from the CVToolbox internal sources. It is then
Page 28 of 39
possible to control some channels directly from a Max patch, while other channels are being controlled over MIDI.
This
9.3.1 - Arguments
The kissbox.cvtoolbox object accepts an argument which can be entered directly when the object is created
on a patch. This argument is used to define the IP address of the CVToolbox to which the object will connect.
Ex: kissbox.cvtoolbox 192.168.0.253 configures the object for a connection with the module located at
192.168.0.253.
When a kissbox.cvtoolbox object is created without parameter, it requires to receive a setdestination
message to define the IP address before any data can be sent to the hardware module.
9.3.2 - Messages
The kissbox.cvtoolbox object recognizes the following messages on its inlet:
connect <IP>: indicates the IP address of the hardware module to which the object will connect. IP address
must be expressed in dotted format (e.g: setdestination 192.168.0.253). When the object receives this message, it
will automatically attempt to connect to the hardware module.
quit : deactivates the direct control of channels from Max patch and closes the RTP-MIDI session. This
message can be used by a patch to release gracefully CVToolbox resources. When a quit message is received by
the object, all channels under direct control are switched back to the configuration stored in the CVToolbox nonvolatile memory. The quit message is revoked when a connect message is received.
setcv <ChanNum><Value> : set a CVToobox output to a given value. ChanNum range is from 1 to 8 and
represents the channel number to control. Value can be given in float or integer format, from 0 to 65535. A value
of 0 gives a 0V output. A value of 65535 gives a 10V output. When a setcv message is received, the channel is
automatically disconnected from its internal source in the CVToolbox. It remains under Max control until the
CVToolbox is reset or the object receives a quit message.
Thanks to Ethernet bandwidth, each channel can be controlled very accurately with an excellent time
resolution. Max/MSP itself limits the time resolution to 1ms, which means that you can control each output with a
time-resolution and latency of one millisecond. You need however to take care of Max/MSP configuration, which
has an influence on the time resolution of the signal (see chapter “Getting the best time-resolution from Max/MSP”
below)
Page 29 of 39
Any easy way to send control signals to the kissbox.cvtoolbox object is to use the snapshot~ object, like in
the screenshot below.
The oscilloscope screenshot hereafter shows you the signal being produced by this patch on CV output. As
you can see, the signal is perfectly formed and no sampling steps are visible (note also the timing precision: scope
resolution is 0.4s per division)
9.3.3 - Getting the best time resolution from Max/MSP
When used with the kissbox.cvtoolbox object, the CVToolbox generates the Control Voltages immediately
when the message is received from the RTP-MIDI network. The sampling frequency of the kissbox.cvtoolbox object
is limited to 1000Hz (maximum rate allowed by Max engine), you can then send up to 1000 commands per second
for each channel (each channel can be updated at full speed, whatever the number of channels used).
This speed constraint does not come from the CVToolbox, which runs with a 10kHz sampling frequency (like
all other Apple-MIDI compliant devices), but from Max itself, so we had to deal with this limit when we designed
the Max object.
Note that control signals at 1000Hz is already much better than what can be found in most analog
synthesizers (just take a look to control engine sampling frequency of a Prophet5 or a DSS-1, you will quickly
understand what we mean)
However, Max/MSP configuration influences the sampling frequency and can lower it. The kissbox.cvtoolbox
object can only send data when Max/MSP engine has provided them from the patch, so you will need to configure
Page 30 of 39
properly Max/MSP in order to get the best performances when it is associated with the CVToolbox.
Using the default configuration provided by Max/MSP will give a sampling period of 5ms, which can fit most
current needs. This configuration is considered however as a “safe configuration”, designed to work on common
computers. Most computers used for Max/MSP are able of much better performances, which in return will give
better timing accuracy when used with the CVToolbox.
In all case, we recommend you to activate the overdrive mode, in order the give the highest priority to Max
processing thread. If possible, use a I/O vector size and Signal Vector Size of 64 in the DSP configuration.
This value will give you a very low latency (around 1.5ms) and works with most computers running Max/MSP
(computers chosen for their capabilities in audio processing).
If a vector size of 64 gives bad audio results on your computer (you will notice that mainly on the audio
output signal, with drops in the sound), you can use a value of 128, which will still give you a pretty good latency
and time resolution of 3ms.
9.3.4 - Output
The outlet of the object transmits the connection status of the hardware module. It allows user to adapt the
behavior of the patch in case of unsuccessful connection attempt for example.
A “0” is transmitted when the object does not manage to connect to the hardware module. The module
keeps trying to connect to the hardware module until a quit message is received. It is then possible to get multiple
times this value until a successful connection is established.
A “1” is transmitted when the connection with the hardware module is established properly. The value is sent
only one time.
Page 31 of 39
10 - CV TOOLBOX MIDI IMPLEMENTATION
•
MIDI Channel : 1..16 (channel 1 by default)
•
Note On / Note Off with automatic assignation polyphonic engine (configurable from 1 to 8 maximum
notes)
•
Program Change : 32 programs
•
Control Change (realtime modulation of program preset)
◦
CC1 : Modulation wheel (transmitted to all Control Blocks)
◦
CC71 : Resonance modulation (-50% / +50% from program preset)
◦
CC74 : Cutoff modulation (-50% / +50% from program preset)
◦
CC64 : LFO 1 frequency (-50% / +50% from program preset)
◦
CC65 : LFO 2 frequency (-50% / +50% from program preset)
◦
CC66 : LFO 3 frequency (-50% / +50% from program preset)
•
Channel Pressure
•
Pitchbend
•
MIDI Timing Clock (24 Pulses per Quarter Note)
•
Start / Stop / Continue
Page 32 of 39
11 - CV TOOLBOX SYSTEM EXCLUSIVE IMPLEMENTATION
PRELIMINARY NOTE : the following System Exclusive messages are used only for MIDI version of the
CVToolbox. Access to HD protocol specification for CVToolbox is restricted to MMA HDWG members
until HD protocol is officially published by MMA.
Program parameter
F0
00 20 7C
01
00
01
AdH
AdM
AdL
Data....
F7
change (for 1..N parameter) / Bulk dump
KissBox ID
Model ID (CV Toolbox)
Device Number
Function : write program parameter(s)
Data transfer acknowledge
Sent by CV Toolbox when more than one byte of data is received. Not sent when only one byte of
data is received.
F0
00 20 7C
01
00
7F
F7
KissBox ID
Model ID (CV Toolbox)
Device Number
Positive acknowledge
Negative acknowledge
Sent by CV Toolbox when a SYSEX transfer is rejected due to an error
F0
00 20 7C
01
00
00
F7
KissBox ID
Model ID (CV Toolbox)
Device Number
Negative acknowledge
Direct voice triggering
Triggers a specific voice without using the voice allocator
F0
00 20 7C
01
00
02
vv
ss
nn
ll
F7
KissBox ID
Model ID (CV Toolbox)
Device Number
Voice trigger
Voice number
(0..7)
Activation (1) / Deactivation (0)
Note number
Velocity
Page 33 of 39
Request program dump
Makes the CV toolbox send the complete SYSEX dataset for a given program
F0
00 20 7C
01
00
03
nn
F7
KissBox ID
Model ID (CV Toolbox)
Device Number
Request dump
Program number
Save program parameters
Store current program parameters in a given program number
F0
00 20 7C
01
00
04
nn
xx xx xx
F7
KissBox ID
Model ID (CV Toolbox)
Device Number
Store program
Program number (0..31)
Program name (24 bytes)
Set direct high resolution CV (16 bits)
Set a high resolution signal value on a given channel (signal is disconnected from internal engine).
When a channel receives this command, it switches automatically to “16 bits CV” mode (whatever
the mode selected in the configuration page). The channel remains in this mode until the CVToolbox
is restarted or a “Release dynamic 16 bits CV channel” command is received.
F0
00 20 7C
01
00
05
nn
DH
DM
DL
F7
KissBox ID
Model ID (CV Toolbox)
Device Number
Set high resolution signal
Signal number (0..7)
Data MSB (2 bits)
Data intermediate bits (7 bits)
Data LSB (7 bits)
Release dynamic 16 bits CV channel
Release the 16 bits CV mode on a given channel. This command has no effect on a channel which is
configured in a mode different from “16 bits CV” in the Setup page.
F0
00 20 7C
01
00
06
nn
F7
KissBox ID
Model ID (CV Toolbox)
Device Number
Release dynamic high resolution mode
Channel number (0..7)
Page 34 of 39
11.1 - Common parameters
Address
Size
Parameter name
Description
0
0
0
1
Polyphony
0
0
1
1
Polyphony mode
Reserved for future use
0
0
2
1
CVOut 1 mode
0 : VCO Control Block (parameter = voice number)
1 : VCF Control Block (parameter = voice number)
2 : VCA Control Block (parameter = voice number)
3 : LFO 1 (VCO)
4 : LFO 2 (VCF)
5 : LFO 3 (VCA)
6 : VCF Envelope
7 : VCA Envelope
8 : Gate signal (parameter = voice number) – 0/5V
9 : Resonance (parameter N/A)
10 : 16 bits DAC (parameter = signal number 0..7)
11 : MIDI CC (parameter = signal number 0..127)
12 : Sequencer clock (parameter N/A)
13 : Sequencer Run/Stop (parameter N/A)
0
0
3
1
CVOut 1 parameter
Synth engine voice or MIDI Control Number (see mode definition)
0
0
4
1
CVOut 1 MIDI Channel
Reserved for future use
0
0
5
1
CVOut 2 mode
0
0
6
1
CVOut 2 parameter
0
0
7
1
CVOut 2 MIDI Channel
0
0
8
1
CVOut 3 mode
0
0
9
1
CVOut 3 parameter
0
0
10
1
CVOut 3 MIDI Channel
0
0
11
1
CVOut 4 mode
0
0
12
1
CVOut 4 parameter
0
0
13
1
CVOut 4 MIDI Channel
0
0
14
1
CVOut 5 mode
0
0
15
1
CVOut 5 parameter
0
0
16
1
CVOut 5 MIDI Channel
0
0
17
1
CVOut 6 mode
0
0
18
1
CVOut 6 parameter
0
0
19
1
CVOut 6 MIDI Channel
0
0
20
1
CVOut 7 mode
0
0
21
1
CVOut 7 parameter
0
0
22
1
CVOut 7 MIDI Channel
0
0
23
1
CVOut 8 mode
0
0
24
1
CVOut 8 parameter
0
0
25
1
CVOut 8 MIDI Channel
Range
1..8
0..11
0..7
0..120
Reserved for future use
Reserved for future use
Reserved for future use
Reserved for future use
Reserved for future use
Reserved for future use
Reserved for future use
11.2 - VCO Parameters
Address
Size
Parameter name
Description
Range
1
0
0
1
VCO Octave Select
0=-2 oct, 1=-1 oct, 2=base oct, 3=+1oct, 4=+2oct
Default = 2
0..4
1
0
1
1
VCO Coarse Tune
(-64) -1 octave … (63) +1 octave
Default = 64 (no detune)
0..127
1
0
2
1
VCO Fine Tune
(-64) -1 semitone … (63) +1 semitone
Default = 64 (no detune)
0..127
1
0
3
1
VCO Bend Range
In semitones
Default = 1
1
0
4
1
VCO Portamento Time
1
0
5
1
VCO MG Delay
1
0
6
1
VCO MG Frequency
1
0
7
1
VCO MG Waveform
1
0
8
1
VCO MG Intensity
0..127
1
0
9
1
VCO Modwheel MG Intensity
0..127
1
0
10
1
VCO Pressure to Modulation
1
0
11
1
VCO Curve
1..12
0..127
If delay is set to 127, LFO becomes “free run”. Other values make
LFO starts only after a key is played
0..127
0..127
0=Triangle, 1=Raising sawtooth, 2=Falling sawtooth, 3=Square,
4=Random
0..4
0..127
Reserved for future use
Page 35 of 39
11.3 - VCF Parameters
Address
Size
Parameter name
Description
Range
2
0
0
1
VCF EG Attack Time
0..127
2
0
1
1
VCF EG Decay Time
0..127
2
0
2
1
VCF EG Breakpoint Level
0..127
2
0
3
1
VCF EG Slope Time
0..127
2
0
4
1
VCF EG Sustain Level
0..127
2
0
5
1
VCF EG Release Time
0..127
2
0
6
1
VCF EG Attack Time Velocity Sense
0..127
2
0
7
1
VCF EG Decay Time Velocity Sense
0..127
2
0
8
1
VCF EG Slope Time Velocity Sense
0..127
2
0
9
1
VCF EG Auto Retrig
2
0
10
1
VCF EG Intensity
2
0
11
1
VCF EG Polarity
0 = Positive, 1 = Negative
2
0
12
1
VCF Modulation Source
0 = LFO 1, 1 = LFO 2, 2 = LFO 3
2
0
13
1
VCF Cutoff Frequency
0..127
2
0
14
1
VCF Resonance
0..127
2
0
15
1
VCF Cutoff Velocity Sense
0..127
2
0
16
1
VCF Cutoff Keyboard Track
0..127
2
0
17
1
VCF Modwheel Cutoff
0..127
2
0
18
1
VCF Pressure to Cutoff
2
0
19
1
VCF MG Delay
2
0
20
1
VCF MG Frequency
2
0
21
1
VCF MG Waveform
2
0
22
1
VCF MG Intensity
0..127
2
0
23
1
VCF Modwheel MG Intensity
0..127
2
0
24
1
VCF Pressure to Modulation
0..127
0..1
0..127
0..1
0..2
0..127
If delay is set to 127, LFO becomes “free run”. Other values make
LFO starts only after a key is played
0..127
0..127
0=Triangle, 1=Raising sawtooth, 2=Falling sawtooth, 3=Square,
4=Random
0..4
11.4 - VCA Parameters
Address
Size
Parameter name
Description
Range
3
0
0
1
VCA EG Attack Time
0..127
3
0
1
1
VCA EG Decay Time
0..127
3
0
2
1
VCA EG Breakpoint Level
0..127
3
0
3
1
VCA EG Slope Time
0..127
3
0
4
1
VCA EG Sustain Level
0..127
3
0
5
1
VCA EG Release Time
0..127
3
0
6
1
VCA EG Attack Time Velocity Sense
0..127
3
0
7
1
VCA EG Decay Time Velocity Sense
0..127
3
0
8
1
VCA EG Slope Time Velocity Sense
0..127
3
0
9
1
VCA EG Auto Retrig
3
0
10
1
VCA EG Intensity
3
0
11
1
VCA EG Velocity Sense
3
0
12
1
VCA Total Level
Default value = 127
0..127
3
0
13
1
VCA Decay Keyboard Track
Default value = 64
0..127
3
0
14
1
VCA MG Delay
If delay is set to 127, LFO becomes “free run”. Other values make
LFO starts only after a key is played
0..127
3
0
15
1
VCA MG Frequency
3
0
16
1
VCA MG Waveform
3
0
17
1
VCA MG Intensity
0..127
3
0
18
1
VCA Modwheel MG Intensity
0..127
3
0
19
1
VCA Pressure to Modulation
0..127
3
0
20
1
VCA Pressure to Volume
0..127
0..1
Default value = 127
0..127
0..127
0..127
0=Triangle, 1=Raising sawtooth, 2=Falling sawtooth, 3=Square,
4=Random
Page 36 of 39
0..6
Address
3
0
Size
21
1
Parameter name
VCA Modulation Source
Description
0 = LFO 1, 1 = LFO 2, 2 = LFO 3
Page 37 of 39
Range
0..2
12 - VSTIZER MIDI IMPLEMENTATION
The VSTizer plugin can easily be remotely controlled by a control surface. The following table indicates the
relationship between the knobs on the VSTizer editor and the MIDI Controllers.
You can find on KissBox website a configuration file for TouchOSC application on iPad. This configuration file
allows you to control the CV Toolbox VSTizer easily. We recommend you to use the wireless capabilities of iPad
coupled with RTP-MIDI capabilities to add a wireless virtual MIDI port to your sequencer (no need for an extra toy
to connect to the docking port of the iPad...)
VERY IMPORTANT : these controllers are used only by the VSTizer plugin. The CV Toolbox hardware module
does not react to these Control Change messages.
MIDI CC
Function
MIDI CC
Function
0
Not used
32
VCA EG Slope time velocity sense
1
Transmitted to CV Toolbox
33
VCA EG Auto trigger
2
VCF EG Breakpoint level
34
VCA LFO Delay
3
VCF EG Slope time
35
VCA LFO Frequency
4
VCF EG Sustain level
36
VCA LFO Shape / Source
5
VCF EG Release time
37
VCA EG Decay Keyboard Track
6
VCF EG Attack time velocity
sense
38
VCA Total Level
7
VCF EG Decay time velocity
sense
39
VCA EG Intensity
8
VCF EG Slope time velocity
sense
40
VCA LFO Intensity
9
VCF EG Auto trigger
41
VCA LFO Modulation Wheel
10
VCF LFO Delay
42
VCA LFO Pressure
11
VCF LFO Frequency
43
VCA EG Velocity Intensity
12
VCF LFO Shape / Source
44
VCA Pressure to Level
13
VCF Cutoff
45
VCO Octave Select
14
VCF Resonance
46
VCO Coarse Tune
15
VCF EG Intensity
47
VCO Fine Tune
16
VCF LFO Intensity
48
VCO BendRange
17
VCF EG Invert
49
VCO Portamento Time
18
VCF Cutoff Keyboard Track
50
VCO LFO Delay
19
VCF Cutoff Modwheel
51
VCO LFO Frequency
20
VCF Cutoff Key Velocity
52
VCO LFO Shape / Source
21
VCF Cutoff Pressure
53
VCO LFO Intensity
22
VCF LFO Modwheel
54
VCO LFO Modulation Wheel
23
VCF LFO Pressure
55
VCO LFO Pressure
24
VCA EG Attack time
56
VCF EG Attack time
25
VCA EG Decay time
57
VCF EG Decay time
26
VCA EG Breakpoint level
27
VCA EG Slope time
28
VCA EG Sustain level
29
VCA EG Release time
30
VCA EG Attack time velocity
sense
31
VCA EG Decay time velocity
sense
Page 38 of 39
13 - Document revisions
Date
Author
Version
Description
07/03/2013
B.Bouchez
0.1
First draft for beta testers
20/07/2013
B.Bouchez
0.2
Errors corrected in the MIDI SYSEX tables
Added practical usecases for different synthesizers after reports from
beta testers
30/10/2013
B.Bouchez
0.3
Added detailed chapter for Max/MSP external
30/12/2013
B.Bouchez
0.4
Update for MIDI Channel support
Added HD related informations
14 - Copyrights / Trademarks
VST Plugin Technology is a trademark of Steinberg Media Gmbh
Minibrute is a registered trademark of Arturia
Minitaur, Minimoog, Moogerfogger are registered trademarks of Moog
MS20 is a registered trademark of Korg
Windows is a registered trademark of Microsoft Inc.
Mac and OS-X are registered trademarks of Apple Inc.
Carbon knob used in the VSTizer plugins designed by Sasha Radojevic, licensed under CC0 public domain
license
All other names quoted in this document are the properties of their respective brand owners
Page 39 of 39