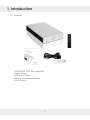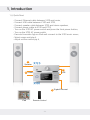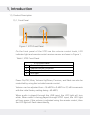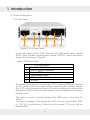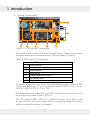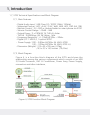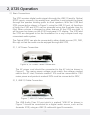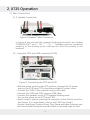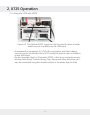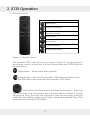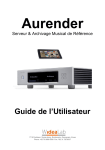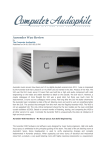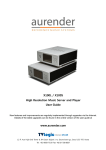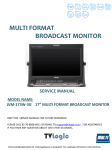
1
X725 USB DAC & AMP
User’s Manual
TVLogic Co., Ltd. owns all intellectual property rights to the technical information detailed
in this manual. This manual may only be used by and distributed to authorized parties.
Duplication or distribution of this manual to unauthorized parties is strictly prohibited.
Table of Contents
1. Introduction
....................... 3
1.1. Warranty
....................... 3
1.2. Precautions
....................... 4
1.3. Contents
....................... 5
1.4. Quick Start
....................... 6
1.5. Product Description
....................... 7
1.5.1. Front Panel
....................... 7
1.5.2. Rear Panel
....................... 8
1.6. Internal Components
....................... 9
1.7. X725 Technical Specifications and Block Diagram ....................... 11
1.7.1. Main Features
....................... 11
1.7.2. Block Diagram
....................... 11
2. X725 Operation
....................... 12
2.1. Basic Connections
....................... 13
2.1.1. AC Power Connection
....................... 13
2.1.2. USB 2.0 Cable Connection
....................... 13
2.1.3. Speaker Connection
....................... 14
2.2. Using the X725 with USB connected (X100)
....................... 15
2.3. Using the X725 with SPDIF
....................... 15
2.4. Remote Control
....................... 16
-2-
1. Introduction
1.1. Warranty
The warranty period for the Aurender X725 DAC Amplifier is two years from
the date of purchase and includes parts and labor. The warranty is nontransferable and excludes damage due to (i) normal wear and tear, (ii)
abuse, misuse, or neglect, (iii) repair, attempted repair, or any modifications
by anyone not authorized by TVLogic or its distributors. After inspection,
TVLogic will at its discretion repair, adjust or replace the product free of
charge. Users are responsible for shipping the products to TVLogic or an
authorized service center, and TVLogic will pay for return shipping provided
the repair is under warranty.
For any technical support issues, please use the Remote Support Request
feature of the Aurender App or contact [email protected].
The Aurender X725 is designed to be used with the Aurender X100 Music
Player and speakers with peak power ratings above 250W and can be used
with other auxiliary components.
-3-
1. Introduction
1.2. Precautions
Read the following instructions carefully before setting up or making any
connections to the Aurender X725.
•Be careful not to drop or mishandle the device to avoid internal
damage.
•Do not disassemble the device.
•Do not expose device to oil, dust, water, high humidity, or smoke.
•Keep the device in a well-ventilated area and ventilation openings free
from obstruction.
•When cleaning, use only a soft cloth. Keep out of contact with water or
other liquids.
•All servicing must be performed by a qualified technician, or the
warranty will be voided.
•Unplug power cord during severe lightning or when unused for a long
period of time.
•Unplug the device from the outlet only after completely turning off the
unit.
•Always turn the power off before connecting or disconnecting any
cables.
•Always make sure that the AC voltage matches the voltage stated in
the rear panel mains inlet.
•Ensure that the left and right speaker channels are properly connected
to prevent reversed polarity.
•Care must be taken not to short the speaker connections in order to
prevent damage to the device.
<Warning> Always turn the power off before connecting or disconnecting
any cables and ensure that all devices are grounded in order to prevent any
damage to the Aurender or any other components in the audio system.
-4-
1. Introduction
1.3. Contents
•AURENDER X725 DAC Amplifier
•Power Cable
•USB A to B Cable
•Remote Control and Battery
•User Manual
-5-
1. Introduction
1.4. Quick Start
•Connect Ethernet cable between X100 and router.
•Connect USB cable between X100 and X725.
•Connect speaker cable between X725 and stereo speakers.
•Connect power cable to X100 and X725.
•Turn on the X100 AC power switch and press the front power button.
•Turn on the X725 AC power switch.
•Execute Aurender App on iPad and connect to the X100 music server.
•Select songs and play it.
•Adjust volume and enjoy it.
3
X725
Speaker
2
USB
4 Power
X100
1 Gigabit Ethernet
iPad
Remote Control
-6-
1. Introduction
1.5. Product Description
1.5.1. Front Panel
1 2
3
4
Figure 1. X725 Front Panel
On the front panel of the X725 are the volume control knob, LED
indicator light and remote control receiver sensor as shown in Figure 1.
Table1. X725 Front Panel
1
2
3
4
X725 Front Panel
Aurender logo
Remote control IR sensor
Volume control knob
LED light
Power On/Off, Mute, Volume Up/Down, Previous, and Next can also be
controlled by using the included remote control.
Volume can be adjusted from -96 dBFS to 0 dBFS in 0.5 dB increments
with the initial factory setting being -60 dBFS.
When audio is played through the USB input, the LED light will turn
white. When audio is being played through SPDIF input, the LED light
will turn green. If the volume is adjusted using the remote control, then
the LED light will flash intermittently.
-7-
1. Introduction
1.5. Product Description
1.5.2. Rear Panel
1
2
3
4
5
6
Figure 2. X725 Rear Panel
In the rear panel of the X725, there are the USB audio input, optical
SPDIF input, speaker binding posts, power ON/OFF switch and mains
power inlet as shown in Figure 2.
Table2. X725 Rear Panel
1
2
3
4
5
6
X725 Rear Panel
Right Speaker Output
USB 2.0 type B connector
Optical SPDIF input
Left Speaker Output
AC Power Switch
AC Inlet
The maximum output of the Aurender X725 is rated at 250W per channel
at 4Ω. Caution should be taken when connecting the speaker cables.
The X725 should always be turned off before making any connections
and ensure that the left and right speakers are connected to the proper
binding posts.
The direct current received through the USB input is less than 5V
100mA.
The mains voltage of the Aurender X725 can be set at either 220V
or 110V AC at the factory. Products set to accept 110V must not be
labelled 220V.
-8-
1. Introduction
1.6. Internal Components
6
7
1
2
3
5
Figure 3. X725 Internal Components
4
The Front board, Linear PSU board, Audio board, Power amp module
and Rear board are located within the X725 as shown in Figure 3.
Table 3. X725 Internal Components
1
2
3
4
5
6
7
X725 Internal
Front board
Linear power supply board
Audio board
Rear board
Power amplifier module
AC power inlet
Binding posts
AC power is sent from (6) to (2) by a connecting cable (CABLE_X7251-M1), and then from (2) to (5) by another cable (CABLE_X725-1-J2 for
220V, or CABLE_X725-1-J1 for 110V).
The digital signal from the USB and SPDIF inputs are sent from (4) to (3)
by a connecting cable (CABLE_X725-3).
The FCC cable (CABLE_X725-2) is used to connect (1) to (3) in order
for the LED light to turn on when there is a signal received from the IR
sensor or when the volume is changed.
-9-
1. Introduction
A cable (CABLE_X725-4) connects (2) to (3) and provides DC power to the
analog audio signal processing section.
A cable (CABLE_X725-5) connects (3) to (5) in order to receive the line
input of the power amp.
A cable (CABLE_X725-6) connects (5) to (7), the power amp’s speaker
outputs. Caution must be taken to ensure that the connectors match
exactly when soldering (7). Pin 1 of (6) connects to R+ of (7), Pin 2 of
(6) connects to R- of (7), Pin 3 of (6) connects to L- of (7), Pin 4 of (6)
connects to L+ of (7).
-10-
1. Introduction
1.7. X725 Technical Specifications and Block Diagram
1.7.1. Main Features
•Digital Audio Input : USB Class 2.0 / SPDIF (24bit, 192kHz)
•Supported Format : AIFF, ALAC, FLAC, WAV, M4A, APE, DSD (64, 128)
•Remote Control : IR, I-PAD or Android tablet or smart phone via X100
•Volume Control Range : -95dB ~ 0dB
•Output Power : 2 x 230W @ 1% THD+N, 4ohm
•THD+N : 0.008%(typ.) @ 1W, 8ohm, 1kHz
•Frequency Response : +/- 0.5dB @ 20Hz ~ 20kHz
•Digital I/O :1 USB 2.0, 1 optical SPDIF
• Power Supply : 200 ~ 240Vac 60/50Hz 5A (AUR-X725)
100 ~ 120Vac 60/50Hz 5A (AUR-X725-A)
•Dimension (Weight) : 215 x 55 x 355 mm (4.7kg)
/ 8.5 x 2.2 x 14.0 inches (10.4 lbs)
1.7.2. Block Diagram
Figure 4. is a function block diagram of the X725 and shows the
relationship among the various components which consist of an USB
2.0 Audio Processor, DAC & Conditioner, Power Amp, Power Supply,
connectors and other interfaces.
Figure 4. X725 Function Block Diagram
-11-
2. X725 Operation
The Aurender X725 is an all-in-one DAC, pre-amplifier and power amplifier
and designed to simplify the task of configuring and setting up an audio
system. With the wide range of digital audio sources (music servers, digital
audio players, CD players, Blu-ray players, DVD players, etc.) available today,
there is a need for an all-in-one DAC, pre-amplifier and power amplifier. By
combining the DAC, pre-amplifier and power amplifier, only the music sources
and speakers need to be connected. With digital audio inputs, there is no
need for left and right channels to be connected. Just a simple USB cable or
SPDIF optical cable, power cord, Ethernet cable, and a pair of speaker cables
are all you need. An audio system designed around the Aurender X725 and
X100 music player will use fewer cables and fewer audio components than a
traditional analog based audio system, and can be set up much quicker and
more easily.
The digital audio signal received from the USB and optical (SPDIF) audio
inputs are converted to an analog signal by the internal DAC. The pre-amplifier
section controls volume and source selection, and the power amplifier
amplifies the audio signal to power the speakers.
In the Figure 5, a system diagram of the Aurender X725 connected to the
X100 music player and speakers. By combining the DAC and amplifier into one
component, the Aurender X725 enables for simple set up and connection, in
addition the Aurender X725 and X100 can be controlled through the Aurender
App for iPad, making it easy to quickly find, browse and play high resolution
digital music files.
Figure 5. X-Pac, Convenient Two Component System Configuration.
X725 DAC & AMP
USB 2.0
X100 Player
Stereo Speaker
Remote Control
iPad w / Aurender App
-12-
2. X725 Operation
2.1 Basic Connections
The X725 receives digital audio signals through the USB 2.0 and/or Optical
SPDIF inputs, converts it to analog form, amplifies it and outputs the signal
through the speaker binding posts to drive speakers. With the X100 and
X725 connected as shown in Figure 5. using the USB 2.0 port, all functions
of both the X100 and X725 can be accessed using the Aurender App for
iPad. When volume is changed or other features of the X725 are used, it
will be even be shown on the X100 front panel LCD display. The X100 and
the X725 are designed to be the foundation for a very compact and very
convenient audio system.
The Optical SPDIF can also be connected to other digital sources (CD, DVD,
Blu-ray) so that the audio can be enjoyed through the X725.
2.1.1. AC Power Connection
Figure 6. AC Power Cable Connection
The AC power cord should be connected to the AC inlet as shown in
Figure 6. The mains power voltage must match the voltage marked
next to the AC Inlet. Products marked 110V must be connected to 110V
mains power and products marked 220V must be connected to 220V.
2.1.2. USB 2.0 Cable Connection
Figure 7. USB 2.0 Cable Connection
The USB Audio Class 2.0 port which is marked “USB IN” as shown in
Figure 7 should be connected to a digital audio source, such as the
Aurender X100, using an USB 2.0 cable with type B connector.
-13-
2. X725 Operation
2.1 Basic Connections
2.1.3. Speaker Connection
Figure 8. Speaker Cable Connection
In Figure 8 are pictured the speaker binding posts which are marked
“SPEAKER OUT” and “- ○R –“, “- ○L –“. Speakers must be connected
properly to the binding posts making sure that the polarity is not
reversed.
2.2. Using the X725 with USB connected (X100)
Figure 9. Connecting the X725 and X100
•With the power switch in the OFF position, connect the AC power
main to the X100 and X725 using the provided AC power cords.
•Connect the X100 to the network using a LAN cable.
•Connect the X100 and X725 using an USB cable.
•Connect the speakers to the X725 speaker binding posts.
•Turn on the power to the X725 and X100.
•Select songs to play by pressing the song title on the iPad to send it to
the Queue. (For more details, refer to the X100 User Guide).
•Volume, Next Song, Previous Song, Play, Pause and other functions can
also be controlled using the remote control or Aurender App for iPad.
-14-
2. X725 Operation
2.3. Using the X725 with SPDIF
Figure 10. The Optical SPDIF input can also be used to listen to other
audio sources in addition to the USB input
•As explained in paragraph 2.2, DVD, Blu-ray players and other digital
sources can be connected to the X725 using the optical input in addition
to the USB input.
•On the Aurender App for iPad select SPDIF in the Source selection menu.
•Volume, Next Song, Previous Song, Play, Pause and other functions can
also be controlled using the remote control or Aurender App for iPad.
-15-
2. X725 Operation
2.4. Remote Control
X725 Remote Control
Mute button
Power On/Off button
Volume/Previous/Next button and
Play/Pause button
Back button
Menu button
Volume up button
Volume down button
Figure 11. Remote Control
The Aurender X725’s remote control is shown in Figure 11. At the bottom of
the remote control is a small slot, pull the slot and insert the CR2032 with the
creased side up.
Mute button – Mutes audio when pressed
Power button – Turns off the Aurender X100 when connected using
the USB cable (Only works with the Aurender X100 Player).
Volume/Previous/Next button and Play/Pause button – Press top
side of the outer ring to increase volume and the bottom to lower it. To play
the previous song, press the left side and to play the next song, press the
right side. Pressing the center ring will play or pause the selected song (Only
works with the Aurender X100 Player).
-16-
2. X725 Operation
2.4. Remote Control
Back button – Stops play and replays the selection (Only works with
the Aurender X100 Player).
Menu button – Switches inputs from USB to Optical SPDIF (Only works
with the Aurender X100 Player).
Volume Up – Press to increase volume.
Volume Down – Press to decrease volume.
-17-
Smart Audio Division
www.aurender.com