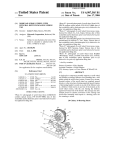
1
Contents
Features................................................................................... 1
1
2
3
4
5
6
7
8
9
10
Introduction ...................................................................... 2
Starting with the Video9000 ............................................. 3
Connections and controls.................................................. 4
System configurations ...................................................... 6
How to control the Video9000........................................ 12
Digitizing with the Video9000 ....................................... 16
Superimposing with the Video9000................................ 18
Video9000 with Power basic .......................................... 20
Using GFX9000 applications.......................................... 21
Building the Video9000 into a pc box ............................ 25
Appendix A Connector pin layouts...................................... 26
Appendix B Terms explained .............................................. 29
Features
Features
•
•
•
•
•
•
•
•
•
Real time frame digitization
Superimposition of graphical images
Maximal resolution 512x424 dots
32768 colours
Overscan modes supported
Interlace supported
CVBS, S-VHS and RGB inputs available
Colour and intensity controls available
Internal RGB switch
1
1 Introduction
1
Introduction
You are now the owner of a high quality digitizer and superimposer for the MSX 2/2+/turboR
computer. You can grab pictures from a video film in 32768 colours, superimpose parts of it
with animations and titles upon video images, mix your own creations with these video
images, etc. Furthermore you can switch from MSX 2/2+/turboR screen to GFX9000 screen
and vice versa just by one simple command.
This manual describes how to connect and use the Video9000. With the aid of chapter 2 you
can use the Video9000 immediately. It describes the basic configuration. Chapter 3 clarifies
the connectors and controls of the Video9000. It explains their function and for which video
device it can be used. Chapter 4 will give you a number of video configurations that can be
used, depending on the available video equipment. It also gives some information about video
recorders and their video connectors in particular.
Chapter 5 explains how to control the Video9000 by means of the Video9000 control register
and how to use the V9990 superimpose functions.
Chapter 6 and 7 describes how to digitize and superimpose respectively. Small basic programs
are given with which the digitize and superimpose function can be examined and practised. If
you want to use Power basic in combination with the Video9000 you should read chapter 8.
Chapter 9 deals with the problem of ‘bad-behaving’ GFX9000 applications and it describes
how to fix them. Finally chapter 10 gives some advises and recommendations about how to
put the Video9000 into a pc box.
At the end of this manual several terms used in this text are explained.
2
2 Starting with the Video9000
2
Starting with the Video9000
To get started with the Video9000 you can use the prescriptions below. The following list
gives the most elementary configuration that can be used. You may extend it later on
according to chapter 4. The numbers mentioned in the list below refer to the figure in the next
chapter.
TURN OFF YOUR COMPUTER BEFORE
CONNECTING THE VIDEO9000 TO
THE MSX SLOT!!
• Turn off your computer and monitor if not already done
• Put the Video9000 slot connector into an MSX primary slot (1).
The side from which the flatcable leaves the connector must be in the same direction as the
‘picture side’ of a standard game cartridge: for a Philips MSX 2 and turboR it must be
directed upwards or towards you, for a Sony MSX 2 it must be downwards.
Be sure you have put in the connector completely and correctly!
• Connect the MSX RGB output to the Video9000 via the RGB superimpose cable (5).
• Connect your RGB colour monitor to the Video9000 RGB output by means of the SUB-D
to SCART or SUB-D to SUB-D monitor cable (2). If you are using a SUB-D to SUB-D
cable, it may be necessary to release wire 8 and 9 from pin 8 and 9 of one SUB-D
connector respectively.
• Turn on your computer.
You should now see the normal MSX boot-up screen, as was the case when not having a
Video9000 and GFX9000 at all. A normal non-GFX9000 application or game may be
executed. But it’s also possible to execute GFX9000 applications, if they are ‘well-behaving’.
For example GFXAGE might be executed without problems. If not, switch off the R800
and/or 7 MHz mode. Chapter 9 will explain what is ‘well-behaving’ and how ‘bad’ programs
can be made ‘well-behaving’.
Because the Video9000 has an integrated RGB switch, such a device is not necessary
anymore.
In chapter 5 you can find all information about how to control the Video9000.
3
3 Connections and controls
3
Connections and controls
BE SURE THE COMPUTER IS SWITCHED OFF
BEFORE CONNECTING THE VIDEO9000 TO THE
MSX SLOT!!
The connection points of the Video9000 can be found at the left and the rear side of the
Video9000. The video contrast and colour controls are placed at the front side. The computer
must be switched off when connecting the Video9000 to the computer. It is not necessary to
turn off the computer when (dis)connecting a VCR, camera or TV to the video (3) or S-VHS
(4) input, but there is a very small chance that a GFX9000 application will be disturbed or
hanging. Restart the application by resetting the computer then.
(1) Slot connector
Put the Video9000 slot connector into an MSX primary slot.
The upper side of this slot connector, as shown in the figure
above, must be in the same direction as the ‘picture side’ of a
normal game cartridge (for example upwards for Philips or
turbo R computers, downwards for Sony computers)
(2) RGB video-out
connector
Connect your colour monitor or TV here with the aid of the
SUB-D to SCART or SUB-D to SUB-D connector. Only RGB is
outputted, not a standard composite video signal.
4
3 Connections and controls
(3) S-VHS video-in
connector
Use this connector when having a S-VHS camera or VCR. This
gives a higher quality than CVBS video but less than RGB.
(4) CVBS video-in
connector
Use this connector when having an external video source with
only a video output (CVBS, cinch connector). Use a cinch-cinch
or SCART-cinch cable. Most normal cameras and VCRs do
have a CVBS output (outputted via cinch or SCART).
(5) RGB video-in
connector
Connect the SCART or DIN RGB output of your MSX
computer to the Video9000 via this cable. It may also be used as
external video input when having a VCR with RGB output.
(6) Colour
saturation
When having connected an external video source to the S-VHS
(3) or CVBS (4) video input, the colour saturation level can be
changed here (clockwise is more colour, completely counterclockwise will give a black and white image).
(7) Intensity
(Contrast)
When having connected an external video source to the S-VHS
(3) or CVBS (4) video input, the intensity/contrast level can be
changed here (clockwise is increasing intensity).
NOTE: The fact that a VCR has a SCART connector does not mean that the RGB signals are
used by that VCR. Standard VCRs only use the CVBS signal of the SCART plug, instead of
the RGB signals. Because the Video9000 only has an RGB output the images can’t be
recorded directly by these VCRs, but an RGB to CVBS (and/or S-VHS) converter must be
used. These converters can be bought in electronic stores or, in the future, ordered from
Sunrise Swiss.
5
4 System configurations
6
4 System configurations
4
System configurations
A)
Colour monitor or
TV with RGB input
(SCART or SUB-D)
To display the GFX9000 images, a RGB input colour
monitor or TV is needed. In this configuration only the
GFX9000 is used, as if the Video9000 is not present at
all. The MSX boots-up with white screen and superimposition and digitization are not used.
B)
Colour monitor or
TV with RGB input
and MSX with RGB
output (SCART or
DIN)
Also here an RGB input display device must be used. The
RGB output of the MSX (SCART or DIN RGB monitor
output) is connected to the Video9000 RGB superimpose
input. In this configuration the MSX images and the
GFX9000 images can be superimposed and the MSX
images can be digitized. The MSX boots-up with its
normal boot-up screen/messages and the GFX9000 is
made transparent. The MSX is used as external video
source.
C)
VCR or camera/
camcorder without
RGB and S-VHS
output, but with
CVBS output
Your VCR or camera doesn’t have an RGB output, but
does have a standard video output (CVBS). Connect it to
the Video9000 via the CVBS video input. In this
configuration both the MSX and the VCR/camera are
used as external video source and can be digitized and/or
superimposed with the GFX9000.
D)
VCR or camera/
camcorder without
RGB output, but with
S-VHS output
Your VCR or camera doesn’t have an RGB output, but
does have a S-VHS output. Connect it to the Video9000
via the S-VHS video input. The S-VHS signal gives a
better image quality than the CVBS signal. Digitization
and superimposition of both the MSX images and the
VCR/camera is possible.
E)
VCR with RGB input
and camera/camcorder with CVBS
output
If you have a VCR with RGB input, connect it to the
Video9000 RGB output in order to get the highest image
quality. In this configuration the results of the Video9000
superimposing or digitizing can be recorded and displayed
via a colour TV that is connected to that VCR. If your
VCR also has an RGB output (two SCART connectors at
the VCR needed then), an RGB colour monitor can also
be connected to the VCR in order to display the
Video9000 result images.
7
4 System configurations
8
4 System configurations
9
4 System configurations
F)
Colour TV with video
output (often
SCART)
G) VCR without RGB
input, but with CVBS
or S-VHS input
10
Your colour TV has a video output (often outputted via a
SCART connector). You can use your TV as external
video source when connected to the standard video input
(CVBS). You can digitize/superimpose TV programs.
Your VCR doesn’t have an RGB input, but does have a
S-VHS and/or standard video input. You need an RGB to
CVBS converter in order to record the Video9000 images.
Such a converter can be bought in electronic stores and, in
the future, be ordered from Sunrise Swiss. Connect the
Video9000 RGB output to the convertor and the S-VHS
or CVBS output to your VCR. If the converter has an
RGB output too, your RGB colour monitor can be used to
display the Video9000 images.
4 System configurations
Video Cassette Recorder (VCR)
If you want to use the Video9000 at its best, a high quality VCR is really needed:
• To be able to directly record a superimposed or digitized screen, you need a VCR with at
least one RGB input. The fact that a VCR has a SCART connector does NOT mean that an
RGB input or output is available. The SCART connector of many VCRs only inputs and
outputs a standard video signal (CVBS). In that case an RGB to CVBS converter is needed
to be able to record the Video9000’s screen. This can be bought in electronic stores or, in
the future, be ordered from Sunrise Swiss.
• To be able to make undisturbed recordings, you need a high quality recorder, and the best
is to use a special edit recorder. Most of these recorders also have an RGB input and RGB
output when the VCR has two SCART connectors.
• The quality of your VCR determines the quality of your created/superimposed video film.
Most VCRs with only one SCART connector are not able to record the Video9000’s screen.
You need the RGB to CVBS/S-VHS converter then. Such a VCR might have an RGB output,
which can be checked as described below.
VCRs with two SCART connectors can have both an RGB input and an RGB output. You can
check this as described below.
VCRs that only have a S-VHS input, need to use the RGB to CVBS/S-VHS converter too.
The Video9000 can’t be used at all in combination with VCRs that only have an RF
connector.
Whether your VCR does have an RGB input can be checked by just connecting the
Video9000’s output to your VCR’s SCART connector. When during the boot-up of your
MSX computer no boot-up image is visible at the VCR (must be visible on your colour TV),
but a black screen instead, your VCR doesn’t have an RGB input.
Whether your VCR does have an RGB output can be checked by connecting the RGB
superimpose input connector of the Video9000 to the SCART connector of your VCR and
reset the MSX computer. If your colour monitor (connected to the Video9000’s RGB output)
does not display the VCR video signal (a video tape or TV program), but a black screen
instead, your VCR does not have an RGB output.
11
5 How to control the Video9000
5
How to control the Video9000
The Video9000 control port
The Video9000 control port is port &H6F. This port can be written by the basic command
OUT &H6F,X where X is some value between 0 and 255. This port is write only. Because
each bit of this value has its own meaning it’s more convenient to type:
OUT &H6F,&BXXXXXXXX
The right-most bit is bit 0, the left-most bit 7. The function of each bit is as follows:
Port &H6F: Video9000 control register
0
S1
S0
GEN
TRAN
0
YMIX
YM
YM:
Half-tone mode is switched on when this bit is 1 (only valid when GEN is 1)
YMIX: Mixed mode is switched on when this bit is 1 (only valid when GEN is 1)
TRAN: Transparent bit: When 0 the V9990 screen is made transparent completely and only
the external video signal is visible (e.g. the MSX V9938/58 screen). This bit is only
valid when GEN is 1.
GEN: Genlock enable bit: When this bit is 1 the genlock is enabled. Superimposition and
digitization are possible now. After an MSX hardware RESET this bit is made 1.
S0, S1: Video source select
S1
0
1
1
S0
X
0
1
Selected video source:
RGB input is used
CVBS input is used
S-VHS input is used
After a hardware RESET this port is set to &B00010000. This means that the genlock is
enabled (superimposition and digitization possible), that the GFX9000 image is completely
transparent and that the RGB input is selected. Therefore the MSX boot-up screen is visible
after a hardware RESET.
By typing OUT &H6F,0 the genlock is disabled and only the GFX9000 image is visible. At
this moment only the GFX9000 is active, and the Video9000 acts as if it’s not present. The
GFX9000 is restored to the situation as it was before the Video9000 was added to it. If
GFX9000 software somehow doesn’t work properly when the Video9000 was active, you can
always give the above command and start the GFX9000 application (not by a hardware
RESET then).
12
5 How to control the Video9000
Example: Type OUT &H6F,&H10 (=&B00010000) and the normal MSX screen is visible
when having connected the computer RGB monitor output with the Video9000 by means of
the RGB superimpose cable (5). Note that this situation is established by a hardware RESET.
Example: Type OUT &H6F,&H5A (=&B01011010) to mix the GFX9000 image and the
CVBS inputted external video signal (4).
Example: Type OUT &H6F,&H70 (=&B01110000) to display only the S-VHS inputted
video signal.
Example: Type OUT &H6F,&H18 (=&B00011000) to have the GFX9000 image
superimposed over the MSX 2/2+/turboR screen. If you only see the GFX9000 image (e.g.
only a white or black screen) it means that no part of the GFX9000 screen is transparent. How
this is done is written below in the paragraph ‘About the YS bit’.
After an access to port &H6F that changes bit 4, 5 or 6, at least one frame
cycle (vertical retrace) must be waited, before writing to any of the V9990’s
registers again.
About the YS bit
What is the YS bit?
To be able to superimpose the V9990 images over an external video source, the V9990 must
know at what parts of the screen it is transparent and at what parts it isn’t (opaque). Normally
each dot of the screen has it’s own value, that represents its colour. The V9990 can have a
maximum of 15 bits (=32768 colours) per pixel. Now a sixteenth bit is introduced that
determines if the pixel must be shown, or if it’s transparent (so that the external video source
is visible through this one-dot hole). For example, by setting this sixteenth bit (bit no. 15) at 1
for all dots within a circle, the external video source is visible through this circle.
This sixteenth bit is called the YS bit and determines the transparency state of the
corresponding pixel. But not all screen modes of the V9990 use sixteen bits, only the fullcolour modes. When using the palette mode (like MSX 2 screen 5 does), each dot is given a
palette number, and this number refers to a colour that has been written in the palette table.
Because the ‘value’ of the dot is not a direct colour, but rather a reference to a colour in the
palette table, the YS bit has moved to this palette table:
For example:
Imagine that palette number 0 corresponds to colour 0 (black) and that palette
number 1 corresponds to colour 992 (bright red). The palette table is then as
follows:
13
5 How to control the Video9000
Palette
number:
0
1
.
.
.
Colour code:
Green Red
0
0
0
31
.
.
.
.
.
.
Blue
0
0
.
.
.
Decimal
colour value:
0
992
.
.
.
All ‘number 0’ dots at the screen (black dots) can be made transparent by
writing 128 (=&B1000000) in the red-column at row 0. This means that bit 7 of
the red-component in the palette table is made 1.
In the palette mode bit 7 of the red-component in the palette table is the YS bit. It has exactly
the same function as in the full-colour mode. To make all dots that refer to palette number 23
transparent, bit 7 of the red-component in the palette table at number 23 (‘row 23’) must be
made 1. To return the colour of these dots, just write 0 to the YS bit in the palette table at
number 23. How to access the palette table can be found in the V9990 application manual.
The V9990’s YUV and YJK screen modes are handling the YS bit at a third way, but this
won’t be discussed here. Refer to the V9990 application manual for information about this.
The YS enable bit
So, by introducing the YS bit, the V9990 knows when to be transparent and the GFX9000
user can make dots transparent or not as he or she likes. But this whole transparency system
can be switched on and off. When switched off, all YS bits, as discussed above, are ignored.
The on and off switching of the ‘YS system’ is performed by the YS enable bit. This is bit
number 5 of V9990’s register 8. It can be accessed by the basic commands
OUT &H64, &H08
OUT &H63, INP (&H63) OR &B00100000
selecting V9990 register 8
turn YS enable bit into 1
OUT &H64, &H08
OUT &H63, INP (&H63) AND &B11011111
selecting V9990 register 8
turn YS enable bit into 0
or
In the first case the YS enable bit is made 1, which means that the YS bits are used and thus
parts of the GFX9000 image can be made transparent. In the second case the YS enable bit is
reset, which makes the V9990 ignore the YS bits. The GFX9000 screen is not transparent at
all (completely opaque).
Bit 3 of port &H6F (the TRAN bit) has the highest priority. This means that, although the YS
enable bit is reset (no transparency at all) and/or the YS bits themselves are 0 (non-transparent
dots), the GFX9000 image is still transparent when TRAN is 1.
More details about the YS bits and the ‘YS system’ can be found in the V9990 application
manual.
14
5 How to control the Video9000
Frame frequencies
In order to have the GFX9000 images superimpose well upon an external video source, the
frame frequencies of both the V9990 and the external video source must be equal (both 50Hz
or both 60Hz). For example if you want to superimpose the GFX9000 screen upon a video
signal coming from a PAL video camera or VCR, the V9990 must be set to 50Hz. After a
hardware RESET the V9990 is set to 60Hz.
The V9990 frame frequency can be changed by the following basic instructions:
OUT &H64, &H07
OUT &H63, INP (&H63) OR &B00001000
selecting V9990 register 7
turning bit 3 into 1 (=50Hz)
OUT &H64, &H07
OUT &H63, INP (&H63) AND &B11110111
selecting V9990 register 7
turning bit 3 into 0 (=60Hz)
or
As may be clear from the above commands, bit 3 of V9990’s register 7 is the frame frequency
bit where a 1 means 50Hz and a 0 means 60Hz.
The MSX frame frequency can be changed as follows:
VDP (10) = VDP (10) OR &B00000010
turning bit 1 into 1 (=50Hz)
VDP (10) = VDP (10) AND &B11111101
turning bit 1 into 0 (=60Hz)
or
Be sure both frame frequencies are equal. Applications may ‘hang’, and digitization and
superimposition are not performed properly, if not.
Basic commands
Although the above basic instructions are not hard to understand and to execute, there will be
a basic extension in the future, that will make the Video9000 even easier to access.
15
6 Digitizing with the Video9000
6
Digitizing with the Video9000
With the aid of the digitize function of the Video9000 you can ‘freeze’ (moving) images of
every standard PAL video source, like a VCR, camera, camcorder or TV receiver (tuner). This
digitizing is performed real time (50 pictures per second) and 32768 colours are used. The
digitize resolution can be 192x290 (not quite interesting), 256x212, 384x290, 512x212,
192x580 (strange aspect ratio...), 256x424 and 512x424. The last three are interlaced (a
512x424 picture uses almost all available memory of the GFX9000).
Digitization is only possible in the full colour bitmap screen modes, i.e. the B1, B2 and B3
modes. It will be possible in the future to convert the full colour image to a screen mode with
less colours available, by software.
Because of the great number of colours and the rather high quality, the digitized pictures can
be hardly distinguished from normal non-digitized TV pictures. The price that must be paid
for this, is the high amount of disk space needed for a digitized picture. So a harddisk is
preferred what this is concerned, but normal floppy discs can be used too, of course.
If you want to digitize, you can use the digitize program that is delivered together with the
Video9000, or you can use the following basic program (Power basic not installed):
10 ‘ ***VIDEO9000 DIGITIZE PROGRAM***
20 ON STOP GOSUB 310: STOP ON
30
40
50
60
‘ GFX9000 INITIALIZATION
OUT &H67,0
OUT &H64,6: OUT &H63,&H97: OUT &H63,8
OUT &H64,8: OUT &H63,&HC2
70 OUT &H64,14: OUT &H63,0
80 OUT &H61,0: OUT &H61,0: OUT &H61,0
90 OUT &H64,15: OUT &H63,0
Activate CTRL/STOP function
Non-overscan mode
512x212; 32768 colours; 50Hz
Display on; cursor off; digitize off;
YS system disabled
Select palette no. 0
Make palette colour 0 black
Border colour is black
100
110
120
130
140
150
‘ DIGITIZE INITIALIZATION FOR GFX V1.0
OUT &H64,36
FOR D=1 TO 14: READ V: OUT &H63,V: NEXT D
OUT &H64,52: OUT &H63,&H20
IF (INP (&H65) AND 1)=1 THEN 140
DATA 0,0,0,0,0,2,0,2,0,12,255,255,0,0
First used command register
Write coor., size and colour
Execute clear V9990 screen command
Clear screen command ready? No, wait
Coor., size, colour (=black)
160
170
180
190
OUT
OUT
OUT
OUT
Write digitize mask at a special place
of the GFX9000 memory
Mask = &HFFFF (no masking)
Strange but necessary, don’t bother
200
210
220
230
240
‘ VIDEO9000 INITIALIZATION
OUT &H6F,&H58
TIME=0
IF TIME=0 THEN 230
‘ START DIGITIZING
16
&H64,0: OUT &H63,0
&H63,&HFC: OUT &H63,7
&H60,&HFF: OUT &H60,&HFF
&H64,34: OUT &H63,255: OUT &H63,3
Genlock on; CVBS input selected;
GFX9000 not transparent
Wait one frame cycle (1/50 sec.)
6 Digitizing with the Video9000
250
260
270
280
290
OUT &H64,&HC8
OUT &H63,INP (&H63)
A$=INKEY$: IF A$=””
OUT &H63,INP (&H63)
A$=INKEY$: IF A$=””
300
310
320
330
‘ STOP DIGITIZE PROGRAM
OUT &H64,&HC8: OUT &H63,&HC2
OUT &H6F,&H10
END
OR &B00011000
THEN 270
AND &B11100111
THEN 290 ELSE 260
V9990 register 8
Start digitizing (bit 4 and 3 at 1)
Key pressed? No, then wait
Halt digitizing (bit 4 and 3 at 0)
Key pressed? No, then wait, else repeat
Halt digitizing
Select RGB input; GFX9000 transp.
Save this program before running and execute it after having connected a VCR or camera to
the CVBS input of the Video9000. Press space to ‘freeze’ a picture, and press space again to
continue digitizing. Use the colour (6) and intensity (7) controls to get the best results. Stop
the program by pressing CTRL/STOP. Change line 40 into 40 OUT &H67,1 for overscan
mode digitization.
If the program doesn’t work immediately, type in OUT &H6F,&H10 followed by a return and
look what has gone wrong by reading the Basic error message.
Important notes
Because several GFX9000s have wrong memory (VRAM) chips, the digitize procedure is a
little strange. Normally only bit 4 and 3 of V9990’s register 8 must be set to start digitizing,
and reset to stop. But the GFX9000s which have wrong VRAM chips, must have some more
instructions for some reason. For compatibility reasons every Video9000 user must follow the
instructions below:
Digitize procedure
• Set the V9990 into the screen mode you want (32768 colours must be chosen) by means of
register 6 and 7 (only 50Hz when using a PAL video device like a VCR)
• Disable the hardware cursor via register 8 (bit 6 at “1”)
• Execute a LMMV (fill area), LINE, PSET or ADVANCE (move pset pointer) command of the
V9990 if the last executed command was not one of these four. The ADVANCE command is
the shortest and fastest command (see the V9990 application manual).
• Write &HFFFF to the VRAM address that can be calculated as follows:
Address = &H80000 – 2*XIMM where XIMM is the width of the image space in dots
• Write &H03FF into V9990’s SY register (register 34 = &HFF and 35 = &H03)
• Set both bit 4 and 3 of register 8 to start digitizing and reset both to halt digitizing
For the GFX9000s with good VRAM steps 2 - 5 are meaningless, but must be performed in
‘non-personal’ software for compatibility reasons.
17
7 Superimposing with the Video9000
7
Superimposing with the Video9000
Superimpose is the effect that a moving or non-moving video image is covered by (parts of) a
second image. In the case of the Video9000, this second image is the graphical screen
produced by the GFX9000. At those places the graphical screen is made transparent, the
moving video scene is visible. The subtitling of foreign TV films, the overlaid scores of a
football game in sport programs on TV, but also the weather broadcasting programs (the maps
with clouds and suns are superimposed upon the background) are examples of superimposing.
The Video9000 is able to superimpose all screen modes of the GFX9000 upon an external
video image, except for the high-scan modes B5 and B6. The Video9000 superimposer
supports both the 50Hz and the 60Hz frame frequency principally, but due to the fact that all
PAL video sources (European video standard) have a frame frequency of 50Hz,
superimposition is practically performed only at 50Hz.
To get two video images superimposed upon each other, both video signals must be
synchronized. This means that both signals are running equally fast and are both drawing the
same piece of screen at all times. For example, when the external video signal is just starting
to draw line 100 of the video image, the V9990 processor must start with the same line too
and both signals must draw that line at the same speed.
The circuit that synchronizes the V9990 with the external video signal is called a genlock.
Therefore, to be able to superimpose (and for digitizing holds the same), the genlock circuit
must be running (enabled). The genlock is controlled by bit 4 of port &H6F as described in
chapter 5. When this bit is 1 the genlock is enabled and the GFX9000 is synchronized with the
video signal of the selected input (RGB, S-VHS or CVBS), if present.
Superimposing is only useful if the video scene is not completely covered by the graphical
image. Therefore, the GFX9000 screen must be made transparent at certain places. This is
carried out by making the YS bit 1 (provided that the YS enable bit is also 1), as described in
chapter 5 in the paragraph ‘About the YS bit’.
Starting with the superimposer
Type in the following program (Power basic not installed):
10 ‘ ***VIDEO9000 SUPERIMPOSE PROGRAM***
20 ON STOP GOSUB 300: STOP ON
30
40
50
60
18
‘ GFX9000 INITIALIZATION
OUT &H67,0
OUT &H64,6: OUT &H63,&H97: OUT &H63,8
OUT &H64,8: OUT &H63,&HE2
Activate CTRL/STOP function
Non-overscan mode
512x212; 32768 colours; 50Hz
Digitize off; YS system enabled
7 Superimposing with the Video9000
70 OUT &H64,14: OUT &H63,0
80 OUT &H61,128: OUT &H61,0: OUT &H61,0
90 OUT &H64,15: OUT &H63,0
Select palette no. 0
Set YS bit for palette colour 0
Border colour is transparent
100 RESTORE 260: GOSUB 210
Make whole screen transparent
110
120
130
140
‘ VIDEO9000 INITIALIZATION
OUT &H6F,&H58
TIME=0
IF TIME=0 THEN 140
Genlock on; CVBS input selected;
GFX9000 not transparent via bit 3
Wait one frame cycle (1/50 sec.)
150
160
170
180
190
‘ DRAW GFX9000 FIGURE
RESTORE 270: GOSUB 210
A$=INKEY$: IF A$=”” THEN 170
RESTORE 280: GOSUB 210
A$=INKEY$: IF A$=”” THEN 190 ELSE 160
Draw red box in the middle of the screen
Key pressed? No, then wait
Draw transparent box in the red box
Key pressed? No, then wait, else repeat
200
210
220
230
240
‘ DRAW GFX9000 FILLED BLOCK
OUT &H64,36
FOR D=1 TO 14: READ V: OUT &H63,V: NEXT D
OUT &H64,52: OUT &H63,&H20
RETURN
250
260
270
280
‘ CO-ORDINATES, ETC. FOR BLOCKS
DATA 0,0,0,0,0,2,0,2,0,12,255,255,0,128
Transparent big-sized box (clear screen)
DATA 124,0,74,0,128,0,64,0,0,12,255,255,224,3 Red box in the middle of the screen
DATA 156,0,90,0,64,0,32,0,0,12,255,255,0,128
Transparent box within the red box
290 ‘ STOP SUPERIMPOSE PROGRAM
300 OUT &H6F,&H10
transp.
310 END
First used command register of V9990
Write box-coor., -format and -colour
Execute box-fill command
Select RGB input; GFX9000
Save this program before running and execute it after having connected a VCR or camera to
the CVBS input of the Video9000. Press space to change the superimposed image a little. Use
the colour (6) and intensity (7) controls to optimise the external video screen. Quit the
program by pressing CTRL/STOP. Change line 40 into 40 OUT &H67,1 for overscan mode
superimposition.
You can change the value &H58 in line 120, if you wish: &H5A will mix both video signals,
&H18 will superimpose the GFX9000 image upon the MSX 2/2+/turboR text screen and
&H78 will use the S-VHS input. Try to change the right-most bit (bit 0) of port &H6F.
Of course any graphical image and/or animation can be superimposed upon the external video
source. By using Power basic, lines, boxes, circles and animations are much easier to program.
See the next chapter if you want to use Power basic in combination with the Video9000.
19
8 Video9000 with Power basic
8
Video9000 with Power basic
To program animations, wipes, texts, etc. easier, you can use Power basic (not supplied with
the Video9000). All possibilities of the GFX9000 and Video9000 can be used via the basic
OUT&H6X,Y command, but the LINE or COPY commands of Power basic are much more
convenient.
To use Power basic in combination with the Video9000 follow the steps below:
• RESET the computer and start Power basic (CALL V9990 <RETURN>)
• Type: VDP (7) = VDP (7) OR 8 <RETURN> to switch to 50Hz frame frequency
• Type: VDP (8) = VDP (8) OR &B00100000 <RETURN> to switch on the YS system
• Load or create the Power basic program showing the animations or pictures you want
• For superimposing: precede the program with the command OUT &H6F,&H58 in order to
get the animations superimposed upon the CVBS video source (VCR, camera, etc.) and use
the YS bit to make parts of the screen transparent (see chapter 5 paragraph: ‘About the YS
bit’; note that Power basic don’t support full colour; use SCREEN 5 instead, for example)
• For digitization: Power basic doesn’t support 32768 colour modes, so digitization is not
useful.
As you can see, Power basic is most useful for superimposing. Digitizing can be performed
with the supplied digitizing program.
Example: Type in the following program after you did start-up Power basic:
10 ON STOP GOSUB 180: STOP ON
20 SCREEN 7
30 VDP (7)=VDP (7) OR 8
40 VDP (8)=VDP (8) OR 32
50 COLOR=(0,128,0,0)
60 COLOR 15,0,0
70 OUT &H6F,&H58
80 A=RND (-TIME)
90 FOR X=1 TO 100
100 X1=RND (1)*512: Y1=RND (1)*212
110 X2=RND (1)*512: Y2=RND (1)*212
120 CL=RND (1)*15+1
130 LINE (X1,Y1)-(X2,Y2),CL,B
140 NEXT X
150 A$=INKEY$: IF A$=”” THEN 150
160 CLS: GOTO 90
180 SCREEN 0: OUT &H6F,0: END
20
Activate CTRL/STOP function
512x212; 16 colours
50Hz
YS system enabled
Colour 0 is transparent (it was black)
Foreground white, background transparent
Select CVBS input; no ‘overall transparency’
Random numbers
Start co-ordinates at random
End co-ordinates at random
Colour at random (but not colour 0)
Draw random box
Key pressed? No, then wait
Clear screen and repeat
Text screen; only GFX9000 and quit
9 Using GFX9000 applications
9
Using GFX9000 applications
If you want to start a GFX9000 application (like GFXAGE, Paint9000 or PicView) you can
easily execute it by loading or even resetting the computer (autoexec). Two things can happen
then:
1. The application is ‘well behaving’: It starts as it used to be and there are no problems (like
hanging program, destroyed image, etc.) at all.
2. The application is ‘bad-behaving’: Images are corrupted, the computer may hang, etc.
‘Well-behaving’ applications
When a GFX9000 application starts, it will always perform an OUT &H6F,0 command, if it’s
programmed according to the rules. This means that the genlock is turned off (remember that
the genlock is enabled after a hardware RESET). This turning off takes some time and
therefore at least one frame cycle (1/50 or 1/60 sec.) must be waited, before any write
operation to the V9990 is performed.
Now, ‘well-behaving’ applications do wait long enough after the OUT command, before
writing to the V9990 (or at least before executing a V9990 command). In most of these
applications the waiting is performed accidentally (i.e. by chance the microprocessor must do
some preparations before executing the V9990 command and this takes some time). This
means that fast processors (like the R800 or even a Z80 at 7 MHz) may turn ‘well-behaving’
applications into ‘bad-behaving’ ones.
For this reason, the waiting process must always consist of waiting for the V9990’s vertical
retrace (=period that the electron beam that draws the screen returns to the top-left corner of
the Cathode Ray Tube) to make the waiting time processor independent.
Fixing ‘Bad-behaving’ applications
‘Bad-behaving’ applications are all those programs that are not running properly after
execution (when using the fastest CPU mode). For those applications some help programs
have been made to be able to execute them properly. Some are written for MSX-DOS, others
for MSX basic.
21
9 Using GFX9000 applications
Applications for DOS
If you have a ‘bad-behaving’ application that runs under MSX-DOS, fix it by following the
steps below:
• Start DOS (e.g. by CALL SYSTEM or RESET)
• Go to the drive and directory in which the application is stored
• Copy the ENAGFX.COM and DISGFX.COM files (from the disk that also contains the
digitize program) to this directory
• Make a batch file as follows:
COPY CON NAME.BAT <RETURN> where NAME is the name of the application
ENAGFX.COM <RETURN>
NAME.COM
<RETURN> where NAME is the name of the application again
DISGFX.COM <RETURN>
^Z <RETURN> where ^Z means CTRL + Z (end of batch file)
• From now on start the application by typing: NAME.BAT (don’t forget .BAT)
Example:
Let’s take the application PicView. Suppose that PicView (the PICVIEW.COM file) is
located at the directory C:\GFX\PICVIEW\ . Go to this directory, put the digitize
program disk in a diskdrive (suppose it’s called A:) and type in:
COPY A:???GFX.COM
Then type:
COPY CON PICVIEW.BAT
ENAGFX.COM
PICVIEW.COM
DISGFX.COM
^Z
Start PicView by typing PICVIEW.BAT followed by <RETURN>.
NOTE:
When you have a harddisk you could better copy the ENAGFX.COM and DISGFX.COM
files to the root directory of you harddisk, instead of copy them to each directory that contains
a GFX9000 application. In that case, be sure the path (in the autoexec.bat file) is directed at
least to the root directory (e.g. insert PATH = C:\; in your autoexec.bat file). Any ‘badbehaving’ GFX9000 application must be able to find these both files.
NOTE:
If the application already has a batch file, you must add the ENAGFX.COM command just at the
beginning of that batch file, and the DISGFX.COM command just before the ^Z command.
22
9 Using GFX9000 applications
Applications for disk basic
If you have a ‘bad-behaving’ application that runs under MSX disk basic, fix it by following
the steps below:
• Go to disk basic when you are in DOS (e.g. by BASIC or perhaps by a RESET)
• Be sure you can access the drive and directory in which the application is stored
• Make a file loader as follows:
10
20
30
40
OUT &H6F,0
BLOAD “NAME.EXT”,R
OUT &H6F,&H10
NEW
and save this as NAME.LDR or NAME.BAS in the application directory
• From now on start the application by typing: NAME.LDR or NAME.BAS
NOTE:
Line 20 must contain the application load and execute command. If this command is a RUN
”NAME.EXT” or LOAD ”NAME.EXT”,R command, both OUT commands in the listing
above must be added to the NAME.EXT program file, instead of making a new file loader.
Example:
Imagine you normally load and execute a GFX9000 application by the command
BLOAD “GFXDEMO.BIN”,R. Then type in the following basic program:
10
20
30
40
OUT &H6F,0
BLOAD “GFXDEMO.BIN”,R
OUT &H6F,&H10
NEW
and save it with SAVE “GFXDEMO.LDR”.
Start GFXDEMO by typing RUN “GFXDEMO.LDR”.
Example:
Imagine you load and execute a GFX9000 application by RUN “GFXDEMO.BAS”.
Now, load this program with LOAD “GFXDEMO.BAS” and type LIST <RETURN>.
Let 10 be the first line number. Then type 5 OUT &H6F,0 <RETURN>.
Find the line number that is executed just after quitting the application. Most of the
times this is the last line, or the line just below the last BLOAD “GFXDEMO.BIN”,R
or DEF USR=&HXXXX: A=USR (0) command. Let’s say this is line number 40.
Insert here: 50 OUT &H6F,&H10 (the number 50 is only an example).
Save the basic program with SAVE “GFXDEMO.BAS”.
Start GFXDEMO by typing RUN “GFXDEMO.BAS”.
NOTE:
Some ‘BLOAD’ programs for disk basic might overwrite the basic loader. Then, the program
will be executed normally if the previous steps are followed, but the application won’t
terminate properly: it will return to basic after a quit or exit, but the Video9000 will still show
the GFX9000 image (which may be black). By typing ‘blind’ OUT &H6F,&H10 <RETURN>
or by resetting the computer the normal MSX 2/2+/turboR screen will be visible. If this in not
a problem, you might even skip the ‘hanging’ four lines of the example above, in all cases.
23
9 Using GFX9000 applications
Terminating a GFX9000 application
Both ‘well-behaving’ and ‘bad-behaving’ applications won’t terminate properly initially. This
is caused by the fact that none of the applications (except for specific Video9000 software)
terminates with the command OUT &H6F,&H10 which let the Video9000 know that the
standard MSX 2/2+/turboR screen (V9938/58 Video processor) must be displayed.
By carrying out the steps given in the previous paragraphs, the application will terminate
properly. So for this reason, it is recommended that all GFX9000 applications are ‘fixed’ by
one of the procedures previously discussed.
Although several applications will work fine after having performed the above procedures,
there may always be applications (especially those for disk basic) that won’t terminate
properly. Applications for disk basic can be very different, and therefore many different fixing
strategies can be followed. Instead, a general solution:
YOU CAN ALWAYS TERMINATE BY MEANS OF A HARDWARE RESET!
Finally, it might be a good idea to change a function key (for example F1) into the command
OUT &H6F,&H10 by typing: KEY 1,”OUT &H6F,&H10”+CHR$ (13) <RETURN>. Then
you can always go back to the MSX 2/2+/turboR text screen by pressing F1.
24
10 Building the Video9000 into a pc box
10 Building the Video9000 into a pc box
If you want to build the Video9000 into a pc box, you can follow the strategy given below:
• Open the Video9000 box by means of the three ‘cross-head’ screws at the bottom side, but
only remove the two black ones completely
• If there are any spacers (pieces of plastic between the two PCBs) that are not fastened
anymore, remove them
• Drill some holes through the bottom half of the box, and mount the Video9000 by means
of these holes at a suitable place in the pc box
• Extend the cable to the colour and intensity controllers in order to be able to move these
controllers to, for example, the front side of the pc box
• Extend the video input and output connectors to the back side of the pc box, if necessary
NEVER REMOVE THE BOTTOM HALF OF THE VIDEO9000 BOX!!
ANY GUARANTEE WILL BE LOST, OTHERWISE!
It is also possible to use the upper half of the Video9000 box for mounting the Video9000
somewhere in the pc box. Fasten the upper half of the box first, and put the Video9000 back
onto it by means of the three ‘cross-head’ screws.
25
Appendix A Connector pin layouts
Appendix A
Connector pin layouts
NOTE: All signals are valid when looking towards the Video9000, except for the MSX slot
connector.
1 Slot connector
Pin:
1
3
5
7
9
11
13
15
17
19
21
23
25
27
29
31
33
35
37
39
41
43
45
47
49
Name:
*CS1
*CS12
Reserve
*WAIT
*M1
*IORQ
*WR
*RESET
A9
A11
A7
A12
A14
A1
A3
A5
D1
D3
D5
D7
GND
GND
+5V
+5V
SOUNDIN
I/O: Used:
O
O
Y
I
O
O
Y
Y
O
Y
O
O
O
Y
O
O
O
O
Y
O
Y
O
Y
I/O
Y
I/O
Y
Y
I/O
Y
I/O
Y
Y
O
Y
O
Y
I
Pin:
2
4
6
8
10
12
14
16
18
20
22
24
26
28
30
32
34
36
38
40
42
44
46
48
50
Name:
*CS2
*SLTSL
*RFSH
*INT
*BUSDIR
*MERQ
*RD
Reserve
A15
A10
A6
A8
A13
A0
A2
A4
D0
D2
D4
D6
CLOCK
SW1
SW2
+12V
-12V
I/O: Used:
O
O
O
I
Y
I
O
Y
O
O
O
Y
O
O
O
Y
O
O
Y
O
Y
Y
I/O
Y
I/O
I/O
Y
Y
I/O
O
Y
Y
O
Y
O
Y
NOTE: The I/O indications are given from the computer’s point of view, i.e. as if looking
into
the MSX cartridge slot.
26
Appendix A Connector pin layouts
2 RGB Video output connector
Pin:
1
2
3
4
5
6
7
8
9
Name:
I/O:
GND
GND
REDout
O
GREENout
O
BLUEout
O
StatusRGB
O
CVBSout *)
O
Audio left out
O
Audio right out O
*) In fact this signal is only a *CSYNC signal, used for synchronization. So no composite
video output (CVBS) is available.
NOTE: If a SUB-D to SUB-D connector is used, it might be necessary to release wire 8 and 9
from wire 8 and 9 of one SUB-D connector respectively.
2 RGB Video input connector
SCART:
Pin: Name:
I/O: Used:
1 Audio right in
I
Y
2 Audio right out
O
3 Audio left in
I
Y
4 Audio GND
Y
5 BLUE GND
6 Audio left out
O
7 BLUE in
I
Y
8 Status CVBS
I
9 GREEN GND
10 Reserve
Y
11 GREEN in
I
12 Reserve
13 RED GND
Y
14 GND
15 RED in
I
Y
I
16 Status RGB
17 CVBS GND
18 RGB Status GND
Y
19 CVBS in *)
I
20 CVBS out
O
21 GND Shield
DIN:
Pin:
1
2
3
4
5
6
7
8
Name:
GND
Audio in
Status CVBS
CVBS in *)
Status RGB
RED in
GREEN in
BLUE in
I/O: Used:
Y
I
Y
I
I
Y
I
I
Y
I
Y
I
Y
*) It is sufficient to apply only a *CSYNC signal, but a CVBS signal may be inputted as well.
27
Appendix A Connector pin layouts
4 S-VHS video input connector
Pin:
1
2
3
4
5
Name:
I/O:
GND
GND
Luminance in (Y in)
I
Chrominance in (C in)
I
GND Shield
-
5 CVBS video input connector
Pin:
Name:
Core
CVBS in
Shield GND
28
I/O:
I
-
Appendix B Terms explained
Appendix
B
Terms explained
CHROMINANCE
The part of a video signal that represents the colour information
of the screen. Compare luminance.
CINCH CONNECTOR
Type of connector, often used for inputting and/or outputting
audio and video signals. It looks like a tulip.
COMPOSITE VIDEO
See CVBS.
CONTRAST
Also called intensity. It is the difference between light and dark
of a video image or signal. By increasing the contrast level,
white will become more bright, but black stays as dark as it was
before.
CVBS
This is a video signal that contains all information to display an
image by a monitor or TV, i.e. the luminance part (black and
white), chrominance part (colour) and synchronization part.
Most video equipment do have a CVBS video input and/or
output. Another term is Composite Video or simply video. In
German it’s called FBAS.
DIGITIZE
The action that ‘freezes’ a moving or non-moving video image,
and turns it into a digital format, so that it can be processed by a
computer.
DIN CONNECTOR
A round connector with 3, or more contacts inside, used by
Sony and turboR MSX computers to output the RGB video
signals. Another connector type often used for this is SCART.
FBAS
The German term for CVBS. See CVBS for more information.
FRAME FREQUENCY
Speed at which the screen is refreshed by the monitor or TV.
50Hz means 50 pictures (frames) per second, 60Hz gives less
flickering as the monitor displays 60 frames per second.
European televisions, VCRs and cameras have a frame
frequency of 50Hz. Therefore, to get the GFX9000
synchronized (equally speeded) with a VCR or camera, the
GFX9000 must be set at 50Hz.
GENLOCK
Circuit that synchronizes the GFX9000 with an external video
source, in order to be able to superimpose or digitize.
Synchronize means that both signals are running equally fast
and that both signals are starting with the same screen line at
the same time.
29
Appendix B Terms explained
INTENSITY
Also called contrast. See contrast for more information.
LUMINANCE
The part of a video signal that represents the black and white
information of the screen. Compare chrominance.
MIX
The action that two images are ‘added’ and displayed together.
Before adding the brightness of both images is reduced to 50%.
OUT
A basic command that can be used to control the GFX9000 and
Video9000 directly.
OVERSCAN MODE
The screen mode of the GFX9000 in which no border is visible
around a graphical image.
PAL
The video standard used by most European video devices. It is
the way at which the CVBS video signal is made. The
Video9000 is supporting PAL video. In the United States and
Japan the NTSC standard is used. This standard can’t be used
with the Video9000. The third standard is SECAM and is used
in France. Neither this standard is supported by the Video9000.
POWER BASIC
A basic version specially made for the GFX9000. It’s based on
KUN basic, but all graphical and text commands are made for
the GFX9000.
RGB VIDEO
Another way of transporting video signals. The three colour
components, red, green and blue, are transported separately.
This video signal gives high-quality images. It’s often inputted
or outputted via a SCART or DIN connector.
SCART
Connector that outputs and/or inputs both CVBS and RGB
video signals. The RGB signal, though, is not always supported
by this connector. Only CVBS video can be inputted an
outputted by the same connector. The RGB video is either
inputted or outputted. Audio signals are also inputted and/or
outputted by this connector.
SUPERIMPOSE
The action that one image is displayed upon another. The
hindmost screen is visible when the foremost image is
transparent. The Video9000 superimposes the GFX9000
graphical image upon an external video source, coming from a
VCR, TV or camera or the MSX computer.
S-VHS
Almost the same as CVBS video, except that the chrominance
(colour part) and the luminance (black and white part +
synchronization) are transported separately. It gives a higher
quality than CVBS video, but less than RGB video. S-VHS is
also called S-Video or Y/C-video.
30
Appendix B Terms explained
VCR
Abbreviation for Video Cassette Recorder.
VIDEO
Another definition of CVBS video. See CVBS for more
information.
VIDEO OUTPUT
The connector that outputs the CVBS video signal. Most video
equipment have such a CVBS output. It can be outputted by a
SCART or DIN connector or by a special CVBS connector
(CINCH connector).
WIPE
The effect that one image is gradually replaced by another
image. For example the second image will be slowly visible by
making the first image transparent more and more.
31
Guarantee
Sunrise Swiss guarantees the errorfree operation of the Video9000 during 12 months after
purchasing. In case of failure Sunrise Swiss decides on repairing or changing the Video9000.
Any changes to the Video9000 are not covered by this warranty. This warranty will be lost if
the Video9000 bottompanel has been removed! In this manual Video9000 does mean all the
components that are added to the GFX9000.
32