1
MotionBuilder Plugin
User’s Guide
Version 2.6.0
March 2013
NaturalPoint Corporation
33872 SE Eastgate Circle
Corvallis OR 97339
Copyright 2004-2011 NaturalPoint Corporation. All rights reserved.
NaturalPoint Publication Number: P-OT-055
Printed in the US.
NaturalPoint Proprietary
All data and information contained in or disclosed by this document is confidential and proprietary information of NaturalPoint
Corporation and all rights therein are expressly reserved. By accepting this material the recipient agrees that this material and the
information contained therein is held in confidence and in trust and will not be used, copied, reproduced in whole or in part, nor its
contents revealed in any manner to others without the express written permission of NaturalPoint Corporation. Information in
this document is preliminary and subject to change and does not represent a commitment on the part of NaturalPoint
Corporation.
MotionBuilder Plugin
2
TABLE OF CONTENTS
Table Of Contents ...................................................................................................................................................................................... 3
MotionBuilder Plugin Overview ................................................................................................................................................................. 5
OptiTrack Optical Device............................................................................................................................................................................ 6
Device Panel ........................................................................................................................................................................................... 7
Step-By-Step Usage Example ................................................................................................................................................................. 9
Recording Optical Data ........................................................................................................................................................................ 11
Playing Back Recorded Data................................................................................................................................................................. 11
MotionBuilder Actor / Character Setup ............................................................................................................................................... 11
Actor Setup (Mocap Marker Data -> MotionBuilder “Actor”) ......................................................................................................... 12
Character Setup (MotionBuilder Actor -> Character) ...................................................................................................................... 13
Virtual Camera Device (Insight VCS) ........................................................................................................................................................ 14
Installation and Licensing ..................................................................................................................................................................... 16
Supported Platforms ........................................................................................................................................................................ 16
Installation ....................................................................................................................................................................................... 16
Licensing........................................................................................................................................................................................... 16
Creating a Virtual Camera device (OptiTrack Server) .......................................................................................................................... 18
Creating a Virtual Camera device (Universal Mode) ............................................................................................................................ 20
Connection Settings ............................................................................................................................................................................. 21
Controllers ........................................................................................................................................................................................... 22
Controller Profiles ............................................................................................................................................................................ 22
Profile Setup..................................................................................................................................................................................... 22
Action Parameters ............................................................................................................................................................................... 24
Virtual Camera Device Settings ........................................................................................................................................................... 28
MotionBuilder Camera Settings ........................................................................................................................................................... 30
Appendix A : Insight VCS:Pro Quick Start Guide ...................................................................................................................................... 31
Appendix B : Insight VCS:Pro LED Identification Key ............................................................................................................................... 33
MotionBuilder Plugin
3
Technical Support .................................................................................................................................................................................... 34
MotionBuilder Plugin
4
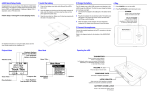
MOTIONBUILDER PLUGIN OVERVIEW
The NaturalPoint OptiTrack MotionBuilder Plugin is a collection of MotionBuilder devices, scripts, and samples used for working with
NaturalPoint data inside MotionBuilder. The device plugins allow users to stream live data into MotionBuilder. The following
diagram outlines typical MotionBuilder communication.
MotionBuilder Plugin Client/Server Architecture
Arena
Full Body Marker Data
Face Marker Data
RigidBody Data
Multicast Address
(224.0.0.1:1001)
NatNet SDK
MotionBuilder
UDP Packets
TrackingTools
MotionBuilder Plugin
RigidBody Data
5
OPTITRACK OPTICAL DEVICE
The OptiTrack Optical Plugin device allows to you map motion capture (optical) data onto an animated character within
MotionBuilder.
MotionBuilder Character Driven by Motion Capture Data
The OptiTrack Optical device represents a single mapping between an OptiTrack MarkerSet and a MotionBuilder Actor. To create
this device, simply drag the OptiTrack Optical from the Motion Builder Asset Browser into the Viewer window or Scene browser.
Once you have created an OptiTrack Optical device, you can adjust its settings and connect it to both an OptiTrack Server (e.g.
Arena) and a Motion Builder Actor.
MotionBuilder Plugin
6
DEVICE PANEL
Optical Device Interface
1. Device Settings The standard MotionBuilder Device Settings dialog.
Online
Click this box to connect to the OptiTrack Server (e.g. Arena).
Red
Not connected
Yellow
Connected, not streaming
Green
Connected and streaming
Live
Indicates to MotionBuilder that data is coming from a live source
(checked) or from a recorded take.
Recording
Indicates to MotionBuilder that data from this device should be
recorded when MotionBuilder is recording.
Model Binding
Unused
Device Information
Information about the status of the connection
NOTE: FOR MORE INFORMATION ON DEVICE SETTINGS, PLEASE REFER TO THE MOTIONBUILDER HELP.
MotionBuilder Plugin
7
2. Optical Model Sets the mapping between a Mocap marker set and a MotionBuilder "opticals" set.
Optical Model
Specified the MotionBuilder "Opticals" model to map the markers
to.
Generate a new Optical model /
Update the current optical model
Adds/updates the current MarkerSet from OptiTrack to list of
MotionBuilder "Opticals" model.
Damping Time
Device damping time.
3. Global Settings
Server Address
IP address of the OptiTrack Server. Use the local loopback
(127.0.0.1) address if the server application is running on the same
machine.
Note! Be sure to configure any Firewall software first! (either
disable or permit MotionBuilder as an exception)
OptiTrack MarkerSet
The name of the OptiTrack MarkerSet this optical is binding to.
MarkerSet Scale
The global scale factor to be applied to the marker data before
mapping to the actor.
MotionBuilder Plugin
8
STEP-BY-STEP USAGE EXAMPLE
The following is a quick, step-by-step process for streaming marker data from Arena into MotionBuilder
Arena Streaming Step-by-Step
Step
[Arena] Configure Arena for Streaming Data
Details
From the Arena Streaming Pane:
Select an IP address to stream from.
Select Streaming -> Start Streaming Button
Note! Be sure to configure any Firewall software first! (either disable or
permit MotionBuilder as an exception)
[Mobu] Create an OptiTrack Optical device
In the MotionBuilder Asset Browser Window -> Devices window. You should
see:
OptiTrack Optical
Within MotionBuilder, drag the OptiTrack Optical device into the Navigator
(or Viewer) pane. An instance will be created under the 'Devices' node
[Mobu] Connect Optical Device to Arena
In the Navigator window, select OptiTrack Optical from the Devices node
On the OptiTrack Optical pane, set the IP address of the OptiTrack server
(e.g. Arena).
Click on the 'Online' checkbox - it should change from red to yellow (or
green if data from the OptiTrack Server is currently streaming)
[Mobu] Create a MarkerSet -> Opticals Mapping
In the 'OptiTrack MarkerSet' Dropdown, select the name of a currently
defined MarkerSet in Arena.
Press the 'Generate new optical model' button
In the Navigator window, under the 'Opticals' node, you should see a new
the marker list. This indicates the plugin has successfully retrieved the
marker list from the OptiTrack server. You should also see the Opticals
displayed in the viewer window if the Server is currently streaming.
[Mobu] Begin streaming marker data
From Arena, start live capture or data playback
From MotionBuilder, ensure the “Viewer” window is active (Mobu will not
update otherwise)
The marker set should be animating in the Mobu Viewer window
The Mobu 'online' check boxes should be green, indicating data is live and
actively streaming
MotionBuilder Plugin
9
MotionBuilder Plugin
10
RECORDING OPTICAL DA TA
The OptiTrack Optical device can record optical data to the current MotionBuilder take. The following step-by-step procedure can be
used to record data:
Step
Details
Enable Optical Device for recording
[Mobu] -> Optical -> Check "Recording"
Start Recording
[Mobu] -> Transport Control -> Record (Create new take)
[Mobu] -> Transport Control -> Play ( start recording frames)
[Mobu] -> Transport Control -> Stop
PLAYING BACK RECORDED DATA
The OptiTrack Optical device can be used show live data or blend live data with a recorded take. To playback recorded optical data,
you need to tell MotionBuilder to disable live streaming.
Step
Disable Live streaming
Details
[Mobu] -> Optical -> Uncheck Recording
[Mobu] -> Optical -> Uncheck Live
Playback recorded take
[Mobu] -> Transport Control -> Rewind
[Mobu] -> Transport Control -> Play
MOTIONBUILDER ACTOR / CHARACTER SETUP
The following guide is provided as a simplified process for working specifically with Arena software. It is not the only process. For
the latest information on setting up and configuring MotionBuilder Actors and Characters, please refer to your MotionBuilder
documentation.
To animate characters in MotionBuilder, you need to create the following data flow (or “mapping”):
Mocap Marker Data -> MotionBuilder “Actor” -> Skeleton Data -> MotionBuilder “Character”
The Mocap Marker Data -> MotionBuilder “Actor” step maps Motion Capture data (Markers) to the MotionBuilder Actor object.
The MotionBuilder Actor object is a skeleton solver that creates joint angles from Marker data.
MotionBuilder Plugin
11
The MotionBuilder “Actor” -> Skeleton Data -> MotionBuilder “Character” step is specific to MotionBuilder, and maps the
MotionBuilder Actor skeleton onto your final character skeleton. This step requires a “rigged” character. Refer to the MotionBuilder
help for detailed information on this process.
ACTOR SETUP (MOCAP M ARKER DATA -> MOTIONBUILDER “ACTOR”)
You can either create a new marker map from scratch, or save time by importing an existing marker map.
Create Marker Map from Scratch
1. Create OptiTrackMB Optical device
2. Connect to Arena
3. Generate Opticals
4. Stream a frame of T-Pose data from Arena
a. You should see the Opticals in the MotionBuilder 3D viewer
5. Create MB Actor
6. Fit MB Actor to Opticals
7. Create an Optical -> MarkerSet -> Actor mapping:
a. Import existing mapping
i. Actor -> MarkerSet -> Import -> OptiTrack HIK file
ii. Drag all opticals (incl root) onto Actor’s “Reference Cell”
b. Create a new mapping:
i. Actor -> MarkerSet -> Create
ii. Drag individual opticals to Actor segments
8. Activate Actor (Actor -> Activate)
a. Actor snaps to marker cloud pose
b. Actor should now be animating in Viewer
Import Existing Marker Map (from File)
Option
1.
2.
3.
4.
5.
6.
1: Restore MarkerSet from HIK file
[Mobu] Import MarkerSet definition (.hik file)
[Mobu] Connect to Arena
[Mobu] Generate Opticals
[Arena] Stream a T-Pose frame of data into MotionBuilder
[Mobu] Actor Panel : Drag Opticals to Actor Markers (Actor Prop Sheet -> Reference)
[Mobu] Activate Actor (Actor -> Activate)
a. Actor snaps to marker cloud pose
b. Actor should now be animating in Viewer
Option
1.
2.
3.
4.
5.
6.
7.
2: Export FBX from Arena
[Arena] Export skeleton as FBX
[Mobu] Merge FBX from Step 1 (File -> Merge)
[Mobu] Connect to Arena
[Mobu] Generate Opticals
[Arena] Stream a T-Pose frame of data into MotionBuilder
[Mobu] Actor Panel : Drag Opticals to Actor Markers (Actor Prop Sheet -> Reference)
[Mobu] Activate Actor (Actor -> Activate)
a. Actor snaps to marker cloud pose
MotionBuilder Plugin
12
b.
Actor should now be animating in Viewer
CHARACTER SETUP (MOT IONBUILDER ACTOR -> CHARACTER)
1. Do Actor Setup (Above)
2. Import a rigged skeleton (File -> Merge -> Skeleton)
3. If skeleton is not “characterized, characterize it:
a. Create MB Character (Drag onto skeleton “hips” )
4. Map Character to Actor
a. Select Character -> Character Settings -> Input Type -> Actor Input
b. Check “Active”
5. Activate Actor (Actor -> Activate)
a. Skeleton and Actor should now be animating in Viewer
Note! For more information on setting up and configuring MotionBuilder Actors and Characters, please refer to your
MotionBuilder documentation.
ARENA EXPRESSION USE RS
Note! The Optical Device has a special Property, Arena Expression ( viewable from the MotionBuilder Properties window), that
must be checked when using with Arena Expression:
MotionBuilder Plugin
13
VIRTUAL CAMERA DEVICE (INSIGHT VCS)
The Virtual Camera device is specifically designed for creating a Virtual Camera in MotionBuilder. You can use the Insight VCS device
with standard OptiTrack applications such as Arena and Tracking Tools, or you can use the device in "Universal" mode, which works
with generic MotionBuilder Optical or RigidBody objects, allowing you to use the Insight VCS device with alternative motion capture
systems that support optical or rigid body devices in MotionBuilder.
Camera Tracking in MotionBuilder
The Virtual Camera Device provides a robust camera tool supporting typical camera movements:
Insight VCS Features
Pan / Dolly / Boom
Use VCS controls to Pan Left/Right and Up/Down. Pan in local, world, or a
combination of coordinate systems. Adjust pan speeds on the fly with controls or
scripts.
Pitch / Tilt / Roll
Absolute orientation at all times from the OptiTrack optical system.
Free Move
Absolute position at all times from the OptiTrack optical system. Scale movement in
real-time with controllers or from script.
Zoom
Fully control camera zoom / FOV and zoom rates using the controller's analog
thumbsticks and speed adjusters.
Smooth
Advanced Kalman filtering allows for customizing a "steadicam" feeling.
MotionBuilder Plugin
14
Play / Record
Control common actions like recording and playback using the controller.
Custom commands
Customize the controller by mapping controller inputs to execute scripts for complete
control and one-person camera operation.
The Virtual Camera also integrates into existing MotionBuilder camera control workflows, including spline/path/constraint
animation and custom scripted behaviors.
MotionBuilder Plugin
15
INSTALLATION AND LICENSING
SUPPORTED PLATFORMS
The Insight VCS Plugin is currently supported on the following MotionBuilder versions:
Windows
o MotionBuilder 2010 32-bit and 64-bit
o MotionBuilder 2011 32-bit and 64-bit
o MotionBuilder 2012 32-bit and 64-bit
o MotionBuilder 2013 32-bit and 64-bit
o MotionBuilder 2014 64-bit
INSTALLATION
1.
Run the MotionBuilder Plugin installer, following the instructions.
2.
To confirm installation - the plugin should appear in the MotionBuilder Asset Browser under devices.
LICENSING
The VCS:Mobu plugin requires a valid license to run. There are two versions of the Insight VCS:Mobu plugin:
Standard: For user's with OptiTrack motion capture equipment and applications (e.g. ARENA™ or Tracking Tools).
Universal: For user's with 3rd party motion capture equipment. This version works with any MotionBuilder Rigid Body.
Each version has its own licensing requirement:
Insight VCS Licensing Requirements
Product
Licensing
Requires Unique Hardware Key
VCS:Mobu Standard
VCS:Mobu license is installed into the OptiTrack Server
Application's (e.g. ARENA™ or Tracking Tools) license
folder. The server application administers the license to
the plugin during connection.
No - uses Server Application's key.
VCS:Mobu Universal
VCS:Mobu Universal license is installed into the local
workstation's (system running MotionBuilder) OptiTrack
license folder, and requires a hardware key.
Yes.
Please refer to your order confirmation and/or Quick Start Guide for specific licensing instructions.
Additional information on licensing can be found in our Licensing and Activation FAQ:
http://www.naturalpoint.com/optitrack/support/activate/faq.html
MotionBuilder Plugin
16
MotionBuilder Plugin
17
CREATING A VIRTUAL CAMERA DEVICE (OPTITRACK SERVER)
1. [OptiTrack Server App] Create a Rigid Body from your tracking controller’s markers.
Note! The “neutral” or “zero” orientation of a rigid body is the orientation when it is created in the software
(Motive/Arena/TrackingTools). This will be the camera’s neutral orientation. In addition, for correct interpretation into
MotionBuilder’s coordinate system, it is important you align your rigid body with the correct axis and coordinate system
convention as follows:
Arena / TrackingTools users: Point your tracking controller (e.g. VCS Pro) along physical volume +Z axis.
Motive users: Point your tracking controller (e.g. VCS Pro) along physical volume -Z axis.
Arena / Tracking Tools
MotionBuilder Plugin
Motive
18
2. [OptiTrack Server App] Enable network streaming (make sure rigid body data is streaming).
3. [MotionBuilder] Drag the OptiTrack Insight VCS device from the Motion Builder Asset Browser Panel into the Viewer or
Navigator window.
4. [Insight VCS Panel] Connect to an OptiTrack Server (e.g. Arena, TrackingTools) by clicking the “Online” checkbox. If the
connection was successful and data is streaming from you OptiTrack server application, this box will change from Red to Green.
Note! Be sure to configure any Firewall software first! (either disable or permit MotionBuilder as an exception)
5. [Insight VCS Panel] Create a new MotionBuilder camera using the Model Binding dropdown.
6. [Insight VCS Panel] [Optional] If tracking more than one rigid body object in your OptiTrack server application, select the rigid
body you wish to use as your tracking source using the Rigid Body ID dropdown on the CameraTracker device panel (Note: the
camera tracker will automatically default to the first detected Rigid Body).
You should now see a standard MotionBuilder Camera moving within your 3D scene:
MotionBuilder Plugin
19
CREATING A VIRTUAL CAMERA DEVICE (UNIVERSAL MODE)
In Universal mode, a MotionBuilder rigid body is used to drive a camera position. This position/orientation information is merged
with the VCS camera controls and applied to the camera's final state (position, lens settings, etc).
It is assumed the rigid body orientation matches the MotionBuilder default camera orientation (camera lense aimed down +X axis).
For example, if streaming from NaturalPoint's TrackingTools, create a rigid body in MotionBuilder from the optical data, with the
camera lense aimed down +X in MotionBuilder.
STEP-BY-STEP
1. [MotionBuilder] Create a Rigid Body.
2. [Insight VCS Panel] Check the "Universal Connection" Radio.
3. [Insight VCS Panel] Check "Online".
4. [Insight VCS Panel] Create a new MotionBuilder camera binding using the Model Binding dropdown.
5. [Insight VCS Panel] Select the Rigid Body you created in step 1 using the Rigid Body dropdown in the Universal Connection
group box.
LIMITATIONS
The following VCS features/properties are unavailable when operating in Universal Mode:
Scale Rotation
Offset Rotation
MotionBuilder Plugin
20
CONNECTION SETTINGS
Virtual Camera connection settings are managed by the Main interface tab on the Virtual Camera device panel:
Insight Virtual Camera- Main Interface
Insight Virtual Camera - Main Interface Settings
Online
Click this box to connect to the OptiTrack Server (e.g. Arena).
Red
Not connected
Yellow
Connected, not streaming
Green
Connected and streaming
Live
Indicates to MotionBuilder that data is coming from a live source (checked) or from a
previously recorded take.
Recording
Indicates to MotionBuilder that data from this device should be recorded when
MotionBuilder is recording.
Model Binding
Indicates the MotionBuilder Camera to be controlled by the tracking controller.
MotionBuilder Plugin
21
Device Information
Information about the status of the connection.
OptiTrack Connection
Indicates the data source is an OptiTrack server application, such as Arena or Tracking
Tools.
Universal Connection
Indicates the data source is a generic MotionBuilder RigidBody.
Server Address
IP Address of the OptiTrack Server
Rigid Body ID
[OptiTrack Connection] Name of the OptiTrack server application’s Rigid Body to use
for tracking.
Rigid Body
[Universal Connection] Name of the MotionBuilder RigidBody to use as a
position/orientation source.
CONTROLLERS
The Insight VCS plugin supports any DirectInput compatible joystick or USB device. Controllers can then be configured to perform
actions or control the camera using Controller Profiles.
CONTROLLER PROFILES
Virtual Camera controls are managed by a Control-to-Event mapping system called the Controller Profile. The controller profile is
configured in the Controller Tab. The Insight VCS plugin allows you to create and swap between multiple controller profiles,
allowing you to create any number of custom button/axis configurations depending upon the scene, particular move types, different
physical VCS controllers or HID devices, etc.
Profiles can be saved and then later swapped out using the Profile Dropdown.
Profiles are saved into <VCS Mobu install folder>\Profiles folder .
The VCS plugin ships with 2 default profiles:
The 2 controller VCS Pro (<VCS Mobu install folder>\Profiles\VCSProDefault.xml).
The XBox based VCS Mini (<VCS Mobu install folder>\Profiles\VCSMiniDefault.xml).
When the Insight VCS plugin is first launched, it will attempt to detect any compatible controllers. It will then attempt to match the
detected controllers with an existing Controller Profile, beginning with the last used ("preferred") profile.
PROFILE SETUP
The VCS plugin supports 2 types of controller inputs and 2 types of actions:
Axis Inputs / Actions: Axis inputs are analog inputs and represent the range of values. This range has been scaled to [0, 1000]. Axis
inputs can be assigned to Axis actions. PTZ operations (Pan, Tilt, Zoom) are good examples of typical Axis Actions.
MotionBuilder Plugin
22
Button Inputs / Actions: Button inputs are the button inputs on the controller. These are “one shot” events that occur when the
button is pressed. Transport commands such as Play, Record, and Rewind are typical examples of “one shot” events.
Note! Some Insight VCS controllers have a dial that is represented in the Axis list as a "Wheel". This is a special form of an axis, and
can be used to modify existing actions, such as zoom speed, pan speed, and motion scale amount.
Figure 3 – A Typical Insight VCS Controller Map
Insight VCS Inputs / Action Settings
Axes
Name of the controller’s analog input.
Action
Action to take or value to change.
Param
Input parameter used by some actions to modify the action in some way (e.g. speed up or slow
down zooming).
Value
Current value of the control input.
MotionBuilder Plugin
23
ACTION PARAMETERS
Some actions have parameters that modify the way they operate. The following tables list the axis and button actions, and how the
parameter value for that action is interpreted.
VCS controller - Axis Actions
Action
Parameter(s)
Example
Pan Right/Left
[Pan Speed] [Curve Type]
1.0
1.0 1
0.5 1
2.0
Dolly In/Out
[Pan Speed] [Curve Type]
1.0
Pan Up/Down
[Pan Speed] [Curve Type]
1.0
Focal Length +/-
[Focal length change rate] [Curve Type]
1.0
Orbit Offset
[Orbit offset change rate] [Curve Type]
1.0
Focal Distance
[Focal distance change rate] [Curve Type]
1.0
Wheel Modifier
[VCS Dial controls only] Modify an axis' parameter value
(e.g. zoom speed, pan speed, translation scale) by a
specified increment.
Examples:
X Axis .1 (+/- the X Axis parameter by 0.1)
Y Axis .2 (+/- the Y Axis parameter by 0.2)
Z Axis .1 (+/- the Z Axis parameter by 0.1)
Scale All .5 (+/- all translational scale by .5)
Translate All 1.0 (+/- all pan speeds by 1.0)
Format:
[ pan at normal rate, linear curve]
[ pan at normal rate, ease-in curve]
[ pan at half speed, ease-in curve]
[ pan at 2x speed ]
[axis name] [increment]
Rotate Right/Left
[Rotate Speed] [Curve Type]
1.0
1.0 1
0.5 1
2.0
Rotate Up/Down
[Rotate Speed] [Curve Type]
SAME AS ABOVE
Tilt Right/Left
[Rotate Speed] [Curve Type]
SAME AS ABOVE
MotionBuilder Plugin
[ rotate at normal rate, linear curve]
[rotate at normal rate, ease-in curve]
[rotate at half speed, ease-in curve]
[rotate at 2x speed ]
24
Curve Types
When mapping a controller thumbstick axis to an animatable camera parameter (pan, zoom), you have the option of specifying how
the Insight VCS plugin should interpret controller axis movement as a standard animation curve. Instead of modifying the value over
time, however, the motion curve modifies the value over the controller span, from neutral/center position (0) to maximum position
(Max). The following diagram describes this relationship:
Controller value modifier curve
The VCS plugin offers the following built-in curve options:
Linear Curve
Cubic Curve
Description : Y = X
Description : Y = X3
Parameter Value : 0
Parameter Value : 1
Quartic Curve
MotionBuilder Plugin
Sine Curve
Description : Y = X4
Description : Y = sin(X)
Parameter Value : 2
Parameter Value : 3
25
VCS Controller - Button Actions
Action
Parameter
Example
Record
Copy data from previous take?
true
Play
None
Fullscreen
Toggles between Fullscreen and the MotionBuilder GUI.
On return to the MotionBuilder GUI, this parameter
indicates the number of viewports to show.
2
RunScript
Runs a MotionBuilder python script. This script must be
located in your MotionBuilder scripts root folder.
ResetOffset.py
ToggleAxisAction
Toggles a specified axis between 2 actions.
Y Axis, 3, 1.0 1, 4, 0.1 2
[Axis name],[Action1 Index], [Action1 Params],[Action2
Index],[Action2 Params]
The example at right toggles the Y Axis behavior between
Dolly In/Out at speed 1.0 with a Cubic Curve and Focal
Length at 0.1 speed with a Quartic curve.
This action can be used to extend axis functionality
without swapping profiles.
Pause
None
Stop
None
Rewind
None
Suspend Tracking
None
Scale Translation +/-
Increment amount
.5
Scale Rotation +/-
Increment amount
.5
Zoom +/-
Increment amount
.5
FOV +/-
Increment amount
.5
Playback Speed +/-
Enumerated value that matches Mobu transport
2
Reset Zoom
Focal Length to reset to
50.0
MotionBuilder Plugin
26
ResetOffset
[x y z] Optional - specifies the position to reset camera
to, otherwise camera is reset to (0.0,0.0,0.0)
10.0 10.0 0.0 [reset camera offset to 10,0,0]
Reset Rotation Offset
[x y z] Optional - specifies the rotation vector to reset to
(in degrees), otherwise camera is reset to (0.0,0.0,0.0)
0.0 90.0 0.0 ( reset camera to 90 degrees yaw)
Reset Orbit Offset
None
Change Camera
None
Play Last Take
None
Reset To Live
None
MotionBuilder Plugin
27
VIRTUAL CAMERA DEVICE SETTINGS
The Insight VCS plugin has several properties that can be used to customize its behavior. These properties can be accessed in the
same manner as any other MotionBuilder object property, such as from the Asset Browser or from MotionBuilder's Python scripting
environment.
Figure 4 – Insight VCS Properties
MotionBuilder Plugin
28
Insight VCS Properties
Action
Parameter
Scale Translation
Scale the physical movement (when tracking controller is moved).
Scale Rotation
Scale the physical rotation (when tracking clip is rotated).
Offset Translation
Can be used for 2 purposes :
1. To adjust the center of the physical volume to the virtual scene.
2. To effectively pan/truck/dolly the camera. This value is updated by the thumbstick controls for the Pan/dolly/truck
operations
OffsetTranslationMode
Affects how Offset Translation is applied to the camera:
0 : Global Translates the camera according to the MotionBuilder global coordinate system (global).
1 : Local Translates the camera according to the camera’s coordinate system (local).
2 : LocalOnStart Translates the camera according to the camera’s coordinate system when the camera first moves (stick
first moves), then keeps that axis (Does not continuously update the coordinate system).
Boom Global Always
Always pan camera up/down in the global Y axis, regardless of the OffsetTranslationMode
Scale Updates Offset
Instructs whether changes to Scale Translation update the Offset Translation value in order to keep the camera in the
same position (true) or does not affect Offset Translation, resulting in camera position moving to new scaled amount.
Smooth Translation Amount
Applies smoothing to the camera position values.
Smooth Rotation Amount
Applies smoothing to the camera rotation values.
Dead Zone
Controller thumbsticks do not typically restore to an exact center value. Dead Zone can be used to specify a value range
around thumbstick center that should be ignored. This can be used, for example, to prevent drift in pan/dolly/zoom when
thumbsticks are mapped to these actions.
MotionBuilder Plugin
29
MOTIONBUILDER CAMERA SETTINGS
A MotionBuilder Camera controls how you see the 3D scene. MotionBuilder’s Camera object allow users the ability to model realworld cameras, including settings such as Focal length, aspect ratio, film format, etc.
Refer to the MotionBuilder documentation for more information on Camera Settings.
MotionBuilder Plugin
30
APPENDIX A : INSIGHT VCS:PRO QUICK START GUIDE
MotionBuilder Plugin
31
MotionBuilder Plugin
32
APPENDIX B : INSIGHT VCS:PRO LED IDENTIFICATION KEY
MotionBuilder Plugin
33
TECHNICAL SUPPORT
NaturalPoint is committed to providing best-in-class technical support.
In order to provide you with the most up to date information as quickly as possible, we recommend the following procedure:
1.
Update to the latest software. For the latest versions of OptiTrack software, drivers, and SDK samples, please visit our
downloads section:
http://www.naturalpoint.com/optitrack/support/downloads.html
2.
Check out the OptiTrack FAQs:
http://www.naturalpoint.com/optitrack/support/opti-faq.html
3.
Check the forums. Very often a similar issue has been reported and solved in the forums:
http://forum.naturalpoint.com/
4.
Contact technical support:
Phone: 541-753-6645
Fax: 541-753-6689
Email Form: http://www.naturalpoint.com/optitrack/support/contact/
Mail:
MotionBuilder Plugin
NaturalPoint Corporation
P.O. Box 2317
Corvallis, OR 97339
34