1
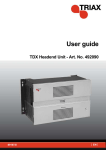
User guide
| GB |
891074
DVB-T module - 492022
TRIAX - your ultimate connection
Rev. 05 - 2011 - C
TRIAX - your ultimate connection
Contents
Contents
Disposal................................................................................................................................... 3
Box content............................................................................................................................. 3
DVB-T module........................................................................................................................ 3
Labels...................................................................................................................................... 4
Cover removal........................................................................................................................ 4
Module installation................................................................................................................. 4
Module removal...................................................................................................................... 5
Input cable installation........................................................................................................... 6
Status LED’s............................................................................................................................ 6
Configuration of system........................................................................................................ 7
Log in....................................................................................................................................... 8
System window...................................................................................................................... 9
Communication icon............................................................................................................ 10
Administration window........................................................................................................ 10
Language settings.............................................................................................................. 11
Country settings.................................................................................................................. 12
Time zone settings.............................................................................................................. 13
Password settings.............................................................................................................. 15
Licence handling................................................................................................................. 16
IP settings........................................................................................................................... 17
Create a new system configuration.................................................................................... 21
Save configuration............................................................................................................... 22
Change system configuration............................................................................................. 22
Input window........................................................................................................................ 23
Configuration of input module............................................................................................ 24
Status information................................................................................................................ 27
Delete setup.......................................................................................................................... 28
Log file................................................................................................................................... 29
Update firmware................................................................................................................... 33
Reboot system...................................................................................................................... 38
Load to TDX.......................................................................................................................... 39
Load from TDX...................................................................................................................... 40
System information.............................................................................................................. 42
Your notes............................................................................................................................. 43
Rev. 05 - 2011 - C
2
Introduction
Disposal
Within in the European Union this label indicates that the product
cannot be disposed of with the general household waste. Neither
the headend nor the input and output modules can be disposed of
with the general household waste.
For proper treatment and recycling of old products, please take
them to designated collection points in accordance with your national legislation.
Box content
A new input module is wrapped in antistatic bubble wrap and packed in a
cardboard box when you receive it.
Included in the box is a user guide instructing you in how to use the TDX
Service Tool to configure the module
DVB-T module
The DVB-T module is one of the input modules that you can install in the input section of your TDX headend unit.
Below is an illustrated description of a DVB-T module.
Rev. 05 - 2011 - C
3
Basics
Labels
A label is placed on the input module where you can write the information regarding the configuration of the module.
Besides the information that you write on the label, the module type and part
number are also displayed on the label.
Note
The coloured part at the top of the label also informs you of the
module type. Each type of module is allocated a different coloured
label.
On one of the other sides of the module you will find a label with the bar
code printed on it.
Cover removal
Before you can install a DVB-T module in the input section you have to remove the cover that protects the module slot.
You do not need tools to remove the covers, just use your fingers.
For EMC and cooling reasons only remove covers from the module slots that
you want to insert modules into.
Module installation
It is optional in which slots you place the individual input modules in the input
section. For convenience each slot has been given a number, and an overview of the slot numbers has been placed on the inside of the door of each
unit.
Note
Rev. 05 - 2011 - C
Slot no. 1 is placed in the top left-hand corner of the input section when you face the front of the unit.
4
Basics
You install an input module by sliding the module into a module slot in the input section of the headend unit and push it till the module clicks into place.
Module
removal
Rev. 05 - 2011 - C
It is possible to remove an input module from a module slot without using
any tools, just use your fingers to press the fastener downwards and then
pull the module outwards to remove it from the module slot.
5
Basics
Input cable
installation
When all the required input modules have been installed you can connect the
input signal cables one by one to the input modules.
It is also possible to make a loop through from one input module to another.
Status LED’s
There is a status LED on the front of each module. The LED indicates whether the module has locked on to a frequency or needs to be configured.
Rev. 05 - 2011 - C
Green - flashing
The module has not been configured yet.
Green
No errors and the module is locked to the frequency.
Red
Error and the module is not locked to the frequency.
No colour
Power has not been switched on.
6
Basics
When you update the software of a module the status LED provides you with
information about the updating process.
Configuration
of system
Orange
Boot loader state.
Temporary off
Initiation of the software update.
Temporary green
Every time the modules receives a valid data package.
Repeated until the update is completed without errors.
Red
Software update failed.
In order to set up and configure the input and output modules within the
headend system you have to connect your laptop (Windows based) to the
RJ45 socket on the main headend unit using a Cat5 cable.
The Triax TDX Digital Headend system uses the programmes below and in
addition to access the TDX Service Tool Microsoft© Silverlight Runtime version 3.0 is required.
Recommendations:
Operating system: Windows XP or above.
Browser: Windows Internet Explorer version 6.0 or above.
Additional software: Microsoft© Silverlight Runtime version 3.0 or above.
To access the TDX Service Tool, open your web browser on your computer and input the following IP address in the web address bar
http://192.168.0.100 and press enter.
Note
Rev. 05 - 2011 - C
Your laptop has to use a static IP address in order to access
the TDX Service Tool using the above mentioned IP address.
7
Basics
Log in
When you have loaded the TDX Service Tool from the TDX headend system
to your laptop/computer the Login window of TDX Service Tool is displayed.
The first time you want to log in to your TDX headend system you have to
enter the default password. The default password is: triax1234
You can change the default password as soon as you have logged in to your
headend system. For more information about changing passwords, see “Administration window” on page 10.
When you have pressed the Log in button the System window is displayed.
Note
Rev. 05 - 2011 - C
Every time you set up a new headend system you have to start
from scratch in the TDX Service Tool, meaning that you will
have to change the default password, select which language
you want to use in the TDX Service Tool and change the IP address if your TDX headend system is part of a distribution network.
8
TDX Service Tool
System window The System window contains a number of tabs and buttons, information
about connected units and a configuration list area.
Communication icon
Informs you when the communication between the
TDX system and the TDX Service Tool fails. For
more information, see “Communication icon” on
page 10.
Tabs
Via the tabs you enter the different stages of setting up your input and output modules.
Buttons
The buttons in the upper right-hand corner deal
with the TDX Service tool whereas the buttons below the configuration list area deal with the entire
setup itself.
System information
list
This list displays whether any subunits are connected to the main headend unit and also whether
they are functioning.
Configuration list
area
This list area will display the present configuration
of your headend system as well as the previous
versions of the configuration.
Note
Rev. 05 - 2011 - C
In connection with every new headend system the System window in the TDX Service Tool will display an empty configuration
list area.
9
TDX Service Tool
Communication icon
The colour of the communication icon tells you when TDX Service Tool is not
communicating properly with the TDX headend system.
Administration
window
To change password and language you have to open the Administration window by clicking the Admin. button in the top right-hand corner of the System
window.
Green: The TDX Service Tool and your TDX headend system exchange information without any problems.
Red: The TDX Service Tool and your TDX headend system are not communicating properly. Press the F5 button to refresh the Internet browser and renew communication between the TDX Service Tool and the headend system.
Click the Admin. button to open the Administration window.
Rev. 05 - 2011 - C
10
TDX Service Tool
Language
settings
When you have opened the Administration window the Language settings
area is displayed.
To select another language, click the arrow to the right of the Current language field to open the drop-down list with the languages you can choose
from.
Select the language you want to use in the TDX Service Tool.
The language you selected is now displayed in the Current language field.
Rev. 05 - 2011 - C
11
TDX Service Tool
Country settings
To enter the Country settings area, click the arrow bracket to the left of
Country settings.
Now you can see the fields of the Country settings area.
To set the location of your TDX headend system, click the arrow to the right
of the Country field to open the drop-down list with the countries you can
choose from.
Rev. 05 - 2011 - C
12
TDX Service Tool
Select the country in which your TDX headend system is located. The country you selected is now displayed in the Country field.
Time zone
settings
Rev. 05 - 2011 - C
To enter the Time zone settings area, click the arrow bracket to the left of
Time zone settings.
13
TDX Service Tool
To set the time zone of your TDX headend system, click the arrow to the right
of the Time zone field to open the drop-down list with the time zones you can
choose from.
Select the time zone you want to use in connection with your TDX headend
system.
The time zone you selected is now displayed in the Time zone field.
To set time in accordance with the time zone, click the arrow to the right of
the Input module field to open the drop-down list with all the input modules
installed in your main unit.
Rev. 05 - 2011 - C
14
TDX Service Tool
Select the input module you want to use for setting the time. The input module you selected is now displayed in the Input module field.
Password
settings
To enter the Password settings area, click the arrow bracket to the left of
Password settings.
To change password enter the old password in the Old password field.
Enter the new password in the New password field.
To verify the new password enter the new password once more in the Confirm password field.
Rev. 05 - 2011 - C
15
TDX Service Tool
Licence handling If you have bought licences to output services using e.g. IPTV you have to
activate these licences in your TDX headend system using Licence handling
in the Administration window.
To enter the Licence handling area, click the arrow bracket to the left of Licence handling.
Before you can activate a licence you have to contact Triax and provide information about the serial number displayed in the Serial number field and
the ID displayed in the TDX unique ID field.
When Triax has received the ID of your TDX they will provide you with the activation key.
Enter the activation key in the Activation key field then click the Activate button to access the licence you have bought.
Rev. 05 - 2011 - C
16
TDX Service Tool
Note
When you have clicked the Activate button to access your licence
your TDX unique ID is changed and the activation key is deleted.
If you want to buy more licences you will have to contact Triax with
the new TDX unique ID to get a new activation key to access an additional licence.
When you have accessed your licence you use e.g. the IPTV tab to select
the services you want to output in connection with the licence.
IP settings
Rev. 05 - 2011 - C
If your TDX headend system is part of a network you have to change the IP
address of the configuration port to include the main unit in the network.
To enter the IP settings area, click the arrow bracket to the left of IP settings.
17
TDX Service Tool
Enter a new IP address, subnet mask and default gateway in the corresponding fields.
In case you need to reset the IP address to the factory default address, you
have to use the ID switch.
To return to factory default settings do the following:
• Switch off the power to the main unit.
• Set the ID switch on the main unit to “7”, then switch on the power.
The four LEDs flash red and yellow until the process of resetting the IP
address has been completed.
If the reset process has been successful the LEDs will turn green.
If the reset process fails the LEDs will turn red.
• Switch off the power to the main unit.
• Set the ID switch on the main unit back to the initial setting.
• Switch on the power to the main unit.
Now you have reset the IP address to the factory default address.
Important To make a changed IP address take effect you have to reboot
the TDX headend system using the Reboot button in the System maintenance area or switch off the power.
To output services using an IPTV system or to include a subunit in a network
you have to enter an IP address, subnet mask and default gateway for each
unit link socket you use.
With regard to IPTV you also have to enter a multicast IP address and a multicast port for each unit link socket you use. .
To enter the IP settings area, click the arrow bracket to the left of IP settings.
Now click the Unit link 1 tab to display the relevant fields.
Rev. 05 - 2011 - C
18
TDX Service Tool
Enter a new IP address, subnet mask and default gateway in the corresponding fields.
In connection with IPTV the fields at the bottom of the area are needed as
well.
Click the Enable RTP protocol check box if you want to use Real-time Transport Protocol in your IPTV system.
In case you cannot use the default values displayed in the two fields, enter a
new multicast IP address and a multicast port in the corresponding fields.
Rev. 05 - 2011 - C
19
TDX Service Tool
Click the Unit link 2 tab if you have connected an IPTV system or a second
subunit to the Unit link 2 socket and enter an IP address, subnet mask and
default gateway and in connection with IPTV also a multicast IP address and
a multicast port.
Important To make a changed IP address take effect you have to reboot
the TDX headend system using the Reboot button in the System maintenance area or switch off the power.
When you have made the changes you want to make in the Administration
window, click the OK button at the bottom of the Administration window to
save the changes and return to the System window.
Note
Rev. 05 - 2011 - C
You only need to change password, language, time zone,
country and IP addresses the first time you enter a new TDX
headend system in order to set it up.
20
TDX Service Tool
Create a new
system configuration
To create a new configuration, click the New configuration button in the System window.
Now a configuration file is created and the file is listed in the configuration list
area.
You use the buttons below the configuration list area to manage configuration files in your headend system.
Set active
Click this button when you want to activate a selected
configuration file.
New
Click this button to create a new configuration file.
Delete
Click this button to delete a selected configuration file.
Load from TDX
Click this button to upload the configuration file from the
TDX system to your computer/laptop. More information
about uploading, see “Load from TDX” on page 40.
Load to TDX
Click this button to download a configuration file from
your computer/laptop to your TDX system. More information about downloading, see “Load to TDX” on page 39.
To activate a new configuration file, select the file and click the Set active
button, and the Apply button to save the configuration file.
Rev. 05 - 2011 - C
21
TDX Service Tool
Save configuration
An important button when you change your configuration of the headend
system is the Apply button placed in the upper right-hand corner of the TDX
Service Tool window.
Apply
Change system
configuration
Rev. 05 - 2011 - C
Whenever you have made changes in your configuration,
“Apply” on the Apply button turns red to tell you that you
have unsaved changes that need to be saved.
Click the Apply button to save the changes. When changes have been saved the “Apply” text looses the red colour.
When you change an existing configuration of your headend system the TDX
Service Tool updates the date and time of the configuration file when you
save the changes using the Apply button.
22
TDX Service Tool
Input window
Click the Input tab in the TDX Service Tool to display the Input window.
The first time you display the Input window in a new configuration the module list only displays the number and type of input modules that you have
inserted in the main and subunits.
You have to configure the input modules one by one.
To display the Configuration window, click the Setup button of the DVB-T input module you want to configure.
Rev. 05 - 2011 - C
23
TDX Service Tool
Configuration
of input module
The first time the TDX Service Tool displays the Configuration window for a
DVB-T input module in a new configuration, the fields will display default values and the list of services will be empty.
You have two possibilities when you configure a DVB-T module:
• You can use the specifications of the channel plan
or
• You can enter a frequency manually in order to search for the services
you require.
Using the channel plans:
To select the required channel plan, click the arrow to the left of the Channel
plan field to open the drop-down list with the channel plans you can choose
from.
Select the channel plan you want to use.
To select the required channel, click the arrow to the left of the Channel field
to open the drop-down list with the channels you can choose from.
Select the channel you want to use.
When you have selected a channel the Frequency and Bandwidth fields are
automatically filled in.
Click the Update button to enter the information into the headend system
and in return get a list of available services.
Rev. 05 - 2011 - C
24
TDX Service Tool
Enter frequency manually:
To be able to enter a frequency manually, click the arrow to the left of the
Channel field to open the drop-down list with the channels you can choose
from.
Select “Frequency” from the drop-down list.
Enter the desired frequency in kHz in the Frequency field.
To select the required bandwidth, click the arrow to the left of the Bandwidth
field to open the drop-down list with the bandwidths you can choose from.
Select the bandwidth you want to use.
Click the Update button to enter the information into the headend system.
As a result a list of available services is displayed in the services list area.
Rev. 05 - 2011 - C
25
TDX Service Tool
To select services you can either select all services in the service list area by
clicking the All button at the top of the list or select the services one by one
clicking the square to the right of the services you want to make available in
your TDX service pool.
Note
By clicking one of those column headlines that are underlined in
the service list area you can sort the list into alphabetical or numerical order depending on which column headline you click.
When you have selected the services you want, click the Submit button to
save this information in the headend system and return to the Input window.
Rev. 05 - 2011 - C
26
TDX Service Tool
Now the selected services are available in the TDX service pool.
Remember to click the Apply button in the upper right-hand corner from time
to time to save new settings in the configuration.
Note
Status information
Rev. 05 - 2011 - C
When you display the Configuration window for an input module
that has been configured, all fields are filled in and services have
been selected.
If you want to change the existing channel plan, channel, frequency, bandwidth or services just follow the same procedure as when
you configure an input module for the very first time.
Status information is placed at the bottom of the Configuration window. The
information displayed in the configuration window of a DVB-T module includes the status of the module and revision of software.
27
TDX Service Tool
Status
Informs you whether the input module is locked or not.
SW revision
Displays the software version of the input module.
When you return to the Input window the configuration of the input module is
displayed in the module list.
Now you can continue to configure the other input modules one by one, following the procedure described on the previous pages.
Delete setup
If you want to remove an input module and the associated configuration you
can use the Delete button of the module in question in the Input window.
Click the Delete button of the DVB-T input module you want to remove.
A message window is displayed asking you to confirm that you want to remove the input module.
Rev. 05 - 2011 - C
28
TDX Service Tool
Until you have removed the input module physically from the headend unit
the module list will display an empty line.
Log file
You can save a log file that lists actions that have occurred in the TDX headend system. This may be useful in case of problems with your TDX headend
system.
The size of the log file will be adequate for listing all actions that have occurred in the system for a couple weeks.
To save a log file on your computer/laptop you have to open the Administration window.
Click the Admin. button in the top right-hand corner of the TDX Service Tool
window to open the Administration window.
Rev. 05 - 2011 - C
29
TDX Service Tool
To enter the System maintenance area, click the arrow bracket to the left of
System maintenance.
In the System maintenance area click the Save log button to open the File
Download window.
In the File Download window you can either open the log file or save the file
to your laptop/computer.
If you want to open the log file click the Open button in the File Download
window.
Rev. 05 - 2011 - C
30
TDX Service Tool
In case you need to save the log after having looked at the file in the Notepad window you can use the Save as command in the File menu of the Notepad window.
If you only want to save the log file when you open the File Download window, click the Save button to open the Save as window.
Navigate to the folder where you want to place the log file.
Click the Save button to save the file.
Rev. 05 - 2011 - C
31
TDX Service Tool
Clicking the Save button displays the Download window.
When the log file has been downloaded and saved, you can open the log file,
open the folder where you have saved the log file or just close the window.
When you close the Download window you return automatically to the Administration window. Close this window by clicking the OK or Cancel button.
Rev. 05 - 2011 - C
32
TDX Service Tool
Update
firmware
When firmware updates for your TDX system is available on the Triax home
page, www.Triax.com, you can download these updates to your computer
and then upload the updates to your TDX system using the Administration
window.
Click the Admin. button in the top right-hand corner of the TDX Service Tool
window to open the Administration window.
To enter the System maintenance area, click the arrow bracket to the left of
System maintenance.
Click the Change... button to the right of the version number of the current
firmware to open the Firmware window.
Rev. 05 - 2011 - C
33
TDX Service Tool
The Firmware window lists the current version of your TDX firmware as well
as the previous versions of the firmware.
Click the Upload file... button to display the Open window.
In the Open window navigate to the folder where you saved the update file
when you downloaded it from the Triax home page.
Select the file.
Click the Open button to include the file in the list in the Firmware window.
Rev. 05 - 2011 - C
34
TDX Service Tool
When you have clicked the Open button you return to the Firmware window.
In the Firmware window the new update file is placed at the bottom of the list
of updates.
Click the file name to select the file and then click the Set active button to
transfer the update to the TDX system.
Clicking the Set active button displays the Firmware update window. In this
window you select whether you want to update all firmware, i.e. modules,
system controller and user interface, or only firmware that is in need of an
update.
Triax recommend that you use the Replace all option when you want to update your firmware.
You should only use Update old packages if your TDX headend system consists mainly of new modules and a few older modules that might benefit from
an update.
Rev. 05 - 2011 - C
35
TDX Service Tool
When updating the firmware, the Firmware update status window will display
information about status and errors as well as the progress of the update itself. An update will take approximately 5 minutes.
When you have finished updating the firmware you have to reboot the system by clicking the Restart button in order to make the update effective.
Important
Rev. 05 - 2011 - C
When rebooting the TDX headend system the distribution of
services to all your end-users will be interrupted for a very
short time.
36
TDX Service Tool
When you have rebooted the TDX headend system, a message window is
displayed asking you to restart your Internet browser.
When you have restarted your browser you have to log into the TDX Service
Tool in case you need to make any changes.
If your list of firmware updates needs to be tidied you can remove one or
more of the previous firmware updates listed in the Change firmware window.
Select the firmware update and click the Delete package button.
The firmware update is removed from the list.
Rev. 05 - 2011 - C
37
TDX Service Tool
Reboot system
If you need to switch the TDX headend system off and then immediately start
it again you can use the Reboot button in the System maintenance area of
the administration window.
Click the Reboot button to reboot the TDX headend system.
Note
You can also reboot the TDX headend system by switching off
the power manually.
Important When rebooting the TDX headend system or switching off the
power the distribution of services to all your end-users will be
interrupted.
When the TDX system has been rebooted, you close the Administration window and restart your Internet browser.
When you have restarted your browser you have to log into the TDX Service
Tool if you need to make further changes.
Rev. 05 - 2011 - C
38
TDX Service Tool
Load to TDX
In case you want to load a configuration file made using the TDX Configurator from your computer/laptop to your TDX system you have to use the Load
to TDX button on the System tab.
Click the Load to TDX button at the bottom of the System tab to display the
Open window.
In the Open window navigate to the folder where you saved the configuration
file from the TDX Configurator.
Select the file, then click the Open button to include the file in the configuration list on the System tab.
Rev. 05 - 2011 - C
39
TDX Service Tool
The configuration file will now be listed in the configuration list area.
If the name of the new configuration file is identical to the existing configuration file a number in brackets will be added to the name of the new file.
Load from TDX
You can save a configuration file from your TDX headend system to your
computer/laptop in case you want to use it in another TDX headend system
that is identical to the one from which you want to save the configuration file.
If, however, you load a configuration file into a dissimilar TDX system you will
have to reconfigure all those modules that deviate from what is specified in
the configuration file. All deviating modules will be marked in red.
To save a configuration file on your computer/laptop you have to use the
Load from TDX button on the System tab.
Click the Load from TDX button at the bottom of the System tab to display
the Save As window.
Rev. 05 - 2011 - C
40
TDX Service Tool
Navigate to the folder where you want to save the configuration file.
Enter the name of the configuration file in the File name field.
Select file type in the File type field.
Click the Save button to save the file.
You return automatically to the System tab when you have saved the configuration file.
Rev. 05 - 2011 - C
41
TDX Service Tool
System information
To get detailed information about the individual units you can click the unit
in question in the System information list and open the System information
window.
In the System information window you get information about system errors,
which software version each of the input and output modules uses and the
MAC addresses.
In connection with errors in your TDX headend system you can use the System information window as starting point for locating the errors.
Rev. 05 - 2011 - C
42
Your notes
Your notes
Rev. 05 - 2011 - C
43
891074
05 - 2011 - C
TRIAX - your ultimate connection
TRIAX - your ultimate connection