1
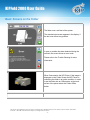
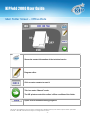
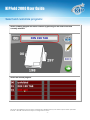
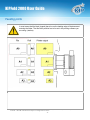
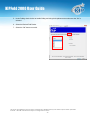
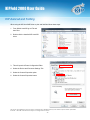
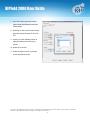
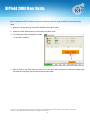
KIP Certified AutoCAD Driver KIPFold 2000 User Guide Version Q 1.2 KIPFold 2000 User Guide Safety Read these safety instructions completely before operating the folder and keep this manual for future reference close to the folder. Carefully observe all warnings, precautions and instructions on the folder or the ones described in the operating instructions. In order to guarantee hazard-free operations all maintenance and repairs are only to be carried out by trained personnel. WARNING: Indicates a potentially hazardous situation which, if not avoided, COULD result in death or serious injury. Warning CAUTION: Indicates a potentially hazardous situation which, if not avoided, MAY result in minor or moderate injury. Maintenance and Modifications To avoid the risk of introducing hazards, all modifications and maintenance activities are strictly reserved to properly qualified and trained service technicians. In daily use, any electrical equipment may be subject to parts wear and eventual failure. In order to maintain safety and reliability, the Customer Engineer (hereafter called CE) must perform regular maintenance inspections. General Make sure that the folder is placed on a level, horizontal surface of sufficient strength. See the respective specifications sheet for the weight of the equipment Always use materials for the respective folder. Materials not approved can cause faults in the folder. Do not use the folder when it is emitting unusual sounds. Remove the plug from the power socket or turn off the fixed connection to the electricity grid and contact Customer Service. Do not use the folder in rooms which are subject to excessive vibration. Move the folder careful and slow using two persons. Set the adjustable feet on the ground when the folder is in the desired position No part of this publication may be copied, reproduced or distributed in any form without express written permission from KIP. 2013 KIP. All references subject to change without notice -1- KIPFold 2000 User Guide Main connection cable Do not use different connector cables, other than supplied with the folder. When replacement of the power supply cable is required because of damage or defect, contact your CE for proper replacement of this power supply cable. Mains connection Do not use an extension cable to connect the machine. This machine is not designed for connection to an IT power supply system. An IT power system is voltage network in which the neutral wire is not connected to earth. When the machine is connected through a wall-socket, place the machine near a wall-socket that is easily accessible. When the machine is connected through a fixed connection to the electricity grid, the disconnect device in the fixed connection must be easily accessible. The machine must be connected to an earth (grounded) outlet. Measures to take in case of an accident 1. If an accident has occurred, the distributor who has been notified first must immediately take emergency measures to provide relief to affected persons and to prevent further damage. 2. If a report of a serious accident has been received from a customer, an onsite evaluation must be carried out quickly by an authorized person. 3. To determine the cause of the accident, conditions and materials must be recorded through direct on-site checks, in accordance with instructions. 4. For reports and measures concerning serious accidents, follow the regulations specified by the distributor. Disclaimer These safeguards have been compiled to the best of our knowledge. They are intended as a compact guide to the safe handling of the product. We reserve the right to revise specification data sheets, as new information becomes available. It is the user´s responsibility to determine the suitability of this information for the adoption of safety precautions as may be necessary. It is the user´s responsibility to ensure that the specification data sheets are the latest ones issued. If and in so far as limitation of liability is permitted under the applicable laws, we do not accept liability for any inaccuracy that may occur in this information. No part of this publication may be copied, reproduced or distributed in any form without express written permission from KIP. 2013 KIP. All references subject to change without notice -2- KIPFold 2000 User Guide Power & Switch on Please use only the power cable supplied with the folder. 90 - 240 VAC 50/60Hz Do not use multi plug extension cords! These cords will not stand the power consumption of printer and folder. The power supply box is at the folder's right bottom side. The main switch of the machine is next to the power cable connector. Find the folders serial number on the rating plate next to the switch. No part of this publication may be copied, reproduced or distributed in any form without express written permission from KIP. 2013 KIP. All references subject to change without notice -3- KIPFold 2000 User Guide Basic Screens on the Folder The folder runs a self-test of the system. The standard start screen appears in the display, if the test runs without any problem. In case, a problem has been detected during the self-test, the screen shows an error code. Please refer to the Trouble Shooting for more information. When Connected to the KIP Printer, if this image is displayed on the Folder Screen the KIP Printer is controlling the folder in an online condition. In order to put the folder into an Offline state, at the touch screen of the printer select the Folder Offline button. No part of this publication may be copied, reproduced or distributed in any form without express written permission from KIP. 2013 KIP. All references subject to change without notice -4- KIPFold 2000 User Guide Main Folder Screen – Offline Mode Shows the contact information of the technical service Program editor. Click on meter counter to reset it This icon notes “Manual” mode. The KIP printers control the online / offline condition of the folder. Opens a list of available folding programs. No part of this publication may be copied, reproduced or distributed in any form without express written permission from KIP. 2013 KIP. All references subject to change without notice -5- KIPFold 2000 User Guide Media and formats Format limits Fan Folder All documents with length from 210 mm (8.5") up to 6.000 mm (19,6 ft) (80 gr. Paper) or unlimited length (option) and width up to max. 914 mm (36"). Long copies will be deployed fan folded in the tray under the bridge. Cross Folder Maximum paper length of 2500 mm. Longer copies will not be transported into the cross folder but deployed fan folded in the catch tray under the bridge. Recommended media The paper weight should not be less than 60 g/m² (18#) and not more than 110 g/m².(24#) For application of media types, please contact your dealer. Film or materials with glossy shiny surfaces are not suitable. No part of this publication may be copied, reproduced or distributed in any form without express written permission from KIP. 2013 KIP. All references subject to change without notice -6- KIPFold 2000 User Guide Select and customize programs Select a folding program for offline function by pressing on the name of the fold currently selected. Select the disired program. No part of this publication may be copied, reproduced or distributed in any form without express written permission from KIP. 2013 KIP. All references subject to change without notice -7- KIPFold 2000 User Guide Feeding prints In most cases the title block (legend) has to be on the leading edge of the document entering the folder. The title block position has to be set in the printing software you are using. (rotation) No part of this publication may be copied, reproduced or distributed in any form without express written permission from KIP. 2013 KIP. All references subject to change without notice -8- KIPFold 2000 User Guide With the optional Rotation Unit, A2 or C-size formats can be printed landscape on an A1 or D-size roll. The folder will automatically rotate them into the right position. No part of this publication may be copied, reproduced or distributed in any form without express written permission from KIP. 2013 KIP. All references subject to change without notice -9- KIPFold 2000 User Guide Manual folding Deactivate the online connection from the printer’s display. Insert the sheet "face down" (title block leading) Align in center. The insertion rail on the table can be slid into an optimized position for the document you are feeding. No part of this publication may be copied, reproduced or distributed in any form without express written permission from KIP. 2013 KIP. All references subject to change without notice - 10 - KIPFold 2000 User Guide Please try feeding the paper as straight as possible. No part of this publication may be copied, reproduced or distributed in any form without express written permission from KIP. 2013 KIP. All references subject to change without notice - 11 - KIPFold 2000 User Guide Using the KIPFold 2000 with KIP Applications Once the KIPFold 2000 is installed and functioning, KIP applications can be used to fold various packet sizes that were set up during configuration of the folder. Available KIP Applications: KIP Print KIP PrinNet KIP Windows Driver KIP AutoCAD Driver KIP C7800 – Touchscreen Printing KIP Print and Folding When using the KIP Print software there are two methods for printing using the KIPFold 2000. Method 1 In this method the fold packet to be used will be selected first by clicking the Fold button on the main screen ribbon bar. Once here select the desired Folder Packet setting to be applied to the entire job. Doing this procedure prior to selecting the files to be printed will then apply the selected fold packet to all selected files making everything in the job ticket print and fold the same way. No part of this publication may be copied, reproduced or distributed in any form without express written permission from KIP. 2013 KIP. All references subject to change without notice - 12 - KIPFold 2000 User Guide Method 2 In this method files will be added to the job ticket in the usual manner (Add Files, Browse for and select files, add them to the job to be printed). Once the files to be printed have been added, using the dropdown menu in the Fold column, ease file can be given a different fold packet. This method can be used when a job has to be folded in a very specific way. KIP PrintNet and Folding When using the KIP PrintNet software there are two methods for printing using the KIPFold 2000. Method 1 In this method the fold packet to be used will be selected first by clicking the Job Defaults button on the main screen ribbon bar. This will open the Job Defaults screen. Once here select the desired Folder Packet setting to be applied to the entire job. Doing this procedure prior to selecting the files to be printed will then apply the selected fold packet to all selected files making everything in the job ticket print and fold the same way. No part of this publication may be copied, reproduced or distributed in any form without express written permission from KIP. 2013 KIP. All references subject to change without notice - 13 - KIPFold 2000 User Guide Method 2 In this method files will be added to the job ticket in the usual manner (Add Files, Browse for and select files, add them to the job to be printed). Once the files to be printed have been added, using the dropdown menu in the Fold column, each file can be given a different fold packet. This method can be used when a job has to be folded in a very specific way. KIP Windows Driver and Folding When using the KIP Windows Driver to print and fold files follow these steps: 1. Select the file to be printed in the appropriate application. For this example Adobe is being used. 2. Go to File and select Print 3. When the Print window opens select the installed KIP Windows Driver and then select the Properties button. 4. When the Properties button opens select the Print Options Tab. No part of this publication may be copied, reproduced or distributed in any form without express written permission from KIP. 2013 KIP. All references subject to change without notice - 14 - KIPFold 2000 User Guide 5. Under Folding check the box to enable folding and using the dropdown arrow make sure that “On” is selected. 6. Select the Desired Fold Packet. 7. Select the “OK” button to set this. No part of this publication may be copied, reproduced or distributed in any form without express written permission from KIP. 2013 KIP. All references subject to change without notice - 15 - KIPFold 2000 User Guide KIP Autocad and Folding When using the KIP AutoCAD Driver to print and fold files follow these steps: 1. From Within AutoCAD go to File and then Print. 2. Double click the installed KIP AutoCAD driver. 3. This will open the Plotter Configuration Editor 4. Select the Device and Document Settings Tab 5. Select the Custom Properties option 6. Select the Custom Properties button No part of this publication may be copied, reproduced or distributed in any form without express written permission from KIP. 2013 KIP. All references subject to change without notice - 16 - KIPFold 2000 User Guide 7. Once the custom properties window opens under Media Options select the Folder Button. 8. Selecting On will use the Folder Presets determined by the Presets.ini file in the IPS. 9. Select any of the available presets to apply that setting to the files being printed. 10. Select OK to set this 11. Select OK again to return to the print screen and submit the file. No part of this publication may be copied, reproduced or distributed in any form without express written permission from KIP. 2013 KIP. All references subject to change without notice - 17 - KIPFold 2000 User Guide KIP Touchscreen (KIP C7800) and Folding When connected to a KIP C7800 Color printer and wanting to print and fold files follow these steps: 1. Select the Print Button and browse to the location of the file (s) to be printed. 2. Select the Next Arrow 3. When the next window opens choose the desired settings for the correct output. a. Under Rotation choose from, 0, 90, 180 and 270 and Automatic. b. Under Folder choose from i. Controller – uses the Unattend.ini file to determine how to fold the files based on the files dimensions ii. Preset 0 through 8 (naming of presets to be determined during setup). c. If multiple files were selected a different setting can be given to each file. No part of this publication may be copied, reproduced or distributed in any form without express written permission from KIP. 2013 KIP. All references subject to change without notice - 18 - KIPFold 2000 User Guide When connected to a KIP C7800 Color printer and wanting to fold files using the Offline function follow these steps: 1. When the user first goes up to the KIP C7800 the Folder will be online. 2. Select the Folder Offline button to put the folder into offline mode. 3. The following window will indicate the Folder is in the offline condition. 4. With the folder in the offline state the user can now use the Folder touchscreen to determine folding output and manually feed pages into the folder and have them folded. No part of this publication may be copied, reproduced or distributed in any form without express written permission from KIP. 2013 KIP. All references subject to change without notice - 19 - KIPFold 2000 User Guide Overview No part of this publication may be copied, reproduced or distributed in any form without express written permission from KIP. 2013 KIP. All references subject to change without notice - 20 - KIPFold 2000 User Guide Error Code List Code Description Location 1: Master Controller errors 1 Communication and common errors 1:1 EEPROM transfer error 1:2 Communication error between FF and CF 1:3 Bad communication between FF and CF 1:4 Wrong communication between FF and CF 1:5 Data exchange failed from FF or CF 1:6 Data exchange failed to FF or CF 1:7 Data transfer failed from FF or CF 1:8 Data transfer failed to FF or CF 1:9 No response from FF 1:10 No response from CF 1:11 Cover open 1:12 License error: Map fold (panel width is smaller than 160mm or 6.3 inches) 2 Other communication errors 2:1 Sheet management error 2:2 No contact to FF during initialization 2:3 No contact to CF during initialization 2:4 No contact to modules during initialization 3 Result codes 3:1 FF: result code is NIO 3:2 FF: result code is TIMEOUT 3:3 FF: result code is UNKNOWN 3:4 CF: result is NIO 3:5 CF: result is TIMEOUT 3:6 CF: result is UNKNOWN 3:7 Error counting sheets 3:8 Too many sheets are in the folder No part of this publication may be copied, reproduced or distributed in any form without express written permission from KIP. 2013 KIP. All references subject to change without notice - 21 - KIPFold 2000 User Guide 9 Start-up and initialization errors 9:1 No contact while resetting FF or CF 9:2 Time-out while resetting FF 9:3 Time-out while resetting CF 9:4 No contact while initializing FF or CF 9:6 Time-out while initializing FF or CF 9:7 No contact while starting FF or CF 9:8 Timeout while starting FF or CF 9:9 Parameter transfer to FF or CF failed 9:10 Checking EEPROM in FF or CF failed 13 13:1 Printer messages Printer sends an error and folder stops Location 2: Fan Folder errors 22 Sensor errors on start-up 22:01 Sensor LB1 cut 22:02 Sensor LB2 cut 22:03 Sensor LB3 cut 22:04 Sensor LB4 cut 22:05 Sensor LB5 cut 22:06 Sensor LB0A cut 22:07 Sensor LB0B cut 22:08 Sensor LB8 cut 22:10 Encoder disc is not present at sensor LB7 26 Time out errors 26:01 No paper at sensor LB1 26:07 No paper at sensor LB0 26:08 No paper at sensor LB8 26:09 No paper at sensor LB4 26:40 No paper at sensor LB0A 28 28:01 License errors License error Missing high speed license (speed is greater than 9.99 meter per minute) No part of this publication may be copied, reproduced or distributed in any form without express written permission from KIP. 2013 KIP. All references subject to change without notice - 22 - KIPFold 2000 User Guide Location 3: Cross Folder errors 82 Sensor errors on start-up 82:01 Sensor LB10 cut 82:02 Sensor LB11 cut 82:03 Sensor LB12 cut 84 Time out errors 84:01 No paper at sensor LB10 84:02 No paper at sensor LB11 or LB12 84:03 Jam at FF exit at sensor LB8 84:04 Jam at sensor LB11 or LB12 84:12 Jam between sensors LB11 or LB12 and CF exit sensor LB14 84:13 Jam at CF exit sensor LB14 Location 4: Tab Applicator 41:01 Tab unit is not ready 41:02 Error on motor end stage 41:03 No tape inside the unit or sensor is damaged 41:04 Jam close to the knife 41:05 No tab unit is installed No part of this publication may be copied, reproduced or distributed in any form without express written permission from KIP. 2013 KIP. All references subject to change without notice - 23 -