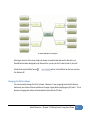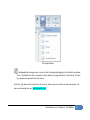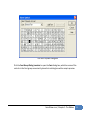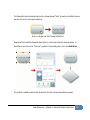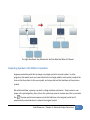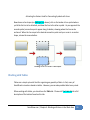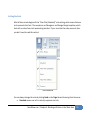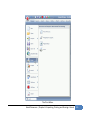
1
SmartDraw User Guide Contents Welcome to SmartDraw ............................................................................................................................... 8 The Resources Section of SmartDraw.com .......................................................................................... 9 Tech Support ...................................................................................................................................... 10 SmartHelp ........................................................................................................................................... 10 Chapter 1: Building Visuals Using SmartDraw ............................................................................................ 11 Opening a Visual Template ..................................................................................................................... 11 Start a Basic Visual Template ............................................................................................................. 12 Open More Specific Templates and Examples ................................................................................... 16 Open a Recently Used Visual .............................................................................................................. 18 Open a Recently Visited Template ..................................................................................................... 19 Using the Application Screen to Build a Visual ....................................................................................... 20 The Work Area .................................................................................................................................... 22 The Ribbon.......................................................................................................................................... 22 SmartPanel ......................................................................................................................................... 26 SmartHelp ........................................................................................................................................... 28 Adding Color and Style to a Visual.......................................................................................................... 30 Themes ............................................................................................................................................... 30 Quick Styles ........................................................................................................................................ 32 AutoStyle ............................................................................................................................................ 33 Changing the Fill of a Shape ............................................................................................................... 34 SmartDraw.com | Welcome to SmartDraw 2 Using the Line Button ......................................................................................................................... 36 Applying Effects .................................................................................................................................. 37 Chapter 2: The Ribbon ................................................................................................................................ 40 The Home Tab ........................................................................................................................................ 40 The Clipboard Group .......................................................................................................................... 41 The Tools Group ................................................................................................................................. 42 The Theme Group ............................................................................................................................... 47 The Shape Style Group ....................................................................................................................... 48 The Font Group................................................................................................................................... 51 The Paragraph Group ......................................................................................................................... 54 The Design Tab ....................................................................................................................................... 56 The Position & Size Group .................................................................................................................. 57 The Shape Layout Group .................................................................................................................... 58 The Shape Properties Group .............................................................................................................. 62 The OLE Group .................................................................................................................................... 68 The Insert Tab ......................................................................................................................................... 70 The Page Tab .......................................................................................................................................... 72 The Page Style Group ......................................................................................................................... 73 The Page Setup Group ........................................................................................................................ 74 The Rulers & Grid Group .................................................................................................................... 76 The Find & Replace Group .................................................................................................................. 77 SmartDraw.com | Welcome to SmartDraw 3 The Table Tab ......................................................................................................................................... 78 The Insert Table Group ....................................................................................................................... 78 The Rows & Columns Group ............................................................................................................... 79 The Table Style Group ........................................................................................................................ 81 The Data Group .................................................................................................................................. 84 The Chart Tab ......................................................................................................................................... 86 The Insert Chart Group ....................................................................................................................... 87 The Chart Data Group......................................................................................................................... 88 The Layout Group ............................................................................................................................... 89 The Labels Group ................................................................................................................................ 91 The Picture Tab ....................................................................................................................................... 92 The Get Images Group ........................................................................................................................ 92 The Picture Size Group ....................................................................................................................... 94 The Exposure Group ........................................................................................................................... 96 The PowerPoint® Tab .............................................................................................................................. 96 The Export Group ............................................................................................................................... 97 The Animation Group ......................................................................................................................... 97 The Review Tab ...................................................................................................................................... 99 The Help Tab ......................................................................................................................................... 100 Chapter 3: Automatic Shape Connectors ................................................................................................. 101 Flowcharts ............................................................................................................................................ 101 SmartDraw.com | Welcome to SmartDraw 4 Mind Maps............................................................................................................................................ 108 Moving Automatically Connected Symbols .......................................................................................... 112 Replacing Symbols with Different Symbols .......................................................................................... 113 Collapsing Branches.............................................................................................................................. 114 Chapter 4: Working with Items in the Work Area .................................................................................... 116 Working with Symbols .......................................................................................................................... 116 Adding Symbols ................................................................................................................................ 116 Finding More Symbols ...................................................................................................................... 118 Symbol Libraries ............................................................................................................................... 123 Working with Lines ............................................................................................................................... 131 Connecting Symbols with Lines ........................................................................................................ 136 Working with Tables ............................................................................................................................. 139 Adding a Table .................................................................................................................................. 140 Working with Table Cells .................................................................................................................. 141 Working with Text ................................................................................................................................ 143 Adding Text to Symbols .................................................................................................................... 144 Adding Text to Lines ......................................................................................................................... 146 Adding Text to Table Cells ................................................................................................................ 147 Adding Free-Floating Text ................................................................................................................ 148 Moving Items in the Work Area ........................................................................................................... 149 Resizing Items in the Work Area .......................................................................................................... 150 SmartDraw.com | Welcome to SmartDraw 5 Rotating Items in the Work Area .......................................................................................................... 152 Flipping Items in the Work Area ........................................................................................................... 153 Aligning Items in the Work Area........................................................................................................... 154 Grouping Items in the Work Area ........................................................................................................ 156 Working with Charts ............................................................................................................................. 156 Inserting a Chart ............................................................................................................................... 160 Adding Series and Categories ........................................................................................................... 162 Adding Data to a Chart ..................................................................................................................... 163 Filling a Series with Color or Images ................................................................................................. 166 Working with Maps .............................................................................................................................. 170 Working with Dimensions .................................................................................................................... 175 Setting the Scale ............................................................................................................................... 176 Showing Dimensions ........................................................................................................................ 178 Resizing Items to Scale ..................................................................................................................... 181 Working with Layers ............................................................................................................................. 182 Chapter 5: Exporting, Printing and Sharing a Visual ................................................................................. 185 Setting up the Page .............................................................................................................................. 186 Exporting a Visual to Different Programs and File Formats ................................................................. 190 Exporting a Visual to Microsoft PowerPoint® .................................................................................. 190 Exporting a Visual to Microsoft Word® ............................................................................................ 192 Exporting a Visual to Microsoft Excel® ............................................................................................. 192 SmartDraw.com | Welcome to SmartDraw 6 Saving a Visual as a PDF .................................................................................................................... 193 Exporting to Other File Types ........................................................................................................... 195 Printing a Visual .................................................................................................................................... 198 Using SharePoint along with SmartDraw ............................................................................................. 203 Importing Visio Files ............................................................................................................................. 203 Installation & Licensing......................................................................................................................... 207 Installation ........................................................................................................................................ 207 SmartDraw.com | Welcome to SmartDraw 7 Welcome to SmartDraw Communicate visually with powerful graphic visuals like Flowcharts, Org Charts, Mind Maps, and so much more using the quick automatic controls of SmartDraw. Building a visual is as simple as a few clicks of the mouse! All you have to do is choose the template for the visual you want to build and use the visual-specific SmartPanel™, with its oneclick building tools, to let SmartDraw do the work for you. Your days of dragging, dropping, and manually spacing symbols are over. And once you’ve finished building your visual, SmartDraw has one-click export options, allowing you to animate and place your visual into a Microsoft PowerPoint® presentation, save your visual as a PDF or other file type, or place your visual into Microsoft Word® or Excel®. This User Guide provides detailed instructions in using these revolutionary controls. You can find additional help in a variety of locations: SmartDraw.com | Welcome to SmartDraw 8 The Resources Section of SmartDraw.com Visit our website’s Resources section for access to the SmartDraw Training Center, Tutorials, Graphics Glossary, and more. SmartDraw.com | Welcome to SmartDraw 9 Tech Support Visit the Support section of SmartDraw’s website for access to an email form as well as the tech support phone numbers and Frequently Asked Questions. SmartHelp Within SmartDraw, you can click the button on the right side of any screen to open an in-screen window of step-by-step instructions and tutorial videos. What’s great is that the SmartHelp window will stay open while you work on your visual so that you can read along without having to close it or change screens. SmartDraw.com | Welcome to SmartDraw 10 Chapter 1: Building Visuals Using SmartDraw Opening a Visual Template SmartDraw has many templates for the visuals it offers. Each of these templates has special settings and a special set of buttons that make building a particular visual fast and easy, so it’s important that you choose the right template. When you open SmartDraw, you’ll see the Home Screen. SmartDraw.com | Chapter 1: Building Visuals Using SmartDraw 11 The Home Screen There are a few different ways to open a visual. Start a Basic Visual Template SmartDraw.com | Chapter 1: Building Visuals Using SmartDraw 12 When you first open SmartDraw, notice that Basics are selected in the left-hand column of the Home Screen. If you have opened SmartDraw before, this may not be the case, so click on Basics. In the Template Preview Area, you’ll find buttons for templates of SmartDraw’s most commonly used visual types. You can click on one of these to get started right away. Or if the visual you want to create is not shown here, click the “More” file folder to view the full list of basic visual templates. SmartDraw.com | Chapter 1: Building Visuals Using SmartDraw 13 Search for a Template Using Keywords If you know what type of visual you would like to create, you can search for it using keywords. Click the Search button in the left column of the Home Screen. This opens the Search bar along the top of the Template Preview Area. SmartDraw.com | Chapter 1: Building Visuals Using SmartDraw 14 The Search Bar To get started, type a keyword into the Search Bar’s text entry field. As you type, suggestions appear below. You can click on one of these to search for that suggestion, or click the next to the text entry field to run the search. button Suggestions Appear When You Type a Keyword SmartDraw.com | Chapter 1: Building Visuals Using SmartDraw 15 The first search result is shown in the Template Preview Area. You can view the other search results by clicking the Previous and Next buttons in the Search Bar. When you have found the visual you want to open, just click on it to get started. Open More Specific Templates and Examples In the left column of the Home Screen, click Templates under New. In the Template Preview Area, there are several file folder buttons organizing visuals by their function. Click on one of these to open it. SmartDraw.com | Chapter 1: Building Visuals Using SmartDraw 16 Inside these folders, you’ll find visuals relevant to the topic of the folder, as well as more folders. When you find the visual you want to create, click on it to get started. SmartDraw.com | Chapter 1: Building Visuals Using SmartDraw 17 At the top of the Home Screen, you’ll find the Navigation Bar, complete with Forward buttons, a Back and Home button and breadcrumbs. The Navigation Bar The Back button will revert the Template Preview Area to the last screen it had shown. Once you use the Back button, the Forward button becomes available so that you can return to the screen you had been viewing when you clicked Back. The Home button will take you back to the top level of the Home Screen – in this case, as if you had selected Templates under New again. The rest of the Navigation Bar is devoted to breadcrumbs. Each breadcrumb is a link to a page in the path you took to reach your current location in the Template Preview Area. Just click on a breadcrumb to go back to that page. Open a Recently Used Visual In the left column of the Home Screen, click Documents under Recent. In the Template Preview Area will be any saved file you have created or opened with SmartDraw. Simply click on the visual you would like to revisit. SmartDraw.com | Chapter 1: Building Visuals Using SmartDraw 18 Open a Recently Visited Template Even if all you did was open and close a template, SmartDraw records which templates you open so that you can quickly find them again. Click Templates under Recent in the left column of the Home Screen to view these recently visited templates. SmartDraw.com | Chapter 1: Building Visuals Using SmartDraw 19 The last template visited is the first on the list. Using the Application Screen to Build a Visual Once you’ve opened a visual template, you will arrive at the Application Screen, where you will be able to create your visual. SmartDraw.com | Chapter 1: Building Visuals Using SmartDraw 20 The Flowcharts Application Screen There are four basic regions on this screen: the Work Area, the Ribbon, SmartPanel, and SmartHelp. SmartDraw.com | Chapter 1: Building Visuals Using SmartDraw 21 The Work Area Your visual will be built in the Work Area. As you add more symbols to it, the Work Area will automatically grow to make room. Although the Work Area looks like a single page, you will be able to split the Work Area into multiple pages prior to printing your visual. This is something you should keep in mind, since a large visual printed on one page may have to be decreased in size so much that it becomes illegible. For more on this, see Printing a Visual. The Ribbon The Ribbon contains all of the buttons you need for the basics of manipulating items in your visual. The buttons there never change for any visual. The Ribbon is divided into a set of tabs which sort the buttons based on their function. For example, there’s a tab devoted to inserting and formatting tables. The Ribbon Tabs Each tab is subdivided into groups which further organize the buttons. For example, in the image below, the Picture tab is divided into a group of options for inserting a picture, a group for changing the size and shape of the picture, and a group for editing the brightness and contrast of the picture. SmartDraw.com | Chapter 1: Building Visuals Using SmartDraw 22 The Picture Tab For more on the buttons contained within the Ribbon’s tabs, see Chapter 2: The Ribbon. Just above the Ribbon is the SmartDraw button and Quick Access Toolbar. The SmartDraw Button and Quick Access Toolbar The SmartDraw button opens a menu containing functions such as New, Save, Export, and various other options for settings. SmartDraw.com | Chapter 1: Building Visuals Using SmartDraw 23 SmartDraw.com | Chapter 1: Building Visuals Using SmartDraw 24 The SmartDraw Menu The Quick Access Toolbar has a series of one-click buttons: Undo, Redo, New, Save, Print, Save as PDF, Export to Microsoft Word®, Export to Microsoft PowerPoint®, and Export to Microsoft Excel®. The Undo button removes the last action you performed on the visual, literally “undoing” your action. You can undo up to 100 actions at any given time. The Redo button is useful if you use to undo button when you didn’t intend to. The action removed by clicking Undo will be once again performed when you click Redo. You can redo anything you’ve undone until you perform a new action on the visual. The New button will open the Home Screen so that you can choose a template to open. If the currently open visual has had any changes made to it, clicking on a new template will start a new instance of SmartDraw, leaving the current visual open. If you click New while the template is still unchanged, the current template will be closed and the new template opened in its place. The Save button will open the Save dialog box, where you can name your visual and specify a location for the .SDR file on your computer. If you click the Save button again, it will simply save the file without the dialog box. The Print button will always open the Print dialog box, where you can select a printer, specify which pages and how many copies to print, and change some settings for how your visual will be printed. SmartDraw.com | Chapter 1: Building Visuals Using SmartDraw 25 The Save as PDF button opens the Export dialog box, where you can name your visual and specify a location for the .PDF file on your computer. You cannot use SmartDraw to edit the PDF file that is created, but this file format is handy for sharing the visual with your peers. The Export to Microsoft Word® button instantly places your visual into a Microsoft Word® document. If a document is already open, the visual will be placed on a page there. If not, a new document will be opened, and the visual will be placed on the first page. The Export to Microsoft PowerPoint® button instantly places your visual into a Microsoft PowerPoint® presentation. If a presentation is already open, the visual will be placed on the last slide there. If not, a new presentation will be opened, and the visual will be placed on the first slide. The Export to Microsoft Excel® button instantly places your visual into a Microsoft Excel® workbook. If a workbook is already open, the visual will be placed on a sheet there. If not, a new workbook will be opened, and the visual will be placed on the first sheet. SmartPanel In contrast to the Ribbon, each visual has its own unique SmartPanel, with controls specialized to building that particular visual. Some will have symbol galleries for adding symbols, others have “Add Text” buttons, and many have specific buttons for adding things like tasks, topics, ancestors, and so on. SmartDraw.com | Chapter 1: Building Visuals Using SmartDraw 26 SmartDraw.com | Chapter 1: Building Visuals Using SmartDraw 27 The Flowcharts SmartPanel and the Floor Plans SmartPanel Many SmartPanels, such as that of Flowcharts shown above, employ Automatic Shape Connectors, which means you will not only add a symbol, but it will also be connected to another symbol already in the Work Area, with perfect spacing and placement. These give you the ability to produce your visual with record speed. We will further discuss Automatic Shape Connectors in Chapter 3. As you may notice in the images above, every SmartPanel has a button for opening SmartHelp at the bottom. SmartHelp Because each visual is different from the others, SmartDraw has visual-specific SmartHelp focusing on how to use SmartPanel and the Ribbon to build the visual for which your template was intended. Many tasks discussed in SmartHelp also have a link to a web-based video which shows you how to perform that task. SmartDraw.com | Chapter 1: Building Visuals Using SmartDraw 28 SmartDraw.com | Chapter 1: Building Visuals Using SmartDraw 29 By default, SmartHelp is closed so that you have more room in the Work Area. To open SmartHelp, you can click Open Help in SmartPanel. Or you can click Help in the title bar of the Work Area. SmartHelp does not open in a new window, which means you can keep it open while you build your visual. This way you can follow along without having to close it to do the next step. Adding Color and Style to a Visual SmartDraw makes adding color to your visual just as easy as building it. Themes You can change the entire color scheme of the visual with a single click. Themes provide a professional, color-coordinated appearance to the entire visual. In the Home tab, just click on a theme in the Theme group and all colors are instantly changed. SmartDraw.com | Chapter 1: Building Visuals Using SmartDraw 30 SmartDraw.com | Chapter 1: Building Visuals Using SmartDraw 31 Changing Themes from “Default” to “Cornflower” However, if you manually color an item in the Work Area and then change the theme, the colors will be overridden so that they match the theme. Instead, you should color items using Quick Styles. Quick Styles You can apply a fill color, line color and style, text font, color, and size, and more to selected items in the Work Area using Quick Styles. Just click on an item in the Work Area - or hold down the Shift key and click on several items - to select it. Then, click the Quick Styles button in the Shape Style group of the Home tab and choose a style from the menu. SmartDraw.com | Chapter 1: Building Visuals Using SmartDraw 32 Changing Quick Styles In the image above, changing Quick Styles turned a gray gradient fill to a solid blue fill, changed a thin dark gray border to no border, and added a drop shadow. The colors offered in the Quick Styles menu are determined by the selected theme. When you change themes, the colors change to match the theme, but all other styling remains the same. Our Style21 shape above will still be Style21, but the color will be different: Changing the Theme Only Changes the Color of Quick Styles AutoStyle A few visual types, such as Mind Maps and Storyboards, employ AutoStyling to automatically color and style shapes based on their hierarchical level in the visual. That is, shapes you add or move automatically adopt the color, size, shape, and style of other shapes in that same level. These colors and styles are Quick Styles so that changing the theme maintains the differences while changing the colors. SmartDraw.com | Chapter 1: Building Visuals Using SmartDraw 33 A Mind Map with AutoStyle Coloring a visual in this manner helps the viewer to understand and see the hierarchy, so SmartDraw has been designed to do the work for you so you don’t have to color it yourself. Visuals that use AutoStyle have a this feature off. button in SmartPanel so that you can turn Changing the Fill of a Shape You can manually change the fill of a shape. However, if you are going to work with themes, make sure you choose a theme and do not change it again before applying any fill colors. This is because changing the theme will automatically override the fill color. SmartDraw.com | Chapter 1: Building Visuals Using SmartDraw 34 To apply a fill, just click on the shape to select it, then click the Fill button and choose a color from the menu. You can also choose a gradient, texture, or hatch, and you can set the transparency of the fill. The Fill Menu SmartDraw.com | Chapter 1: Building Visuals Using SmartDraw 35 Using the Line Button You can change the color and style of the border of shapes or of lines using the Line button in the Shape Style group of the Home tab. Like fill colors, line and border colors are overridden by a change in themes, so make sure you are satisfied with the selected theme before applying line and border colors using the Line button. To apply a line color or style, click on the shape or line, then click the Line button and choose from the menu. The Line menu looks very similar to the Fill menu above, but with a few additions at the top: Thickness, Dashes, and (if only lines but no shapes are selected) Arrowheads. Use these submenus to change the weight, styling, and arrowhead settings of the selected line(s) or shape(s). The Top Section of the Line Menu SmartDraw.com | Chapter 1: Building Visuals Using SmartDraw 36 Applying Effects Take your visual to the next level by applying effects like shadows, reflections, glows, gloss, and more to items in the Work Area. Again, changing the theme after applying an effect will override the effect, so do not apply any effects until you are satisfied with the selected theme. To apply an effect, click Effects in the Shape Style group of the Home tab, position your cursor over one of the types of effect, and then choose from the submenu that appears. SmartDraw.com | Chapter 1: Building Visuals Using SmartDraw 37 The Effects Menu The Perspective option at the bottom of the menu is a special case. It allows you to tilt your entire visual for a unique perspective. However, once you apply the perspective, you can no longer edit the visual unless you close the Perspective Export window (which is much like the Print Preview window), thus undoing the perspective. SmartDraw.com | Chapter 1: Building Visuals Using SmartDraw 38 A Chart with a Perspective Effect SmartDraw.com | Chapter 1: Building Visuals Using SmartDraw 39 Chapter 2: The Ribbon This chapter will explain in detail the function of each button in the tabs of the Ribbon. Visuals should primarily be built using SmartPanel, but the Ribbon contains many helpful controls as well. The Home Tab The Home tab contains many of the simple, common functions you might use for formatting and manipulating your visual. The Home Tab SmartDraw.com | Chapter 2: The Ribbon 40 The Clipboard Group The Clipboard group may be quite familiar to you, with common functions like copy, cut, and paste. Simply click the Paste button to paste anything you have copied, even if it was in a different program. Or click the below the Paste button to open the Paste menu, which has more advanced (but easy to use) pasting options. The Paste Menu Paste Special allows you to embed an object copied from another program. You can doubleclick the object in the Work Area to open it for editing in the program it came from. Just close the program and the object will automatically be updated. SmartDraw.com | Chapter 2: The Ribbon 41 Duplicate pastes an exact copy of the selected item(s) into the Work Area. Using this control will keep you from having to keep remaking the same formatted item. Click the Cut button to copy the selected items and then remove them from the Work Area. Click the Copy button to place a copy of the selected items on the clipboard. When you use the Paste control in most programs, the last thing you copied will be inserted. The Format Painter button allows you to copy the formatting (that is, fill color, font, and so on) of an item and apply it to other items. To do this, click on the item which has the format you would like to copy, then click Format Painter and click on the item to which you want to apply the format. The Tools Group The Tools group contains simple controls that can be quite useful for building your visual. The Select button changes your cursor so that clicking on an item selects it. Click the below the Select button to open the Select menu for more selection options. SmartDraw.com | Chapter 2: The Ribbon 42 The Select Menu Click Select Multiple to change the cursor so that you can click on several items to select each of them. You can do the same thing by holding the Shift key and clicking on each item. Click All to select every item in the Work Area. You can also hold down the Ctrl button and press the A key. Click All Shapes to select every shape, symbol, and anything else that is not a line. Click All Lines to select every line in the Work Area. SmartDraw.com | Chapter 2: The Ribbon 43 Click Delete to permanently remove all selected items from the Work Area. You can also press the Delete or Backspace key. The Text button changes your cursor so that clicking anywhere in the Work Area – whether on a shape, symbol, line, or the background – allows you to start adding text where you clicked. Click on the Shape button to add the shape shown on the button. To change shapes, click the below Shape and choose a new shape from the menu. When you choose a shape, that shape will be shown as the button icon instead of the default rectangle. After choosing a shape, click in the Work Area where you would like to add the shape. SmartDraw.com | Chapter 2: The Ribbon 44 The Shape Menu The Line button changes your cursor so that clicking and dragging in the Work Area draws a line. By default the line is straight, but the button is programmed to “remember” the last line shape you selected from the menu. Click the below Line to open the Line menu, where you can choose a new line shape. For more on drawing lines see Working with Lines. SmartDraw.com | Chapter 2: The Ribbon 45 The Line Menu Click the Arrowheads button to open the Arrowheads menu, where you can choose a direction, or you can click Custom to choose a shape and change other settings for the selected lines. SmartDraw.com | Chapter 2: The Ribbon 46 The Arrowheads Menu The Theme Group The Theme group is a very unique group with a single function: applying a theme to the entire Work Area. A theme instantly provides your visual with a professional, color-coordinated appearance. Just click one of the sets of color samples. You can use the arrows on the right side of the group to navigate among the 16 themes. scrolls the gallery up by one row. scrolls the gallery down by one row. SmartDraw.com | Chapter 2: The Ribbon 47 opens the entire Theme gallery so that you can view all themes at once. The Shape Style Group The Shape Style group contains controls for adding color and style to items in the Work Area. Quick Styles are a fill color and style, line color and style, font, and more which can be applied with a single click to the selected items in the Work Area. Clicking this button opens a menu of all of the Quick Styles available. The colors offered in Quick Styles are directly determined by the selected theme. When you change themes, any item with a Quick Style will keep the style but will change colors to match the theme. SmartDraw.com | Chapter 2: The Ribbon 48 SmartDraw.com | Chapter 2: The Ribbon 49 The Quick Styles Menu Use the options under the Fill button to simply apply a fill color, gradient, texture, or hatch to the selected shapes or symbols. Note: If you change the theme, any applied fills will be overridden. The Line button has controls for setting the thickness, dashes, arrowheads, and color of the selected lines. It can also make these changes to the border of any selected shape or symbol. Note: Changing the theme will automatically override any applied line color and style. You can apply effects, such as shadow, glow, gloss, or reflection, to the selected items using the Effects button. Click on this button to open the Effects menu, and then position your cursor over the type of effect you want to apply and choose the effect from the submenu. SmartDraw.com | Chapter 2: The Ribbon 50 The Effects Menu The Font Group The Font group has controls for editing text. You can select text by clicking and dragging the mouse to highlight the text (you may have to double-click the item the text is attached to in order to access the text first). SmartDraw.com | Chapter 2: The Ribbon 51 Click this menu button to view a choice of fonts which you can apply to the selected text. Click on a font to instantly apply it. Click this menu button to view a choice of font sizes for the selected text. Click on a number to select it, or click Custom to define your own font size. Click the Bold button to make the selected text bold. Click the Italics button to italicize the selected text. Click the Underline button to underline the selected text. Click the Subscript button to make the selected text a subscript. Click the Font Color menu button to open the Font Color menu, where you can select a solid, gradient, or texture color for the selected text. Click the Text Symbol button to open the Insert Symbol dialog box, where you can choose a text symbol to insert into the selected text. SmartDraw.com | Chapter 2: The Ribbon 52 The Insert Symbol Dialog Box Click the Font Group Dialog Launcher to open the Font dialog box, which has some of the controls in the Font group conveniently placed into a dialog box with a sample preview. SmartDraw.com | Chapter 2: The Ribbon 53 The Font Dialog Box The Paragraph Group SmartDraw.com | Chapter 2: The Ribbon 54 The Paragraph group has controls that will help you to format the layout of the selected text. The Bullets button opens the Bullets menu, where you can choose a style of list bullets, or remove existing bullets. The Bullets Menu The Spacing menu allows you to specify whether the spacing between lines of the selected text is single, 1.5, or double. Click the Alignment button to view choices of how text is aligned. If the text is inside a shape, the alignment will affect the direction in which the shape grows as you add more text than can fit inside the shape. If the text is along a line, the alignment changes where the text rests on the line. SmartDraw.com | Chapter 2: The Ribbon 55 The Alignment Menu The Direction button opens a menu which allows you to specify whether text on a line travels along the direction of the line or stays horizontal. The Design Tab The Design tab contains controls for helping you manipulate items in the Work Area. The Design Tab SmartDraw.com | Chapter 2: The Ribbon 56 The Position & Size Group With the Position & Size group, you can precisely control the dimensions of the selected items. The numbers are in the units specified by the scale (see Working with Dimensions). You can click on the dimensions to type in new numbers, or use the increase/decrease buttons to their right. Click the Dialog Launcher to open the Position and Size dialog box, where you can determine the location and dimensions of the selected shapes. SmartDraw.com | Chapter 2: The Ribbon 57 The Position and Size Dialog Box The Shape Layout Group The Shape Layout group has controls which help you to organize and arrange items in the Work Area. SmartDraw.com | Chapter 2: The Ribbon 58 For a neater appearance, you can use the Align button to precisely align the selected items in the work area. To use this button, first hold down the Shift key and click on each item you wish to align. The last item on which you click will have black handles while the others have white handles: The item with the black handles will act as a reference point for the others, so they will align with respect to that item. Then, click the Align button and choose an alignment from the menu. SmartDraw.com | Chapter 2: The Ribbon 59 The Shapes are Aligned with the Bottom of the Dark Blue Shape The Rotate button allows you to rotate an item about its center. Select the item, click the Rotate button, and choose an angle from the menu or click Custom to type your own angle into a dialog box. When you choose an angle, the item is rotated counter-clockwise by the angle from its original position. That is, if you click 90° twice, the item will only be rotated a total of 90° to the left, not the expected 180°. SmartDraw.com | Chapter 2: The Ribbon 60 If you have several items which you’d like to keep together, you can use the Group button to convert them to a single item. Just hold down the Shift key and click on each item, then click the Group button and choose Group from the menu. If you want the items to be individual again, just select the grouped item and choose Ungroup from the same menu. Items may cover each other in the Work Area. Select an item and click the Bring to Front button to make that item lay “on top” of the other items in the Work Area. That is, no other item will cover the selected item. The Send to Back button does the opposite of Bring to Front: all other items will be on top of the selected item so that it doesn’t cover any others. In contrast to rotation, the Flip button changes the selected item to a mirror image of itself. There are two choices in the menu: Flip Vertically and Flip Horizontally: SmartDraw.com | Chapter 2: The Ribbon 61 The Make Same button allows you to make two or more items have the same height, width, or both. Just select the items by holding the Shift key and clicking on each item. The last item you select will have black handles while the others have white handles. The whitehandled items will use the black-handled item as a reference point – that is, they will adopt the size of the black-handled item. Click Make Same and choose from the menu. The Space Evenly button allows you to make three or more selected items have the same vertical, horizontal, or both distance from each other. The Shape Properties Group SmartDraw.com | Chapter 2: The Ribbon 62 The Shape Properties group has buttons which allow you to make changes to the shape and settings of items in the Work Area. The Change Shape button opens a menu with two options. Position your cursor over Change Shape in the menu to see a submenu of shapes into which you can change the selected symbols in the Work Area. Click Edit Shape Outline to temporarily transform the handles of the selected symbol so that you can drag the outline into a custom shape. The Change Shape Menu The Change Shape button is usually grayed out unless a shape or symbol is selected in the Work Area. SmartDraw.com | Chapter 2: The Ribbon 63 Under the Change Line button is a menu for changing the shape of a selected line to a variety of other shapes. Simply click on a new shape to apply it to the selected line. Again, this button is usually grayed out unless a line is selected. The Change Line Menu You can anchor lines to connection points on symbols in most visual types. All symbols have default connection points, but you can change them by clicking Connection Points. This opens the Choose Connection Points dialog box, where you can choose between Default, Continuous, and Custom connection points. The dialog offers instruction on how to set Custom connection points: SmartDraw.com | Chapter 2: The Ribbon 64 The Choose Connection Points Dialog Box The Text Entry button opens the Text Entry Properties dialog box, which has options for how the selected symbols grow as more text is entered than can fit inside the symbol, when text entry is allowed, what pressing the Enter key while editing text inside the selected symbol does, and so on. SmartDraw.com | Chapter 2: The Ribbon 65 The Text Entry Properties Dialog Box The Dimensions button opens the Show Dimensions dialog box, where you can specify when and how the dimensions of the selected items are shown. SmartDraw.com | Chapter 2: The Ribbon 66 The Show Dimensions Dialog Box You can click the Dialog Launcher to open the Shape Properties dialog box, which contains many of the same controls as the Shape Properties group, in addition to a few more settings. SmartDraw.com | Chapter 2: The Ribbon 67 The Shape Properties Dialog Box The OLE Group SmartDraw.com | Chapter 2: The Ribbon 68 The Links button opens the Links dialog box, where you can manage the OLE links in the visual. For an object to be linked, you must have inserted it using the Paste Special control in the Paste menu on the Home tab and chosen “Paste Link” in that dialog box. In the Links dialog box, you can update a linked object, open the source from which the object is linked, break the link, and so on. The Links Dialog Box SmartDraw.com | Chapter 2: The Ribbon 69 The Objects button opens a menu with options for opening the source of the OLE item. The Insert Tab The Insert tab only contains one group: the Insert group. This is made up of buttons for inserting different types of items into the Work Area. The Insert Tab The Table button opens a menu of preset table sizes for you to choose from to insert, or you can click Define to create a more custom table. See Working with Tables for more information. The Picture button opens the Insert Picture dialog box, where you can browse through your computer’s files to find the picture you want to insert. If a shape is selected when you click the button, the picture will be inserted inside that shape. Otherwise, it will be added to the Work Area as a new symbol. The Chart button opens a menu of chart types for you to choose from. See Working with Charts for more information. SmartDraw.com | Chapter 2: The Ribbon 70 The Note button adds an annotation to the selected item. Just click the button, type in the box that appears near the item, and click somewhere else to close the text box. A yellow icon appears on the item. You can position your cursor over this icon to read the note, or click on the icon to edit the note. The icons do not appear when you export the visual, and when you print it, a list of notes is printed on a separate page. The Map button opens the Google Maps® tool window so that you can create a custom map using the power of Google®. You can even import a spreadsheet of data to be automatically plotted on your map. For more on this, see Working with Maps. The Web Page button opens an internet browser so that you can navigate to the web page of which you would like to capture a screenshot. When you have found the web page, just click Capture Webpage on the browser to insert the screenshot. The HyperLink button allows you to convert the selected item into a link to a web page or file. This can be in the form of a text link, or an item itself can be the link, depending on whether you highlight text or click on an item. SmartDraw.com | Chapter 2: The Ribbon 71 Text with a Hyperlink and a Shape with a Hyperlink The More button opens a menu with more options of objects you can insert. For each of these, the appropriate program is automatically opened. Make the necessary changes, and then just close that program’s window. The object will be inserted into the Work Area. The More Menu The Page Tab SmartDraw.com | Chapter 2: The Ribbon 72 The Page tab contains buttons for setting up and working with the Work Area. The Page Tab The Page Style Group The Page Style group only contains one button. The Background button opens a menu, from which you can choose a background color, picture, gradient, or texture for the Work Area. SmartDraw.com | Chapter 2: The Ribbon 73 The Page Setup Group The Page Setup group has buttons for setting up the Work Area. The Orientation button opens a menu with choices for whether the page should be Portrait or Landscape. The Margins button opens a menu with choices for the width of the margins when you print your visual, or you can click Define to create custom margins settings. The Layers button allows you to add and manage layers of the Work Area. For more, see Working with Layers. The Work Area button opens the Set the Work Area dialog box, where you can define the number of pages on which your visual lies, and a few options for controlling the growth of the Work Area. This dialog box is important if you are going to print your visual because it will ensure the visual is printed as you want it – you wouldn’t want to print one visual split into 50 pages, or to shrink a large visual down to fit on just one page. SmartDraw.com | Chapter 2: The Ribbon 74 The Set the Work Area Dialog Box The Center in the Work Area moves your entire visual so that it is centered on the total white space of the Work Area, while maintaining all spacing in your visual. SmartDraw.com | Chapter 2: The Ribbon 75 The Rulers & Grid Group The Rulers & Grid group contains controls for working with dimensions and snapping items to the (usually invisible) grid. The Scale button opens a menu with options for the scale of the Work Area. The dimensions of items will be shown in the scale you select, and the rulers (when visible) will reflect the scale as well. This is particularly useful for visuals like Floor Plans, in which the scale matters. For more details, see Working with Dimensions. The Snaps button allows you to choose how items attach to the (usually invisible) grid in the Work Area, or specify whether they snap to the grid at all. Using snaps helps you to work with items quickly and easily. For example, items which snap to the grid are much easier to align. There are three checkbox buttons in the Rulers & Grid group: - Show Rulers shows or hides the rulers along the top and left edges of the Work Area. - Show Grid shows or hides the grid, which is defined by the scale of the rulers. - Use Snaps turns on or off the setting for all items to snap onto the grid. SmartDraw.com | Chapter 2: The Ribbon 76 The Find & Replace Group The Find & Replace group helps you to search for words or phrases you may have entered into the visual. The Find button opens the Find and Replace dialog box, where you can enter a word or phrase and search for each instance of that word or phrase in the Work Area. You can also hold down the Ctrl key and press the F key to open the same dialog box. The Replace button opens the same Find and Replace dialog box, but with more controls for replacing. You can also reach this dialog box by clicking the Find button and then clicking “Replace >>” in that dialog box. The Find and Replace Dialog Box SmartDraw.com | Chapter 2: The Ribbon 77 The Table Tab The Table tab consists of buttons dedicated to creating and formatting tables. The Table Tab The Insert Table Group The Insert Table group has controls for adding a table to the Work Area. SmartDraw.com | Chapter 2: The Ribbon 78 The Table button inserts a simple table with the number of rows and columns specified to the right of the button. You can change these numbers by clicking on the menu buttons and choosing new values. The menu button below the Table button opens a menu in which you can choose a preset size of table to insert, or click Define to create a custom table with more formatting. The Add New Table Dialog Box The Rows & Columns Group SmartDraw.com | Chapter 2: The Ribbon 79 The Rows & Columns group has buttons for working with table cells. Most of the buttons in this group are grayed-out unless you have clicked inside a table. The Delete button opens a menu containing options to remove a row, column, or the contents of a row or column. It’s enough to click inside one cell in the row or column you want to delete or clear the contents of. The Insert Left button adds a column to the left of the column containing the selected cell. If more than one column is selected, the same number of columns will be added to their left. The Insert Right button adds a column to the right of the column containing the selected cell. If more than one column is selected, the same number of columns will be added to their right. The Insert Above button adds a row above the row containing the selected cell. If more than one row is selected, the same number of rows will be added above them. The Insert Below button adds a row below the row containing the selected cell. If more than one row is selected, the same number of rows will be added below them. SmartDraw.com | Chapter 2: The Ribbon 80 When more than one cell is selected, the Join Cells button will merge the cells into one cell by removing the gridlines dividing them. The Split Cells button divides each selected cell into two side-by-side cells by adding a gridline. The Distribute button opens a menu from which you can choose to space rows or columns evenly. That is, all rows will have the same height or all columns will have the same width. The Table Style Group The Table Style group has buttons for changing the color and style of the table cells or the entire table. The Format Table button opens the Format Table dialog box, where you can select a premade table format and define the number of rows and columns. You can also add your own table formats so that you can apply them to other tables later. Just format a table manually, click this button, then click [Current Settings] in the list and click Add to List. SmartDraw.com | Chapter 2: The Ribbon 81 The Format Table Dialog Box The Fill button contains options for filling the selected table cells with a solid or gradient color, texture, or hatch. Simply click on the fill you wish to apply. The Grid button contains a menu for the thickness and dashes of the selected gridlines, as well as a menu very similar to that of the Fill button, except that the color, texture, or hatch you select will be applied to the gridlines instead of the cells. SmartDraw.com | Chapter 2: The Ribbon 82 The Effects button opens a menu of effects such as shadow, glow, bevel, and more. Just position your cursor over the type of effect you’d like to apply and choose from the submenu that appears. The Effects Menu SmartDraw.com | Chapter 2: The Ribbon 83 The Perspective effect should only be applied once you are done creating your visual, since you will not be able to make any further changes while the effect is applied. This is because the entire visual is tilted for a 3-D effect. The Data Group The Data group has buttons for controlling the data entered into table cells. The Autofill button opens the Autofill Table dialog box, where you can automatically number the cells of a row or column using numbers, dates, months, and so on, starting with the selected cell. SmartDraw.com | Chapter 2: The Ribbon 84 The AutoFill Table Dialog Box The Convert to Table button allows you to change any selected symbol into a table. A dialog box appears, allowing you to choose a table format and the number of rows and columns. The symbol maintains its original outline, but contains gridlines inside it. The Convert to Text button allows you to change the selected table to a shape instead. All text in the table is placed inside the shape, arranged in a similar manner to how it had been in the table cells. SmartDraw.com | Chapter 2: The Ribbon 85 This checkbox button allows you to lock or unlock the selected table cells to text editing. This is helpful for locking headers and other cells for which the text should not be regularly changed. The Chart Tab The Chart tab is dedicated to creating and formatting charts and graphs. When creating a chart, you should use the Charts & Graphs visual template so that you can use SmartPanel. Then, when you’re done making the chart, you can paste it into the visual of your choice if you’d like to. For more on this, see Working with Charts. SmartDraw.com | Chapter 2: The Ribbon 86 The Chart Tab The Insert Chart Group The Insert Chart group contains buttons for different methods of creating a chart. The New button opens a menu of types of chart for you to choose from. Select a chart type to instantly insert a chart into the Work Area. The From File button allows you to browse your computer for a spreadsheet from a program such as Microsoft Excel®. The data in the file you choose will be read by SmartDraw and converted into a chart. The From Clipboard button reads data you have copied to the clipboard (using the “Copy” function on a spreadsheet for example) and creates a chart from it. SmartDraw.com | Chapter 2: The Ribbon 87 The Chart Data Group The Chart Data group contains buttons which help you to add and manipulate data on your chart. The Add Series button adds one more bar, line, or slice to each category. That is, a new color is added. SmartDraw.com | Chapter 2: The Ribbon 88 The Add Category button adds a new set of the series. That is, a new bar or point is added for each series, all grouped into a new category. Since Pie charts and Relative Value charts only show one category at a time, this button is grayed out when you are creating one of these types of chart. The Show Data Table button causes the corresponding data table to appear or disappear. Any changes you make to the data in the table will instantly update the chart, and vice versa. The Swap Series & Categories button changes the series to categories and the categories to series. The Pie Data button opens a menu listing all of the categories of your chart. Choose one of the categories to instantly convert your chart into a Pie chart with that category shown. The other data is not lost when you do this – you can switch categories or change back to another type of chart using the Chart Type button (see the Layout group). The Layout Group SmartDraw.com | Chapter 2: The Ribbon 89 The Layout group has buttons for changing the overall appearance of the chart. The Chart Type button opens a menu from which you can choose a type of chart to which you can change your current chart without losing any data. Once you choose a chart type, a second menu appears with a few options on layout, including how data labels should be shown, which direction the chart goes, and so on. The Quick Layouts button opens a menu of choices of layouts specific to the type of chart you are creating. You can choose any of these layouts to apply a professional look to your chart with a single click, including how data labels are shown, the direction in which the chart goes, and so on. The Rotate Chart button opens a menu from which you can choose which quadrant of the axes your chart should use. That is, you can choose which axis your bars or lines grow from. The Axes button opens a menu where you can choose whether the vertical and horizontal axes are shown. The Grid button opens a menu where you can choose whether various gridlines in the chart area are shown. The Legend button opens a menu where you can choose whether a legend is shown, the format of the legend, and where the legend will be shown. SmartDraw.com | Chapter 2: The Ribbon 90 The Set Range menu buttons allow you to choose the maximum and minimum values of the axis with number values (by default this is the vertical axis, unless you rotate the chart or choose a Quick Layout with a rotated chart). The Labels Group The Labels group contains buttons for changing how and whether various types of labels appear, as well as controls for when the chart is quite large. The Data button opens a menu where you can choose whether and how data point labels are displayed. The Horizontal Axis button opens a menu where you can choose how and whether the various labels of the horizontal axis are shown, as well as whether there are tickmarks along the axis. The Vertical Axis button opens a menu where you can choose how and whether the various labels of the vertical axis are shown, as well as whether there are tickmarks along the axis. SmartDraw.com | Chapter 2: The Ribbon 91 The Group Labels button allows you to condense labels by date or by number. The options in the menu are grayed out unless your chart becomes so large that the labels are illegible and crowded, such as a chart with 100 or more categories. The Format Labels button opens a menu where you can format the labels you have grouped. This button is grayed out unless you have used the Group Labels button on a large chart. The Picture Tab The Picture tab is made up of controls for inserting and formatting images from your computer’s files. The Picture Tab The Get Images Group SmartDraw.com | Chapter 2: The Ribbon 92 The Get Images group consists of a series of buttons for inserting images. The From Camera button opens the Select Photo Source dialog box, where you can specify the drive to which your digital camera or memory card is attached. The Picture Folder button opens a dialog box where you can browse for the folder of JPEG files you want to open. When you click Open, the folder’s contents are shown in the Library tab, where SmartPanel is located. Then, you can click on a picture and click again in the Work Area to add it. The Open Picture button opens a dialog box where you can browse your files for one image. If a symbol is selected when you click the button, you will be given the option to insert the image inside the symbol. The Capture Webpage button opens an internet browser. Browse to the webpage you want to capture, then click Capture Webpage at the top of the browser to insert a screenshot of the page into the Work Area. SmartDraw.com | Chapter 2: The Ribbon 93 The Picture Size Group The Picture Size group has buttons for adjusting the image you have inserted. The Pan & Zoom button opens a toolbar for adjusting the image when it’s inside a shape. You can click the Arrow buttons to move the picture around, and the magnifying glasses to zoom in or out. For example, if you inserted a picture of a person’s face, you can adjust the picture so that their face is shown inside the shape. SmartDraw.com | Chapter 2: The Ribbon 94 The Pan & Zoom Toolbar The Crop button opens a menu containing a selection of proportions to which you can crop the image, such as 4”x6”. If you inserted an image into a shape other than a rectangle, the Trim to Shape button will cut the image so that the parts of the image not shown are removed. This can save disk space, especially if you have inserted many pictures. SmartDraw.com | Chapter 2: The Ribbon 95 The Exposure Group The Exposure group has buttons for changing the quality of the image itself. The Brightness button opens a menu in which you can adjust the brightness of the image by a percentage. The Contrast button opens a menu in which you can adjust the contrast of the image by a percentage. The PowerPoint® Tab You can use the PowerPoint® tab to animate your visual so that it appears step-by-step when you export it to Microsoft PowerPoint®. This will help your viewers to follow along with you as you analyze your visual during your presentation. SmartDraw.com | Chapter 2: The Ribbon 96 The PowerPoint® Tab The Export Group The Export group contains a button for sending your visual to Microsoft PowerPoint®, with an option you can turn on or off. The Send to PowerPoint® button instantly places your visual onto a slide of a Microsoft PowerPoint® presentation. If a presentation was already open, the visual is added to a new slide at the end of that presentation. If not, a new presentation is opened with the visual on the first slide. If the Include Animation checkbox button is checked, the animations you program using the Animation group will be included when you send your visual to Microsoft PowerPoint®. The Animation Group SmartDraw.com | Chapter 2: The Ribbon 97 The Animation group has controls for you to program individual items in your visual to appear in the presentation upon clicking a certain number of times. You can also preview your animation. You can use the Step menu button to assign a step to the selected item(s) in the Work Area. For example, if you assign an item with Step 3, it will appear after the third click when you are presenting the slide containing your visual. If you are animating a chart, you can use the Chart Preset menu instead of the Step menu as a shortcut. There are a few common ways you may want to present your chart, such as by having one category or series appear at a time. SmartDraw can automatically animate your chart using your choice of method listed in the menu. The Chart Preset Menu The Preview button will allow you to see what the visual will look like in Microsoft PowerPoint® before you export it. You can use the and buttons to navigate SmartDraw.com | Chapter 2: The Ribbon 98 from step to step, or simply click the mouse to move the animation forward, just like in PowerPoint®. You can click to return to editing your visual. The Review Tab The Review tab only consists of the Comments group, which contains buttons for writing and viewing markup comments on the visual. The Add Comment button opens a temporary text box next to the selected item. Enter text in this box, then click somewhere else to close it. Your user initials and the comment number appear in a small colored box on the item. You can position your cursor over this box to view the comment, or click on the box to edit the comment. The comments you add will automatically be removed when you export your visual, and when you print, the comment markers are replaced by numbers and a list of the comments is printed SmartDraw.com | Chapter 2: The Ribbon 99 on a separate page. However, you can hide the comments while working in SmartDraw or on the printout by unchecking . Use the numerical order. and buttons to read the comments in their The Help Tab The Help tab only consists of one group: the SmartDraw group. It contains the buttons you need to find help and maintain your copy of SmartDraw. The Tech Support button will instantly take you to the Support page of the SmartDraw website in a new tab or window of your default internet browser. From there, you can get the help you need from one of SmartDraw’s experts. The Updates button will instantly take you to the Patches & Updates page of the SmartDraw website in a new tab or window of your default internet browser. From there, you can click on the latest updates to download them so that your copy of SmartDraw is up to date. SmartDraw.com | Chapter 2: The Ribbon 100 The About button will open a window giving you the version number, license number, and more about your copy of SmartDraw. Click on the window to close it. The License button opens a dialog box where you can view your current software licenses. Chapter 3: Automatic Shape Connectors Most of the visuals offered by SmartDraw have a specific structure to them, with shapes and symbols connected by lines in a particular layout. It can be quite tedious to make sure everything is laid out and spaced nicely, and once the visual is finally perfect, you wouldn’t dare make changes to it! Thanks to Automatic Shape Connectors, this is not the case in SmartDraw! For such visuals, SmartPanel has special controls for adding symbols which are automatically connected to each other and perfectly spaced. They even adjust to accommodate new shapes as they are added. Let’s look at a few examples of visuals that use this innovative, easy-to-use tool. Flowcharts SmartDraw.com | Chapter 3: Automatic Shape Connectors 101 Many visuals adopt a flowchart-like structure, with chains of symbols connected to indicate the flow of a process. A Flowchart on Deciding What to Do on a Weekend The flowchart shown above only took about ten minutes to make thanks to SmartPanel. Let’s take a look at how to do this. SmartDraw.com | Chapter 3: Automatic Shape Connectors 102 The Flowcharts visual template starts with a shape labeled “Start” already in the Work Area, so we can click on this and type to add text. Click on a Shape and Start Typing to Add Text Now we’d like to add the diamond shape (that is, a decision) below the starting shape. In SmartPanel, we click on the “Decision” symbol in the symbol gallery, then click Add Below. The symbol is added automatically attached to the first symbol and perfectly spaced. SmartDraw.com | Chapter 3: Automatic Shape Connectors 103 Now we add Process symbols below and to the right of the decision we just added, using the same method: select the decision, click on the Process symbol in the gallery, and click Add Right. Then, we repeat to add the process below the decision. We can add text to the connectors by double-clicking on them and typing. We can continue adding symbols in the same manner. There are also a few keyboard shortcuts to make construction even faster. Hold down the Ctrl key and press an arrow key to add a SmartDraw.com | Chapter 3: Automatic Shape Connectors 104 symbol in that direction from the selected shape. To add text faster, you can use the Tab key to move from symbol to symbol. The second decision, labeled “Sunny Outside?”, is the beginning of a split path, so to add the processes attached to it, we’ll need a different button. In SmartPanel, we can use the Split Path buttons to add two processes below “Sunny Outside?” We add a few more shapes and the flowchart is built: SmartDraw.com | Chapter 3: Automatic Shape Connectors 105 SmartDraw.com | Chapter 3: Automatic Shape Connectors 106 The only thing that is missing is the line from “Press ‘Snooze’” to “Alarm Goes Off”. This is a very specialized line, so we’ll have to draw it ourselves. We click “Draw Lines” in SmartPanel to change the cursor to a pencil icon. Then we click on the edge of “Press ‘Snooze’” where we want the line to start, and click again on the edge of “Alarm Goes Off”. The line is automatically anchored to both shapes so that it will adjust itself to stay attached to them even if you move one of the shapes. Now we just add some color using the Quick Styles and Themes buttons in the Home tab, and we’ve built the flowchart! SmartDraw.com | Chapter 3: Automatic Shape Connectors 107 Mind Maps Mind Maps and other similar visuals consist of shapes branching from a central main idea shape. A Mind Map Just like Flowcharts, the Mind Maps SmartPanel has buttons that make building a visual like this as easy as a few clicks. SmartDraw.com | Chapter 3: Automatic Shape Connectors 108 The Build Group of Mind Maps SmartPanel You don’t even have to choose symbols from a symbol gallery. Just click Add Topic in SmartPanel to add boxes attached to the central shape. SmartDraw.com | Chapter 3: Automatic Shape Connectors 109 Click “Add Topic” Three Times to Add Three Topics The topics are added on alternating sides of the central shape so that the visual maintains a balanced appearance. To add a subtopic to a topic, we just click on that topic and click Add Subtopic in SmartPanel once for each subtopic. SmartDraw.com | Chapter 3: Automatic Shape Connectors 110 Adding Two Subtopics to the Selected Topic You can also add subtopics to other subtopics to go one level deeper. SmartDraw.com | Chapter 3: Automatic Shape Connectors 111 Notice that the subtopics added in the image above are a different color, size, and shape from the topic to which they were added. This is because Mind Maps (and a few other visuals) use AutoStyle, which automatically change colors and styles each tier of hierarchy so that they are visually distinguishable. You can always turn this off by clicking in SmartPanel. Moving Automatically Connected Symbols SmartDraw makes it easy to rearrange symbols, even if they are connected to other symbols by Automatic Shape Connectors. All you have to do is click and drag the symbol to a new position. As you approach the new position, dashed lines and connection points appear where the symbol can be reattached. Simply release the mouse button when the outline of the symbol snaps to the connection point you want. Dragging a Symbol to a Connection Point Some visuals, such as Org Charts and Mind Maps, have a hierarchy in their structure. When you drag a symbol that has subordinate symbols attached to it, those symbols stay attached. SmartDraw.com | Chapter 3: Automatic Shape Connectors 112 The Light Blue Boxes Stay Attached to the Dark Blue Box When It’s Moved Replacing Symbols with Different Symbols Suppose you decide you’d like to change a rectangle symbol to an oval symbol. In other programs, that would mean you have to delete the rectangle, add the oval symbol, readjust the lines so that they attach to the new symbol, and retype the text that had been in the previous symbol. But with SmartDraw, replacing a symbol is a drag-and-drop mechanism. Simply select a new shape in the symbol gallery, then click on the symbol you want to replace when the cursor looks like . The new symbol even keeps any text that had been in the original symbol and it automatically connected when it replaces the original symbol. SmartDraw.com | Chapter 3: Automatic Shape Connectors 113 Collapsing Branches Visuals with hierarchies, such as Org Charts and Mind Maps, can become quite large. For this reason, SmartDraw offers the ability to “collapse” branches in order to temporarily hide them so that your visual is less cluttered while you work. Each symbol with subordinate symbols attached to it has an icon near the branch attaching the subordinate symbols. Just click on that icon to collapse the branch. SmartDraw.com | Chapter 3: Automatic Shape Connectors 114 Clicking the Collapse Icon When you want to see the collapsed branch again, just click the been. icon where the button had Clicking the Expand Icon When you print or export your visual, these icons will not be visible. However, if you print or export your visual while a branch is collapsed, that branch will remain hidden in the printout or exported file. SmartDraw.com | Chapter 3: Automatic Shape Connectors 115 Chapter 4: Working with Items in the Work Area No matter what visual you are working on, you will be manipulating a variety of items in the Work Area to create it. This chapter is devoted to discuss in detail what you need to know in order to do this. Working with Symbols The majority of visuals involve a specific set of symbols placed in a specific layout. These symbols may be geometric shapes, tables, clipart, or anything else the visual requires. Many symbols have special settings that help you to work with them as well. Adding Symbols In many SmartPanels, a symbol gallery is included, with a library of visual-specific symbols opened. SmartDraw.com | Chapter 4: Working with Items in the Work Area 116 The Symbol Gallery in the Activity Networks SmartPanel Other visuals have special buttons like “Add Left”, “Add Topic” or “Insert Descendant”. These buttons add the appropriate symbol, automatically attached by a line to another symbol already in the Work Area. For more on these, see Chapter 3: Automatic Shape Connectors. To add a symbol, simply click on the symbol in the gallery, then click again on the Work Area where you’d like to add it. The symbol you chose is instantly “stamped” where you click. SmartDraw.com | Chapter 4: Working with Items in the Work Area 117 Clicking on the Work Area to Add a Symbol from the Library If you hold down the Shift key while clicking on the symbol in the gallery, you can click on the Work Area multiple times to add the same shape several times. When you’re done adding the symbol, press the Esc key. Finding More Symbols You’re not just restricted to one library of symbols. SmartDraw has hundreds of libraries of symbols which you can always access. Above the symbol gallery (when it’s present) in SmartPanel, you’ll find the Library Selector menu button. Click this button for more options: SmartDraw.com | Chapter 4: Working with Items in the Work Area 118 The Library Selector Menu For some visual types, there will be other libraries for you to choose from in the Library Selector menu. For example, in the gallery for Planograms, shown above, the “Shelf Units and Storage” library is open, but there are also “Clothing” and “Products” libraries available as well. Click on one of these libraries to open it in the gallery. If none of the offered libraries has the symbol you want to add, click More… in the Library Selector menu to open the “More Symbols” dialog box. SmartDraw.com | Chapter 4: Working with Items in the Work Area 119 The More Symbols Dialog Box SmartDraw.com | Chapter 4: Working with Items in the Work Area 120 In this dialog box, you can type in a keyword to search for a particular symbol using the search bar at the top of the left column. When you click the Search button, a folder called “Search Results” appears with all the libraries containing symbols related to your keyword search. You can preview a library by positioning your cursor over the library name, or click on the library name to show the library in the area on the right side of the dialog box. SmartDraw.com | Chapter 4: Working with Items in the Work Area 121 Positioning the Cursor Over a Library to Preview It You can also browse the libraries using the explorer tree. The libraries are organized into folders based on the visual for which they are intended, with the exception of the “Clip Art” folder. Click one of the icons to view the contents of that folder. SmartDraw.com | Chapter 4: Working with Items in the Work Area 122 When you have found a library you’d like to open, click on its name and click Open Library at the bottom of the dialog box. Once you have opened all the libraries you want, click OK. All of the libraries you opened appear in the Library Selector menu. Symbol Libraries Although SmartDraw’s large variety of symbol libraries should usually leave you satisfied, you have the ability to add and customize libraries of your own. Creating a New Symbol Library You can create a new, empty library, or you can import a folder of images into a new library. You can create an empty library to which you will be able to add symbols manually and one at a time. To do this, click the SmartDraw Button in the top left corner of the window, then position your cursor over Utilities. In the menu that appears to the right, click Create Library. SmartDraw.com | Chapter 4: Working with Items in the Work Area 123 SmartDraw.com | Chapter 4: Working with Items in the Work Area 124 Starting the Process of Creating a New Library This opens the Create a New Symbol Library dialog box, where you can name the library and place it into a category. If you don’t choose a category, your new library will be placed in the “My Symbols” folder, which is accessible when you are searching for more symbols. The Create a New Symbol Library Dialog Box When you click OK, an empty floating library window appears, ready for you to add symbols. If you prefer to show the library in SmartPanel, you can drag it on top of the gallery. If SmartPanel does not have a gallery, you can also click the Library tab, next to the SmartPanel tab to show the library. SmartDraw.com | Chapter 4: Working with Items in the Work Area 125 A New, Empty Symbol Library in a Floating Window If you’d like to add a folder of images from your computer, you can create a new library to hold those images. To do this, click the SmartDraw Button in the upper left corner of the window, position your cursor over Utilities, and click Library Builder Wizard. SmartDraw.com | Chapter 4: Working with Items in the Work Area 126 SmartDraw.com | Chapter 4: Working with Items in the Work Area 127 Starting the Process of Making a Symbol Library from a Folder of Images This opens the SmartDraw Library Builder Wizard dialog box, where you can indicate the file format and folder location of the images you want to add. You can also choose where among the existing libraries your new library will be stored, and you can set up properties for the images for once they become symbols. Finally, at the bottom you can click Convert Files to build your library. SmartDraw.com | Chapter 4: Working with Items in the Work Area 128 The SmartDraw Library Builder Wizard Dialog Box SmartDraw.com | Chapter 4: Working with Items in the Work Area 129 The library you create can be accessed by clicking More in the Library Selector Menu. You can find the library under the category you selected for it, and the library itself will have the name of the folder you imported. Adding Symbols to a Library You can drag any item in the Work Area into an open library in SmartPanel to add it to that library. When you do this, a dialog box appears asking if you’d like to add the item. When you click OK, a second dialog box appears, where you can specify some settings about the item, as well as give it a name. SmartDraw.com | Chapter 4: Working with Items in the Work Area 130 The Edit Symbol Dialog Box Working with Lines For most visuals, SmartDraw will do the majority of your line drawing with Automatic Shape Connectors. However, you always have the ability to manually draw lines as well. Adding Lines SmartDraw.com | Chapter 4: Working with Items in the Work Area 131 Some SmartPanels include a line-drawing tool: The Lines Group of Some SmartPanels However, you can always find the Line button in the Tools group of the Home tab. Both buttons can perform the same tasks. The Line Button and Menu in the Home Tab The only difference is that, if you click Draw Lines in SmartPanel, the default line shape is “Shape Connector”, where as the default line shape of the Line button in the Home tab is “Straight Line”. SmartDraw.com | Chapter 4: Working with Items in the Work Area 132 You can always choose the shape of line you want to draw. Either click the Line Shape menu button in SmartPanel, or the below the Line button in the Home tab. In the menu that appears, you’ll find a selection of line shapes. The Straight Line shape allows you to draw a straight line in any direction and with any length. Once you have selected this line shape, just click where you want the line to start, hold down the mouse button, drag the mouse to draw the line, and release the mouse button when the line is the correct length. The Curved Line shape allows you to draw an arc. Draw it just like you would draw a straight line. Once the line is drawn, you can use the central black square handle to adjust the depth and direction of the arc. Dragging the Center Black Square Handle to Change the Depth of the Arc The Shape Connector is specially designed for attaching to shapes and other symbols. By default, most symbols have a predefined set of connection points where lines can be anchored. To draw a shape connector line, click where you want the line to start, then simply click again where you want the line to end. When the line is connected to a symbol, SmartDraw.com | Chapter 4: Working with Items in the Work Area 133 you can change where the bend in the line is by dragging the central black square handles. For more on connecting symbols, see Connecting Symbols with Lines. Adjusting Where the Shape Connector Bends The Curved Connector functions in the same way as the shape connector, except that it has curves rather than right angles. A Curved Connector The Freehand Line tool allows you to draw any line you want as if you were drawing it by hand. However, since it’s not easy to draw using the mouse, SmartDraw automatically smoothes the lines you draw for a better appearance. To draw a line, just click and drag the mouse. If you bring the end of the line back to the beginning, you can create a closed shape which you can treat like any other shape. SmartDraw.com | Chapter 4: Working with Items in the Work Area 134 After you finish drawing the line or the shape, a special set of handles appear so that you can make adjustments to the line or outline of the shape. Click and drag a white diamond handle to change the arc depth of the segment between the two nearest square black handles. Click and drag a black square handle to drag the line segments between the two nearest black square handles. Changing the Outline of a Freehand Line If you are editing a freehand shape, deselecting the shape for the first time causes these handles to permanently disappear. Once you have deselected the shape for the first time, reselecting it causes a different set of handles to appear. There are four black square handles at the corners of the rectangle of space containing the shape. Drag these to resize the entire shape. There are also black diamond handles, which you can drag to “move” a segment, causing the two segments attached to either end to lengthen in order to stay attached. Dragging a Black Diamond Handle of a Freehand Shape SmartDraw.com | Chapter 4: Working with Items in the Work Area 135 The Polygon Line tool allows you to draw custom geometric shapes. When you click on the Work Area, a line is attached to the point you click and your cursor. Click again to attach the line to a second point, but it is still also attached to the cursor. Continue clicking at each corner of the shape you are creating. You can leave it as just a line by pressing the Esc key when you’re done drawing, or create a solid shape by clicking on the start point of the line. A Custom Polygon As with the freehand line tool, a polygon line has white diamond handles and square black handles, which share the same function as those on a freehand line. If you deselect and reselect a solid shape, it will change its handles to the black square handles and black diamond handles as described for the freehand shapes above. Connecting Symbols with Lines Quite often, visuals include lines between symbols. These are almost always automatically drawn using SmartPanel and Automatic Shape Connectors when you add the symbols, and this should be your primary method to add lines. However, sometimes you need to draw a special line that Automatic Shape Connectors can’t do. SmartDraw.com | Chapter 4: Working with Items in the Work Area 136 For the visual templates in which you are most likely to need the ability to connect symbols, an optional feature is activated by default, allowing the line to be anchored to the symbols so that moving a symbol caused the line to readjust itself in order to stay attached. If lines in your visual do not seem to attach to lines, you can manually activate this feature. Click the SmartDraw Button in the upper left corner of the window. Then, in the menu that appears, position your cursor over Options, then make sure Allow Lines to Link is checked in the right side of the menu. SmartDraw.com | Chapter 4: Working with Items in the Work Area 137 SmartDraw.com | Chapter 4: Working with Items in the Work Area 138 Activating the Feature Used for Connecting Symbols with Lines Now choose a line shape (see Adding a Line above), click on the border of one symbol where you’d like the line to be attached, and draw the line to the other symbol. As you approach the second symbol, connection point appear along its border, showing where the line can be anchored. When the line snaps to the desired connection point and your cursor is an anchor shape, release the mouse button. Drawing a Line to Connect Two Shapes Working with Tables Tables are a simple yet useful tool for organizing any quantity of data. In fact, many of SmartDraw’s visuals are based on tables. However, you can always add a table to any visual. When working with tables, you should use the Table tab. Please visit The Table Tab for a full description of the buttons found on this tab. SmartDraw.com | Chapter 4: Working with Items in the Work Area 139 Adding a Table To add a simple table, choose the number of rows and columns using the menu buttons, then click Table on the Table tab. Adding a Simple Table You can also click the under the Table button to view a menu of preset sizes of simple table for you to insert. In the menu as well, you can click Define to open the Add New Table dialog box, where you can make a more advanced table. SmartDraw.com | Chapter 4: Working with Items in the Work Area 140 The Add New Table Dialog Box In this dialog box, you can choose from a variety of premade table formats, which you can preview. You can also define the number of rows and columns in your new table. When you have defined the table, click OK to insert it. Working with Table Cells You can always change the number of rows and columns to a table you have already added. One way is to change the numbers in the drop menus in the Insert Table group of the Table tab while the table is selected. SmartDraw.com | Chapter 4: Working with Items in the Work Area 141 Another way is to use the buttons in the Rows & Columns group of the Table tab, where you can add a column to the left or right of the selected cell or a row above or below the selected cell. Or you can delete a column, row, or the contents in those cells. The Rows & Columns Group on the Table Tab Some table-based visuals also have similar controls in SmartPanel: The Format Group from Affinity Diagrams SmartPanel You can also format your table further using the remainder of the Rows & Columns group. You may want to join a few cells to make, for example, a header cell. To do this, just click and drag your mouse to highlight all the cells you want to join, and click Join Cells. The cells are instantly transformed into a single cell. SmartDraw.com | Chapter 4: Working with Items in the Work Area 142 Joining the Top Three Cells into a Single Cell Perhaps you’d like to break one cell into two side-by-side cells. Just select the cell (or highlight several cells), then click Split Cells. Each selected cell is instantly split into two cells. Splitting the Top Three Cells Working with Text SmartDraw is primarily meant for building visuals rather than editing text, but every visual needs text in order to bring clarity to it. For this reason, you can add text to symbols, along lines, in tables, or as free-floating text boxes. You can format the text you add using the Font and Paragraph groups on the Home tab. For details on what each button does, see The Home Tab. SmartDraw.com | Chapter 4: Working with Items in the Work Area 143 Adding Text to Symbols To add text to any symbol, just double-click on the symbol and start typing. When you are done adding text, press the Esc key or click somewhere else in the Work Area. Double-Clicking on a Shape and Typing to Add Text Text is added inside most symbols, but for some, such as symbols related to engineering, the text is added below the symbols instead. If you are adding text to a series of symbols, you can press the Tab key to quickly move from symbol to symbol, speeding up the process. As you continue to add text, the symbol is automatically resized to accommodate the text. Symbols Automatically Grow as Text is Added to Them You can change a symbol’s growth properties by clicking Text Entry on the Design tab. This opens the Text Entry Properties dialog box, where you can specify whether the selected SmartDraw.com | Chapter 4: Working with Items in the Work Area 144 symbols grow horizontally, vertically, both. Or you can choose to make the text decrease in font size first. The Text Entry Properties Dialog Box SmartDraw.com | Chapter 4: Working with Items in the Work Area 145 Adding Text to Lines To add text to a line, simply double-click on it and start typing. This includes Automatic Shape Connectors as well. You can change where text is positioned on a line using the Alignment button in the Paragraph group of the Home tab. To use this button, be sure the line and not the text is selected. Examples of Each Option in the Alignment Menu For lines which are not horizontal, you can also specify whether the text should go along the direction of the line or stay horizontal using the Direction button also in the Paragraph group on the Home tab. SmartDraw.com | Chapter 4: Working with Items in the Work Area 146 Examples of the Options in the Direction Menu Adding Text to Table Cells With most table cells, all you have to do is click inside the cell and start typing to add text. However, some cells – especially in premade tables like form blocks – are locked to text editing, so that clicking on them only causes them to turn blue rather than allow text entry. You can unlock a cell by selecting it and then clicking in the Data group of the Table tab. You can use this tool to lock your own cells as well – just uncheck the Text Editing checkbox button while the cells are selected. You may find this especially useful when you are designing forms. SmartDraw.com | Chapter 4: Working with Items in the Work Area 147 Adding Free-Floating Text Text does not have to be attached to a preexisting item in order to be added. Instead, you can make a new free-floating text box in the Work Area. Many SmartPanels contain an Add Text button: The Add Text Button Found in Many SmartPanels However, you can always find the buttons have the same function. Text button in the Tools group of the Home tab. Both The Text Button Found on the Home Tab To add text, click one of these buttons, then click again in the Work Area where you’d like to add text and start typing. However, you should be careful where you click, because if you click on an item in the Work Area, you will add text to that item instead of creating a new text box. If you want to add a text box which you can manually position over an item (giving you greater control over where text SmartDraw.com | Chapter 4: Working with Items in the Work Area 148 inside an item lies), add the text to a blank place in the Work Area, then drag the text box into place. By default, the text box you add has no fill or border. However, you can treat this text box just like any other shape: you can color it, resize it, move it, rotate it, attach lines to it, and so on. If you delete all of the text from a text box and then deselect it, SmartDraw will automatically delete the empty text box so that the Work Area does not become cluttered. Moving Items in the Work Area Once you’ve added items, you can move them anywhere in the Work Area by clicking and dragging the item to a new position. Manually Dragging a Shape in the Work Area If the item you are moving is a table or shape with no fill, make sure you click on its border to move it so that you actually make contact with the item rather than the background. Also, make sure the cursor looks like it. so that you will be moving the item rather than resizing or rotating SmartDraw.com | Chapter 4: Working with Items in the Work Area 149 You can also move a symbol one pixel at a time by clicking on it to select it, then using the arrow keys on your keyboard. However, if the visual you are constructing employs Automatic Shape Connectors, you may not be able to use this feature since the symbols are connected. For more on how to move automatically connected symbols, visit Chapter 3: Automatic Shape Connectors. Resizing Items in the Work Area When you click on an item, black square handles appear along it or its border. To resize an item, simply click and drag one of these handles. Dragging the Bottom-Right Handle to Resize a Shape Most library symbols can be resized disproportionately. To resize the symbol proportionately, hold down the Shift key while dragging the handles. If the symbol you are working with resizes proportionately by default, holding down the Shift key will cause it to resize disproportionately. By default, symbols automatically grow as you add text to them, so you won’t have to worry about resizing those symbols manually. However, if you are creating a visual with many symbols containing text, it may end up looking messy with all the symbols differently sized. To fix this, hold down the Shift key while clicking on each symbol you’d like to make the same size, clicking on the symbol which has the size you’d like the others to have last. Then, click Make Same in the Design tab and choose Both from the menu that appears. SmartDraw.com | Chapter 4: Working with Items in the Work Area 150 Making Symbols the Same Size for a More Uniform Look Some visuals require the use of dimensions for precise sizing to scale. For more on this, see Working with Dimensions. SmartDraw.com | Chapter 4: Working with Items in the Work Area 151 Rotating Items in the Work Area Rotating an item causes it to spin in place. This is particularly useful in Floor Plans and other layout-planning visuals, since furniture and other such items are commonly laid out in a way that is not necessarily aligned with the page. You can even rotate an entire frame of walls and any furniture contained inside it. There are two ways to rotate items. Every item has a small circular rotation handle when it is selected, usually located near the right edge. You can click on this handle and drag in a circular motion to freely rotate the item. Rotating a Symbol Using the Rotation Handle For a more precise rotation, you can click on the Rotate button on the Design tab and choose a specific angle from the menu. These angles are the angle when rotating the item counter-clockwise from its original position. That is, if you choose 90° twice, the item will only be rotated a total of 90° rather than the 180° (two 90° rotations) you might expect. SmartDraw.com | Chapter 4: Working with Items in the Work Area 152 Rotating a Shape by 45° Counter-Clockwise Flipping Items in the Work Area In contrast to rotating an item, flipping an item creates a mirror image of the item. This is another feature which is particularly useful in Floor Plans and other layout-planning visuals. For example, you may want to fix a door symbol so that it swings in the correct direction. To flip an item, click on it to select it, then click Flip in the Design tab and choose either Flip Vertically or Flip Horizontally from the menu that appears. SmartDraw.com | Chapter 4: Working with Items in the Work Area 153 Flipping a Symbol to Create a Mirror Image Aligning Items in the Work Area For a neater appearance, you can align items in your visual with each other. Begin by holding down the Shift key while clicking on each item you’d like to align. The last item you click on will have black square handles while the others have white square handles. This item will be used as a reference for the others, so that all of the items with white handles will align with the item with black handles. SmartDraw.com | Chapter 4: Working with Items in the Work Area 154 The Last Item Selected has Black Handles Once the items are selected, click items to be aligned. Align in the Design tab and choose how you want the SmartDraw.com | Chapter 4: Working with Items in the Work Area 155 The Shapes Aligned With the Bottom of the Dark Blue Shape Grouping Items in the Work Area Sometimes it’s useful to be able to treat several items as a single item. For this reason, you can group items. To do this, select each item by holding down the Shift key and clicking on each item, or click and drag the mouse to trace a box around the items you want to select. Then, click Group in the Design tab and choose Group Objects from the menu. Grouping Three Shapes into a Single Shape You can ungroup a grouped item by choosing Ungroup Objects in that menu instead. Working with Charts SmartDraw.com | Chapter 4: Working with Items in the Work Area 156 Although you always have access to the Chart tab, it’s best if you create a chart using the Charts & Graphs visual template in the New > Basics folder, or one of the templates in the Charts & Graphs folder under New > Templates. Opening the Basic Charts & Graphs Template SmartDraw.com | Chapter 4: Working with Items in the Work Area 157 Opening the Folder of More Specific Charts & Graphs Templates This is because SmartPanel for these templates has some special tools designed to make creating a professional-looking chart faster and easier. SmartDraw.com | Chapter 4: Working with Items in the Work Area 158 SmartDraw.com | Chapter 4: Working with Items in the Work Area 159 The Charts SmartPanel When you’re done creating your chart, you can always copy it and paste it into another visual such as a flyer, product sheet, or newsletter. To do this, make sure nothing in the Work Area is selected, then press the Ctrl and C keys at the same time to copy the chart. Then, go to the other visual and press the Ctrl and V keys at the same time to paste the chart. Inserting a Chart For some Charts & Graphs templates, a chart is already inserted when you open the template. If it’s not the type of chart you want to create, click Change Chart Type in SmartPanel and choose a new chart type from the menu to instantly change the chart. SmartDraw.com | Chapter 4: Working with Items in the Work Area 160 The Change Chart Type Menu Or if you want to create a chart by importing data, you can press the Ctrl and A keys at the same time to select the chart, then press the Delete key. If you already have a spreadsheet with the data you want to represent in the chart, you can easily import that data, and SmartDraw will automatically construct a chart from it. There are two ways to do this. You can copy the data in the spreadsheet, then click Clipboard in SmartPanel. A chart is instantly generated. Paste Data from SmartDraw.com | Chapter 4: Working with Items in the Work Area 161 The other way to import data is to click Import from Excel® File in SmartPanel, then browse for the file you want to import. SmartDraw will read the file and create a chart from its contents. If you just want to start with a blank chart to which you will manually add data, choose a chart type from the menu under Create New Chart in SmartPanel. Adding Series and Categories A chart is made up of series and categories. A series is an aspect being analyzed by the chart, such as a person or company. A category consists of one instance of each series, such as a year. For example, suppose we are modeling the sale of a set of products over a few years. Each product would be its own series, and each year would be a category, containing sales data for each product. SmartDraw.com | Chapter 4: Working with Items in the Work Area 162 Series are typically assigned a color which is different from that of other series so that they are distinguished, and each category has one of each color. If you added a blank chart without importing your own data, you may wish to add more series or categories, or you may want to remove some. In SmartPanel, you can click Add Series or Add Category to add a series or category, respectively. Or you can click Remove and choose either Remove Series or Remove Category from the menu to remove the selected series or category. You can find controls to add series or categories in the Chart Data group of the Chart tab as well. Adding Data to a Chart If you created a chart by importing data, you won’t have to add much more data to your chart. However, if you added a new chart, you’ll have to manually add your data. There are several ways to do this: Edit the Data Table Edit the Data Labels Drag a Series by its Handles SmartDraw.com | Chapter 4: Working with Items in the Work Area 163 Edit the Data Table SmartDraw automatically creates a data table corresponding to the chart, although by default it’s hidden. To show this table, click Show Data Table in the Chart Data group of the Chart tab. You can also click the icon found at the bottom right of the chart area. Click either of these again to hide the data table. A Data Table of a Chart If you change the data in this table, it will automatically be reflected in the chart as well. You can even change the series and category names in this table, and they will be changed on the chart and legend. Edit the Data Labels You can choose how and whether data labels are shown on your chart using the menu under Data in the Labels group of the Chart tab. SmartDraw.com | Chapter 4: Working with Items in the Work Area 164 The Data Menu If the data labels of the chart are shown, you can click on the label and edit the number. If you click somewhere else or press the Enter key, the corresponding data point will instantly adjust to reflect the change you made in its label. Editing a Data Label to Change the Value of a Bar SmartDraw.com | Chapter 4: Working with Items in the Work Area 165 When you press the Enter key, the next data label is automatically selected so that you can just start typing to edit that data value. Drag a Series by its Handles When you click on a series, black square handles appear on each data point (bar, point, or slice) of the series. You can click and drag this handle to manually adjust a data value. As you drag the handle, a temporary data label appears so that you can see the value. Dragging a Handle to Change a Data Value Filling a Series with Color or Images It’s easy to change the color of the entire series. Just click on one data point (bar, line, or slice) of the series to select the entire series. Then, you can use the Style group of SmartPanel to choose a new color or image. SmartDraw.com | Chapter 4: Working with Items in the Work Area 166 The Style Group of Bar Charts SmartPanel Simply click on a color in the gallery to apply it to the selected series. The swatch in the legend will also be changed to match the series. For an even more professional look, click Fill with Images. This opens a library of images, which are displayed where the squares of color had been. SmartDraw.com | Chapter 4: Working with Items in the Work Area 167 Clicking Fill with Images Click on an image to instantly fill the selected series with that image. SmartDraw.com | Chapter 4: Working with Items in the Work Area 168 Filling a Series with an Image You can change how the image fills the series by clicking Image Fill Type below the gallery. In the menu that appears, you can choose from a variety of options. You can even create a custom value for each image if you choose to stack the images. We recommend that you try each one so that you can see which one looks best for your chart. SmartDraw.com | Chapter 4: Working with Items in the Work Area 169 The Image Fill Type Menu You can also import your own images with which to fill a series. While the series is selected, click Import Image in the Style group and search your computer for the image of your choice. The image you choose is instantly inserted into the series. Want to search for more SmartDraw symbol libraries? Click Libraries in the Style group, then choose More. For more on how to use the More Symbols dialog box, see Finding More Symbols. Working with Maps SmartDraw.com | Chapter 4: Working with Items in the Work Area 170 SmartDraw offers two different types of map template. The Map template offers symbols in the shape of countries and states which you can stamp. The Live Map template uses Google® to build a custom map, to which you can also add overlays representing data you import. This section will cover Live Maps. To insert a Live Map from the Live Map template, begin by clicking Insert Map in SmartPanel. The Insert Map Button in Live Maps SmartPanel However, you don’t have to use the Live Maps template to create a Live Map. For example, you can directly insert a map into a flyer or floor plan. This is because you can always find the Map button on the Insert tab, which will lead you to the same Google® Maps tool. Clicking either Insert Map in the Live Map SmartPanel or Map on the Insert tab will open the Google® Maps tool window, where you can enter a location or address to get started. SmartDraw.com | Chapter 4: Working with Items in the Work Area 171 The Google® Maps Tool Window Within this window, you can use the controls on the left side to further customize your map. The Map Type menu button allows you to choose between a road map, a satellite image, or a satellite image with roads superimposed on it. SmartDraw.com | Chapter 4: Working with Items in the Work Area 172 The Zoom slider allows you to zoom in or out on the map. You can also use the scroll wheel on your mouse. The Map Size menu button allows you to choose from a variety of sizes for the area of map shown. This changes the actual size of the viewing square, whereas the zoom changes the size of the features of the map. The remainder of the Format group is used only if you use the Overlays group below it, so we will return to it after discussing the Overlays group. The Overlays group allows you to insert markers and overlays highlighting the locations you wish to illuminate in your custom Live Map. If you want to plot something like regional sales or the location of offices, and this data is already in a spreadsheet or outline, click Add Data & Markers to import data from a file with a format like .TXT, .CSV, .TSV, .XLS, or .XLSX. Or you can choose to paste or type your data into the dialog box. SmartDraw will automatically read your data and place a marker at each location. Under the Add Data & Markers button is a tree of checkboxes for countries, states, zip codes, cities, and so on. Click a checkbox to automatically generate an outline of that region. SmartDraw.com | Chapter 4: Working with Items in the Work Area 173 Clicking the Checkbox to Outline California The Shape Quality menu button at the bottom of the Overlays group allows you to control the detail of the outlines. However, the more detail you add, the more memory the map will take, so if you have a slow computer, you shouldn’t increase the detail. Now that you know how to add data, markers, and outlines, let’s return to the bottom of the Format group in the maps tool window. The Bottom of the Format Group SmartDraw.com | Chapter 4: Working with Items in the Work Area 174 The Background menu button allows you to choose how much of the map is visible with respect to the outlines. For example, “Map inside outlines” crops the map so that only the outlined regions are shown, and “Outlines Only” causes only the outline with no map to be shown. When you choose from this menu, the actual results won’t be visible until you import your map to the Work Area. The Show Markers checkbox button allows you to show or hide any data markers you have added. Similarly, the Show Overlays checkbox button allows you to show or hide outlines. The Show Traffic checkbox button inserts the green, yellow, and red lines on major roads to indicate traffic conditions, just like Google® Maps. When you are done creating your map, click Import to SmartDraw to instantly insert the map into the Work Area. You can always edit your map by double-clicking on it, or if you are using the Live Map template, you can click Edit Map in SmartPanel. You can use the Fill and Line buttons in the Shape Style group of the Home tab to change the color of outlines and markers. Working with Dimensions Some visuals, such as Floor Plans, Crime Scene Diagrams, and Storage Designs, require the use of dimensions so that they can be drawn to scale. The templates for these visuals include libraries of special symbols which are already drawn to scale and have settings that make their dimensions appear when selected. SmartDraw.com | Chapter 4: Working with Items in the Work Area 175 Setting the Scale Most of these visuals begin with the “Floor Plan (Standard)” scale setting, which means that one inch represents four feet. The exceptions are Planograms and Storage Design templates, which start with a scale of one inch representing two feet. If your visual has the scale you want, then you don’t need to read this section! The Scale Menu You can always change the scale by clicking Scale on the Page tab and choosing from the menu: Standard causes one inch to actually represent one inch. SmartDraw.com | Chapter 4: Working with Items in the Work Area 176 Floor Plan (Standard) causes one inch to represent four feet. Metric causes one centimeter to actually represent one centimeter. Floor Plan (Metric) causes one centimeter to represent half (0.5) of a meter. Or you can click Custom to open the Set Rulers and Grids dialog box, where you can create your own scale, along with the position and appearance of the rulers. SmartDraw.com | Chapter 4: Working with Items in the Work Area 177 The Set Rulers and Grids Dialog Box Showing Dimensions In the visuals that use dimensions, most items will show their dimensions only when selected by default. However, you can change the settings of each individual item. Select the item you want to change, then click Show Dimensions dialog box. Dimensions in the Design tab to open the The Show Dimensions Dialog Box In this dialog box, you can specify whether and when dimensions of the selected item are shown. You can also specify what exactly the dimensions are measuring, from lengths to area. SmartDraw.com | Chapter 4: Working with Items in the Work Area 178 There are two ways for dimensions to be shown: standard and extension lines. Most items use standard dimensions, but extension lines give you more control over where the dimensions are so that you can control their visibility. Standard Dimensions Versus Extension Line Dimensions When a symbol with extensions lines is selected, a black diamond-shaped handle appears on each dimension. You can click and drag this handle to lengthen the connectors of the dimension. SmartDraw.com | Chapter 4: Working with Items in the Work Area 179 Dragging a Dimension to Extend its Connectors SmartPanel of some visuals, such as Floor Plans, Landscape Designs, and Crime Scene Diagrams, has a special Show Dimensions checkbox button, which will allow you to show or hide the dimensions of all walls and other lines. SmartDraw.com | Chapter 4: Working with Items in the Work Area 180 The Show Dimensions Checkbox Button in Floor Plans SmartPanel Resizing Items to Scale Although symbols are already drawn to scale, you may wish to give them different measurements. If the dimensions are shown at least when the symbol is selected, you can click on a dimension and edit its number. When you click somewhere else or press the Enter key, the symbol is resized to match the dimension. SmartDraw.com | Chapter 4: Working with Items in the Work Area 181 Typing a New Dimension to Resize a Symbol Otherwise, you can always use the Position & Size group of the Design tab. Select an item, then use the increase/decrease buttons to change the size, or you can click on the dimensions shown in the group and edit the numbers there. The Position & Size Group of the Design Tab Working with Layers You can make your visual in several Layers. You can think of a layer as a stack of transparent sheets of paper, to which you can attach symbols and lines. Then, you can change the order of the “stack” to view and work with a different set of items. Layers provide a way to keep items separated so that they cannot interact with each other, and so that you can hide an entire set of items from view with a single click. Although most visuals do not require the use of layers, there are several common applications. For some Floor Plans, it may be desirable to place wiring or crime scene evidence on a different layer from the floor plan. In Swim Lane Flowcharts, the swim lanes are kept separate from the SmartDraw.com | Chapter 4: Working with Items in the Work Area 182 flowchart so that the lines do not interfere with each other. In Web Page Annotations, the screenshot of the web page is on a different layer from the annotation symbols. Layers also make it easy to create a worksheet with an answer key that can be hidden. The Swim Lane Flowcharts and Web Page Annotations templates start with layers already created for you. For all other visual templates, you must add your own layers if you would like to use them. Begin by clicking the Layers button in the Page Setup group of the Page tab. In the menu that appears, you can add or manage layers and make changes to the selected item in the Work Area with respect to the layers. The Layers Menu Click Define Layers to open the Define Layers dialog box. Here you can add new layers, edit existing layers, and more. SmartDraw.com | Chapter 4: Working with Items in the Work Area 183 The Define Layers Dialog Box Of course, there is always at least one layer to your Work Area, and it’s titled “Default”. To add another layer, click Add a New Layer. This opens a second dialog box, where you can give the new layer a title and define some properties: SmartDraw.com | Chapter 4: Working with Items in the Work Area 184 Visible means that when this layer is not on top, you can still see it. When this box is unchecked, all items on that layer will disappear if another layer is selected. Clickable means that when the layer is not on top, you can still click on and manipulate items on it. Once you have defined the new layer, click OK and the layer will be added to the list in the Define Layers dialog box. You can always edit the title and properties of the layer by selecting it in this list and clicking Edit Layer. When there are two are more layers in a visual, silver layer tabs appear at the bottom of the Work Area. You can click on these to quickly switch from layer to layer. You can also quickly change the properties of a layer by clicking on the small arrow on its tab. Layer Tabs When you print, export, or share your visual, pay attention to which layer is on top because SmartDraw will print what is visible. If a layer which is not visible is not on top, it will not appear on the printout. Chapter 5: Exporting, Printing and Sharing a Visual Being able to share your finished visual quickly and easily is just as important as building it. With features such as the Quick Access Toolbar and Microsoft SharePoint® integration, SmartDraw makes sure sharing your visual is a snap! SmartDraw.com | Chapter 5: Exporting, Printing and Sharing a Visual 185 Setting up the Page As you add items to the Work Area, it will automatically expand to make room for your visual. Because of this, you may not realize how large your visual has become. When you share your visual, you’ll want to check the settings in order to avoid squeezing a large visual onto one page or making a 100-page file or printout. Click Work Area in the Page Setup group of the Page tab to open the Set the Work Area dialog box. SmartDraw.com | Chapter 5: Exporting, Printing and Sharing a Visual 186 The Set the Work Area Dialog Box In this dialog box, you can see and define how many pages are spanned by your visual. You can also turn off the automatic growth of the Work Area. SmartDraw.com | Chapter 5: Exporting, Printing and Sharing a Visual 187 You can change settings so that dashed lines appear at the edges of pages in the Work Area. To do this, click the SmartDraw Button and position your cursor over Print. Clicking Page Setup in the SmartDraw Menu Then, click Page Setup to open the Page Setup dialog box. SmartDraw.com | Chapter 5: Exporting, Printing and Sharing a Visual 188 The Page Setup Dialog Box SmartDraw.com | Chapter 5: Exporting, Printing and Sharing a Visual 189 Then, uncheck Print on One Page in the Options section of the dialog box. This will cause dashed lines to appear at the edges of pages. Click OK to return to your visual. Exporting a Visual to Different Programs and File Formats The majority of visuals built using SmartDraw are instantly sent to a Microsoft Office® product, or exported as another file format. This section will cover how to do this. Exporting a Visual to Microsoft PowerPoint® Visuals go hand-in-hand with presentations, so SmartDraw includes some special controls for preparing a visual for Microsoft PowerPoint®. Studies show that viewers of a presentation are better able to follow along with the presenter if animations are used. That is, components of the slide appear bit by bit as the presenter addresses them. If a visual is simply inserted into a PowerPoint® presentation, it is counted as one image, and so the animation tools in PowerPoint® cannot be used. That’s why SmartDraw has the PowerPoint® tab, complete with tools for animating and exporting your visual! The Groups of the PowerPoint® Tab Use the Step menu button in the Animation group to assign a step number to each item in your visual. The step number represents the number of mouse clicks before that item appears. SmartDraw.com | Chapter 5: Exporting, Printing and Sharing a Visual 190 When you are assigning these steps, try to think of how you will present the visual. Where will you start? What things should appear in the same step? Remember, the goal is to help your audience follow along and understand what you are saying. If you are going to export a chart, you don’t have to assign steps. Instead, the Chart Preset menu button offers several preset choices for how your chart will be animated, such as one category appearing at each click. While you are animating, you can click Preview and use the Next, Previous and Cancel buttons to see how the visual will look. You cannot edit your visual while in preview mode, so make sure you click Cancel before trying to make any changes. Once you are ready to send your visual to Microsoft PowerPoint®, make sure Include Animation is checked in the Export group, then click Send to PowerPoint®. If a presentation was already open, the visual will be positioned on a new slide at the end of the presentation. If not, PowerPoint® will open a new presentation with your visual on the first slide. The visual may be reduced in size so that it can fit on a slide. You can also click the button on the Quick Access Toolbar, at the top of the window next to the SmartDraw button, to send your visual to Microsoft PowerPoint®. The Quick Access Toolbar SmartDraw.com | Chapter 5: Exporting, Printing and Sharing a Visual 191 Exporting a Visual to Microsoft Word® It’s as easy as one click to send the contents of the Work Area to Microsoft Word® as an image. Simply click the window. in the Quick Access Toolbar, which can always be found in the top left corner of The Quick Access Toolbar If a Word® document was already open, the visual will be inserted where the text entry cursor is blinking at the time, the same as if you had inserted an image using Word®. If a document is not open, a new document is opened with the visual on the first page. The visual may be reduced in size so that it can fit on a page in Microsoft Word®. You can’t edit a SmartDraw visual from within Microsoft Word®, but it’s easy to replace an exported visual by deleting it in the document, then exporting the edited visual again from SmartDraw. Exporting a Visual to Microsoft Excel® Just like exporting to Microsoft Word®, it’s as easy as a single click to export a visual to Microsoft Excel®. Just click in the Quick Access Toolbar. If an Excel® workbook was already open, the visual will be placed on the sheet that is open. If a workbook is not open, Excel® will be automatically started, and the visual will be placed on the first sheet. SmartDraw.com | Chapter 5: Exporting, Printing and Sharing a Visual 192 You can’t edit a SmartDraw visual from within Microsoft Excel®, but it’s easy to replace an exported visual by deleting it in the workbook, then exporting the edited visual again from SmartDraw. Saving a Visual as a PDF When you click in the Quick Access Toolbar, your visual will be saved as a .SDR – a SmartDraw file. We recognize that you may wish to share your visual with people who may or may not own a copy of SmartDraw. For this reason, we make it easy for you to save your visual as a PDF, which is readable by programs like Adobe Acrobat®. The Quick Access Toolbar Just click in the Quick Access Toolbar, found in the top left corner of the window. The Export dialog box appears, allowing you to name the file and choose a location in your computer to which to save your PDF. SmartDraw.com | Chapter 5: Exporting, Printing and Sharing a Visual 193 The Export Dialog Box for PDFs Notice the Fit on One Page checkbox in the bottom left corner of this dialog box. If this is checked, your visual will be scaled down so that it fits on a single page. If your visual is large, this process may cause it to be illegible. For more on this, see Setting up the Page. SmartDraw.com | Chapter 5: Exporting, Printing and Sharing a Visual 194 Exporting to Other File Types Clicking in the Quick Access Toolbar will only save your visual as a .SDR SmartDraw file. However, SmartDraw offers many more choices of file type to which you can save your visual in order to make sharing your visual easier. When you are ready to export your visual, click the SmartDraw Button and position your cursor over Export. In the menu that appears is a list of all the file formats to which you can export your visual. SmartDraw.com | Chapter 5: Exporting, Printing and Sharing a Visual 195 SmartDraw.com | Chapter 5: Exporting, Printing and Sharing a Visual 196 Export Options in the SmartDraw Menu Click on a file type to export your visual. Each selection opens a specific dialog box with options for saving your visual to that file type. Most include an option to name the file and choose a location on your computer. SmartDraw.com | Chapter 5: Exporting, Printing and Sharing a Visual 197 The Export Dialog for JPEG The exception is the Export to HTML Files dialog box, which appears after you click HTML in the menu. Instead of saving a file, a folder containing all the files you need to upload to your web server is created. This is usually a .GIF file and a .HTM file. The Export to HTML Files Dialog Box Printing a Visual Before printing a visual, you may find it useful to check the size of it. Because the Work Area automatically grows as you add more items, you may not realize how many pages your visual may take up. Also, the default printing setting is usually to print your visual on a single page. If SmartDraw.com | Chapter 5: Exporting, Printing and Sharing a Visual 198 your visual is large, this means SmartDraw will have to shrink it down, perhaps so much that it becomes illegible. For more on how to address these issues, please see Setting up the Page. It’s as easy as one click to start the printing process. Click located in the top left corner to open the Print dialog box. in the Quick Access Toolbar The Print Dialog Box SmartDraw.com | Chapter 5: Exporting, Printing and Sharing a Visual 199 In this dialog box, you can choose a printer, the pages and number of copies you want to print, and a few more options. Click Preview to see your visual as it will look on the page. You can also reach these options and more by clicking the positioning your cursor over Print. SmartDraw Button and SmartDraw.com | Chapter 5: Exporting, Printing and Sharing a Visual 200 The Print Menu SmartDraw.com | Chapter 5: Exporting, Printing and Sharing a Visual 201 In addition to Print and Print Preview, there are also the Perspective Export and Page Setup controls. For details on how to use the Page Setup dialog box, see Setting up the Page. On the print menu, if accessed by using the SmartDraw button, you will see an option called Perspective Export. The Print Menu: Highlighted Perspective Export Perspective Export let’s you add a 3D effect to your graphic to help you catch the eyes of the people you are presenting to. Perspective Export works best when making charts, flowcharts or diagrams etc., it is not a good effect when creating flyers. Example of a Presentation Using Perspective Export When using Perspective Export, there is one thing that you need to remember! After you apply the Perspective Export you have to print your graphic as is; you can no longer go back and edit your graphic UNLESS you close out of the Perspective Export by putting your cursor in the top right hand corner of your screen and clicking the Close button. SmartDraw.com | Chapter 5: Exporting, Printing and Sharing a Visual 202 Using SharePoint along with SmartDraw Importing Visio Files In order for you to import any files or documents from Visio to SmartDraw you need to make sure that your computer has Visio and .Net installed for the importing to work. At any point while working with SmartDraw though, you can import documents from Visio, whether you’ve just opened SmartDraw or if you are already working on a graphic. When you are ready to import a Visio document all you need to do to import a file from Visio is click on the SmartDraw button. Once you have clicked the button position your cursor over Import. In the menu that appears are two options: Import Single Visio File and Convert Folder of Visio Files. The Import Menu If you click on the Import Single Visio File option it will open up your Open dialog box. From there, you will navigate to the SINGLE Visio file you would like to import to SmartDraw. This option only allows one Visio file to be imported. SmartDraw.com | Chapter 5: Exporting, Printing and Sharing a Visual 203 The second option, Convert Folder of Visio Files, can only be accessed when you are at the SmartDraw Homepage. To get to the Convert Folder of Visio Files option all you need to do is click on the SmartDraw button and position your cursor over Import. In the menu that appears are two options: Import Single Visio File and Convert Folder of Visio Files. When you click on the Convert Folder of Visio Files options a Visio Import Dialog Box opens up. SmartDraw.com | Chapter 5: Exporting, Printing and Sharing a Visual 204 Visio Import Dialog Box This dialog box allows you to choose which folders you would like to convert. By clicking the Browse button, another dialog box will pop up entitled Browse for Folder. This box allows you to find the folders, including the subfolders, which you would like to convert to Visio. SmartDraw.com | Chapter 5: Exporting, Printing and Sharing a Visual 205 After you select the folder you would like to convert to Visio click the Ok button. This will take you back to the Visio Import Dialog Box, in this box you can select whether you would like to include folders subfolders by clicking . Then you click the Convert button in the bottom right hand corner of the Visio Import Dialog Box. SmartDraw.com | Chapter 5: Exporting, Printing and Sharing a Visual 206 Installation & Licensing In order to be able to use the great graphics, effects and other great things SmartDraw has to offer you, you will need to install the product fully by online download or by CD installation and obtain a license. Installation Installation Guide Installation Options There are two ways to install SmartDraw for use in an organization: 1. On a network server 2. On individual client computers Installing on a client computer The simplest way to install SmartDraw on an individual PC is to insert the program CD into the drive, wait for setup.exe to start, and then enter the serial number when prompted. Alternatively, if your users have permission to install programs on their own PC, they can self-install from the setup.exe/setup.msi copied to a network server\share. The steps required are: 1. Copy setup.exe\setup.msi from the CD to a location on a shared server. (See Step # 1: Setting the server up properly for basic steps on how to create your shared directory. 2. Send the network (UNC) path to the setup.exe\setup.msi to your users and have them run the file. SmartDraw.com | Chapter 5: Exporting, Printing and Sharing a Visual 207 3. When they execute the file, they will be prompted for the Serial Number to proceed with the install. This is not however the most efficient way to install a large number of licenses onto client machines. For mass deployment of SmartDraw, you can use the Orca MSI table editor to change or bundle certain information directly into the MSI install. After modifications, you can use a distribution package to quickly install without any user action such as: Group Policy and the Active Directory Systems Management Server (SMS) Other remote installation software Installing on Windows Vista® With the release of Windows Vista®, a new feature called User Access Control was introduced. The main goal of User Account Control is to reduce the exposure and attack surface of the operating system by requiring that all users run in standard user mode and software is installed on a per user basis by default. For programs such as SmartDraw, which takes an average of 2 gigabytes of disk space, per user installation by machine is not recommended. As a defense-in-depth measure, User Account Control also provides additional protection for administrators through its Administrator Approval Mode. With Administrator Approval Mode, Windows Vista® will run most applications with standard user permissions even if the user is an administrator. If a user wishes to run a program that requires administrator permissions, they must give consent through a User Account Control prompt. This helps limit malware's ability to make system-wide changes without the administrator's knowledge. However, Administrator Approval Mode does not provide the same level of security or control as a true standard user account. SmartDraw.com | Chapter 5: Exporting, Printing and Sharing a Visual 208 The UAC control creates some difficulties when installing SmartDraw, as the Windows Installer 4.0 engine, running in the Local System account on Windows Vista®, has lesser permissions than it had on previous Windows versions and inheritance of permissions does not work properly with MSI installations. Installing a individual client PC To work around this, you must install with setup.exe, instead of setup.msi. Windows Vista® will immediately detect that setup.exe is an install program that will require elevated rights and therefore display the UAC prompt in which you can give it permission to continue running. As a result, the entire install executes with elevated privileges. In contrast, when running the setup.msi directly, the UAC prompts occur later and do not elevate rights in the correct sequence of events; as a result, and most installations run with restricted permissions. Deploying via Group Policy & SMS Deploying via Group Policy, SMS® or other deployment systems should largely remain unaffected, as the Systems Administrator should not be affected by UAC when deploying to a Vista® client. Please contact [email protected] with your network environment details if you encounter problems. As documentation on how to work with these new restrictions is released, SmartDraw will continue to monitor and improve this aspect of installation. Installing SmartDraw on a Network Server SmartDraw may be installed remotely on a server and shared by multiple users with a multi-seat license. The program is loaded from the server but actually runs on a user’s client machine. No registry entries or other changes are made to the server. This method of installation requires the least amount of maintenance from an Administrative standpoint as only one installation of SmartDraw needs to be maintained and updated. SmartDraw.com | Chapter 5: Exporting, Printing and Sharing a Visual 209 Step # 1: Setting the server up properly. To install on a server, you must set up an appropriate network share. On the target server, create a folder called “SmartDraw”. 1. Right-click on the SmartDraw folder and select “Share & Security”. 2. Choose to share the folder and give it an appropriate share name. 3. Click on the Permissions button to set the appropriate access to the folder. SmartDraw.com | Chapter 5: Exporting, Printing and Sharing a Visual 210 In the Permissions Dialog, click on “Add” to selectively add permissions to the folder. 4. Under Normal Server configurations, you can give access to users, groups, or built-in security principles. SmartDraw.com | Chapter 5: Exporting, Printing and Sharing a Visual 211 Once permissions are set, your share on the server should be ready. A Note on Permissions The administrator installing SmartDraw should have “Full Control” over the folder. It is recommended that you give users “Change” and “Read” permissions to the folder so they can freely access the program and make changes to libraries if necessary. In the event you wish to lock down the environment, you can set the permissions to “Read” only for the folder with the exception of one file, SDX.DLX (that is created after you install SmartDraw). This file keeps track of the number of seats used and must be set to “Change” and “Read” permission for all users. You must set the permission of SDX.DLX after it has been installed. SmartDraw.com | Chapter 5: Exporting, Printing and Sharing a Visual 212 Step # 2: Installing SmartDraw Once you’ve set up the share properly, run the SmartDraw “setup.msi” from the client machine or on the server. If you install from the server, your installation directory should read: C:\SmartDraw\SmartDraw (or the name of the shared folder you created) If you wish to install to a client PC, you will need to map the SmartDraw share before proceeding to the next step. 1. To Map your share, open My Computer. 2. On the Tools menu, click Map Network Drive. 3. In Drive, type or select the drive letter to map to the shared resource. 4. In Folder, type the server and share name of the resource, in the form of \\server name\share name. Or click Browse to locate the resource. 5. Click Finish. 6. In the User name and password dialog box, in User name, type your user name if you are prompted. 7. In Password, type your password. SmartDraw.com | Chapter 5: Exporting, Printing and Sharing a Visual 213 After you’ve set up your mapped drive, you can then choose your newly mapped drive as the installation directory: Your installation directory should read: [Drive]:\SmartDraw\SmartDraw After you have your installation directory squared away, simply enter your serial number when prompted and let the installation finish (You should also have a live Internet connection to your client machine). When the installation is complete, SmartDraw will create its license file sdx.dlx in the installation directory and then validate it by connecting to smartdraw.com. SmartDraw.com | Chapter 5: Exporting, Printing and Sharing a Visual 214 Administering a Multi-Seat License To access the Administration Dialog, start up SmartDraw, create a document, access the Help Ribbon, and select the “License” icon. At the “SmartDraw Licenses Dialog, hold down the “CTRL” and “SHIFT” key and click on the “View Users” button. This will open the “Network Administration” dialog with Administrative rights. If no “View Users” button is present, this means that no one has connected to the network copy of SmartDraw yet. Exit out of SmartDraw and have one or two users log on and exit out and try accessing the dialog again. Each new client machine that makes use of a network installation of SmartDraw with a multi-seat license is added to the list of seats used. SmartDraw.com | Chapter 5: Exporting, Printing and Sharing a Visual 215 The “Computer Name” is logged as the “User Name” and the computer’s default hard-drive’s serial number is recorded as the “Serial Number.” Once the number of seats purchased equals the number of seats used, no more clients may access the installation. You can disable users on the seat list to free up seats for a new user or old user. A disabled client cannot run SmartDraw from that client. If you need more licenses, we'd be happy to explain the different options available to you. Just call 858225-3370 or toll-free 800-817-4238, or e-mail [email protected]. SmartDraw.com | Chapter 5: Exporting, Printing and Sharing a Visual 216 Step # 3: Creating Desktop shortcuts for your users 1. Now that you have SmartDraw installed on the network, you can create shortcuts to the SmartDraw.exe file so they can run the program. Through Windows Explorer, browse to the SmartDraw installation directory on the server, and select “SmartDraw.exe”, and go to the File Menu, and select “Create Shortcut.” 2. Deploy the shortcut to your users and they can click on it to run SmartDraw at any time. SmartDraw.com | Chapter 5: Exporting, Printing and Sharing a Visual 217 SmartDraw.com | Chapter 5: Exporting, Printing and Sharing a Visual 218 Group Policy and the Active Directory Group policy is a feature of the Microsoft Windows® NT family of operating systems that provides centralized management and configuration of computers and remote users in an Active Directory environment. To deploy via group policy: 1. On the server, choose “Start>Programs>Administrative Tools”, and click “Active Directory Users and Computers”. This step starts Active Directory Users and Computers Microsoft Management Console (MMC). SmartDraw.com | Chapter 5: Exporting, Printing and Sharing a Visual 219 Note: If Administrative Tools was not found, please right-click the taskbar, click “Properties” and select “Display Administrative Tools” on the “Advanced” tab. SmartDraw.com | Chapter 5: Exporting, Printing and Sharing a Visual 220 2. Right-click the Organizational Unit on which you want to install the package and select “Properties.” 3. In the Group Policy tab, select a Group Policy Object or create a new one, and click Edit. The Group Policy MMC will start. 4. In the Group Policy MMC, expand the “Computer Configuration>Software Settings” or “User Configuration>Software Settings.” Right-click Software installation and select New>Package…. Installation Guide SmartDraw Guide For IT Professionals 5. In the Open dialog, browse to the installer (setup.msi you modified) and click open. Note: The MSI installer requires the client computers to have the MSI 2.0 engine installed. 6. In the Deploy Software dialog, select Assigned and click OK. You’ve now setup SmartDraw to deploy to the computers or users found within the group policy, and it will be installed the next time the policy is updated on their computer. SmartDraw.com | Chapter 5: Exporting, Printing and Sharing a Visual 222