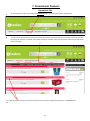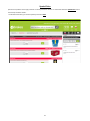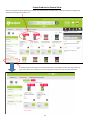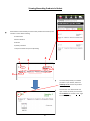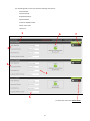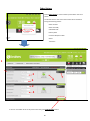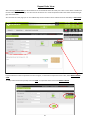
1
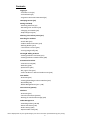
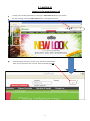
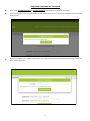
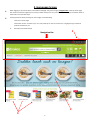
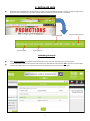
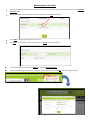
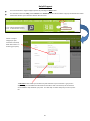
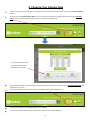
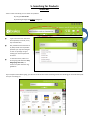
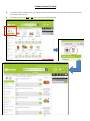
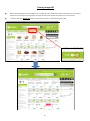
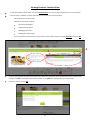
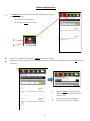
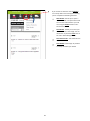
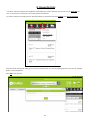
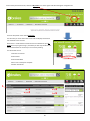
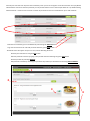
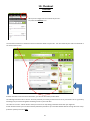
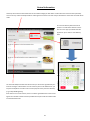
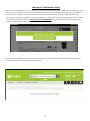
Online Ordering User Guide
1
Contents:
Logging In
- Via brake.co.uk (p3)
- Via bookmark (p4)
- Forgotten Username & Password (p5)
Homepage Screen (p6)
Settings and Help
- Switching Accounts (p7)
- Renaming Your Accounts (p8)
- Changing Your Details (p9)
- Help & Support (p10)
Choosing Your Delivery Date (p11)
Searching for Products
- Search Bar (p12)
- Product Browse Function (p13)
- Refining Results (p14)
- Grid Versus List View (p15)
- Turning Images Off (p16)
Viewing & Adding Products
- Viewing Products: Grid View (p17)
- Viewing Products: Detailed View (p18)
Promotional Products
- Promotions Tab (p19)
- Multi-buy (p20)
- Special Price (p21)
- Buy x get x free (p22)
- Promo Products in General Product View (p23)
Your Basket
- Overview (p24)
- Viewing/Amending Products in Basket (p25)
- Quick Add (p26)
- Basket Navigation Bar (p27 - p28)
Favourite Lists (p29-31)
Checkout
- Overview (p32)
- Central Information (p33-34)
- Waiting for Confirmation Stage (p35)
Order Management
- Amending Orders (p36-38)
- Recent Purchases (p39)
- Order History (p40)
- Repeat Order View (p41)
*Prices displayed in any user guide imagery are not an accurate representation of your pricing.
2
1. Logging In
Logging In Via www.brake.co.uk
To begin online ordering with Brakes, firstly type in www.brake.co.uk into your browser.
On the homepage, select the Order Online button in the right hand corner.
A box will appear asking you to type in your Username and Password
which you will have been sent via email. Once completed select GO.
3
Logging In Via Bookmark
If you prefer to bookmark your pages once logging in, when returning to the site you will see the log in screen below.
From this screen you will also have the opportunity to do the following:
View our Social Media pages
Open an account if you are not yet a customer
Visit the brake.co.uk website
View our Terms and Conditions
Request any Forgotten User Details
Watch the Online Ordering Tutorial Video
1
2
3
6
5
4
4
Forgotten Username or Password
If you select Forgotten Username or Forgotten Password, the following pop up boxes will appear.
If you have forgotten your username, please call the number listed and our customer services team will be more than
happy to help.
If you have forgotten your password, please type in your username and a new password will be sent to the email address used in registration.
5
2. Homepage Screen
When logging on you will be taken to the below homepage. The green and grey navigation bar at the top of the page
will remain constant throughout your journey and will allow you to carry out most tasks. We will go into further detail of
these tasks in the next few steps.
A few key features worth pointing out at this stage are the following:
Links to our social pages
Information section relevant to you. This may show tips on how to use the site, or highlight any promotional
products available to you.
3.
Recently Purchased Products
1
Navigation Bar
2
3
6
3. Settings & Help
At the top of the navigation bar you will be able to view your account settings as well as access any help or support you
require in your online journey. This section will be looking in detail at the area circled in red below.
Account Number
Account Name
Securely log out of site
Contact Name
Switching Accounts
Select Account Number to view the accounts available to your user. The below pop up menu will appear.
To switch accounts, select an account from the list that you would like to view and click OK. If you have a large number
of accounts linked to your user, utilise the search bar to quickly find the account you wish to view.
7
Renaming Your Accounts
If you would like to label your account number so it is more recognisable, it is also possible to do this from the Switching
Accounts screen.
Hover the mouse over the selected account and you will see an Edit button appear.
Select Edit and then type the label of your choice.
Click Save once finished to confirm your changes or Cancel if you wish to go back.
You can also label your accounts via Settings by selecting Rename Accounts.
A pop up menu will appear where you can type in your chosen new label. Click OK to confirm changes and exit.
8
Changing Your Details
The Settings button will allow you to change certain account details such as email and password.
To do this select Change My Details and the below pop up menu will appear.
Update the fields you wish to change and click Save to save and exit.
To update the Full Name and User Name fields you will need to contact Customer Services.
9
Help & Support
You can also access a range of support options by selecting the Help button.
This contains links to our FAQs, tutorial Videos and a Contact Us section which leads to a pop up comments form which
will be sent direct to your relevant Customer Services team.
Choose a subject
category for your
comment in the drop
down box to aid us in
resolving your query.
The Browse button allows you to attach any files relevant to your comment. E.g. If you are
experiencing an issue difficult to describe and are able to take a screenshot, this screenshot
can be added to help illustrate your point. This will help us resolve the query as soon as possible.
10
4. Choosing Your Delivery Date
To start your order, firstly check you are viewing the account you would like to place an order on (see Account Settings
section).
The next step is to Choose Delivery Date. This can be done using the green navigation bar and selecting the Calendar
Icon. A pop up calendar will then appear for you to choose your delivery date.
The key at the bottom of the
pop up indicates which delivery dates are available.
Only the delivery dates for the account you are viewing will be available for selection. Select CONFIRM SELECTION once
happy with your choice.
Your chosen date will then clearly be shown in the Calendar Box in the Navigation Bar.
You are now ready to start adding products to your basket!
You can also use this method to alter your delivery date at any time whilst ordering.
11
5. Searching for Products
Search Bar
There are two main ways you can search for products:
By using the Search Bar
By browsing through the Products categories.
Type in the search bar the name
of the product, the code, or any
key characteristics.
Our predictive search functionality will provide a list of possible
products you may be looking for
as soon as you begin to type
making your search experience
far easier.
To start the search, either continue typing and select the Grey
Magnifying Glass Icon, or
choose an option from the suggested list.
If you misspell a word when typing, you will see results for the closest matching search term allowing you to still find the products you are looking for.
12
Product Browse Function
To browse generally through Brakes’ great range of products, firstly click on the Products button on the grey band of the
navigation bar.
A drop down menu will appear with several categories. Hover your
mouse over each category to navigate through the menu and find the
type of products you would like to browse through.
Your current selection will be highlighted in green.
Click any category within the menu to move forward to the products
page.
13
Refining Results
At the top of your results page you will be told how many results your search has returned. If this is a large number, try
more specific key words in your search terms or use our refinement tool on the left hand side of the page.
To filter your results, tick the refinement category you
wish to filter by and your results page will refresh.
The new page will show all active filters in a small green
box.
To remove the filter click the X
To remove all filters click Clear All
14
Product Versus List View
You are also able to change the way you view products from the automatic grid view shown below, to a list format if
this is easier for you to use.
Do this by clicking on the Grid or List icon on the left hand side of the page.
15
Turning Images Off
When viewing products it’s also possible to turn images off. This is useful if the internet connection you are using is
slower than normal. By removing images, the page will load much quicker and reduce your inconvenience.
To do this select the Images Off button at the top of the screen, underneath the Search Bar.
16
6. Viewing & Adding Products
Viewing Products: Grid View
When looking at the results screen you will be able to see each product with a small amount of detail.
Listed underneath the product photo will be the following information:
Product Name
Pack Size
Product Code
Icons to notify you of any other key information about that particular product (to view the meaning of each icon
hover your mouse over the icon and a small text box will appear)
Price
1
3
2
It is also possible to add products to basket direct from this grid view.
Do this by amending the Quantity using the + and - signs, and then clicking the green ADD button.
The item will then appear on the right hand side of the screen in your basket.
17
4
5
Viewing Products: Detailed View
To view the product in more detail, click on the Product Name and a pop up box will appear with more information.
From this view, in addition to earlier information, you can now also see the following:
A brief description of the product
Additional information including:
Ingredients & Allergens
Nutritional Information
Packaging Information
Handling & Cooking Advice
You can also add to basket from this view using the same method as before: Amend Quantity and select ADD
2
1
If you already have the item you wish to add in your basket, the below pop up will appear asking you to confirm if you
would like to add this quantity to the existing number, or to replace the quantity with your new quantity.
Choose an option and click OK.
18
3
7. Promotional Products
Promotions Tab
To view products on offer, select the grey Promotions button on the grey band of the navigation bar.
You will then be presented with a list of all available promotions and a black Promotions header in which you can filter
by the type of promotion available. The number of products available under each promotion will be shown in brackets
next to each type.
The initial full list of promotional products will show which promotion category they belong to in the Red Header
Bar.
19
Multibuy
Select the Multibuy icon in the black promotions header to see all available products in this category.
Multibuy offers you a free or reduced product when you buy other products from a designated list. To use this promotions
select ADD.
You will then be presented with a pop up which has two columns.
In the left column, scroll down to choose the required number of full price items by amending the quantity underneath each product.
In the right column, choose the correct number of promotional items you are entitled to. You will be reminded to do
this by a message at the top of the basket and the highlighted Number of Promotional Items Remaining text in the
right column.
Once your desired products are selected, click
CONFIRM ADD TO BASKET
20
Special Price
Special Price products are simply products at a lower price than normal. To view these select the Special Price icon in
the black promotions header.
To add these to basket, just amend quantity and select ADD.
21
Buy (x) Get (x) Free
To view the one of the Buy (x) Get (x) Free offers, choose one of the headings indicated below in the black promotions header.
Enter the quantity specified and select the ADD button. These products will appear in your basket along with the additional
free product indicated by the red box below.
22
Promo Products in General View
When searching for products generally, promotional products will be indicated with a red banner above the image which
will detail which type of promotion it is.
Promotion type will also appear in the refinement filter on the left hand side of the page. Select the
type of promotion you would like to see and the page will refresh to show only these products.
23
8. Your Basket
Overview
Once you have chosen a delivery date or have
started adding products, a basket will open on the
right hand side of your screen. From this basket
you are able to view and amend the products you
have selected so far.
1
3
2
4
Highlighted on the right are the key areas
that make up your basket.
Basket navigation bar
5
Unique basket code
Date basket opened
Deadline date and time by which
your order must be placed to arrive
on your chosen delivery day
6
Quick Add function
Products
24
Viewing/Amending Products In Basket
At the bottom of the basket you will see the products that make up this
number in more detail including:
Product Code
Name of Product
Pack Size
Quantity in Basket
Total price of that line (Price x Quantity)
1
2
4
5
3
To amend the quantity or to delete
products in your basket, select the
sideways arrow next to the product
code.
This will then turn downwards and
open a menu in which you can either
select Remove or use the + and - signs
to amend quantity.
25
Quick Add
It is also possible to add products directly to basket using the Quick Add function if you already know the product code.
This can make life considerably easier if you are using a Stock Sheet to place your order.
Quick Add can be found in the light grey box near the top of the basket.
To add products, type in the Product Code, then the Quantity, then select the green ADD button.
The product will then move into the basket below.
26
Basket Navigation Bar
The Basket Icon at the top right of the basket immediately tells you the
following information:
The cost of your current basket
The number of items in your basket.
2
1
One of our new features, is the ability to Switch between open baskets.
Each basket you open will be given a code unique to that particular basket. This will begin with the letters EC and can be
found here:
Select the Switch icon and the unique
basket codes of each of your basket will
appear in a list.
Choose the basket you would like to
view and it will open upon selecting.
27
If you choose to select the central Options
icon a drop down menu will appear allowing
you to complete the following functions.
New Basket—Allows you to open a
new basket with a unique basket code.
You can then switch back to your old
one using the Switch function mentioned earlier.
Save Basket - Allows you to save your
basket to use at a later stage. You can
also do this by select the Save icon on
the main Basket Navigation Bar.
Save As Favourite—See Favourites List
Section
Clear Basket—Will empty all products
currently sat within your basket
28
9. Favourite Lists
In order to make your experience using Brakes Online Ordering as easy as possible, you can also use our Favourites feature. This allows you to create your own customised lists of products.
To create a favourite list simply add your desired products to your basket and select Options then Save As Favourite.
A pop up box will then appear asking you to name your Favourite List. This can be anything relevant to you such as “Monday
Order” or “Dessert Options”.
Select OK to save your list.
29
To then view your favourite lists, select the My Orders icon at the right hand side of the green navigation bar.
From the drop down menu select Favourites.
This will take you to the favourites screen and will display all favourite
lists attached to this account.
Please bear in mind that these Favourite lists are attached to your account and not your general log in, therefore you will only be able to see
the lists attached to the account you are currently viewing.
You will be able to see:
Favourite List’s Name
Date Created
Date Last Modified
Which user created your template
Number of Products
1
2
4
3
5
30
Some of your favourite lists may have been created by a user you do not recognise. These lists have been set up by Brakes
administrators and aim to showcase products you may be interested in such as the example below of “Top 20 Best Selling
Chilled Products”. These lists will not show a number of products and are also unavailable for you to edit or delete.
Favourite lists created by you can be deleted by select the green DELETE button.
To go into the Favourite List and view products select the green VIEW button.
The below screen will appear and you can carry out the following functions:
Rename your favourite list using the Edit button
Add new products to the list by typing in the product code and selecting the green ADD button
Remove products by selecting REMOVE
Add products to basket by amending the quantities of products you would like and selecting ADD TO BASKET.
1
2
3
4
31
10. Checkout
Overview
When you are happy with the contents of your basket, select the Checkout icon.
You will then be taken to a checkout screen to confirm the details of you order. The main detail of your order can be found in
the centre of the screen.
At either side of the main checkout information, you will also find useful product ideas.
The “Missing from this order?” column will show products you usually purchase but are not in your basket. This is a great way
of making sure you haven’t forgotten something crucial to your next dish!
The “Have You Tried?” side we will also show you some of our top selling products that we think you might like.
In both of these sections you are able to directly add these products to your checkout basket without moving off screen. Simply edit the quantity and select ADD.
32
Central Information
At the top of the central information box at the checkout stage you will able to confirm who the order has been placed by.
This can be very useful if multiple staff are ordering from the same accounts and you would like to track who has made which
order.
Your chosen delivery date will also be
present. To amend this select the calendar icon and a pop up calendar box will
appear for you to select a new delivery
date.
The Customer Ref/PO number box will be set up to be used as agreed with your
account manager. If PO numbers are not necessary this can be left blank or you
may find it helpful to include a note as to the purpose of this particular delivery
(e.g. Friday Wedding Party)
If the section has a small red star, then it has been agreed with the account manager that a valid PO number must be provided at this point and the checkout will
not submit without this.
33
To amend the quantity of each product in
your basket use the + and– signs, or type in
the quantity you would like in the white
box. The price beneath the Quantity box
will automatically reflect the changes.
To remove the product from
the basket completely select
REMOVE.
Review the total cost of
your current basket.
Review the number
of lines and items in
your basket.
You will also have options repeated from the earlier basket stage available
at checkout such as the ability to Save Basket, Save Favourite or to Print
your basket.
If you are satisfied with your order select the green SUBMIT ORDER
button.
34
Waiting For Confirmation Stage
Once you have submitted your order, the order will go into the “Waiting For Confirmation” stage. This means that your order
will be sent to our system to ensure that all the products you have ordered are available for this date. Once your order has
been confirmed you will be sent this confirmation via email. Any out of stock products will be highlighted in this email.
This process should take no longer than a few minutes, however to allow you to continue shopping whilst this goes on, a pop
up will appear allowing you to choose DON’T WAIT FOR CONFIRMATION. If you choose this the order will still go through,
however you will be taken away from the Waiting for Confirmation screen.
If you select this, you will be taken to the below screen confirming that the order has been submitted. You will receive the
confirmation that the order has been processed via email.
35
10. Order Management
Amending Orders
One of the great features of ordering online with Brakes is that you have the ability to amend you order even after you’ve
submitted. This function is available right up until your cut off time the day before delivery!
Orders that have not yet passed the cut off time are stored as Open Orders.
To view all Open Orders select the Amend Orders icon at the right hand side of the navigation bar.
The small red oval at the centre of the icon will show how
many Open Orders you currently have available to edit.
Once selected you will see a list of order numbers available for
you to edit.
If you are not sure which one you would like to view, select
Amend Open Orders to see all orders in further detail.
36
The Amending Orders screen will show the following information:
Order Number
Order Placed By
Requested Delivery
Submitted Date
Customer Ref/PO number
Status of the order
Total Price
1
6
7
2
3
4
5
To amend the order select Amend Order.
37
After selecting AMEND ORDER you will be taken to the screen below. In addition to the information present in the
prior screen, you will now also be able to amend products.
To add a product enter the Product Code or Description into the white bar, add the quantity and select ADD.
To amend the quantity of products already
in your order, adjust the + or - signs next to
each product or select REMOVE to get rid
of the item completely.
Once you have made your changes, you MUST select the RESUBMIT button for your changes to be
recognised.
Or select CANCEL ORDER if you no longer want this
order delivered.
38
Recent Purchases
It is also possible to view both a list of products you recently purchased, and the account’s order history.
To view recently purchased products select the My Orders icon at the right hand side of the navigation bar and choose Recent Purchases.
The Recent Purchases screen will appear showing a list of
recently purchased products.
Select the drop down menu next to Date Ordered to adjust
how many products you view.
You will also notice that when going into My Orders you will
be offered an easier of way of navigating the various order
management tools by using the black bar. This shows all areas and the number of Lists/Orders/Products available in each
area.
39
Order History
Select Order History to view all orders placed within the last 4
weeks.
You will be taken to the screen below which will show Orders
listing the following details:
Order Number
Order Placed By
Submitted Date
Delivery Date
Customer Ref/PO number
Status
Total Price
1
3
6
5
2
4
To look in more detail at this order please select the green VIEW DETAILS button.
40
7
Repeat Order View
After selecting VIEW DETAILS you will be taken to the screen below which will show your order in more detail. In addition to
the information on the prior page. You will now also be able to see a list of the products within that order beneath the light
grey information box.
Also note that from this page you can also additionally see the number of items ordered and have the ability to Print Order.
If you would like to order the products from this list again, or would like to repeat the entire order, select REPEAT ORDER
VIEW.
To add products amend the quantity and select ADD. To repeat the whole order select REPEAT ORDER.
41
Notes
42
Notes
43
44