1
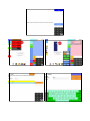
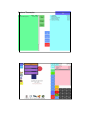
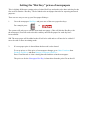
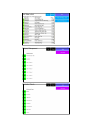
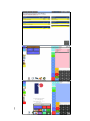
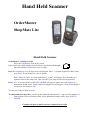
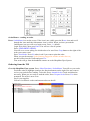
The Retail Data Partnership Ltd
USER GUIDE
For
ShopMate V6
ShopMate Lite
OrderMaster
Symbol CS3000
Contact Details
Address:
The Retail Data Partnership Limited
Brewery House
4 Scotgate
Stamford
Lincolnshire
PE9 2YB
Website:
www.retaildata.co.uk –
Please log in to the User Area of the website to use
the resources there.
Email: [email protected]
Fax: 0870 4323678
Tel: 01780 480562
Department Extension Number
Hours available
Sales
1
Mon - Fri 09:00 - 17:00
Promotions
2
Mon - Fri 09:00 - 17:00
Hotkeys
2
Mon - Fri 09:00 - 17:00
Technical Support
3
Mon - Sun 07:00 - 19:00
Accounts
4
Mon - Wed 09:00 - 17:00
General enquiries
5
Mon - Fri 09:00 - 17:00
Technical Support is available 365 days of the year between 07:00 - 19:00.
Between 07:00 - 09:00 and 17:00 - 19:00 Technical Support is available for Emergencies only.
© The Retail Data Partnership 20121
Contents
Page
Description
4
4
6
8
10
10
12
14
16
18
18
20
22
24
26
29
30
Getting Started / System Maintenance
User Login
Sessions
Processing a Transaction
Managing the Till Roll Discount, Void. Refund, CashBack, Price Check.
Payments from Cash Drawer
Save & Retrieve / Historic Transactions
Manage Products / Accounts
Setting the “Hot Key” prices of newspapers
Shelf Edge Label Printing
Category Management / Wholesaler Details
Reports / Training Mode / Messages
Promotions
Price-Embedded Barcodes
Handheld Scanner – ShopMate Lite – OrderMaster
Stock Management
Symbol CS3000 – OrderMaster
Relevant screenshots are printed opposite the text in this Guide
Please Note: Your ShopMate Epos system must always be shut down using the menu system. Do
not switch off as this could damage the hard disk in the computer. If the hard disk is suddenly
switched off, it does not have time to save and this could corrupt the data on the computer. This
would mean that your EpoS system would not function and you would be unable to trade.
Getting Started
Users on the till: When you first switch the system on you will see the User Log In screen. Touch
the pre-programmed user called Admin. Enter the pin number of 6 zeros. To add new users, change
passwords etc refer to User Login below.
Adding a float to the cash drawer: You will then see the open session screen. You can start
trading at recommended retail prices by putting a float in the drawer, entering the float amount in
the box using the number pad and pressing Open Session. For more information on Sessions see
page 4 of this guide
System Maintenance
This menu should only be used when requested by the Support Staff of the Retail
Data Partnership Limited.
Select: Other Functions / System Maintenance
Shutdown: This will shut down the system. If you shut down the master till, any slave tills will stop
working because the slave tills use the database on the master till.
Re-Boot: This will restart the system. If you restart a master till, any slave tills will stop working
because the slave tills use the database on the master till.
Restart Kiosk: This will restart the software. This may need to be done to implement changes made
to your till but it may not convenient if we restart the software while you are trading.
User Login
Login
Select your name from the list. Enter your pin number Press: Login
Logout
Press: Sessions / User Logout
Administrator
If you are logged in as the Administrator, or have administrative functions, you can manage other
users. The Administrator can add, edit or delete new and existing users.
Press: Other functions / Administration / User Management.
Edit User
When you are logged in as a user you can edit your pin number only.
Press: Other Functions / Administration / User Management.
NB. The PIN number is set to 000000 by default for Admin
Sessions
Closing a Session
Press: Session / Close Session A message will appear asking if your sure you wish to close session.
Press: Yes to continue closing the session or No to return to the trading screen. The system will ask
for Payments In and Payments Out. Count the cash in drawer and enter that figure into relevant box.
Press: Add. Complete the same process for all Payment options.
Press: Submit Takings The receipt printer will automatically print till contents
Open a Session
Enter the amount of float. Press: Open Session
Increase Float
Enter the amount by which you wish increase. Press: Session / Increase Float A message will
indicate that the increase was successful. The cash drawer will open.
Decrease Float
Enter the amount by which you wish to decrease. Press: Session / Decrease Float. A message will
indicate that the decrease was successful. The cash drawer will open and a receipt will print.
Screen lock
Press: Session / Padlock. Press: Yes. To unlock, type in your shop number. Press: Unlock Screen.
Session Report Analysis
Comments in brackets are not normally
seen on a Session Report.
5 Cashback -£75.00
Total Session Payouts -£192.03
(These are the ways funds have left your till.)
Session Report
The Retail Data Partnership Ltd.
(Shop Name.)
Float £260.78
(The amount of money you have put into the till to start
your session.)
Till No.: 2
Session ID: 685
(Which till the report is from and the session
identification.)
TOTAL CASH (in drawer) £659.49
(Just cash, not card transactions, vouchers etc.)
Session Start: Wed 17th Oct 21:42 BST
Session End/Now: Thu 18th Oct 21:24 BST
(Time and date session started and ended.)
Payments in:
Cash taken £590.74
2 Voucher £6.20
2 Visa Credit £32.79
3 Card Payment £56.37
10 Visa Debit £131.65
Total Session Takings £817.75
(These are the ways funds have entered your till.)
Payments out:
2 Lottery Payout -£16.30
7 Lottery Instant Payout -£52.00
1 Supplier Payout -£47.19
2 Miscellaneous Payout -£1.54
TOTAL (in drawer) £886.50
(Including all the ways funds have entered your till.)
Float -£260.78
Total Session Movement £625.72
(Total in drawer minus the float you started with.)
Miscellaneous
12 No Sale
9 Void £22.15
17 Cancel transaction £90.51
121 Trade Transactions
Average Spend £6.14
(This is a general overview of the till during the session.)
Takings Breakdown
Non-VATable Takings £442.60
Takings @ 20.00% £300.15
Net Takings @ 20.00% £250.12
VAT @ 20.00% £50.03
(A snapshot of your takings. More information is available
on your Financial Summary report.)
Tobacco £164.18
Total Category Sales £742.75
(Takings during the session for each category.)
Commission Breakdown
Lottery £128.00
Paypoint £184.00
Commission Total £312.00
(Categories you receive commission on.)
Hourly Breakdown
2 2012-10-18 08:00-9:00 £7.72
9 2012-10-18 09:00-10:00 £36.19
4 2012-10-18 10:00-11:00 £20.30
7 2012-10-18 11:00-12:00 £19.95
15 2012-10-18 12:00-13:00 £144.63
4 2012-10-18 13:00-14:00 £25.69
12 2012-10-18 14:00-15:00 £88.94
15 2012-10-18 15:00-16:00 £60.73
11 2012-10-18 16:00-17:00 £83.53
3 2012-10-18 17:00-18:00 £15.77
9 2012-10-18 18:00-19:00 £72.16
13 2012-10-18 19:00-20:00 £68.54
6 2012-10-18 20:00-21:00 £31.15
11 2012-10-18 21:00-22:00 £67.45
(Footfall, Date, Time & amount taken.)
Category Breakdown
Alcohol £35.75
Cards £0.60
Chiller £30.09
Confectionery £33.61
Drinks £38.22
Frozen £4.43
Groceries £57.01
Household £17.40
Lottery £128.00
Miscellaneous £18.58
News & Mags £13.03
Paypoint £184.00
Pet £5.40
Snacks £12.45
Signed: ...........................
(Signature of whoever cashed up.)
Processing a Transaction
Point of Sale When you scan the barcode on a product, the product description and price will
appear on the ‘till roll’ section on the right of the screen.
Multiple Items
Scan the product barcode, enter the number of items and press Qty button.
Or
Enter the number of items and then scan the product barcode.
Hotkeys Hotkeys are used for items that do not have barcodes, or to speed up transactions that
include newspapers. You have a Hotkey Barcode booklet with the barcodes of priced hotkeys to
enable you to change prices as required.
Hotkeys (using lottery)
Press: Lottery hotkey. This will bring up a screen with bright green hotkeys and blue hotkeys.
A bright green hotkey indicates a set price. A blue hotkey indicates a payment key. If a customer
wants to buy three lottery tickets enter the amount on the keypad. Press: Buy Ticket If a customer
has a winning ticket or scratchcard, enter the amount of winnings on the keypad. Press: Lottery
hotkey then Press: Winning Ticket / Winning Scratchcard
Hotkeys (using Paypoint)
Press: Paypoint hotkey This will bring up a screen with a number of payment options. These
hotkeys are dark green and indicate that they are unpriced. If a customer wants to pay an
electricity bill of £67.59, enter the amount on the keypad. Press: Paypoint then Press : Electric
hotkey.
Note: There are Miscellaneous VAT and Non-VAT hotkeys on your system. These are for use in
emergencies. If you find that you or your staff are using these hotkeys a great deal, you may
need to ask us to set up further hotkeys for items without barcodes. If you require additional
hotkeys, or would like us to remove redundant hotkeys, please contact us with details of what
you require.
Finishing a Transaction If a customer gives you £50, £20, £10, £5, £2 or £1 for the transaction, you
can use the shortcut hotkeys. The till drawer will open. Press : Receipt if required. Pressing Next Customer
is optional.
Or Enter the amount of cash being offered, Press : Cash
Or Select End Sale, which will bring up a screen with different payment options.
Cheque
Enter the amount and Press: Cheque.
Voucher
Enter the value of the voucher and Press: Voucher.
Credit & Debit Cards when you have scanned in all the purchases select End Sale then press the
appropriate card symbol. eg
or
Managing the Till Roll
Void Using Void will remove an item from the Transaction. Ensure that the item you wish to be
removed is highlighted. This is done by using the Up and Down buttons or by selecting the
product description. Press: Void.
When the item is removed the sub total will automatically be updated.
Cancel Whole Transaction To cancel the whole transaction rather than having to void every single
item. Press: Alter / Cancel Transaction
Refund To issue a refund, scan the product. Press: Alter / Refund.
Discount Scan item to be discounted or press appropriate hotkey. Press: Alter / Discount / %
hotkey. To sell an item at a specific price, scan the product Press: Alter / Discount. Enter the
amount Press: Actual Amount.
No Sale To open the cash drawer without processing a transaction. Press: Alter / No Sale. The cash
Drawer cannot be opened in the middle of a transaction.
Multi This hotkey calculates multiples of a product in a transaction. For example: To sell six bags
of sweets priced at 37p each. Press: Sweets. Enter the price of one bag of sweets. Press:
Miscellaneous Sweets hotkey. Enter the number of bags of sweets. Press: Multi. This will
calculate the total amount.
CashBack Enter the amount of CashBack and then Press : CashBack hotkey. When you complete
the transaction the system will calculate the change as the amount of cashback.
Card Charge If you have a charge for credit/debit card use, Press : Card Charge hotkey and the
charge you have set will appear in the transaction.
Price Check Select Price Check. Scan item and the price will be displayed.
Payments from the Cash Drawer
Staff Wages To pay staff wages. Enter amount. Press: Alter. Press: Payout. Press: Staff Wages.
Pay Supplier To pay a supplier. Enter amount. Press: Alter. Press: Payout. Press: Supplier.
Miscellaneous Payment To make a miscellaneous payment. Enter amount. Press: Alter.
Press: Payout. Press: Miscellaneous payment.
Money to Bank To take money from cash drawer for banking or safekeeping. Enter amount.
Press: Alter. Press: Payout. Press: Money to Bank.
Save and Retrieve
To save a transaction to be brought back later to finish (lay away)
For example, if a customer is not able to pay, you can save the transaction and continue serving
other customers. When the customer returns with the money, you can retrieve their transaction and
continue to serve them.
At the end of the transaction when a customer realises that he can’t pay.
Press: Alter / Save / Retrieve / Save.
When customer returns with payment
Press: Alter / Press Save / Retrieve / Retrieve.
Touch the item description on the left menu (there may be more than one saved transaction).
Press Select. If you have chosen the wrong transaction, press another transaction in the left menu
and press Select.
When you have the correct transaction on the right menu. Press: Retrieve.
Transactions can be viewed by using the Up & Down buttons. Press Retrieve to continue with the
transaction or Cancel to remove it.
Note :
There is no limit to the number of transactions that can be saved. If you have more than one till, you
can retrieve transactions from any till. (If you save a transaction on till 1, you can retrieve it on till
2.)
If there is a power failure, open transactions will automatically be entered into Save / Retrieve.
Historic Transactions
This shows the last 1,000 transactions each day and allows you to print a receipt.
Press: Other Functions / Administration / Reports.
Press: Historical Transactions.
Touch the Transaction required.
Press: Select / Receipt
Manage Products
Select Manage Products on the front screen then scan a product or type in a barcode. In this screen
you can change the details of the product and select if it is locally managed in your store, or
managed by The Retail Data Partnership.
Details Tab:
Categorisation can be swapped between an RDP category and a User category. The default
is set to the categories set by The Retail Data Partnership and is titled RDP. You will need to
set up your categories before you can manage them locally. See section 11.1 of the manual.
If you select Locally Managed, you can assign the product to one of your categories.
Product Information The Item Size will be set by us if we have the information. You can
select Locally Managed and enter the information you have on the product.
Shelf Edge Label: You can select Print Quick Label to print a label from the receipt printer.
You can also select Add to Label List to print on the laser printer when you have a list of 21.
Pricing Tab: In this tab you can set the VAT level, adjust cost information and selling price. You
can also set how that price is achieved.
For example, the selling price is at the bottom of the screen as Mark Up. To change a price,
touch the price you are selling at, a numberpad will pop up for you to type in the new selling
price. Now press Submit then OK or Apply. ( Ok will Apply and exit the screen while Apply
changes the price but keeps you in the screen.)
Stock Details Tab: Here you can change the wholesaler from which you have purchased the
product. You can also adjust stock levels and re-order information.
Accounts
Setting up an Account Press: Other Functions / Administration / Account Administration. Press:
New Account. Enter the relevant information and press Save. The Account number will be
generated automatically. The only fields required are number and surname, but customer
records will be more accurateif you complete the other fields.
Paying for a Transaction on Account When the customer is ready to pay, Press: End Sale /
Account. Press: one of the four searching options. When you have found the correct account,
Press: Pick Press: Purchase on Account
Paying off an Account If a customer wants to pay off part or all of what they owe,
Press: End Sale / Account Press: one of the four searching options. When you have found
the correct account, Press: Pick. Enter the amount and Press: Money into Account (Red
button) Finish the transaction with End Sale / Cash or Cheque etc.
Press the End Sale option once to enter the amount. Press it again to complete the
transaction.
Editing or Printing Account Details Press: Other Functions / Administration. Press: Account
Management Select account by one of the methods offered. Enter the amount to be paid off
To print account report Press: View Account / Print
Setting the “Hot Key” prices of newspapers
This is slightly different to setting prices of other Hot Keys and needs to be done each day for the
first week so that the “Hot Key” can be linked to the newspaper barcode for reporting and stock
purposes.
There are two ways to set up your Newspaper Hotkeys.
1.
Go to the newspaper Hot Keys and press one of the news paper hot keys.
For example press
or
The system will ask you to scan the associated newspaper. (This will link the Hot Key with
the newspaper) You will need to do this each day until all the papers for each day have
been scanned.
NB. The news paper will be added to the till roll to be sold and so will need to be voided if
not to be sold or done in training mode.
2.
If a newspaper price is altered then the barcode is also altered.
To set up prices or if the price of a newspaper changes go to Other Functions then
Products and Prices and then Manage Newspaper Hot Keys.
Press Clear Barcode to clear existing barcode and then scan the newspaper.
The price set for the Newspaper Hot Key is then taken from the price file on the till.
Shelf Edge Label Printing
Using the Laser Printer: To print shelf edge labels using the laser printer, you need to create a list
of product details. The list can be printed onto a sheet of paper or a sheet of pre-cut labels.
The printer is set to print onto an A4 sheet of 21 labels (3 across and 7 down.) The size of
these labels is determined by the height of the most widely used shelf edge fittings used
around the UK.
Adding products to List Press: Other Functions / Products & Prices / Change price Scan the
product barcode, enter using the keypad or search for the product by pressing the Search
Button. When the Product Details are displayed, Press: Add to Label List to add product to
the list. Press: Print Shelf Edge, to print a temporary label from the receipt printer.
Print / Edit the Shelf Edge Label List Press: Other Functions / Products & Prices / Print Shelf
Edge Labels. Press: Print Shelf Edge Labels to print the list. To remove an item from the list,
select Rem To remove the whole list, Press: Other Functions / Products & Prices / Print
Shelf Edge Labels / Clear Shelf Edge List.
For till rolls, printer cartridges and shelf edge labels:
Talpa Office ProductsLtd, 2nd Floor, 5 Princes Road, Shepton Mallet, Somerset BA4 5HL
Tel 01749 330683 email : [email protected]
Category Management
Use this if you wish to assign products to categories other than the default categories on the system.
If you decide to use this option, you will need to categorise all of your stock in this way.
Adding a Category Press: Other Functions / Administration / Category Management.
Press: Add New Category Enter the name of the category to be created
Press: Save Current.
Wholesaler Details
Details of relevant wholesalers can be kept in this area
Press: Other Functions / Administration / Wholesaler Details.
Select View for relevant wholesaler.
Wholesaler details can now be edited or deleted.
Or
Select Add New and fill in relevant details. Select Save Current.
Reports
View Reports Press: Other Functions / Administration / Reports / Reports.
Press the Report tab and select the appropriate report to view.
Press the Date tab and select your required date.
Press: Generate Report.
Press: Print if required (picture of printer in top right hand corner)
Exit is at the bottom right of the screen.
In options you can access the training mode data, set the day of the week for the start of your
financial week and set the till that you wish to generate the financial summary and save as a csv file
on the back office.
Training Mode
In Training Mode no normal transactions will be recorded. Stock will not be adjusted by sale and no
payment will be recorded.
To Enable Training Mode Press: Other Functions / Administration / Training Mode / Enable The
till roll will turn pink (fig 7.2) and the words Training Mode Enabled will appear under the
shop number.
To Disable Training Mode
Press: Other Functions / Administration / Training Mode / Disable
The till roll will turn blue (Sometimes the next time it is used) and Training Mode Enabled
will disappear.
Messages
The message button on the front screen shows blue or red numbers in the corner showing the
number of unread messages. A blue number denotes a service message and a red number denotes an
“Added Value” message.
To Read a Message Press the message button then select the message you wish to read. The
message will display on the right of the screen.
To Delete a Message Press the envelope at the bottom of the screen with a red cross on it.
]
Promotions
You can operate a variety of promotions on ShopMate. We can set these up on your till(s) for you.
This is particularly useful if you are part of a symbol group, as many of the symbol groups send
promotion details to us in advance. You can manage your own promotion either on the till or, if you
have the ‘Window on the Till’ back office software connected to your till(s), you can manage them
there. In either case, setting up or managing your promotions works the same.
To enter promotions, touch Other Functions then Promotions. You will be prompted to select a
period for the promotion. You can either enter the dates for a new promotional period by
touching Add New Promotions Period or touching the down arrow next to the promotion
period dates to open the drop-down box that shows you the available promotion periods
already on the system.
If you touch Add New Period then Set Dates, the screen will display a calendar for you to
select a start date. When this has been selected the calendar will be displayed for you to
select an end date. NOTE that the dates are inclusive.
When you have selected the dates, select SAVE to save your new promotions period. Then
select the promotion period that you want to use by dropping down the promotions date box
and touching the required dates, then press GO. The View Promotions screen displays.
To add a promotion, click on Add Promotion. The top of the screen shows the Type of
promotion that will be added. To see the choice of promotion types, press Change.
The options are:
Buy One Get One Free
Multibuy –
Reduced to –
Buy No. Get One Free –
Linked Promotion –
e.g. any four of these five different chocolate bars for 99 pence
e.g. price reduced from one price to another.
e.g buy five different chocolate and get one free. (Either the least
expensive or the most expensive)
e.g. buy two bottles of shampoo, and get Hair magazine for £1.00(P)
where P could be zero.
Select the promotion type you require, by pressing the Pick square next to it. The screen will display
the boxes into which you need to add details. The first box needs a description of the promotion.
NOTE: The different types of promotion require you to complete different boxes on the screen. It is
important to remember that when you enter barcodes, you MUST click on the Add square to the
right of the data entry box to add the barcode to the promotion details. When you have entered all
the details of the promotion, touch Save. Occasionally, a barcode will be added that is not on your
till. You will be asked if you would like to Add it Anyway. If you say Yes, the promotion will work
for that barcode as soon as it is added to your till. You can review the promotions you have entered
by touching Back at the top right corner of the screen. If you touch the promotion description, it will
bring up the promotion which can be edited and new products added. You can also see a detailed
report by clicking on View Report. To delete a promotion, go to the list of promotions in a particular
promotion period and tick the box under Rem then touch Remove Promotion.
Promotions – Troubleshooting
You may run regular promotions set by your wholesaler symbol group, as well as your own
promotions from time to time.
Wholesaler promotions are usually set up by TRDP staff about a week before they go ‘live’. We
strongly advise you to check your promotions report before they go ‘live’. Press: Other Functions /
Administration / Reports / Reports to ensure that they have been downloaded and check that they
are what you expect.
If a promotion does not fire on your tills the most usual reason is that you have been supplied with a
product barcode that was not included in the promotion brief. This is simple to correct.
Check the barcode(s) on the product(s) against those that appear in your Current Promotion report.
Call us with the promotion ID, product description and barcode(s). We will add the barcode(s) to
your promotions. Please do not telephone us without checking your promotion report. Please have
the relevant barcodes to hand before you call.
Setting up your own promotions You can set these up yourself., but if you would like us
to set up promotions for you, please visit the User Area at www.retaildata.co.uk, log in and
use the pre-set form,
email ([email protected]) or fax (0870 432 3678) the details to us.
We need the following information to set up promotions:
Start and end dates,
Product description,
Promotion type (multibuy, BOGOF, etc),
Promotion price,
Barcodes.
Price Embedded Barcodes
Scan the barcode
If this is the first time that this product has been scanned you will be asked if you would like to add
the product.
When you press Add the system will recognise that it is a PEB (Price Embedded Barcode) and offer
some details to be added or edited.
Fill in the details required and press Save.
The product will be recognised and the price displayed on the till roll.
Hand Held Scanner
OrderMaster
ShopMate Lite
Hand Held Scanner
OrderMaster - making an order
Press: the Ordermaster icon on the screen.
If the icon is not visible simply press the House icon and scroll through
the icons until the Ordermaster icon is visible.
Press the Ordermaster icon. A login screen will appear. Press: 1. (default Login ID is 0001), then
press Enter. You will then see a list of options.
Press: Make Up Order. A screen with orders 1, 2 and 3 will appear. You can make up 3
separate orders at the same time. This is useful if you want to order stock separately.
Press; New. A screen with the words NEW ORDER will appear. Under the word Supplier is a
downwards facing arrow. Touch it and your supplier list will appear,. Click on the supplier
you want to use and press OK.
You are now ready to make an order.
To add products to the order, scan the product barcode and press the + sign to set the number of
items required. This will always order in box quantity not single items. Press ADD TO
ORDER.
Continue the process until you have completed your order
OrderMaster - sending an order
Press: OrderMaster icon on the screen. If the icon is not visible press the House icon and scroll
through the icons until the Ordermaster icon is visible. When you have pressed the
Ordermaster icon you will see a login screen. Press: 1. (default
Login ID is 0001), then press Enter. You will see a list of options.
Press: SEND/PRINT ORDER.
You will see a screen asking for which order to be sent. Press: Prep button to the right of the
order you want to send.
Press: Send Order. Press No when it ask if you want to print the order.
When you get the message Is the Scanner plugged in and the switcher box set,
put the scanner into the cradle and press Yes.
Your order will go from the handheld scanner on to the ShopMate Epos System.
Ordering from the Till
Go to the ShopMate Epos system. Press: Other Functions / OrderMaster. You will see your order.
Touch the order to highlight it and use the function buttons on the right. You may want to
review your order before sending. To do this, Press: Amend Order. Check and amend as
necessary. When you are ready to send the order, Press: Prepare Order. Press: Yes when
prompted. The order is now on its
way to your supplier.
You can view historic orders and unsent orders on the till.
Price Check on Hand Held Scanner
Press: the OrderMaster icon on the screen. If the icon is not visible press the House icon and scroll
through the icons until the Ordermaster icon is visible. You will see a login screen. Press:1.
(default LoginID is 0001), then press Enter. Press: PRICE CHECK. Scan the product
barcode for the price.
Downloading a new Pricefile Each week you will need to download a new price file to the
handheld scanner. To do this, Press: the OrderMaster icon on the screen. If the icon is not
visible, press the House icon and scroll through the icons until the OrderMaster icon is
visible. You will see a login screen.
Press: 1. (default LoginID is 0001), then press Enter. Press: Administration / Get Prices. Tick
the box on the right opposite your supplier details. Press: Continue, then press Yes. This will
delete the current price file. When the price file is deleted a new screen will ask for new
wholesaler details. Press the down arrow, press your supplier details. Press: Continue, then
place the handheld scanner into the cradle and press Yes. This will download the new price
file.
Users Press: the OrderMaster icon on the screen. If the icon is not visible, press the House icon and
scroll through the icons until the OrderMaster icon is visible. You will see a login screen.
Press: 1. (default LoginID is 0001), then press Enter. Press: Administration / Users. Here
you can delete, edit and add new users. When editing or adding new users you can assign
them as a manager user by Selecting 1 in the access field. Select 2 for staff users. Press Exit
to save changes.
ShopMate Lite
Press: the SMLite icon on the screen. If the icon is not visible press
the House icon and scroll through the icons until SMLite icon
is visible. When you have pressed the SMLite icon the login
screen will appear. Press: 1. (default LoginID is 0001), then press Enter.
Lite Till If you have a power cut or are otherwise unable to use your Epos system, you can use the
handheld scanner as a till, using cash only. Go to SMLite. Press: Lite Till. You will be asked
to keep a £100 or change it to another figure. Press: Keep to keep the float. Press: Enter Sale.
Scan the product barcodes. When you have all the items in the transaction, Press: Pay
Goods In / Removed / Returns / Stock Take options All these options work in the same way.
Press one of the options, then scan a product
barcode. Press the + sign to specify an amount and then press Save. Scan the next product
barcode and press Save.
Price Change To change the price of a product go to SMLite. Press: Price Change. Scan the
product barcode, enter the new price and press Enter.
Hot Sync When you have used the handheld scanner for any of the functions described above, the
Information will stay on the handheld scanner until you synchronize the scanner to the till
system. To sync the scanner, Press: the House button until you see the Hot Sync icon, press
the button and the image will be enlarged.
Ensure that the scanner is correctly placed in the cradle and press the large Hot Sync icon on
the screen.
Stock Management
Stock Take You need to make a ‘Stock Take Group’. Once this has been done, you can assign
several different sessions of stock taking to the group and then commit the group. This
enables you to have more than one person doing a stock take at any time. When you commit
the group, you will update your system with the new Information, which can be viewed in
relevant reports.
To Carry Uut a Stock Take: Press Other Functions / Products & Prices / Manage Stock / New
Stock Take Group . You will be asked for a description for the Stock Take Group. Fill in the
required field and press Save.
You will see the Stock Take Group that you have created. You need to assign the stock take
sessions to the group. Press select to highlight the group. You will see several buttons at the
bottom of the screen. Press Add Stock Take Session, and you will be prompted to add
products to the list. Press Input Barcode and enter the barcode manually using the keypad, or
scan the barcode using a barcode scanner, then press OK. You will see the item in a list and
you can change the quantity by pressing the highlighted number under the heading Quantity.
Use the numbered keypad to enter the correct quantity, then press Submit. If you make a
mistake, delete the product line using Delete Product. You can print the stock session report
by pressing Print Stock Session.
Adding a session using the Handheld Scanner Press Other Functions / Products & Prices /
Manage Stock and synchronise the handheld scanner to the till system. When the handheld
scanner has been synchronised, a window will appear indicating that there is an unassigned
Stock Take Session. Press Please Select a Stock Take Group. You will then be prompted to
assign it to one of the available groups. Touch the group you want to assign the session to,
then press Assign. If a group is not available, or if you want to create another group, press
Add New Group. When all sessions have been assigned to a group, you can preview all
sessions in that group by touching the session you want to see. This will highlight that
session, then press Edit Stock Take Session.
When editing the Stock Take Session you can change the quantity by pressing the
highlighted number under the heading Quantity and using the numbered keypad to enter the
correct quantity. Then press Submit.You can delete a product by pressing the product line
and then Delete Product.
Add products by pressing Input Barcode or scanning the barcode with the handheld scanner.
Print the Stock Session by pressing Print Stock Session. A print window will appear. Press
the Print button at the bottom right corner.
You can delete the session by pressing the Delete Stock Take Session. When you have edited
a group of sessions, you will need to select the group and press Commit Stock Take Group.
Only then will the figures on the till be updated.
SYMBOL CS 3000
To create an order. Scan a product using the + button on
the scanner.
Each time you scan a barcode, one of that product will be
added to the order.
If the wholesaler only supplies that product by the case or a
minimum number then one case or one minimum amount will be added.
If you scan a barcode using the – button on the scanner then the last instance of that barcode will
be deleted from the order.
When the order has been created place the scanner in its cradle and the order will be sent to the till.
The scanner will make a two tone beep when it starts sending an order and the till will play a
melody when it has received the order successfully.
Note. Do not put the scanner into the cradle until you have completed your order as it will
be sent to the till as a completed order.
OrderMaster Via Toshiba ST-A10
Editing and sending your order. To view your order on the till select Other Functions then
OrderMaster.
Any orders that you have sent will be in Held Orders.
Select Held Orders then in the pop up box select the arrow for Create Order from. Then touch the
required order.
Now select your wholesaler in the same way. Select the arrow or Select a Wholesaler and select the
wholesaler. Now select Next. Your order will now be displayed and you can edit the quantity
ordered before creating the order to send.
Touch the quantity you want to change. A number pad will appear where you can select the number
required and press Submit.
Below the order will be a list of products that are not supplied by the wholesaler.
When you have finished editing select Create Order. The order will now be in your Current Orders
list. When you have sent an order it will move to Historic Orders
Amend an Order To amend an order touch Order to be Amended. It will change to yellow and
offer the option to Amend or Prepare. Touch Amend then touch the item to be amended and press
Select Item.
You can now alter the amount ordered and press Save or Delete the item.
Print Order While you are in the amend screen you have the option to Print Order. This will print
on the laser printer attached to the till.
Send an Order To send order touch Prepare Order. The till will then prepare the order to send to the
wholesaler. Select Yes and the order will attempt to go. If the order fails to go it will be in Historic
Orders and highlighted Unsent Orders. Touch Unsent Orders and any unsent orders will be
displayed. The order will attempt to go every five minutes or you can send the order manually by
pressing Attempt to Send Order.