1
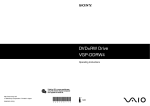
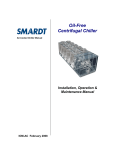
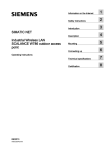
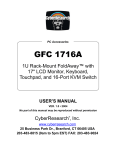
2
ISE2v2 Washing Machine
user guide
Installation
and setting
up your
machine
Use and
care of your
machine
Advice, help
and troubleshooting
guide
ISE2 Washing Machine
Dear customer,
Thank you for choosing your ISE washing machine, we hope it offers you many years of
outstanding results and reliable service.
We would like you to be aware of how to correctly use the machine as it may differ from the
way that any previous machine you have owned may operate ISE appliances use the most
up to date technologies available to ensure that you receive the best possible wash results
whilst helping to protect and care for our environment along with saving you money in
detergent and energy use. It is both kind to your wallet and the planet.
We recommend that you read through this instruction manual even if you have used a
washing machine in the past and familiarise yourself with the machine and how it operates
before using the machine, paying careful attention to the installation section if you have
chosen to install the machine yourself.
We take great care in our products’ design and function, including this manual to ensure
that you get the best out of your new machine and we hope you enjoy how easy we try to
make life for you.
All contents © 2007 Independent Service Engineering Limited
Contents
Section1: Installation
Pages 1-4
How to install the machine correctly and ensure optimum operation
Section2: Programs
Pages 5-15
A guide to programs available and the recommended uses
Section3: Using Your Machine
Pages 16-19
How to use the machine
Section4: Safety & Security
Pages 20-21
The safety features of your ISE machine and how to use the security features
Section5: Care & Maintenance
Pages 22-23
General care of your machine
Section6: Troubleshooting Guide
Pages 24-26
A guide to any general problems that you may encounter and how to resolve them
Section 1: Installation
transit
Please pay attention to the following instructions before using your washing
machine.
Failure to install the machine correctly may result in irreperable damage which is not covered by your warranty. If you are unsure do not
proceed and call an appliance engineer or installer.
1
2
3
4
Transportation screws, which are located at the
back of the machine, must be removed before
running the machine
Loosen the screws by rotating counterclockwise
by a suitable wrench or spanner
Remove the screws by pulling them.
Often this may take a little force and manipulation to release the rubber mounts
To the holes where the transport screws have
been removed, insert the plastic transport screw
taps found in the accessories bag inside the
machine
1
The transportation screws that have been removed from the machine should be kept for any future transportationof the machine
Suitable Installation Surroundings
It is important that you adhere to the following guidelines to get optimal noise and
vibration reduction from your machine:
• The machine should be installed on a solid surface*
• The machine should not be installed on thick carpet or a loose carpet/flooring
such as a rug, carpet tiles however are acceptable if properly fixed
• The machine should be properly levelled
• Clearance should be allowed at either side and top for movement and ventilation
purposes
• Your machine is designed to be operated from UK mains votage only in a suitable
area in accordance with legislation
Connections
water in
Your new machine requires three “connections” to operate as folows:
• Cold water fill from a 3/4” BSP inlet connection
• Drain to either standpipe (ideal) or sink trap connection
• 13A UK three-pin plug point
Water Connection
The machine should be connected using the included 1.5M fill hose to a suitable water
outlet tap. Should you not have one avaibable please contact a plumber for further
assistance in fitting one.
The maximum recommended distance, with a suitable extended fill hose is 2.5M from
the outlet.
The fill hose should be connected using the washers supplied in order to prevent leaks
and should be tightened to “hand tight” to achive an optimal connection. Overtightening of this connection may result in the hose connection splitting so please be careful.
The machine will operate between 1 and 10 BAR pressure and the incoming water
pressure can greatly affect program times.
The water fill pipe should be connected to
the machine as shown in the diagram to the
right
CHECK AND ENSURE THERE ARE NO LEAKS AFTER CONNECTING!
* Installation to a “floating” floor or many types of wooden floor can cause excessive vibration if not installed and
levelled correctly
2
Drainage Connection
The machine should be connected using the fixed 1.5M drain hose to a suitable drainage point on your home plumbing. If this is not available or seems unsuitable you may
require a plumber to alter your drainage point to suit an automatic washing machine.
water out
Should you require an extended drain hose to reach the drain point the maximum
advisable length of hose is 2.5M, extending any further than this may cause issues with
draining.
It is vital that the drain hose is elevated within the guidelines shown in the diagram below. Failure to do so can cause “backfilling” where the machine can fill from the home
plumbing causing malodourers and this is not covered by warranty
•
Be sure that water inlet and drain hoses are not folded, twisted, crushed or elongated by stretching
•
Water drain hose should be mounted at a height of minimum 60 cm, maximum
100 cm from the ground
•
The end of the drain hose may directly be fitted to the dirty water outlet hole or a
special apparatus mounted on the outlet bracket of the wash-stand
•
Never attempt to extend the water drain hose by adding extra parts without advice from an engineer or installer, drain extension kits are strongly discouraged
3
Mains Votage Connection
Your machine requires a UK 13A standard plug point from which to draw power and
is pre-fitted with a standard 13A plugtop which is moulded onto the power lead.
Wherever possible this should be inserted directly to a suitable plug point and not an
extension lead or suchlike.
power
Your machine contains sensitive electronic components which, if fed a poor or irregular
power supply, can manifest “ghost” faults, that is, faults that are generated by an irregular or poor power supply that cause the electronics to become unstable. It is therefore
very important that the mains supply is good.
Should you wish or require to extend the power supply please contact your installer or
an appliance engineer for a suitable solution.
Levelling The Machine
levelling
One very important part of the installation is to ensure, after the machine is placed into
postion that it is level and solid. Failure to do so can lead to excessive vibration from
the machine and poor or no spin if the vibration reaches a level that it operates the
machine’s built in anti-balance circuitry.
To do this it is best advised to use a spirit level on the lid of the machine ensuring that
the top is level from front to back and side to side. This is not always possible where the
machine is installed beneath a worktop and, in this case, a thing spirit level placed on
the leading edge will allow you to ensure the machine is as level as possible from the
front.
Levelling is made easy by using the front feet as shown above.
Simply loosen the plastic locking ring, adjust the foor to the desired height by screwing
or unscrewing as usual to level the machine using your spirit level.
Once complete screw the locking plastic rings back to lock each foot into position and
to ensure that they remain as set.
4
Section 2: Programs
use
In this section we will deal with the various programs and functions of the washing
machine and take you through it step by step. Please feel free to use this guide as a
reference and doing so will ensure that you get the best possible results from your
machine.
The first part of the machine that we will explain is the program dial which you use to
set the various programs depending on the fabric type and level of soiling (how dirty
the clothes are). The choice of the proper program is very important if you wish to
receive the best possible results.
The program dial is divided into five main sections (detailed below) for each different
type of wash with one of those sections offering additional rinse, spin and drain functions.
Drain/Spin Section
Wool Section
Programs18-20
This section is for
woolen or handwash
only fibres
Programs 21-23
This section is to
allow an extra drain,
rinse or spin
Cottons Section
Programs 1-9
This section is for
cottons and mixed
fabrics
Delicates Section
Synthetics Section
Programs 15-17
This section is for
delicate fibres
Programs 10-14
This section is for
synthetic fabrics
As the above diagram shows how the control dial and programs are split into easy to
follow groupings making it far easier to select first by fabric type and then by wash
temperature or any other special requirements or programs which we shall explain
next.
These section symbols are shown on the soap drawer front in an easy to understand
visual guide to each program’s function for quick reference.
5
Program Guide & Symbols
Now that you know what section of the dial is used for what type of fabric it becomes
easy to select the program that you desire to use within each section. On the ISE2 this
mainly falls down to simply selecting the temperature of wash that you require and
pressing the start button.
guide
However, there are many special programs on the dial which we shall explain in this
section which may benefit you under certain circumstances or for special care fabrics.
It is worth taking heed of the fabric care labels on many modern garments as they can
use special fibre mixes and, if you use the wrong program, you can irreperably damage
these more delicate items.
Cycle Times
Throughout this guide we do give approximate cycle times which we have verified
under test. However it is very important to note that these can vary by a considerable
degree depending on local conditions and the time of year.
During the winter the incoming cold water temperature is often several degrees lower
than it is during the summer months and this leads to additional heating time so this
can affect these times.
Water pressure can also massively change the cycle times. A lower water pressure
would mean that on every fill the machine takes slightly longer and can lead to longer
than anticipated cycle times.
If the machine completes the cycle but takes longer than you would expect then there
is almost cerrtainly no fault with the machine it is just being affected by local conditions such as these.
Sorting Laundry
More than any other factor, sorting your laundry into whites/lights and coloured items
is essential to getting good results and we strongly advise that you do not mix light or
white items with coloured ones on any program. Doing so can lead to discolouration
and dye transfer which may well be irreversable.
It is also important that you use two detergents, one for whites/lights that is bleach
containing and one specifically for coloured items which does not contain any bleach.
Doing this will ensure that your machine remains in good order and that your clothes
last much longer.
6
Cotton Washes
cottons
Cotton and mixed fabric washes are the most common washes used in the UK, in
particular the 40°C wash. With modern energy saving methods it is possible to use very
little electricity and reduce the water consumption but this does mean that the wash
time is extended. To combat this the ISE2 has two programs that we recommend for
everday use which do complete faster, the ECO wash and the “40° mix” with the mixed
wash being the best choice for many everyday loads.
Where time is not such a concern please use the standard programs to achieve a
deeper clean and to reduce water and electricity consumption.
The Cotton 30°C wash is only recommended where a detergent such as Ariel or Simply
is used that supports the use of this program or results may be compromised.
It is worth noting that the wash agitagion is greater on all the cotton cycles than that of
synthetic or delicates cycles for a deeper and more intensive cleaning however, if you
repeatedly place delicate items in a cotton cycle it can cause damage to your clothing.
The following section details the uses and features of each cotton cycle.
cotton 90°C
This is the cotton 90°C cycle and is essentially a boil wash. It should be used for very
heavily soiled items that require to be effectively sterilised. It can also be used for
bleaching and dying items as instructed by the garment label.
Uses detergent compartment 2
Ideal for: Very heavily soiled cotton or linen textiles
Can be used with: Full load Approximate cycle time: 137 minutes
cotton 60°C with prewash
The cotton 60°C cycle with the bucket is a 60°C cycle with a pre-wash. It should be
used for very heavily soiled cotton or linen and gives a very strong wash. This temperature and above is ideal for bedding as it kills almost all mites.
Uses detergent compartment 1 and 2
Ideal for: Very heavily soiled cotton (bedding) or linen textiles including coloured items
Can be used with: Full load Approximate cycle time: 136 minutes
7
cotton 60°C
This is the standard cotton 60°C cycle and is the best program for most cottons,
especially if worn next to the skin or used in bedding which is not too dirty. Using this
program for bedding also ensures that almost all mites are destroyed.
Uses detergent compartment 2
Ideal for: Medium soiled cotton or linen textiles and bedding
Can be used with: Full load Approximate cycle time: 162 minutes
cotton 40°C
The 40°C cotton cycle is the most commonly used wash cycle in the UK as it copes
admirably with most everday washing and should prove efficient and effective for most
clothing. Most cottons or cotton mixes can be washed safely on this cycle and you will
have all the benefits of stain removal.
Uses detergent compartment 2
Ideal for: Medium soiled cotton or linen textiles including coloured items
Can be used with: Full load Approximate cycle time: 130 minutes
ecowash
Our ecowash program is a specially developed variant of the common and popular
40°C cotton cycle which reduces the water and power useage still further and yet improves slightly on time performance without lessening the results. For most everyday
cotton clothing this cycle is ideal and will help you to further reduce your water and
electricity consumption.
Uses detergent compartment 2
Ideal for: Medium soiled cotton or linen textiles including coloured items
Can be used with: Full load Approximate cycle time: 121 minutes (40°C)
8
cotton 30°C
The cotton 30°C cycle should only be used when suitablely rated detergents are used,
please see your detergent packaging too see if this is the case.
Uses detergent compartment 2
Ideal for: Slightly soiled cotton or linen textiles including coloured items
Can be used with: Full load Approximate cycle time: 117 minutes
quick wash
The quickwash is designed to refresh garments and to clean very lightly soiled items
and we do not recommend it for more intense cleaning.
Uses detergent compartment 2
Ideal for: Very lightly soiled cotton or linen textiles including coloured items
Can be used with: Half load Approximate cycle time: 30 minutes (25°C)
cold cotton
This is the cottons cold cycle where cold water only is used and should be used as
directed by the garment labelling.
Uses detergent compartment 2
Ideal for: Slightly soiled cotton or linen textiles including coloured items
Can be used with: Full load Approximate cycle time: 105 minutes
40° mix
mixed wash
The mixed wash program is an excellent balance between time and performance
for most people. This allows a mix of fabrics and colours to be washed effectively in a
much shorter time whilst retaining thebest possible stain removal characteristics. For
most everday washing you will find this program very effective and fast.
Uses detergent compartment 2
Ideal for: Medium soiled cotton or linen textiles including coloured items
Can be used with: Full load Approximate cycle time: 73 minutes (40°C)
9
Synthetic Washes
Synthetic washes for man made fibres are also known as acrylics on some older garments and require a more gentle wash action than most cotton based fabrics. Therefore these washes have a lower agitation speed and are more gentle in the washing
process. It is important that you select the correct wash type as, should you wash for
example a synthetic printed t-shirt on a cottons wash by mistake, you can cause damage to the fabric of the garment and this can lead to a loss of qulaity in the print or the
fabric itself.
synthetic
If you are unsure of what wash to use please refer to the wash labels section later in this
guide and, if this information is unavailable, we would advise that you select a gentle
wash to avoid damage to your clothes. Conversely, washing a cotton item that requires
a higher level of agitation on a synthetic program may not clean it properly.
This rest of this section will explain the various synthetic wash options and what they
are used for.
synthetic 60°C
The synthetic 60°C cycle should only be used when the care label of the garment specifically states that it can be used for dirty synthetic or mixed synthetic garments.
Uses detergent compartment 2
Ideal for: Heavily soiled synthetic or mixed synthetic textiles including coloured items
Can be used with: Half load Approximate cycle time: 100 minutes
baby wash
This program has been specifically designed to clean baby clothing by using a slightly
longer agitation stage and higher temperature to help remove stubborn staining and
at the same time remain gentle to the clothes and rinse well.
Uses detergent compartment 2
Ideal for: All baby clothing
Can be used with: Half load Approximate cycle time: 122 minutes (50°C)
10
synthetic 40°C
The synthetic 40°C cycle is the most common synthetic cycle used and should suit
most everyday synthetic or mixed fibre garments.
Uses detergent compartment 2
Ideal for: Medium soiled synthetic or mixed synthetic textiles including coloured items
Can be used with: Half load Approximate cycle time: 81 minutes
sport wash
Another special program that has been designed to clean sports wear such as tracksuits, jogging wear and gym wear to keep it looking good for longer.
Uses detergent compartment 2
Ideal for: All baby clothing
Can be used with: Half load Approximate cycle time: 91 minutes (40°C)
synthetic cold
Use this cycle where you have delicate synthetic or mixed fibre garments that may be
damaged by heat.
Uses detergent compartment 2
Ideal for: Lightly soiled synthetic or mixed synthetic textiles including coloured items
Can be used with: Half load Approximate cycle time: 83 minutes
curtain wash
This is a program designed specifically to clean mixed fibre curtains which often have
delicate surfaces, specifically tuile, diolen and dralon curtains but it can be used for
other similar delicate items.
Uses detergent compartment 2
Ideal for: All synthetic curtains, other delicate items
Can be used with: Half load Approximate cycle time: 130 minutes (40°C)
11
Delicate Washes
Often delicate items, especially machine washable wool or wool mixed fabrics, require
an even more gentle wash than the synthetic washes in order to give the best possible
care for you clothes. These programs have a still lower drum agitation and so are genteler to your clothes and none will heat above 30°C or offer the full spin speed, all these
programs will spin at the lower speed.
delicates
It is almost very important that, when washing wool or woolen mix items that you
use a detergent for that specific purpose. Failure to use the correct detergent will
almost certainly result in damage, primarily shrinkage, to your clothes which cannot be
reversed.
delicate 30°C
The delicate 30°C cycle is designed with a very gentle wash action to care for very delicate fibres such as silk mixtures, polyester, polimiads and so on. The need for this cycle
will be shown on your fabric care label.
Uses detergent compartment 2
Ideal for: Slightly soiled wool or delicate textiles including coloured items
Can be used with: Full load Approximate cycle time: 98 minutes
delicate cold
As above only with no heating of the water where it is not required.
Uses detergent compartment 2
Ideal for: Lightly soiled wool or mixed delicate textiles including coloured items
Can be used with: Less than half load Approximate cycle time: 83 minutes
12
handwash
You can use the special handwash cycle to clean garments that are marked as being for
handwash only thus saving you the need to handwash any items. However, particular
care must be paid to the detergent requirments for each fabric type, please refer to the
fabric care label on the garment for more information.
With the above in mind with the detergent requirements, any fabric type can be
washed using this program except wool.
Uses detergent compartment 2
Ideal for: Lightly soiled synthetic or mixed synthetic textiles including coloured items
Can be used with: Half load Approximate cycle time: 89 minutes (30°C)
wool 30°C
The wool 30°C cycle is designed with a very gentle wash action to care for both hand
and machine washable woolen items. However it is extremely important to use the
correct “Wool” detergent when washing woolens as well as to use less than half the
drum capacity to allow these items to move freely around the drum.
Uses detergent compartment 2
Ideal for: Lightly soiled wool items
Can be used with: Less than half load Approximate cycle time: 65 minutes
As above only with no heating of the water where it is not required.
wool cold
Uses detergent compartment 2
Ideal for: Very lightly soiled wool items
Can be used with: Less than half load Approximate cycle time: 54 minutes
Please remember that your choice of detergent is vital to get outstanding
results when using woolen and delicate cycles
13
Additional Programs
additonal
Often delicate items, especially machine washable wool or wool mixed fabrics, require
an even more gentle wash than the synthetic washes in order to give the best possible
care for you clothes. These programs have a still lower drum agitation and so are genteler to your clothes and none will heat above 30°C or offer the full spin speed, all these
programs will spin at the lower speed.
rinse
This feature allows you to do an additional rinse and spin cycle on it’s own
spin only
This program gives a spin at normal speed should you require only to spin some items.
drain only
This option will simply drain the machine.
Program Options
options
The program option buttons allow more flexability in the programs and for you to
tailor the programs to the way in which you want them to work. They are also required
for some fabrics, such as the “no-spin” option which is required for delicate silks and
suchlike. Please note the symbols below and, in the previous guide to each program,
you can quickly see which options are available on which programs as some options
are not available on all programs since either they are not required or they could prove
detrimental to the type of fabric that the program is designed to be used with.
no spin
This function, when selected as indicated by the indicator lamp, cancels any spin on
the program which you select.
The “no spin” function is especially useful for very delicate items that you do not wish to
spin or the clothing may be damaged such as fine wool, silk mix or handwash items.
extra rinse
The extra rinse is an option that adds one extra rinse to the program and this especially
useful for people with sensitive skin where you wish the clothes to be as detergent and
fragrance free as possible.
easy iron
Easy iron reduces the creasing in your clothes making them easier to iron.
14
Laundry Symbols
symbols
All clothing manufactured has laundry symbols on the garment’s labelling that will
give an indication of the recommendations for washing without causign damage to
the garments as well as extending the life of them. Washed incorrectly some items may
become damaged in a few washes or it could take many for the item to become damaged. It is important that you follow the labels as much as possible to ensure that your
clothes last as long as possible and remain looking new.
In normal circumstances the main five laundry symbols are shown below although
there are various options shown with these symbols as the maximum temperature suitable will be shown in the “bucket” where applicable.
Normal Wash Process
Any program can be used dependendent on the temperature indicated but
a vigorous wash process is recommended. Pre-treat stubborn stains.
Mild Wash Process
“Easy care” coloured wash: reduce the quantity of laundry. Pre-wash only if
the textiles are heavily soiled. Avoid spinning or do spin for short periods
only to minimise the risk of creasing. Maximum temperature will be indicated in the bucket.
Very Mild Wash Process
For articles e.g. in machine-washable wool. This washing cycle ensures a
low mechanical treatment. Reduce the quantity of laundry substantially, the
drum should be not more than on-third full. Select an appropriate delicates
washing program.
Pay particular attention to the detergent instructions as use of the wrong
detergent me irreparably damage delicate items.
Do Not Wash
Articles marked in this way must not be washed. They may be sensitive to
any kind of wet treatment or be unsuitable for washing in a washing machine because of their size.
Hand Wash Only
Garments with symbol can only be hand washed or washed in your machine using the special hand wash program at a water temperature between 30° C and a maximum of 40° C, depending on the particular article.
15
Section 3: Using You Machine
use
Your machine has been designed with great care and thought to be as simple to use as
possible and, now that you understand the various programs and how the timer dial is
arranged, you can see that it is as intuative as possible.
This section is all about how to use your machine and offers advice on getting the
most from your ISE.
First Use
When your machine is delivered you may find that there is some residual water from
factory testing in the machine, this is nothing to be concerned about and is perfectly
normal.
Although not absolutely necessary we do recommend that you run a “maintenance
wash” when the machine is first installed as it accomplishes several things at once:
•
•
•
You establish that the machine is operating normally
That the machine is installed correctly
That the machine is clear and clean internally
It also allows you to see how the machine operates and become familiar with the controls and soap dispencer section.
To carry out a maintenance wash:
•
•
•
•
•
•
Place a normal dose of bleach containing detergent (see page 12 ) in compartment 2 of the soap drawer
Do not place any clothing in the drum
Turn main control dial to the Cotton 90°C wash
Ensure that the door is closed and latched
Press the Start/Pause button
Allow the program to complete
This will clean and refresh the insides of the machine and a regular maintenance wash
is recommended about once a month to keep the inside of the machine clean, fresh
and operational. Should you ever encounter any malodour or smell from the machine
please run at least one maintenance wash to clear the smell.
16
Laundry Sorting & Detergents
The very first thing to do is sort your laundry into white/lights, separate coloured or
dark items and articles that require special treatments, such as wool or hand wash
clothing. This is essential to prevent dye transfer and to keep your clothes looking good
for longer.
use
It is also important that you use the correct detergent for these types of clothing and
this can be very confusing.
It is no more or less expensive than simply using the same detergent for all as many
people do, but it will ensure far superior results from your washing machine as well as
helping to retain your clothes good looks for much longer.
You will require a minimum of two detergents and possibly three if you wash delicates:
•
Normal detergent containing bleach
•
Colour detergent that does not contain bleach
•
Special detergents for wools and delicates
From an environmental standpoint we recommend Simply by Aquados for both
normal biological detergent or non-biological and also for colour detergent. This is the
only detergent which will deliver excellent results and environmental benefits. This is
also the only detergent currently bearing the EU Eco Flower mark.
You can find out more at www.simplywashing.com
Should you wish to wash woolen, part woolen or other delicate items it is essential that
you use a mild detergent or you will damage the clothing. We would suggest that a
mild detergent such as Woolite is ideal for such garments.
Important Notes:
Bleach containing detergent is normal powder or tablets only and this includes both
biological and non-biological powders or tablets.
Colour detergent does not contain any bleach at all.
No liquid or liquid tablets contain bleach.
Normally no delicate detergents contain bleach.
WARNING!
Use only detergent that is recommended for domestic automatic (front loading)
washing machines as other detergents such as commercial or toploader/twin
tub detergents can cause damage that will not be covered by your warranty.
17
Detergent Drawer
For most washes all that is required is to use compartment “2” of the soap dispenser
and the middle fabric conditioner one if required. Compartment “1” is only used for prewash detergent where required by the cycle chosen.
use
Compartment 2
Main Wash
Softener
Compartment
Compartment 1
Pre-Wash
Loading Laundry
In order for the washing machine to clean your clothing the garments placed in the
drum must have room to move. This means that you cannot cram the machine full and
effectively overload the drum. Should you do so then there is a risk of damage to the
machine and the clothing as well as inferior cleaning results so it is highly inadvisable.
To load correctly you should always have an approximate 10cm gap (roughly the width
of your hand) between the top of the laundry and the top of the door as shown in the
photograph below:
This shows the correct amount of space that is required to obtain the optimal results
from your ISE and, loaded correctly with the correct detergent being used your machine will deliver great washing results.
18
Starting The Machine
Once you have loaded the machine and placed the detergent in the correct compartment of the soap drawer or placed the detergent in the drum you are ready to close
the door and select your desired program.
use
Should the door not be closed correctly or hindered in some way the safety features
of the machine will not allow it to start and if this should happen then the start/pause
light will blink to indicate that the door is not correctly closed. Once closed the program and options can be set.
Simply select the desired program using the main program selector knob. As you do
this the start indicator will illumiate.
Select any options that you wish to use on that program and the corresponding indicators will light.
To begin the program now press the Start/Pause button once and the program will
start.
Changing The Program
If you have selected a program and wish to change it follow this procedure:
• Press the Start/Pause button
• Turn the program dial to the “O” (Off ) position
• Set the program dial to the desired program
• Press the Start/Pause button again to start the new selection
Cancel A Program
Should you wish to cancle a program follow this procedure:
• Press the Start/Pause button
• Turn the program dial to the “O” (Off ) position
• Set the program dial to the draining or spinning program
• The program ready light will illuminate
• Press the Start/Pause button again to drain and clear the program
Program End
Once the Program has ended the machine will automatically stop and the program
end light will be lit. Turn the program selector to the “O” (Off ) position to switch the
machine off.
19
Section 4: Safety & Security
safety
Your ISE washing machine has several safety and security features built in in order to
protect your clothing, children and the machine itself. It is important that you familiarise yourself with these features
Balance Protection
The machine has a feature built into the electronics that will detect what is known as
an “out of balance” or OOB situation where the weight of clothing in the drum could
cause damage by being spun through excessive vibration. Things that are liable to
make this feature engage is where single items of clothing, especially heavy items such
as towels or jeans, would not distribute evenly around the drum before the machine
spins.
The machine will attempt, before entering into a spin cycle, to sort and distribute the
washing to give as even a balance as possible thereby minimising any vibrations and
making the machine smoother and quieter in operation.
However, should the machine not be able to evenly distribute the laundry to ensure
that the machine spins in a safe and controlled manner the spin cycle will abort after
several attempts to compensate.
In order to avoid this situation we would suggest washing several items at once or,
where this is not possible, add “ballast” to the machine so that it can spin safely. This
practise of not washing single items where it is avoidable is far more efficient and
environmentally friendly.
Overfill & Overheat
Your machine is also equipped with sensors that will detect both an overfill and
overheat situation. Both of these features work in the background and require no user
intervention.
Should either of these features be activated an error message will be indicated by way
of a fault code and you should contact your nearest service centre for further assistance.
20
Child Lock
All ISE washing machines feature a child lock for safety purposes.
safety
On the ISE2 series the child lock prevents children from making any changes to the
program or settings whilst the machine is running.
Child lock is activated by pressing the first (Start/Pause) and third button (Extra Rinse)
on the control panel at the same time for more than 3 sec. When child lock is activated,
LEDs on the function buttons blink to indicate that child lock is active.
In order to deactive child lock, the same buttons (1st and 3rd) should be pressed again
for more than 3 seconds. Deactivation of child lock is shown by blinking of LED on
Start/Pause button.
WARNING!
This feature will deactivate all controls and function buttons whilst it is active!
Power Failure Protection
Your machine has a feature whereby if you suffer from a power loss or power cut, that
when power is restored the machine will continue operation from the point at which it
stopped.
This is not harmful to your machine.
Drain Protection
Your machine also has a safety feature that will prevent it from spinning when full of
water, for instance if the machine fails to drain for any reason.
This is to prevent possible damage to the machine by trying to spin too much weight
as well as to stop water leaking. Should this happen please contact your nearest service
centre for more assistance.
21
Section 5: Care & Maintenance
care
Taking a little care and regularly cleaning your machine will ensure a longer life and
better performance.
Soap Drawer
The soap drawer can easily be removed for cleaning purposes, simply press the blue lock in the softener compartment as shown and pull the drawer out.
It is advised that this is cleaned approximately once a
month as well as the inside of the drawer to prevent a
build up of excess detergent and softener which can lead
to mould or mildew forming in the drawer.
The siphon plug can then be removed for cleaning as, if
this becomes blocked, the machine may not take fabric
conditioner correctly.
Pump Filter
The filter is located at the bottom right hand side of the machine behind the lower
kickplate and can be easily accessed for cleaning. Please remember to clear this on a
failry regular basis as small items such as coins and pins inadvertanlty left in pockets
will end up here. However it is vital that pockets are checked as items left in clothing
can cause severe damage to the machine and any damage may not be covered by
your warranty if it is caused by external objects.
It is recommended that the filter is cleared on a monthly basis.
WARNING!
Failure to clear the filter on a regular basis can cause drainage and or noise
problems!
22
To access the filter the lower kickplate has to be
removed. To do this simply push gently upwards
and pull the kickplate toward you.
care
This should allow the kickplate to be removed easily
and without any damage.
Once the kickplate is removed the filter can be
unscrewed and removed to clean it.
Please note that there will be some water in the
sump at this point which will come out so before
you remove the filter runs a “Drain” cycle to clear as
much water as possible, however there may still be
up to 2-3 litres of water in the sump.
Once the filter is removed you will be able to see the blades of the drain pump and you
can see if these are clear with no objects blocking them or impairing their way.
The filter should be clear of all objects and any fluff, coins, pins or any other materials
should be removed to prevent damage or a failure to drain.
WARNING!
Always remember to place towelling on the floor to catch excess water!
Please note that damage caused by foreign objects or faults arising from these
being present may not be covered by your warranty.
23
Section 5: Troubleshooting
help
Very often simple problems are easily rectified often without any need for a service
engineer to visit. Should you encounter any behaviour that you feel is unusual or not
normal in some way please pay particular attention to this section before contacting a
service centre.
The machine will not start or power on
Check the plug and fuse for the machine amking sure that power is available to the socket to
which ithe machine is plugged into.
Start/Pause button not pressed
Program knob set to “O” (Off ) position
Door not closed
The machine will not fill with water
Is the water inlet tap switched on and the hose not bent or obstructed?
Door not closed
The machine will not drain water
Ensure that the drain hose is not obstructed or bent and that the drain is clear. This is especially inportant where connected to a sink trap.
Pump filter may be obstructed, please check that it is clear
The machine vibrates
Ensure that the transit straps have been removed (see Page 1)
Ensure that the feet have been adjusted and that the machine is level (See Page 4)
Ensure that the load is balanced as best as possible
Is the flooring that the machine is installed on solid? It is possible that installation on a
wooden “floating” floor can lead to vibration.
There is foam in the detergent drawer
Too much detergent has been used, please reduce the doseage.
Incorrect detergent used, please use a recommended detergent for domestic use automatic
washing machines only
The washing results are poor
The single biggest cause of this is overloading, please see page 18 of this guid for loading
advice and instruction.
Have you selected the suitable program for the laundry type?
Incorrect detergent used, please use a recommended detergent for domestic use automatic
washing machines only or insufficient detergent used to clean correctly.
Ensure that the detergent dose meets the criteria based on soil level (how dirty the clothing
is), the water hardness for the area and the amount of laundry being cleaned.
24
Very often simple problems are easily rectified often without any need for a service
engineer to visit. Should you encounter any behaviour that you feel is unusual or not
normal in some way please pay particular attention to this section before contacting a
service centre.
help
The water drains as it fills
The drain hose is set too low and must be raised in accordance with the installation instructions on page 3
There is dirty water in the machine after use
The machine is filling with water from your drainage system. Very often this is a result of the
drain hose being too low and connected to a sink trap or a fault with your plumbing which
may require the attention of a plumber.
No water is seen in the drum
No fault, today’s energy efficient washing machines use much less water and the water will
rarely, if ever, be seen above the level of the door.
There are residues on the clothes
Invariably caused by overloading or overdosing detergent.
The machine does not spin
Imbalanced load, see page 20
Blocked or obstructed filter, see page 22-23 for instructions on cleaning the filter
25
Error Codes
Should a fault or error be detected your machine will display this by flashing the lights
as shown below.
Error 01
Start/Pause Flashes
The door is not detected as being closed, close the door.
Error 02
Low water level, ensure that water supply is okay
Error 03
Pump failed or pump blocked, clear filter
help
Program Ready Flashes
Start/Pause & Program Ready Flash
Error 05
Start/Pause & Program End Flash
Heater or heater sensor failure, power off the machine and call service centre
Error 06
Program Ready & Program End Flash
Motor fault detected, power off the machine and call service centre
Error 07
Start/Pause, Ready & Program End On
Configuration error, power off the machine and call service centre
Error 08
Start/Pause, Ready & Program End Flash
Motor error detected, power off the machine and call service centre
Error 09
Program Ready & Program End On
Over or under voltage supply detected once resolved the machine will restart
N.B.: Error code 04 not used on this model
WARNING!
Please ensure that the appliance should only be serviced by a competent service
engineer and that you should not attempt any repairs beyond maintenance
described in this manual.
There is a risk of electric shock from internal components even when mains voltage is removed.
26
ISE Limited
19-21 Nursery Street, Kilmarnock, Scotland
0845 226 1268
www.iseappliances.co.uk