1
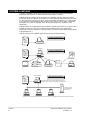
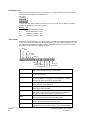
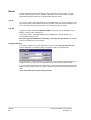
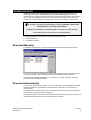
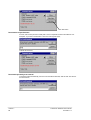
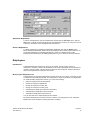
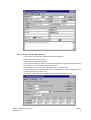
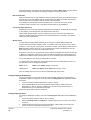
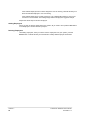
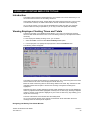
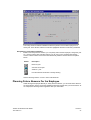
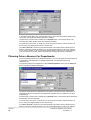
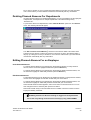
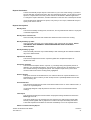
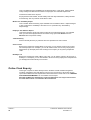
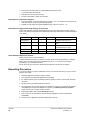
TORUS FOR WINDOWS
USER GUIDE
TCS-UG-T7-2
MANUAL CONVENTIONS
What You Need To Know
This guide assumes that you are already familiar with Microsoft Windows terminology and
navigation techniques, including how to work with standard Windows menus, mouse, clicking
and double-clicking, dialog boxes etc. If you are not familiar with Windows, please refer to your
Windows documentation before using TORUS.
In general, when this guide indicates a procedure using toolbar buttons or mouse actions, it
takes for granted that you know the alternative procedure using only the keyboard. For example,
in most cases, you will be directed to “click the Find toolbar button”, rather than “select the View
Find command or press Alt+V, F”.
General Typographic Conventions
This guide is organised in sections, beginning with Introduction, Installation then
conventions..Getting Started..and so on to get you to learn and use the program efficiently. At
the end of this guide, you will find the Appendix section that covers Cabling and Error
Messages..etc.
This guide uses the following typefaces.
Monospaced
This typeface represents text to be entered on the keyboard. It is used for anything you must
type literally (such as enter Holiday leave).
Boldface
This typeface indicates a key on your keyboard. For example, "Press Esc to exit."
Keyboard conventions:
• Not all keyboards have their keys labelled the same. In this guide, all key names are shown
using Boldface as mentioned above.
The Enter key is used is this guide. This key may be labelled as Return or
keyboard.
•
•
•
•
The Insert key is used is this guide. This key may be labelled as Ins on your keyboard.
The Delete key is used is this guide. This key may be labelled as Del on your keyboard.
The four arrow keys are shown as Up, Down, Left and Right arrow keys.
Where keys are used in combinations, they will be shown with the + sign. For example,
Alt+F means to hold down the Alt key while pressing the F key.
Where keys are used in sequences or procedures, they will be shown separated with
commas. For example, F10,F,E means to press F10 then press the F key then press E in
successive keystrokes.
•
*
↵ on your
•
Notes Box
*
Notes boxes such as this contain important information set off from the text of
the current subject.
TORUS for Windows User Guide
TCS-UG-T7-2
Version 7
1
SYSTEM OVERVIEW
TORUS is a powerful software tool to be used with a computer to access and manipulate
Employees’ Times Data on Timelink 4000 Recorders directly or remotely.
TORUS allows the collection of the information from Timelink units then apply your working
rules to the clockings collected, this enables you to edit employees’ data conveniently from the
PC. This information can then be kept for as long as required, thus allowing you to take reports
on this data over a period that may span a week or many months or even years. Adjustments
are made by the means of definable codes, allowing all changes to be reported on, and
categorised.
TORUS Reports can be displayed on the window for previewing or printed on your printer. Also,
TORUS can save your reports as computer text files enabling them to be electronically
transferred to another computer or to be imported by your other computer applications (Payrolls
or Spreadsheets etc.).
TORUS enhances your Timelink system in several ways as illustrated below:
Standard Timelink System
Timelink
4000
TORUS
Standalone TORUS System
Timelink
4000
PAYROLL
Main TORUS
Multi-User TORUS System
Timelink
4000
Downloads, edits Timelink's Data, updates Data Files on
File Server. Produce Online and TORUS's specific Reports.
TORUS's Program
and Data Files are
stored in here.
File Server
Other PCs from different departments connected to the network can run TORUS and produce TORUS's Specific Reports.
Version 7
2
TORUS for Windows User’s Guide
TCS-UG-T7-2
Features
TORUS contains powerful features to improve and enhance your every working day in collecting
and editing Employees' clocking times from your Timelink unit(s), producing reports for
management purposes and interfacing to payroll. Major features of TORUS are:
SELECTIVE EDITING / REPORTING
TORUS allows you to select a number of Employees then apply appropriate functions to the
selected Employees, such as Reports, change Department, change GROUP, SHIFT, booking
or unbooking Absences..etc.
In addition, your employees selection can be saved or retrieved for future operations.
POINT AND CLICK VIEWING / EDITING
In most TORUS data windows (BROWSERS) such as Weekly Time, Monthly Planner and
Whole Year Planner Windows, use your mouse to place the pointer onto a date or a Daily Total.
TORUS will tell the status of that date or Total in the Status bar. If you wish to amend the
information, just double-click the MouseButton then TORUS will bring up the appropriate Editing
Windows.
DEPARTMENTAL AUTHORISATIONS
Users of TORUS system can be assigned to access to certain Employees by Departmental
Authorisations feature. For examples, user FRED can be assigned to access and manage
information of Employees in ADMIN Department while user JANE can be assigned to access
Employees in ADMIN and STORES Departments.
AUTOMATIC DATA DOWNLOAD
You can set up TORUS to automatically download all installed Timelinks at a specified time or
repeatedly at an interval which can be set from 1 minute upward.
OTHER FEATURES
•
•
•
•
•
•
•
•
•
•
•
•
•
Lookup tables for easy and accurate data entries
Infringe Clockings and Edited Totals highlighting both on screen and Printer
Rapid Employees’ Times Editing Procedures
Week, Month and Year Absence Planning
Support Flexitime and Fixed Hours
Support multiple weekly or monthly
Comprehensive Management Reports
Detailed System Audit File
System Password Protection
Multiple Timelink Units Supported
Single or Multi-Users
Data Export
Data Archive and Restore facilities
TORUS for Windows User Guide
TCS-UG-T7-2
Version 7
3
Minimum System Requirements
TORUS runs on the intel Pentium or compatible PC. The PC also requires the following:
1.
2.
3.
4.
5.
6.
Pentium 133 MHz CPU or more power processor
VGA Monitor (SVGA Colour preferred)
Microsoft Windows 95/98/ME/NT4/2000 or later
32MB or more of system RAM (the more the merrier!)
At least 1 free Serial (COM) Port
Pointing device (mouse/trackball)
Employees
Up to 50
Up to 100
Up to 200
Up to 500
501 or more
Disk Space
40MB or more
50MB or more
70MB or more
150MB or more
380MB or more
The figures above do not taken into account Employees’ image files if you use the Photos
feature.
For remote connections from PC to Timelink unit, modems with full Hayes commands
compatibility should be used. We recommend you to use our approved modems. Please contact
Technical Support for details.
TORUS supports all printers you installed in WINDOWS. Reports are directed to the screen by
default and can also be directed to disk files.
*
For Multi-User Systems - Networks supported are:
Netware 3.1x and 4.x, Windows for Work Groups 3.11, Windows NT 3.5x/4.x, PCLAN or MS-LAN.
*
Not all Network server support the new long file name when saving reports in
TORUS. Windows NT/2000/95/98/ME systems support long file name.
Version 7
4
TORUS for Windows User’s Guide
TCS-UG-T7-2
GETTING STARTED
This section provides all the information you need to install TORUS on your computer and begin
running TORUS.
Contents of TORUS Package
The following items came with your TORUS package:
• Diskettes containing TORUS's System Files
• This User's Guide (for general Users of TORUS system)
• Admin. Manual
(for Supervisors to maintain TORUS system)
Installing TORUS
Standalone Version
TORUS comes with an installation program called SETUP. It automatically copies the TORUS
files from floppy drive to your hard disk or Network drive.
To install TORUS on to your Hard Disk:
1. Insert the TORUS Disk 1 into a floppy drive, normally drive A ( or B).
2. From the Windows Program Manager, select the File Run command.
3. Type A:\SETUP (or B:\SETUP) then press <Enter>
This will invoke the TORUS installer.
Then follow the instructions issued by SETUP.
After complete, a group called TORUS8 is created in your ‘Programs’ Menu. Select
Start/Programs/Torus32/T8Admin to run the administration program.
If you wish to have TORUS programs on your desktop, run 'Windows Explorer' from the
Start/Programs Menu. View the files in TORUS8 directory, drag and drop the files T8MAIN.EXE
and T8ADMIN.EXE on to the desktop to create short cuts. Close Windows Explorer. Double
click the T8ADMIN.EXE icon to run administrator program.
Information on how to setup COM ports, system globals etc..using T8ADMIN.EXE, please refer
to the Admin. Manual.
Multi-User Version
TORUS can be installed in any directory in the File Server. The procedure is the same as the
Standalone Version as described above. However, we recommend you to install it in its own
directory. For proper Multi-User operation, the following points must be noted:
•
All TORUS’s Programs and Data Files must be installed on the File Server.
•
The directory where TORUS’s files are installed must have Create, Delete, Read, Write and
Modify attributes.
•
Work stations must run TORUS from TORUS’s own directory on the network. No file
search paths should be used.
*
You should have NETWORK SUPERVISOR privilege or equivalent over the
Network before installing TORUS on to the Network.
To install TORUS on to your File Server:
1. Log on to your Network as SUPERVISOR or equivalent
2. Decide where you want to install TORUS in your File Server
3. Follow the installation commands as laid out in “Standalone Version”
See “SYSTEM SETUP” on how to create work stations to run TORUS.
TORUS for Windows User Guide
TCS-UG-T7-2
Version 7
5
Starting TORUS
You can start TORUS by double clicking on the TORUS icon in the TORUS program group.
TORUS allows multi-operator to use the system, to make it a secure system, you must identify
yourself, or "log on," and enter a password each time you start TORUS.
In the Log on dialog box, type your username and password and then click the OK button. Note
that TORUS remembers your log on name from last time and place in the User name field to
save you typing.
Exiting TORUS
It is very important to exit TORUS properly so that changes to Data files are correctly updated
and closed. There are 2 ways to leave TORUS:
1. Choose the Exit option in File Menu.
2. Keep pressing the Exit key Alt+F4.
You will be prompted before exiting the program.
*
Never use the computer's power switch to quit TORUS, or you may lose data.
Always use Exit TORUS a recommended above so that TORUS can save changes to
the working files properly.
Getting Help
While running TORUS, you can get help in several ways:
Version 7
6
1.
The Status line at the bottom of the window. As you move around the window and perform
tasks, it provides a basic description of the feature you are using.
2.
The Help screen. Press F1 key to use the online help system.
3.
The Help Menu. It contains the following options for obtaining information about TORUS.
Use this option
To get..
How to use Help
help for using the help options
Contents
The complete TORUS online help system
About TORUS
TORUS information window
TORUS for Windows User’s Guide
TCS-UG-T7-2
WORKING WITH TORUS
This chapter introduces you to the TORUS Desktop and various features, explains how to carry
out your tasks using Windows items such as Menus, icons etc.
TORUS Components
TORUS allows you to open and simultaneously work with multiple windows. The TORUS
Desktop Window is the main window where all other windows belong to TORUS are opened
and contained in.
Listed below are major TORUS components that you will be working with for most of the time in
the TORUS Desktop.
Browsers
Browsers are TORUS Data Windows that allow you to conveniently view and if authorised, edit
the Employee information that is currently stored in the PC. You can browse and edit
Employee’s:
•
Weekly Time Sheets
•
Monthly Absence Planners
•
Yearly Absence Planners
•
Employee Job Sheets (JOB COSTING MODULE ONLY)
Tables
In TORUS, tables are used to present referenced Data codes such as Public Holidays, Absence
Reasons, Departments etc. All Tables are in the File Open Menu.
Reports
TORUS permits you to open and view multiple reports, this is useful if you need to compare
information between reports or different Employees. The number of Report Windows to be
concurrently opened depends on your Computer’s Resources, that is the more power your
Computer with more memory installed, the more Windows you can open at the same time.
TORUS Basics
TORUS Desktop is a flexible, intuitive and user friendly operating environment for accessing
and editing Employees Time&Attendance information. As well as Menus, almost all features of
TORUS are available at a touch of a button. Common tasks you can carry out from with TORUS
desktop are:
•
Open and work with different types of TORUS windows
•
Adding, editing and deleting Employees’ information
•
Browse Employee’s Timesheets and Planners
•
Obtain Online or Database reports
•
Download Data
and more..
Arranging and Switching Windows
You can switch between the currently opened windows by clicking on the Window Menu. You
can also use the commands on the Window menu to reformat the current window layout such
as cascading or tiling them.
In addition, almost all windows can be resized, repositioned, minimised or maximised using the
standard Windows techniques.
TORUS for Windows User Guide
TCS-UG-T7-2
Version 7
7
Date Entry Tools
Whenever TORUS requires a date entry, it allows you to make date entry in a number of ways.
A typical date entry field may look like as below:
You can enter the date manually in the entry box or you can push the four buttons provided to
increase or decrease the date in the entry box.
Button
To
<<
<
>
>>
Decrease the date by 1 week
Decrease the date by 1 day
Increase the date by 1 day
Increase the date by 1 week
The Toolbars
All Browser and Table Windows in TORUS contains a toolbar that provides buttons as shortcuts
to commonly used menu commands. All toolbars have a same set of buttons and their functions
are similar but appropriate to the type of Window the toolbar is attached to. Basic functions of
the buttons on the toolbar are explained as below:
Close
Open
Top
Previou
s Next
Bottom
Find
Print
Previous Period
Current Period
Version 7
8
Copy
Next Period
Close
This button closes the Window that is currently opened and
active. Same as option Close in the File menu.
Open
This button calls up the Open File Dialog. Same as option
Open in the File menu.
Top
This button positions the current record at the top of the List of
the current Window. i.e. Employee 1 or Department 1. This is
the same as option Go to Top in the View menu.
Previous
This button displays or highlights the previous record. Same as
option Previous in the View menu.
Next
This button displays or highlights the next record. Same as
option Next in the View Menu.
Bottom
This button positions the current record at the bottom of the
List of the current Window. i.e. Last Employee or Department
99. Same as option Go to Bottom in the View menu.
Find
This button calls up the Find Dialog such Find Employee or
Find Text. Same as option Find in the View Menu.
Print
This button prints the information in the current Window to the
printer. Same as option Print in the File menu.
Previous Period
This button shows the information for the Previous Period of
the period currently in display. Same as option Previous Period
TORUS for Windows User’s Guide
TCS-UG-T7-2
in the View menu.
Current Period
This button shows the information for the Current Period i.e.
the Period that includes today’s date. Same as option Today in
the View menu.
Next Period
This button shows the information for the Next Period of the
period currently in display. Same as option Next Period in the
View menu.
Copy
The button copies the information in current Window to
clipboard. Same as option Copy in the Edit menu.
Depending on the type of window, only the buttons that are applicable to the active window are
enabled.
The Status Bar
The status bar is displayed at the bottom of the main TORUS Desktop window. It shows helpful,
informative text about various features of the system, giving you quick summary or reminder
about their contents, or the actions they perform.
For example, when moving the mouse pointer over the buttons in the toolbar, the status bar
shows the description of what each button does. Likewise, highlight a menu option to display a
description of what it does.
Additionally, in the Browsers, the status bar shows the date and absence reason (if any) of the
highlighting date or clocking that the mouse pointer is pointed to.
Selecting Employees
TORUS allows you to select a number of Employees then apply appropriate functions to the
selected Employees, such as Reports, change Department, change GROUP, SHIFT, booking
or unbooking Absences..etc.
You can select employees by a number of methods; individual or multiple. There is also an
option available to select all Employees. All selecting methods to be carried out from the
‘Employees List’ window.
Select Individual Employee
From the ‘Employees List’ window, activate the ‘Select’ option from the ‘Edit’ menu or click the
‘Select’ button.
Select Multiple Employees
With multiple Employees selection method, you can select employees by department, by
Timelink unit or by gender status of employees.
From the ‘Employees List’ window, activate the ‘Multiple Select’ option from the ‘Edit’ menu,
the following dialog appears to take your entries for selecting.
You can specify more than one entry to select Employees. For examples, you can select all
females in Finance department
The ‘Clear List before selecting’ check box is unchecked as default. Check this if you wish to
empty the current selection list before selecting your new employees.
TORUS for Windows User Guide
TCS-UG-T7-2
Version 7
9
Users
TORUS allows different users with different access capacities to use the system. To avoid
misuses, TORUS requires users to ‘Log On’ to identify the user so that TORUS can apply
appropriate privileges for that user to complete tasks within the system.
Log On
To log on the system, select Log On option from the User Menu. In the Log on dialog box, type
your username and password and then click the OK button. Note that TORUS remembers your
log on name from last time and place in the User name field to save you typing.
Log Off
Logging off TORUS will reinstate DEFAULT USER to the system. All your privileges such as
editings or reports will be cancelled out.
To log off the system, select Log Off option from the User Menu. TORUS will ask you to
confirm before logging you off.
Note that logging off TORUS does not actually close down and quit TORUS. Use the Exit
option from the File menu to quit TORUS.
Change Password
If you need to change your current password to a new one, select Change Password option
from the User Menu. The following dialog box appears to take your new password.
For security reason, TORUS requires you to verify your current password before allowing you to
change to a new one. Enter your current password in the ‘Verify Current Password’ field.
Type your new password twice in the ‘New Password’ and ‘Retype Password’ then push the OK
button to confirm. Select Cancel if you wish to cancel and your current password will remain the
same.
* Note that TORUS will not allow blank passwords.
Version 7
10
TORUS for Windows User’s Guide
TCS-UG-T7-2
DOWNLOAD DATA
Collecting information from the Timelink units for processing by the TORUS is known as
downloading data. This is an important process in your TORUS system. To ease the
download process, TORUS keeps track of the last successful download date for each Timelink
unit, so when downloading, you don't have to remember how many days to download. This
enables you to choose whether to download daily, once every 2 or 3 days, or even weekly.
*
We strongly recommend to download data every day. HOWEVER, YOU SHOULD
DOWNLOAD DATA AT LEAST ONCE A WEEK.
In a Multi-User installations, downloading Data can only to be carried out at the
work station which is connected to the Timelink Network.
For greater flexibility, TORUS offers 2 methods to download your data;
1.
Manual Download.
2.
Automatic Download.
Download Manually
To download data manually, pull down the Times menu then select the appropriate option:
If you have more than one Timelink unit installed, a list of Timelink unit(s) will be presented to
you ready for selection. Select Timelink(s) or all then press OK to start the download.
If a Timelink unit is already downloaded on the current day, TORUS will ask you to select a
previous date to download back dated.
Download Automatically
This is a very useful feature in TORUS. You can set up TORUS to automatically download all
installed Timelinks at a specified time or repeatedly at an interval which can be set from 1
minute upward.
To download data automatically, from the Communications Window, click the ‘Set Auto’ button,
enter the time or the interval period to download.
TORUS will remember your Auto-Download setting and will apply it every time you start up. The
following samples show you how to set Auto-Download in TORUS.
TORUS for Windows User Guide
TCS-UG-T7-2
Version 7
11
Click this button
Download at a specified time
For this, enter a time (24 hours format) with a colon to separate the Hours and Minutes. For
examples, if you wish to download at 7:45 in the morning then enter;
TORUS will show this;
Download repeatedly at an interval
To download data automatically, from the Communications Window, click the ‘Set Auto’ button.
As shown below;
Version 7
12
TORUS for Windows User’s Guide
TCS-UG-T7-2
*
If you set up Auto-Download, you should not use Screen Saver and ‘System
Agents’ (in Plus! Pack) as this will interfere with the Auto-Download process.
>> Once the Auto-Download process has started, please wait until it completes
then resume your work on the PC.
>> In multi-user TORUS, there should be only one PC setup to Auto-Download
on any one Timelink Network.
Disable Auto Download
To disable Auto-Download, enter 0 (zero).
TORUS for Windows User Guide
TCS-UG-T7-2
Version 7
13
MAINTAINING DATA FILES
TORUS has a number of Data files that are used for storing information not available from the
Timelink unit. In these files, TORUS keeps records of your Employees and Department details,
Groups details and Adjustment codes information.
This Information must be set up correctly by you so that TORUS can function properly. You
should make full use of this information to get the most from TORUS.
To open a file for viewing and/or editing, select Open option from the File menu. The following
window will appear (if a file window is already opened then it’s button will not be available).
Departments
Introduction
The most popular practical method of grouping employees together is by Department. TORUS
gives you up to 99 departments. Each Employee is assigned to a department.
Departments have descriptive names up to 16 characters long. By default, when TORUS
downloads data from your Timelink unit(s), all NEW employees will be assigned to department
number 1 (Default Department). You should assign them to the correct department accordingly.
Users of TORUS system are assigned by SUPERVISOR to access to all or certain
Departments. See TORUS ADMIN manual for information on how to authorise Departments to
System User.
View or Change Department information
To view or change department details, open the Departments window from the File Open
menu, you will then be presented with the Departments window, sorted by department code as
below.
To change the department name, highlight the appropriate department then click the Edit
button.
Version 7
14
TORUS for Windows User’s Guide
TCS-UG-T7-2
Add a New Department
To add a new department, open the Departments window from the File Open menu, click the
New button. TORUS will automatically find the next department code for you. All you have to do
is enter the description of the new department then click OK.
Delete a Department
To delete a department, highlight the appropriate department then click the Delete button.
Before deleting a department, TORUS scans the Employee File to make sure that there are no
employees still belong to the deleting department. If there are, TORUS will list out the
Employees that still belong to the deleting department for you to view then cancel the deletion.
Employees
Introduction
TORUS identifies each employee by his or her ID number. This ID number can be 10
characters or numbers or both. This ID Number can be used as Employee personnel reference
number or Payroll number. This ID number is unique for each Employee, TORUS makes sure
that no two Employees have the same ID number.
Browsing the Employees List
The Employees List contains all Employees currently stored in your System. It provides you with
a method to locate employees quickly, sort employees by names, by numbers or by department
etc. While browsing Employees in this list, you can do the following:
•
Select an employee into the selected list
•
Change an employee’s department
•
Change an employee’s current shift
•
Change an employee’s current group
•
View/Change an Employee’s Personnel information
•
View/Change an Employee’s T&A information
• View/Plan an Employee’s future absences
You can also add new or delete employees from this list.
By default, all Employees are shown in this list. However, only Employees in your authorised
Departments are accessible for viewing information or editing.
TORUS for Windows User Guide
TCS-UG-T7-2
Version 7
15
Sort Employees
In the Employees List, you can sort employees by Name, Number or ID by selecting the sort
button in the Sort by: box. The Auto Search field will change to reflect the sorting you selected.
Try to master the control of the Employees List because it will save you a lot of time.
*
The sorting set in the employees list will be applied to the way you scroll
between employees in the BROWSERS such as Weekly Times, Month and Year
Absence Windows.
Find Employee
In the Employees List, you can quickly locate a particular employee by Name, Number or ID by
using the Auto Search field. To find a particular employee and select him/her as current
employee:
From the Employee List, you can find a particular Employee by Name or Number depending on
the sorting method in the Employees List.
The ‘Auto Search’ field searches the Employee file begins with the characters entered here.
For example, to find employee "BROWN DAVID" do the following:
1. In the ‘Sort By:’ box, tick the ‘Name’ button
2. In the Find field, type B.
3. The List moves its cell pointer to the first employee whose lastname begins with an B.
If the employee you are searching for is not currently highlighted, you can continue to enter
characters into the search control until an exact match is found or you can use the down arrow
key to find the employee. In this case type ‘ROWN’.
View or Change Employee General Information
The Employee General Information window holds the following details:
Version 7
16
TORUS for Windows User’s Guide
TCS-UG-T7-2
View or Change Employee T&A Information
The Employee T&A Information window holds the following details:
Multiplication factors of the four rates
Other settings for Flexitime Employees
TORUS checks Holidays and Sick days entitlements against the Employee's booking and warns
the operator if any over booking of holidays taken place.
The Multiplication Factors are used to calculate Gross (or Premium) Rate.
To change Employee General Information, call up the Employees List, select the Employee you
wanted to change then press the 'I' key.
You will then be presented with the Employee T&A information window, as below.
TORUS for Windows User Guide
TCS-UG-T7-2
Version 7
17
All the Data items in this windows are self explanatory except the ‘Work Type’ entry, this setting
determines whether an Employee is working in Flexitime or Fixed Hours pattern.
Max Credit & Debit
Apply to Flexitime only, for each Employee, this is the total of flexi hours to be carried forward to
the next period. It is only applied when an Employee has Flexi Balance less than the minimum
debit or more than the maximum credit at the end of the flexi period.
For examples, if an Employee has the Flexi Balance of +11:32 at the end of July but the
maximum credit is 8:00 then only +8:00 will be carried forward to August Balance.
Annual Sick days entitlement
Depending on the annual sick paid days entitlement of an Employee, TORUS will give warnings
to the operator if an Employee has over claimed his/her sick days.
With TORUS, each Employee can have a different number of annual sick days entitlement.
However, all NEW Employees will have their sick days defaulted to the setting in the 'Globals'
setting from the 'System' Menu.
Weekly Limits
Use this setting to apply weekly overtimes for an employee. TORUS applies weekly rate
process strictly from RATE1 to RATE6 order. To exclude a rate in this process, set it to 99:59.
Example 1. If you only use 2 paying rates. At the end of a week, if an employee worked hours in
Basic exceeds a certain value, say 37:30, exceeding hours will become OT1 hours then set
Basic weekly rate to 37:30 and OT1 weekly rate to 99:59.
Example 2. If you only use 3 paying rates and you wish to limit weekly rates other than from rate
1 (Basic). For examples, at the end of a week, leave all the worked hours in Basic intact and if
worked hours in OT1 exceeds a certain value, say 16:00, exceeding hours become OT2 hours.
To accommodate this, the setting of weekly limits is as follow:
If a weekly rate is set to 99:59 then TORUS will exclude it from the weekly limits process. For
the case above, set the weekly rates as follow:
Rate1=99:59
Rate2=16:00 Rate3=39:00 (or any hours)
Rate1=99:59
Rate2=8:00 Rate3=99:59 Rate4=39:00 (or any hours)
Also any weekly rate can be set to 0:00 and TORUS still apply the process.
Change Employee Department
The only information you may need to add to your Employees’ Data file is the assignment of
department numbers to employees. To do this, select the Employees List option from the File
Menu then:
1.
Locate the employee whose department you want to change.
2.
Push the Pers.info button and in the Employee’s Personnel info window select the
department you wish to change to. Note that you can only change an Employee to a
department that you are authorised to manage.
Repeat the above steps for another employee.
Change Employee Card
To change an Employee’s clocking card, select the Employees List option from the File Menu
then:
Version 7
18
1.
Locate the employee whose card you want to change.
2.
Select the Change Card in the Edit Menu. TORUS will prompt you to insert a new card to
change to.
3.
Insert then remove the new card into the Card reader. TORUS will try to send the new
card’s code to the Timelink and report back to you.
TORUS for Windows User’s Guide
TCS-UG-T7-2
Repeat the above steps for another employee.
Manually Clocking Employee IN or OUT
If an employee forgot to bring the clocking card or the card has been damaged, you can use
TORUS to manually clock that employee IN or OUT accordingly. To manually clock an
Employee IN or OUT, select the Employees List option from the File Menu then:
1.
Locate the employee whose card you want to change.
2.
Select the Manual Clocking in the Edit Menu. TORUS will prompt you to specify whether
to clock IN or OUT at what time.
3.
Push the OK button when all info has been specified. TORUS will try to send the clocking
information to the Timelink and report back to you.
Repeat the above steps for another employee.
Manually Edit Employee’s Flexi Balance
This option only relevant to Employees that have been setup to work in Flexitime mode.
Normally Flexi Balance is calculated automatically but If you need to edit an employee’s flexi
balance manually, select the Employees List option from the File Menu then:
1.
Locate the employee whose flexi balance you want to change.
2.
Select the Flexi Balance in the Edit Menu. TORUS will prompt you to specify the date to
set the new balance to, as below..
.
You must set this date as the first date of the intended flexi period. For examples, if your
Flexi period is monthly then set this date as date 01 of the month/year of that period. If your
flexi period is a multiple weekly period then set this date to the starting date of the intended
flexi period
3.
Push the OK button when the date is correct. TORUS will then ask you to specify the flexi
balance to be set. Enter the new balance as HH:MM. If the new balance is debit prefix the
balance with minus i.e. -HH:MM. When ready, push the OK button to apply the new
balance.
Repeat the above steps for another employee.
Assigning Employee Job Costing Usage
This option is only relevant to Timelink units that have been fitted with Job Costing module. An
employee can be setup to use the Job Costing system installed in the timelink.To assign or
remove an Employee Job Costing Usage, select the Employees List option from the File Menu
then:
1.
Locate the employee whose card you want to change.
2.
Select the Job Costing Usage in the Edit Menu. Depending on whether an Employee has
been assigned to use Job Costing or not, TORUS ask you a question as below:
If the selected employee is already assigned to use Job Costing, TORUS will ask you to
remove his or her Job Costing Usage..or..
TORUS for Windows User Guide
TCS-UG-T7-2
Version 7
19
If the selected employee has not been assigned to use Job Costing, TORUS will ask you to
allow the selected employee to use Job Costing.
If the selected employee is currently logged on a job, TORUS will indicate so and you are
not allow to remove his/her Job Costing Usage until that employee is logged off the job.
Repeat the above steps for another employee.
Adding Employees
When you wish to add new employees to the system, all you need to do is push the New button
in the Employees List then follow the prompts.
Deleting Employees
Like adding employees, when you wish to remove employees from your system, push the
Delete button. TORUS will ask you twice before it actually delete Employee information.
Version 7
20
TORUS for Windows User’s Guide
TCS-UG-T7-2
Absence Reason Codes
Introduction
One of the benefits of TORUS is the ability to analyse your employees' attendance records.
Adjustment codes allow you to categorise absence reasons and infringement Clockings that
affect employees’ totals.
If for any reason you wish to adjust the daily totals of your employees, you can change their
totals to any value you want and give reasons why you have made the change. You can then
take a report for all the adjustment reasons to help you in analysing your employees’ attendance
records.
Up to 99 Adjustment codes can be defined by you to suit your working environment.
View or Change Adjustment Codes
To view or change Adjustment Codes, pull down the File menu then select the Reason Codes
option:
The Short Code field is used primarily for the Absence Yearly Chart. You can give an
Adjustment Code any short code character. TORUS makes sure that you can not use the same
short code for more than one reason.
The value of a reason is the default hours that TORUS will use to apply to various operations
such as calculating the equivalent days of sick based on the value specified in reason number 4
(Sick) and TORUS calculates the equivalent holidays off based on the value specified in reason
number 2 (Holiday).etc.
To edit information of a reason, highlight the appropriate reason push the Edit button. A similar
reason editing window will appear as below:
All entry definitions are self explanatory but some fields require more details as below:
TORUS for Windows User Guide
TCS-UG-T7-2
Version 7
21
The Calc column is to be used with the Adjustment values. It determines what calculation is to
be carried out on the totals with the value 'HH:MM'. The calculation code is as follows:
+
Add HH:MM to the current total
-
Subtract HH:MM from the current total
=
Make the current total equal to HH:MM
? Allow manual entry with default of HH:MM
For greater flexibility, absence Reasons can be categorised, for examples, you can have
different reasons for Sickness such as Dentist, Food Poisoning, Industrial Injury etc.
The Type list box allows you to do this, currently there 4 categories defined.
•
•
•
•
Normal
Public Holiday
Employee Holiday
Sickness
Absence Reasons with Normal Type will get paid i.e. the edited hours always get added to the
Employee Daily Totals.
Absence Reasons with Employee Holiday Type are used in Employee Annual Holiday
calculations.
Absence Reasons with Public Holiday Type are treated as different from Employee Holiday
type and are not used in Employee Annual Holiday calculations.
Absence Reasons with Sickness Type are used in Employee Sickness calculations.
*
Notice that Reason Codes 1 to 9 are reserved, you can not change their
descriptions or Types. However, you could change other fields for these Codes
Version 7
22
TORUS for Windows User’s Guide
TCS-UG-T7-2
VIEWING AND EDITING EMPLOYEE TOTALS
Introduction
The weekly totals information downloaded from your Timelink units can be edited and you can
record what was the reason for the editing carried out.
When editing Employees' Totals, TORUS keeps the original values intact just in case you wish
to recall them. However, the edited values will be used for calculations and for displaying.
As you use the system, you may need to edit Employees' Totals more than you anticipate.
TORUS makes it as easy as possible for you to carry out this task rapidly and efficiently.
Viewing Employee Clocking Times and Totals
TORUS incorporates a very flexible browser allowing you to view your employees' clocking
times and their totals with extreme ease. From this viewing window you can adjust their totals if
necessary.
To view Employees’ Weekly Clocking Times, you can either:
1. Select the Times menu then select Browse Weekly Times option.
2. In the Employees List, highlight an Employee then click the TimeSheet button.
The following window will appear:
The weekly time sheet window relates to a single employee. The commencing date of the week
and the name and ID of the current employee is shown at the top.
Below the week commencing date are the clocking details for the week. Day and Date are both
indicated together with two pairs of IN and OUT Clockings. Infringement Clockings are
highlighted.
Displayed next to the clocking details are the daily totals calculated for the currently highlighted
week. Any adjusted totals will be highlighted. Each day has six rates of pay showing in separate
columns. Use the mouse pointer to highlight any one of the six rates of any day enabling you to
adjust them if necessary.
The area at the bottom of the window show the weekly totals.
As you move around with the mouse pointer, the Status bar shows information about the
clockings where the mouse pointer is placed.
Navigating the Weekly Time Sheet Window
TORUS for Windows User Guide
TCS-UG-T7-2
Version 7
23
While in the Time Sheet window, you can quickly select another employee, change the week
commencing date or adjust totals. Below is a list of the buttons you can use to carry out these
tasks quickly.
Button
Description
Back one week.
View the current week.
Advance 1 week.
Select the first Employee in the list.
Select the previous Employee in the list.
Select the next Employee in the list.
Select the last Employee in the list.
Call up the Find Employee Dialog.
Editing Daily Totals Of The Current Employee
While viewing the Employee Weekly time window, use the mouse the highlight a daily total that
is needing adjustment then double-click your mouse button. As an example, the following
window appears to take your information
Move around entry fields to enter the information then push the OK button when done.
The ‘Send to Timelink’ check box is checked as default if your PC has a link to the Timelink
network. This enables TORUS to update your edited totals to Timelink unit so that Employees
can query on their totals.
TORUS also retains the original daily totals.
Note that the weekly totals will be instantly recalculated as daily totals are adjusted.
Any adjustment made by mistake can be corrected by highlighting it then press Delete key.
Version 7
24
TORUS for Windows User’s Guide
TCS-UG-T7-2
VIEWING AND EDITING ABSENCE
Introduction
TORUS enables you to plan your Employees Absence in advance, such as Holidays, Training
or Sickness..etc.
The absences planned can also be edited or cancelled at later dates, allowing you to re-adjust
the absence calendar with total flexibility. For examples, an Employee has booked 2 weeks
holidays but has gone back to work after only taking 1 week off. In this case, you can cancel his
second holiday week.
*
Only use Absence Planning to plan Employees’ Future Absence. For Editing of
Employees’ Previously worked Hours, use the EDITING EMPLOYEE TOTALS
Feature in the Employee Weekly Timesheet.
Absence Reports are available so that you can keep track of Employees’ Holidays and Sickness
Entitlements. They may also be used to analyse Employees’ absence patterns.
In addition, based on the absence planned, TORUS can produce Work Force Availability
reports for you to manage resources.
Annual Holiday Starting Month
TORUS uses the Holiday starting month to calculate Employees’ annual Holidays and Sick
Days Entitlements. Based on this, absence to-date figures are calculated automatically for you
to view or get up-to-date Absence Reports.
Most Companies start their annual holiday year from 1st January every year. However, TORUS
allows you to change this setting if your Company uses a different month. Any month in the
calendar can be used. To set your company annual holidays starting month, select the 'Globals'
Option from the ‘System' Menu in TORUS Admin program.
If your work place do not have a global starting month for Annual Holidays, TORUS allows you
to set the Annual Holiday Starting Month for each individual Employee. This can be done in the
Employee’s ‘Personnel’ Window.
Annual Holidays and Sick days Entitlements
To enable you to use the Absence Planning feature effectively, TORUS records Annual
Holidays and Sick days entitlement for each Employee. From these figures, TORUS checks and
give you warning messages if an Employee has over booked (i.e. gone off sick more days than
his or her entitled annual sick days).
Setting Individual Employee’s Annual Holiday and Sick days Entitlement
To change the annual Sick days entitlement, highlight an Employee in the Employees List then
select the ‘Personnel’ option.
Viewing Employee Absence Information
TORUS incorporates a conventional calendar layout allowing you to view and analyse your
employees' absence with extreme ease. There are two type of calendars TORUS uses; Monthly
and Yearly.
The Monthly Calendar is used to display Employee Absence Information in details. Allowing you
to accurately plan (or book) Employees’ absence.
The Yearly Calendar is used to display the overall absence pattern of an Employee for the
period of a whole calendar year. This will help you to pick out any pattern to the absences of
particular Employees.
TORUS for Windows User Guide
TCS-UG-T7-2
Version 7
25
Monthly Absence Calendar
To view an Employee’s Monthly Absence Calendar, select the Absence menu then Planner
option. The following window will appear:
Navigating the Monthly Absence Window
While in the Monthly Absence window, you can quickly select another employee, change the
month etc.. Below is a list of the Tool Bars buttons (see Tools Bar section) you can use to carry
out these tasks quickly.
Button
Description
Back one month.
View the current month.
Advance 1 month.
Select the first Employee in the list.
Select the previous Employee in the list.
Select the next Employee in the list.
Select the last Employee in the list.
Call up the Find Employee Dialog.
See later sections on how to add or edit absences.
Yearly Absence Calendar
To view an Employee’s Yearly Absence Calendar, select the Absence menu then Year
Planner option. The following window will appear.
Version 7
26
TORUS for Windows User’s Guide
TCS-UG-T7-2
The Yearly Absence Calendar identifies the absence pattern of the current Employee for a
whole year. In this window, Absence Codes are highlighted with Short Codes that you defined.
Navigating the Yearly Absence Window
While in the Yearly Absence window, you can quickly select another employee, change the year
etc.. Use the buttons (see Tools Bar section) you can use to carry out these tasks quickly.
Actions of these buttons are the same with the Monthly Absence window with the exceptions
below:
Button
Description
Back one year.
View the current year.
Advance 1 year.
Print the absence information currently showing.
See the following sections on how to add or edit absences.
Planning Future Absence For An Employee
While viewing the Employee Monthly or Yearly Absence Window, you can book future Absence
for the Employee. Use the mouse the highlight the date then double-click your mouse button. As
an example, the following window appears to take your information:
TORUS for Windows User Guide
TCS-UG-T7-2
Version 7
27
In the Absence Plan dialog box, enter the date range to be booked which will be default to the
current day. The Reason for Booking defaults to ‘Holiday’.
The date range can be further controlled by the ‘Exclude’ field. In the example above, only
Thursdays are getting booked, other days will not be included.
You must also give a reason for booking. If you do not know the reason, use the Reason List
box to call up your defined Reasons list to choose from.
The ‘Ask to Override’ check box is checked as default. This means that if TORUS found an
absence code that is already booked for any day in the selected dates, it will pop up a dialog
box to ask you whether or not to override the booked absence code with your newly specified
code. Uncheck this if you wish TORUS overrides this automatically with any confirmation.
Planning Future Absence For Departments
As well as planning absence for individual Employees, you can book Absence for All Employees
in Department; one Department or multiple Departments. This allows booking factory
‘shutdowns’ etc.
To plan future Absence for Departments, select ‘Book Department’ option from the ‘Absence’
menu. The following Window will appear;
The Absence Plan Window for Department looks similar to the Absence Plan Window box for
individual Employee’s except that a new department selection list box is added for you select
department(s).
The date range can be further controlled by the ‘Exclude’ field. In the example above Saturdays
and Sundays will not be included.
You must also give a reason for booking. If you do not know the reason, use the Reason List
box to call up your defined Reasons list to choose from.
The ‘Ask to Override’ check box is checked as default. This means that if TORUS found an
absence code that is already booked for any day in the selected dates, it will pop up a dialog
Version 7
28
TORUS for Windows User’s Guide
TCS-UG-T7-2
box to ask you whether or not to override the booked absence code with your newly specified
code. Uncheck this if you wish TORUS overrides this automatically with any confirmation.
Deleting Planned Absence For Departments
As well as planning absence for individual Employees, you can book Absence for All Employees
in Department; one Department or multiple Departments. This allows booking factory
‘shutdowns’ etc.
To plan future Absence for Departments, select ‘UnBook Absence’ option from the ‘Absence’
menu. The following Window will appear;
The ‘Ask to Confirm each UnBooking’ check box is checked as default. This means that if
TORUS found an absence code that is required to unbook in any day in the selected dates, it
will pop up a dialog box to ask you whether or not to unbook. Uncheck this if you wish TORUS
unbooks this automatically with any confirmation.
Editing Planned Absence For an Employee
Undo Planned Absence
To unbook planned Absence for an Employee in the Employee Monthly or Yearly Absence
window, use the mouse the highlight the date then press the Delete key.
To unbook planned Absence for an Employee in the Employee Week Timesheet window, use
the mouse the highlight an edited daily total then press the Delete key.
Edit Planned Absence
To edit planned Absence for an Employee in the Employee Monthly or Yearly Absence window,
use the mouse the highlight the date then double-click your mouse button.
To unbook planned Absence for an Employee in the Employee Week Timesheet window, use
the mouse the highlight an edited daily total then double-click your mouse button.
When the Edit Absence window appears, select a new reason in the reason list box. You can
also change the hours if necessary then push the OK button.
Notice that TORUS will try to send the edited hours to Timelink unit if this is carried out in the
Employee’s Weekly Timesheet.
*
All Editing activities for Absence Planning are logged into the System Audit
File so that every editing can be traced if necessary by using TORUS ADMIN.
TORUS for Windows User Guide
TCS-UG-T7-2
Version 7
29
REPORTS
Using the information downloaded from your TIMELINK units and edited on your PC, TORUS
can produce specific Summary and Detail management reports. These reports are designed to
save you time and help you to gain valuable perspective of time management in your work
force.
There are two types of reports available; TORUS specific Reports and Online Clock Reports.
TORUS Specific Reports
These reports are based on the employees clocking information you downloaded from the
Timelink(s) and stored in your PC or server. This information may have been edited by you or
other users.
Employees to be included in the reports can be those that you selected or general Employees in
the ‘Employees List’.
The caption of the Reports window shows ‘Reports for Selected Employees’ if you called the
Reports window from the ‘Selected Employees List’ and the employees selection box
indicates ‘Select Employees’.
Otherwise, it will show ‘Reports for Departments’ and the employees selection box indicates
‘Select Department’, as example shown below.
Depending on what report is highlighted in the ‘Select Report’ list box, TORUS will show the
appropriate controls for you to initiate your report. For example, if you highlight one of the
Weekly reports (first 5 reports) then TORUS shows the ‘From Date’ and ‘Multiple Weeks’
controls, but if you highlight the ‘Reasons Analysis’ report then TORUS shows the ‘From Date’
and ‘To Date’ controls
Details of other controls in the Reports window are explained as below:
Selecting Company(s)
For multiple Companies, in addition to the Employees selection box, you can elect to include
employees that belong to certain companies and filter out the rest. If the entry in this field is
‘ALL’ (this is the default) then all employees are included.
Reports Sorting Methods
TORUS allows you to sort reports in a number of ways. For example, you can elect to sort
primary by Department then within the Department, you can specify sorting the reports by
Employee Numbers or by Employee Names alphabetically.
Version 7
30
TORUS for Windows User’s Guide
TCS-UG-T7-2
Reports Destination
TORUS automatically outputs reports to the screen for you to view. After viewing, if you wish to
print the data then click the Print button. Also from the Reports window, you can select to output
reports to computer files so that they can be archived or transferred to different applications.
To change the report’s destination, click the radio button in the Dest. box in the Reports window.
If FILE is selected as destination for reports, every time you do a report, TORUS will ask you to
specify a file name to write to.
Reports Descriptions
Weekly Times
This shows the weekly clocking times, actual hours, and any amendments made for employees
in selected Departments.
Weekly Times with Shift info
Same as Weekly Times but shift numbers are attached to each IN and OUT clocking.
Weekly Summary by Rates
Same as Weekly Times but only includes Weekly Totals excluding all other details. THIS IS
THE REPORT THAT NORMALLY USED FOR EXPORTING DATA TO PAYROLL
APPLICATIONS.
Weekly Summary by Days
Same as Weekly Times but only includes Weekly Totals excluding all other details for different
days of the selected week.
Adjustments Summary
This shows the adjustments made in a period together with complete descriptions of
adjustments codes.
Exceptions Summary
This shows the exceptions times in a period, e.g. Clockings during infringement periods as
defined in your Timelink shift patterns. This shows only employees who are either late or who
have clocked in during an infringement period. The exception report shows you the times
clocked in with the erroneous clocking clearly highlighted.
Reason Analysis
This report shows the accumulated hours; four rates and Gross for a particular Reason in a
specified period. This is useful if you wish to keep track of a special adjustment such as SickSSP or Training..etc.
Overtime Worked
This report lists Employees who have accumulated overtime hours i.e. have worked at rate 2, 3
and/or 4 in a specified period.
It is primarily designed to help Supervisors who wish to check for Unauthorised Overtime
workings.
Flexi Report
This report lists Employees' Flexi information. Employees working Flexitime are those have
Work Type set as ‘F’.
This report details every day worked hours and compare to the daily target to provide daily
balance printed together with any adjustment. Include in this report are weekly and Period
Totals with separate accumulators for Sickness and Holidays occur in the reported Period.
Absence To-Date Summary Report
TORUS for Windows User Guide
TCS-UG-T7-2
Version 7
31
This is an additional report available from the Absence Menu. In this report, TORUS will list
Yearly Holidays And Sickness information for Employees from selected Departments.
Information included in this report is:
Employee Name and Number, annual holidays and Sick days entitlements, holidays booked
and remaining. Also any sickness hours taken to-date.
Work Force Availability Report
This is another Absence Planning report available from the Absence Menu. It helps Managers
to see at a glance the availability of the work force on a particular day. Selectable by
Department(s).
Employee Year Absence Report
This report shows the whole year absence calendar of a particular Employee. It is available
when you view the Employee absence information using option Year Planner from the
Absence Menu and press the P key.
Totals Summary
Same as Weekly Summary by rates but with user specified From and To Dates.
Service Years
Based on the Employees’ Started Dates, at any time, you can ask the system to list out long
serviced Employees. For examples, you can ask TORUS to list out how many Employees in
Department/s (or all Depts) have been working for the company for 30 years by September
1996.
Birthdays List
Based on the Employees’ Date of Birth, at any time, you can ask the system to list out a list of
birthdays. For examples, you can ask TORUS to list out how many Employees in Department/s
(or all Depts) have their birthdays next month/s
Online Clock Enquiry
These type of reports are taken directly from the Timelink. TORUS translate infringement
Clockings and displays them with different colours to the normal colour. All real time enquiry
reports are available from the Report/Online T&A Printout Menu. Please refer to the “TIMELINK
4000 SUPERVISOR MANUAL” for more details on these report.
Note that for Multi-User installations, Online Clock Enquiries can only be carried out at
the work station which is connected to the Timelink unit.
Version 7
32
TORUS for Windows User’s Guide
TCS-UG-T7-2
EXPORT DATA TO OTHER APPLICATIONS
Introduction
TORUS provides you with an option to interface with other applications such as Payroll.
*
NOTE THAT YOU MUST SET THE EMPLOYEE IDs EXACTLY AS YOU
ASSIGNED THEM IN YOUR PAYROLL PACKAGE.
TORUS supports Unipay, Sagelink and Peglink for Pegasus SENIOR Payroll packages as well
as other standard file formats such as ASCII fixed length or Delimited. See the 'Export Options'
from the 'File' Menu for details.
Full record specification is attached to each file format. You may find one of these file formats is
suitable for your requirements. However, if you require other specific format, we could create it
for you, subject to technical discussion.
Export Options
To make the task of exporting data as easy as possible for you, TORUS is designed to
remember your preferred options and the exported file name you last specified so that when
exporting data, you don't have to specify your exporting options again. Default Options that can
be set are:
1. File format (UNIPAY, Peglink for Pegasus etc.)
2. Default File Name
Select the 'Export Options' from the 'File' Menu to view or modify your export options.
Information on UNIPAY Payroll
This format originally created for Spillers Pet Foods (now is Friskies). this File layout is intended
for SCS Premier PayPlus Payroll Software. Record Specification is as follows:
FIELD
START
LENGTH
EXAMPLES
NOTES
Group Number
1
3
101
Employee ID
4
5
01234
Alpha-Numeric
Dummy
9
12
12 blanks
ASCII value 32
DataCode1
21
3
Basic Hours
Unipay code 860
Value1
24
6
003750
for 37:30 hours
Dummy
30
1
1 blank
DataCode2
31
3
Times and half
Unipay code 861
for 2:45 hours
101=“Seacombe” 102=“Aintree”
Value2
34
6
000275
Dummy
40
1
1 blank
DataCode3
41
3
Double Times
Unipay code 862
Value3
44
6
000275
for 2:45 hours
Dummy
50
1
1 blank
DataCode4
51
3
Holiday Hours
Value4
54
6
000000
Dummy
60
1
1 blank
DataCode5
61
3
Sickness Hours
Value5
64
6
000000
Dummy
70
11
11 blanks
Unipay code 868
Unipay code 863
NOTES ON UNIPAY FORMAT:
TORUS for Windows User Guide
TCS-UG-T7-2
Version 7
33
•
File type is FLAT ASCII with no special identifier between records.
e.g. 1=ASCII 49 or A=ASCII 65
•
Each Record is exactly 80 bytes long.
•
No End of File Marker ( ASCII 26 ) required.
Information on Peglink for Pegasus
•
If you use Peglink, notice that TORUS uses 4 rates, 1 to 4. You should name the export file
xWG.DAT where x is the Company identifying letter.
•
Peglink currently supports Pegasus SENIOR range only from version 3 -> 6.
Information on Sagelink for Sage Sterling or Sovereign
This format originally created for Sheffield University to link to their Sage Sovereign. this File
layout is intended for Sage Authorised dealer MacLellan Sage Developers. Record Specification
is as follows:
START
LENGTH
Company ID
FIELD
1
1
1
EXAMPLES
Sheffield Union has 1 to 3
NOTES
Employee ID
2
6
001234
Alpha-Numeric, left padded
zero.
Payrun Type
8
2
01
left padded zero. As Sage
Sovereign’s pay run type.
PayCode
10
2
01
As Sage Sovereign’s pay code
Value
12
8
0037.500
for 37:30 hours
Other Standard Export file formats
Please contact TCS for more information.
* Notice that Export files have no headers or footers. Each record is separated by a Carriage
Return and Line Feed. Each field is separated by a pair of " or a comma or fixed length
depending on your selected file format.
RATE values can be in Normal or Decimal and Employees’ rate factors are applied.
Exporting Procedure
To make sure data you export is absolutely correct, we would recommend you to carry out the
following procedure:
1. Download Data from Timelink unit(s) to TORUS
2. View and Edit any authorised adjustments accordingly
3. Do TORUS Reports (such as Weekly Summary report) to check for correctness. Re-edit if
necessary.
4. Get approvals from SUPERVISORS if required.
5. Once approved, carry out the report that is suitable for exports. For examples, for UNIPAY
and PEGLINK, the report that suitable for exporting is the Weekly Summary by Rates
report. Have a final on screen checks if need to.
6. Select Export Menu then activate Start Export option.
7. Run or carry out the procedure to activate Payroll application to Import TORUS data
immediately
8. Check that your Application imported TORUS data correctly
Version 7
34
TORUS for Windows User’s Guide
TCS-UG-T7-2
APPENDIX
Working Time Regulations
From version 7.25, TORUS has an optional module to support the Working Time Regulations
recently introduced by the European Council. In here, we can not describe this regulation in
detail. We recommend you read the Regulations document which available from the D.T.I
document titled ‘A Guide to Working Time Regulations’. Phone number 0845 6000 925.
Some areas in the Regulations document are not relevant to TORUS. Currently, TORUS
supports the following regulations:
Regulations
Descriptions
TORUS support
3, 4 and 5
Requirements of the 48 hour week limits
Full
6
Length of Night work
Handle by Timelink
7
Health Assessment and Transfer of night
workers to day work
Partly in the ‘Employee's
Special Hazards’ window
8
Pattern of work. Employee must be given
adequate rest breaks.
TORUS not affected
9
Records. Adequate records must be kept for
2 years
TORUS allows records to
be kept forever
10
Daily rest
TORUS not affected
11
Weekly rest
TORUS not affected
12
Rest breaks
Handle by Timelink
13
Entitlement to annual leave
Yearly Absence Window
14
Compensation related to entitlement leave
Full
15
Dates on which leave taken
Full
16
Payment in respect of periods of leave
Outside the scope of
TORUS. This is payroll.
17
Entitlement under other provisions
Outside the scope of
TORUS.
To implement this Regulation, changes are made in the following areas of TORUS:
•
Absence Reasons table modified to have Excluded day flag. A reason is to be selected as
‘Excluded day’ if employee is not working on that day. For examples, ‘Holiday’ or ‘Sick’ or
‘maternity leave’ are excluded.
•
In the T&A Window of each individual employee, there is an additional button called
‘Regulations'. This button calls up a Dialog Window to define whether an employee has
agreed or not to work more than 48 hours a week on average. In this case, he or she will be
excluded from the new Averaging reports designed for the Regulations.
•
In addition, Employee's Special Hazards requirement is also defined in the Regulations
Window.
•
A new report 'Average Weekly Hours Worked for Reference Period' has been added in
Reports Window. In this report:
. Period Start Date is selectable.
. Period Duration is selectable from 1 up to 99 weeks (default is 17 weeks).
. Weekly Limit to apply is also User Definable (default 48:00).
•
Employee Adjustments report has Excluded days column added with sub total.
TORUS for Windows User Guide
TCS-UG-T7-2
Version 7
35
Warning and Error Messages
If TORUS encounters problems, it will pop up a window in the middle of the screen to tell you
what went wrong and normally provides you with a number of options to proceed, depending on
the type of problem it encountered. There are two types of messages; Warning and Error.
Warning messages are usually caused by minor hardware failures or user's errors, such as
mistyping or the printer not being ready or no diskette in the floppy drive when trying to run
backup..etc. Warning messages are very informative and recoverable by the user. Some minor
warning messages are not listed here.
Below is a list of possible warning and error messages in alphabetical order.
Can't connect to remote Modem!
TORUS can't talk to the remote modem.
There may be something wrong with the remote modem. Local modem may be OK.
Can't initialise Modem!
TORUS cannot communicate with your modem. There could be any number of
reasons why your modem is not responding in TORUS.
1. If you have an external modem (one that is separate from the computer,
connected by a short cable), check that it is turned on. If it is already turned on,
turn it off, then back on. Restart TORUS and see if the problem persists.
2. If you have another communications program installed on your computer, make
sure that you are not trying to use both it and TORUS simultaneously. TORUS is
fundamentally a communications program. Because of the way your computer's
operating system functions, each communication program installed on your
computer requires dedicated use of a modem attached to a COM port to operate.
Thus, you can run only one communications program at a time. Running TORUS
and another communications program simultaneously causes a conflict.
3. Modem may not be compatible. TORUS requires a Hayes Compatible modem to
function correctly.
Communications to Timelink unit failed!
TORUS can't send messages to the Timelink unit. This could be that the COM port
was wrongly set up. Check Baud rate, parity, data bits etc. Use the System Menu
then select the COM Port option to set them up. Check they are the same on the
Timelink unit.
Download Data corrupted. Process Abandoned!
TORUS detects illegal data in the time information downloaded. Try to download data
again and the problem may not occur.
Wrong Password!
This message is shown if you typed in your password wrongly. Try again.
Product Support
Technical support should be sought initially from your supplier but may be obtained ultimately
from Torus Software Systems: UK Tel-0115 939 1204 Fax-0115 939 1201.
When you call, you should be at your computer with TORUS running and this User's Guide at
hand. Have your document open and be prepared to give the following information:
1. The Serial Number of the TORUS system.
2. The type of hardware that you are using, including network hardware, printer and modem.
3. The exact wording of any messages that appeared on your screen.
4. What happened and what you were doing when the problem occurred.
Version 7
36
TORUS for Windows User’s Guide
TCS-UG-T7-2