1
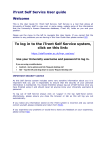
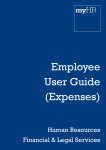
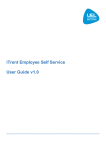
iServe Employee Self Service (ESS) Guide
Welcome to the User Guide for iServe (Employee Self Service). Self Service enables
College employees to view and update some of their personal details.
If you have any difficulty logging in or using the system then email the helpdesk
[email protected] By emailing the Helpdesk you will automatically log a call.
Should you have any queries regarding the data held about you within the system, then
please email the HR department [email protected]. This mailbox is
monitored Monday to Friday.
Important Security Advice
As iServe holds sensitive information about you, it is important that you use it responsibly to
maintain the security of your personal information.
You are only able to amend certain aspects of your personal information. If you notice that
any other information stored on the iServe system is incorrect, please immediately email
[email protected]
You should therefore always log out of Self Service once you have finished using it.
To log out of Self Service, you will need to close the browser (or tab) to ensure you have
fully exited the system.
You should never let anyone else know your username and password, as this information
would allow people to access information about you such as contact details and pay details,
hence exposing you to the risk of identity fraud.
Data Protection
Employees have access to their own details only by using their login details and password.
Other employees cannot see your details through Self Service – they can only see their own.
Managers will have access to certain information about their staff via the main iTrent HR
system. For example managers will record sickness absences.
All users must comply with Data Protection legislation and IT regulations.
Further guidance on this can be found on the intranet
1
Logging onto iTrent Self Service
To log on, go to https://hris.croydon.ac.uk/clive_selfservice/wrd/run/etadm001gf.open_ss (You
may want to save this link to your favourites)
You will then be presented with the login screen below for iServe.
Enter your College Username and Password and then click Login.
If you are unable to gain access email the helpdesk [email protected]
2
Main Menu
The iServe main menu (home page) provides you with access to all the sub-menus.
The page is divided into four areas.
1. Navigation – This will show you where you are in „Employee Self-Service‟. You are able to
click on any item in the navigation trail to return to that point.
2. Options - This area holds the sub menu options. To go to the required option click on the
required button.
3. Detail area - This area will display the pages that you will use to display or maintain data
held about you.
4. Administration - This area holds the administration buttons:
E-mail Admin – Clicking this button will create an email addressed to the helpdesk
[email protected]
Logout - This button will inform you to close the browser (or tab) to log you out of iServe.
Note: The pictures that appear will scroll randomly from a bank of images, so may look
different each time you view a given page
3
Personal Details
This screen gives you options to see all the personal information held about you.
Click on the required option to see the relevant information.
Please work your way through the tabs and check that the information held is correct and
amend/inform the HR department where necessary.
Please pay particular attention to your working pattern and reporting manager as the
accuracy of this information is important for self-service.
4
Personal Details – Personal Information
This page allows you to view your name, title, preferred name, marital status and date of
birth details.
Fields marked with * should already be completed:
You will be able to amend all fields except your date of birth, but some changes will trigger
an email to you to prompt you to send an email to the HR department at
[email protected] to arrange an appointment to check relevant documents.
Enter the required details and then click save.
Please note: If you have changed your personal information, you may also need to inform
HMRC (Tax Office) and your pension provider.
The Local Government pension scheme website is http://www.croydonpensionscheme.org/
The Teachers‟ Pension website is https://www.teacherspensions.co.uk/
5
Personal Details – Sensitive Information
This page displays and allows you to maintain the sensitive personal details held about you
in iServe. You do not have to provide evidence in support of this information but it is helpful
to the College in enabling it to fulfil its monitoring obligations, such as in relation to equality
and diversity data, understand the profile of the workforce and eliminate unlawful
discrimination. Please complete each field by selecting from the drop down menus.
Enter the required details and then click save.
The information you supply will not be visible to your manager. You have the option of
selecting “prefer not to say”.
This data will only be used by the HR department. By providing this information you consent
to the College using the information where necessary for equality and diversity monitoring.
Disability - Please indicate here if you consider yourself to have a disability. Under the
Equality Act 2010 a person has a disability if:
They have a physical or mental impairment.
The impairment has a substantial and long-term adverse effect on his or her ability to
perform normal day to day activities.
6
Personal Details – Addresses
This page displays and allows you to maintain the home address details held for you in
iTrent.
Your current address should be displayed.
Click on Select and this will display your full address.
If it is not correct, make any amendments and click Save.
If you have moved, you should add new address details by clicking the New Address details
button on the options side of the page. This will keep a history on the main iTrent system of
your previous address details.
7
Enter your new address and then click save
If you enter incorrect information, re-enter and click Save again
This will put an end date on the previous address the day prior to you entering the new one.
If you have more than one address type, ensure the mailing address is selected for the
appropriate one by ticking the mailing address box (this will be the address that all
correspondence will be sent to).
If you select an address type that already exists it will overtype the existing details.
The College requires a home address to enable contact in the event of circumstances such
as a long term illness, study leave, maternity or paternity leave etc. as well as for its pension
providers and HMRC. Therefore it is important that these details are kept up to date at all
times.
8
Personal Details –Contact Details
This page allows you to maintain the contact details held about you in iTrent.
If you wish to amend a displayed means of contact, click the Select button next to the
contact
Make the required amendments then click Save.
If you have more than one phone number/email address, input both into the field separating
the numbers as shown here e.g. 0795 6856222 / 0780 1236789
Please note: the „User email address‟ is the email that iServe will use to deliver e-mails to
you. If this is not your work email address, please contact HR immediately on
[email protected]
9
If you wish to add new phone or email details, select New – Contact Details
and use the drop down menu to choose the means of contact – the list will
only show those not yet used.
Ensure your home and mobile telephone numbers are up to date.
Personal email address is not required for the running of the system, but is another
means of contacting you.
Please note: You will need to provide an email address in order to receive an electronic
payslip. This is accessed on a separate screen (Payroll - E-form Preferences)
10
Personal Details - Emergency Contacts
This page allows you to maintain the emergency contact details held for you in iTrent.
If you wish to amend or delete a displayed emergency contact, click the Select button next to
the contact.
Make the required amendments then click Save.
It is not essential for staff to enter emergency contact details; however doing so may be
beneficial to both you and the College.
Please note: Information on emergency contacts may be passed on to your managers,
therefore by entering this information you are giving your consent to it being passed to
managers in appropriate circumstances.
11
If you wish to add a new emergency contact select New – Emergency Contact Details and
complete the fields as instructed.
Enter the required amendments then click Save
If your emergency contact has more than one contact phone number, input all numbers into
the Contact field separating the numbers as shown here e.g. 07945 856222 / 01904 856525
If your emergency contact resides at the same address as you, you are able to use the „Use
My Home Address‟ box. Ticking this box will automatically insert your home address.
You have just one primary contact and if you create a new contact and make it primary, then
previously ticked boxes will become un-ticked.
Ticking the „Use as Next of Kin‟ option will save this information in Next of Kin details.
12
Personal Details – Next of Kin
This page allows you to maintain the Next of Kin details held for you in iTrent.
If you wish to amend or delete a displayed Next of Kin details, click the Select button next to
the contact.
Make the required amendments then click Save.
13
Employment Details
Records held in the employment section of iServe is read only and therefore cannot be
amended by employees. However if you believe that any of the information held in this
section is incorrect for example, the name of your reporting manager, please ask your
manager to send an email to [email protected]
14
Employment - Current Jobs
This page displays the details for your current job. If you have more than one job you will be
able to see details for each job you have with the College.
All employment information relates to your current employment with the College.
Please note: You should check that the information above is correct, especially the reporting
manager and your working pattern.
If these are incorrect please email the helpdesk [email protected]
15
Employment – Previous Jobs
There is currently no history displayed for previous jobs you may have held at the College as
the system has recently been developed to show this record but in the future if you change
jobs within the College you will see the previous jobs record displayed.
16
Payroll Details - Menu
This page allows you to view the payroll details held for you including your bank details and
payslip history.
17
Payroll Details – Bank Details
This page shows bank details we currently hold for you.
You can change the details by clicking the Select button
18
You must enter your new Sort Code, Account Number and Account Name.
If your Account has a Roll Number, input it in the Roll Number box.
Please note: You should be aware of the date you make the change – if you change your
bank details after the current month‟s payroll run date, the change will not take effect until
the following month.
Details of the Payroll deadlines can be obtained from the HR intranet so that you can check
when to change your details in time for the next months‟ payroll. Please keep your existing
bank account open until your new details are able to be input.
19
As with most large payroll systems the majority of UK banks details are held on our system.
If the new sort code is not recognised by the system, you will receive this message
You should then email the helpdesk [email protected] with the new sort code
details.
This will then be set up and you will be sent an email so that you can input your new bank
details.
20
Payroll Details - Latest Payslip (pdf)
This page displays your latest payslip details. Payments, Deductions and Net Pay
totals are shown for the current month.
You can email the payslip to yourself by clicking the E-slip button. The displayed payslip will
be sent to the email address you have specified on the e-form preferences page.
If, when receiving the email, you are unable to remember your password, go to e-form
preferences to change it, you will then need to resend the e-slip to yourself by clicking on the
e-slip button again.
21
Payroll Details – Payslip history (pdf)
To view details of a previous payslip click the Select button next to the payslip you wish to
view. As this record is newly provided in Employee Self Service you will only be able to see
payslips from September 2013.
You can email the payslip to yourself by clicking the E-slip button. The displayed payslip will
be sent to the Email address you have specified on the e-form preferences page.
22
Payroll Details - P60
To view details of a P60 click the Select button next to the P60 you wish to view. As this is a
new service in Employee Self Service you will only be able to view P60s from April 2014.
You can email the P60 to yourself by clicking the E-slip button. The displayed payslip will be
sent to the Email address you have specified on the e-form preferences page.
23
Payroll E-form preferences
This page allows you to direct your payslip and P60 to a chosen email account.
Payslips
Input the email address to which you want your payslip sent.
Input and confirm your password, this is required to enable you to open the
PDF securely from your email.
P60’s
Input the email address to which you want your P60 sent.
Input and confirm your password – this will be used to enable you to open the
PDF securely from your email.
24
Absence
This allows to you to view all absences (past and future in case of Annual leave).
Click the required option.
Please note: All leave is calculated in hours and entitlement is calculated from your working
pattern.
Please ensure that your working pattern is correct and should an on-going change be
agreed between you and your manager then please inform the HR department immediately
by emailing [email protected].
25
Absence – Holiday Dates
This screen shows all the holiday dates you have taken, been approved or awaiting
authorisation in the current leave year.
To request a new holiday click on the „New – New Holiday Dates‟ button.
26
This opens a new page
Click on the drop down box for Holiday period
Select one of the options
27
Now you need to input the start and end date of the leave you are requesting and type in
any notes as appropriate. These notes will show when an automatic email is sent to your
manager requesting him or her to authorise your leave request.
By clicking on the peer group calendar you will be able to see all the other staff leave.
The annual leave you have requested will show as awaiting authorisation.
You will receive an email when your Manager authorises/rejects your annual leave request.
28
Absence – Holiday balances
This page shows your current holiday balance taking into account all holidays requested but
not yet taken.
Please note: you can only amend details of an annual leave request if it has not yet been
authorised by your manager.
To amend the details go to the holiday dates option and select the annual leave you want to
amend, amend details and save. Your manager will receive an email to say you have
amended the leave request.
If you want to amend your holiday dates and they have already been authorised, you will
need to delete the request and submit a new one. Click on the leave to be deleted and click
delete, then re-enter the amended leave by adding new holiday dates.
It is only possible to amend or delete a leave booking if the start date is in the future. If you
need to amend or delete a leave booking that took place in the past please email the iTrent
helpdesk [email protected].
When you amend or cancel annual leave your manager will receive an email to inform them
that you have amended leave.
You will receive an email when your manager authorises/rejects the amended annual leave.
29
Please note: the Bank Holiday entitlement shown also includes any discretionary Christmas
Closure days which may be provided to staff by the College in any particular leave year.
When booking leave for the Christmas closure period, which is notified to you in the College
calendar, please ensure you enter the whole period the College is closed as the holiday
period you are requesting. Employee Self Service will then automatically calculate the
required annual or Bank Holiday/Closure leave that needs to be deducted from your leave
entitlement based on your personal working pattern and contractual hours. Should you have
any query on your leave entitlement please email [email protected]
Any leave carried forward from the previous year will have to be manually added to your
current year‟s entitlement by your manager
30
Absence – Sickness Dates
This page shows you your sickness absence record. In accordance with the College‟s
normal absence reporting arrangements, when you are off sick and call your manager to
report your sickness absence your manager will enter the first date of your sickness
absence, the reason for your absence and your expected return date.
You will receive an email to confirm this information.
When you return to work you must then complete the end date of this absence prior to the
return to work interview with your manager.
To complete the absence record please click on the selected absence to access the record.
31
Then enter the end date of your absence (i.e. the date before you returned to work even if it
is a non-working day) and save. Only working days during the sickness period will be
counted as days of sickness absence but the period of absence will always need to be
recorded with an end date of the day before you returned to work even if this was a Sunday
or other non-working day.
At the same time you should complete a Self-Certificate; this may be found on the HR page
of the intranet. This should then be attached to the absence by clicking on document
attachments.
Once you have completed the end date, click Save. Your manager will receive an email
notifying him or her of the completion of the sickness absence record and will then arrange a
„Return to Work‟ interview with you.
IMPORTANT: Please note that failure to complete this screen with an end date may
affect your pay.
Thank you for reading through this User Guide to Employee Self Service. If you have any
questions regarding accuracy of the data held about you please refer to the HR
Department. If you have any questions regarding how to access or update your records
please refer to the iTrent Helpdesk.
September 2013
32