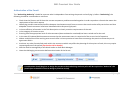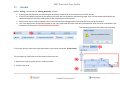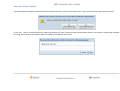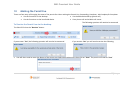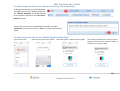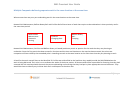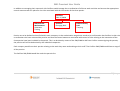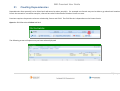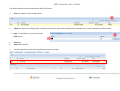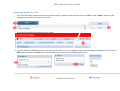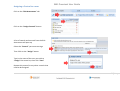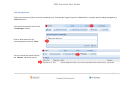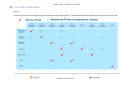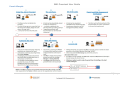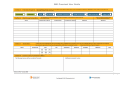
1
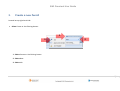
End User Guide Proscient SWL Proscient User Guide DATE VERSION CONTROL 01/10/2014 DOCLOC 1 11/12/2014 1 26/01/2015 1 16/02/2015 17/02/2015 03/03/2015 3.1 1 2 3 V.2.2.3 DESCRIPTION AUTHOR BUILD TBC QA First draft Kirsty Brown Various updates (Craig Gilmour, Kirsty Brown TBC Reg Crampton and NWR UPDATES following review from Mike Brown TBC Reg Crampton (Still needs full QA) TBC QA done Kirsten Walker Yes TBC UPDATES From NWR Reg Crampton TBC Final review DL/KH/RC Final review (formatting) Kirsten Walker QA DATE 29/01/2015 Contents 1. Log in to Proscient ...............................................................................................................3 2. Home Page Filters ................................................................................................................3 What is a filter?....................................................................................................................3 Home Page Filters ................................................................................................................3 3. Create a new Permit ............................................................................................................4 4. Define Work Area ................................................................................................................6 5. Creating a Job/Incident Template and Utilising to create a Cyclic/Incident Permit ...........7 Utilising a Job Template to create a Cyclic Permit ..............................................................0 Completing the Cyclic Permit.............................................................................................10 Utilising an Incident Response Template to Create an Incident Response Permit ...........11 6. Non‐Escalated Risk.............................................................................................................13 Permits within Proscient....................................................................................................14 To add Hazards and Controls from a populated list ..........................................................16 To manually add Hazards and Controls .............................................................................17 7. Escalated Risk.....................................................................................................................20 8. Steps within a RA ...............................................................................................................24 9. Completing the permit (Track information) including Draft Incomplete and Draft..........25 10. Verify and Authorise ..........................................................................................................31 Verification of the Permit ..................................................................................................31 Authorisation of the Permit...............................................................................................32 11. Issued .................................................................................................................................33 Issue of a Cyclic Permit ......................................................................................................34 12. Making the Permit live.......................................................................................................35 To Receive the Permit Live via the desktop. .....................................................................35 To make the permit Live via the “Release Authority” (on the desktop) ...........................36 To make the permit Live via the “Mobile Optimised Web Page” .....................................36 1 | P a g e SWL Proscient User Guide To make the Permit Live by Calling the Mitie Call Center.................................................37 PA responsibilities while the permit is Live .......................................................................37 13. Handover and Suspend......................................................................................................38 To “Handover” the permit via the “Mobile Optimised Web Page” ..................................38 To “Suspend” the Permit via the desktop. ........................................................................39 To “Suspend” the permit via the “Mobile Optimised Web Page” ....................................40 To “Suspend” the Permit by Calling the Mitie Call Center................................................40 14. Amend................................................................................................................................41 15. Job Complete and Job Incomplete ....................................................................................43 To “Job Complete/Incomplete” the Permit via the desktop.............................................43 If “Job Complete” selected ................................................................................................43 If “Job Incomplete” selected .............................................................................................44 To “Job Complete/Incomplete” the Permit via the “Mobile Optimised Web Page” ........45 16. Lessons...............................................................................................................................46 What is a Lesson?...............................................................................................................46 17. Archive including options within Archive ..........................................................................47 18. PTW Compliance check......................................................................................................48 To create a Permit to Work Compliance check Click create .............................................48 19. Job Planning .......................................................................................................................49 20. What is a Job Pack .............................................................................................................50 To create another permit in the same job pack. ...............................................................50 Multiple permits to deliver a single package of work. ......................................................50 Multiple Companies delivering separate work in the same location at the same time. ..51 21. Creating Dependencies......................................................................................................53 22. Additional Features............................................................................................................59 Supporting information .....................................................................................................59 Assigning a permit to a user ..............................................................................................60 Assigning a Control Point to a user....................................................................................61 Countersignature ...............................................................................................................62 23. Summary information........................................................................................................63 Roles...................................................................................................................................63 Permit Lifecycle..................................................................................................................64 Incident Response Permit Lifecycle ...................................................................................66 Incident Response Permit Pad example ............................................................................67 Icon States..........................................................................................................................69 2 | P a g e SWL Proscient User Guide 1. Log in to Proscient 2. Home Page Filters What is a filter? A filter allows you to select specific records based on defined criteria. For example you can filter a list of permits to show only permits that have been assigned to you; you could filter permits by discipline or by date range. Home Page Filters Select Show Filters Tick and Untick the filters you would like to be included on the home page screen Ensuring a Tick is in the “always show Assigned to Me” box will show all items assigned to you, when you log in to the home page Select Save & Apply once you have chosen your preferred filters Reset to Default – This setting will cancel all of your filters back to original Proscient settings Hide Filters – Will take you back to the Home Screen When you log off/log on you will see that Proscient has remembered your filters 3 | P a g e SWL Proscient User Guide 3. Create a new Permit Located at top right hand side Select Create or Use Existing button 1 3 2 1 ‐ Select Create or Use Existing button 2 ‐ Select New 3 ‐ Select Job 4 | P a g e SWL Proscient User Guide Type in a very simple Job title that aids in identification of the permit Type in a more detailed description of the works to be undertaken, giving an overview of the entire works that are to be covered in the permit Add and Describe individual steps required to complete the works described in the “Description” Steps should be separate phases of work where there are different control measures applied due to different risk e.g. introduction of a piece of plant, a change in task or in method, or if the protection requirements are different, i.e. getting to and from work area and during the work. Enter the anticipated Start Date & Time for the work to be carried out Enter the planned duration the job will take from the start time, not the timeframe we have for protection etc. This creates the End Date and Time on the permit. Note: Only use the fixed end date when a specific time is given for work in possessions or line blockages Select Location – This opens the map on the appropriate section of the map for the chosen depot Define Work area then draw your work area (see section 4 for details) Note: If you define a work area outside of the previously chosen depot, this will override it Select the Discipline to give an indication as to what the main activity is, and who is leading on the whole job, additional disciplines can be identified. Identify how many people are working on this job, this helps when risk assessing (large workgroups etc.) and also to define if the work is being conducted by an Individual Working Alone Enter the details of the permit planner, so they can be contacted to discuss any planning issues Note: this is a searchable field allowing a planner to display all permits “planned” by that individual in one search. Click Save 5 | P a g e SWL Proscient User Guide 4. Define Work Area Draw work – Draw a Circle Draw a work area – Draw a Polygon Edit work area – Can edit a shape that has been created Resize work – Reduce or Enlarge a shape that has been created Select work area – Select a shape that has been created Clear – Clear a shape that has been selected Clear All – Clear all shapes that have been created Once you have drawn your work area, Double Click left mouse button Remember you are identifying the Work Area for this job, not the Worksite Click Next once you have created and drawn your work area Drag the Red icon to the work position in the work area Click Save once the icon has turned green You will not be able to select Save if the icon has not turned Green You would now complete the Risk Assessment (See Section 7 or 8 for details) 6 | P a g e SWL Proscient User Guide 5. Creating a Job/Incident Template and Utilising to create a Cyclic/Incident Permit Located at top right hand side Select Create or Use Existing button 3 1 ‐ Select Create or Use Existing button 1 2 2 ‐ Select New 3 ‐ Select Job Template 7 | P a g e SWL Proscient User Guide Type in a very simple Job title that aids in identification of the Template Type in a more detailed description of the works to be undertaken, giving an overview of the entire works that are allowed to be covered when Utilising this Template, remembering that a Job Template is for lower risk, regularly undertaken and often short duration tasks Add and Describe individual steps if required to complete the works described in the “Description” (Steps can also be added in the Risk Assessment section of Proscient) Enter the planned duration the job will take and leave Validity Period as 365 days. Select Location – This opens the map on the appropriate section of the map for the chosen depot Define the work area where this Job Template can be utilised, then draw your work area (see section 4 for details) Select the Discipline to give an indication as to what the main activity is and who is leading on the whole job, additional disciplines can be identified. Identify how many people are working on this job, this helps when risk assessing (large workgroups etc.) and also to define if the work is being conducted by an Individual Working Alone Enter the details of the permit planner, so they can be contacted to discuss any planning issues Note: this is a searchable field allowing a planner to display all templates “planned” by that individual in one search. Click Save 8 | P a g e SWL Proscient User Guide Utilising a Job Template to create a Cyclic Permit 1 ‐ Select Create or Use Existing button 2 ‐ Select Use Existing 1 2 3 ‐ Type in the title or a letter in the title of the Job Template to be ‘Utilised’ 4 ‐ Select Job Templates from the drop down list and then click ‘Search’ 3 4 5 ‐ Select the relevant Job Templates from the list highlight it, and you will note the screen becomes active 6 ‐ Clicking on the button in the bottom right of the button will create your Cyclic Permit 9 | P a g e SWL Proscient User Guide Completing the Cyclic Permit Note: that you are unable to type information into Title Note: that you are unable to type information into Description Type in any additional detailed description required for this Cyclic Permit, remembering that the work being undertaken MUST stay within the design envelope of the Description above Enter the anticipated Start Date & Time for the work to be carried out Enter the planned duration the job will take from the start time, not the timeframe we have for protection etc. This creates the End Date and Time on the Cyclic Permit. Note: There is a maximum validity of 7 days for a cyclic permit Select Location – This opens the map on the appropriate section of the map for the chosen depot Define Work area then draw your work area (see section 4 for details) Note: This should stay within the boundaries of the original work area drawn as when the worksite location is edited then End User has to Edit/Review the Risk Assessment. You would then go on to complete the Cyclic permit Track Information (see section 9) before clicking Save. Click Save 10 | P a g e SWL Proscient User Guide Utilising an Incident Response Template to Create an Incident Response Permit 1) Upon receiving notification of an incident the Controller shall 1 ‐ Select Create or Use Existing button 1 2 2 ‐ Select Use Existing 3 ‐ Type in the title or a letter in the title of the Job Template to be ‘Utilised’ 4 ‐ Select Job Templates from the drop down list and then click ‘Search’ 3 4 5 ‐ Select the relevant Job Templates from the list highlight it, and you will note the screen becomes active 6 ‐ Clicking on the button in the bottom right of the button will create your Incident Response Permit 11 | P a g e SWL Proscient User Guide The Controller will then complete the remaining details on the IRP and position the icon at the correct location on the map within Proscient Note: that you are unable to type information into Title Note: that you are unable to type information into Description The Controller will add in any additional detailed description required for this Incident Response Permit, remembering that the work being undertaken MUST stay within the design envelope of the Description above Enter the anticipated Start Date & Time for the work to be carried out Enter the planned duration the job will take from the start time Note: There is a maximum validity of 7 days for an Incident Response permit Select Location – This opens the map on the appropriate section of the map for the chosen depot Define Work area then draw your work area (see section 4 for details) Click Save The Controller notifies the PA of any temporary change notices (TCNs), lessons learned or additional hazards which are visible in Proscient (allowing the PA to record this information on the incident response permit pad) and issue the permit number to the PA. The PA will complete the task and operational risk assessment, and capturing this, along with protection from trains (safe system of work), on the incident response permit pad, and taking the permit ‘live’, managing the response activity and closing the permit. See sections 11 and 12 for “Issuing” a Permit and making a Permit "Live" 12 | P a g e SWL Proscient User Guide 6. Non-Escalated Risk Once the permit has been created…. 1 ‐ Click on the Risk Assessment tab 2 ‐ You will note the Major Location Hazards has already been populated (for the Work Area you identified) 4 ‐ From the Risk Assessment Template Select your category of work (see next page for descriptions) ● Lineside ● Off Lineside ● On or Near the line Non‐Intrusive ● On or Near the line Intrusive 5 ‐ Finally select the arrow to move your choice to the right hand side column 13 | P a g e SWL Proscient User Guide Permits within Proscient Off Lineside Lineside On or Near the line Non‐Intrusive Not affecting operational capability. On or Near the line. On or Near the line Intrusive Affecting operational capability. On or Near the line. 14 | P a g e SWL Proscient User Guide Select any other hazards associated with the work as detailed in the “Description” section of the permit. Click on the relevent Hazard Select the arrow to move your choice to the right hand side column If you make an incorrect selection you can return it by selecting it and using the lower arrow left facing arrow! If the task will NOT be conducted using a NWR Risk Assessment then select “External Risk Assessment” You can add Additional Hazard and Controls from either a populated list within the database, or by manually entering details: 15 | P a g e SWL Proscient User Guide To add Hazards and Controls from a populated list 1 ‐ Select Add Hazard & Controls This will bring up the additional Hazards and Controls table. 2 ‐ Identify the relevant Hazard Group. 3 ‐ Identify the applicable Hazard 4 ‐ Select the relevant controls 5 ‐ Clicking Confirm will send this selected Hazard and Control across to be part of your risk assessment 6 ‐ Once all additional Hazards and Controls have been selected in this way, click Save Your additional Hazards and Controls will be shown at the bottom of the risk assessment 16 | P a g e SWL Proscient User Guide To manually add Hazards and Controls 1 ‐ Select Add Hazard & Controls This will bring up the additional Hazards and Controls table. 2 ‐ Select Custom Hazards & Controls tab 3 ‐ Type in the Hazard Name 4 ‐ Type in the Control Details 5 ‐ Clicking Confirm will send this Hazard and Control across to be part of your risk assessment 6 ‐ Once all additional Hazards and controls have been added by repeating this process, click Save Your additional Hazards and Controls will be shown at the bottom of the risk assessment 17 | P a g e SWL Proscient User Guide Click Next once you have selected all of the appropriate hazards This is a NON‐ESCALATED RISK (See Section 7 for Escalated Risk) Select No Select Individual Select Next If required you can add steps ensuring the relevant Hazards are identified for each one Select Next Select the relevant hazards and controls that are appropriate for the work as detailed in the “Description” section of the permit (tick and untick the boxes) Some Hazards will be Mandatory – you will not be able to deselect 18 | P a g e SWL Proscient User Guide Identify which controls need to be: Standard (The control applies for the duration of the task) Control Point (The control must be confirmed before the permit is made Live) New Job (A control requiring additional permitted work to secure the worksite) Select Next Select Finish Green ticks represent where you are within the Risk Assessment process The colour outline represents where the work is taking place (i.e.) Green – Off Lineside FLAGS Mandatory Recommended Optional Additional Manually Added After selecting “Finish” you will be presented with a summary of the Risk Assessment you have constructed, from here you can review each hazard with its respective controls ensuring you have considered everything, and that your Risk Assessment is fit for purpose, also an opportunity to remove duplicated control measures 19 | P a g e SWL Proscient User Guide 7. Escalated Risk Click the Risk Assess button For the Job Type Select one of the four track options ● Lineside Activities ● Off Lineside Activities ● On or Near the line Non‐Intrusive ● On or Near the line Intrusive Select the arrow to move your choice to the right hand side column Select any other hazards specific to the task/job/location that are required Click Next once you have selected all of the appropriate hazards 20 | P a g e SWL Proscient User Guide Select Yes Select Team Select Next Enter the names of your team either from pre‐populated users and/or by adding an unregistered member. You must have at least 3 people in a team. An Unregistered Member has no Proscient Access, whereas all Users that have permissions in Proscient will be found in the Team Members list. Remember: There is a minimum of 3 people required for an Escalated Risk Assessment. Consideration needs to be given as to who should be involved in the Escalated Risk Assessment: Line Manager? Health and Safety? Task Specialist? SWL? Subject Matter Expert? Contractor? Once the team members have been added Click Next 21 | P a g e SWL Proscient User Guide Select the first Hazard to identify the Initial Risk (This assumes no controls identified) 1 ‐ Select Set Initial Risk 2 ‐ Select Severity and Likelihood by using the drag bar 2 1 3 ‐ Select Confirm once agreed with the Team 3 This requires discussion and agreements from all team members involved in the Risk Assessment meeting. What is the credible Severity and Likelihood of harm occurring with no controls identified? 22 | P a g e SWL Proscient User Guide As a group, identify suitable and sufficient controls for each identified Hazard. Set the Residual Risk based on the identified controls (you can review identified controls on the left tab). Click Confirm Is the risk reduced to an acceptable level? Select Yes then Confirm, if NO, cancel and repeat process Repeat the above process for every hazard identified in each step Click Finish Verify the team Click the Home tab When verifying the team you are acknowledging the all team members took place in a “live” Risk Assessment meeting and all agreed with the outcome. Have each member (where applicable) countersign the permit! 23 | P a g e SWL Proscient User Guide 8. Steps within a RA If steps are required, but haven’t been created when first raising the permit (as in Section 3) Steps can be created as part of the Risk Assessment process, Steps can be added so that individual task based risk assessments can be completed for each step. This must be considered carefully as when a control measure is identified as a “control point” that control must be “in place” before the permit can be made “Live”, irrespective of which step it is applicable too. It may be more appropriate to create an individual permit for each step. When a control measure is identified as a “New Job” there is a separate permit required to undertake that control measure. Where multiple steps are required and can be managed within one permit, carry out the following: Select Add Step and type in your step title; repeat the process until you have added all of your required steps. Select Next Tick the applicable hazards for step 1 (Use add more hazards button if nothing appropriate) Once hazards are selected for step 1 Click Next, and repeat for each step. Any mandatory hazards must be selected for at least one of the steps and will then turn green once selected 24 | P a g e 9. SWL Proscient User Guide Completing the permit (Track information) including Draft Incomplete and Draft The next step to complete the Permit will require returning back to the Job Tab Click on the Job Tab Click on the Edit button If you do not click on Edit you are unable to complete the remaining fields within the Permit. 25 | P a g e SWL Proscient User Guide You now have a number of fields that have to be completed. Some fields are marked with a red asterisk which is mandatory. To identify which company is delivering the work. To record if a Safe System of Work is required. Only write "Yes" in the box if this is the type of protection arrangement that you are using. If there are multiple protection arrangements being used for the permit you must identify which step or activity the protection arrangements are applicable too! 26 | P a g e SWL Proscient User Guide To explain why we have not used this option (safeguarded) and give the mitigating circumstances against doing so. (This does not print in the permit but is a mandatory field if Safeguarded is not chosen). To explain why we have not used this option (Fenced) and give the mitigating circumstances against doing so (This does not print in the permit but is a mandatory field if Safeguarded or Fenced is not chosen). To explain why we have not used this option (Separated) and give the mitigating circumstances against doing so. (This does not print in the permit but is a mandatory field if Safeguarded, Fenced or Separated is not chosen). To record if an electrical isolation is required and which type is required. (If yes, then select “Yes, AC” or “Yes, DC” and you should consider electrical isolation as a ‘Control Point’ rather than a standard control). To record if a possession is required. (If yes, then should consider this as a control point rather than a standard control). 27 | P a g e SWL Proscient User Guide PPS Worksite Reference Number. This is a mandatary field if "Work requiring a possession" box is marked “Yes”. To record if a line blockage is required. (If yes, then should consider this as a control point rather than a standard control). Select Edit and input the details of any line blockages that have been booked in relation to the permit. WON item number. This is a mandatary field if "Work requiring a possession" box is marked Yes. (This may not be known when the permit is first produced.) This is an important field to assist if emergency services are required. (Nearest Post Code to access point) This is an example of how the detail would be shown for the “Line Blockage Information” Field shown above Example 28 | P a g e SWL Proscient User Guide This is an important field to assist if emergency services are required. (OS Grid reference contains 2 letters & 6 numbers). This would be the first port of call in any emergency. This would vary on who it could be. It may be the emergency services, or the manager. This has to be determined by the creator of the permit. The number for above. For recording the name and number of the signal box or boxes that control the section of track, this information should be copied using the "Quick link" function. For recording the name and number of the ECRO/s for this section, this information should be copied using the "Quick link" function. To state which ELR(s) are being worked on. To state the mileage on each ELR (s) are being worked on. If multiple mileages then all text is printed in the same box. 29 | P a g e SWL Proscient User Guide This is to give the name, speed and status (open/blocked) for each line. Example Any additional contacts (multiple signal boxes, ECROS etc.) will be populated here DEFAULT – 3 Years If permit is to be kept indefinitely then select Yes Now Click on Save (located in the bottom right hand corner of the screen) Upon completion of the track information the permit “Planner” can move permit from “Draft incomplete” to “Draft” – Indicating that all the information has now been entered into the Permit. Consideration should be given to Assign the permit to the Performing Authority who will be required to “Verify” the permit (see section 22 for how to Assign a permit to a user) 30 | P a g e SWL Proscient User Guide 10. Verify and Authorise Verification of the Permit Wherever possible, the Performing Authority (PA) carrying out the verification step should be the PA who will be undertaking or overseeing the work. The review should consider as a minimum: The Job Information details (where, when, description of task and steps) The Risk Assessment to ensure all the foreseeable Hazards and Controls have been identified (have “control points” been used appropriately) Track Access information (Appropriate protection methods are planned, for access and egress and for undertaking the work) Any possible conflicting work activities (View this permit in the planning tab, map view and Gantt view to check for any other activities that may be taking place when it is planned to carry out your work) Filters within the Job Planning Tab: See Section 19 for details on how to set up customised filters to aid your reviews and identify potential conflicting work ! Once reviewed if the PA is satisfied that “so far as possible” everything has been captured and in sufficient detail to allow the work to be completed on time and in a safe manner, the PA will “Verify” the drafted permit, if more work is required then the PA should have a conversation with the relevant Planner to address any omissions, once rectified the permit should be Verified. The following question will need to be answered Consideration should be given to Assign the permit to the Authorising Authority who will be required to “Authorise” the permit (see section 22 for how to Assign a permit to a user) 31 | P a g e SWL Proscient User Guide Authorisation of the Permit The “Authorising Authority” should be a person who is independent from writing the permit and verifying it, before “Authorising” the following should be considered as a minimum: Check that the Planner and PA have the correct competency and have worked together in order to produce a Permit that meets the requirement of the initial request Identifying possible interactions/conflicts between simultaneous work fronts to ensure that work can be safely carried out and that adequate controls measures have been identified within this permit/job pack Is there sufficient information in the Task Description to clearly state the requirements of the task Is the category of Permits correct Ensuring that the appropriate level of risk assessment (Non‐escalated or escalated) has been carried out for the task. In the case of Escalated Risk Assessments ensure that the assessment team is comprised of the correct level of expertise Where multiple PAs will be working over several shifts it is best practice to have them countersign the permit to show they are in agreement with it. Are there any other Permits/Job packs within the same area which may affect the planning of either piece of work, this may require countersignature of the permit (See Section 19 for details) Will the work be managed by a Safe Work Leader or Safe Work Manager Have the challenging conversation before authorisation of the Permit Consideration should be given to Assign the permit to the Authorising Authority who will be required to “Authorise” the permit (see section 22 for how to Assign a permit to a user) 32 | P a g e SWL Proscient User Guide 11. Issued Before “Issuing” the permit the “Issuing Authority” should: Ensuring the PA /PAs who are delivering the work fully understand all the requirements of the Permit If the PA /PAs who are delivering the work hasn’t been the PA involved in the planning stage, then a more detailed briefing will be required to ensure they fully understand all the requirements of the Permit Discuss with the PA /PAs to identify if any circumstances have changed which will need the Permit to be Amended This is an opportunity to check the system to see if any new work activities have been planned that have not been considered in the production of this permit. (See Section 19 for details) The following question will need to be answered To Print the Permit, look to the right hand side or the screen and select “Print Permit” This will open up a PDF version of the permit where you can: 1 1 ‐ Resize your map using the zoom in and out arrows 2 ‐ Confirm and Print 2 33 | P a g e SWL Proscient User Guide Issue of a Cyclic Permit A prompt appears between Authorised and the Issued states for a Cyclic Permit which asks: "Have you altered the safe system of work?" If the ‘Yes…’ option is selected then an additional prompt will state "Please provide authorisation number and name of authorising manager" ensuring clarity and the traceability when the SSOW is changed for the Permit. 34 | P a g e SWL Proscient User Guide 12. Making the Permit live There are four ways of changing the state of the permit for either making the Permit Live, Suspending, Handover, Job Complete/In‐Complete: Via the Proscient on the desktop Via the Release Authority (phone call) Via the Proscient on the hand held device Via a phone call to the Mitie call center The following question will need to be answered To Receive the Permit Live via the desktop. The PA will Click on the “Receive” button If you answer “Yes”,the following question will need to be answered If you answer “No” you will need to action the following You will then need to enter the Name of the person you had conversation with, then click on “Save” The permit will now be “Live” 35 | P a g e SWL Proscient User Guide To make the permit Live via the “Release Authority” (on the desktop) To Receive the Permit Live via the desktop. The “PA” must call the “Release Authority”, the “Release Authority” will find the permit on the system and Click on the “RA Direct Receive” button You will then need to enter the details of the SWL you have “Released” the permit to, click on “Save” The permit will now be “Live” To make the permit Live via the “Mobile Optimised Web Page” Log in to Proscient: Search for the permit you require Select the option to take the Permit “Live” You will be prompted with a series of closed questions which must be answered “Yes” for the permit to be taken “Live” 36 | P a g e SWL Proscient User Guide To make the Permit Live by Calling the Mitie Call Centre. To provide ePermit activation to those staff on site who wish to activate an ePermit to work, but who do not have internet connectivity on‐site, staff will call a pre‐determined phone number (TBC) to contact the Mitie call centre. A short discussion will take place and following the necessary safety checks, the contact centre will activate the ePermit on behalf of the caller. Before making the call to the Mitie Centre to activate your ePermit you will need to be able to provide the following information: ► Confirmation that you are a Safe Work Leader ► That you wish to activate your ePermit ► Your ePermit Number ► Confirmation that a safety conversation has been held ► Your name You will receive verbal confirmation that the required action against that ePermit number has taken place Whichever option is used for making the permit “Live” it is the PA’s responsibility to record the relevant details on the Permit The key responsibilities of the Performing Authority (PA) are: Brief the contents of the permit to permit user/s to ensure they understand the full scope of the work, the identified hazards and controls and record the relevant details on the Permit. Ensure that all “Control Points” have been put in place prior to making the Permit go "Live". PA responsibilities while the permit is Live Continually monitor work site conditions. If significant changes are identified these shall be assessed and where required the Permit amended. This will require a re‐authorisation of the Permit. Ensure that specific control measures for higher risk activities listed on the Permit are put in place during the course of the work. Ensure that only work detailed on the Permit takes place. Ensure that the worksite remains in a clean and tidy state. Ensure that any Lessons Learned whilst undertaking the task are recorded on the Permit. 37 | P a g e SWL Proscient User Guide 13. Handover and Suspend Effective “Handover” between oncoming and departing personnel at crew change is fundamental to ensure continuity is maintained and that there will be no adverse impact on work activities. Where a handover takes place, Both PAs must have a face to face discussion at the worksite before carrying out the required action within Proscient and on the hard copy of the permit. To “Handover” the permit via the “Mobile Optimised Web Page” Log in to Proscient: Search for the permit you require PA1 Select the Permit to give “Handover” PA2 Select the Permit to “Handover”for the permit to be taken “Live” When work is temporarily suspended on site, the permit must be “Suspended” on Proscient and on the hard copy of the permit indicating no work is currently taking place. On Suspension of the Permit the Performing Authority (PA) shall contact the Issuing Authority and explain the reason for suspending the Permit. The PA shall ensure that the work site is left in a clean and safe state. Work will not resume until the Permit has been made Live by the Performing Authority. 38 | P a g e SWL Proscient User Guide To “Suspend” the Permit via the desktop. The “PA” will Click on Suspend You will then need to answer the following question If you answer “Yes” The permit will go to the “Suspended” state If you answer “No” you will need to acknowledge the following The same process applies where the “Release Authority” carries this out on behalf of the “PA” 39 | P a g e SWL Proscient User Guide To “Suspend” the permit via the “Mobile Optimised Web Page” Log in to Proscient: Search for the permit you require Select the option to “Suspend” the Permit To “Suspend” the Permit by Calling the Mitie Call Centre. To provide ePermit intervention to those staff on site who wish to "Suspend" an ePermit, but who do not have internet connectivity on‐site, staff will call a pre‐determined phone number (TBC) to contact the Mitie call centre. A short discussion will take place and following the necessary safety checks, the contact centre will “Suspend” the ePermit on behalf of the caller. Before making the call to the Mitie Centre to Suspend your ePermit you will need to be able to provide the following information: ► Confirmation that you are a Safe Work Leader ► Your Name ► Your ePermit Number ► Confirmation that you want to “Suspend” you ePermit ► Confirmation that you have left your site clean and tidy You will receive verbal confirmation that the ePermit number has been “Suspended” ► ► Whichever option is used for “Suspending” the permit it is the PA’s responsibility to record the relevant details on the Permit 40 | P a g e SWL Proscient User Guide 14. Amend The Amend function is most likely to be used to add information to the Risk Assessment (for example where the use of a power tool has become necessary and the tool was not part of the original Risk Assessment). It is not usual to allow for Scope/Job creep whereby the work scope is expanded to include new, previously unidentified work. Where Amendments are required the SWL MUST STOP all work being undertaken on the permit (in the “Amend” State, the permit is no longer “Live”) To Amend the Live permit via the desktop left mouse click on the double chevrons, then highlight “Amend” and select by clicking on the left mouse button again You will need to enter a reason for “Amending” the permit, then click Save The permit would now be in the “Amend” state and the required changes made. The permit can also be taken to “Amend” from the Mobile Optimised Web Page, but carrying out the amendments would still require the user to be logged in to Proscient via the desktop 41 | P a g e SWL Proscient User Guide Cautionary note: Careful consideration needs to be given if you are making significant changes to the previously identified Risk Assessment Table (RAT), for example if changing the permit from Lineside to On or Near the Line Non‐Intrusive then you will lose all of the details of the Track Information, and the permit will revert to “Draft Incomplete” You will be given a prompt upon changing one of the RATs to allow you to consider if you really do want to make the changes? Upon completion of any Amendments, the permit will need to be “Re‐Authorised” by the Authorising Authority. Where amendments are carried out on behalf of the SWL (for example no internet connectivity on‐site) it is the Safe Work Leader’s responsibility to ensure the worksite copy of the permit is updated to reflect that of the ePermit. Following “Authorisation”, the permit would need to be “Issued” and made “Live” as normal before work could begin. 42 | P a g e 15. SWL Proscient User Guide Job Complete and Job Incomplete Job Complete: When the full scope of work is completed, and the worksite has been left in a safe, clean and tidy condition the PA must change the state of the Permit to “Job Complete” indicating no further work is required. Job In‐Complete: Where the full scope of work is unable to be completed, the worksite must still has been left in a safe, clean and tidy condition the PA must change the state of the Permit to “Job In‐Complete” indicating no further work is taking place using this permit. A new permit must be produced if further work needs to take place. To “Job Complete/Incomplete” the Permit via the desktop. The “PA” will Click on either “Job Complete” or “Job Incomplete” If “Job Complete” selected You will then need to answer the following question If you answer “Yes” The permit will go to the “Job Complete” state If you answer “No” you will need to consider raising a Temporary Change Notice (TCN) and acknowledge the following The permit will move to “Job Complete” 43 | P a g e SWL Proscient User Guide If “Job Incomplete” selected You will then need to answer the following question If you answer “Yes” The permit will go to the “Job Incomplete” state If you answer “No” you will need to consider raising a Temporary Change Notice (TCN) and acknowledge the following You will then need to enter the reason for “Job Incomplete” and click Save, the permit will move to “Job Incomplete” The same process applies where the “Release Authority” carries this out on behalf of the “PA” 44 | P a g e SWL Proscient User Guide To “Job Complete/Incomplete” the Permit via the “Mobile Optimised Web Page” Log in to Proscient: Search for the permit you require Select the option to “Job Complete” or “Job Incomplete”the Permit Whichever option is used for completing the permit it is the PA’s responsibility to record the relevant details on the Permit 45 | P a g e SWL Proscient User Guide 16. Lessons What is a Lesson? A Lesson can be either “Job” based or “Location” based depending on its nature. A “Job” Based Lesson will only be presented to the user when the permit with that Lesson is copied, whereas a “Location” based Lesson will be presented to the user when they raise any permit for work to be carried out in the “Location” to which the Lesson was raised. This feature allows users to continuously improve work through feedback. Select the permit that you would like to add the lesson to Select Supporting Information Tab Select Create This lesson applies to: Select Job or Location ‐ Mandatory Field Lesson Title: Type in the title of the lesson ‐ Mandatory Field Details of Lesson: Type in a full description of lesson ‐ Mandatory Field Choose Save A Line Manager will have to validate the Lesson and can also make the Lesson no longer applicable 46 | P a g e 17. SWL Proscient User Guide Archive including options within Archive Following “Job Complete” and “Job Incomplete” the permit must be archived. Within Archive there are 3 options that can be manually selected: “Archive” – This will remain in the Database for 3 years (This is the standard default selection) “Retained Archive” – This will remain in the Database indefinitely (This can be selected as the default within the permit generation ‐ section 9) “Archive Do Not Copy” – This will remain in the Database for 3 years and prevents it from being copied If the Default to retained archive option is used, then permits will automatically move to “Retained Archive” 24 hours after the Permit has been made Job Complete or Job In‐Complete If the standard default to archive is used the permit will be automatically move to the “Archive” by the system 14 days after the Permit has been made Job Complete or Job In‐Complete The “Planner” will Click on the “Archive” button Before the permit moves to the “Archive” state, there is a reminder to capture any lessons that have been recorded on the paper copy of the permit If you answer “Yes”, the permit will go to the “Archived” state The “Planner” can then move the permit to one of the other “Archive” states as required. If required the permit can be moved back from either “Retained” or “Do Not Copy” If you answer “No” the permit will remain at the previous state. 47 | P a g e SWL Proscient User Guide 18. PTW Compliance check To create a Permit to Work Compliance check Click create Insert title and compliance type (Desktop or Work Area) Answer each question as Yes, No or N/A in turn by clicking on the relevant button You can also Create and assign actions on this screen if required. 48 | P a g e SWL Proscient User Guide 19. Job Planning The Job planning facility will allow you to view permits in Time View, Map View and List View. It is vital that potential conflicts between works taking place are identified and managed during the process These views should be used to filter for other works that are taking place in your work area at the same time. The presence of other work will have an impact on your planning and will need to be considered when structuring your permit, your Risk Assessment and how the work will be delivered. As this will have filters within this screen you can personalise your filters and also change the state of permits Map View Time View, Map View, List View Job in live state but clashes Red line is NOW in with another job time. Time and date (dependencies) (red outline in the bar above and coloured block) List View Jobs in drafted state (chequered block) Jobs pack – click to expand or remove from view. All jobs in Job in Live state pack are listed below. (coloured block) Filters Apply your Filters once you have customised, you can then Save your filters for future use 49 | P a g e SWL Proscient User Guide 20. What is a Job Pack A job pack consists of a single or number of permits that are produced either to deliver a single package of work or multiple packages of work in the same area at the same time. To create another permit in the same job pack. 1) Open a permit that has already been created 3) Click on create permit 2) Click on Job Pack 4) Choose to create new or copy Multiple permits to deliver a single package of work. If the package of work has several distinct tasks/steps then producing individual permits for each task should be considered. Reasons for producing separate permits rather than one permit with multiple steps: If the individual steps are to be undertaken by different workgroups. This will enable the person briefing the workgroup to have only the relevant information required to brief their group and undertake the task, rather than have to look through a large permit with information that they do not require. If there are different control points for each step. If a control point is selected as a control measure for a specific step, the permit cannot be made live until that control has been put in place. If the interdependence between one step and another step is critical. By producing separate permits dependencies can be built between permits to provide more robust control over the sequencing of the work. If the works are of a complex nature. A permit can be produced for managing the worksite. If the permits for the individual steps have a live – live link with the permit for managing the worksite, this means that at the start of the work the permits for the individual steps cannot be made live until the worksite manager’s permit has been made live and at the end of the work the worksite managers permit cannot be “handed back” until all of the permits for the steps have been “handed back”. This gives a more robust method of ensuring that works relying on the protection put in place as part of the management of the worksite permit have to be completed or suspended before the protection can be given up. 50 | P a g e SWL Proscient User Guide Multiple Companies delivering separate work in the same location at the same time. Where more than one party are undertaking work in the same location at the same time. Network Rail Maintenance, Balfour Beatty Rail and Carillion Rail all have items of work that require to be undertaken in close proximity and in the same time period. Balfour Beatty Network Rail Maintenance: Rail: Carillion: Tamping Ultrasonic Changing Rails Testing Network Rail Maintenance, Carillion and Balfour Beatty rail would produce a permit or permits for the work that they are planning to undertake. Once the first permit has been started in Proscient and the time and location on the map has been entered, the other two companies will have visibility that somebody else is intending to work at the same location at the same time that they are planning to work. A lead for the work area will have to be identified. If Carillion were identified as the lead then they would provide the SWL/SWM when the work is being delivered. Their role is to co‐ordinate the works of the three parties. All three would still be responsible for ensuring that they had assessed the risk associated with the work they were undertaking and ensuring that they had put in place appropriate control measures. They would also have to identify any risk that their work could export to the other two. 51 | P a g e SWL Proscient User Guide In addition to managing their own work risks Carillion would manage the co‐ordination of all three work activities and ensure that appropriate control measures were in place for the risks associated with the interaction of the three parties. Carillion: SWL 2 /SWM Network Rail Maintenance: Ultrasonic Testing Carillion: Changing Rails Balfour Beatty Rail: Tamping Permits are to be drafted and verified within each company. At the authorisation stage there needs to be confirmation that Carillion in their site co‐ordination role have reviewed the permits and that the control measures associated with control of risks relating to the interaction of the three parties have been included in the permit. This is to be done by means of the SWL/SWM or AA from Carillion countersigning the permits, the permits will still be Authorised by the individual companies. Each company would issue their permits relating to the work they were undertaking to their staff. The Carillion SWL/SWM would have a copy of all the permits. The Carillion SWL/SWM would the make the permits live 52 | P a g e SWL Proscient User Guide 21. Creating Dependencies Dependencies allow permit(s) to be linked and referenced to other permit(s). For example one Permit may not be able to go ahead until another Permit has started or in another example, a Permit has to be finished before another Permit can start. Proscient requires the permits to have a relationship, Parent and Child. The Child Permit is dependent on the Parent Permit. Open the Child Permit and Select Job Pack The following screen will open once you have selected job pack 53 | P a g e SWL Proscient User Guide The Parent Permit can be opened within the Child Permit: Click on Create or Use Existing button Select the option Use Existing (this example presumes the permit has already been created and is in either drafted or Verified state) Type in the Number of your Permit and Click Search Click Save Select Job Pack Tab You will now see that the Child and Parent permits are listed: 54 | P a g e SWL Proscient User Guide The permits need to be linked, there are three ways of linking permits: Finish Start Live Live Live Not Live A Parent Permit must finish before the Child Permit starts (ie. Live) A Parent Permit must be Live before the Child Permit becomes Live When a Live Parent Permit is suspended then a Child Permit can become Live Ensure that the permit you require first is Highlighted and has a green arrow pointing to the Unique ID Click on the Add Button to create the dependency in the References section 55 | P a g e SWL Proscient User Guide Select the Relationship Type (Finish/Start, Live/Live or Live/Not Live) nd Select the 2 Permit and Choose Save ( This example – Clear Vegetation) Note:‐ Activity 1 is the permit that was originally highlighted and Activity 2 is undefined until you select the 2nd permit. 56 | P a g e SWL Proscient User Guide In this example: Erect Fencing cannot go Live when Clear Vegetation is Live, as dangerous machinery will be used when clearing vegetation. Job Pack can have as many permits as you require. You would open the Child Permit and select Job Pack. You would then add the Parent, then another child, child, child etc. You would then choose the Add button within the References section and create the required dependencies as above Finish/Start, Live/Live or Live/Not Live You can also create dependencies to permits not listed in this Job Pack too! 57 | P a g e SWL Proscient User Guide 58 | P a g e SWL Proscient User Guide 22. Additional Features Supporting information In the Supporting Information tab Click Add to add Link/Attachment/Other item You can Insert (copy and paste) a URL from the web browser to link to a website/webpage. You can Attach a word/excel/pdf document, for example a Task Briefing Sheet, a Line blockage form or COSHH Assessment, etc… You can Type in a reference to any other items relating to the work. There are a bank of blank templates which can be printed directly from Proscient 59 | P a g e SWL Proscient User Guide Assigning a permit to a user From the Home Page, locate the permit you wish to assign, to open the permit either Click on “View” in the “Action” section for the highlighted permit or click on the permit title From the View page of the permit Click on ‘Assign’ Type the name of individual who you want to assign the permit to, (as you begin to type, names will begin to populate the list of users) Select the individual then Click ‘Save’. You will then see that the permit is assigned to that user. 60 | P a g e SWL Proscient User Guide Assigning a Control to a user Click on the “Risk Assessment” tab Click on the “Assign Controls” button A list of hazards and controls from the Risk Assessment will open up Select the “Control” you want to assign Then Click on the “Assign” button Type in the name of the user you wish to “Assign” the control to, then click “Save” Repeat this process for any other controls that need to be assigned. 61 | P a g e SWL Proscient User Guide Countersignature There are numerous reasons as to why somebody may “Countersign” against a permit. (Multiple PA’s, multiple permits being managed by a SWM/SWL2 etc…) From within the permit Click on the “Countersign” button Enter a valid reason for the countersignature and click “Save” You can review the reason listed in the “History” tab of the permit 62 | P a g e SWL Proscient User Guide 23. Summary information Roles Proscient has specific role types that are involved in the lifecycle of a permit. The table below relates the Proscient role to your current roles 63 | P a g e SWL Proscient User Guide Permit Lifecycle 64 | P a g e SWL Proscient User Guide 65 | P a g e SWL Proscient User Guide Incident Response Permit Lifecycle 66 | P a g e SWL Proscient User Guide Incident Response Permit Pad example 67 | P a g e SWL Proscient User Guide 68 | P a g e SWL Proscient User Guide Icon States Icon What does this mean? Who performs the step Drafted. The PA communicates with the PL and requests the job, the PL will ensure any line blockages are applied for, and start/finish times to suit the work are agreed. The PA gathers all relevant information to the best of their knowledge. Any supporting certificates and documentation will be linked and referenced. PL (Planner) & PA (SWL) Verified. The PA Performing the job (or if he is not available, the PA requesting the permit) then reviews this document before verifying it is correct. PA (SWL) AA (Line MGR) & PA (SWL) Authorised. There is a final review of the document at the permit meeting before the AA authorises the permit. IA (Planner/Line MGR) & PA (SWL) PA (SWL) & Release Authority (RA) PA (SWL) Issued. The IA will issue the permit. This can happen a number of days before the work is due to start. The PA in charge of the job shall discuss the work content with the IA. The IA will then hand out the printed permit/sin the issued state. Live Onsite. On site the PA will have to correctly answer a number of pre‐set questions on a mobile version of Proscient to ensure their knowledge of the permit and job content. In the event of remote access failure the PA will request the release authority (RA) to directly release the permit to live. Live. The PA will then conduct a Safe Work Briefing to ensure the group’s understanding, and get the group to sign the permit. Any problems must be reported back. The permit is live and the job can now start. S Job Suspended. If necessary the PA will suspend the permit. When ready to begin work again the PA will follow the process above for making the permit Live. PA (SWL) RA (Release Authority) Job Incomplete. For example the work content has some Job Complete. On completion of the job the PA will ensure: outstanding items to be completed. In this case a new permit The work area is left Safe, Clean and Tidy, is required, the PA will ensure: Return all paperwork to the office The work area is left Safe, Clean and Tidy, Job Complete the permit. Return all paperwork to the office The IA will be informed of Job Completion. No paperwork is to Job Incomplete the permit. be thrown away. Lessons can be added. In either Job Complete or Job Incomplete state the permit is no longer live and cannot be re‐opened. PA (SWL) I A Archive. The Planner will archive all documentation both paper and electronic. The document will remain archived for 3yrs. If the document is not archived, it will automatically archive after 14 days. Default to retained archive – Will archive indefinitely or Archive do not copy – Stops the document being reused. Planner 69 | P a g e