1
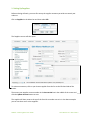
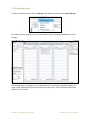
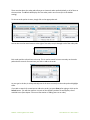
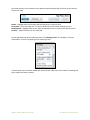
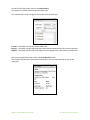
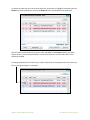
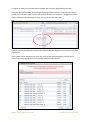
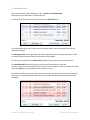
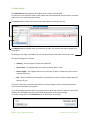
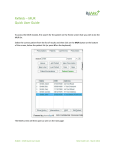
RxWeb – Ordering
Quick User Guide
Contents
1. Setting Up Suppliers
2. The Ordering Screen
3. Adding, Deleting, Changing Quantities and Transferring Items
4. Sending an Order
5. Order History
RxWeb – Ordering Quick User Guide
Helix Health Ltd - March 2014
1. Setting Up Suppliers
Before ordering will work, you must first set up the supplier accounts you wish to transmit your
orders to.
Click on Suppliers in the Menu bar and then select Edit
The Suppliers screen will then open:
To activate an account, click on your chosen supplier from the list on the left-hand side of the
screen.
Then enter your supplier account number in the Account No box in the middle of the screen and
click the Update Account button to save.
The supplier will then move to the top of the list with a number next to it. In the above example
you can see there are 3 active suppliers.
RxWeb – Ordering Quick User Guide
Helix Health Ltd - March 2014
2. The Ordering Screen
To open the Ordering screen, click on Ordering in the Menu bar and then select Open Ordering
The Ordering screen will open in a new Internet Explorer Tab or Window (depending on your IE
settings)
The ordering screen is arranged so that it will display all of your supplier order pads together in a
single screen. Depending on how many suppliers you have set up, it will resize each of the order
pads to fit on the screen.
RxWeb – Ordering Quick User Guide
Helix Health Ltd - March 2014
There are tabs above the order pads allow you to view each order pad individually, or all of them at
the same time. The All tab will display all of the order pads in one screen (this is the default
setting).
To view an order pad on its own, simply click on the appropriate tab.
You can also use the arrow buttons to the right of the tabs, to cycle through each of the order pads
Each order pad has a Search box at the top. This is used to search for items currently on the order
pad and also to search for new items you wish to add to the order.
As you type in the box, it will dynamically search the items currently on the order pad and highlight
them.
If you wish to search for a new item to add to the order, just press Enter after typing or click on the
Search button. This will then perform a search of the suppliers product file and display a list of
available items (See chapter 3 for more information on adding items to an order).
RxWeb – Ordering Quick User Guide
Helix Health Ltd - March 2014
Each order pad has a set of buttons at the bottom and also displays the Total Price of the items on
the current order.
Delete – Highlight items on the order pad and then press to remove them
Print Order – Prints the order out. Can also be used to Print Selected by clicking on arrow
Send Selected – Highlight items on the order pad and then press to transmit the selected items
Send All – Transmit all items on the order pad
On the right-hand side of the Ordering screen is the Message Server. This displays a ‘running
commentary’ of what is happening on the ordering screen.
It shows when items have been added and removed from order pads, when orders are sending and
when replies have been received.
RxWeb – Ordering Quick User Guide
Helix Health Ltd - March 2014
On the left-hand side of the screen is the Order History.
This displays the folders which contain the Order Pads.
The calendar date can be changed to view orders from previous days
Current – This folder contains the current order pads
Recycle – This folder contains pads with items that have been deleted from the current order pads
Replied – This folder contains pads with replies from the suppliers for orders which have been sent
Also on the left-had side of the screen is the Item Details window.
This displays individual item information for whichever item you have selected on the current
order pad.
RxWeb – Ordering Quick User Guide
Helix Health Ltd - March 2014
3. Adding, Deleting, Changing Quantities and Transferring Items
To add a new item to an order, click into the search box at the top of your chosen suppliers order
pad and type the name of the item. You do not have to type the whole name, just the first few
letters (you may wish to include the strength to narrow down the search).
Then press ENTER on your keyboard or click on the Search button.
The Add Item window will then open, displaying a list of results from the suppliers product file
which match your search criteria. (If there are too many results, or the wrong items displayed, you
can amend your search at the top of the window.)
When you have identified the item you want, click in the Qty box next to the item and type in the
number of packs you wish add to the order.
Then press ENTER on your keyboard, or click on the Add To button in the bottom right corner.
The Add Item window will then close and the item will be displayed on the current order pad.
Note: You can add multiple items at the same time from the Add Item screen by entering a
quantity next to each item before pressing the ‘Add To’ button.
RxWeb – Ordering Quick User Guide
Helix Health Ltd - March 2014
To remove an item from the current order pad, click on the item to highlight it and then press the
Delete key on your keyboard or click on the Delete button at the bottom of the order pad.
The item will be removed from the current order and added to the Recycle folder in the Order
History section. From the Recycle folder it can be restored to your current order pad if it was
deleted by mistake.
To change the quantity of an item on your order, simply click on the quantity next to the item you
wish to change and type in a new value.
RxWeb – Ordering Quick User Guide
Helix Health Ltd - March 2014
To transfer an item from one order pad to another you can simply drag and drop the item.
Using your left mouse button, click and hold the button down on an item. Then move the mouse
pointer over to another order pad. You will see that the item you clicked on is ‘dragged’ across the
screen. Release the mouse button to ‘drop’ the item on the new order pad.
The item will then be added to the new order pad providing the supplier has the same item in their
product file.
If the system cannot identify the item you are moving from another supplier, it will ask you to
confirm the item by giving you a list of possible matches to choose from.
RxWeb – Ordering Quick User Guide
Helix Health Ltd - March 2014
4. Sending an Order
There are two options when sending an order - Send All and Send Selected.
Both buttons are at the bottom of each order pad.
To send all items on the order pad, simply click on the Send All button.
The order pad will go gray for a few seconds whilst the order is transmitting and then all of the
items will disappear.
The Message Server on the right-hand side off the Ordering screen will display information about
the order sending and when a reply is received from the supplier.
The reply can be checked in the Order History window (See chapter 5 for more information)
The Send Selected button allows you to transmit certain lines from the order pad.
To select a line on the order, simply click on it and it will turn red/pink. To select multiple lines, hold
down the CTRL key on your keyboard whilst clicking on items.
The button will indicate how many items you have selected. Simply click on the button to transmit
those items. The unselected items will remain on the order pad whilst the transmitted items will
disappear.
RxWeb – Ordering Quick User Guide
Helix Health Ltd - March 2014
5. Order History
The Order History section displays the folders which contain the order pads.
Its main uses are to check the status of the replies from transmitted orders and to book in received
orders (if you are maintaining stock levels).
The Current folder contains the current order pads which are waiting to be sent.
The Replied folder will appear once you have sent an order. This contains the reply message from
the supplier.
By clicking on the reply in the folder, you can see the items from the order in the main screen.
The reply messages are as follows:
• Awaiting – You can expect the item to be delivered
• Out of Stock – The supplier does not currently have the item in stock
• Cannot Supply – The supplier does not carry the item, or does not expect to have it back in
stock any time soon
• DTP – Direct To Pharmacy, the supplier has switched your item to another supplier who will
deliver it for you
If an item in the reply is marked as Out of Stock or Cannot Supply, it will be copied back onto the
next Current order pad for the supplier.
If you are maintaining stock levels in the system, you can book your orders in when you receive the
delivery. This will update your stock levels with the quantities in the reply message.
To do this, simply click on the Received button at the bottom of the reply.
RxWeb – Ordering Quick User Guide
Helix Health Ltd - March 2014