1
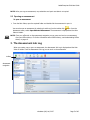
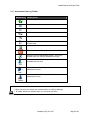
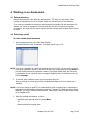
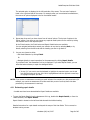
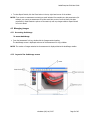
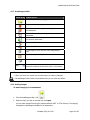
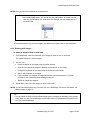
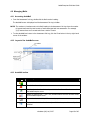
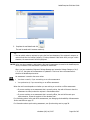
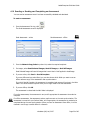
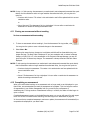
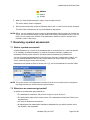
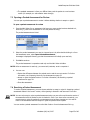
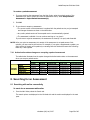
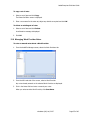
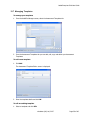
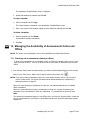
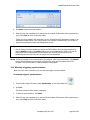
AudaEnterprise Gold User Guide
Table of Contents
1.
Introduction
3
2.
Getting Started with Assessments
3
2.1
2.2
2.3
3
4
5
Creating an assessment
Copying an assessment
Opening an assessment
3.
The Assessment Job Log
5
4.
Working on an Assessment
7
4.1
4.2
4.3
4.4
4.5
4.6
4.7
4.8
4.9
4.10
4.11
4.12
Data permissions
Selecting a model
Managing images
Entering administration, vehicle or address data
Validating an assessment
Calculating an assessment
Accessing a report
Using the Glass’s Guide Evaluator
Managing Mails
Sending or Sending and Completing an Assessment
Closing an assessment without sending
Completing an assessment
7
7
9
12
13
13
14
15
16
20
21
21
5.
Accessing assessment information
22
6.
Comparing Versions of an Assessment
22
7.
Resolving a parked assessment
24
7.1
7.2
7.3
7.4
24
24
25
25
8.
9.
What is a parked assessment?
When does an assessment get parked?
Opening a Parked Assessment for Review
Resolving a Parked Assessment
Searching for an Assessment
26
8.1
8.2
Searching with online connectivity
Searching with offline connectivity
26
28
Assigning or Reassigning an Assessment
29
9.1
9.2
29
29
Understanding when an assessment is assigned or reassigned
Assigning or Reassigning an assessment
10.
Importing Assessment Data
30
11.
Exporting Assessment Data
30
12.
AudaFile
31
AudaEnterprise Gold User Guide
12.1
12.2
12.3
12.4
12.5
12.6
12.7
13.
Managing the Availability of Assessments Online and Offline
13.1
13.2
14.
Checking out an assessment (taking it offline)
Checking in an assessment (returning it online)
Synchronising work
14.1
14.2
14.3
14.4
14.5
14.6
15.
31
32
32
32
33
35
36
37
37
38
38
Triggering synchronisation
Manually triggering synchronisation
Understanding what happens during synchronisation
Cancelling a synchronise (sync)
Post-synchronise: identifying updates to checked-out assessments
Understanding Offline History
Appendix A
15.1
16.
What is AudaFile ?
Applying a template to an assessment
Accessing AudaFile
Managing Addresses
Managing Rates
Managing Work Provider Notes
Managing Templates
38
39
40
40
41
41
43
Business Rules relating to Offline History and Reassignments
Further Information
43
46
©Audatex (UK) Ltd, 2007
Page 2 of 46
AudaEnterprise Gold User Guide
1. Introduction
This User Guide provides an introduction to working with assessments in AudaEnterprise. The guide
assumes experience with AudaWorkstation, AudaPad, AudaEnterprise v2.0 or AudaEnterprise Mobile
Solution v3.1, and general use of Microsoft Windows applications.
NOTE: All references in this document to ‘managing connectivity’, ‘online / offline’ and ‘synchronisation’
are only applicable to users of AudaEnterprise Gold Mobile Solution; they are not applicable to the
Desktop Solution. Information that is only applicable to AudaEnterprise Gold Mobile Solution is
shown with an icon
2. Getting Started with Assessments
2.1 Creating an assessment
To create an assessment
1. From the Main Index, Assessment menu select Create Assessment, or from the toolbar
click
.
The Create New Assessment screen is displayed.
2. Select the Work Provider from the drop-down list.
The Work Provider defaults to the previously selected Work Provider. The last five Work
Providers are displayed at the top of the drop-down list.
NOTE: If you have a template associated with the selected Work Provider, on creating the assessment,
the information in the template, for example addresses and rates, is automatically included. For
further information about templates, see Managing Templates on page 36.
3. If necessary, enter or edit the Assessment Number.
The first time you create an assessment, the Assessment Number field is blank. When you
subsequently create an assessment, the next sequential assessment number is automatically
displayed.
NOTE: The Assessment Number must be unique. If you create an assessment offline, when you
subsequently return to online connectivity and synchronise the assessment, the system checks
that the assessment number is unique.
©Audatex (UK) Ltd, 2007
Page 3 of 46
AudaEnterprise Gold User Guide
4. Click OK. If you have changed the Assessment Number, you are given the option of using the
number as the start of the default Assessment Number sequence in future, click Yes or No as
required.
A new assessment is created and displayed. The Main Index is hidden.
NOTE: If you have online connectivity and close the assessment, it will appear in your online Work In
Progress folder. Otherwise, it will appear in your offline Work In Progress folder.
2.2 Copying an assessment
To copy an assessment
1. From the Main Index, select an assessment from the folder, then from the Assessment menu
select Copy Assessment, or from the toolbar click
.
The Copy Assessment screen is displayed.
2. Select the Work Provider from the drop-down list.
The Work Provider defaults to the previously selected Work Provider.
NOTE: If you have a template associated with the selected Work Provider, on creating the assessment,
the information in the template, for example addresses and rates, is automatically included.
However, any addresses or rates changed or added to the assessment you are copying will not be
overwritten by the information in the template. For further information about templates, see
Managing Templates on page 36
3. If necessary, enter or edit the Assessment Number.
The first time you copy an assessment, the Assessment Number field is blank. When you
subsequently copy an assessment, the next sequential assessment number is automatically
displayed.
NOTE: The Assessment Number must be unique. If you create an assessment offline, when you
subsequently return to online connectivity and synchronise the assessment, the system checks
that the assessment number is unique.
4. Select Copy Images and/or Copy Repair Operations as required.
5. Click OK. If you have changed the Assessment Number, you are given the option of using the
number as the start of the default Assessment Number sequence in future, click Yes or No as
required.
The assessment is copied and displayed. The Main Index is hidden.
©Audatex (UK) Ltd, 2007
Page 4 of 46
AudaEnterprise Gold User Guide
NOTE: When you copy an assessment, any calculation and repair cost data is not copied.
2.3 Opening an assessment
To open an assessment
¾
From the Main Index, open the required folder and double-click the assessment to open it.
You can also open an assessment by selecting it and then from the toolbar click
, or from the
Assessment menu, select Open Selected Assessment. The assessment is displayed and the Main
Index is hidden.
NOTE: From your offline tab on the assessment navigation you can open and work on an assessment
from your Offline History. For further information about Offline History, see Understanding Offline
History on page 41.
3. The Assessment Job Log
When you create, copy or open an assessment, the Assessment Job Log is displayed and the Main
Index is hidden. From the Assessment Job Log you can work on the assessment.
toolbar
Assessment
navigation
©Audatex (UK) Ltd, 2007
Page 5 of 46
AudaEnterprise Gold User Guide
3.1.1 Assessment Job Log Toolbar
Button Icon
Enables you to
Confirm completion of validation items
Calculate the cost of repair operations
Access assessment reports
Send the assessment
Export the assessment
AudaFile - access Templates, Addresses, Rates and Work
Provider Notes
Apply a template to an assessment
Close the Assessment Job Log and return to the Main Index
Opens the ‘Copy to Address Book’ screen – this is only
available when you have the Addresses form open
Add a new address - this is only available when you have
the Addresses form open
Copy an address - this is only available when you have the
Addresses form open
Delete an address - this is only available when you have the
Addresses form open
Tips:
• When you hover your mouse over a toolbar button, a tooltip is displayed.
• All toolbar buttons are available when you are online and offline.
©Audatex (UK) Ltd, 2007
Page 6 of 46
AudaEnterprise Gold User Guide
4. Working on an Assessment
4.1 Data permissions
Data permissions define which data sets (Manufacturers’, TTS, Bike) you may access. When
working on assessments, you can only select models from the data sets you have access to.
If you receive an assessment containing a model selected from outside your data permissions (for
example, you receive an assessment for a bike model but you don’t currently have bike data
permissions), the model selection will be read-only and any changes made to Repair Details will not
be saved.
4.2 Selecting a model
To select a model for an assessment
1. From the Assessment Job Log, select Model Selection.
The Model Selection screen is displayed. The default vehicle type is ‘Car’.
NOTE: If you are an AudaVIN user, rather than following steps 2 to 5 below, you can select a model by
entering the registration number in the field at the top of the screen and then clicking Search. If
you have already entered the registration number in the General Details page, the field will be
pre-populated. You can check the vehicle coverage of AudaVIN, that is, the models covered, by
clicking Coverage.
2. If required, select a different vehicle type from the drop-down list.
After you change the vehicle type, the list of available manufacturers for that vehicle type is
refreshed.
NOTE: If you have a license for AudaTTS, the model selection shows a combined list of manufacturers
and models from both Audatex manufacturer’s and the Thatcham TVI (Thatcham Vehicle Index)
databases. For further information about AudaTTS, please see the AudaTTS User Guide provided
on the Installation CD.
3. Select the required manufacturer, by either:
• Highlighting the required option and clicking Next
Or
• Double-clicking the required option
©Audatex (UK) Ltd, 2007
Page 7 of 46
AudaEnterprise Gold User Guide
The selected option is displayed in the left-hand side of the screen. The next set of options is
listed in the right-hand side of the screen. For example, after you have selected a manufacturer,
the next set of options displayed is the list of available models.
4. Repeat step three until you have chosen from all sets of options. The last set of options is the
‘Extras’ section, from here you can choose any required model options for the vehicle by ticking
the checkbox next to the required option.
At the ‘Extras’ section, the Finish button and Repair Details button are available.
You can navigate backwards to amend your selection at any time by selecting Back, or by
directly selecting from the left-hand side the heading you want to go back to.
5. You can now choose to either:
• Exit Model Selection by clicking Finish.
Or
• Navigate directly to repair operations for the assessment by clicking Repair Details.
If you select Finish, the Assessment Job Log is displayed. If you select Repair Details, you can
select the tasks necessary to repair the damaged vehicle.
Tip:
• In step 3, if you want to use the keyboard to highlight the required option, use the tab
key until the option at the top of the list is highlighted and use the up/down arrows keys
to highlight the option you want.
NOTE: If you receive an assessment containing a model selected from outside your data permissions (for
example, you receive an assessment for a bike model but you don’t currently have bike data
permissions), the assessment is read-only.
4.2.1 Estimating repair details
A model must have been selected before Repair Details are available.
¾
To open the Repair Details from the Assessment Job Log, double-click Repair Details, or from the
Model Selection, click Repair Details.
Repair Details is located on the left-hand side beneath the Vehicle heading.
Detailed instructions for repair details are beyond the scope of this User Guide. This is covered on
Audatex training courses.
©Audatex (UK) Ltd, 2007
Page 8 of 46
AudaEnterprise Gold User Guide
¾
To close Repair Details, click the Close button in the top right-hand corner of the window.
NOTE: If you receive an assessment containing a model selected from outside your data permissions (for
example, you receive an assessment for a bike model but you don’t currently have bike data
permissions), Model Selection options will be read-only and any changes made to Repair Details
will not be saved.
4.3 Managing images
4.3.1 Accessing AudaImage
To access AudaImage
¾
From the Assessment Job Log, double-click the Images section heading.
The AudaImage screen is displayed and most of the Assessment Job Log is hidden.
NOTE: The number of images attached to the assessment is displayed below the AudaImage toolbar.
4.3.2 Layout of the AudaImage screen
toolbar
©Audatex (UK) Ltd, 2007
Page 9 of 46
AudaEnterprise Gold User Guide
4.3.3 AudaImage toolbar
Button Icon
Enables you to
Attach one or more image (.jpg) files to the assessment
Delete the selected image
Prevent the selected image from sending when you send
the assessment
Prevent all images from sending when you send the
assessment
Remove any holds on images so they will be sent when
you send the assessment
Zoom in by 25% with each selection
Zoom out by 25% with each selection
Fit the image to within the size of the image display
area
Copy the image to the clipboard
Generate a pdf from which you can print
Zoom in/out directly to a particular size (this is located
above the brightness control rather than on the toolbar)
Tips:
• When you hover your mouse over a toolbar button, a tooltip is displayed.
• All AudaImage toolbar buttons are available when you are online and offline.
4.3.4 Adding images
To attach image(s) to an assessment
1. From the AudaImage toolbar, click
.
2. Select the file(s) you wish to add and then click Open.
You can select multiple files using the standard Widows SHIFT or CTRL shortcuts. The image(s)
is displayed in AudaImage and added to the assessment.
©Audatex (UK) Ltd, 2007
Page 10 of 46
AudaEnterprise Gold User Guide
NOTE: Only .jpg files can be attached to the assessment.
Tip:
• On the Add Image screen, you can use the View Menu button to choose how you
view the .jpg files before you select them. For example, you can change files to a
thumbnail view.
In the Assessment Job Log, the new image(s) are added to the image count for the assessment.
4.3.5 Working with images
To select an image to view or work with
1. From AudaImage, select the thumbnail of the image you want to view or work with.
The system displays the full size image.
2. You can now:
•
Resize the display of the image using the toolbar buttons.
•
Zoom in to an area of the image by selecting an area directly on the image.
•
Change the brightness of the image using the brightness control slider.
•
Add or edit comments on an image.
•
Control whether one image or all images will be sent with the assessment. For further
information, see Controlling image sending on page 12.
•
Display an image as a negative.
3. Repeat steps 1 and 2 for each image you wish to work with.
NOTE: You can also add images at any time while you are in AudaImage. For further information, see
Adding images on page 10.
Tip:
• You can adjust the width of the thumbnail display pane by dragging its boundary to the desired
width. When you exit from AudaImage, the last width setting is remembered and used the next
time you access AudaImage.
©Audatex (UK) Ltd, 2007
Page 11 of 46
AudaEnterprise Gold User Guide
4.3.6 Controlling image sending
You can choose whether or not to send images when you send an assessment.
NOTE: Following the first time an image is sent with an assessment, the send/hold setting for the image
is automatically changed from send to hold.
To prevent an image being sent with an assessment
¾
From AudaImage, select the assessment, and from the toolbar click
.
To apply a hold on all images
¾
From the toolbar, click
.
To release a hold on all images
¾
From the toolbar, click
.
NOTE: You can also choose whether or not to send images when you send an assessment. For further
information on sending assessments, see Sending or Sending and Completing an Assessment on
page 20.
4.3.7 Closing AudaImage
¾
To exit from AudaImage, close the AudaImage window.
The Assessment Job Log is displayed.
4.4 Entering administration, vehicle or address data
To enter administration or other assessment data (for example, Assessment Notes, Total
Loss Details, Rates or Addresses)
1. From the Assessment Job Log, open the section you want to complete by double-clicking on the
heading on the left-hand side.
The selected section is displayed.
2. Complete the section.
NOTE: In the Rates section, you can apply rates that you have stored in AudaFile. In the Addresses
section, you can apply addresses that you have stored in AudaFile. You can also copy an address
. For further information, see Error!
you have received in an assessment to AudaFile using
Reference source not found. on page Error! Bookmark not defined..
©Audatex (UK) Ltd, 2007
Page 12 of 46
AudaEnterprise Gold User Guide
3. Repeat steps 1 and 2 for all sections you wish to add data to.
Once you open a section, it stays open until you close the assessment, enabling you to revisit the
section quickly by selecting the section heading or section tab.
NOTE: When you exit from the assessment, you are asked to confirm whether you wish to save the
changes. For further information, see Sending or Sending and Completing an Assessment on page
20.
4.5 Validating an assessment
Every assessment has default validation items that must be entered before the assessment can be
calculated; for example labour rates and model selection details. In addition, Work Providers may
specify additional items they require to be entered in the assessment.
To validate an assessment
.
1. From the Assessment Job Log toolbar, click
The assessment is checked to ensure the required validation items are complete.
2. If validation is successful, you can calculate the assessment. For further information, see
Calculating an assessment on page 13.
Or
If there are validation items that are missing, you are informed which items need to be
completed in the Validation Items section of the screen.
4.6 Calculating an assessment
When an assessment has been successfully validated, you can calculate an assessment. For further
information about validating an assessment, see Validating an assessment on page 13. There is a
limit to the number of calculations you can perform offline before you must synchronise.
1. From the Assessment Job Log toolbar, click
.
The calculation is performed and a Reports screen is displayed. Calculating a report does not
send the assessment to any recipients.
©Audatex (UK) Ltd, 2007
Page 13 of 46
AudaEnterprise Gold User Guide
2. Select a report to view the calculation details.
A report in pdf format is displayed. For further information about using reports, see Accessing a
report on page 14.
NOTE: After an assessment has been calculated for the first time, it is possible to send it. For details on
how to send an assessment, see Sending or Sending and Completing an Assessment on page 20.
4.7 Accessing a report
To access an assessment report
1. From the Assessment Job Log:
• From the toolbar, click
.
The Reports screen is displayed. Reports are only available when a calculation has been
performed.
Or
• Perform a calculation by selecting
the Reports screen is displayed.
from the toolbar. When the calculation is complete,
2. Select the report type you wish to open.
The report is displayed in pdf format, and can be printed or saved as required.
NOTE: Adobe Acrobat Reader is required to read pdf files. If you do not have Acrobat Reader installed,
you will be prompted to save the report. You can download the (free) Acrobat Reader from
http://www.adobe.com/products/acrobat/readstep2.html.
©Audatex (UK) Ltd, 2007
Page 14 of 46
AudaEnterprise Gold User Guide
Tip:
• If you want to copy a section of the pdf report, choose ‘Select Text’ from the Adobe Acrobat
toolbar (the icon and tooltip text may vary between versions of Acrobat Reader). Select the
section of text you want to copy and from the Edit menu, select Copy to copy it to the clipboard.
4.8 Using the Glass’s Guide Evaluator
On the Valuation screen, you can apply values and mileage information directly from the Glass’s
Guide Evaluator to the assessment.
NOTE: The Valuation screen, and therefore the Glass’s Guide valuation is only available to Work Provider
users. You must also have Glass’s Guide Evaluator installed on your PC.
To use values from the Glass’s Guide Evaluator
1. From the Valuations screen, in the Valuations section, select Glass’s.
Glass’s Evaluator is displayed.
2. Select a vehicle and value, and choose Export Data To Glassmatics.
3. Close the Glass’s Guide Evaluator.
4. The following fields are imported from Glass’s into the assessment:
• Edition Month / Year
• G.C. Retail
• G.C. Trade
• @ Mileage
©Audatex (UK) Ltd, 2007
Page 15 of 46
AudaEnterprise Gold User Guide
4.9 Managing Mails
4.9.1 Accessing AudaMail
¾
From the Assessment Job Log, double-click the Mails section heading.
The AudaMail screen is displayed and the Assessment Job Log is hidden.
NOTE: The numbers in brackets next to the Mails heading in the Assessment Job Log show the number
of unread emails and the total number of mails associated with the assessment. For example,
‘(3/5)’ means there are 3 unread mails from a total of 5 mails.
¾
To close AudaMail and return to the Assessment Job Log, click the Close button in the top right-hand
corner of the window.
4.9.2 Layout of the AudaMail screen
toolbar
4.9.3 AudaMail toolbar
Button Icon
Enables you to
Add a mail to the assessment
Cancel from the mail you are in
Edit the selected mail – this is only available before the mail has been saved to
the AudaEnterprise server
Delete the selected mail – this is only available before the mail has been saved
to the AudaEnterprise server
Opens the selected mail in pdf format ready to print
Reply to the selected mail – this is only available when you select a mail you’ve
received
©Audatex (UK) Ltd, 2007
Page 16 of 46
AudaEnterprise Gold User Guide
Tip:
• All AudaMail toolbar buttons are available when you are online and offline.
4.9.4 Creating a mail
To create a mail for an assessment
.
1. From the AudaMail toolbar, click
The Create Mail screen is displayed.
2. Select the Mail Type and the Recipient and then click OK.
The new mail is displayed.
NOTE: When you create a mail, a default recipient may be shown. For example, when you create an
interim or authority note, the default recipient will be the repairer who sent you the assessment.
©Audatex (UK) Ltd, 2007
Page 17 of 46
AudaEnterprise Gold User Guide
3. Complete the mail details and click
.
The mail is saved and it becomes read-only.
Tip:
• You can quickly select a recipient by typing the first few characters of the recipient’s company or
network code into the ‘Lookup Company’ or ‘Lookup Network Code’ fields. After you type in each
character, the nearest match will be highlighted.
NOTE: When you have created an Authorisation Mail and the assessment is saved to the AudaEnterprise
server, the status of the assessment is updated to ‘Authorised’.
When you have created an Engineers’ Salvage Message and entered a Salvage Category of A, B,
C, D, X or Z, the status of the assessment is updated to ‘Total Loss’ when the assessment is
saved to the AudaEnterprise server.
An assessment is saved to the server when:
•
You close or send it, if you are working on an online assessment.
•
You synchronise it, if you are working on an offline assessment.
When the mail is sent depends on whether you are working on an online or offline assessment:
• If you are working on an assessment that is currently online, the mail will be sent when the
assessment is closed, unless the recipient is ‘Non-Audatex User’.
• If you are working on an assessment that is currently offline, the mail will be sent upon
synchronisation, unless the recipient is ‘Non-Audatex User’.
For information about online and offline assessments, see Managing the Availability of Assessments
Online and Offline on page 37.
For information about synchronising assessment, see Synchronising work on page 38.
©Audatex (UK) Ltd, 2007
Page 18 of 46
AudaEnterprise Gold User Guide
4.9.5 Editing a mail
You can edit a mail before the assessment is saved to the AudaEnterprise server.
An assessment is saved to the AudaEnterprise server when:
• You close or send it, if you are working on an online assessment.
• You synchronise it, if you are working on an offline assessment.
To edit a mail
1. To edit a mail, within AudaMail, select the mail you want to edit, and from the toolbar select
.
2. Edit the details as required and click
.
4.9.6 Viewing a mail
¾
To view a mail, from AudaMail select the mail you want to view.
4.9.7 Printing a mail
¾
To print a mail from AudaMail, select the required mail and from the toolbar click
.
The mail is displayed in pdf format. You can then use the functionality within Adobe Acrobat to print
it.
NOTE: Adobe Acrobat Reader is required to read pdf files. If you do not have Acrobat Reader installed,
you will be prompted to save the report. You can download the (free) Acrobat Reader from
http://www.adobe.com/products/acrobat/readstep2.html.
4.9.8 Deleting a mail
If you create a mail in error, you can delete it before the assessment is saved to the AudaEnterprise
server. An assessment is saved to the AudaEnterprise server when:
• You close or send it, if you are working on an online assessment.
• You synchronise it, if you are working on an offline assessment.
¾
To delete a mail, from AudaMail select the mail, and from the toolbar click
.
The mail is permanently deleted.
©Audatex (UK) Ltd, 2007
Page 19 of 46
AudaEnterprise Gold User Guide
4.10 Sending or Sending and Completing an Assessment
You can send an assessment once it has been successfully validated and calculated.
To send an assessment
1. From the Assessment Job Log, click
.
The Send Assessment screen is displayed.
Send Assessment – online
Send Assessment - offline
2. From the Network Copy Code drop-down list, select the required recipients.
3. For images, select Send Selected Images, Send All Images, or Hold All Images.
Send Selected Images will send all images that haven’t had a ‘Hold’ applied in AudaImage.
4. If you are online, click Send or Send & Complete.
If you are offline and you select Send, you can also choose which folder you want to see an
offline reference copy of the assessment after synchronisation.
If you click Send & Complete, the assessment is completed and removed from view in the Main
Index. You should select this option when you no longer need to see the assessment.
5. If you are offline, click OK.
The assessment is closed and the Main Index is displayed.
For online assessments, the assessment is sent, and if appropriate the assessment is marked as
complete.
For offline assessments, the assessment and any mails are sent on the next synchronisation. The
assessment is moved into your Outbox folder, and if appropriate, the assessment is marked to be
completed during the next synchronisation. When you send an assessment from offline, it will be
checked in and a copy is saved offline for reference.
©Audatex (UK) Ltd, 2007
Page 20 of 46
AudaEnterprise Gold User Guide
NOTE: In step 1, if after opening the assessment you authorised it and subsequently amended the repair
details, and the calculation value no longer matches the authorised value, you are given the
option to:
• Continue with the send. The values in the authorisation mail will be updated with the current
calculation value.
or
• Cancel the send. The Assessment Job Log is displayed. You can either re-authorise the
assessment or delete the existing authorisation mail.
4.11 Closing an assessment without sending
To close an assessment without sending
1. To close an assessment without sending it, from the Assessment Job Log toolbar, click
.
You are given the option to save or discard changes to the assessment.
2. Select Yes or No.
Selecting No means that any changes to Local Notes and Mails will be discarded but any new
images are kept. The Main Index is displayed. If you have created a mail or entered a Salvage
Category of A,B,C,D,X or Z in the assessment or the Engineer’s Salvage Message, you are not
given the option to discard any changes. The assessment is always saved and the Main Index
displayed.
NOTE: If, after opening the assessment you authorised it and subsequently amended the repair details,
and the calculation value no longer matches the authorised value, you are given the option to:
• Continue closing the assessment. The values in the authorisation mail are updated with the
current calculation value.
or
• Cancel. The Assessment Job Log is displayed. You can either re-authorise the assessment or
delete the existing authorisation mail.
4.12 Completing an assessment
When you have finished working on an assessment and no longer need to see it displayed on your
Main Index, we recommended you mark the assessment as ‘complete’. This is to keep the number
of assessments in your folders manageable, both for you and for the performance of
AudaEnterprise. If a large number of assessments build up in a folder, the folder will take longer to
open or refresh.
Completed assessments remain on the AudaEnterprise server, so you can still search for and reopen
them. For further information about searching, see Searching for an Assessment on page 26.
In the event that a completed assessment receives an update, the assessment will automatically be
reopened and redisplayed in your Main Index.
©Audatex (UK) Ltd, 2007
Page 21 of 46
AudaEnterprise Gold User Guide
Special business rules govern what happens if an update is received from an assessment that
originated from a user’s Offline History or an assessment that has been checked out and
subsequently reassigned. For further information, see Appendix A on page 43.
An assessment can be completed from the Main Index or from the Job Log.
4.12.1 Completing an assessment from the Main Index
¾
To complete an assessment from the Main Index, select the assessment(s) you want to complete and
from the Assessment menu select Complete Assessment.
• For an online assessment, the assessment is removed from the Main Index.
• For an offline assessment, the assessment is marked to be returned online and completed
(and therefore removed from display) on next synchronisation. You can still access the
assessment offline until it is synchronised, when the assessment is moved from your offline
Work In Progress folder to your Outbox.
4.12.2 Completing an assessment when you are sending it
For details of how to complete an assessment at the same time you send it, see Sending or Sending
and Completing an Assessment on page 20.
5. Accessing assessment information
To access summary information about an assessment and its history
1. Ensure you are online and then from the Main Index select an assessment.
2. From the Information menu, select Assessment.
The AudaEnterprise Assessment Information screen is displayed and the Main Index is hidden.
3. From the Assessment Summary you can also choose to view a history log of the events for the
assessment. To view the assessment history, click Assessment History.
The Assessment History is displayed.
4. From the Assessment History screen you can:
• Sort the assessment history events by selecting the column heading you want to sort by.
• Filter events by selecting an event to filter by. Only the selected type of event is displayed.
• Return to the Assessment Summary by clicking Assessment Summary.
• Close the Assessment Information screen to return to the Main Index.
6. Comparing Versions of an Assessment
When there is more than one version of an assessment, you can view a comparison report
highlighting differences between versions. You can access this comparison report either from the
Main Index or from the Assessment Job Log.
©Audatex (UK) Ltd, 2007
Page 22 of 46
AudaEnterprise Gold User Guide
To compare versions of an assessment
1. From the Main Index, select the assessment and from the Assessment menu select Compare
Versions, or from the toolbar click
.
If there are only two versions of the assessment, the version comparison report is displayed.
Proceed to step 3.
If there are more than two versions of the assessment, a version summary screen listing the
versions of the assessment is displayed.
2. Select the two versions you want to compare and click OK.
A version comparison report is displayed highlighting how the two versions differ.
In the comparison report, the older version (on the left-hand side) is always the baseline, and
the more recent version (on the right-hand side) is compared against the older version.
In each section of the report, you can see where the versions were the same and where they
differed.
Additions, deletions and changes are shows as follows:
©Audatex (UK) Ltd, 2007
Page 23 of 46
AudaEnterprise Gold User Guide
+ Addition
-
Deletion
∆ Change
3. When you have finished viewing the report, close the report window.
The version history screen is displayed.
4. Either continue comparing versions by following steps 2 and 3, or exit from the Version Compare.
The Main Index or Assessment Job Log are displayed as appropriate.
NOTE: Offline, you can compare the current version of the assessment with the version you checked out.
That is, you can see what changes you have made since checking the assessment out. If you are
online, you can compare two versions of the assessment, whether a version is checked out or
checked in (held on the server).
7. Resolving a parked assessment
7.1 What is a parked assessment?
A parked assessment is a version of the assessment that is not active (that is, it cannot be worked
on or amended). A parked assessment is a result of the system receiving an update to an
assessment following certain scenarios. See When does an assessment get parked below.
You can only access parked assessments online from your User tab (or Admin tab if present). You
can view a parked assessment and you can choose whether you wish to make this your active
version (overwriting your current active version).
Assessments with parked versions are shown with a [+] next to the assessment in the Main Index.
NOTE: The current version of the assessment continues to be the current version and is not subject to
any changes unless you choose to accept a parked version.
7.2 When does an assessment get parked?
An update to an assessment gets parked when:
• The assessment is checked in and you have it open to view or work on it.
• The authorisation status of the current version of the assessment is Authorised, Total Loss or
Supplementary.
• You have the assessment checked out.
• An administrator has reassigned a checked-out assessment to you and the previous owner
has checked in the assessment.
©Audatex (UK) Ltd, 2007
Page 24 of 46
AudaEnterprise Gold User Guide
• The updated assessment is from your Offline History and the update is a new business
version (for example, an authorisation status change).
7.3 Opening a Parked Assessment for Review
You can open a parked assessment to review it before deciding whether to accept or reject it.
To open a parked assessment for review
1. From the Main Index, for an assessment that has one or more parked versions attached to it,
select the [+] next to the assessment to view the parked version(s).
The parked assessments are listed.
2. Select the parked assessment you want to view and open it by either double-clicking it or from
the Assessment menu, select Open Selected Assessment.
A message is displayed informing you that the assessment will initially open read-only.
3. Click OK to continue.
The parked assessment is opened as read-only and the Main Index is hidden.
NOTE: When an assessment is read-only, you cannot edit, calculate, send or complete it.
4. You can now:
• Review the differences between the parked version and the current version. For further
information, see Comparing Versions of an Assessment on page 22.
• Accept or reject the parked version. For further information, see Resolving a parked
assessment on page 24.
• Close the assessment.
7.4 Resolving a Parked Assessment
To resolve a parked assessment, you must choose whether to accept or reject it. Accepting a parked
assessment makes it the ‘current’ version, while rejecting it discards it and removes it from view.
NOTE: You can only accept or reject a parked assessment when you are online and the active version of
the assessment with the parked version is checked in. Even if you have online connectivity, you
cannot accept or reject an update for an assessment that has been checked out. You need to
check in the assessment and then accept or reject the parked version update.
You can resolve a parked assessment from the Main Index or from the Assessment Job Log.
©Audatex (UK) Ltd, 2007
Page 25 of 46
AudaEnterprise Gold User Guide
To resolve a parked assessment
1. If you are resolving the assessment from the Main Index, select the parked version of the
assessment you want to resolve and from the Assessment menu, select Accept Parked
Assessment or Reject Parked Assessment(s).
2. Click OK.
3. If you choose to accept an assessment:
• The current version of the assessment is replaced with the parked version you just accepted
and changes the status as shown in the table below.
• Any earlier parked versions of the accepted version are automatically rejected.
• The assessment is editable. You can continue working on it or close it.
If you choose to reject an assessment, the assessment is closed (if it is open) and discarded.
NOTE: When you reject an assessment, the sender of the assessment is not made aware of the
rejection; you may need to inform them. For example, if you reject a Supplementary update, you
might inform the sender of the update by re-sending them the Authorised version and informing
them why it was rejected.
7.4.1 Authorisation status changes on accepting a parked assessment
The table below illustrates how the system changes the Authorisation status on the assessment
when you accept a parked version.
Parked
Version
Initial
Interim
Authorised
Total Loss
Supplementary
Initial
Interim
Interim
Authorised
Total Loss
Interim
Authorised
Total Loss
Current Version
Authorised
Total Loss
Supplementary
Supplementary
Supplementary
Supplementary
Supplementary
Supplementary
Supplementary
Supplementary
Supplementary
Supplementary
Supplementary
Supplementary
Supplementary
8. Searching for an Assessment
8.1 Searching with online connectivity
To search for an assessment while online
1. From the Main Index, select the Search tab.
The search options are displayed on the left-hand side and the results are displayed in the main
pane.
©Audatex (UK) Ltd, 2007
Page 26 of 46
AudaEnterprise Gold User Guide
2. In the left-hand side, enter the search details in the field(s) you want to search by. If you want
to include completed assessments in your search, tick Include Completed Assessments.
3. Click Search.
NOTE: Only the expanded fields (the fields you can see that are open) are searched on.
The search results are displayed. If a search results in more than 100 assessments, you are
prompted to refine the search details.
4. You can now:
• View or filter the list of search results.
• Open an assessment from the search results to view or edit. To open an assessment, doubleclick it, or from the Assessment menu, select Open Assessment.
• Perform another search by repeating steps 2 and 3.
• Reopen a completed assessment (before opening it to edit). To reopen a completed
assessment, from the Main Index, Assessment menu, select Reopen Assessment.
If you are only able to open an assessment as read-only, you will be asked to confirm you want
to continue opening the assessment. For further information about when an assessment is
editable and when it is read-only, see Understanding when online search results are editable or
read-only on page 28.
5. You can now either:
• Work on the assessment as required. For information on working on assessments, see
Working on an Assessment on page 7.
• View and close the assessment without working on it by clicking
.
Tips:
• To open a search field, select the arrow to the right of the field’s title:
• To clear search fields, click Clear.
©Audatex (UK) Ltd, 2007
Page 27 of 46
AudaEnterprise Gold User Guide
NOTE: When you search online, the assessments you have permission to search will depend on your
company configuration. For example, your configuration might enable you to search all
assessments in group x only, or all assessments assigned to you only.
8.1.1 Understanding when online search results are editable or read-only
An assessment is editable when:
An assessment is read-only when:
•
It is unassigned to anyone in your
‘New Work’
•
It is assigned to someone you do not
have permission to assign to
•
It is assigned to you
•
It is checked out (offline)
•
It is assigned to someone you have
permission to assign to
•
It is being synchronised
•
Another user with permission to edit it
has it open online
•
It has been completed – the
assessment must be reopened before it
can be edited again
For information about assigning assessments, see Assigning or Reassigning an Assessment on page
29.
8.2 Searching with offline connectivity
To search for an assessment offline, you can use the filter above the list of assessments in a folder.
This is useful if you need to look for an assessment in your Offline History folder (it is unlikely that
you will have a large number of assessments checked out in your Work In Progress folder).
To search with offline connectivity
1. From the Show assessments where drop-down list, select the filter condition.
2. Enter the first character, or first few characters in the starts with field.
The assessments are filtered and the number of matches displayed.
NOTE: The filter is retained as you navigate between folders until you choose to clear it.
3. To clear the filter, click Clear.
©Audatex (UK) Ltd, 2007
Page 28 of 46
AudaEnterprise Gold User Guide
9. Assigning or Reassigning an Assessment
9.1 Understanding when an assessment is assigned or reassigned
9.1.1 Assignment
When the system receives an assessment, business rules are applied to determine where to route
and initially assign the assessment. The assessment may be assigned to a group or directly to a
user. When the assessment is assigned to a group, and a user in that group opens, amends and
saves the changes to the assessment, the assessment is assigned to that user.
9.1.2 Reassignment
It is possible to reassign an assessment to another user or group; the permissions configured in
your user profile determine whether or not you have permission to reassign and who you can
reassign to.
9.2 Assigning or Reassigning an assessment
You must have online connectivity to assign or reassign an assessment.
To reassign an assessment
1. Select the assessment(s) you want to assign and from the Main Index Assessment menu, select
Reassign.
The Reassign Assessment screen is displayed.
NOTE: You can select multiple files using SHIFT or CTRL.
2. Select a group or a user to assign the assessment to, and click Reassign.
The assessment is reassigned (including any checked out assessments) and the Main Index is
displayed.
The new assignee will see the reassigned assessment as unread (in bold) in the appropriate
folder - ‘New Work’ for an engineer, ‘Work in Progress’ for a repairer.
©Audatex (UK) Ltd, 2007
Page 29 of 46
AudaEnterprise Gold User Guide
NOTE: In the event that you reassign a checked out assessment (assessment X) assigned to a user (user
A) - for example due to user A’s unexpected absence from work - if/when user A subsequently
chooses to check in/send/send & complete assessment X, the system won’t send the
synchronised version of the reassigned assessment or any mails attached to it. Rather, the
assessment is parked with its new assignee (user B) and any mails will remain attached to this
parked assessment version. When you reassign a checked out assessment, the system cannot
display which assessments are checked out and which are not.
The exception to the above is the scenario where user A attempts to send assessment X after
user B has completed the assessment: in such a scenario, the system will send the reassigned
assessment or any mails attached to it; if you wish to avoid assessment X being sent in latter
scenario you will need to instruct user A to check in assessment X rather than send it, so
assessment X becomes a parked version when the assessment is reopened and reassigned to
user A. For further details of the business rules related to reassignments, refer to Appendix A.
10. Importing Assessment Data
To import assessment data
1. From the Main Index, Tools menu, select Import.
2. Select the file(s) to import and click Open.
You can select multiple files using SHIFT or CTRL.
NOTE: Files to be imported must be in AXFORMAT and the file name must adhere to the Audatex
assessment number convention; it must be up to 8 characters long, start with Alpha characters
and end with numerical characters.
3. Click OK.
The Main Index is displayed. The newly imported assessments are displayed in bold to show they
are un-read. Your company configuration determines the folder that the imported assessments
are placed in. For an Engineer user it is likely to be the New Work folder, while for a repairer
user it is likely to be the Work In Progress folder.
NOTE: The import of an assessment may be skipped because it already exists.
11. Exporting Assessment Data
It is possible to export assessments from the Main Index or from the Job Log when an assessment is
open.
If you wish to always export assessment data to the same location, you can specify this in the Settings
dialog. You will not then be asked to select a location each time you export.
To export assessment data from the Job Log
1. From the Tools menu, select Settings.
2. Click
. Choose the default export location and click OK.
3. If you wish to export images, select Include images in assessment export.
©Audatex (UK) Ltd, 2007
Page 30 of 46
AudaEnterprise Gold User Guide
4. Click OK.
5. From the Assessment Job Log toolbar, click
.
If you have specified an export location (step 1 to 4) the assessment will be exported.
OR
If you have not specified a location within the Settings dialog, choose a location to export to and
click OK.
The assessment is exported and a confirmation message is displayed.
6. Click Close.
The Assessment Job Log is displayed. The exported assessment data can now be imported into
another user’s AudaEnterprise.
To export assessments from the Main Index
1. If necessary, follow steps 1 to 4 above in To export assessment data form the Job Log.
2. In the Main Index select the assessment(s) you wish to export and then from the Tools menu
select Export.
The assessment is exported and a confirmation message is displayed.
3. Click Close.
12. AudaFile
12.1 What is AudaFile ?
AudaFile is information such as addresses and rates you can store and reuse with future
assessments to save you typing it in each time.
You can store addresses and rates individually, add notes on Work Providers and also create
‘templates’ of a collection of reference data.
You can create a template linked to a Work Provider so that every time you create or copy an
assessment with that Work Provider, the assessment will be automatically populated with any rates,
addresses and work provider notes you have linked to that template (for example, a template could
include ‘Repairer Address A’, ‘Insurer Address B’ and ‘Rates Set C’).
You can also apply an existing template to an assessment. This means you can:
• apply a template to an assessment you have received.
• apply a template to an assessment after you have created or copied it.
• apply more than one template to an assessment.
©Audatex (UK) Ltd, 2007
Page 31 of 46
AudaEnterprise Gold User Guide
12.2 Applying a template to an assessment
To apply a template to an assessment
1. From the Assessment Job Log toolbar, click
.
2. Select the template to apply.
You are asked to confirm that you want to proceed before the template is applied.
12.3 Accessing AudaFile
¾
From the Main Index toolbar, click
.
The AudaFile Manager is displayed. From here you can add, edit, copy and delete your reference
data, such as sets of rates and templates. For further information about particular reference data,
see Managing Addresses on page 32, Managing Rates on page 33, Managing Work Provider Notes on
page 35, and Managing Templates on page 36.
12.4 Managing Addresses
To manage your addresses
1. From the AudaFile Manager screen, select the Address Book tab.
2. From the Address Book tab you can add, edit, copy and delete your Addresses.
To add a new address
1. Click Add.
The Address Template Editor screen is displayed.
©Audatex (UK) Ltd, 2007
Page 32 of 46
AudaEnterprise Gold User Guide
2. Enter the address details and click OK.
To edit an existing address
1. Select an address and click Edit.
The Address Template Editor screen is displayed.
2. Edit the address as required and click OK.
To copy an address
1. To copy an address to another address type, select an address and click Copy To.
The list of address types is displayed.
2. Select an address type.
The copied address is displayed in the Address Templates Editor screen.
3. Edit any details as required and click OK.
To delete an address
1. Select an address and click Delete.
A confirmation message is displayed.
2. Click OK.
12.5 Managing Rates
A Template Rate Set allows you to save rates information as a template. You can then apply these
rates to assessments by selecting the Template Rate Set rather than having to enter the same
information for many assessments.
©Audatex (UK) Ltd, 2007
Page 33 of 46
AudaEnterprise Gold User Guide
To manage your set of rates
1. From the AudaFile Manager screen, select the Rates tab.
2. From the Rates tab you can add, edit, copy and delete your sets of rates.
To add a new set of rates
1. Click Add.
The Rates Editor is displayed.
2. Enter a name for the Rates Set and the rate details and click OK.
To edit an existing set of rates
1. Select a set of rates and click Edit.
The Rates Set Editor is displayed.
2. Update the Rates Set as required and click OK.
©Audatex (UK) Ltd, 2007
Page 34 of 46
AudaEnterprise Gold User Guide
To copy a set of rates
1. Select a set of rates and click Copy.
The Rates Set Editor screen is displayed.
2. Enter a new name for the rates set, adjust any details as required and click OK.
To delete an existing set of rates
1. Select a set of rates and click Delete.
A confirmation message is displayed.
2. Click OK.
12.6 Managing Work Provider Notes
To enter or amend notes about a Work Provider
1. From the AudaFile Manager screen, select the Work Providers tab.
2. From the left-hand side of the screen, select a Work Provider.
Any notes already entered on the selected Work Provider are displayed.
3. Click in the Notes field and enter or amend your notes.
When you select another Work Provider, click Save Notes.
©Audatex (UK) Ltd, 2007
Page 35 of 46
AudaEnterprise Gold User Guide
12.7 Managing Templates
To manage your templates
1. From the AudaFile Manager screen, select the Assessment Templates tab.
2. From the Assessment Templates tab you can add, edit, copy and delete your Assessment
Templates.
To add a new template
1. Click Add.
The Assessment Template Editor screen is displayed.
2. Enter the template details and click OK.
To edit an existing template
1. Select a template and click Edit.
©Audatex (UK) Ltd, 2007
Page 36 of 46
AudaEnterprise Gold User Guide
The Assessment Template Editor screen is displayed.
2. Update the template as required and click OK.
To copy a template
1. Select a template and click Copy.
The copied template is displayed in the Assessment Template Editor screen.
2. Enter a new name of the template, adjust any other details as required and click OK.
To delete a template
1. Select a template and click Delete.
A confirmation message is displayed.
2. Click OK.
13. Managing the Availability of Assessments Online and
Offline
NOTE: This section is only applicable if you are using AudaEnterprise Gold Mobile Solution.
13.1 Checking out an assessment (taking it offline)
To check out an assessment so it is available to work on offline (for example, when you are ‘on the
road’) you must be online. There is no technical limit to the number of assessments you can take
offline.
¾
From the Main Index, select the assessment(s) you want to make available offline from the relevant
folder on your ‘User’ tab (or ‘Admin’ tab if present) and from the toolbar, click
.
NOTE: If you wish to take an assessment with one or more parked versions offline, only the current
version is taken offline. For further information about Parked Assessments, see Resolving a
parked assessment on page 24.
Where you have selected one assessment to check out, the selected assessment(s) is available
offline immediately.
Where you have selected more than one assessment to check out, a screen summarising the
assessments you have selected to check out is displayed. To proceed with the check out, click
Start.
The checked out assessments appear in your Offline tab in your Work In Progress folder. A read-only
copy of the assessment(s) is also kept on the AudaEnterprise server whilst the assessment remains
checked out.
©Audatex (UK) Ltd, 2007
Page 37 of 46
AudaEnterprise Gold User Guide
NOTE: An administrator can be configured with the ability to reassign an offline assessment, overriding
the ‘read-only’ lock. This is useful, for example, in the event a user who has an assessment offline
becomes sick and is unable to check in their work, the administrator can reassign the assessment.
For further information, see Assigning or Reassigning an Assessment on page 29.
13.2 Checking in an assessment (returning it online)
¾
To check in an assessment, select the required assessment from your Work In Progress folder, and
from the Assessment menu select Check In.
The assessment is marked to be checked in during the next synchronisation and it is moved to your
Outbox.
You can still access the assessment until the next synchronisation takes place; if you do, when you
close an assessment you opened from your Outbox:
• If you choose to not save any changes the assessment remains in your Outbox and will be
checked in during the next synchronisation.
• If you choose to save any changes, the check in is cancelled and the assessment is returned
to your Offline Work In Progress folder. It will not be checked in during the next
synchronisation.
NOTE: Once the assessment has been returned online, a copy of the assessment is stored in your Offline
History. For further information about Offline History, see Understanding Offline History on page
41.
14. Synchronising work
NOTE: This section is only applicable if you are using AudaEnterprise Gold Mobile Solution.
14.1 Triggering synchronisation
To synchronise (sync)
1. When you return to online connectivity from offline connectivity, a message is displayed asking if
you wish to synchronise your work.
2. Click Yes.
3. The Synchronisation Tasks screen is displayed showing how many assessments are due to be
checked in, and how many assessments left offline will have their status checked.
©Audatex (UK) Ltd, 2007
Page 38 of 46
AudaEnterprise Gold User Guide
4. Click Start to start the synchronisation.
5. When the sync has completed (or to exit the Synchronisation Tasks screen without performing a
sync), click Close to return to the Main Index.
If after the synchronisation has completed, you are informed that the assessment number for an
assessment created offline is not unique (within your company’s assessments), you are able to
amend the assessment number and subsequently re-sync.
Tip
• You can hold an individual assessment and/or the Offline History from the synchronisation by
clicking Details and ticking the Hold checkbox next to the assessment or folder. This may be
useful when you are using mobile communications such as a 3G card to connect to the
AudaEnterprise server and only want to synchronise one assessment.
NOTE: To see more details of the synchronisation (for example, a full list of assessments), click Details.
A list of the assessments you are about to synchronise, along with the folders that will be
included in the synchronisation, (listed as Globals) are displayed.
14.2 Manually triggering synchronisation
When you have online connectivity, you can manually trigger a synchronisation.
To manually trigger a synchronisation
1. From the Main Index, File menu, select Synchronise, or from the toolbar click
.
2. Click Yes.
The Synchronisation Tasks screen is displayed.
3. To start the synchronisation, click Start.
4. When the sync has completed (or to exit the Synchronisation Tasks screen without performing a
sync), click Close to return to the Main Index.
©Audatex (UK) Ltd, 2007
Page 39 of 46
AudaEnterprise Gold User Guide
14.3 Understanding what happens during synchronisation
AudaEnterprise Gold
After the system has successfully synchronised each assessment item in your Outbox, a copy of the
assessment is kept offline (unless you were only sending a mail or your company has requested that
Offline History is deactivated). For further information about Offline History, see Understanding
Offline History on page 41.
NOTES: Mails will not be sent where the recipient is a ‘Non-Audatex User’.
An assessment or any mails from an assessment that has been reassigned while you were offline
will not be sent. Any mails attached to such an assessment remain with the assessment for
information. For further information about reassigned assessments, see Assigning or Reassigning
an Assessment on page 29.
14.4 Cancelling a synchronise (sync)
1. To cancel a sync while it is executing, click Stop.
The sync is stopped. Depending when you choose to stop, some of the data may have been
synchronised.
2. To return to the Main Index, click Close.
©Audatex (UK) Ltd, 2007
Page 40 of 46
AudaEnterprise Gold User Guide
14.5 Post-synchronise: identifying updates to checked-out assessments
14.5.1 Assessment version updates
If the system detects that any checked out assessments have received a new assessment version on
the AudaEnterprise server, when the synchronisation is complete, the Synchronisation Tasks screen
is displayed next to the assessment in
informs you that new versions are available. Additionally,
your offline Work In Progress folder to inform you the assessment has a parked version. You can
only view a parked assessment from your online work. For further information about parked
assessments, see Resolving a parked assessment on page 24.
NOTE: To resolve an update to a parked assessment that is offliine, you will first need to return the
assessment online. For further information, see Managing the Availability of Assessments Online
and Offline on page 37.
14.5.2 Identifying mail updates
If the system detects that either i) any checked-out assessments or ii) any assessments in your Offline
History received new mails on the AudaEnterprise server, the system fetches these mails from the server
is
during the sync and the Synchronisation Tasks screen informs you they are available. In addition,
displayed next to the assessment in your offline Work In Progress folder. You can access these mails
offline. For information about Offline History, see Understanding Offline History on page 41.
14.5.3 Identifying reassigned assessments
If the system detects that any assessments remaining offline have been reassigned on the
AudaEnterprise server since you last synchronised, the Synchronisation Tasks screen informs you
is displayed next to the assessment in your offline Work In
they are available. Additionally,
Progress folder to inform you the assessment is now assigned to someone else.
You can:
• Return your offline version of the now reassigned assessment(s) to online. For information
about returning an assessment online, see Managing the Availability of Assessments Online
and Offline on page 37. The next time you synchronise, the system will park your copy of the
assessment to it’s new assignee but will not send it; in the event it’s new assignee had
already completed it, the system will send the assessment you sent, park your offline copy of
the assessment against the latest version on the AudaEnterprise server, reopen it and assign
it to you.
• Do nothing; the assessment will remain in your offline Work In Progress folder.
14.6 Understanding Offline History
14.6.1 What is Offline History?
During synchronisation, for every assessment that is being checked in (including assessments you
complete or send from offline), an offline copy of the assessment is kept for your own reference
purposes. When you check in or complete an assessment, after synchronisation the assessment will
show in your Offline History folder on your offline tab.
©Audatex (UK) Ltd, 2007
Page 41 of 46
AudaEnterprise Gold User Guide
When you are offline and send an assessment, you can choose which offline folder (Work In
Progress or Offline History) will display the offline copy of the assessment after synchronisation. For
further information about sending or sending and completing assessments, see Sending or Sending
and Completing an Assessment on page 20.
By default, the offline copy of the assessment is kept in the Offline History folder for 30 days before
being automatically removed. If, when the assessment is being copied to your Offline History folder,
a copy of the assessment already exists, the earlier version is overwritten with the latest version and
the expiry time restarts.
14.6.2 Working on Offline History assessments
You can open assessments from your Offline History to view and, if necessary, work on. When you
close an assessment you have worked on from your Offline History:
• If you do not save any changes, the assessment is kept in your Offline History folder.
• If you save any changes, the changed version is placed in your offline Work In Progress folder
and is treated as an offline assessment.
If you open an assessment from your Offline History that is already in your offline Work In Progress
folder, it will open as read-only.
When you synchronise an assessment you have worked on from your Offline History, the
AudaEnterprise server treats the assessment as an update to the ‘master’ on the server and applies
business rules to determine exactly what happens to the assessment. For information on the
business rules, see Appendix A on page 43.
14.6.3 Offline History settings
Your company decides whether or not Offline History is active (the default is yes), and how many
days Offline History is stored for (the default is 90 days, the maximum is 180 days); these settings
are configurable by your company.
©Audatex (UK) Ltd, 2007
Page 42 of 46
AudaEnterprise Gold User Guide
15. Appendix A
15.1
Business Rules relating to Offline History and Reassignments
The following summarises the business rules for an assessment (assessment X) that either:
• Has been re-assigned since User A last synchronised (this includes whether User A included X
in the sync or not and also whether User A has changed assessment X or not since checking it
out.)
• Has been opened and worked on from Offline History and User A chose to include it in the
sync.
The following terms apply in the business rules:
• User B is another user.
• Unlocked means assigned to someone, but not completed, not checked-out or not being
edited by anyone online.
• Locked means being edited by anyone, or checked out by anyone except user A –client-side
logic prevents user A from editing an assessment from Offline History where it already exists
as Checked Out in their Work In Progress folder offline.
• Version of X means the version of the assessment that was stored in Offline History or User
A checked out.
15.1.1 Rules where User A chose to Check In X with/without a Send AND does not
choose to Complete
Origin of X
Who X is assigned
to on Server
Status on Server
Rule
Where version of X = version on
server (i.e. neither A or B has not
changed X): overwrite
Open (i.e. not locked or
checked out)
Else: Park
Regardless, don’t Send (where
selected)
Work In
Progress
Re-assigned to B
Locked/Checked Out
Park and don’t send (where selected)
Where version of X = version on
server: overwrite
Else: Park
Completed
Offline
Completed (by anyone)
©Audatex (UK) Ltd, 2007
Regardless, Reopen, ensure X is
assigned to User A, Send (where send
selected)
Where version of X = version on
Page 43 of 46
AudaEnterprise Gold User Guide
server: overwrite
Else: Park
History
Assigned to User B
Open (i.e. not locked or
checked out)
Locked/Checked Out
Assigned to User A
Open
Regardless, Reopen, ensure X is
assigned to User A, Send (where send
selected)
Where version of X = version on
server (i.e. neither A or B has not
changed X): overwrite
Else: Park
Regardless, don’t Send (where
selected)
Park and don’t send (where selected)
Where version of X = version on
server: overwrite
Else: Park
Send regardless
Locked but not Checked Out
Park & Send (where selected)
15.1.2 Rules where A chose to sync without including X in the sync (e.g. X is in ‘Work In
Progress’)
Origin of X
Who X is assigned
to on Server
Status on Server
Rule
Work In
Progress or
Offline
History
Re-assigned to B
Open/Locked/Checked Out
Completed
Flag on client so user is aware it’s not
assigned to them on the server
©Audatex (UK) Ltd, 2007
Page 44 of 46
AudaEnterprise Gold User Guide
15.1.3 Rules where A chose to Check In X with/without a Send AND chose to Complete
Origin of X
Who X is assigned
to on Server
Status on Server
Open (i.e. not locked or
checked out)
Work In
Progress
Where version of X = version on server
(i.e. neither A or B has not changed X):
overwrite
Else: Park
Regardless, don’t Send (where
selected)
Re-assigned to B
Locked/Checked Out
Completed
Completed (by anyone)
Offline History
Rule
Assigned to User B
Open (i.e. not locked or
checked out)
Locked/Checked Out
Assigned to User A
Open
Locked but not Checked
Out
©Audatex (UK) Ltd, 2007
Park and don’t send (where selected)
Where version of X = version on server:
overwrite & Complete
Else: Park, Reopen & ensure X is
assigned to User A
Send (where selected) regardless
Where version of X = version on server:
overwrite & Complete
Else: Park, Reopen & ensure X is
assigned to User A
Send (where selected) regardless
Where version of X = version on server
(i.e. neither A or B has not changed X):
overwrite
Else: Park
Regardless, don’t Send (where
selected)
Park and don’t send (where selected)
Where version of X = version on server:
overwrite and Complete
Else: Park
Send (where selected) regardless
Park & Send (where selected)
Page 45 of 46
AudaEnterprise Gold User Guide
16. Further Information
For further assistance, please contact the Audatex Service Desk tel: 0118 923 5666,
fax: 0118930 4175, email: [email protected].
Audatex (UK) Limited
The Forum
Station Road
Theale
Reading
RG7 4RA
AudaEnterprise Gold User Guide version 1.0
©Audatex (UK) Ltd, 2007
Page 46 of 46