Download User Guide - Clear Books
Transcript
User Guide Setup, sales, purchase and support information for your Clear Books account Digital Edition Contents 2 4 Chapter 1: Customising your Dashboard 7 Chapter 2: Setting up a Bank Account 12 Chapter 3: Customers and Suppliers 13 Importing Existing Customers and Suppliers 17 Creating New Customers and Suppliers 19 Chapter 4: Sales and Invoices 20 Importing Existing Invoices 24 Creating New Quotes 27 Creating New Invoices from Quotes 28 Creating New Invoices 30 Creating New Recurring Invoices 33 Creating New Credit Notes 35 Chapter 5: Sending Automated Emails 39 Chapter 6: Purchases and Bills 40 Importing Existing Bills 44 Creating New Bills 46 Creating New Recurring Bills 49 Creating New Credit Notes 51 Entering Employee Expenses 54 Chapter 7: Bank Statements 55 Importing Bank Statements 57 Recreating Bank Statements Contents 58 Explaining Transactions on Bank Statements 61 Quick Paying an Invoice 62 Reconciling Transactions with Paid Invoices 63 Chapter 8: Customising your Invoices 68 Chapter 9: Help and Support 69 Asking a Question 71 Reporting a Problem 72 Suggesting an Idea 73 Chapter 10: Networking with other Businesses 76 Chapter 11: Top Ten Questions 77 How do I show a refund to a customer? 79 How do I email a customer statement? 82 How do I approve multiple draft invoices? 83 How do I edit transactions in bulk? 85 How do I delete an attachment? 88 Where can I find my voided invoices? 89 How do I reconcile my bank account? 90 How do I change the bank account details on an invoice? 92 How do I change the HMRC entity? 93 Where do I post my VAT payments to HMRC? Contents 3 1 Customising your Dashboard BACK TO CONTENTS Customising your Dashboard The first area that you see when you log into your Clear Books account is your dashboard. The dashboard can be tailored to suit your needs and displays shortcuts to the areas within Clear Books that you use the most in the form of widgets. To customise your dashboard, scroll to the bottom of the screen and click “Customise Dashboard”. Tick the boxes next to the widgets that you would like to be listed on your dashboard and click “Save”. Chapter 1 Customising your Dashboard 5 If you would like your widgets to be laid out differently you can rearrange them. To do this, hover over the widget you would like to move, click on the arrow symbol that appears in the top right hand corner of the widget and drag it to where you would like it to be positioned. You can edit your dashboard any time you need to. 6 Chapter 1 Customising your Dashboard 2 Setting up a Bank Account Setting up a Bank Account To set up a bank account, choose “Money > Banking” and click “New Account”. Select which type of account you would like to add. For the purpose of this example: press the “+” button next to “Bank Account”. 8 Chapter 2 Setting up a Bank Account BACK TO CONTENTS Fill in as much information as you can about your bank account in the “Details”, “Settings” and “Payment Methods” tabs and click “Save”. All of the fields that you fill in from the “Details” tab will be included in the payment advice on your invoices if this is your default payment account. Chapter 2 Setting up a Bank Account 9 To set this account as your default payment account choose “Settings > Invoices > Preferences”, select the account from the “Default Payment Details” drop down list and click “Save Preferences”. 10 Chapter 2 Setting up a Bank Account BACK TO CONTENTS To set the opening balance for this account choose “Settings > Getting Started > Cash” and enter the figure next to the relevant bank account. Then click “Update”. It is in this area that you also set any other opening balances such as debtors and creditors. You can then choose “Money > Banking” to find this bank account and add any other accounts that you have to Clear Books. Chapter 2 Setting up a Bank Account 11 3 Customers and Suppliers BACK TO CONTENTS Importing Existing Customers and Suppliers If you have customer and supplier data saved to accounting software that you were using previously you can import this directly into Clear Books. To do this you will first need to download your data in CSV (comma-separated values) format. Then choose “Tools > Import” and click either “Customers” or “Suppliers” depending on what data you are importing. This will take you to a screen showing how your data should be laid out. Chapter 3 Customers and Suppliers 13 Make sure that your spreadsheet is formatted correctly (as per the layout in the screenshot below) and then select the CSV file using the “Choose File” button and click “Upload”. This will pull your data into Clear Books. 14 Chapter 3 Customers and Suppliers BACK TO CONTENTS Use the drop down boxes to select the appropriate titles for each column and then click “Import”. Uncheck any contacts that you don’t want to import into Clear Books and click “Confirm Import”. Chapter 3 Customers and Suppliers 15 This will direct you to a confirmation page to let you know that your customer details have been imported. Clear Books will remember the headings that you have set for your CSV imports to save you more time if you import more contacts in the future. If at any time you would like to change these choose “Tools > Import > Settings” to reset the mapping. 16 Chapter 3 Customers and Suppliers BACK TO CONTENTS Creating New Customers and Suppliers To add customers and suppliers manually choose either “Sales > Customers” or “Purchases > Suppliers”. This example will take you through adding a customer, but the processes of adding a customer and a supplier are the same. Choose “Sales > Customers” and click “New Customer”. Chapter 3 Customers and Suppliers 17 Then enter all of your customer’s information. It is important to enter as much information as you have for each customer. The more information Clear Books has; the more intelligent it will be with populating invoices and statements. Click on “More Settings” and enter as much information as possible. Then click “Save Entity”. 18 Chapter 3 Customers and Suppliers 4 Sales and Invoices Importing Existing Invoices If you have invoices saved to accounting software that you were using previously you can import these directly into Clear Books. To do this you will first need to download your invoice data as a CSV file. Then choose “Tools > Import” and under the “Sales” heading click “Sales Invoices”. This will take you to a screen showing how your data should be laid out. 20 Chapter 4 Sales and Invoices BACK TO CONTENTS Make sure that your spread sheet is formatted correctly (as per the layout in the screenshot below) and then select the file using the “Choose File” button and then click “Upload”. This will pull your data into Clear Books. Chapter 4 Sales and Invoices 21 Use the drop down boxes to select the appropriate titles for each column and then click “Import”. You can then uncheck any invoices that you don’t want to import into Clear Books and click “Confirm Import”. 22 Chapter 4 Sales and Invoices BACK TO CONTENTS This will direct you to a confirmation page to let you know that your invoices have been imported. These invoices will then be listed in “Sales > Invoices > Unpaid” waiting to be paid. Clear Books will remember the headings that you have set for your CSV imports. If at any time you would like to change these, choose “Tools > Import > Settings” to reset the mapping. Chapter 4 Sales and Invoices 23 Creating New Quotes In the sales process, the first document that you might need to create is a quote. To do this, choose “Sales > Quotes” and click “New Quote”. The different types of quote that you can create are: “Quote”, “Estimate”, “Proforma Invoice” and “Sales Order”. Use the “Quote Type” drop down box to select which one you would like to create. 24 Chapter 4 Sales and Invoices BACK TO CONTENTS Enter all of the details of your quote and then click “Save Draft”. This will save the quote as a draft, which can be found by choosing “Sales > Quotes > Draft”. Chapter 4 Sales and Invoices 25 Once you are happy with your quote, click the green tick icon in the “Options” column to mark it as complete. Once the quote has been marked as complete, it will be moved into the “Complete Quotes” area. It is from the options column that you are also able to print your quote as a PDF, send it to your customer via email, attach a scan and edit the quote if you need to. 26 Chapter 4 Sales and Invoices BACK TO CONTENTS Creating New Invoices from Quotes When your customer approves a quote you are able to turn it straight into an invoice by clicking the icon highlighted below. You can make finishing changes to the quote if necessary and then click “Confirm Invoice” to create the final invoice. Chapter 4 Sales and Invoices 27 Creating New Invoices To create a new invoice choose “Sales > Invoices” and click “New Invoice”. Then enter all relevant details and either save the invoice as a draft by clicking “Save Draft” or if your invoice is complete click “Confirm Invoice”. 28 Chapter 4 Sales and Invoices BACK TO CONTENTS Once your invoice is confirmed it will be in “Sales > Invoices > Unpaid” waiting to be paid. It is from the options column that you are also able to print your invoice as a PDF, send it to your customer via email, attach a scan and edit the invoice if you need to. Chapter 4 Sales and Invoices 29 Creating New Recurring Invoices You are able to create recurring invoices within Clear Books if you have customers that you invoice on a regular basis. To do this, choose “Sales > Invoices > Recurring” and click “New Recurring Invoice”. 30 Chapter 4 Sales and Invoices BACK TO CONTENTS Enter the invoice details as you would for any normal invoice. You will notice that you also have the option to set the frequency that the invoice is generated at, whether it is created in draft for you to approve or automatically approved and how many times this invoice will be created. Then click “Confirm Invoice”. Chapter 4 Sales and Invoices 31 The recurring invoice template will be in “Sales > Invoices > Recurring”, waiting to be generated. Once a recurring invoice has been generated it will be located in “Sales > Invoices > Draft” or “Sales > Invoices > Unpaid”. This depends on whether you choose to have your recurring invoice created in draft or automatically approved. 32 Chapter 4 Sales and Invoices BACK TO CONTENTS Creating New Credit Notes If you need to credit a customer you can generate a credit note. To do this, choose “Sales > Invoices > Credit Notes” and click “New Credit Note”. Enter the details in the same way as you would for an invoice and click “Confirm Credit Note”. Chapter 4 Sales and Invoices 33 This credit note will then be listed in “Sales > Invoices > Credit Notes”, ready to be printed as a PDF or emailed to your customer. To apply the credit note to an invoice from your customer, click on the relevant “Invoice #” in “Sales > Invoices > Unpaid” and scroll down. Any credit notes for that customer will be listed under the title “Available credit notes for customer”. Enter how much you would like to credit the customer and then click “Apply”. 34 Chapter 4 Sales and Invoices 5 Sending Automated Emails Sending Automated Emails If you email invoices to your customers you can set these emails to go out automatically. To do this, choose “Sales > Emails > Settings” and enable the automatic emails that you would like Clear Books to send for you. You will notice that you are able to automatically email an invoice to a customer as soon as it is generated, automatically email customers to prompt them when an invoice payment is due and automatically email customers to remind them when their payments are overdue. When you enable auto emails all existing customers will automatically be opted in. You will need to edit individual customer details to opt them out. When you add new customers they will automatically be opted out of auto emails. If you would like them to be opted in you will need to change this. 36 Chapter 5 Sending Automated Emails BACK TO CONTENTS To opt customers in/out of auto emails click on “More Settings” when adding/editing a customer (see page 18) and scroll down to “Reminder Settings”. Use the drop down boxes to select which auto emails you would like your customer to receive and then click “Save”. Chapter 5 Sending Automated Emails 37 To set the default email content that your customers receive, choose “Sales > Emails > Templates”. Use the tabs to access all of the different email templates. Edit the copy to suit your preferences and then click “Save”. Note that when manually emailing a document it is possible to edit the text in the body of that specific email if you need to. 38 Chapter 5 Sending Automated Emails 6 Purchases and Bills Importing Existing Bills If you have bills saved to accounting software that you were using previously you can import these directly into Clear Books. To do this you will first need to download your bill data as a CSV file. Then choose “Tools > Import” and under the “Bills” heading click “Bills”. This will take you to a screen showing how your data should be laid out. 40 Chapter 6 Purchases and Bills BACK TO CONTENTS Make sure that your spreadsheet is formatted correctly and then select the file using the “Choose File” button and then click “Upload”. This will pull your data into Clear Books. Chapter 6 Purchases and Bills 41 Use the drop down boxes to select the appropriate titles for each column and then click “Import”. You can then uncheck any bills that you don’t want to import into Clear Books and click “Confirm Import”. 42 Chapter 6 Purchases and Bills BACK TO CONTENTS This will direct you to a confirmation page to let you know that your bills have been imported. These bills will then be listed in “Purchases > Bills > Unpaid” waiting to be paid. Clear Books will remember the headings that you have set for your CSV imports. If at any time you would like to change these, choose “Tools > Import > Settings” to reset the mapping. Chapter 6 Purchases and Bills 43 Creating New Bills To create a bill choose “Purchases > Bills” and click “New Bill”. The process of creating a bill is the same as creating an invoice. Enter all of the relevant details and then either click “Save Draft” or “Confirm Bill” depending on if the bill is complete or not. 44 Chapter 6 Purchases and Bills BACK TO CONTENTS The recurring bill template will be in “Purchases > Bills > Unpaid”, waiting to be paid. Chapter 6 Purchases and Bills 45 Creating New Recurring Bills You can create recurring bills within Clear Books if you have suppliers that invoice you on a regular basis. To do this, choose “Purchases > Bills > Recurring” and click “New Recurring Bill”. This is done in the same way as creating a recurring sales invoice, so enter the details as you would for any normal bill. 46 Chapter 6 Purchases and Bills BACK TO CONTENTS Set the frequency that the bill is generated at, whether it is created in draft for you to approve or automatically approved and how many times this bill will be created. Then click “Confirm Bill”. Chapter 6 Purchases and Bills 47 The recurring bill template will be in “Purchases > Bills > Recurring”, waiting to be generated. Once a recurring bill has been generated it will be located in “Purchases > Bills > Draft” or “Purchases > Bills > Unpaid”. This depends on whether you choose to have your recurring bill created in draft or automatically approved. 48 Chapter 6 Purchases and Bills BACK TO CONTENTS Creating New Credit Notes If you are credited by a supplier you will need to enter this into Clear Books as a credit note. To enter a credit note from a supplier into Clear Books, choose “Purchases > Bills > Credit Notes” and click “New Credit Note”. Chapter 6 Purchases and Bills 49 Enter the details in the same way as you would for a bill and click “Confirm Credit Note”. To apply the credit note to a bill from your supplier, click on the relevant bill “ID” in “Purchases > Bills > Unpaid” and scroll down. Any credit notes from that supplier will be listed under “Available credit notes for Supplier”. Enter how much you have been credited by the supplier and click “Apply”. 50 Chapter 6 Purchases and Bills BACK TO CONTENTS Entering Employee Expenses You can keep track of employees’ expenses within Clear Books. If you haven’t already entered your employees’ details in “Purchases > Suppliers” you will need to do this before you can begin entering their expenses. Make sure that when adding employees you click “More Settings” and set their “Employment Status”. To begin entering expenses choose “Purchases > Expenses” and click “Add” in the “Add Receipt” column next to the name of the employee you would like to add an expense for. Chapter 6 Purchases and Bills 51 Enter the details of the expense and then click “Submit for Approval”. Employees are able to enter their own expenses if you have invited them in to your Clear Books account as a user. To do this, choose “Home > Users” and invite your employees into your Clear Books account. You can set their permissions so that they can only access their expenses, or you can allow them to access other areas of Clear Books as well if they are involved in the accounts. 52 Chapter 6 Purchases and Bills BACK TO CONTENTS Once an expense has been submitted, use the icon highlighted below to attach any scans of relevant receipts or invoices. You will see that the expense is listed in “Purchases > Expenses > Unapproved” ready to be approved by you. To approve an expense use the “Select Employee” drop down list to select the relevant employee. Check the box in the “Select” column and click “Approve Expense”. This will then move the expense to “Purchases > Expenses > Approved”. Approved expenses for an employee will be grouped up into a bill waiting to be paid. This can be found in “Purchases > Bills > Unpaid”. You will also notice that you are able to create recurring expenses if necessary. Chapter 6 Purchases and Bills 53 7 Bank Statements BACK TO CONTENTS Importing Bank Statements To import your bank statements choose “Money > Import Tool”. Use the area entitled “Import Statement”, select the account that the statement applies to and click “Select Account”. To import your statement you will need to first download it from your internet banking as a CSV file and save it to your computer. Click “Choose File” and select your saved bank statement. Then click “Upload”. Chapter 7 Bank Statements 55 This will upload your statement to Clear Books. The first time you upload a statement you will need to use the drop down menus to identify what information is in each column. Once you have done this, click “Import”. This will import your statement into Clear Books ready to be explained. You will find this statement in “Money > Banking” under the title “Imported statements that need explaining”. Clear Books will remember the headings that you have set for your CSV imports, so if at any time you would like to change these choose “Money > Import tool > Mappings” to reset the mapping. It is possible to have your bank statements imported into Clear Books automatically on a daily basis. This means that you don’t have to take the time to download or import them yourself. Choose “Money > z” to find out more. 56 Chapter 7 Bank Statements BACK TO CONTENTS Recreating Bank Statements If you don’t use internet banking or you would simply prefer to enter your transactions yourself, choose “Money > Import Tool” and use the area entitled “Re-Create Statement”. Select the account that the statement applies to and click “Select Account”. Then enter each transaction from your bank statement one by one in the area highlighted below. Once you have recreated your statement it will be listed in “Money > Banking” under the title “Imported statements that need explaining”. Chapter 7 Bank Statements 57 Explaining Transactions on Bank Statements To begin explaining transactions on a bank statement choose “Money > Banking” and click on the “Filename” of the relevant statement. Then click on the transaction that you would like to explain. 58 Chapter 7 Bank Statements BACK TO CONTENTS Select the customer/supplier that this transaction applies to in the “From” / “To” box. If there aren’t any unpaid invoices/bills in Clear Books that relate to a transaction then explain the transaction by entering the details yourself. Then click “Add Transaction”. This will explain the transaction in the accounts. If there are any unpaid invoices/bills for the selected customer/supplier, they will be listed when you select that customer/supplier. If one of the listed unpaid invoices/bills applies to this transaction click “Allocate”. This will allocate the payment against the invoice/bill to mark it as paid. Chapter 7 Bank Statements 59 
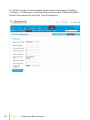
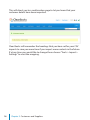
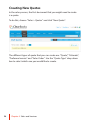
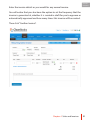
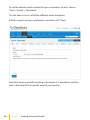
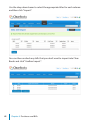
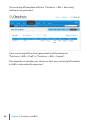
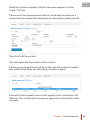
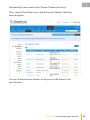
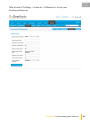
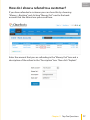
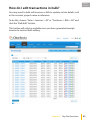
Then click “Create Transactions”. This transaction will then be listed as explained. 60 Chapter 7 Bank Statements BACK TO CONTENTS Quick Paying an Invoice If you receive a payment for an invoice and it is not on your bank statement (e.g. if a customer pays you by cheque or in cash), you will want to mark the invoice as paid. To mark an invoice as paid, choose “Sales > Invoices > Unpaid” and click on the relevant “Invoice #”. Then scroll down and fill in the details of the payment in the “Quick Pay” section. Then click “Pay”. This will then list the invoice as paid in “Sales > Invoices > Paid”. Chapter 7 Bank Statements 61 Reconciling Transactions with Paid Invoices If you have quick paid an invoice and then the transaction shows up on your bank statement you can explain this transaction by reconciling it with the paid invoice. To reconcile paid invoices with payments when they appear on the bank statement click on the relevant transaction and select the customer in the “From” box as you would normally. This will bring up all of the recent invoices associated with the selected customer. Click “Reconcile” in the “Add” column next to the paid invoice that the transaction relates to. This will then mark the transaction on the bank statement as explained without creating another invoice for it. 62 Chapter 7 Bank Statements 8 Customising your Invoices Customising your invoices To set your own invoice themes choose “Settings > Invoices > Create Theme”. Create your invoice theme using the “Theme Settings”, “Labels” and “Styling” areas. At any time click “Preview” to see how your invoice theme is looking. Remember to click “Save Theme” every time you change something to make sure that your theme is saved. 64 Chapter 8 Customising your Invoices BACK TO CONTENTS Alternatively, have a look in the “Invoice Themes Directory”. This is where Clear Books users publish invoice themes that they have designed. Use any of these invoice themes as they are or edit them to suit your business. Chapter 8 Customising your Invoices 65 You are able to save as many invoice themes to your Clear Books account as you like. They will be listed in “Settings > Invoices > Themes”. If you have more than one invoice theme saved to your Clear Books account you will be given the option to choose which theme to use when creating an invoice. 66 Chapter 8 Customising your Invoices BACK TO CONTENTS Take a look in “Settings > Invoices > Preferences” to set your invoice preferences. Chapter 8 Customising your Invoices 67 9 Help and Support BACK TO CONTENTS Asking a Question From any area in Clear Books click the “Help” button for a brief overview. If you would like to ask a question about something within Clear Books click “Ask a question”, type your question and click “Submit”. Chapter 9 Help and Support 69 This will bring up any frequently asked questions and help guides related to your question. If you find the answer to your question here then click “Yes. Question answered”. If your question still hasn’t been answered click “Nope. Contact support”. This will send your question as a support ticket direct to our support team. They will respond via email. 70 Chapter 9 Help and Support BACK TO CONTENTS Reporting a Problem If you find a bug or a problem within Clear Books click “Report a problem”. This button works the same way as “Ask a question”. The help system will check if the problem you are reporting has been resolved. If not, you can submit the problem to our support team. Chapter 9 Help and Support 71 Suggesting an Idea If you would like to suggest an idea for a feature to be implemented within Clear Books click “Suggest an idea”, enter the details of your idea and then click “Submit”. This idea will be posted in the “Network”. 72 Chapter 9 Help and Support 10 Networking with other Businesses Networking with other Businesses To access the Network use the drop down box in the top right hand corner of your Clear Books account and select “Network”. You will be taken to “Ideas > Browse Ideas”. This is where any ideas that you submit using the help area are posted. You can vote for ideas that you like. Our developers monitor ideas and votes to decide which features to implement next. 74 Chapter 10 Networking with other Businesses BACK TO CONTENTS To set up your profile within the Network navigate “My Profile > Edit My Profile”. Enter as much information as you would like about yourself and your business, upload a picture and then click “Save Profile”. Once you have created your profile you can start connecting with other users. To find people to connect with and view your existing connections click “People”. To send someone a message, just click on their profile and you will find the option there. To view your received message and conversations click “Messages”. The “Directory” is also an area that you might like to have a look at to view other businesses using Clear Books’ profiles. Chapter 10 Networking with other Businesses 75 11 Top Ten Questions BACK TO CONTENTS How do I show a refund to a customer? If you have refunded a customer you can show this by choosing “Money > Banking” and clicking “Money Out” next to the bank account that the refund was processed from. Enter the amount that you are refunding in the “Money Out” box and a description of the refund in the “Description” box. Then click “Explain”. Chapter 11 Top Ten Questions 77 This will direct you to a page where you will need to explain this “Money Out” transaction. First click the “Refund” tab, then select the customer that you are refunding from the “Customer” drop down list. Enter all of the details to explain the refund and click “Create Transaction”. You will notice that there is the option to create a rule for a transaction of this description – please do this if you process refunds of this description regularly as it will save you time. This will then create an explained transaction from that bank account for the refund. 78 Chapter 11 Top Ten Questions BACK TO CONTENTS How do I email a customer statement? You can email statements to your customers by choosing “Sales > Customers” and clicking on the relevant customer name. This will direct you to an overview of the customer. Click “Email Statement”. Chapter 11 Top Ten Questions 79 This will direct you to the email template that will be sent to your customer along with their statement. Edit the copy if you would like to and then click “Send Email”. By default, the statement will send to the email address that you have saved for your customer. 80 Chapter 11 Top Ten Questions BACK TO CONTENTS Below is an example of how a customer statement will look when you email it. Chapter 11 Top Ten Questions 81 How do I approve multiple draft invoices? If you would like to save time by approving multiple draft invoices in one go, choose “Sales > Invoices > Draft”. Place ticks in the boxes next to the invoice numbers for the draft invoices that you would like to approve. Then click “Approve Selected”. This will approve these invoices and move them to “Sales > Invoices > Unpaid”. This process is the same for approving multiple draft bills. Choose “Purchases > Bills > Draft” and follow the same steps. 82 Chapter 11 Top Ten Questions BACK TO CONTENTS How do I edit transactions in bulk? You may need to bulk edit invoices or bills to update certain details such as the account, project name or reference. To do this, choose “Sales > Invoices > All” or “Purchases > Bills > All” and click the “Bulk Edit” button. This button will only be available once you have generated enough invoices to warrant bulk editing. Chapter 11 Top Ten Questions 83 This will direct you to an area where you can edit all of your selected invoices’ accounting date, reference, project and account. Edit the invoices that you would like to change and then click “Update”. If you don’t want to sift through all of your invoices/bills when batch editing you can also batch edit from any of these areas: 84 Chapter 11 Top Ten Questions BACK TO CONTENTS How do I delete an attachment? If you have attached a scan to a document within Clear Books you are able to delete this if necessary. In this example we will assume that the scan to be deleted is attached to an invoice. To remove the attachment, choose “Sales > Invoices” and locate the invoice that the scan is attached to. Click on the “View Scan” icon in the options column for that invoice. Chapter 11 Top Ten Questions 85 This will direct you to the “Manage Scans” area for that invoice and you will see any files that are attached under the “Attached Files” heading. Drag the file that you would like to delete into the “Available Files” box and click “Attach”. 86 Chapter 11 Top Ten Questions BACK TO CONTENTS A red cross will appear next to the file. Click the cross to delete the attachment. Chapter 11 Top Ten Questions 87 Where can I find my voided invoices? If you would like to view your voided invoices or bills choose “Reports > All” and scroll down to the “Exceptions” area. Click on either “Void Sales” or “Void Purchases” depending on whether you would like to view invoices or bills. This will bring up a list of all of your voided invoices/bills. 88 Chapter 11 Top Ten Questions BACK TO CONTENTS How do I reconcile my bank account? If you don’t import your bank statements into Clear Books you may like to reconcile the transactions in Clear Books with your bank statement to make sure that everything is accounted for. To do this, choose “Money > Banking” and click on the name of the bank account that you would like to reconcile. Use the search filters to narrow the results and then compare your actual bank statement to the transactions that are listed for that account on Clear Books. Go through your transactions. If they match your actual bank statement, tick the check boxes. When you are happy with your selections, click “Reconcile”. To unreconcile, tick the boxes next to the relevant transactions and click “Unreconcile”. Chapter 11 Top Ten Questions 89 How do I change the bank account details on an invoice? The bank account details that show up on your invoices are the details for the bank account that you set as your default payment account. To set your default payment account, choose “Settings > Invoices > Preferences” and select the account that you would like to be shown on your invoices in the “Default Payment Details” drop down box. 90 Chapter 11 Top Ten Questions BACK TO CONTENTS To edit the details of a bank account choose “Money > Banking” and click the “Edit” icon for the relevant bank account. Then enter the correct bank account details and click “Save”. Chapter 11 Top Ten Questions 91 How do I change the HMRC entity? If at any time you need to change your HMRC entity you will need to first add the new entity as a supplier. Do this as you would add any other supplier, by choosing “Purchases > Suppliers” and clicking “Add New Supplier”. To set this contact as your HMRC entity choose “Settings > Organisation > Tax”. Select the new entity using the “HMRC Entity” drop down box and then click “Save Changes”. 92 Chapter 11 Top Ten Questions BACK TO CONTENTS Where do I post my VAT payments to HMRC? Payments to HMRC need to be posted to the account code “VAT Control”. This will decrease the amount of VAT building up on your dashboard. If you are using the Clear Books built in VAT report, when you confirm a VAT return a bill will be created in “Purchases > Bills > Unpaid”. In this case, simply allocate the payment to the bill. Chapter 11 Top Ten Questions 93 For more information, please visit our site: www.clearbooks.co.uk ©2012 Clear Books Limited